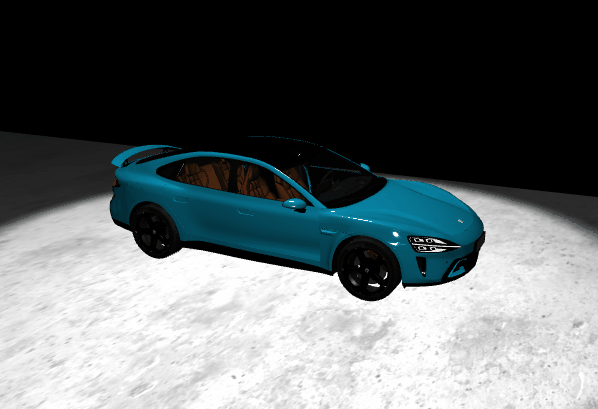
【图片完整效果代码位于文章末】
在上一篇文章中我们实现了汽车模型的加载,这篇文章主要讲如何让汽车看起来像在运动。同时列出聚光灯和摄像机灯光的加载方法。
查看上一篇👉【threejs教程6】threejs加载glb模型文件(小米su7)👈
往期文章:
threejs基础开发应用示例
【threejs教程2】threejs物体点击交互事件
【threejs教程3】threejs物体轮廓发光
【threejs教程4】threejs添加跳动标注
【threejs教程5】threejs添加文字标注,且始终面向屏幕
实现原理
汽车实际还是在原地,只有底部的地面纹理在不断地偏移,使汽车看起来像在运动。
实现步骤
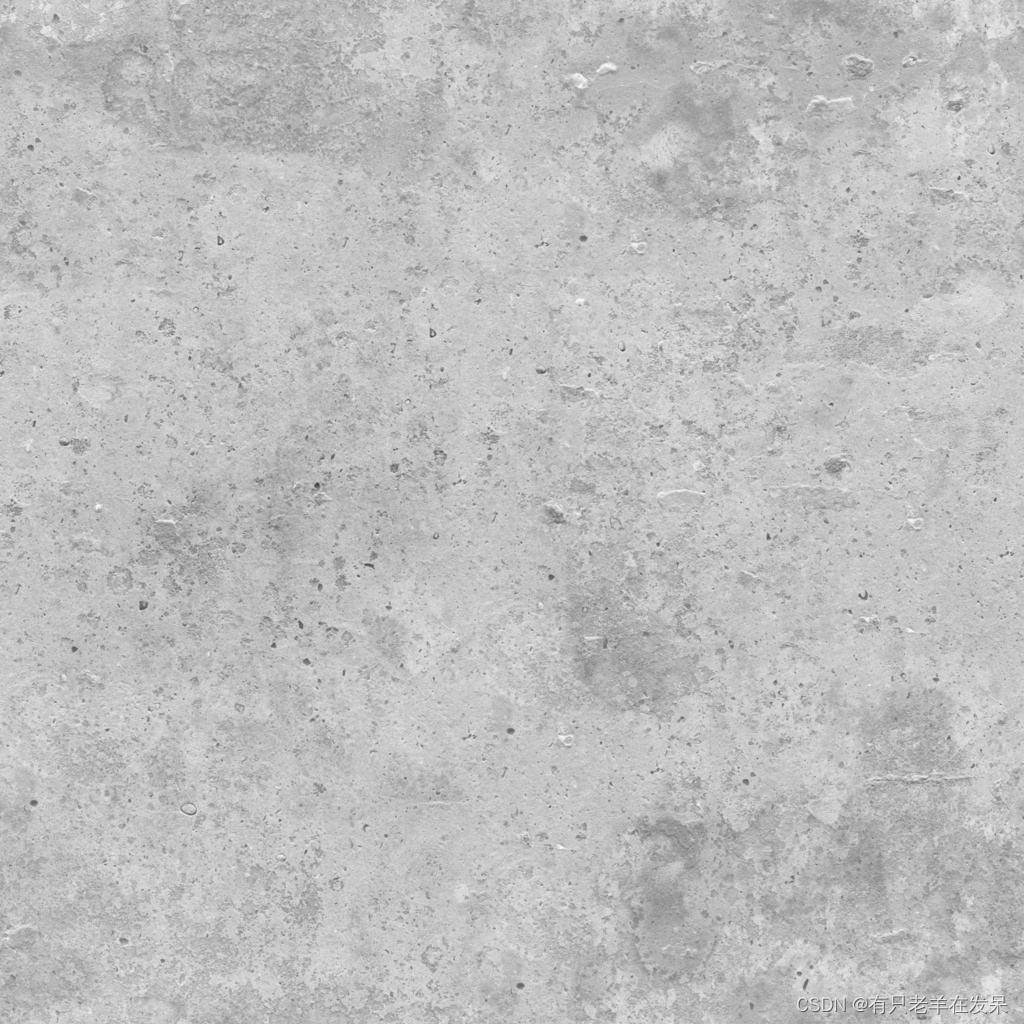
1. 添加地板
纹理图如下,水印好像去不了,需要无水印纹理的话可以跟我要。也可以自己截取一下把水印裁掉,或者自己找个别的纹理也行。
javascript">// 加载地面
function loadGround() {// 加载纹理const textureLoader = new THREE.TextureLoader();const floorTexture = textureLoader.load('./img/shuini.jpg'); // 替换为你的jpg文件路径// 设置纹理重复以覆盖整个地板floorTexture.wrapS = THREE.RepeatWrapping;floorTexture.wrapT = THREE.RepeatWrapping;floorTexture.repeat.set(1, 10);// 创建地板的材质const floorMaterial = new THREE.MeshStandardMaterial({ map: floorTexture });// 创建地板的几何体const floorGeometry = new THREE.PlaneGeometry(10, 60); // 参数为宽度和长度// 结合几何体和材质创建网格const floorMesh = new THREE.Mesh(floorGeometry, floorMaterial);// 将地板沿Y轴旋转-90度使其与相机视角垂直floorMesh.rotation.x = -Math.PI / 2;// 添加地板到场景scene.add(floorMesh);
}
2.让地板的纹理运动
不断更新地板在y轴方向的偏移量,即可达到不断重复运动的效果。
javascript"> function animate() {requestAnimationFrame(animate);// 更新纹理偏移量,这里只在V轴(纵向)上移动floorTexture.offset.y += 0.004; // 每帧偏移0.004,根据需要调整速度if (floorTexture.offset.y > 1) {floorTexture.offset.y -= 1; // 当偏移到下一个重复时重置}}animate(); // 开始动画循环3.添加光源
我们添加了一个聚光灯和一个摄像机灯光效果,可以根据需求自己调整参数。如果觉得显示不佳也可以添加辅助灯光PointLight点光源和DirectionalLight平行光源等。
javascript">function addspotLight() {// 创建聚光灯const spotLight = new THREE.SpotLight(0xffffff, 1); // 光的颜色和强度spotLight.position.set(0, 5, 0); // 调整光源位置,这里假设汽车位于原点附近spotLight.castShadow = true; // 开启阴影投射spotLight.angle = Math.PI / 4; // 灯光锥角,控制光照的圆形范围大小spotLight.penumbra = 0.1; // 半影软边宽度,增加真实感spotLight.decay = 1; // 光照随着距离增加的衰减系数,影响光照范围// 设置目标为汽车的位置,假设carMesh是您的汽车模型spotLight.target = carMesh;// 将聚光灯添加到场景中scene.add(spotLight);scene.add(spotLight.target);
}
function addCameraLight() {// 创建光源const cameraLight = new THREE.PointLight(0xffffff, 0.8); // 白色点光,强度1cameraLight.castShadow = true; // 允许投射阴影(如果需要)scene.add(cameraLight);function updateCameraLight() {// 更新光源的位置cameraLight.position.copy(camera.position);// 更新光源的方向(对于DirectionalLight,确保它指向相机的前方)cameraLight.target.position.copy(camera.position);cameraLight.target.position.add(camera.getWorldDirection(new THREE.Vector3()).multiplyScalar(-1));cameraLight.lookAt(cameraLight.target.position);}function animate() {requestAnimationFrame(animate);// 保持光源与相机同步updateCameraLight();renderer.render(scene, camera);}animate();
}
4.完整效果代码如下所示
javascript"><template></template>
<script setup>
import * as THREE from 'three';
import { onMounted, ref } from 'vue';
import { OrbitControls } from 'three/examples/jsm/controls/OrbitControls';
import { GLTFLoader } from 'three/examples/jsm/loaders/GLTFLoader';
import { DRACOLoader } from 'three/examples/jsm/loaders/DRACOLoader';
import { RectAreaLightHelper } from 'three/examples/jsm/helpers/RectAreaLightHelper.js';
const scene = new THREE.Scene();
let carMesh;
const camera = new THREE.PerspectiveCamera(75,window.innerWidth / window.innerHeight,0.1,1000
);
const renderer = new THREE.WebGLRenderer({ antialias: true });
const controls = new OrbitControls(camera, renderer.domElement);onMounted(() => {init();
});
function init() {camera.position.set(-5, 3, -3);renderer.setSize(window.innerWidth, window.innerHeight);document.body.appendChild(renderer.domElement);controls.update();function animate() {requestAnimationFrame(animate);controls.update();renderer.render(scene, camera);}animate();// addLight();loadGround();
}
// 添加汽车模型
const loader = new GLTFLoader();
const dracoloader = new DRACOLoader();
dracoloader.setDecoderPath('./draco/gltf/');
loader.setDRACOLoader(dracoloader);
loader.load('./model/xiaomisu7.glb', (gltf) => {carMesh = gltf.scene;scene.add(carMesh);carMesh.position.y = 0.1;console.log(carMesh);carMesh.traverse((child) => {if (child.isMesh && child.name.includes('车轮')) {function animate() {requestAnimationFrame(animate);child.rotation.x -= 0.05;}animate();}});addspotLight();addCameraLight()
});
// 加载地面
function loadGround() {// 加载纹理const textureLoader = new THREE.TextureLoader();const floorTexture = textureLoader.load('./img/shuini.jpg'); // 替换为你的jpg文件路径// 设置纹理重复以覆盖整个地板floorTexture.wrapS = THREE.RepeatWrapping;floorTexture.wrapT = THREE.RepeatWrapping;floorTexture.repeat.set(1, 10);// 创建地板的材质const floorMaterial = new THREE.MeshStandardMaterial({ map: floorTexture });// 创建地板的几何体const floorGeometry = new THREE.PlaneGeometry(10, 60); // 参数为宽度和长度// 结合几何体和材质创建网格const floorMesh = new THREE.Mesh(floorGeometry, floorMaterial);// 将地板沿Y轴旋转-90度使其与相机视角垂直floorMesh.rotation.x = -Math.PI / 2;// 添加地板到场景scene.add(floorMesh);function animate() {requestAnimationFrame(animate);// 更新纹理偏移量,这里只在U轴(横向)上移动floorTexture.offset.y += 0.004; // 每帧偏移0.01,根据需要调整速度if (floorTexture.offset.y > 1) {floorTexture.offset.y -= 1; // 当偏移到下一个重复时重置}}animate(); // 开始动画循环
}
function addspotLight() {// 创建聚光灯const spotLight = new THREE.SpotLight(0xffffff, 1); // 光的颜色和强度spotLight.position.set(0, 5, 0); // 调整光源位置,这里假设汽车位于原点附近spotLight.castShadow = true; // 开启阴影投射spotLight.angle = Math.PI / 4; // 灯光锥角,控制光照的圆形范围大小spotLight.penumbra = 0.1; // 半影软边宽度,增加真实感spotLight.decay = 1; // 光照随着距离增加的衰减系数,影响光照范围// 设置目标为汽车的位置,假设carMesh是您的汽车模型spotLight.target = carMesh;// 将聚光灯添加到场景中scene.add(spotLight);scene.add(spotLight.target);
}function addCameraLight() {// 创建光源const cameraLight = new THREE.PointLight(0xffffff, 0.8); // 白色定向光,强度1cameraLight.castShadow = true; // 允许投射阴影(如果需要)scene.add(cameraLight);function updateCameraLight() {// 更新光源的位置cameraLight.position.copy(camera.position);// 更新光源的方向(对于DirectionalLight,确保它指向相机的前方)cameraLight.target.position.copy(camera.position);cameraLight.target.position.add(camera.getWorldDirection(new THREE.Vector3()).multiplyScalar(-1));cameraLight.lookAt(cameraLight.target.position);}function animate() {requestAnimationFrame(animate);// 保持光源与相机同步updateCameraLight();renderer.render(scene, camera);}animate();
}
</script>
文章如有技术相关错误请各位批评指正