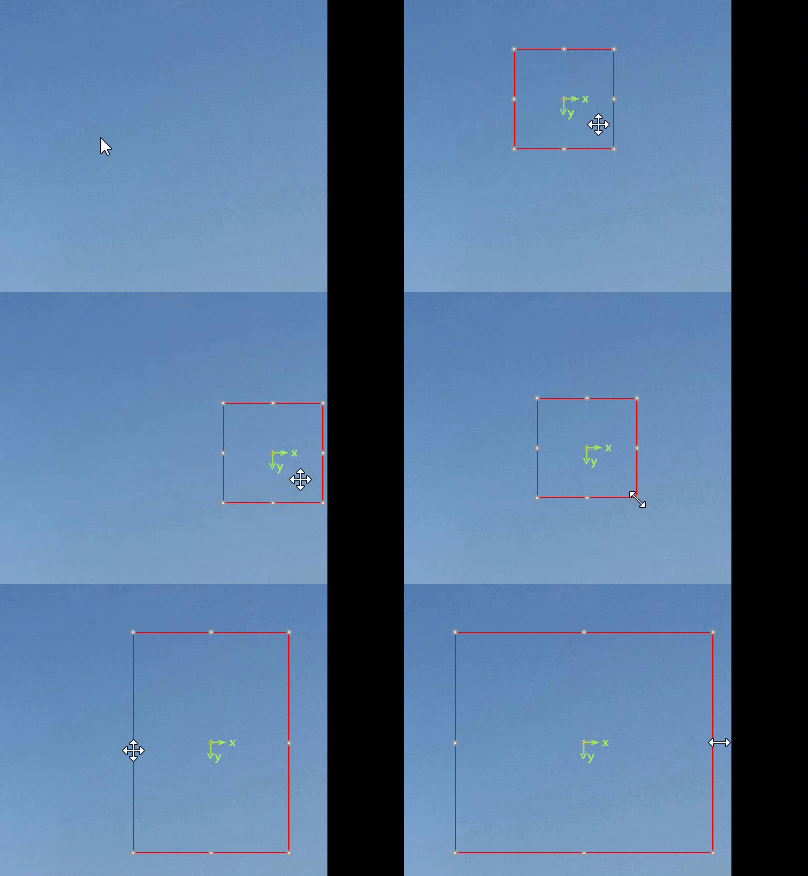
效果

功能
使用wpf实现
- 在图片上画一个矩形框
- 该矩形框可以调节大小
- 该矩形框可以拖动调整位置
注:这里的鼠标事件是,双击在图上画一个固定大小的矩形框,右键按住拖动矩形框。有需要的可以自行调整对应的鼠标事件
参考资料:https://blog.csdn.net/u013113678/article/details/121466724
实现代码
实现自定义的装饰器(可以直接整个复制使用)
public class CanvasAdorner : Adorner
{//4条边Thumb _leftThumb, _topThumb, _rightThumb, _bottomThumb;//4个角Thumb _lefTopThumb, _rightTopThumb, _rightBottomThumb, _leftbottomThumb;Ellipse _centerPoint;private const double thumbSize = 6;private const double centerPointRadius = 3;Grid _grid;UIElement _adornedElement;UIElement _parentElement;public CanvasAdorner(UIElement adornedElement, UIElement adornedParentElement) : base(adornedElement){_adornedElement = adornedElement;_parentElement = adornedParentElement;// 中心点_centerPoint = new Ellipse{Width = centerPointRadius * 2,Height = centerPointRadius * 2,Fill = Brushes.Red,Stroke = new SolidColorBrush((Color)ColorConverter.ConvertFromString("#999999")),StrokeThickness = 2,HorizontalAlignment = HorizontalAlignment.Center,VerticalAlignment = VerticalAlignment.Center,};//初始化thumb缩放手柄_leftThumb = CreateThumb(HorizontalAlignment.Left, VerticalAlignment.Center, Cursors.SizeWE);_topThumb = CreateThumb(HorizontalAlignment.Center, VerticalAlignment.Top, Cursors.SizeNS);_rightThumb = CreateThumb(HorizontalAlignment.Right, VerticalAlignment.Center, Cursors.SizeWE);_bottomThumb = CreateThumb(HorizontalAlignment.Center, VerticalAlignment.Bottom, Cursors.SizeNS);_lefTopThumb = CreateThumb(HorizontalAlignment.Left, VerticalAlignment.Top, Cursors.SizeNWSE);_rightTopThumb = CreateThumb(HorizontalAlignment.Right, VerticalAlignment.Top, Cursors.SizeNESW);_rightBottomThumb = CreateThumb(HorizontalAlignment.Right, VerticalAlignment.Bottom, Cursors.SizeNWSE);_leftbottomThumb = CreateThumb(HorizontalAlignment.Left, VerticalAlignment.Bottom, Cursors.SizeNESW);_grid = new Grid();_grid.Children.Add(_leftThumb);_grid.Children.Add(_topThumb);_grid.Children.Add(_rightThumb);_grid.Children.Add(_bottomThumb);_grid.Children.Add(_lefTopThumb);_grid.Children.Add(_rightTopThumb);_grid.Children.Add(_rightBottomThumb);_grid.Children.Add(_leftbottomThumb);AddVisualChild(_grid);// 绘制中心点和x,y坐标轴_grid.Children.Add(_centerPoint);DrawAxisWithArrow(0,15,0,0,isXAxis: true);DrawAxisWithArrow(0, 0, 10, 25, isXAxis: false);}protected override Visual GetVisualChild(int index){return _grid;}protected override int VisualChildrenCount{get{return 1;}}protected override Size ArrangeOverride(Size finalSize){//直接给grid布局,grid内部的thumb会自动布局。_grid.Arrange(new Rect(new Point(-_leftThumb.Width / 2, -_leftThumb.Height / 2), new Size(finalSize.Width + _leftThumb.Width, finalSize.Height + _leftThumb.Height)));return finalSize;}// 创建缩放手柄private Thumb CreateThumb(HorizontalAlignment horizontalAlignment, VerticalAlignment verticalAlignment, Cursor cursor){var thumb = new Thumb {Width = thumbSize,Height = thumbSize,HorizontalAlignment = horizontalAlignment,VerticalAlignment = verticalAlignment,Background = Brushes.Green,Cursor = cursor,Template = new ControlTemplate(typeof(Thumb)){VisualTree = GetFactory(new SolidColorBrush(Colors.White))},};thumb.DragDelta += Thumb_DragDelta;return thumb;}// 缩放手柄resize逻辑private void Thumb_DragDelta(object sender, DragDeltaEventArgs e){var c = _adornedElement as FrameworkElement;var p = _parentElement as FrameworkElement;var thumb = sender as FrameworkElement;double left, top, width, height;if (thumb.HorizontalAlignment == HorizontalAlignment.Left){left = double.IsNaN(Canvas.GetLeft(c)) ? 0 : Canvas.GetLeft(c) + e.HorizontalChange;width = c.Width - e.HorizontalChange;// 确保不会超出 Canvas 左边界if (left < 0){width += left; // 减少宽度以适应左侧边界left = 0; // 不能再向左移动}}else{left = Canvas.GetLeft(c);width = c.Width + e.HorizontalChange;// 确保不会超出 Canvas 右边界if (left + width > p.Width){width = p.Width - left; // 减少宽度以适应右侧边界}}if (thumb.VerticalAlignment == VerticalAlignment.Top){top = double.IsNaN(Canvas.GetTop(c)) ? 0 : Canvas.GetTop(c) + e.VerticalChange;height = c.Height - e.VerticalChange;// 确保不会超出 Canvas 上边界if (top < 0){height += top; // 减少高度以适应上侧边界top = 0; // 不能再向上移动}}else{top = Canvas.GetTop(c);height = c.Height + e.VerticalChange;// 确保不会超出 Canvas 下边界if (top + height > p.Height){height = p.Height - top; // 减少高度以适应下侧边界}}if (thumb.HorizontalAlignment != HorizontalAlignment.Center){if (width >= 0){Canvas.SetLeft(c, left);c.Width = width;}}if (thumb.VerticalAlignment != VerticalAlignment.Center){if (height >= 0){Canvas.SetTop(c, top);c.Height = height;}}}private void DrawAxisWithArrow(int x1, int x2, int y1, int y2, bool isXAxis){// 绘制主轴线Line axisLine = new Line{X1 = x1,Y1 = y1,X2 = x2,Y2 = y2,Stroke = Brushes.GreenYellow,StrokeThickness = 1,HorizontalAlignment = HorizontalAlignment.Center,VerticalAlignment = VerticalAlignment.Center,Margin = new Thickness { Left = x2, Top = 0, Right = 0, Bottom = 0 }};_grid.Children.Add(axisLine);// 绘制箭头TextBlock textBlock = new TextBlock { Text=isXAxis?"> x": "∨y",Foreground = Brushes.GreenYellow,HorizontalAlignment= HorizontalAlignment.Center,VerticalAlignment= VerticalAlignment.Center,Margin= new Thickness { Left= isXAxis ? x2 * 2:5, Top=y2, Right=0, Bottom= isXAxis ? 2.5:0 }};_grid.Children.Add(textBlock);}//thumb的样式FrameworkElementFactory GetFactory(Brush back){var fef = new FrameworkElementFactory(typeof(Ellipse));fef.SetValue(Ellipse.FillProperty, back);fef.SetValue(Ellipse.StrokeProperty, new SolidColorBrush((Color)ColorConverter.ConvertFromString("#999999")));fef.SetValue(Ellipse.StrokeThicknessProperty, (double)2);return fef;}
}
xaml前台代码(根据自己实际情况调整图片的Source和Canvas的Width、Height,这里我的图片是绑定viewmodel的值,Canvas的宽高是始终跟图片大小一致)
<Grid Grid.Row="0" HorizontalAlignment="Center" VerticalAlignment="Center"><Image x:Name="imageView" Stretch="Uniform" Source="{Binding LoadTemplate}"MouseLeftButtonDown="Image_MouseLeftButtonDown"/><Canvas x:Name="overlayCanvas"Width="{Binding ActualWidth, ElementName=imageView}" Height="{Binding ActualHeight, ElementName=imageView}"/>
</Grid>
xaml后台代码(截取相关代码)
using System;
using System.Windows;
using System.Windows.Controls;
using System.Windows.Shapes;
using System.Windows.Documents;
using System.Windows.Input;private Rectangle _currentRectangle;
private bool _isDragging = false;
private Point _startPoint;
private Point _originalRectanglePosition;
private DateTime _lastClickTime = DateTime.MinValue;// 图片点击事件
private void Image_MouseLeftButtonDown(object sender, MouseButtonEventArgs e)
{// 双击DateTime currentClickTime = DateTime.Now;TimeSpan timeSinceLastClick = currentClickTime - _lastClickTime;_lastClickTime = currentClickTime;if (timeSinceLastClick.TotalMilliseconds >= 300) return;if (_currentRectangle != null){ResetCanvas();}Point clickPosition = e.GetPosition(overlayCanvas);double rectWidth = 100;double rectHeight = 100;double rectLeft = clickPosition.X - rectWidth / 2;double rectTop = clickPosition.Y - rectHeight / 2;// 确保矩形框不会超出 Canvas 的左边界if (rectLeft < 0){rectLeft = 0;}// 确保矩形框不会超出 Canvas 的右边界if (rectLeft + rectWidth > overlayCanvas.Width){rectLeft = overlayCanvas.Width - rectWidth;}// 确保矩形框不会超出 Canvas 的上边界if (rectTop < 0){rectTop = 0;}// 确保矩形框不会超出 Canvas 的下边界if (rectTop + rectHeight > overlayCanvas.Height){rectTop = overlayCanvas.Height - rectHeight;}_currentRectangle = new Rectangle{Width = rectWidth,Height = rectHeight,Stroke = Brushes.Red,Fill = Brushes.Transparent,StrokeThickness = 1};Canvas.SetLeft(_currentRectangle, rectLeft);Canvas.SetTop(_currentRectangle, rectTop);overlayCanvas.Children.Add(_currentRectangle);// 为矩形添加resize装饰器var layer = AdornerLayer.GetAdornerLayer(_currentRectangle);layer.Add(new CanvasAdorner(_currentRectangle, overlayCanvas));// 为矩形添加拖动事件_currentRectangle.MouseRightButtonDown += Rectangle_MouseLeftButtonDown;_currentRectangle.MouseMove += Rectangle_MouseMove;_currentRectangle.MouseRightButtonUp += Rectangle_MouseLeftButtonUp;_currentRectangle.MouseEnter += Rectangle_MouseEnter;
}private void Rectangle_MouseLeftButtonDown(object sender, MouseButtonEventArgs e)
{if (e.RightButton == MouseButtonState.Pressed){_isDragging = true;_startPoint = e.GetPosition(overlayCanvas);_originalRectanglePosition = new Point(Canvas.GetLeft(_currentRectangle), Canvas.GetTop(_currentRectangle));_currentRectangle.CaptureMouse();}
}
private void Rectangle_MouseMove(object sender, MouseEventArgs e)
{if (_isDragging){Point currentPosition = e.GetPosition(overlayCanvas);// 计算矩形的新位置double newLeft = _originalRectanglePosition.X+ (currentPosition.X - _startPoint.X);double newTop = _originalRectanglePosition.Y + (currentPosition.Y - _startPoint.Y);// 限制矩形不超出 Canvas 边界newLeft = Math.Max(0, Math.Min(newLeft, overlayCanvas.Width - _currentRectangle.Width));newTop = Math.Max(0, Math.Min(newTop, overlayCanvas.Height - _currentRectangle.Height));// 更新矩形的位置Canvas.SetLeft(_currentRectangle, newLeft);Canvas.SetTop(_currentRectangle, newTop);}
}
private void Rectangle_MouseLeftButtonUp(object sender, MouseButtonEventArgs e)
{_isDragging = false;_currentRectangle.ReleaseMouseCapture();
}
private void Rectangle_MouseEnter(object sender, MouseEventArgs e)
{_currentRectangle.Cursor = Cursors.SizeAll;
}


