目录
网络设计
设计两个卷积大层
具体参数
代码:
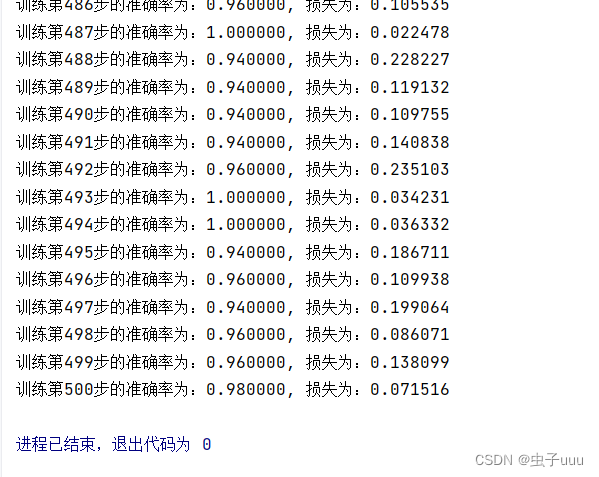
结果:
网络设计
设计两个卷积大层

手写数字识别数据集下载:
链接:https://pan.baidu.com/s/1nqhP4yPNcqefKYs91jp9ng?pwd=xe1h
提取码:xe1h
我们知道mnist图像数据【None,784】28*28
具体参数
第一层
卷积:32个filter、大小5*5、strides = 1、padding = "SAME"
tf.nn.conv2d(input,filter,strides=,padding=)
input:输入图像[None,28,28,1]
要求:形状[batch,heigth,width,channel]
类型为float32,64
filter:
weights = tf.Variable(initial_value=tf.random_normal(shape=[5,5,1,32]))
bias = tf.Variable(initial value=tf.random normal(shape=[32]))
变量initial value=random normal(shape=[F,F,3/1,K])
strides: 步长 1 [1,1,1,1]
padding:“SAME"
"SAME”:越过边缘取样
“VALID”:不越过边缘取样
输出形状:[None,28,28,32] ----通道数变为32
激活:Relu 上层结果直接输入进来
tf.nn.relu(fetures)
池化:
输入形状:[None,28,28,32]
大小2*2 、strides2
根据公式计算输出形状:[None,14,14,32]
第二层
卷积:64个filter、大小5*5、strides = 1、padding = "SAME"
tf.nn.conv2d(input,filter,strides=,padding=)
input:输入图像[None,14,14,32]
要求:形状[batch,heigth,width,channel]
类型为float32,64
filter:
weights = tf.Variable(initial_value=tf.random_normal(shape=[5,5,32,64]))
bias = tf.Variable(initial value=tf.random normal(shape=[64]))
变量initial value=random normal(shape=[F,F,3/1,K])
strides: 步长 1 [1,1,1,1]
padding:“SAME"
"SAME”:越过边缘取样
“VALID”:不越过边缘取样
输出形状:[None,14,14,64] ----通道数变为64
激活:Relu
tf.nn.relu(fetures)
池化:输入[None,14,14,64]
大小2*2 、strides2
根据公式计算输出形状:[None,7,7,64]
全连接层
tf.shape()
[None,7,7,64] ---->[None,7*7*64]
[None,7*7*64] * [7*7*64,10] = [None , 10]
y_predict = tf.matmul[pool2,weights] + bias
代码
import tensorflow as tf
import os
from tensorflow.examples.tutorials.mnist import input_data
tf.compat.v1.disable_eager_execution()# 1、利用数据,在训练的时候实时提供数据
# mnist手写数字数据在运行时候实时提供给给占位符tf.compat.v1.app.flags.DEFINE_integer("is_train", 1, "指定是否是训练模型,还是拿数据去预测")
FLAGS = tf.compat.v1.app.flags.FLAGSdef create_weights(shape):return tf.Variable(initial_value=tf.compat.v1.random_normal(shape=shape, stddev=0.01))
def create_model(x):"""构建卷积神经网络:param x::return:"""# 1)第一个卷积大层with tf.compat.v1.variable_scope("conv1"):# 卷积层# 将x[None, 784]形状进行修改input_x = tf.reshape(x, shape=[-1, 28, 28, 1])# 定义filter和偏置conv1_weights = create_weights(shape=[5, 5, 1, 32])conv1_bias = create_weights(shape=[32])conv1_x = tf.nn.conv2d(input=input_x, filters=conv1_weights, strides=[1, 1, 1, 1], padding="SAME") + conv1_bias# 激活层relu1_x = tf.nn.relu(conv1_x)# 池化层pool1_x = tf.nn.max_pool(input=relu1_x, ksize=[1, 2, 2, 1], strides=[1, 2, 2, 1], padding="SAME")# 2)第二个卷积大层with tf.compat.v1.variable_scope("conv2"):# 卷积层# 定义filter和偏置conv2_weights = create_weights(shape=[5, 5, 32, 64])conv2_bias = create_weights(shape=[64])conv2_x = tf.nn.conv2d(input=pool1_x, filters=conv2_weights, strides=[1, 1, 1, 1], padding="SAME") + conv2_bias# 激活层relu2_x = tf.nn.relu(conv2_x)# 池化层pool2_x = tf.nn.max_pool(input=relu2_x, ksize=[1, 2, 2, 1], strides=[1, 2, 2, 1], padding="SAME")# 3)全连接层with tf.compat.v1.variable_scope("full_connection"):# [None, 7, 7, 64]->[None, 7 * 7 * 64]# [None, 7 * 7 * 64] * [7 * 7 * 64, 10] = [None, 10]x_fc = tf.reshape(pool2_x, shape=[-1, 7 * 7 * 64])weights_fc = create_weights(shape=[7 * 7 * 64, 10])bias_fc = create_weights(shape=[10])y_predict = tf.matmul(x_fc, weights_fc) + bias_fcreturn y_predictdef full_connected_mnist():"""单层全连接神经网络识别手写数字图片特征值:[None, 784]目标值:one_hot编码 [None, 10]:return:"""mnist = input_data.read_data_sets("./tmp/mnist_data",one_hot=True)# 1、准备数据# x [None, 784] y_true [None. 10]with tf.compat.v1.variable_scope("mnist_data"):x = tf.compat.v1.placeholder(tf.float32, [None, 784])y_true = tf.compat.v1.placeholder(tf.int32, [None, 10])y_predict = create_model(x)# 3、softmax回归以及交叉熵损失计算with tf.compat.v1.variable_scope("softmax_crossentropy"):# labels:真实值 [None, 10]  one_hot# logits:全层的输出[None,10]# 返回每个样本的损失组成的列表loss = tf.reduce_mean(tf.nn.softmax_cross_entropy_with_logits(labels=y_true, logits=y_predict))# 4、梯度下降损失优化with tf.compat.v1.variable_scope("optimizer"):# 学习率optimizer = tf.compat.v1.train.AdamOptimizer(0.001).minimize(loss)# 5、得出每次训练的准确率(通过真实值和预测值进行位置比较,每个样本都比较)with tf.compat.v1.variable_scope("accuracy"):equal_list = tf.equal(tf.argmax(y_true, 1), tf.argmax(y_predict, 1))accuracy = tf.reduce_mean(tf.cast(equal_list, tf.float32))# 初始化变量opinit_op = tf.compat.v1.global_variables_initializer()# 开启会话去训练with tf.compat.v1.Session() as sess:# 初始化变量sess.run(init_op)if FLAGS.is_train == 1:# 循环步数去训练for i in range(500):# 获取数据,实时提供# 每步提供50个样本训练mnist_x, mnist_y = mnist.train.next_batch(50)# 运行训练op_,accuracy_value,loss_value = sess.run([optimizer,accuracy,loss],feed_dict={x: mnist_x, y_true: mnist_y})print("训练第%d步的准确率为:%f, 损失为:%f " % (i +1,accuracy_value,loss_value))else:# 如果不是训练,我们就去进行预测测试集数据for i in range(100):# 每次拿一个样本预测mnist_x, mnist_y = mnist.test.next_batch(1)print("第%d个样本的真实值为:%d, 模型预测结果为:%d" % (i+1,tf.argmax(sess.run(y_true, feed_dict={x: mnist_x, y_true: mnist_y}), 1).eval(),tf.argmax(sess.run(y_predict, feed_dict={x: mnist_x, y_true: mnist_y}), 1).eval()))return Noneif __name__ == "__main__":full_connected_mnist()
结果