1.可调动对象的调动方式
方法 1、函数指针调动
方法2 、类类型的括号的重载 调动可调动对象
#include<iostream>
#include<functional>
using namespace std;
struct Foo
{void operator()(int x){cout<<"Foo operator "<<x<<endl;}
};
struct Bar
{using Pfun =void (*) (int);Pfun成为一个类型static void func(int x){cout<<"Bar func"<<x<<endl;}operator Pfun()const{return &Bar::func;}
};
struct Test
{
public:int x_;Test(int x):x_(x){}
public:void funb(){cout<<" Test funb"<<x_<<" ";}int func(int x){x_= x;cout<<"Test func"<<x<<" ";}
};
int add(int x,int y)
{return x+y;
}
int main()
{int x=10;int *p = &x;方法调动1:通过函数指针void (*fp)(int) = Bar::func; fp(x);方法调动2:通过对象重载Foo foo;  foo(x);方法调动2:重载实现调动Bar bar;return 0;
}
打印结果:
Bar func10
Foo operator 10
方法3、function
struct Test
{
public:int x_;Test(int x):x_(x){}
public:void funb(){cout<<" Test funb"<<x_<<" ";}int func(int x){x_= x;cout<<"Test func"<<x<<" ";return x;}
};
int add(int x,int y)
{return x+y;
}
int main()
{std::function<int(int,int)>pfuna = add;auto val = pfuna(1,2);int x=10;Test test(10);  std::function<void(Test&)>pfunb =&Test::funb;pfunb(test);std::function<int(Test&,int )>pfunc = &Test::func;auto val1 = pfunc(test,100);有返回值,需要有值去接收cout<<val1<<endl;return 0;
}
打印结果:
Test funb10 Test func100 100
注意:<int(Test&,int )>尖括号中传入的是类型!
一个回调函数的例子:
/*function 一个回调函数的例子*/
class Test
{std::function<void()> callback;
public:Test(const std::function <void()>&f):callback(f){}void notify(){callback();}};class Foo
{
public:void operator()(void){cout<<__FUNCTION__<<endl;cout<<__TIME__<<endl;}
};
int main()
{Foo foo;Test test(foo); 通过foo对象去激活foo中的仿函数 !test.notify();return  0;
}
可调动对象之--------
lamda表达式
2 .BIND与FUNCTION 示例:
/bind/
//作用1:将可调用对象与其参数一起绑定成一个仿函数
//作用2:将多元(参数个数为n,n>1) 可调用对象转成一元或(n-1)元,即只绑定部分参数
#include<iostream>
#include<functional>
using namespace std;
class Test
{
public:int val;Test(int x =0):val(x){}void output(int a,int b){cout<<"a ="<<a<<"  b = "<<b<<"  val = "<<val<<endl;}};
void output(int a,int b)
{cout<<"a ="<<a<<"  b = "<<b<<endl;
}
int main()
{   function<void(int ,int)>Function = output;auto pfun = std::bind(Function,10,20); pfun();pfun(1,2); //此时的传入的参数并不起作用,因为绑定时已经给了固定的参数;auto pfuna = std::bind(Function,20); //error 格式中必须给两个参数auto pfunb = std::bind(Function,std::placeholders::_1,20);//第一个参数位给出占位符,//那么pfun(1,2)的第一个位置就被1占了;pfunb(1,2);Test test(10);auto pfunc = std::bind(&Test::output,test,std::placeholders::_1,placeholders::_2);//pfun;//没用调动可调动对象pfunc(1,2);****************************************************************bind直接执行可调动对象:*括号内给值-> bind直接执行可调动对象*std::bind(&Test::output,test,std::placeholders::_1,placeholders::_2)(100,200); *****************************************************************function 加bind调动类对象成员方法*Test test1(10);std::function<void(Test&,int,int)>Function1 = &Test::output;std::bind(Function1,test1,placeholders::_1,placeholders::_2)(200,300);*****************************************************************注意占位符和提取符的说法:*std::function<void(Test&,int,int)>Function2 = &Test::output;//std::bind(Function2,test1,placeholders::_1,placeholders::_3)(200,300);//errorstd::bind(Function2,test1,placeholders::_1,placeholders::_3)(100,200,300);//ok,第三个占位符可以提取到第三个参数return  0;}
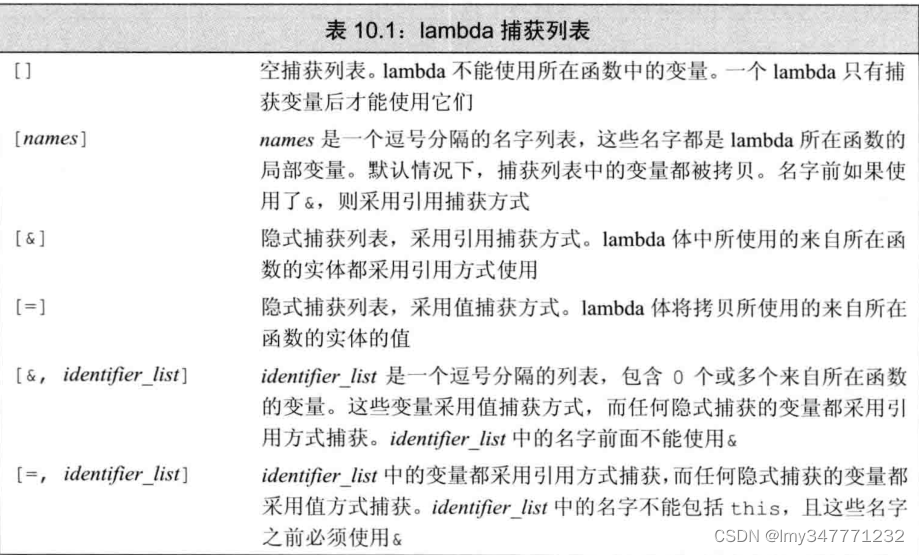
lamda表达式:
int main()
{   int x= 10,z=20;// auto val = [](int a)->int {//     return a+1;// };//cout<<val(1);// auto val = [=]() -> int{//     return x+10;// };// cout<<val(); //无参也要写括号  //reuslt::20auto val = [&]() ->int {x += 1000;return x;};cout<<"val = "<<val()<<endl;  //必须执行完VAL()后x的值才发生变化。cout<<"x = "<<x<<endl;/*无返回值的测试*/[&]() ->void {x += 1000;};cout<<"val = "<<val()<<endl;  cout<<"x = "<<x<<endl;cout<<"val = "<<val()<<endl;cout<<"x = "<<x<<endl;//带形参的测试:auto num = [x,&z](int y)->int {return x+(z++);};cout<<"num = "<<num(1)<<endl;cout<<z<<endl;//只引用形式捕获z,其他为隐式的以值捕获auto num1 = [=,&z](int y)->int{return x+(z++);};cout<<"num1 = "<<num1(1)<<endl;cout<<z<<endl;//只以值捕获z,其他为隐式的以引用捕获auto num2 = [&,z](int y)->int{cout<<"lamda"<<x<<endl;return (x++)+z;};cout<<"num2 = "<<num2(1)<<endl;cout<<"x"<<x<<endl;return 0;
}
线程的几种执行方式
1.thread的使用
    void funa(int x){cout<<"funa"<<endl;}void funb(int *p){cout<<"funb"<<endl;}  void func(int &x){cout<<"func"<<endl;x+=10;}
int main()
{   int x=10;int *p =&x;thread tha(funa,1);thread thb(funb,p);//thread thd(func,x); //error 函数无法以引用接收thread thc(func,std::ref(x)); //oktha.join();thb.join();thc.join();//thd.join();cout<<x<<endl;return 0;}
结果:
funa
funb
func
20
/利用using 定义函数指针/
void fun(int x,int y)
{   cout<<"nihao:fun"<<std::endl;
}using PFUN = void (*)(int , int);PFUN funt = fun; //okstd::thread thp(funt,2,2);//ok
3.线程调动类成员方法
typedef void (*pfun)();
using PFUN = void (*)(void);
class mythread
{
public:mythread(int val):val_(val){}int val_;
public:void fun_thread(int val){cout<<val_<<endl;cout<<val<<endl;}};
int main()
{mythread my1;std::thread thc(&mythread::fun_thread,&my1,100);thc.join();return 0;
}
4./线程函数是仿函数的例子/
/*线程函数是仿函数的例子*/
class Test
{
public:void operator()(int x,int y){cout<<"add"<<x+y<<endl;}void add(int x,int y){cout<<"add 普通成员函数"<<x+y<<endl;}
};
int main()
{std::thread tha(Test{},1,2); //函数重载直接调动类的成员仿函数Test test;std::thread thb(&Test::add,&test,1,2); //调动成员函数thb.join();tha.join();return 0;
}
5./强转的例子/
class Test1
{
public:
int val = 190 ;
using PFUN = void (*)(int , int);
public:
static void add(int a,int b)
{int c=a+b;cout<<"add c"<<c<<endl;
}
operator PFUN()const
{return &add;
}
operator int()const
{return val;
}
};
int main()
{Test1 test1;int num =test1; //会调动重载的强转函数 operator int()test1(12,23); //result::add 35 .其实是下面的语句://test.operator Test::PFUN()(12,23);return 0;
}
test1(12,23); 调动过程:
test1后面的括号代表调动其重载函数,12,23为add的参数匹配,最后调动ADD函数。
lamda:
int main()
{/*lamda*/std::thread thc([&](int x_) -> void {x += x_; //这里x要用就必须被捕获,注意不能被值捕获(这里值被修改)},100);std::thread thc([=]()->void {printf("lamda \n");});thc.join();cout<<num<<endl;// 110return 0;
}
![[JavaEE] 线程与进程的区别详解](https://img-blog.csdnimg.cn/2a11da931ec84cef8442db590421d00a.png)
