几年前,笔者自学了几课机器学习,但没有涉及深度学习。最近开始看一下PyTorch的一些用法,顺便也了解一下深度学习。所以,从这篇开始,将会发布几篇关于使用PyTorch深度学习的笔记。
另外,公司发的新笔记本里居然有一块GPU, 8GB显存的 NVIDIA RTX A2000, 不知道算中端还是低端,但反正跑起来确实比CPU强多了(见下面程序)。
本篇笔记是来源于一个网上的课程的第一章,讲的是PyTorch以及Jupyter的安装。不过笔者加了一些基础知识,以及几个不同环境下的自己做的实验在里面,另外还加了一个CPU v.s. GPU 的程序性能比拼实验。蛮有意思吧。所以最后写下来,已经和原来的课程内容有较大的不同了。
Chapter 1. Install PyTorch & Jupyter Notebook
1.1 Upgrade pip
本步骤不是必须的。
version 2x.x.x, 21 is for python3, 20 is still python2
sudo pip install --upgrade pip
1.2 Install Pytorch and Jupyter
Step 1. Install virtualenv
virtualenv 是为了解决Python package版本依赖混乱的问题而建立的一个独立的Python运行环境。
安装命令如下:
pip install virtualenv
Step 2. Create virtualenv
For Linux
mkdir ~/TestAI
cd ~/TestAI# -p is to specify Python version
~/.local/bin/virtualenv -p /usr/bin/python3 venv# Or just the command below
# virtualenv -p /usr/bin/python3 venv ls ~/TestAI/venv
For Windows
mkdir TestAI
cd TestAIvirtualenv venv dir TestAI\venv
Step 3. Activate virtualenv
For Linux
cd ~/TestAIsource venv/bin/activate
For Windows
cd TestAI venv/Scripts/activate
Step 4. Install PyTorch
CPU version for Linux
pip install torch==1.9.0+cpu torchvision==0.10.0+cpu torchaudio==0.9.0 -f https://download.pytorch.org/whl/torch_stable.html
CPU version for Mac & Windows
pip install torch torchvision torchaudio
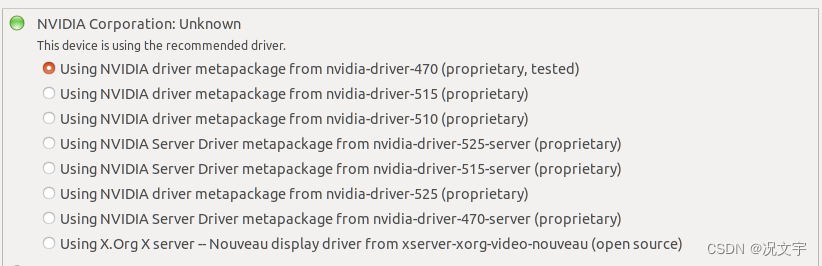
GPU version on Windows
-
Download CUDA toolkit from here
https://developer.nvidia.com/cuda-toolkit-archive
For example, download CUDA11.3 -
Access: https://download.pytorch.org/whl/torch_stable.html
-
Download the following whl file
https://download.pytorch.org/whl/cu113/torch-1.12.1%2Bcu113-cp310-cp310-win_amd64.whl -
In virtual env, run:
pip install "C:\Users\<username>\Downloads\torch-1.12.1+cu113-cp310-cp310-win_amd64.whl"
- Verify the installation
>>> import torch
>>> torch.cuda.is_available()
>>> True
GPU version on Linux (not verified)
Run
pip install torch==1.9.0+cu111 torchvision==0.10.0+cu111 torchaudio==0.9.0 -f https://download.pytorch.org/whl/torch_stable.html
Step 5. Test whether installation is successful
$python
>>> import torch
>>>
>>> torch.cuda.is_available()
Step 6. Exit virtualenv
Run this command in virtualenv
deactivate
Step 7. Install Jupyter Notebook
Jupyter Notebook 是一个开源的 Web 应用。它能够让你创建和分享包含可执行代码、可视化结构和文字说明的文档。
In virutalenv, run:
pip install jupyter
Run on Windows, enter into virtualenv, then,
jupyter notebook
Then Web Browser will open jupyter home page locally.
结束: 连按2次 Ctrl+C
1.3 比较 CPU 和 GPU 的计算效率
运行以下程序:
import time
import torch rows = 20000
cols = 20000a = torch.rand(rows, cols)
b = torch.rand(rows, cols)beg = time.time_ns()
c = a.matmul(b)
end = time.time_ns()# about 30 seconds
print("Time elapsed %.2f seconds" % ((end-beg)/1e9))a1 = a.cuda()
b1 = b.cuda()beg = time.time_ns()
c1 = a1.matmul(b1)
end = time.time_ns()# less than 1 second
print("Time elapsed %.2f seconds" % ((end-beg)/1e9))
运行结果如下:
Time elapsed 31.31 seconds
Time elapsed 0.60 seconds
所以,做上面的矩阵相乘运算,GPU的效率是CPU的52倍: 31.3 / 0.6 = 52
(完)
![[全新重构版四引导双系统]macOS 12.3.1(21E258)With OpenCore 0.8.0 and Clover 5146 and winPE原版镜像](https://img-blog.csdnimg.cn/6f92d1f6873b46069c4a329f72f40fc7.png)