目录
1.前言
2.准备工作
3.开始转模型
4.测试代码
5.不想转,直接用也可以,转好的给你,请关注评论一下
1.前言
RKNN出最新版本了,测试了一下,rk在transformer方面做了很多的工作,至少之前不能转的模型,现在可以在fp16上面运行了,在测试int8的时候还是有误差,以往后面优化吧,这一篇是DETR模型转rknn的fp16模型的过程。
2.准备工作
PC: ubuntu 18.04、rknntoolkit2-1.5
开发板:rk3588
模型链接: onnx模型 提取码: yciw
关于onnx模型怎样来的,请参考博文DERT(DEtection TRansformer) ONNX直接推理!!
这里模型链接中onnx模型做了一点修改,将模型最后的两个gather算子删除了,这样转化才不出错(有心的同学可以对比一下参考博文的onnx模型和本文中的onnx模型最后的输出)
 |  |
3.开始转模型
import numpy as np
import cv2
from rknn.api import RKNNONNX_MODEL = 'modified_models.onnx'
RKNN_MODEL = 'detr_fp16.rknn'
DATASET = './dataset.txt'
QUANTIZE_ON = True
QUANTIZE_OFF = Falseif __name__ == '__main__':# Create RKNN objectrknn = RKNN(verbose=True)# pre-process configprint('--> Config model')rknn.config(mean_values=[[0, 0, 0]], std_values=[[1, 1, 1]], target_platform='rk3588')print('done')# Load ONNX modelprint('--> Loading model')ret = rknn.load_onnx(model=ONNX_MODEL)if ret != 0:print('Load model failed!')exit(ret)print('done')# Build modelprint('--> Building model')ret = rknn.build(do_quantization=QUANTIZE_OFF, dataset=DATASET)if ret != 0:print('Build model failed!')exit(ret)print('done')# Export RKNN modelprint('--> Export rknn model')ret = rknn.export_rknn(RKNN_MODEL)if ret != 0:print('Export rknn model failed!')exit(ret)print('done')
准换后就有了detr_fp16的模型了
4.测试代码
import numpy as np
from PIL import Image
from PIL import ImageDraw, ImageFont
import colorsys
from rknnlite.api import RKNNLitedef get_classes(classes_path):with open(classes_path, encoding='utf-8') as f:class_names = f.readlines()class_names = [c.strip() for c in class_names]return class_names, len(class_names)def get_new_img_size(height, width, min_length=600):if width <= height:f = float(min_length) / widthresized_height = int(f * height)resized_width = int(min_length)else:f = float(min_length) / heightresized_width = int(f * width)resized_height = int(min_length)return resized_height, resized_widthdef resize_image(image, min_length):iw, ih = image.sizeh, w = get_new_img_size(ih, iw, min_length=min_length)new_image = image.resize((w, h), Image.BICUBIC)return new_imagedef cvtColor(image):if len(np.shape(image)) == 3 and np.shape(image)[2] == 3:return imageelse:image = image.convert('RGB')return imageclass DecodeBox:""" This module converts the model's output into the format expected by the coco api"""def box_cxcywh_to_xyxy(self, x):x_c, y_c, w, h = x[..., 0], x[..., 1], x[..., 2], x[..., 3]b = [(x_c - 0.5 * w), (y_c - 0.5 * h),(x_c + 0.5 * w), (y_c + 0.5 * h)]return np.stack(b, axis=-1)def forward(self, outputs, target_sizes, confidence):out_logits, out_bbox = outputs["pred_logits"], outputs["pred_boxes"]assert len(out_logits) == len(target_sizes)assert target_sizes.shape[1] == 2prob = np.exp(out_logits) / np.exp(out_logits).sum(-1, keepdims=True)scores = np.max(prob[..., :-1], axis=-1)labels = np.argmax(prob[..., :-1], axis=-1)  # 加1来转换为类别标签(背景类别为0)# convert to [x0, y0, x1, y1] formatboxes = self.box_cxcywh_to_xyxy(out_bbox)# and from relative [0, 1] to absolute [0, height] coordinatesimg_h, img_w = np.split(target_sizes, target_sizes.shape[1], axis=1)[0], np.split(target_sizes, target_sizes.shape[1], axis=1)[1]img_h = img_h.astype(float)img_w = img_w.astype(float)scale_fct = np.hstack([img_w, img_h, img_w, img_h])boxes = boxes * scale_fct[:, None, :]outputs = np.concatenate([np.expand_dims(boxes[:, :, 1], -1),np.expand_dims(boxes[:, :, 0], -1),np.expand_dims(boxes[:, :, 3], -1),np.expand_dims(boxes[:, :, 2], -1),np.expand_dims(scores, -1),np.expand_dims(labels.astype(float), -1),], -1)results = []for output in outputs:results.append(output[output[:, 4] > confidence])# results = [{'scores': s, 'labels': l, 'boxes': b} for s, l, b in zip(scores, labels, boxes)]return resultsdef preprocess_input(image):image /= 255.0image -= np.array([0.485, 0.456, 0.406])image /= np.array([0.229, 0.224, 0.225])return imageif __name__ == "__main__":count = Trueconfidence = 0.5min_length = 512image = Image.open('1.jpg')image = image.resize((512, 512))image_shape = np.array([np.shape(image)[0:2]])image = cvtColor(image)image_data = resize_image(image, min_length)# image_data = np.expand_dims(np.transpose(preprocess_input(np.array(image_data, dtype='float32')), (2, 0, 1)), 0)image_data = np.expand_dims(preprocess_input(np.array(image_data, dtype='float32')), 0)print(image_data.shape)model_name = "./detr_fp16.rknn"rknn_lite = RKNNLite()# load RKNN modelprint('--> Load RKNN model')ret = rknn_lite.load_rknn(model_name)if ret != 0:print('Load RKNN model failed')exit(ret)print('done')ret = rknn_lite.init_runtime(core_mask=RKNNLite.NPU_CORE_0)# Inferenceprint('--> Running model')net_outputs = rknn_lite.inference(inputs=[image_data])net_outs = {"pred_logits": net_outputs[0][-1], "pred_boxes": net_outputs[1][-1]}bbox_util = DecodeBox()results = bbox_util.forward(net_outs, image_shape, confidence)if results[0] is None:print('NO OBJECT')else:_results = results[0]top_label = np.array(_results[:, 5], dtype='int32')top_conf = _results[:, 4]top_boxes = _results[:, :4]font = ImageFont.truetype(font='model_data/simhei.ttf', size=np.floor(3e-2 * image.size[1] + 0.5).astype('int32'))thickness = int(max((image.size[0] + image.size[1]) // min_length, 1))classes_path = 'model_data/coco_classes.txt'class_names, num_classes = get_classes(classes_path)hsv_tuples = [(x / num_classes, 1., 1.) for x in range(num_classes)]colors = list(map(lambda x: colorsys.hsv_to_rgb(*x), hsv_tuples))colors = list(map(lambda x: (int(x[0] * 255), int(x[1] * 255), int(x[2] * 255)), colors))for i, c in list(enumerate(top_label)):predicted_class = class_names[int(c)]box = top_boxes[i]score = top_conf[i]top, left, bottom, right = boxtop = max(0, np.floor(top).astype('int32'))left = max(0, np.floor(left).astype('int32'))bottom = min(image.size[1], np.floor(bottom).astype('int32'))right = min(image.size[0], np.floor(right).astype('int32'))label = '{} {:.2f}'.format(predicted_class, score)draw = ImageDraw.Draw(image)label_size = draw.textsize(label, font)label = label.encode('utf-8')print(label, top, left, bottom, right)if top - label_size[1] >= 0:text_origin = np.array([left, top - label_size[1]])else:text_origin = np.array([left, top + 1])for i in range(thickness):draw.rectangle([left + i, top + i, right - i, bottom - i], outline=colors[c])draw.rectangle([tuple(text_origin), tuple(text_origin + label_size)], fill=colors[c])draw.text(text_origin, str(label, 'UTF-8'), fill=(0, 0, 0), font=font)del drawimage.save('output.png')
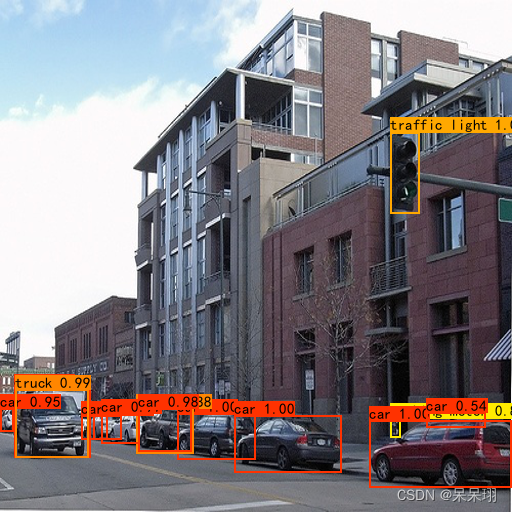
测试的结果如下,还是不错的。
 |  |
5.不想转,直接用也可以,转好的给你,请关注评论一下
DETR_RKNN 提取码: k8tk


