目录
Qt的几个Layout
QBoxLayout
一个例子:
一些常见的API
QGridLayout
一个例子:
API
QFormLayout
例子
API
QStackedLayout
一些例子
API
其他
QSplitter
一些例子
API
附注
这里不是具体的好看的界面设计教程,但是打算说一下:优先使用布局管理,可以事半功倍的拜托对size的管理。
Qt的几个Layout
Qt主要有这些Layout类:
-
QVBoxLayout:表达的是按照垂直方向分配控件,一眼看过去控件按照垂直排列
-
QHBoxLayout:表达的是按照水平方向分配控件,一眼看过去控件按照水平排列
-
QFormLayout:设计表单的时候使用,可以更加美观!
-
QStackedLayout:堆叠布局,也就是对于那些希望在同一个Widget中一次只显示一个internal component的情况下,使用这个是最合适的
QBoxLayout
当然下分了QHBoxLayout和QVBoxLayout的,但是这不要紧,只是水平还是垂直的区分。笔者最近常用的是QHBoxLayout,就选择这个作为样板吧。
我上面说了,这个就是水平排布。默认的时候是居中对齐,当然可以修改Alignment设置更多的对齐方式(笔者建议一开始的所有的状态都在Designer中设置比较好)
我们在Designer中设置完一个Widget的Layout之后,就可以直接拖控件到这个Widget帮助我们自动布局了。那代码端呢?答案是使用addWidget这个函数,
addWidget(QWidget *widget, int stretch = 0, Qt::Alignment alignment = 0)
当然还可以添加spacing,注意会在末尾添加,所以想要在控件之间添加spacing需要:
addWidget(...)
addSpacing(...)
addWidget(...)
或者有的时候想要从布局中找Widget,那可以使用itemAt来索引。
一个例子:
#include "Widget.h"
#include <QLabel>
#include <QPushButton>
#include "ui_Widget.h"
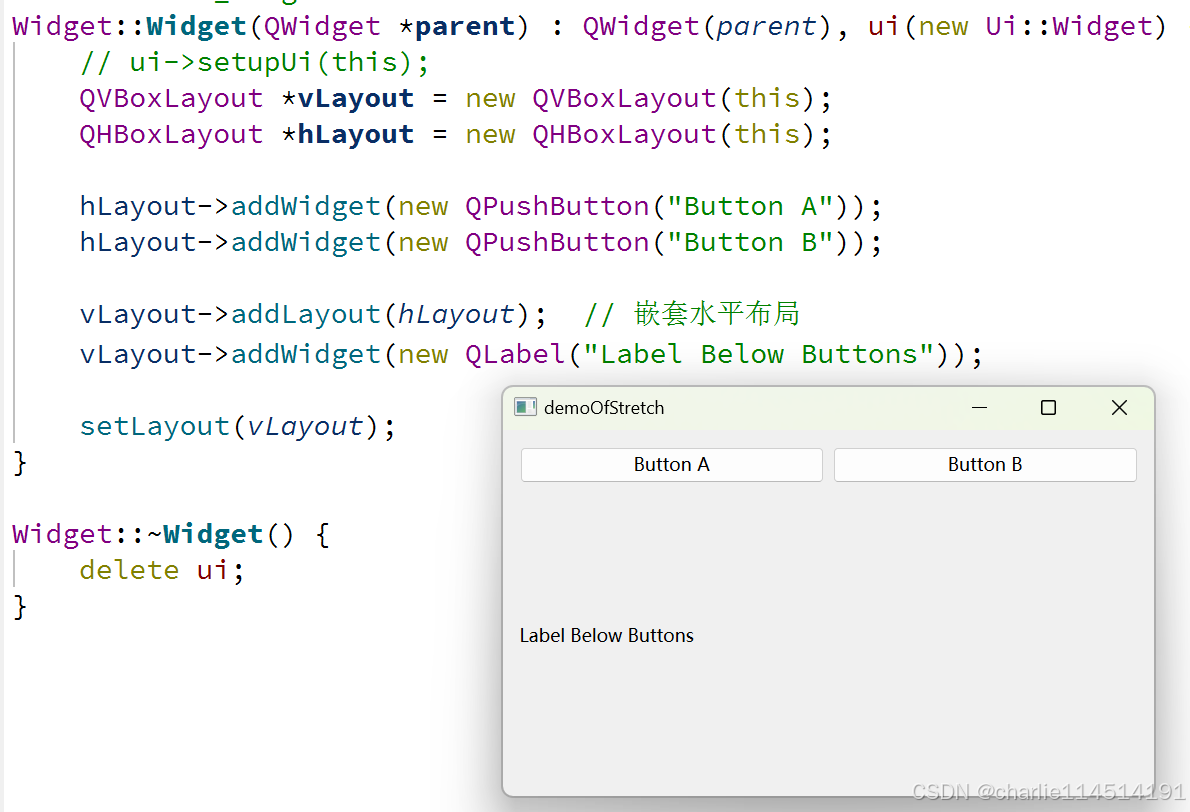
Widget::Widget(QWidget *parent) : QWidget(parent), ui(new Ui::Widget) {// ui->setupUi(this);QVBoxLayout *vLayout = new QVBoxLayout(this);QHBoxLayout *hLayout = new QHBoxLayout(this);
hLayout->addWidget(new QPushButton("Button A"));hLayout->addWidget(new QPushButton("Button B"));
vLayout->addLayout(hLayout); // 嵌套水平布局vLayout->addWidget(new QLabel("Label Below Buttons"));
setLayout(vLayout);
}
Widget::~Widget() {delete ui;
}
一些常见的API
| 方法名称 | 参数 | 描述 |
|---|---|---|
addWidget(QWidget *widget, int stretch = 0, Qt::Alignment alignment = 0) | 组件指针,伸缩因子(默认为0),对齐方式(默认为0) | 将一个子组件添加到布局中,支持伸缩和对齐设置。 |
addLayout(QLayout *layout, int stretch = 0) | 布局指针,伸缩因子(默认为0) | 将另一个布局添加到当前布局中,支持伸缩设置。 |
addSpacing(int size) | 空间大小 | 在布局中添加一个固定大小的空白区域。 |
addStretch(int stretch = 0) | 伸缩因子(默认为0) | 在布局中添加一个可伸缩的空白区域。 |
setSpacing(int spacing) | 间距大小 | 设置布局中子组件之间的间距。 |
setContentsMargins(int left, int top, int right, int bottom) | 四个边缘的外边距 | 设置布局的外边距,控制布局与窗口边界之间的距离。 |
setAlignment(QWidget *widget, Qt::Alignment alignment) | 组件指针,对齐方式 | 设置指定组件的对齐方式。 |
insertWidget(int index, QWidget *widget, int stretch = 0, Qt::Alignment alignment = 0) | 索引,组件指针,伸缩因子(默认为0),对齐方式(默认为0) | 在指定索引位置插入一个组件,并设置伸缩和对齐。 |
insertLayout(int index, QLayout *layout, int stretch = 0) | 索引,布局指针,伸缩因子(默认为0) | 在指定索引位置插入一个布局。 |
removeWidget(QWidget *widget) | 组件指针 | 从布局中移除指定的组件。 |
takeAt(int index) | 索引 | 移除并返回指定索引处的布局项。 |
count() | 无 | 返回布局中子组件的数量。 |
itemAt(int index) | 索引 | 返回指定索引处的布局项。 |
geometry() | 无 | 返回布局的几何矩形,表示布局的边界。 |
invalidate() | 无 | 使布局无效,强制重新计算子组件的位置和大小。 |
sizeHint() | 无 | 返回布局的推荐大小。 |
minimumSize() | 无 | 返回布局的最小大小。 |
maximumSize() | 无 | 返回布局的最大大小。 |
setEnabled(bool) | 是否启用 | 设置布局的启用状态。 |
setParent(QWidget *parent) | 父组件指针 | 设置布局的父组件。 |
QGridLayout
网格分布!现在我们的控件可以看起来更加好看了一些,
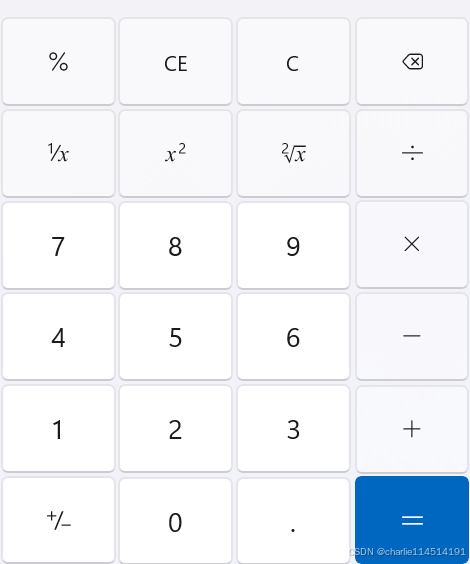
这样的分布就是一个典型的表格分布。我们完全可以搓一个出来的(笔者建议你试试)
GPT说:他的特点是:
-
网格排列:子组件可以在一个由行和列构成的网格中自由放置。
-
灵活性:支持跨行和跨列放置组件,允许组件占据多个单元格。
-
自动调整:布局会自动调整组件的大小,确保它们在窗口大小变化时仍然保持合理的显示。
你可以自己动手试试。
一个例子:
#include "Widget.h"
#include <QLabel>
#include <QLineEdit>
#include <QPushButton>
#include "ui_Widget.h"
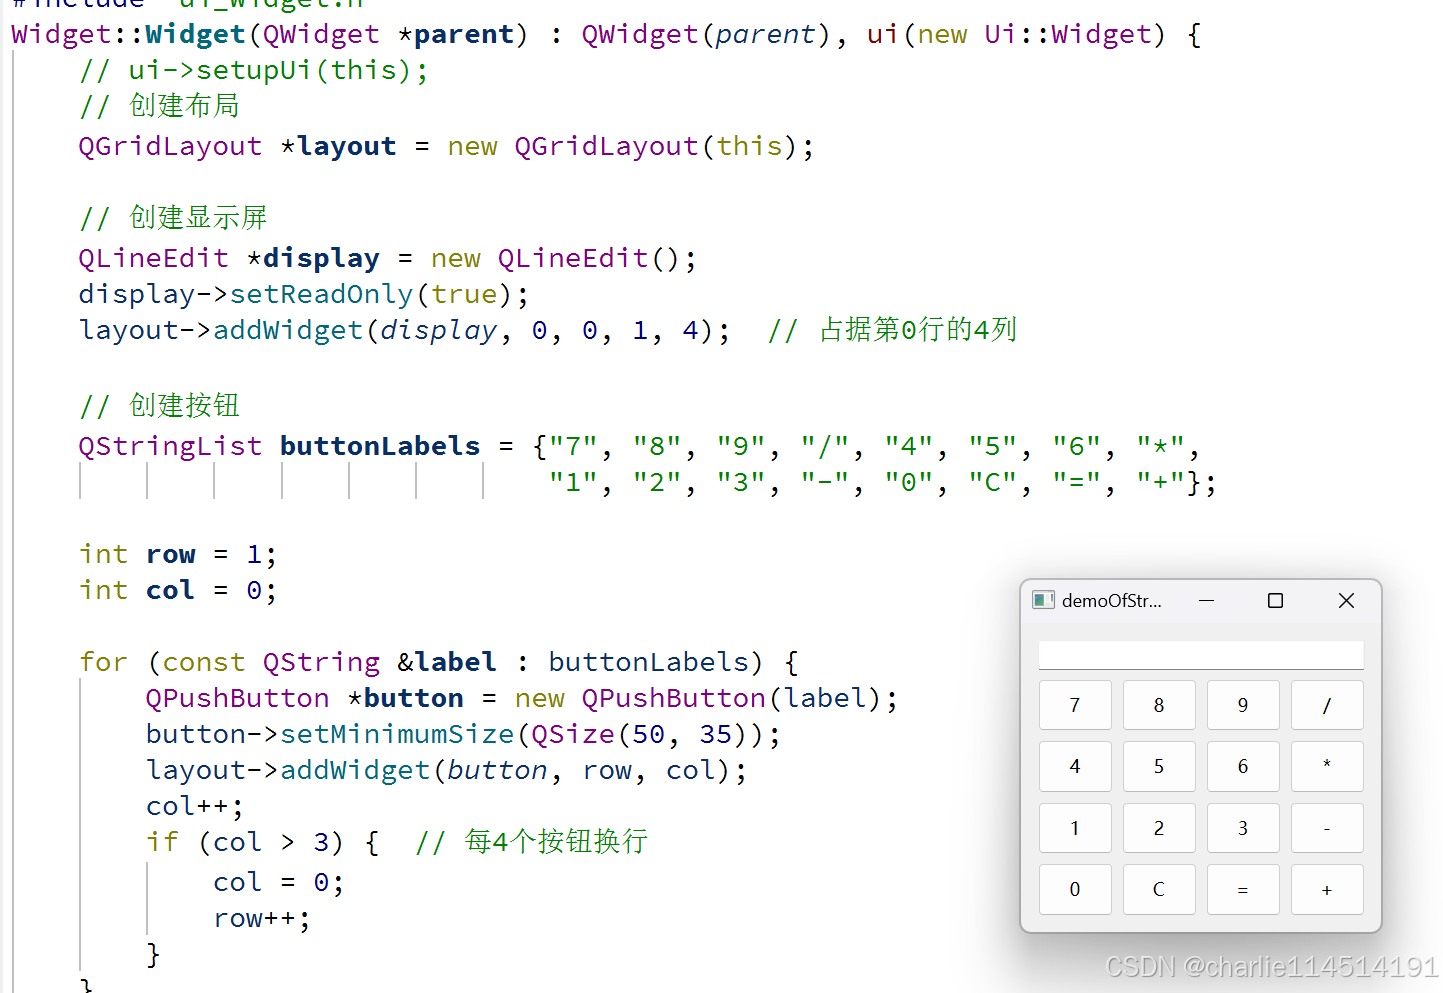
Widget::Widget(QWidget *parent) : QWidget(parent), ui(new Ui::Widget) {// ui->setupUi(this);// 创建布局QGridLayout *layout = new QGridLayout(this);
// 创建显示屏QLineEdit *display = new QLineEdit();display->setReadOnly(true);layout->addWidget(display, 0, 0, 1, 4); // 占据第0行的4列
// 创建按钮QStringList buttonLabels = {"7", "8", "9", "/", "4", "5", "6", "*","1", "2", "3", "-", "0", "C", "=", "+"};
int row = 1;int col = 0;
for (const QString &label : buttonLabels) {QPushButton *button = new QPushButton(label);button->setMinimumSize(QSize(50, 35));layout->addWidget(button, row, col);col++;if (col > 3) { // 每4个按钮换行col = 0;row++;}}
// 设置布局setLayout(layout);
}
Widget::~Widget() {delete ui;
}
API
| 方法名称 | 参数 | 描述 |
|---|---|---|
addWidget(QWidget *widget, int row, int column, int rowSpan = 1, int columnSpan = 1, Qt::Alignment alignment = 0) | 组件指针,行号,列号,行跨度(默认为1),列跨度(默认为1),对齐方式(默认为0) | 将一个子组件添加到指定的网格位置,支持跨行和跨列的设置。 |
setSpacing(int spacing) | 间距大小 | 设置网格中子组件之间的间距。 |
setContentsMargins(int left, int top, int right, int bottom) | 四个边缘的外边距 | 设置布局的外边距,控制布局与窗口边界之间的距离。 |
setRowStretch(int row, int stretch) | 行号,伸缩因子 | 设置指定行的伸缩因子。 |
setColumnStretch(int column, int stretch) | 列号,伸缩因子 | 设置指定列的伸缩因子。 |
removeWidget(QWidget *widget) | 组件指针 | 从布局中移除指定的组件。 |
itemAt(int index) | 索引 | 返回指定索引处的布局项。 |
count() | 无 | 返回布局中子组件的数量。 |
takeAt(int index) | 索引 | 移除并返回指定索引处的布局项。 |
geometry() | 无 | 返回布局的几何矩形,表示布局的边界。 |
invalidate() | 无 | 使布局无效,强制重新计算子组件的位置和大小。 |
sizeHint() | 无 | 返回布局的推荐大小。 |
minimumSize() | 无 | 返回布局的最小大小。 |
maximumSize() | 无 | 返回布局的最大大小。 |
setEnabled(bool) | 是否启用 | 设置布局的启用状态。 |
addItem(QLayoutItem *item, int row, int column, int rowSpan = 1, int columnSpan = 1) | 布局项,行号,列号,行跨度(默认为1),列跨度(默认为1) | 将一个布局项添加到网格中。 |
addLayout(QLayout *layout, int row, int column, int rowSpan = 1, int columnSpan = 1) | 布局指针,行号,列号,行跨度(默认为1),列跨度(默认为1) | 将另一个布局添加到指定位置。 |
QFormLayout
比起来,他比更加通用的QGridLayout更加的特化了:
-
标签和控件对齐:标签和控件以行的形式排列,标签通常位于控件的左侧或上方,方便用户阅读和输入。
-
自适应:控件和标签的大小会自动调整,以适应布局和窗口大小的变化。
-
易于使用:提供简单的方法添加标签和控件,快速构建表单界面。
例子
#include "Widget.h"
#include <QFormLayout>
#include <QLabel>
#include <QLineEdit>
#include <QPushButton>
#include "ui_Widget.h"
Widget::Widget(QWidget *parent) : QWidget(parent), ui(new Ui::Widget) {QFormLayout *formLayout = new QFormLayout(this);
// 创建控件QLineEdit *nameEdit = new QLineEdit();QLineEdit *emailEdit = new QLineEdit();QLineEdit *phoneEdit = new QLineEdit();
// 添加标签和控件到布局formLayout->addRow("Name:", nameEdit);formLayout->addRow("Email:", emailEdit);formLayout->addRow("Phone:", phoneEdit);
// 添加提交按钮QPushButton *submitButton = new QPushButton("Submit");formLayout->addRow(submitButton);
setLayout(formLayout);
}
Widget::~Widget() {delete ui;
}
API
| 方法名称 | 参数 | 描述 |
|---|---|---|
addRow(const QString &labelText, QWidget *field) | 标签文本,控件指针 | 添加一行,包含标签和对应的控件。 |
addRow(QWidget *label, QWidget *field) | 标签控件,控件指针 | 添加一行,使用指定的标签控件和对应的控件。 |
addRow(QWidget *label, QWidget *field, int rowSpan) | 标签控件,控件指针,行跨度 | 添加一行,允许标签和控件占用多个行。 |
setLabelAlignment(Qt::Alignment alignment) | 对齐方式 | 设置所有标签的对齐方式。 |
setFormAlignment(Qt::Alignment alignment) | 对齐方式 | 设置所有控件的对齐方式。 |
insertRow(int row, const QString &labelText, QWidget *field) | 行号,标签文本,控件指针 | 在指定行插入一行,包含标签和控件。 |
insertRow(int row, QWidget *label, QWidget *field) | 行号,标签控件,控件指针 | 在指定行插入一行,使用指定的标签控件和对应的控件。 |
removeRow(int row) | 行号 | 移除指定行。 |
itemAt(int index) | 索引 | 返回指定索引处的布局项。 |
count() | 无 | 返回布局中子组件的数量。 |
takeAt(int index) | 索引 | 移除并返回指定索引处的布局项。 |
setContentsMargins(int left, int top, int right, int bottom) | 四个边缘的外边距 | 设置布局的外边距,控制布局与窗口边界之间的距离。 |
setSpacing(int spacing) | 间距大小 | 设置标签和控件之间的间距。 |
setLabelFont(const QFont &font) | 字体 | 设置所有标签的字体。 |
setFormAlignment(Qt::Alignment alignment) | 对齐方式 | 设置所有控件的对齐方式。 |
setWidget(int row, int column, QWidget *widget) | 行号,列号,控件指针 | 设置指定行列位置的控件。 |
getLabelAlignment() | 无 | 获取标签的对齐方式。 |
getFormAlignment() | 无 | 获取控件的对齐方式。 |
isEmpty() | 无 | 检查布局是否为空。 |
QStackedLayout
这个玩意就是一个Stack,保证可以在一叠Widget中选出一个进行显示。
动态切换:可以通过 setCurrentIndex() 或 setCurrentWidget() 方法动态切换当前显示的控件。
灵活性:可以在运行时添加或移除控件,支持高度动态的用户界面设计。
用户友好:适合实现复杂的用户交互和视图切换。
一些例子
#include "Widget.h"
#include <QFormLayout>
#include <QLabel>
#include <QLineEdit>
#include <QPushButton>
#include <QStackedLayout>
#include "ui_Widget.h"
Widget::Widget(QWidget *parent) : QWidget(parent), ui(new Ui::Widget) {QStackedLayout *stackedLayout = new QStackedLayout(this);
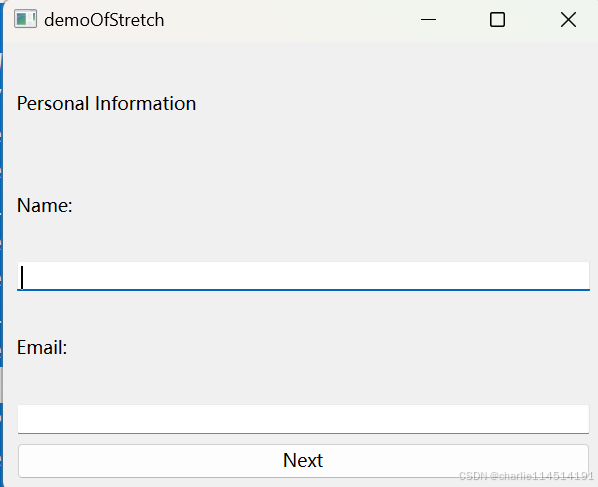
// 创建个人信息页面QWidget *personalInfoPage = new QWidget();QVBoxLayout *personalLayout = new QVBoxLayout(personalInfoPage);personalLayout->addWidget(new QLabel("Personal Information"));personalLayout->addWidget(new QLabel("Name:"));QLineEdit *nameEdit = new QLineEdit();personalLayout->addWidget(nameEdit);personalLayout->addWidget(new QLabel("Email:"));QLineEdit *emailEdit = new QLineEdit();personalLayout->addWidget(emailEdit);
QPushButton *nextToAddressButton = new QPushButton("Next");personalLayout->addWidget(nextToAddressButton);stackedLayout->addWidget(personalInfoPage);
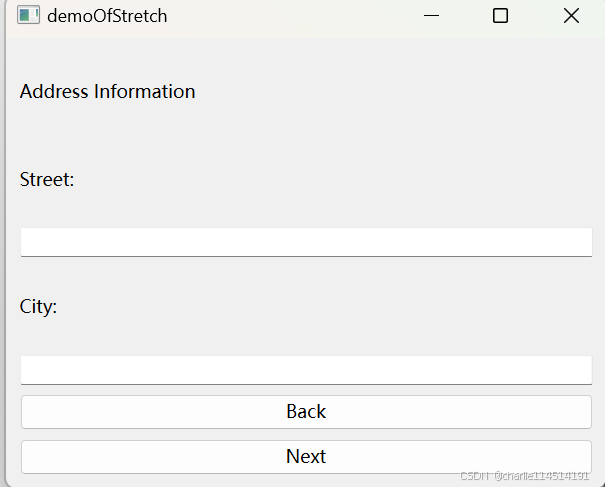
// 创建地址信息页面QWidget *addressInfoPage = new QWidget();QVBoxLayout *addressLayout = new QVBoxLayout(addressInfoPage);addressLayout->addWidget(new QLabel("Address Information"));addressLayout->addWidget(new QLabel("Street:"));QLineEdit *streetEdit = new QLineEdit();addressLayout->addWidget(streetEdit);addressLayout->addWidget(new QLabel("City:"));QLineEdit *cityEdit = new QLineEdit();addressLayout->addWidget(cityEdit);
QPushButton *backToPersonalButton = new QPushButton("Back");QPushButton *nextToConfirmButton = new QPushButton("Next");addressLayout->addWidget(backToPersonalButton);addressLayout->addWidget(nextToConfirmButton);stackedLayout->addWidget(addressInfoPage);
// 创建确认信息页面QWidget *confirmationPage = new QWidget();QVBoxLayout *confirmationLayout = new QVBoxLayout(confirmationPage);confirmationLayout->addWidget(new QLabel("Confirmation Information"));confirmationLayout->addWidget(new QLabel("Please review your information."));
QPushButton *backToAddressButton = new QPushButton("Back");QPushButton *submitButton = new QPushButton("Submit");confirmationLayout->addWidget(backToAddressButton);confirmationLayout->addWidget(submitButton);stackedLayout->addWidget(confirmationPage);
// 设置信号与槽connect(nextToAddressButton, &QPushButton::clicked, [=]() {stackedLayout->setCurrentIndex(1); // 切换到地址信息页面});connect(backToPersonalButton, &QPushButton::clicked, [=]() {stackedLayout->setCurrentIndex(0); // 切换回个人信息页面});connect(nextToConfirmButton, &QPushButton::clicked, [=]() {stackedLayout->setCurrentIndex(2); // 切换到确认信息页面});connect(backToAddressButton, &QPushButton::clicked, [=]() {stackedLayout->setCurrentIndex(1); // 切换回地址信息页面});connect(submitButton, &QPushButton::clicked, this,&Widget::submitForm); // 提交表单,这个API可以自己定义!
setLayout(stackedLayout);resize(400, 300);
}
Widget::~Widget() {delete ui;
}
API
| 方法名称 | 参数 | 描述 |
|---|---|---|
addWidget(QWidget *widget) | 组件指针 | 将一个组件添加到堆叠布局中。 |
insertWidget(int index, QWidget *widget) | 索引,组件指针 | 在指定位置插入一个组件。 |
setCurrentIndex(int index) | 索引 | 设置当前显示的组件索引。 |
setCurrentWidget(QWidget *widget) | 组件指针 | 设置当前显示的组件。 |
currentIndex() | 无 | 返回当前显示组件的索引。 |
currentWidget() | 无 | 返回当前显示的组件。 |
removeWidget(QWidget *widget) | 组件指针 | 从布局中移除指定的组件。 |
count() | 无 | 返回布局中子组件的数量。 |
itemAt(int index) | 索引 | 返回指定索引处的布局项。 |
takeAt(int index) | 索引 | 移除并返回指定索引处的布局项。 |
setContentsMargins(int left, int top, int right, int bottom) | 四个边缘的外边距 | 设置布局的外边距。 |
setSpacing(int spacing) | 间距大小 | 设置组件之间的间距。 |
clear() | 无 | 清空布局,移除所有组件。 |
setEnabled(bool) | 是否启用 | 设置布局的启用状态。 |
widget(int index) | 索引 | 返回指定索引处的组件指针。 |
addLayout(QLayout *layout) | 布局指针 | 添加一个子布局。 |
isEmpty() | 无 | 检查布局是否为空。 |
minimumSize() | 无 | 返回布局的最小大小。 |
maximumSize() | 无 | 返回布局的最大大小。 |
其他
QSplitter
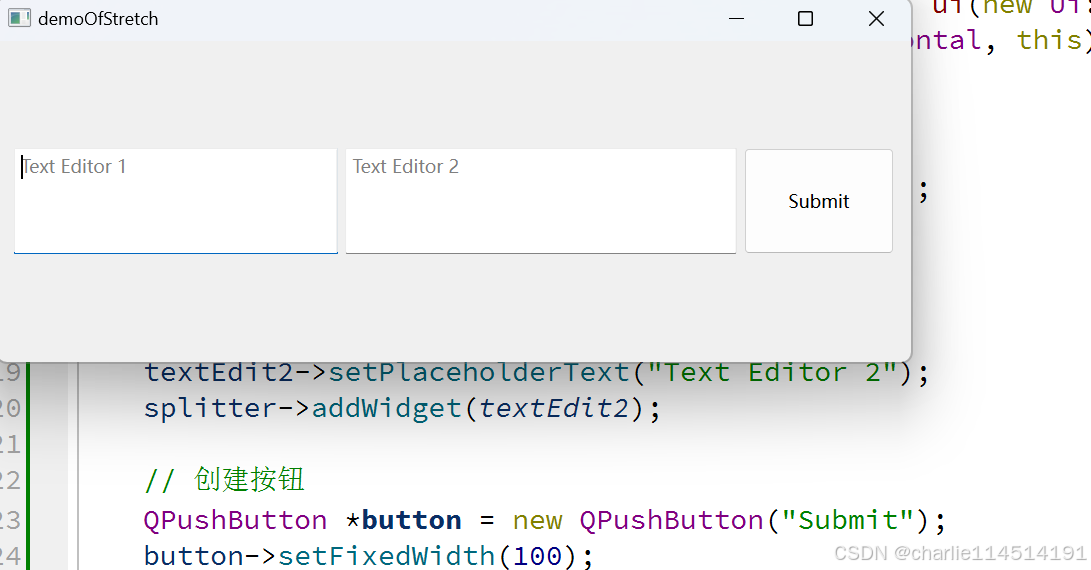
这个很酷:实现的就是用户拖拽一个竖线条实现对各个控件的重新分配。
一些例子
#include "Widget.h"
#include <QFormLayout>
#include <QLabel>
#include <QLineEdit>
#include <QPushButton>
#include <QSplitter>
#include <QTextEdit>
#include "ui_Widget.h"
Widget::Widget(QWidget *parent) : QWidget(parent), ui(new Ui::Widget) {QSplitter *splitter = new QSplitter(Qt::Horizontal, this);
// 创建文本框1QTextEdit *textEdit1 = new QTextEdit();textEdit1->setPlaceholderText("Text Editor 1");splitter->addWidget(textEdit1);
// 创建文本框2QTextEdit *textEdit2 = new QTextEdit();textEdit2->setPlaceholderText("Text Editor 2");splitter->addWidget(textEdit2);
// 创建按钮QPushButton *button = new QPushButton("Submit");button->setFixedWidth(100);splitter->addWidget(button);
// 设置布局QVBoxLayout *layout = new QVBoxLayout(this);layout->addWidget(splitter);setLayout(layout);
}
Widget::~Widget() {delete ui;
}
API
| 方法名称 | 参数 | 描述 |
|---|---|---|
addWidget(QWidget *widget) | 组件指针 | 向分隔器添加一个子组件。 |
insertWidget(int index, QWidget *widget) | 索引,组件指针 | 在指定位置插入一个子组件。 |
setOrientation(Qt::Orientation orientation) | 方向(水平或垂直) | 设置分隔器的方向。 |
setStretchFactor(int index, int stretch) | 索引,拉伸因子 | 设置指定索引的子组件的拉伸因子,用于调整其相对大小。 |
setSizes(const QList<int> &sizes) | 大小列表 | 设置所有子组件的大小。 |
sizes() | 无 | 返回所有子组件的当前大小列表。 |
handle(int index) | 索引 | 返回指定索引的分隔条控件。 |
setCollapsible(int index, bool collapse) | 索引,是否可折叠 | 设置指定索引的子组件是否可折叠。 |
isCollapsible(int index) | 索引 | 检查指定索引的子组件是否可折叠。 |
setOpaqueResize(bool opaque) | 是否透明调整 | 设置在调整大小时是否透明。 |
setChildrenCollapsible(bool collapse) | 是否可折叠 | 设置所有子组件是否可折叠。 |
childrenCollapsible() | 无 | 检查所有子组件是否可折叠。 |
setHandleWidth(int width) | 宽度 | 设置分隔条的宽度。 |
handleWidth() | 无 | 返回分隔条的宽度。 |
setFrameShape(QFrame::Shape shape) | 形状 | 设置分隔器的框架形状。 |
frameShape() | 无 | 返回分隔器的框架形状。 |
附注
附注:一些Layout可以修改伸缩因数来达到调整空间大小比例的特性,下面就是一个例子:
我们的Widget内部使用了QHLayout后,设置伸缩因数依次为0,0,0;0,0,1;1,1,2!他们依次表达为:
全等表达平均分配,伸缩的时候几个按钮会按照均匀分配的方式均匀变化
存在0的:表达该index指示下的控件不会发生伸缩,恒定大小
比例变化:比如说1:1:2表达的是变化是按照1:1:2分配的,其中初始状态的大小也是按照1:1:2分配的。