目录
一、容器存储机制
1、Storage Driver
2、查看Storage Driver
3、Docker 数据管理
4、volume 及 示例
1. 创建一个卷,挂载给一个 httpd 容器
2. 使用 docker volume ls 命令查看卷信息
3. 使用 docker volume inspect 命令查看卷挂载信息
4. 使用 docker inspect 命令查看容器中的 Mounts 信息
5. 查看 volume 中的内容,与容器中的内容一样
6. 在宿主机上更新 volume 内容,发现容器上也同时更新了
7. 销毁容器后,volume 依旧存在,其数据可持久化保存
8. 删除volume
5、bind mount 机制 及 示例
1. bind mount 是将宿主机上已有的目录或文件mount 到容器中
2. 将 /root/htdocs 目录下的 index.html 文件挂载给一个 httpd 容器
3. 分别查看宿主机和容器中的 index.html 文件,发现两者的内容是一样的
4. 销毁容器后
二、数据共享
1、数据共享 — — 主机与容器间
1. 主机与容器数据共享:
2、数据共享 — — 容器与容器间
3、bind mount 实现容器间数据共享
1. 启动两个 httpd 容器,分别命名为 h1 和 h2,并同时挂载 /root/htdocs 目录
2. 查看两个容器的 index.html 内容,是一致的
3. 在宿主机上更新 index.html 内容后,再次查看容器 index.html 文件内容,已同步更新
4、volume container 实现容器间的数据共享
1. 创建一个 volume container
2. 创建两个 httpd 容器,并引用 vc 中的数据
3. 使用 docker inspect 命令查看 vc、h3、h4 容器的挂载信息,三者的卷的挂载是一致的
4. 更新 bind mount 中的数据,并访问 h3 和 h4 验证数据共享
一、容器存储机制
1、Storage Driver
1. Storage driver:管理镜像层和容器层
① Storage driver 处理各镜像层及容器层的处理细节,实现了多层数据的堆叠,为用户 提供了多层数据合并后的统一视图
② 所有 Storage driver 都使用可堆叠图像层和写时复制(CoW)策略
③ docker info 命令可查看当系统上的 storage driver
Storage Driver 类型 功能 overlay2 所有当前 Linux 发行版,都支持的首选存储驱动程序 AUFS 仅在 ubuntu 和 Debian 上支持 Device Mapper CentOS 和 RHEL 的推荐存储驱动程序。但当前版本的 CentOS 和 RHEL 现在都支持overlay2 Btrfs 仅在S LES 上支持 ZFS 仅支持ubuntu 14.04 或更高版本 VFS 主要用于测试目的,不建议用于生成环境
参考资料: Docker storage drivers | Docker Documentation
2、查看Storage Driver
1. 使用 docker info 可查看当前系统使用的 Storage driver
3、Docker 数据管理
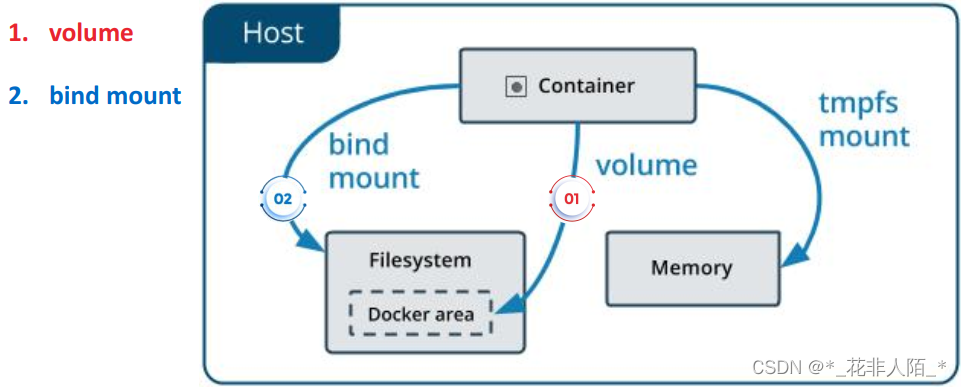
1. Docker 容器中持久化数据一般采用两种存储方式:
参考资料: Use volumes | Docker Documentation
4、volume 及 示例
1. volume 由 Docker 管理,是将特定目录挂载给容器
① docker 会在指定路径下为每个 volume 生成一个目录,作为 mount 源
· 路径: /var/lib/docker/volumes (若路径不存在会自动创建)
② 可通过 -v 将 volume 挂载给一个容器(只要有-v就是持久存储)
· -v格式:<host:path> : <container path> (若路径不存在会自动创建)
注:若不使用-v选项,数据是在内存中,数据不会持久保存
参考资料: Use volumes | Docker Documentation
1. 创建一个卷,挂载给一个 httpd 容器
# docker run -d -p 8080:80 -v /usr/local/apache2/htdocs httpd    #使用容器中的目录作为卷
'容器中的目录 /usr/local/apache2/htdocs 挂载到本地方法1:目录可以通过https://hub.docker.com/  查看对应镜像查看详细信息方法2:可以先运行起来,进入容器通过查看配置文件,过滤^DocumentRoot就是需要的目录'
2. 使用 docker volume ls 命令查看卷信息
# docker volume ls
DRIVER    VOLUME NAME
local     cac2081115360ff43ce5c2c8db0ca1666acb707182dd81d77e0dfd9ffae3b523
3. 使用 docker volume inspect 命令查看卷挂载信息
自动生成了一个带有volume name 的文件夹作为 mount 源
# docker volume ls
DRIVER    VOLUME NAME
local     cac2081115360ff43ce5c2c8db0ca1666acb707182dd81d77e0dfd9ffae3b523
root@k8s-master:~# docker volume inspect cac2081115360ff43ce5c2c8db0ca1666acb707182dd81d77e0dfd9ffae3b523
[{"CreatedAt": "2022-10-27T00:40:34Z","Driver": "local","Labels": null,"Mountpoint": "/var/lib/docker/volumes/cac2081115360ff43ce5c2c8db0ca1666acb707182dd81d77e0dfd9ffae3b523/_data", #此目录为宿主机实际目录"Name": "cac2081115360ff43ce5c2c8db0ca1666acb707182dd81d77e0dfd9ffae3b523","Options": null,"Scope": "local"}
]
4. 使用 docker inspect 命令查看容器中的 Mounts 信息
注意 Type 字段的值是 volume
# docker inspect 11603a249d4a| grep -wA 11 "Mounts""Mounts": [{"Type": "volume","Name": "cac2081115360ff43ce5c2c8db0ca1666acb707182dd81d77e0dfd9ffae3b523","Source": "/var/lib/docker/volumes/cac2081115360ff43ce5c2c8db0ca1666acb707182dd81d77e0dfd9ffae3b523/_data","Destination": "/usr/local/apache2/htdocs","Driver": "local","Mode": "","RW": true,"Propagation": ""}],
5. 查看 volume 中的内容,与容器中的内容一样
容器中的数据被 copy 到了 volume 中
'查看容器中的内容'
# docker exec -it 11603a249d4a cat /usr/local/apache2/htdocs/index.html
<html><body><h1>It works!</h1></body></html>'查看volume中的内容'
# cat /var/lib/docker/volumes/cac2081115360ff43ce5c2c8db0ca1666acb707182dd81d77e0dfd9ffae3b523/_data/index.html
<html><body><h1>It works!</h1></body></html>
6. 在宿主机上更新 volume 内容,发现容器上也同时更新了
# echo hello-world > /var/lib/docker/volumes/cac2081115360ff43ce5c2c8db0ca1666acb707182dd81d77e0dfd9ffae3b523/_data/index.html# docker exec -it 11603a249d4a cat /usr/local/apache2/htdocs/index.html
hello-world
7. 销毁容器后,volume 依旧存在,其数据可持久化保存
~# docker stop 11603a249d4a    #停止容器
11603a249d4a
root@k8s-master:~# docker rm 11603a249d4a    #删除容器
11603a249d4a# docker volume ls        #volume依然存在
DRIVER    VOLUME NAME
local     cac2081115360ff43ce5c2c8db0ca1666acb707182dd81d77e0dfd9ffae3b523# cat /var/lib/docker/volumes/cac2081115360ff43ce5c2c8db0ca1666acb707182dd81d77e0dfd9ffae3b523/_data/index.html
hello-world
8. 删除volume
# docker volume rm 卷名 #若确定volume不在需要,可以手动删除5、bind mount 机制 及 示例
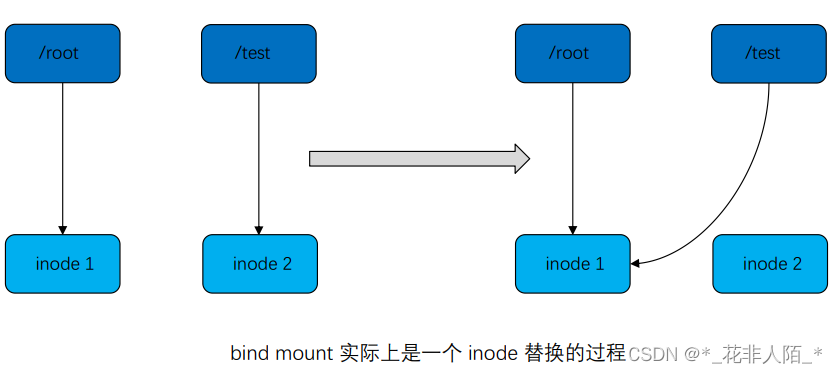
1. bind mount 是将宿主机上已有的目录或文件mount 到容器中
区别:bind mount: 是在自定义目录挂载
volume: 是在指定路径挂载
参考资料: Use bind mounts | Docker Documentation
2. 将 /root/htdocs 目录下的 index.html 文件挂载给一个 httpd 容器
# docker run -d -p 8081:80 -v /root/htdocs:/usr/local/apache2/htdocs/ httpd
f789db02964cdbbb8848ee7473b5c56e117d5f778fece0d4e5aca242c5a7f2ef'发现是空的,因为原本没有这个目录,是创建容器时创建出来的'
# ls /root/htdocs/
# curl localhost:8081
<!DOCTYPE HTML PUBLIC "-//W3C//DTD HTML 3.2 Final//EN">
<html><head><title>Index of /</title></head><body>
<h1>Index of /</h1>
<ul></ul>
</body></html>
3. 分别查看宿主机和容器中的 index.html 文件,发现两者的内容是一样的
'写入index文件到挂载路径,发现已同步到容器内'
# echo haha > /root/htdocs/index.html
# curl localhost:8081
haha
4. 销毁容器后
再次查看 /root/htdocs/index.html 文件内容,数据依旧存在,可持久化保存
# docker stop f789db02964c
f789db02964c
# docker rm f789db02964c
f789db02964c
# cat /root/htdocs/index.html
haha
二、数据共享
1、数据共享 — — 主机与容器间
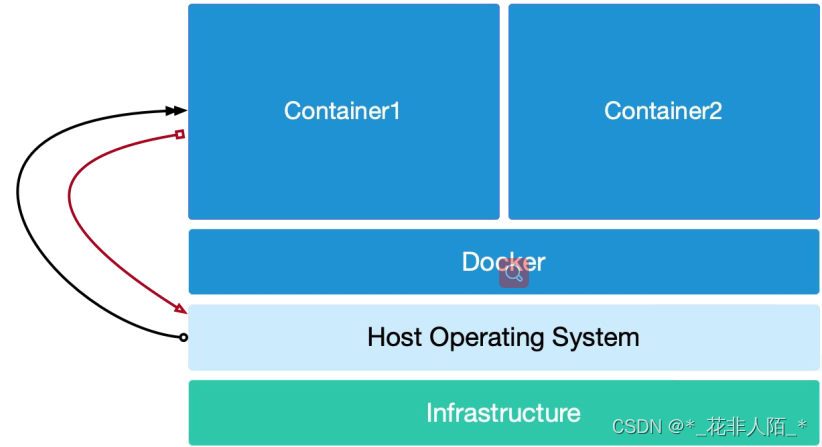
1. 主机与容器数据共享:
① volume:将Host 上的数据 copy 到容器的 volume 中
· 使用 docker cp 命令在容器与 Host 之间复制数据
② bind mount:将Host 上的目录或文件 mount 到容器中
第一次是容器到主机,再之后都是主机到容器;即数据的持久保存
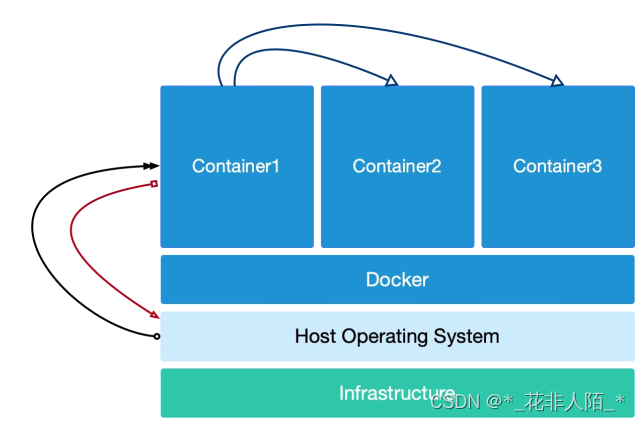
2、数据共享 — — 容器与容器间
3、bind mount 实现容器间数据共享
1. 启动两个 httpd 容器,分别命名为 h1 和 h2,并同时挂载 /root/htdocs 目录
'注意宿主机端口不要和已有端口冲突'
# docker run --name h1 -d -p 8080:80 -v /root/htdocs:/usr/local/apache2/htdocs httpd
3c4c6cfc05a6b0a61003171c30657841b426e03c489a66c1c21ba72bfe6c7284# docker run --name h2 -d -p 8082:80 -v /root/htdocs:/usr/local/apache2/htdocs httpd
95dfdd74321788ad8b682ac8219070beacb715f48bb89cd7485e3d2fe5527234
2. 查看两个容器的 index.html 内容,是一致的
# curl localhost:8080
haha
# curl localhost:8082
haha
3. 在宿主机上更新 index.html 内容后,再次查看容器 index.html 文件内容,已同步更新
# echo heihei > /root/htdocs/index.html
# curl localhost:8080
heihei
# curl localhost:8082
heihei
4、volume container 实现容器间的数据共享
1. 创建一个 volume container
# docker run -d --name vc -v /root/htdocs/:/usr/local/apache2/htdocs httpd
aad6773c0caa9a543b6b078fbd6d0687648dc48f3e0cfb87ed2eaeed45a222b8
2. 创建两个 httpd 容器,并引用 vc 中的数据
# docker run -d --name h3 -p 1001:80 --volumes-from vc httpd
084bac317323b0d95c5756734f7a36c9cdeee59bb2de1159df8848b7fdd08863# docker run -d --name h4 -p 1002:80 --volumes-from vc httpd
bef30117924211df865dc8d01109278839ff3c282c8cde62b0466c1637654aa9
3. 使用 docker inspect 命令查看 vc、h3、h4 容器的挂载信息,三者的卷的挂载是一致的
# docker inspect vc | grep -A 8 "Mounts""Mounts": [{"Type": "bind","Source": "/root/htdocs","Destination": "/usr/local/apache2/htdocs","Mode": "","RW": true,"Propagation": "rprivate"}
# docker inspect h3 | grep -A 8 "Mounts""Mounts": [{"Type": "bind","Source": "/root/htdocs","Destination": "/usr/local/apache2/htdocs","Mode": "","RW": true,"Propagation": "rprivate"}
# docker inspect h4 | grep -A 8 "Mounts""Mounts": [{"Type": "bind","Source": "/root/htdocs","Destination": "/usr/local/apache2/htdocs","Mode": "","RW": true,"Propagation": "rprivate"}
4. 更新 bind mount 中的数据,并访问 h3 和 h4 验证数据共享
# echo new-data > /root/htdocs/index.html
# curl localhost:1001
new-data
# curl localhost:1002
new-data
