Ref: 《Linux设备驱动开发详解:基于最新的Linux4.0内核》中的第5章《Linux 文件系统与设备文件》
基于Linux 5.10
本文结合源码和实例分析了Linux 文件系统与设备文件,主要介绍文件系统的构成和发展,以及三种虚拟文件系统debugfs procfs sysfs的使用
1 在《Linux文件系统目录结构》就Linux目前的文件目录结构介绍每个目录的大致作用
2 在《Linux 文件系统与设备驱动》结合文件系统中两个重要的结构体file和inode介绍了文件系统和设备驱动之间的关系,介绍设备驱动是如何利用文件系统实现分类管理,介绍文件系统如何搭建用户空间和设备驱动桥梁
3 在《devfs》介绍了《devfs》的历史起源为后面的udev引入做铺垫
4 在《udev用户空间设备管理》介绍udev如何取代devfs,介绍udev的基本使用方法,并且介绍了sysfs文件系统和Linux设备模型关系引入kobj和attribute概念
5 在《procfs sysfs debugfs的使用》介绍了三者区别和联系及使用方法
文章目录
- 1. Linux文件系统目录结构
- 2. Linux 文件系统与设备驱动
- 2.1 file结构体
- 2.2 inode结构体
- 3. devfs
- 3.1 devfs的引入
- 3.2 API和实例
- 4. udev用户空间设备管理
- 4.1 udev与devfs的区别
- 4.2 sysfs文件系统与Linux设备模型
- 4.3 udev的组成
- 4.4 udev规则文件
- 5. procfs sysfs debugfs的使用
- 5.1 seq_operations
- 5.2 debugfs
- 5.2.1 API list
- 5.2.2 实例
- 5.3 procfs
- 5.3.1 API list
- 5.3.2 实例
- 5.4 sysfs
- 5.4.1 直接创建kobj方法
- 5.4.1.1 API list
- 5.4.1.2 实例
- 5.4.5 通过创建device间接创建kobj方法
- 5.4.5.1 API list
- 5.4.5.2 实例
写在前面
文件系统可分为虚拟文件系统和真实文件系统,下面是它们之间的区别:
虚拟文件系统(Virtual File System,VFS)和真实文件系统(Real File System)在Linux中都扮演着重要的角色,但它们之间存在一些关键区别:
- 抽象层次:虚拟文件系统是一个抽象层,它为用户和应用程序提供了一个统一的接口,用于访问各种不同类型的文件系统。而真实文件系统是具体实现文件存储和管理的底层系统,例如ext4、XFS、Btrfs等。
- 文件系统类型:虚拟文件系统不依赖于特定的文件系统类型,它可以处理多种不同类型的文件系统。而真实文件系统是特定类型的文件系统,例如FAT32、NTFS、HFS+等。
- 兼容性:虚拟文件系统提供了一种兼容性机制,使得Linux可以同时处理多种不同类型的文件系统,而无需为每种文件系统编写特定的驱动程序。而真实文件系统通常需要特定的驱动程序来支持。
- 功能:虚拟文件系统主要负责处理文件系统的通用操作,例如打开、关闭、读取、写入等。而真实文件系统则负责实现这些操作的具体细节,例如如何在磁盘上存储文件、如何管理文件的元数据等。
- 数据结构:虚拟文件系统使用一些通用的数据结构来表示文件和目录,例如inode、dentry等。而真实文件系统则使用特定于文件系统类型的数据结构来存储文件和目录的信息。
总之,虚拟文件系统是一个抽象层,它为用户和应用程序提供了一个统一的接口来访问不同类型的文件系统,而真实文件系统则是具体实现文件存储和管理的底层系统。虚拟文件系统使得Linux可以轻松地处理多种不同类型的文件系统,提高了系统的兼容性和可扩展性。
此处介绍的文件系统都指虚拟文件。
1. Linux文件系统目录结构
1./bin
包含基本命令,如ls、cp、mkdir等,这个目录中的文件都是可执行的。
2./sbin
包含系统命令,如modprobe、hwclock、ifconfig等,大多是涉及系统管理的命令,这个目录中的文件
都是可执行的。
3./dev
设备文件存储目录,应用程序通过对这些文件的读写和控制以访问实际的设备。
4./etc
系统配置文件的所在地,一些服务器的配置文件也在这里,如用户账号及密码配置文件。busybox的
启动脚本也存放在该目录。
5./lib
系统库文件存放目录等。
6./mnt
/mnt这个目录一般是用于存放挂载储存设备的挂载目录,比如含有cdrom等目录。可以参看/etc/fstab的
定义。有时我们可以让系统开机自动挂载文件系统,并把挂载点放在这里。
7./opt
opt是“可选”的意思,有些软件包会被安装在这里。
8./proc
操作系统运行时,进程及内核信息(比如CPU、硬盘分区、内存信息等)存放在这里。/proc目录为伪文件系统proc的挂载目录,proc并不是真正的文件系统,它存在于内存之中。
9./tmp
用户运行程序的时候,有时会产生临时文件,/tmp用来存放临时文件。
10./usr
这个是系统存放程序的目录,比如用户命令、用户库等。
11./var
var表示的是变化的意思,这个目录的内容经常变动,如/var的/var/log目录被用来存放系统日志。
12./sys
Linux 2.6以后的内核所支持的sysfs文件系统被映射在此目录上。Linux设备驱动模型中的总线、驱动
和设备都可以在sysfs文件系统中找到对应的节点。当内核检测到在系统中出现了新设备后,内核会在sysfs
文件系统中为该新设备生成一项新的记录。
2. Linux 文件系统与设备驱动
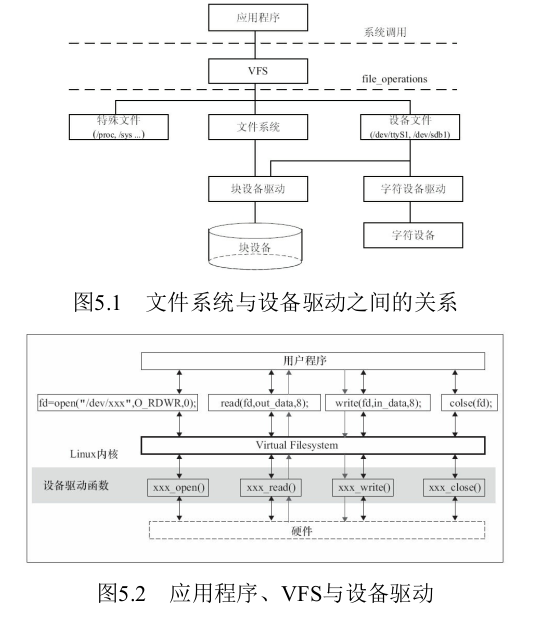
图5.1所示为Linux中虚拟文件系统、磁盘/Flash文件系统及一般的设备文件与设备驱动程序之间的关系。
应用程序和VFS之间的接口是系统调用,而VFS与文件系统以及设备文件之间的接口是file_operations结构体成员函数,这个结构体包含对文件进行打开、关闭、读写、控制的一系列成员函数,关系如图5.2所示。
由于字符设备的上层没有类似于磁盘的ext2等文件系统,所以字符设备的file_operations成员函数就直接由设备驱动提供了,在稍后的第6章,将会看到file_operations正是字符设备驱动的核心。块设备有两种访问方法,一种方法是不通过文件系统直接访问裸设备,在Linux内核实现了统一的def_blk_fops这一file_operations,它的源代码位于fs/block_dev.c,所以当我们运行类似于“dd if=/dev/sdb1of=sdb1.img”的命令把整个/dev/sdb1裸分区复制到sdb1.img的时候,内核走的是def_blk_fops这个file_operations;另外一种方法是通过文件系统来访问块设备,file_operations的实现则位于文件系统内,文件系统会把针对文件的读写转换为针对块设备原始扇区的读写。ext2、fat、Btrfs等文件系统中会实现针对VFS的file_operations成员函数,设备驱动层将看不到file_operations的存在。
 在设备驱动程序的设计中,一般而言,会关心file和inode这两个结构体。
2.1 file结构体
file结构体主要用于表示一个已打开的文件。当一个进程打开一个文件时,内核会创建一个file结构体来表示这个打开的文件。file结构体包含了一些与进程相关的信息,如文件描述符、文件的读写位置(文件指针)、文件的打开模式(只读、只写、读写等)以及指向对应inode结构体的指针。
file结构体主要用于管理进程对文件的访问,它使得多个进程可以同时访问同一个文件,并且每个进程都有自己的文件指针和访问模式。当进程对文件进行读写操作时,内核会根据file结构体中的信息更新文件指针的位置,并通过指向的inode结构体找到文件的实际内容。
总之,file结构体主要用于表示已打开的文件,它包含了与进程相关的文件访问信息,并通过指向inode结构体来访问文件的实际内容。
file结构体代表一个打开的文件,系统中每个打开的文件在内核空间都有一个关联的struct file。它由内核在打开文件时创建,并传递给在文件上进行操作的任何函数。在文件的所有实例都关闭后,内核释放这个数据结构。在内核和驱动源代码中,struct file的指针通常被命名为file或filp(即file pointer)。
struct file {union {struct llist_node       fu_llist;struct rcu_head         fu_rcuhead;} f_u;struct path             f_path;struct inode            *f_inode;       /* cached value */const struct file_operations    *f_op;  /* 和文件关联的操作 *//** Protects f_ep_links, f_flags.* Must not be taken from IRQ context.*/spinlock_t              f_lock;enum rw_hint            f_write_hint;atomic_long_t           f_count;unsigned int            f_flags;        /* 文件标志,如 O_RDONLY 、 O_NONBLOCK 、 O_SYNC*/fmode_t                 f_mode;         /* 文件读 / 写模式, FMODE_READ 和 FMODE_WRITE*/struct mutex            f_pos_lock;loff_t                  f_pos;          /* 当前读写位置 */struct fown_struct      f_owner;const struct cred       *f_cred;struct file_ra_state    f_ra;u64                     f_version;
#ifdef CONFIG_SECURITYvoid                    *f_security;
#endif/* needed for tty driver, and maybe others */void                    *private_data;   /* 文件私有数据 */#ifdef CONFIG_EPOLL/* Used by fs/eventpoll.c to link all the hooks to this file */struct list_head        f_ep_links;struct list_head        f_tfile_llink;
#endif /* #ifdef CONFIG_EPOLL */struct address_space    *f_mapping;errseq_t                f_wb_err;errseq_t                f_sb_err; /* for syncfs */
} __randomize_layout__attribute__((aligned(4)));  /* lest something weird decides that 2 is OK */文件读/写模式mode、标志f_flags都是设备驱动关心的内容,而私有数据指针private_data在设备驱动
中被广泛应用,大多被指向设备驱动自定义以用于描述设备的结构体下面的代码可用于判断以阻塞还是非阻塞方式打开设备文件:
if (file->f_flags & O_NONBLOCK)         /* 非阻塞 */pr_debug("open: non-blocking\n");
else                                    /* 阻塞 */pr_debug("open: blocking\n");
2.2 inode结构体
inode(index node)结构体是文件系统中的一个关键概念,它包含了文件的元数据(metadata),如文件类型(普通文件、目录、符号链接等)、文件大小、文件的创建、修改和访问时间、文件的权限和所有者等信息。此外,inode还包含了指向文件数据块的指针,这些指针用于定位文件的实际内容。
每个文件在文件系统中都有一个唯一的inode号,这个号码用于在文件系统中查找和定位文件。当我们创建一个新文件时,文件系统会分配一个新的inode,并将文件的元数据存储在这个inode中。当我们访问或操作文件时,文件系统会根据文件的inode号找到对应的inode结构体,然后根据其中的信息执行相应的操作。
总之,inode结构体主要用于表示文件的元数据和数据块指针,它是文件系统中定位和管理文件的关键数据结构
VFS inode包含文件访问权限、属主、组、大小、生成时间、访问时间、最后修改时间等信息。它是Linux管理文件系统的最基本单位,也是文件系统连接任何子目录、文件的桥梁
/** Keep mostly read-only and often accessed (especially for* the RCU path lookup and 'stat' data) fields at the beginning* of the 'struct inode'*/
struct inode {umode_t                 i_mode;                           /* inode 的权限 */unsigned short          i_opflags;kuid_t                  i_uid;                            /* inode 拥有者的 id */kgid_t                  i_gid;                            /* inode 所属的群组 id */unsigned int            i_flags;#ifdef CONFIG_FS_POSIX_ACLstruct posix_acl        *i_acl;struct posix_acl        *i_default_acl;
#endifconst struct inode_operations   *i_op;struct super_block      *i_sb;struct address_space    *i_mapping;#ifdef CONFIG_SECURITYvoid                    *i_security;
#endif/* Stat data, not accessed from path walking */unsigned long           i_ino;/** Filesystems may only read i_nlink directly.  They shall use the* following functions for modification:**    (set|clear|inc|drop)_nlink*    inode_(inc|dec)_link_count*/union {const unsigned int i_nlink;unsigned int __i_nlink;};dev_t                   i_rdev;                          /* 若是设备文件,此字段将记录设备的设备号 */loff_t                  i_size;                          /* inode 所代表的文件大小 */struct timespec64       i_atime;struct timespec64       i_mtime;struct timespec64       i_ctime;spinlock_t              i_lock; /* i_blocks, i_bytes, maybe i_size */unsigned short          i_bytes;u8                      i_blkbits;u8                      i_write_hint;blkcnt_t                i_blocks;                        /* inode 所使用的 block 数,一个 block 为 512 字节 */#ifdef __NEED_I_SIZE_ORDEREDseqcount_t              i_size_seqcount;
#endif/* Misc */unsigned long           i_state;struct rw_semaphore     i_rwsem;unsigned long           dirtied_when;   /* jiffies of first dirtying */unsigned long           dirtied_time_when;struct hlist_node       i_hash;struct list_head        i_io_list;      /* backing dev IO list */
#ifdef CONFIG_CGROUP_WRITEBACKstruct bdi_writeback    *i_wb;          /* the associated cgroup wb *//* foreign inode detection, see wbc_detach_inode() */int                     i_wb_frn_winner;u16                     i_wb_frn_avg_time;u16                     i_wb_frn_history;
#endifstruct list_head        i_lru;          /* inode LRU list */struct list_head        i_sb_list;struct list_head        i_wb_list;      /* backing dev writeback list */union {struct hlist_head       i_dentry;struct rcu_head         i_rcu;};atomic64_t              i_version;atomic64_t              i_sequence; /* see futex */atomic_t                i_count;atomic_t                i_dio_count;atomic_t                i_writecount;
#if defined(CONFIG_IMA) || defined(CONFIG_FILE_LOCKING)atomic_t                i_readcount; /* struct files open RO */
#endifunion {const struct file_operations    *i_fop; /* former ->i_op->default_file_ops */void (*free_inode)(struct inode *);};struct file_lock_context        *i_flctx;struct address_space    i_data;struct list_head        i_devices;union {struct pipe_inode_info  *i_pipe;struct block_device     *i_bdev;                        /* 若是块设备,为其对应的 block_device 结构体指针 */struct cdev             *i_cdev;                        /* 若是字符设备,为其对应的 cdev 结构体指针 */char                    *i_link;unsigned                i_dir_seq;};__u32                   i_generation;#ifdef CONFIG_FSNOTIFY__u32                   i_fsnotify_mask; /* all events this inode cares about */struct fsnotify_mark_connector __rcu    *i_fsnotify_marks;
#endif#ifdef CONFIG_FS_ENCRYPTIONstruct fscrypt_info     *i_crypt_info;
#endif#ifdef CONFIG_FS_VERITYstruct fsverity_info    *i_verity_info;
#endifvoid                    *i_private; /* fs or device private pointer */
} __randomize_layout;
对于表示设备文件的inode结构,i_rdev字段包含设备编号。Linux内核设备编号分为主设备编号和次设备编号,前者为dev_t的高12位,后者为dev_t的低20位。下列操作用于从一个inode中获得主设备号和次设备号:
unsigned int iminor(struct inode *inode);
unsigned int imajor(struct inode *inode);
查看主设备号和主设备名称
mi@mi-ThinkStation-K:~$ cat /proc/devices
Character devices:1 mem4 /dev/vc/04 tty4 ttyS5 /dev/tty5 /dev/console5 /dev/ptmx5 ttyprintk6 lp7 vcs10 misc13 input21 sg29 fb89 i2c99 ppdev
108 ppp
...
以input设备为例查看次设备号,input设备的主设备号是13
mi@mi-ThinkStation-K:~$ ll /dev/input/
总用量 0
drwxr-xr-x  4 root root     660 5月  19 13:42 ./
drwxr-xr-x 21 root root    4980 5月  19 13:42 ../
drwxr-xr-x  2 root root     100 5月  17 13:59 by-id/
drwxr-xr-x  2 root root     100 5月  17 13:59 by-path/
crw-rw----  1 root input 13, 64 5月  17 13:59 event0
crw-rw----  1 root input 13, 65 5月  17 13:59 event1
crw-rw----  1 root input 13, 74 5月  17 13:59 event10
crw-rw----  1 root input 13, 75 5月  17 13:59 event11
crw-rw----  1 root input 13, 76 5月  17 13:59 event12
crw-rw----  1 root input 13, 77 5月  17 13:59 event13
crw-rw----  1 root input 13, 78 5月  17 13:59 event14
crw-rw----  1 root input 13, 79 5月  17 13:59 event15
crw-rw----  1 root input 13, 80 5月  17 13:59 event16
crw-rw----  1 root input 13, 81 5月  17 13:59 event17
crw-rw----  1 root input 13, 82 5月  17 13:59 event18
crw-rw----  1 root input 13, 83 5月  17 13:59 event19
crw-rw----  1 root input 13, 66 5月  17 13:59 event2
crw-rw----  1 root input 13, 84 5月  17 13:59 event20
crw-rw----  1 root input 13, 85 5月  17 13:59 event21
crw-rw----  1 root input 13, 86 5月  17 13:59 event22
crw-rw----  1 root input 13, 87 5月  17 13:59 event23
crw-rw----  1 root input 13, 88 5月  17 13:59 event24
crw-rw----  1 root input 13, 89 5月  17 13:59 event25
crw-rw----  1 root input 13, 90 5月  19 13:42 event26
crw-rw----  1 root input 13, 67 5月  17 13:59 event3
crw-rw----  1 root input 13, 68 5月  17 13:59 event4
crw-rw----  1 root input 13, 69 5月  17 13:59 event5
crw-rw----  1 root input 13, 70 5月  17 13:59 event6
crw-rw----  1 root input 13, 71 5月  17 13:59 event7
crw-rw----  1 root input 13, 72 5月  17 13:59 event8
crw-rw----  1 root input 13, 73 5月  17 13:59 event9
crw-rw----  1 root input 13, 63 5月  17 13:59 mice
crw-rw----  1 root input 13, 32 5月  17 13:59 mouse0
主设备号是与驱动对应的概念,同一类设备一般使用相同的主设备号,不同类的设备一般使用不同的主设备号(但是也不排除在同一主设备号下包含有一定差异的设备)。因为同一驱动可支持多个同类设备,因此用次设备号来描述使用该驱动的设备的序号,序号一般从0开始。
在这里,主设备号为13的input设备的驱动可以理解为内核中的input子系统所对应程序
内核Documents目录下的devices.txt文件描述了Linux设备号的分配情况,它由LANANA(the Linux Assigned Names and Numbers authority,网址为http://www.lanana.org/)组织维护,Torben Mathiasen(device@lanana.org)是其中的主要维护者。
3. devfs
3.1 devfs的引入
devfs(设备文件系统)是由Linux 2.4内核引入的,引入时被许多工程师给予了高度评价,它的出现使得设备驱动程序能自主地管理自己的设备文件。具体来说,devfs具有如下优点。
1)可以通过程序在设备初始化时在/dev目录下创建设备文件,卸载设备时将它删除。
2)设备驱动程序可以指定设备名、所有者和权限位,用户空间程序仍可以修改所有者和权限位。
3)不再需要为设备驱动程序分配主设备号以及处理次设备号,在程序中可以直接给
register_chrdev()传递0主设备号以获得可用的主设备号,并在devfs_register()中指定次设备号。
3.2 API和实例
驱动程序应调用下面这些函数来进行设备文件的创建和撤销工作。
/* 创建设备目录 */
devfs_handle_t devfs_mk_dir(devfs_handle_t dir, const char *name, void *info);
/* 创建设备文件 */
devfs_handle_t devfs_register(devfs_handle_t dir, const char *name, unsigned
int flags, unsigned int major, unsigned int minor, umode_t mode, void *ops,
void *info);
/* 撤销设备文件 */
void devfs_unregister(devfs_handle_t de);
使用实例

代码中第7行和第23行分别用于注册和注销字符设备,使用的register_chrdev()和unregister_chrdev()在Linux 2.6以后的内核中仍被采用。第13和22行分别用于创建和删除devfs文件节点,这些API已经被删除了。
虽然devfs的创建和删除的API已经被删除了,但是这会引导出后面介绍的udev
4. udev用户空间设备管理
4.1 udev与devfs的区别
尽管devfs有这样和那样的优点,但是,在Linux 2.6内核中,devfs被认为是过时的方法,并最终被抛弃了,udev取代了它。Linux VFS内核维护者Al Viro指出了几点udev取代devfs的原因:
1)devfs所做的工作被确信可以在用户态来完成。
2)devfs被加入内核之时,大家期望它的质量可以迎头赶上。
3)发现devfs有一些可修复和无法修复的bug。
4)对于可修复的bug,几个月前就已经被修复了,其维护者认为一切良好。
5)对于后者,在相当长的一段时间内没有改观。
6)devfs的维护者和作者对它感到失望并且已经停止了对代码的维护工作。
udev完全在用户态工作,利用设备加入或移除时内核所发送的热插拔事件(Hotplug Event)来工作。在热插拔时,设备的详细信息会由内核通过netlink套接字发送出来,发出的事情叫uevent。udev的设备命名策略、权限控制和事件处理都是在用户态下完成的,它利用从内核收到的信息来进行创建设备文件节点等工作。代码清单5.6给出了从内核通过netlink接收热插拔事件并冲刷掉的范例,udev采用了类似的做法。
#include <linux/netlink.h>
#include <unistd.h>
#include <string.h>
#include <stdlib.h>
#include <stdio.h>
#include <poll.h>
#include <sys/types.h>
#include <sys/socket.h>static void die(char *s)
{/* write s to stderr */write(2, s, strlen(s));/* err exit */exit(1);
}int main(int argc, char *argv[])
{struct sockaddr_nl nls;struct pollfd pfd;char buf[512];// Open hotplug event netlink socketmemset(&nls, 0, sizeof(struct sockaddr_nl));nls.nl_family = AF_NETLINK;nls.nl_pid = getpid();nls.nl_groups = -1; // listen every grouppfd.events = POLLIN;pfd.fd = socket(PF_NETLINK, SOCK_DGRAM, NETLINK_KOBJECT_UEVENT); // recv hotplug event in kernelif (pfd.fd == -1)die("Not root\n");// Listen to netlink socketif (bind(pfd.fd, (void *)&nls, sizeof(struct sockaddr_nl)))die("Bind failed\n");while (-1 != poll(&pfd, 1, -1)){int i, len = recv(pfd.fd, buf, sizeof(buf), MSG_DONTWAIT);if (len == -1)die("recv\n");// Print the data to stdout.i = 0;while (i < len){printf("%s\n", buf + i);i += strlen(buf + i) + 1;}}die("poll\n");// Dear gcc: shut up.return 0;
}
运行上面的app,插入鼠标USB无线接收器,打印的部分数据
add@/devices/pci0000:00/0000:00:14.0/usb1/1-9/1-9.1/1-9.1:1.0/0003:2717:5013.0010
ACTION=add
DEVPATH=/devices/pci0000:00/0000:00:14.0/usb1/1-9/1-9.1/1-9.1:1.0/0003:2717:5013.0010
SUBSYSTEM=hid
HID_ID=0003:00002717:00005013
HID_NAME=MI Mi Wireless Mouse
HID_PHYS=usb-0000:00:14.0-9.1/input0
HID_UNIQ=
MODALIAS=hid:b0003g0001v00002717p00005013
SEQNUM=7468
add@/devices/pci0000:00/0000:00:14.0/usb1/1-9/1-9.1/1-9.1:1.0/0003:2717:5013.0010/input/input59
ACTION=add
DEVPATH=/devices/pci0000:00/0000:00:14.0/usb1/1-9/1-9.1/1-9.1:1.0/0003:2717:5013.0010/input/input59
SUBSYSTEM=input
PRODUCT=3/2717/5013/110
NAME="MI Mi Wireless Mouse"
PHYS="usb-0000:00:14.0-9.1/input0"
UNIQ=""
PROP=0
EV=17
KEY=1f0000 0 0 0 0
REL=1943
MSC=10
MODALIAS=input:b0003v2717p5013e0110-e0,1,2,4,k110,111,112,113,114,r0,1,6,8,B,C,am4,lsfw
SEQNUM=7469
add@/devices/pci0000:00/0000:00:14.0/usb1/1-9/1-9.1/1-9.1:1.0/0003:2717:5013.0010/input/input59/mouse0
ACTION=add
DEVPATH=/devices/pci0000:00/0000:00:14.0/usb1/1-9/1-9.1/1-9.1:1.0/0003:2717:5013.0010/input/input59/mouse0
SUBSYSTEM=input
MAJOR=13
MINOR=32
DEVNAME=input/mouse0
SEQNUM=7470
udev就是采用这种方式接收netlink消息,并根据它的内容和用户设置给udev的规则做匹配来进行工作的。这里有一个问题,就是冷插拔的设备怎么办?冷插拔的设备在开机时就存在,在udev启动前已经被插入了。对于冷插拔的设备,Linux内核提供了sysfs下面一个uevent节点,可以往该节点写一个“add”,导致内核重新发送netlink,之后udev就可以收到冷插拔的netlink消息了。我们还是运行代码清单5.6的程序,并手动往/sys/module/psmouse/uevent写一个“add”,上述程序会dump出来这样的信息:
ACTION=add
DEVPATH=/module/psmouse
SEQNUM=1682
SUBSYSTEM=module
UDEV_LOG=3
USEC_INITIALIZED=220903546792
devfs与udev的另一个显著区别在于:采用devfs,当一个并不存在的/dev节点被打开的时候,devfs能自动加载对应的驱动,而udev则不这么做。这是因为udev的设计者认为Linux应该在设备被发现的时候加载驱动模块,而不是当它被访问的时候。udev的设计者认为devfs所提供的打开/dev节点时自动加载驱动的功能对一个配置正确的计算机来说是多余的。系统中所有的设备都应该产生热插拔事件并加载恰当的驱动,而udev能注意到这点并且为它创建对应的设备节点。
udev和devfs都是Linux系统中用于管理设备文件的子系统,但它们之间存在一些关键区别:
- 时间线:devfs是较早的设备文件管理系统,引入于Linux 2.3.x内核,但在2.6.x内核中被弃用。udev是较新的设备管理系统,引入于Linux 2.6.x内核,现在是主流的设备管理系统。
- 设备文件创建:devfs在内核空间中创建和管理设备文件,而udev在用户空间中创建和管理设备文件。这使得udev更加灵活,易于维护和扩展。
- 配置和定制:udev允许更多的配置和定制选项,如通过udev规则文件自定义设备文件名、权限等。而devfs的配置选项相对较少。
- 系统资源占用:由于devfs在内核空间中运行,它可能会占用更多的系统资源。而udev在用户空间中运行,对系统资源的占用较小。
- 设备文件持久性:udev支持持久设备命名,即使在设备重新连接或系统重启后,设备文件名仍保持不变。而devfs不支持持久设备命名,设备文件名可能会随设备的移除和插入而改变。
总之,udev是一个更现代、更灵活、更易于维护的设备管理系统,已经取代了devfs成为Linux系统中的主流设备管理子系统。
4.2 sysfs文件系统与Linux设备模型
Linux 2.6以后的内核引入了sysfs文件系统,sysfs被看成是与proc、devfs和devpty同类别的文件系统,该文件系统是一个虚拟的文件系统,它可以产生一个包括所有系统硬件的层级视图,与提供进程和状态信息的proc文件系统十分类似。
sysfs把连接在系统上的设备和总线组织成为一个分级的文件,它们可以由用户空间存取,向用户空间导出内核数据结构以及它们的属性。sysfs的一个目的就是展示设备驱动模型中各组件的层次关系,其顶级目录包括block、bus、dev、devices、class、fs、kernel、power和firmware等。
/sys/ 目录是sysfs文件系统的挂载点,它是一个伪文件系统,用于内核与用户空间之间的通信。下面是各个子目录的作用:
- /sys/block/:包含系统中所有块设备的信息,如硬盘、分区等。
- /sys/bus/:包含系统中所有总线的信息,如PCI、USB等。
- /sys/class/:包含系统中各种设备类型的信息,如网络设备、声卡等。
- /sys/dev/:包含设备的字符设备和块设备的映射信息。
- /sys/devices/:包含系统中所有设备的信息,按照设备在总线上的层次结构组织。
- /sys/firmware/:包含系统中固件的信息,如ACPI、EFI等。
- /sys/fs/:包含文件系统相关的信息,如cgroup、fuse等。
- /sys/hypervisor/:包含虚拟化相关的信息,如KVM、Xen等。
- /sys/kernel/:包含内核相关的信息,如内核模块、安全模块等。
- /sys/module/:包含已加载的内核模块的信息。
- /sys/power/:包含系统电源管理相关的信息,如电源状态、休眠模式等。
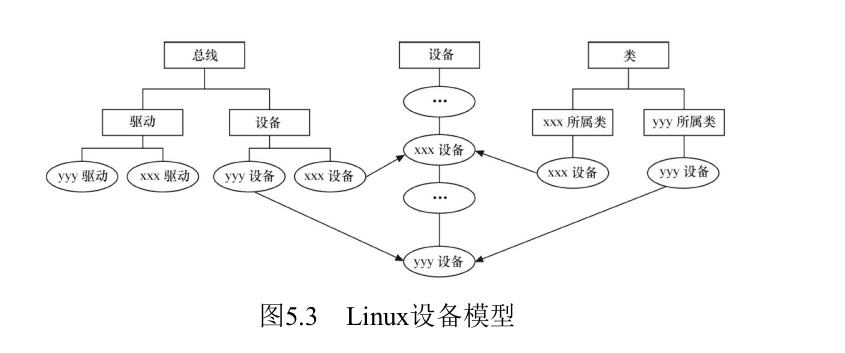
在/sys/bus的pci等子目录下,又会再分出drivers和devices目录,而devices目录中的文件是对/sys/devices目录中文件的符号链接。同样地,/sys/class目录下也包含许多对/sys/devices下文件的链接。如图5.3所示,Linux设备模型与设备、驱动、总线和类的现实状况是直接对应的,也正符合Linux 2.6以后内核的设备模型。
大多数情况下,Linux 2.6以后的内核中的设备驱动核心层代码作为“幕后大佬”可处理好这些关系,内核中的总线和其他内核子系统会完成与设备模型的交互,这使得驱动工程师在编写底层驱动的时候几乎不需要关心设备模型,只需要按照每个框架的要求,“填鸭式”地填充xxx_driver里面的各种回调函数,xxx是总线的名字。
在Linux内核中,分别使用bus_type、device_driver和device来描述总线、驱动和设备
struct bus_type {const char              *name;const char              *dev_name;struct device           *dev_root;const struct attribute_group **bus_groups;const struct attribute_group **dev_groups;const struct attribute_group **drv_groups;int (*match)(struct device *dev, struct device_driver *drv);int (*uevent)(struct device *dev, struct kobj_uevent_env *env);int (*probe)(struct device *dev);void (*sync_state)(struct device *dev);int (*remove)(struct device *dev);void (*shutdown)(struct device *dev);int (*online)(struct device *dev);int (*offline)(struct device *dev);int (*suspend)(struct device *dev, pm_message_t state);int (*resume)(struct device *dev);int (*num_vf)(struct device *dev);int (*dma_configure)(struct device *dev);const struct dev_pm_ops *pm;const struct iommu_ops *iommu_ops;struct subsys_private *p;struct lock_class_key lock_key;bool need_parent_lock;
};struct device_driver {const char              *name;struct bus_type         *bus;struct module           *owner;const char              *mod_name;      /* used for built-in modules */bool suppress_bind_attrs;       /* disables bind/unbind via sysfs */enum probe_type probe_type;const struct of_device_id       *of_match_table;const struct acpi_device_id     *acpi_match_table;int (*probe) (struct device *dev);void (*sync_state)(struct device *dev);int (*remove) (struct device *dev);void (*shutdown) (struct device *dev);int (*suspend) (struct device *dev, pm_message_t state);int (*resume) (struct device *dev);const struct attribute_group **groups;const struct attribute_group **dev_groups;const struct dev_pm_ops *pm;void (*coredump) (struct device *dev);struct driver_private *p;
};struct device {struct kobject kobj;struct device           *parent;struct device_private   *p;const char              *init_name; /* initial name of the device */const struct device_type *type;struct bus_type *bus;           /* type of bus device is on */struct device_driver *driver;   /* which driver has allocated thisdevice */void            *platform_data; /* Platform specific data, devicecore doesn't touch it */void            *driver_data;   /* Driver data, set and get withdev_set_drvdata/dev_get_drvdata */
#ifdef CONFIG_PROVE_LOCKINGstruct mutex            lockdep_mutex;
#endifstruct mutex            mutex;  /* mutex to synchronize calls to* its driver.*/struct dev_links_info   links;struct dev_pm_info      power;struct dev_pm_domain    *pm_domain;#ifdef CONFIG_ENERGY_MODELstruct em_perf_domain   *em_pd;
#endif#ifdef CONFIG_GENERIC_MSI_IRQ_DOMAINstruct irq_domain       *msi_domain;
#endif
#ifdef CONFIG_PINCTRLstruct dev_pin_info     *pins;
#endif
#ifdef CONFIG_GENERIC_MSI_IRQstruct list_head        msi_list;
#endif
#ifdef CONFIG_DMA_OPSconst struct dma_map_ops *dma_ops;
#endifu64             *dma_mask;      /* dma mask (if dma'able device) */u64             coherent_dma_mask;/* Like dma_mask, but foralloc_coherent mappings asnot all hardware supports64 bit addresses for consistentallocations such descriptors. */u64             bus_dma_limit;  /* upstream dma constraint */const struct bus_dma_region *dma_range_map;struct device_dma_parameters *dma_parms;struct list_head        dma_pools;      /* dma pools (if dma'ble) */#ifdef CONFIG_DMA_DECLARE_COHERENTstruct dma_coherent_mem *dma_mem; /* internal for coherent memoverride */
#endif
#ifdef CONFIG_DMA_CMAstruct cma *cma_area;           /* contiguous memory area for dmaallocations */
#endif/* arch specific additions */struct dev_archdata     archdata;struct device_node      *of_node; /* associated device tree node */struct fwnode_handle    *fwnode; /* firmware device node */#ifdef CONFIG_NUMAint             numa_node;      /* NUMA node this device is close to */
#endifdev_t                   devt;   /* dev_t, creates the sysfs "dev" */u32                     id;     /* device instance */spinlock_t              devres_lock;struct list_head        devres_head;struct class            *class;const struct attribute_group **groups;  /* optional groups */void    (*release)(struct device *dev);struct iommu_group      *iommu_group;struct dev_iommu        *iommu;bool                    offline_disabled:1;bool                    offline:1;bool                    of_node_reused:1;bool                    state_synced:1;
#if defined(CONFIG_ARCH_HAS_SYNC_DMA_FOR_DEVICE) || \defined(CONFIG_ARCH_HAS_SYNC_DMA_FOR_CPU) || \defined(CONFIG_ARCH_HAS_SYNC_DMA_FOR_CPU_ALL)bool                    dma_coherent:1;
#endif
#ifdef CONFIG_DMA_OPS_BYPASSbool                    dma_ops_bypass : 1;
#endif
};
device_driver和device分别表示驱动和设备,而这两者都必须依附于一种总线,因此都包含struct bus_type指针。在Linux内核中,设备和驱动是分开注册的,注册1个设备的时候,并不需要驱动已存在,而1个驱动被注册的时候,也不需要对应的设备已经被注册。设备和驱动各自涌向内核,而每个设备和驱动涌入内核的时候,都会去寻找自己的另一半,而正是bus_type的match()成员函数将两者捆绑在一起。简单地说,设备和驱动就是红尘中漂浮的男女,而bus_type的match()则是牵引红线的月老,它可以识别什么设备与什么驱动是可配对的。一旦配对成功,xxx_driver的probe()就被执行(xxx是总线名,如platform、pci、i2c、spi、usb等)。
注意:总线、驱动和设备最终都会落实为sysfs中的1个目录,因为进一步追踪代码会发现,它们实际上都可以认为是kobject的派生类,kobject可看作是所有总线、设备和驱动的抽象基类,1个kobject对应sysfs中的1个目录。
Linux内核中的kobject(内核对象)是一种数据结构,用于表示内核中的各种对象,如设备、驱动程序、文件系统等。kobject的创建背景和作用可以从以下几个方面来理解:
- 统一管理内核对象:kobject提供了一种统一的方式来管理内核中的各种对象。通过kobject,内核可以跟踪对象的生命周期,确保在适当的时候对其进行初始化、清理和释放。
- 简化内存管理:kobject使用引用计数来管理对象的生命周期。当一个对象被创建时,其引用计数为1。当有其他地方需要使用这个对象时,引用计数会增加。当不再需要这个对象时,引用计数会减少。当引用计数为0时,对象会被自动释放。这种机制简化了内存管理,避免了内存泄漏和使用已释放内存的问题。
- 提供用户空间接口:kobject与sysfs文件系统紧密结合,可以将内核对象导出到用户空间。通过sysfs,用户可以查看和修改内核对象的属性,实现用户空间与内核空间的交互。这对于调试、性能分析和系统管理等方面非常有用。
- 支持热插拔和设备模型:kobject是Linux设备模型的基础。设备模型描述了设备、驱动程序和总线之间的关系,支持设备的热插拔。当一个设备被插入或移除时,内核会自动创建或删除相应的kobject,通知用户空间进行相应的处理。
- 事件通知:kobject支持内核事件通知机制(kobject_uevent)。当内核对象发生变化时,可以通过kobject_uevent通知用户空间。这对于设备管理、电源管理等方面非常重要。
总之,kobject在Linux内核中起到了统一管理内核对象、简化内存管理、提供用户空间接口、支持热插拔和设备模型以及事件通知等作用。这些功能使得Linux内核更加灵活、可扩展和易于管理。
总线、设备和驱动中的各个attribute则直接落实为sysfs中的1个文件,attribute会伴随着show()和store()这两个函数,分别用于读写该attribute对应的sysfs文件,代码清单5.8给出了attribute、bus_attribute、driver_attribute和device_attribute这几个结构体的定义。
// 定义一个属性结构,用于表示内核对象的属性
struct attribute {const char              *name;                  // 属性的名称umode_t                  mode;                  // 属性的访问权限(读、写、执行等)
#ifdef CONFIG_DEBUG_LOCK_ALLOCbool                    ignore_lockdep:1;       // 是否忽略锁依赖检查struct lock_class_key   *key;                   // 锁类别键,用于锁依赖检查struct lock_class_key   skey;                   // 静态锁类别键,用于锁依赖检查
#endif
};// 定义一个总线属性结构,用于表示总线类型的属性
struct bus_attribute {struct attribute        attr;                                                   // 基本属性结构ssize_t (*show)(struct bus_type *bus, char *buf);                               // 读取属性值的回调函数ssize_t (*store)(struct bus_type *bus, const char *buf, size_t count);          // 设置属性值的回调函数
};// 定义一个驱动属性结构,用于表示设备驱动的属性
struct driver_attribute {struct attribute attr;                                                          // 基本属性结构ssize_t (*show)(struct device_driver *driver, char *buf);                       // 读取属性值的回调函数ssize_t (*store)(struct device_driver *driver, const char *buf,size_t count);                                                 // 设置属性值的回调函数
};// 定义一个设备属性结构,用于表示设备的属性
struct device_attribute {struct attribute        attr;                                                   // 基本属性结构ssize_t (*show)(struct device *dev, struct device_attribute *attr,char *buf);                                                     // 读取属性值的回调函数ssize_t (*store)(struct device *dev, struct device_attribute *attr,const char *buf, size_t count);                                // 设置属性值的回调函数
};
事实上,sysfs中的目录来源于bus_type、device_driver、device,而目录中的文件则来源于attribute。Linux内核中也定义了一些快捷方式以方便attribute的创建工作。
#define DRIVER_ATTR_RW(_name) \struct driver_attribute driver_attr_##_name = __ATTR_RW(_name)
#define DRIVER_ATTR_RO(_name) \struct driver_attribute driver_attr_##_name = __ATTR_RO(_name)
#define DRIVER_ATTR_WO(_name) \struct driver_attribute driver_attr_##_name = __ATTR_WO(_name)#define DEVICE_ATTR(_name, _mode, _show, _store) \struct device_attribute dev_attr_##_name = __ATTR(_name, _mode, _show, _store)
#define DEVICE_ATTR_PREALLOC(_name, _mode, _show, _store) \struct device_attribute dev_attr_##_name = \__ATTR_PREALLOC(_name, _mode, _show, _store)
#define DEVICE_ATTR_RW(_name) \struct device_attribute dev_attr_##_name = __ATTR_RW(_name)
#define DEVICE_ATTR_ADMIN_RW(_name) \struct device_attribute dev_attr_##_name = __ATTR_RW_MODE(_name, 0600)
#define DEVICE_ATTR_RO(_name) \struct device_attribute dev_attr_##_name = __ATTR_RO(_name)
#define DEVICE_ATTR_ADMIN_RO(_name) \struct device_attribute dev_attr_##_name = __ATTR_RO_MODE(_name, 0400)
#define DEVICE_ATTR_WO(_name) \struct device_attribute dev_attr_##_name = __ATTR_WO(_name)
#define DEVICE_ULONG_ATTR(_name, _mode, _var) \struct dev_ext_attribute dev_attr_##_name = \{ __ATTR(_name, _mode, device_show_ulong, device_store_ulong), &(_var) }
#define DEVICE_INT_ATTR(_name, _mode, _var) \struct dev_ext_attribute dev_attr_##_name = \{ __ATTR(_name, _mode, device_show_int, device_store_int), &(_var) }
#define DEVICE_BOOL_ATTR(_name, _mode, _var) \struct dev_ext_attribute dev_attr_##_name = \{ __ATTR(_name, _mode, device_show_bool, device_store_bool), &(_var) }
#define DEVICE_ATTR_IGNORE_LOCKDEP(_name, _mode, _show, _store) \struct device_attribute dev_attr_##_name =                \__ATTR_IGNORE_LOCKDEP(_name, _mode, _show, _store)
#define BUS_ATTR_RW(_name) \struct bus_attribute bus_attr_##_name = __ATTR_RW(_name)
#define BUS_ATTR_RO(_name) \struct bus_attribute bus_attr_##_name = __ATTR_RO(_name)
#define BUS_ATTR_WO(_name) \struct bus_attribute bus_attr_##_name = __ATTR_WO(_name)xxx:~/tmp/study$ ll /sys/bus/platform/
总用量 0
drwxr-xr-x  4 root root    0 5月  17 13:59 ./
drwxr-xr-x 50 root root    0 5月  17 13:59 ../
drwxr-xr-x  2 root root    0 5月  17 13:59 devices/
drwxr-xr-x 66 root root    0 5月  17 13:59 drivers/
-rw-r--r--  1 root root 4096 5月  22 18:49 drivers_autoprobe
--w-------  1 root root 4096 5月  22 18:49 drivers_probe
--w-------  1 root root 4096 5月  22 18:49 uevent
代码清单5.9的脚本可以遍历整个sysfs,并且dump出来总线、设备和驱动信息。
#!/bin/bash# 该脚本用于在 /dev 目录中填充块设备和字符设备。# 填充块设备# 遍历 /sys/block 目录中的所有块设备for i in /sys/block/*/dev /sys/block/*/*/devdo# 检查设备文件是否存在if [ -f $i ]then# 从设备文件中提取主设备号和次设备号MAJOR=$(sed 's/:.*//' < $i) # 将$i中 : 字符后的所有字符填充为空MINOR=$(sed 's/.*://' < $i) # 将$i中 : 字符前的所有字符填充为空# 从路径中提取设备名称DEVNAME=$(echo $i | sed -e 's@/dev@@' -e 's@.*/@@') # 先将$i中的/dev填充为空,然后再将/及其之前的所有字符填充为空# 打印设备信息echo /dev/$DEVNAME b $MAJOR $MINOR# 取消以下行的注释以在 /dev 中创建设备节点#mknod /dev/$DEVNAME b $MAJOR $MINORfidone# 填充字符设备# 遍历 /sys/bus 和 /sys/class 目录中的所有字符设备for i in /sys/bus/*/devices/*/dev /sys/class/*/*/devdo# 检查设备文件是否存在if [ -f $i ]then# 从设备文件中提取主设备号和次设备号MAJOR=$(sed 's/:.*//' < $i)MINOR=$(sed 's/.*://' < $i)# 从路径中提取设备名称DEVNAME=$(echo $i | sed -e 's@/dev@@' -e 's@.*/@@')# 打印设备信息echo /dev/$DEVNAME c $MAJOR $MINOR# 取消以下行的注释以在 /dev 中创建设备节点#mknod /dev/$DEVNAME c $MAJOR $MINORfidone
上述脚本遍历sysfs,找出所有的设备,并分析出来设备名和主次设备号。如果我们把27行前的“#”去掉,该脚本实际上还可以为整个系统中的设备建立/dev/下面的节点。
4.3 udev的组成
udev目前和systemd项目合并在一起了,见位于https://lwn.net/Articles/490413/的文档《Udev and systemd to merge》,可以从http://cgit.freedesktop.org/systemd/、https://github.com/systemd/systemd等位置下载最新的代码。udev在用户空间中执行,动态建立/删除设备文件,允许每个人都不用关心主/次设备号而提供LSB(Linux标准规范,Linux Standard Base)名称,并且可以根据需要固定名称。udev的工作过程如下。
1)当内核检测到系统中出现了新设备后,内核会通过netlink套接字发送uevent。
2)udev获取内核发送的信息,进行规则的匹配。匹配的事物包括SUBSYSTEM、ACTION、atttribute、内核提供的名称(通过KERNEL=)以及其他的环境变量。
假设在Linux系统上插入一个无线鼠标,可以用udevadm工具捕获uevent信息
udevadm monitor --udev --property
UDEV  [610554.756615] add      /devices/pci0000:00/0000:00:14.0/usb1/1-9/1-9.1/1-9.1:1.0/0003:2717:5013.0030/input/input175/mouse0 (input)
ACTION=add
DEVPATH=/devices/pci0000:00/0000:00:14.0/usb1/1-9/1-9.1/1-9.1:1.0/0003:2717:5013.0030/input/input175/mouse0
SUBSYSTEM=input
DEVNAME=/dev/input/mouse0
SEQNUM=10103
USEC_INITIALIZED=610554756553
ID_INPUT=1
ID_INPUT_MOUSE=1
ID_VENDOR=MI
ID_VENDOR_ENC=MI
ID_VENDOR_ID=2717
ID_MODEL=Mi_Wireless_Mouse
ID_MODEL_ENC=Mi\x20Wireless\x20Mouse
ID_MODEL_ID=5013
ID_REVISION=0625
ID_SERIAL=MI_Mi_Wireless_Mouse
ID_TYPE=hid
ID_BUS=usb
ID_USB_INTERFACES=:030102:
ID_USB_INTERFACE_NUM=00
ID_USB_DRIVER=usbhid
.INPUT_CLASS=mouse
ID_PATH=pci-0000:00:14.0-usb-0:9.1:1.0
ID_PATH_TAG=pci-0000_00_14_0-usb-0_9_1_1_0
MAJOR=13
MINOR=32
DEVLINKS=/dev/input/by-path/pci-0000:00:14.0-usb-0:9.1:1.0-mouse /dev/input/by-id/usb-MI_Mi_Wireless_Mouse-mouse
也可以使用udevadm工具查看节点对应的info
udevadm info /dev/input/mouse0
P: /devices/pci0000:00/0000:00:14.0/usb1/1-9/1-9.1/1-9.1:1.0/0003:2717:5013.0030/input/input175/mouse0
N: input/mouse0
L: 0
S: input/by-path/pci-0000:00:14.0-usb-0:9.1:1.0-mouse
S: input/by-id/usb-MI_Mi_Wireless_Mouse-mouse
E: DEVPATH=/devices/pci0000:00/0000:00:14.0/usb1/1-9/1-9.1/1-9.1:1.0/0003:2717:5013.0030/input/input175/mouse0
E: DEVNAME=/dev/input/mouse0
E: MAJOR=13
E: MINOR=32
E: SUBSYSTEM=input
E: USEC_INITIALIZED=610554756553
E: ID_INPUT=1
E: ID_INPUT_MOUSE=1
E: ID_VENDOR=MI
E: ID_VENDOR_ENC=MI
E: ID_VENDOR_ID=2717
E: ID_MODEL=Mi_Wireless_Mouse
E: ID_MODEL_ENC=Mi\x20Wireless\x20Mouse
E: ID_MODEL_ID=5013
E: ID_REVISION=0625
E: ID_SERIAL=MI_Mi_Wireless_Mouse
E: ID_TYPE=hid
E: ID_BUS=usb
E: ID_USB_INTERFACES=:030102:
E: ID_USB_INTERFACE_NUM=00
E: ID_USB_DRIVER=usbhid
E: ID_PATH=pci-0000:00:14.0-usb-0:9.1:1.0
E: ID_PATH_TAG=pci-0000_00_14_0-usb-0_9_1_1_0
E: DEVLINKS=/dev/input/by-path/pci-0000:00:14.0-usb-0:9.1:1.0-mouse /dev/input/by-id/usb-MI_Mi_Wireless_Mouse-mouse
我们可以根据这些信息,创建一个规则,以便每次插入的时候,为该鼠标创建一个my_usb_device的符号链接
sudo touch /etc/udev/rules.d/99-my-custom.rulessudo vim /etc/udev/rules.d/99-my-custom.rules
在文件中输入下面的规则
SUBSYSTEM=="input", ACTION=="add", ENV{ID_VENDOR}=="MI", ENV{ID_VENDOR_ID}=="2717", ENV{ID_USB_DRIVER}=="usbhid", ENV{DEVNAME}=="/dev/input/mouse0", SYMLINK+="my_usb_device"
重新加载 udev 规则
sudo udevadm control --reload-rules
插入无线鼠标,查看创建的软链接
$ ll /dev/my_usb_device
lrwxrwxrwx 1 root root 12 5月  24 16:17 /dev/my_usb_device -> input/mouse0
4.4 udev规则文件
udev 规则文件的语法主要包括以下几个部分:1. 匹配键(Match keys):用于匹配特定设备属性的键。常见的匹配键有:- ACTION:匹配设备事件,如 "add"(添加设备)或 "remove"(移除设备)。- KERNEL:匹配设备的内核名称。- SUBSYSTEM:匹配设备的子系统。- ATTR{attribute}:匹配设备的某个属性,如 ATTR{idVendor}(供应商 ID)或 ATTR{idProduct}(产品 ID)。- ENV{variable}:匹配环境变量。匹配键使用 == 操作符进行比较,例如 ACTION=="add"。2. 赋值键(Assignment keys):用于设置设备属性的键。常见的赋值键有:- NAME:设置设备节点的名称。- SYMLINK:为设备创建符号链接。- OWNER:设置设备节点的所有者。- GROUP:设置设备节点的组。- MODE:设置设备节点的权限。- ATTR{attribute}:设置设备的某个属性。- ENV{variable}:设置环境变量。赋值键使用 = 操作符进行赋值,例如 SYMLINK+="my_usb_device"。3. 逻辑操作符:用于组合多个匹配键或赋值键。常见的逻辑操作符有:- ,(逗号):表示按顺序执行多个操作。例如:ACTION=="add", ATTR{idVendor}=="1234"。- |(竖线):表示或(OR)操作。例如:KERNEL=="sda|sdb"。- !(感叹号):表示非(NOT)操作。例如:KERNEL!="sda"。4. 注释:以 # 开头的行表示注释,不会被解析。以下是一个 udev 规则文件的示例:# 当添加一个 USB 设备时,如果供应商 ID 为 1234,产品 ID 为 5678,则创建一个名为 my_usb_device 的符号链接
ACTION=="add", ATTR{idVendor}=="1234", ATTR{idProduct}=="5678", SYMLINK+="my_usb_device"注意:udev 规则文件中的匹配键和赋值键不区分大小写。但是,属性值和变量值可能是大小写敏感的。在编写规则时,请确保使用正确的大小写。
udev规则的写法非常灵活,在匹配部分,可以通过“*”、“?”、[ac]、[19]等shell通配符来灵活匹配多个项目。类似于shell中的通配符,代替任意长度的任意字符串,?代替一个字符。此外,%k就是KERNEL,%n则是设备的KERNEL序号(如存储设备的分区号)
5. procfs sysfs debugfs的使用
procfs、sysfs和debugfs都是Linux内核提供的虚拟文件系统,它们将内核数据结构以文件的形式展现给用户空间,方便用户和应用程序访问和修改内核状态。这些文件系统的主要区别在于它们的用途和所提供的信息类型。
- procfs(/proc):procfs是一个伪文件系统,主要用于访问进程相关的信息。它包含了每个进程的状态、内存映射、文件描述符等信息。此外,procfs还提供了一些系统级别的信息,如CPU使用率、内存使用情况等。procfs是Linux内核中最早引入的虚拟文件系统之一,但随着时间的推移,它的功能逐渐变得过于庞大和混乱。
- sysfs(/sys):sysfs是为了解决procfs混乱问题而引入的一个新的虚拟文件系统。它主要用于访问和修改内核对象(如设备、驱动、总线等)的属性。sysfs的目录结构更加清晰,按照设备、总线、驱动等层次进行组织。sysfs的引入使得内核对象的管理变得更加简单和直观。
- debugfs(/sys/kernel/debug):debugfs是一个专门用于内核调试的虚拟文件系统。它提供了一种简单的方法,让内核开发者可以在内核中创建调试文件,用于输出调试信息或者修改内核参数。debugfs的使用主要针对内核开发者,普通用户通常不需要关心这个文件系统。
总之,这些虚拟文件系统之间的区别主要在于它们的用途和所提供的信息类型。procfs主要关注进程相关信息,sysfs关注内核对象属性,而debugfs则专注于内核调试。这些区别使得内核信息的组织和访问变得更加清晰和高效。
Ref: https://tinylab.org/show-the-usage-of-procfs-sysfs-debugfs/
- procfs 历史最早,最初就是用来跟内核交互的唯一方式,用来获取处理器、内存、设备驱动、进程等各种信息。
- sysfs 跟 kobject 框架紧密联系,而 kobject 是为设备驱动模型而存在的,所以 sysfs 是为设备驱动服务的。
- debugfs 从名字来看就是为debug而生,所以更加灵活。
5.1 seq_operations
在介绍这三个虚拟文件系统前需要先介绍seq_operations,这经常用来配合虚拟文件系统用来dump数据
struct seq_operations {void * (*start) (struct seq_file *m, loff_t *pos);void (*stop) (struct seq_file *m, void *v);void * (*next) (struct seq_file *m, void *v, loff_t *pos);int (*show) (struct seq_file *m, void *v);
};
seq_operations 是 Linux 内核中的一个结构,用于实现顺序文件接口。顺序文件接口允许内核模块以顺序方式读取数据,例如在读取 /proc 或 /sys 文件系统中的文件时。seq_operations 结构包含四个函数指针:start、next、stop 和 show。这些函数在读取顺序文件时按照特定的顺序和时机被调用。
执行顺序和时机如下:
-
start:这个函数在读取顺序文件的开始时被调用。它的主要目的是为迭代器分配和初始化资源。通常,它会返回一个指向当前位置的指针,或者在没有数据可读时返回 NULL。
-
show:这个函数用于将当前位置的数据输出到用户空间。它接收一个指向顺序文件实例的指针和一个指向当前位置的指针。show 函数应该将数据格式化为文本,并使用 seq_printf 等函数将其写入顺序文件缓冲区。如果成功,show 函数应返回 0;如果发生错误,返回一个负的错误代码。
-
next:这个函数用于将迭代器移动到下一个位置。它接收一个指向顺序文件实例的指针和一个指向当前位置的指针。next 函数应该更新指针以指向下一个位置,并返回更新后的指针。如果已经到达数据的末尾,next 函数应返回 NULL。
-
stop:这个函数在读取顺序文件结束时被调用。它的主要目的是释放 start 函数分配的资源。stop 函数接收一个指向顺序文件实例的指针和一个指向当前位置的指针。
在读取顺序文件时,这些函数的调用顺序如下:
- 调用 start 函数以初始化迭代器。
- 调用 show 函数以输出当前位置的数据。
- 调用 next 函数以移动到下一个位置。
- 重复步骤 2 和 3,直到 next 函数返回 NULL。
- 调用 stop 函数以释放资源。
这个执行顺序和时机确保了顺序文件中的数据可以按顺序读取,并且在读取过程中可以正确地管理资源。
5.2 debugfs
5.2.1 API list
struct dentry *debugfs_create_dir(const char *name, struct dentry *parent);
入参:- name:要创建的目录的名称,类型为const char *。- parent:要在其下创建目录的父目录的dentry指针,类型为struct dentry *。如果为NULL,则在debugfs的根目录下创建。返回值:- 成功:返回新创建的目录的dentry指针。- 失败:返回NULL或错误指针。用法:- 用于在debugfs文件系统中创建一个新的目录。debugfs是一个用于内核调试的简单RAM文件系统,允许开发人员在运行时检查内核数据结构的状态。
struct dentry *debugfs_create_file(const char *name, umode_t mode,struct dentry *parent, void *data,const struct file_operations *fops);入参:- name:要创建的文件的名称,类型为const char *。- mode:文件的访问权限,类型为umode_t。例如,S_IRUGO表示所有用户可读,S_IWUSR表示所有者可写。- parent:要在其下创建文件的父目录的dentry指针,类型为struct dentry *。如果为NULL,则在debugfs的根目录下创建。- data:要与文件关联的私有数据,类型为void *。通常用于在文件操作中传递特定于模块的数据。- fops:文件操作的结构体指针,类型为const struct file_operations *。定义了对文件执行的操作,例如读、写、打开、关闭等。返回值:- 成功:返回新创建的文件的dentry指针。- 失败:返回NULL或错误指针。用法:- 用于在debugfs文件系统中创建一个新的文件。这个文件可以用于内核调试,例如读取内核数据结构的状态或修改内核参数。通过提供自定义的文件操作结构体,开发人员可以实现对文件的特定操作。
5.2.2 实例
https://elixir.bootlin.com/linux/v5.10/source/drivers/base/power/wakeup.c
下面的实例是 /sys/kernel/debug/wakeup_sources 节点文件的实现
当有用户读取此节点,该节点文件会dump挂在wakeup_sources链表上所有wakeup_source变量的信息
/*** struct wakeup_source - Representation of wakeup sources** @name: Name of the wakeup source* @id: Wakeup source id* @entry: Wakeup source list entry* @lock: Wakeup source lock* @wakeirq: Optional device specific wakeirq* @timer: Wakeup timer list* @timer_expires: Wakeup timer expiration* @total_time: Total time this wakeup source has been active.* @max_time: Maximum time this wakeup source has been continuously active.* @last_time: Monotonic clock when the wakeup source's was touched last time.* @prevent_sleep_time: Total time this source has been preventing autosleep.* @event_count: Number of signaled wakeup events.* @active_count: Number of times the wakeup source was activated.* @relax_count: Number of times the wakeup source was deactivated.* @expire_count: Number of times the wakeup source's timeout has expired.* @wakeup_count: Number of times the wakeup source might abort suspend.* @dev: Struct device for sysfs statistics about the wakeup source.* @active: Status of the wakeup source.* @autosleep_enabled: Autosleep is active, so update @prevent_sleep_time.*/
struct wakeup_source {const char                 *name;int                        id;struct list_head        entry;spinlock_t                lock;struct wake_irq                *wakeirq;struct timer_list        timer;unsigned long                timer_expires;ktime_t total_time;ktime_t max_time;ktime_t last_time;ktime_t start_prevent_time;ktime_t prevent_sleep_time;unsigned long                event_count;unsigned long                active_count;unsigned long                relax_count;unsigned long                expire_count;unsigned long                wakeup_count;struct device                *dev;bool                        active:1;bool                        autosleep_enabled:1;
};static struct wakeup_source deleted_ws = {.name = "deleted",.lock =  __SPIN_LOCK_UNLOCKED(deleted_ws.lock),
};/*** print_wakeup_source_stats - Print wakeup source statistics information.* @m: seq_file to print the statistics into.* @ws: Wakeup source object to print the statistics for.*/
static int print_wakeup_source_stats(struct seq_file *m,struct wakeup_source *ws)
{unsigned long flags;ktime_t total_time;ktime_t max_time;unsigned long active_count;ktime_t active_time;ktime_t prevent_sleep_time;spin_lock_irqsave(&ws->lock, flags);total_time = ws->total_time;max_time = ws->max_time;prevent_sleep_time = ws->prevent_sleep_time;active_count = ws->active_count;if (ws->active) {ktime_t now = ktime_get();active_time = ktime_sub(now, ws->last_time);total_time = ktime_add(total_time, active_time);if (active_time > max_time)max_time = active_time;if (ws->autosleep_enabled)prevent_sleep_time = ktime_add(prevent_sleep_time,ktime_sub(now, ws->start_prevent_time));} else {active_time = 0;}seq_printf(m, "%-12s\t%lu\t\t%lu\t\t%lu\t\t%lu\t\t%lld\t\t%lld\t\t%lld\t\t%lld\t\t%lld\n",ws->name, active_count, ws->event_count,ws->wakeup_count, ws->expire_count,ktime_to_ms(active_time), ktime_to_ms(total_time),ktime_to_ms(max_time), ktime_to_ms(ws->last_time),ktime_to_ms(prevent_sleep_time));spin_unlock_irqrestore(&ws->lock, flags);return 0;
}static void *wakeup_sources_stats_seq_start(struct seq_file *m,loff_t *pos)
{struct wakeup_source *ws;loff_t n = *pos;int *srcuidx = m->private;if (n == 0) {seq_puts(m, "name\t\tactive_count\tevent_count\twakeup_count\t""expire_count\tactive_since\ttotal_time\tmax_time\t""last_change\tprevent_suspend_time\n");}*srcuidx = srcu_read_lock(&wakeup_srcu);list_for_each_entry_rcu_locked(ws, &wakeup_sources, entry) {if (n-- <= 0)return ws;}return NULL;
}static void *wakeup_sources_stats_seq_next(struct seq_file *m,void *v, loff_t *pos)
{struct wakeup_source *ws = v;struct wakeup_source *next_ws = NULL;++(*pos);list_for_each_entry_continue_rcu(ws, &wakeup_sources, entry) {next_ws = ws;break;}if (!next_ws)print_wakeup_source_stats(m, &deleted_ws);return next_ws;
}static void wakeup_sources_stats_seq_stop(struct seq_file *m, void *v)
{int *srcuidx = m->private;srcu_read_unlock(&wakeup_srcu, *srcuidx);
}static const struct seq_operations wakeup_sources_stats_seq_ops = {.start = wakeup_sources_stats_seq_start,.next  = wakeup_sources_stats_seq_next,.stop  = wakeup_sources_stats_seq_stop,.show  = wakeup_sources_stats_seq_show,
};/*** wakeup_sources_stats_seq_show - Print wakeup sources statistics information.* @m: seq_file to print the statistics into.* @v: wakeup_source of each iteration*/
static int wakeup_sources_stats_seq_show(struct seq_file *m, void *v)
{struct wakeup_source *ws = v;print_wakeup_source_stats(m, ws);return 0;
}static const struct seq_operations wakeup_sources_stats_seq_ops = {.start = wakeup_sources_stats_seq_start,.next  = wakeup_sources_stats_seq_next,.stop  = wakeup_sources_stats_seq_stop,.show  = wakeup_sources_stats_seq_show,
};static int wakeup_sources_stats_open(struct inode *inode, struct file *file)
{return seq_open_private(file, &wakeup_sources_stats_seq_ops, sizeof(int));
}static const struct file_operations wakeup_sources_stats_fops = {.owner = THIS_MODULE,.open = wakeup_sources_stats_open,.read = seq_read,.llseek = seq_lseek,.release = seq_release_private,
};static int __init wakeup_sources_debugfs_init(void)
{debugfs_create_file("wakeup_sources", S_IRUGO, NULL, NULL,&wakeup_sources_stats_fops);return 0;
}
上面的实例中没有用到目录创建接口,如果要 /sys/kernel/debug/wakeup_sources 节点放到 /sys/kernel/debug/power/wakeup_sources 则需要添加下面逻辑
struct dentry *power;int err = -ENOMEM;power = debugfs_create_dir("power", NULL);if (!power)return err;wakeup_sources_stats_dentry = debugfs_create_file("wakeup_sources",S_IRUGO, power, NULL, &wakeup_sources_stats_fops);
5.3 procfs
5.3.1 API list
static inline struct proc_dir_entry *proc_mkdir(const char *name, struct proc_dir_entry *parent)
入参:- const char *name:要创建的目录的名称。- struct proc_dir_entry *parent:父目录的proc_dir_entry指针。如果要在/proc根目录下创建目录,可以传递NULL。返回值:- struct proc_dir_entry *:成功创建的目录的proc_dir_entry指针。如果创建失败,返回NULL。用法:- 该函数用于在/proc文件系统中创建一个新的目录。通常用于在/proc中组织相关的文件和子目录。示例:struct proc_dir_entry *my_proc_dir;// 在/proc下创建一个名为my_dir的目录my_proc_dir = proc_mkdir("my_dir", NULL);if (!my_proc_dir) {printk(KERN_ERR "Failed to create /proc/my_dir\n");return -ENOMEM;}
struct proc_dir_entry *proc_create(const char *name, umode_t mode, struct proc_dir_entry *parent, const struct proc_ops *proc_ops);
入参:
- const char *name:要创建的文件的名称。
- umode_t mode:文件的访问权限。例如:S_IRUGO | S_IWUGO表示用户和组可读写。
- struct proc_dir_entry *parent:父目录的proc_dir_entry指针。如果要在/proc根目录下创建文件,可以传递NULL。
- const struct proc_ops *proc_ops:文件操作的回调函数集合,包括读、写、打开、关闭等操作。返回值:
- struct proc_dir_entry *:成功创建的文件的proc_dir_entry指针。如果创建失败,返回NULL。用法:
- 该函数用于在/proc文件系统中创建一个新的文件,并关联相应的操作回调函数。这样,当用户空间程序访问这个文件时,内核会调用相应的回调函数。示例:struct proc_dir_entry *my_proc_file;const struct proc_ops my_proc_ops = {.proc_read = my_read_callback,.proc_write = my_write_callback,.proc_open = my_open_callback,.proc_release = my_release_callback,};// 在/proc下创建一个名为my_file的文件,用户和组可读写my_proc_file = proc_create("my_file", S_IRUGO | S_IWUGO, NULL, &my_proc_ops);if (!my_proc_file) {printk(KERN_ERR "Failed to create /proc/my_file\n");return -ENOMEM;}
5.3.2 实例
在上面例子的基础上,可以修改wakeup_sources_stats_fops并添加语句,实现创建/proc/wakelocks
static const struct proc_ops wakeup_sources_stats_fops = {.proc_open = wakeup_sources_stats_open,.proc_read = seq_read,.proc_lseek = seq_lseek,.proc_release = seq_release_private,
}static int __init wakeup_sources_debugfs_init(void)
{proc_create("wakelocks", S_IFREG | S_IRUGO, NULL, &wakeup_sources_stats_fops);return 0;
}
给接口添加多级目录,这样创建的接口用起来跟 /sys/kernel/debug/wakeup_sources 没有任何差异,类似地,如果要加一级目录,例如 /proc/power/wakelocks,则可以
struct proc_dir_entry *power;int err = -ENOMEM;power = proc_mkdir("power", NULL);if (!power)return err;proc_create("wakelocks", S_IFREG | S_IRUGO, power, &wakeup_sources_stats_fops);
其实针对seq_fops还有更简单的procfs节点文件创建方法,使用接口proc_create_seq,直接填充wakeup_sources_stats_seq_ops即可
proc_create_seq("wakelocks", S_IFREG | S_IRUGO, power, &wakeup_sources_stats_seq_ops);
#define proc_create_seq(name, mode, parent, ops) \proc_create_seq_private(name, mode, parent, ops, 0, NULL)static int proc_seq_open(struct inode *inode, struct file *file)
{struct proc_dir_entry *de = PDE(inode);if (de->state_size)return seq_open_private(file, de->seq_ops, de->state_size);return seq_open(file, de->seq_ops);
}static int proc_seq_release(struct inode *inode, struct file *file)
{struct proc_dir_entry *de = PDE(inode);if (de->state_size)return seq_release_private(inode, file);return seq_release(inode, file);
}static const struct proc_ops proc_seq_ops = {/* not permanent -- can call into arbitrary seq_operations */.proc_open        = proc_seq_open,.proc_read_iter        = seq_read_iter,.proc_lseek        = seq_lseek,.proc_release        = proc_seq_release,
};struct proc_dir_entry *proc_create_seq_private(const char *name, umode_t mode,struct proc_dir_entry *parent, const struct seq_operations *ops,unsigned int state_size, void *data)
{struct proc_dir_entry *p;p = proc_create_reg(name, mode, &parent, data);if (!p)return NULL;p->proc_ops = &proc_seq_ops;p->seq_ops = ops;p->state_size = state_size;return proc_register(parent, p);
}
5.4 sysfs
https://www.cnblogs.com/schips/p/linux_kernel_sysfs_api.html
https://blog.csdn.net/lickylin/article/details/102653175
这里提供两种方法,核心是通过kobj为媒介创建节点文件,但是在设备驱动的开发中常用创建device方法简介创建kobj
5.4.1 直接创建kobj方法
5.4.1.1 API list
/* 创建目录 */
struct kobject * __must_check kobject_create_and_add(const char *name, struct kobject *parent);入参:- name:kobject的名称,类型为const char *- parent:kobject的父对象,类型为struct kobject *返回值:创建并添加成功后的kobject对象,类型为struct kobject *用法:该函数用于创建一个具有给定名称的kobject,并将其添加到给定的父kobject下。如果创建或添加失败,返回NULL。
此函数创建的kobj如果parent为NULL会以/sys/方式出现在目录中
/* 创建节点文件 */
static inline int __must_check sysfs_create_file(struct kobject *kobj, const struct attribute *attr)入参:- kobj:要创建文件的kobject,类型为struct kobject *- attr:要创建的文件属性,类型为const struct attribute *返回值:成功返回0,失败返回错误码用法:该函数用于在给定的kobject下创建一个sysfs文件。文件的属性由attr参数指定。如果创建成功,返回0,否则返回错误码。
/* 创建链接 */
int __must_check sysfs_create_link(struct kobject *kobj, struct kobject *target, const char *name);- kobj:要创建链接的kobject,类型为struct kobject *- target:链接的目标kobject,类型为struct kobject *- name:链接的名称,类型为const char *返回值:成功返回0,失败返回错误码用法:该函数用于在给定的kobject下创建一个指向目标kobject的sysfs链接。链接的名称由name参数指定。如果创建成功,返回0,否则返回错误码。
/* 批量创建节点文件 */
int __must_check sysfs_create_group(struct kobject *kobj, const struct attribute_group *grp);入参:- kobj:要创建属性组的kobject,类型为struct kobject *- grp:要创建的属性组,类型为const struct attribute_group *返回值:成功返回0,失败返回错误码用法:该函数用于在给定的kobject下创建一个属性组。属性组包含一组属性,由grp参数指定。如果创建成功,返回0,否则返回错误码。/* 批量删除节点文件 */
void sysfs_remove_group(struct kobject *kobj, const struct attribute_group *grp);
5.4.1.2 实例
创建/sys/my_dir/my_node_file1,实现写入字符,可被读出
#define define_one_global_rw(_name)                \
static struct kobj_attribute _name =               \
__ATTR(_name, 0644, show_##_name, store_##_name)static char test_str[11];static ssize_t show_my_node_file(struct kobject *kobj, struct attribute *attr, char *buf)
{if (copy_to_user(buf, test_str, sizeof(test_str)/sizeof(char))return -EFAULT;return sizeof(test_str)/sizeof(char);
}static ssize_t store_my_node_file(struct kobject *kobj, struct attribute *attr, const char *buf, size_t count)
{if (copy_from_user(test_str, buf, count))return -EFAULT;return count;
}define_one_global_rw(my_node_file);static __init my_node_file_init(void)
{struct kobject *my_dir_kobj;int ret;my_dir_kobj = kobject_create_and_add("my_dir", NULL);if (!my_dir_kobj)return -ENOMEM;ret = sysfs_create_file(my_dir_kobj, &my_node_file.attr);}
5.4.5 通过创建device间接创建kobj方法
5.4.5.1 API list
/* 创建class */
static inline int __must_check class_create_file(struct class *class, const struct class_attribute *attr)
class_create_file() 函数会在给定的 class 上创建一个新的属性文件,并将属性文件关联到 sysfs 中该类别对象的目录中。
入参class:指向将要创建属性文件的类别对象的指针。attr:指向属性结构体实例的指针。
返回值如果成功创建了属性文件,则返回 0;否则返回负数错误代码。
用法这个函数可以用于向一个设备类别添加一个新的属性文件。对于属性文件,可以读取和写入 sysfs 的特定文件,让用户通过这些文件与内核交互。
/* 创建device */
struct device *device_create(struct class *class, struct device *parent, dev_t devt, void *drvdata, const char *fmt, ...)
device_create() 函数会在给定的 class 中创建一个新设备,并将其加入 sysfs 中。这个函数还会为你的设备节点分配一个主设备和次设备号。
入参
class:指向新设备所属类别对象的指针。parent:指向该设备的父设备的指针。如果没有父设备,请将其设置为 NULL。devt:包含分配给设备的主设备和次设备号的 dev_t 类型变量。drvdata:该参数是供驱动程序使用的设备私有数据。它的类型通常是一个指向设备驱动程序所需数据的指针。fmt:设备名称的格式。
返回值如果成功创建了设备,则返回一个指向新设备的指针;否则返回 ERR_PTR()。
用法这个函数可以用于创建一个新的设备和关联到 sysfs,供用户空间程序进行访问。
/* 创建节点文件 */
int device_create_file(struct device *device, const struct device_attribute *entry);
device_create_file() 函数会在给定的 device 上创建一个新的属性文件,并将属性文件关联到 sysfs 中该设备节点的目录中。
入参device:指向将要创建属性文件的设备对象的指针。entry:指向属性结构体实例的指针。
返回值如果成功创建了属性文件,则返回 0;否则返回负数错误代码。
用法这个函数可以用于向一个设备添加一个新的属性文件。对于属性文件,可以读取和写入 sysfs 的特定文件,让用户通过这些文件与内核交互。
5.4.5.2 实例
创建/sys/class/my_class/my_dev0/my_node_file0和/sys/class/my_dev0/my_class/my_node_file1,实现写入字符,可被读出
static char test_str[11];
struct class *class;
struct device *dev;
struct attribute_group attrs_group;static ssize_t show_my_node_file(struct kobject *kobj, struct attribute *attr, char *buf)
{if (copy_to_user(buf, test_str, sizeof(test_str)/sizeof(char))return -EFAULT;return sizeof(test_str)/sizeof(char);
}static ssize_t store_my_node_file(struct kobject *kobj, struct attribute *attr, const char *buf, size_t count)
{if (copy_from_user(test_str, buf, count))return -EFAULT;return count;
}static DEVICE_ATTR(my_node_file0, 0644, show_my_node_file, store_my_node_file);
static DEVICE_ATTR(my_node_file1, 0644, show_my_node_file, store_my_node_file);static struct attribute *my_attrs[] = {&dev_attr_my_node_file0.attr,&dev_attr_my_node_file1.attr,NULL,
};static int __init my_node_file_init(void)
{int ret;class = class_create(THIS_MODULE, "my_class");if (!class)return -ENOMEM;dev = device_create(class, NULL, 0, NULL, "my_dev0");attrs_group.attrs = my_attrs;ret = sysfs_create_group(&dev->kobj, &attrs_group);/* 两种方法可以起相同效果 */// device_create_file(dev, dev_attr_my_node_file0);// device_create_file(dev, dev_attr_my_node_file1);return ret;}