1. 认识Bitmap
Bitmap是一个final类,因此不能被继承。Bitmap只有一个构造方法,且该构造方法是没有任何访问权限修饰符修饰,也就是说该构造方法是friendly,但是谷歌称Bitmap的构造方法是private(私有的),感觉有点不严谨。不管怎样,一般情况下,我们不能通过构造方法直接新建一个Bitmap对象。
Bitmap是Android系统中的图像处理中最重要类之一。Bitmap可以获取图像文件信息,对图像进行剪切、旋转、缩放,压缩等操作,并可以以指定格式保存图像文件。
2. 创建Bitmap对象
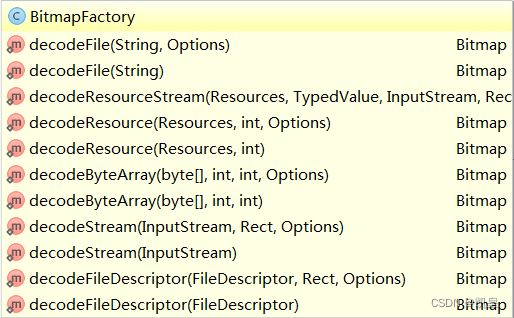
既然不能直接通过构造方法创建Bitmap,那怎样才能创建Bitmap对象。通常我们可以利用Bitmap的静态方法createBitmap()和BitmapFactory的decode系列静态方法创建Bitmap对象。
-
Bitmap的静态方法
createBitmap()
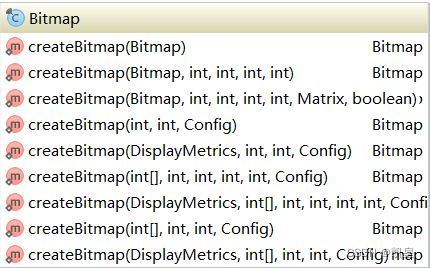
-
BitmapFactory的
decode系列静态方法
2.1. 流——BitmapFactory.decodeStream()
(1) 文件流
FileInputStream fis = new FileInputStream("/sdcard/test.png");
Bitmap bitmap=BitmapFactory.decodeStream(fis);
(2) 以ResourceStream的方式代替R文件
Bitmap bitmap=BitmapFactory.decodeStream(getClass().getResourceAsStream(“/res/drawable/test.png”));
(3) 以文件流+ R文件 的方式
InputStream in = getResources().openRawResource(R.drawable. test );
Bitmap bitmap = BitmapFactory.decodeStream(in);
(4) 图片放在src目录下
String path = "com/xiangmu/test.png"; //图片存放的路径
InputStream in = getClassLoader().getResourceAsStream(path); //得到图片流
Bitmap imageBitmap3 = BitmapFactory.decodeStream(in);
(5) 图片放在 Assets目录
InputStream in = getResources().getAssets().open(fileName);
Bitmap imageBitmap4 = BitmapFactory.decodeStream(in);
2.2. 文件路径——BitmapFactory.decodeFile()
Bitmap imageBitmap = BitmapFactory.decodeFile(path);// (path 是图片的路径,跟目录是/sdcard)
支持的文件格式:
2.3. 资源ID——BitmapFactory.decodeResource()
(1) 以R文件的方式
// 假设 res/drawable下有 test.jpg文件
Bitmap bitmap =BitmapFactory.decodeResource(getResources(), R.drawable.test);
(2) 获取制定packageName的资源文件
ApplicationInfo appInfo = getApplicationInfo();
//得到该图片的id(name 是该图片的名字,"drawable" 是该图片存放的目录,appInfo.packageName是应用程序的包)
int resID = getResources().getIdentifier(fileName, "drawable", appInfo.packageName);
Bitmap imageBitmap2 = BitmapFactory.decodeResource(getResources(), resID);
2.4. 字节数组——BitmapFactory.decodeByteArray()
(1) bmp格式的数组
byte[] bmpBytes = readFileToByteArray(bmpPath);// bmp文件格式
Bitmap bitmap = BitmapFactory.decodeByteArray(bmpBytes, 0, bmpBytes.length);
(2) yuv-nv21/jpg格式的数组
//data可以是jpg格式的数组
Bitmap bitmap = BitmapFactory.decodeByteArray(data, 0, data.length);
//yuv格式的byte[]转换成bitmap
public static Bitmap nv21ToBitmap(byte[] nv21, int width, int height) {   Bitmap bitmap = null;try {YuvImage image = new YuvImage(nv21, ImageFormat.NV21, width, height, null);ByteArrayOutputStream stream = new ByteArrayOutputStream();image.compressToJpeg(new Rect(0, 0, width, height), 80, stream);bitmap = BitmapFactory.decodeByteArray(stream.toByteArray(), 0, stream.size());stream.close();} catch (IOException e) {e.printStackTrace();}return bitmap;
}
2.5. 从bitmapDrawable获取——bitmapDrawable.getBitmap()
InputStream in = getResources().openRawResource(R.drawable. test );
BitmapDrawable bitmapDrawable = new BitmapDrawable(in);
Bitmap bitmap = bitmapDrawable.getBitmap();注意: openRawResource可以打开 drawable, sound, 和raw资源,但不能是string和color。
2.6. Bitmap.createBitmap()
(1) RGB888格式的数组
//24位RGB转Bitmap
public static Bitmap rgb888ToBitmap(byte[] data, int width, int height)
{byte[] Bits = new byte[data.length * 4]; //RGBA 数组// data.length / 3 表示 3位为一组for (int i = 0; i < data.length / 3; i++){// 原理:24位是有彩色的,所以要复制3位,最后一位Alpha = 0xff;Bits[i * 4] = data[i * 3];Bits[i * 4 + 1] = data[i * 3 + 1];Bits[i * 4 + 2] = data[i * 3 + 2];Bits[i * 4 + 3] = -1;}// Bitmap.Config.ARGB_8888 表示:图像模式为8位Bitmap bmp = Bitmap.createBitmap(width, height, Bitmap.Config.ARGB_8888);bmp.copyPixelsFromBuffer(ByteBuffer.wrap(Bits));return bmp;
}//先转成int再转成bitmap,会稍微快几个ms
public static Bitmap rgb888ToBitmap(byte[] data, int width, int height){int[] iData = new int[data.length/3]; //RGBA 数组// data.length / 3 表示 3位为一组for (int i = 0; i < data.length / 3; i++){// 原理:24位是有彩色的,所以要复制3位,最后一位Alpha = 0xff;iData[i] = (((int)data[i*3]) << 16) + (((int)data[i*3+1]) << 8) + data[i*3+2] + 0xff000000;}// Bitmap.Config.ARGB_8888 表示:图像模式为8位return Bitmap.createBitmap(iData, width, height, Bitmap.Config.ARGB_8888);}
(2) 8位灰度数组
public static Bitmap byteToBitmap(byte[] values, int width, int height) {    //使用8位来保存图片Bitmap bitmap = Bitmap.createBitmap(width, height, Bitmap.Config.ARGB_8888);int[] pixels = new int[width * height];for (int i = 0; i < values.length; i++) {//关键代码,生成灰度图,灰度图的argb格式就是0xff开头,后面rgb数值全一样,0xff131313pixels[i] = values[i] * 256 * 256 + values[i] * 256 + values[i] + 0xFF000000;}bitmap.setPixels(pixels, 0, width, 0, 0, width, height);return bitmap;
}//方式二:
public static Bitmap byteToBitmap(byte[] data, int width, int height) {byte[] Bits = new byte[data.length * 4]; //RGBA 数组// 原理:4个字节表示一个灰度,则RGB  = 灰度值,最后一个Alpha = 0xff;for (int i = 0; i < data.length; i++) {		Bits[i * 4] = Bits[i * 4 + 1] = Bits[i * 4 + 2] = data[i];Bits[i * 4 + 3] = -1; //0xff}// Bitmap.Config.ARGB_8888 表示:图像模式为8位Bitmap bmp = Bitmap.createBitmap(width, height, Bitmap.Config.ARGB_8888);bmp.copyPixelsFromBuffer(ByteBuffer.wrap(Bits));return bmp;
}
2.7. Bitmap资源回收
if (bitmap!=null&&!bitmap.isRecycle()) {bitmap.recycle();  bitmap= null;system.gc();
}
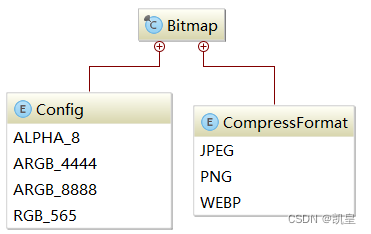
3. Bitmap的颜色配置信息与压缩方式信息
Bitmap中有两个内部枚举类:Config和CompressFormat,Config是用来设置颜色配置信息的,CompressFormat是用来设置压缩方式的。
-
Config解析:
Bitmap.Config.ALPHA_8:颜色信息只由透明度组成,占8位。Bitmap.Config.ARGB_4444:颜色信息由透明度与R(Red),G(Green),B(Blue)四部分组成,每个部分都占4位,总共占16位。Bitmap.Config.ARGB_8888:颜色信息由透明度与R(Red),G(Green),B(Blue)四部分组成,每个部分都占8位,总共占32位。是Bitmap默认的颜色配置信息,也是最占空间的一种配置。Bitmap.Config.RGB_565:颜色信息由R(Red),G(Green),B(Blue)三部分组成,R占5位,G占6位,B占5位,总共占16位。
通常我们优化Bitmap时,当需要做性能优化或者防止OOM(Out Of Memory),我们通常会使用Bitmap.Config.RGB_565这个配置,因为Bitmap.Config.ALPHA_8只有透明度,显示一般图片没有意义,Bitmap.Config.ARGB_4444显示图片不清楚,Bitmap.Config.ARGB_8888占用内存最多。
-
CompressFormat解析:
Bitmap.CompressFormat.JPEG:表示以JPEG压缩算法进行图像压缩,压缩后的格式可以是".jpg"或者".jpeg",是一种有损压缩。Bitmap.CompressFormat.PNG:表示以PNG压缩算法进行图像压缩,压缩后的格式可以是".png",是一种无损压缩。Bitmap.CompressFormat.WEBP:表示以WebP压缩算法进行图像压缩,压缩后的格式可以是".webp",是一种有损压缩,质量相同的情况下,WebP格式图像的体积要比JPEG格式图像小40%。美中不足的是,WebP格式图像的编码时间“比JPEG格式图像长8倍”。
4. Bitmap对图像进行操作
4.1. Bitmap裁剪图像
Bitmap裁剪图像有两种方式:
Bitmap.createBitmap(Bitmap source, int x, int y, int width, int height)
根据源Bitmap对象source,创建出source对象裁剪后的图像的Bitmap。x,y分别代表裁剪时,x轴和y轴的第一个像素,width,height分别表示裁剪后的图像的宽度和高度。
注意:x+width要小于等于source的宽度,y+height要小于等于source的高度。
Bitmap.createBitmap(Bitmap source, int x, int y, int width, int height,Matrix m, boolean filter)
这个方法只比上面的方法多了m和filter这两个参数,m是一个Matrix(矩阵)对象,可以进行缩放,旋转,移动等动作,filter为true时表示source会被过滤,仅仅当m操作不仅包含移动操作,还包含别的操作时才适用。其实上面的方法本质上就是调用这个方法而已。
public static Bitmap createBitmap(Bitmap source, int x, int y, int width, int height) {return createBitmap(source, x, y, width, height, null, false);
}
4.2. Bitmap缩放,旋转,移动图像
Bitmap缩放,旋转,移动,倾斜图像其实就是通过Bitmap.createBitmap(Bitmap source, int x, int y, int width, int height,Matrix m, boolean filter)方法实现的,只是在实现这些功能的同时还可以实现图像的裁剪。
// 定义矩阵对象
Matrix matrix = new Matrix();
// 缩放图像
matrix.postScale(0.8f, 0.9f);
// 按中心点镜像垂直翻转
matrix.postScale(1, -1, x/2, y/2);
// 按中心点镜像水平翻转
matrix.postScale(-1, 1, x/2, y/2);
// 向左旋转(逆时针旋转)45度,参数为正则向右旋转(顺时针旋转)
matrix.postRotate(-45);
// 按中心点顺时针旋转90度
matrix.postRotate(90, x/2, y/2);
//移动图像
//matrix.postTranslate(100,80);
Bitmap bitmap = Bitmap.createBitmap(source, 0, 0, source.getWidth(), source.getHeight(), matrix, true);
Matrix的postScale和postRotate方法还有多带两个参数的重载方法postScale(float sx, float sy, float px, float py)和postRotate(float degrees, float px, float py),后两个参数px和py都表示以该点为中心进行操作。
注意:虽然Matrix还可以调用postSkew方法进行倾斜操作,但是却不可以在此时创建Bitmap时使用。
4.3. Bitmap保存图像与释放资源
bitmap=BitmapFactory.decodeResource(getResources(),R.drawable.feng);
File file=new File(getFilesDir(),"lavor.jpg");
if(file.exists()){file.delete();
}
try {FileOutputStream outputStream=new FileOutputStream(file);bitmap.compress(Bitmap.CompressFormat.JPEG,90,outputStream);outputStream.flush();outputStream.close();
} catch (FileNotFoundException e) {e.printStackTrace();
} catch (IOException e) {e.printStackTrace();
}
bitmap.recycle();//释放bitmap的资源,这是一个不可逆转的操作
4.4. Bitmap获取rgb格式数组
//从bitmap中获取rgb格式的数组
byte[] getByteFromBitmap(Bitmap bitmap){int width = bitmap.getWidth();int height = bitmap.getHeight();int[] pixels = new int[width * height];bitmap.getPixels(pixels, 0, width, 0, 0, width, height);byte[] pixelsBytes = getRgbFromPixels(pixels);bitmap.recycle();return pixelsBytes;
}
byte[] getRgbFromPixels(int[] vArr) {byte[] bytes = new byte[vArr.length*3];for (int i = 0;i<vArr.length;i++){int accum = vArr[i];bytes[i*3] = (byte)((accum>>16) & 0xFF);bytes[i*3+1] = (byte)((accum>>8) & 0xFF);bytes[i*3+2] = (byte)(accum & 0xFF);
//      bytes[i*4+3] = (byte)((accum>>24) & 0xFF);}return bytes;
}
5. BitmapFactory通过BitmapFactory.Options对图像进行操作
BitmapFactory是通过BitmapFactory.Options对图像进行操作的,然后将操作后的图像生成Bitmap对象或者将操作后的图像用已经存在的Bitmap保存,当不能用之保存时会返回null。
BitmapFactory.Options中常用的字段有:
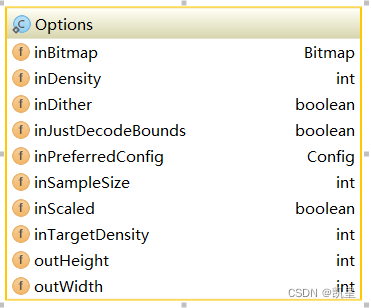
inBitmap:如果设置将会将生成的图像内容加载到该Bitmap对象中。inDensity:给Bitmap对象设置的密度,如果inScaled为true(这是默认的),而若inDensity与inTargetDensity不匹配,那么就会在Bitmap对象返回前将其缩放到匹配inTargetDensity。inDither:是否对图像进行抖动处理,默认值是false。inJustDecodeBounds:如果设置成true,表示获取Bitmap对象信息,但是不将其像素加载到内存,不会真的返回一个Bitmap给你,它仅仅会把它的宽,高取回来给你,这样就不会占用太多的内存,也就不会那么频繁的发生OOM。设置为false,BitmapFactory返回bitmap。- inMutable:如果设为true,将返回一个mutable的bitmap,可用于修改BitmapFactory加载而来的bitmap。
inPreferredConfig:Bitmap对象颜色配置信息,默认是Bitmap.Config.ARGB_8888。- ALPHA_8:每个像素用占8位,存储的是图像的透明值,占1个字节;
- RGB_565:每个像素用占16位,分别为5-R,6-G,5-B通道,占2个字节;
- ARGB-4444:每个像素占16位,即每个通道用4位表示,占2个字节;
- ARGB_8888:每个像素占32位,每个通道用8位表示,占4个字节。
inSampleSize:获取采样率,设置的值大于1时,图像高、宽分别以2的inSampleSize次方分之一缩小;
设置的值小于等于1时,图像高、宽不变。用于对图像进行压缩,设置的值为2的整数次幂或者接近2的整数次幂,当次设置为2时,宽和高为都原来的1/2,图像所占空间为原来的1/4。inScaled:设置是否缩放位图。inTargetDensity:绘制到目标Bitmap上的密度。outHeight:Bitmap对象的高度。outWidth:Bitmap对象的宽度。
BitmapFactory.Options的作用:
(1).防止内存溢出;
(2).节省内存开销;
(3).系统更流畅;
6. 使用Bitmap时防止OOM的有效方法
6.1. 高效压缩图片
/*** 谷歌推荐使用方法,从资源中加载图像,并高效压缩,有效降低OOM的概率* @param res 资源* @param resId 图像资源的资源id* @param reqWidth 要求图像压缩后的宽度* @param reqHeight 要求图像压缩后的高度* @return*/
public Bitmap decodeSampledBitmapFromResource(Resources res, int resId, int reqWidth, int reqHeight) {// 设置inJustDecodeBounds = true ,表示获取图像信息,但是不将图像的像素加入内存final BitmapFactory.Options options = new BitmapFactory.Options();options.inJustDecodeBounds = true;BitmapFactory.decodeResource(res, resId, options);// 调用方法计算合适的 inSampleSizeoptions.inSampleSize = calculateInSampleSize(options, reqWidth,reqHeight);// inJustDecodeBounds 置为 false 真正开始加载图片options.inJustDecodeBounds = false;//将options.inPreferredConfig改成Bitmap.Config.RGB_565,// 是默认情况Bitmap.Config.ARGB_8888占用内存的一般options.inPreferredConfig= Bitmap.Config.RGB_565;return BitmapFactory.decodeResource(res, resId, options);
}// 计算 BitmapFactpry 的 inSimpleSize的值的方法
public int calculateInSampleSize(BitmapFactory.Options options, int reqWidth, int reqHeight) {if (reqWidth == 0 || reqHeight == 0) {return 1;}// 获取图片原生的宽和高final int height = options.outHeight;final int width = options.outWidth;Log.d(TAG, "origin, w= " + width + " h=" + height);int inSampleSize = 1;// 如果原生的宽高大于请求的宽高,那么将原生的宽和高都置为原来的一半if (height > reqHeight || width > reqWidth) {final int halfHeight = height / 2;final int halfWidth = width / 2;// 主要计算逻辑// Calculate the largest inSampleSize value that is a power of 2 and// keeps both// height and width larger than the requested height and width.while ((halfHeight / inSampleSize) >= reqHeight && (halfWidth / inSampleSize) >= reqWidth) {inSampleSize *= 2;}}Log.d(TAG, "sampleSize:" + inSampleSize);return inSampleSize;
}
6.2. 使用缓存
常用的缓存有内存缓存LruCache和磁盘缓存DiskLruCache。