技术背景
在前面两篇文章中,我们分别介绍了分子动力学模拟软件MindSponge的软件架构和安装与使用。这里我们进入到实用化阶段,假定大家都已经在本地部署好了基于MindSpore的MindSponge的编程环境,开始用MindSponge去做一些真正的分子模拟的工作。那么分子模拟的第一步,我们就需要在MindSponge中去定义一个分子系统Molecule()。
基础类Molecule的解析
我们先来看一下源代码中的Molecule这个类的自我介绍:
class Molecule(Cell):r"""Base class for molecular system, used as the "system module" in MindSPONGE.The `Molecule` Cell can represent a molecule or a system consisting of multiple molecules.The major components of the `Molecule` Cell is the `Residue` Cell. A `Molecule` Cell cancontain multiple `Residue` Cells.Args:atoms(Union[List[Union[str, int]], ndarray]): Array of atoms. The data in array can be str of atomname or int of atomic number. Defulat: Noneatom_name(Union[List[str], ndarray]): Array of atom name with data type `str`. Defulat: Noneatom_type(Union[List[str], ndarray]): Array of atom type with data type `str`. Defulat: Noneatom_mass(Union[Tensor, ndarray, List[float]]): Array of atom mass of shape `(B, A)` with data type`float`. Defulat: Noneatom_charge(Union[Tensor, ndarray, List[float]]): Array of atom charge of shape `(B, A)` with data type`float`. Defulat: Noneatomic_number(Union[Tensor, ndarray, List[float]]): Array of atomic number of shape `(B, A)` with data type`int`. Defulat: Nonebond(Union[Tensor, ndarray, List[int]]): Array of bond connection of shape `(B, b, 2)` with datatype `int`. Defulat: Nonecoordinate(Union[Tensor, ndarray, List[float]]): Tensor of atomic coordinates :math:`R` of shape`(B, A, D)` with data type `float`. Default: Nonepbc_box(Union[Tensor, ndarray, List[float]]): Tensor of box size :math:`\vec{L}` of periodic boundarycondition (PBC). The shape of tensor is `(B, D)`,and the data type is `float`. Default: Nonetemplate(Union[dict, str, List[Union[dict, str]]]): Template for molecule. It can be a `dict` in MindSPONGEtemplate format or a `str` for the filename of aMindSPONGE template file. If a `str` is given,it will first look for a file with the same name in thecurrent directory. If the file does not exist, it willsearch in the built-in template directory ofMindSPONGE (`mindsponge.data.template`).Default: None.residue(Union[Residue, List[Residue]]): Residue or a list of residues. If template is not None,only the residues in the template will be used.Default: None.length_unit(str): Length unit. If `None` is given, the global lengthunits will be used. Default: NoneOutputs:- coordinate, Tensor of shape `(B, A, D)`. Data type is float.- pbc_box, Tensor of shape `(B, D)`. Data type is float.Supported Platforms:``Ascend`` ``GPU``Symbols:B: Batchsize, i.e. number of walkers in simulationA: Number of atoms.b: Number of bonds.D: Spatial dimension of the simulation system. Usually is 3."""
可以先看一下Molecule所接收的信息,其实可以主要分为以下几大类别:
- 原子特征信息。用于区分不同原子之间的差异性,比如atom_name原子名称、atom_type原子类型、atomic_number原子序数等。
- 拓扑信息。在构建Molecule的时候需要传入键连信息bond,否则不带键连关系的Molecule计算出来的力场能量是错误的。
- 构象信息。主要是原子坐标coordinate和周期性边界条件pbc_box,作为近邻表计算和力场能量计算的输入,但不作为拓扑连接信息的输入。
- 模块化信息。除了逐个原子的去构建一个Molecule,还可以定义好一系列完整的残基Residue再输入给Molecule进行构建,或者通过模板template来进行构建。
- 单位信息。主要包含长度单位length_unit和能量单位energy_unit。
上述主要是给Molecule的输入信息,输入给Molecule之后在内部构建build一次,才能得到一个最终的分子系统对象。接下来看看构建之后的Molecule的一些重要内置属性(self.xxx):
- 原子特征信息。除了上述传入的那些信息之外,还有原子数num_atoms,batch数量num_walker以及灵活的维度数量dimension。除了每个原子的基本类型外,还保存了一个heavy_atom_mask重原子的信息,便于快速区分重原子和氢原子。
- 拓扑信息。除了键连关系bonds信息,还有h_bonds氢原子成键的信息。
- 构象信息。主要就是coordinate原子坐标,因为需要在Updater中更新迭代,因此这里的coordinate需要是一个Parameter的类型,而不是普通的Tensor。
- 模块化信息。在构建的过程中,对传入的Residue也都进行了extend,因此最终Residue内部的这些信息,都会被合并到前面提到的Molecule的原子特征信息和拓扑信息、构象信息中,同时会保留一个atom_resid用于追溯原子所在的residue。如果在template模板中有配置一些约束限制,比如settle约束算法相关的参数settle_index和settle_length,也会保存在Molecule的属性中,用于后续约束算法的计算。
- 单位信息。units把相关的单位信息都存储在一个Units对象中,支持从global units中调用,可以随时调用。
除了内置属性,Molecule还有一些内置函数可以关注一下:
- 单位转化。主要是convert_length_from和convert_length_to两个函数,用于执行长度单位的变换。
- 系统扩展函数。比如copy函数,可以用于将本系统拷贝一份,但是该拷贝的过程会生成一个新的对象,而不是原有的Molecule对象。但如果是多个的Molecule对象,可以用内置函数append进行合并。如果需要节省一些麻烦,想对系统进行扩展,可以直接使用内置函数reduplicate,在系统内部复制一份。类似于append的功能,可以使用内置函数add_residue来添加新的residue。上述几种方法主要针对于非周期性的体系,如果是带有周期性边界条件的体系,直接使用repeat_box函数即可完成对体系的快速复制。
- 构建函数。一般情况下对于只是想做MD的童鞋而言,没有必要使用到build_system构建系统和build_space构建构象这些函数,但是如果有需要自行调整Molecule的内容时,就需要重新build一次。
- 补介质函数。一般给定的pdb文件会丢失一些氢原子和溶剂分子的信息,这些都可以在做模拟之前手动补上。目前MindSponge支持的是对体系加水分子fill_water,可以指定溶剂层的厚度,或者指定一个盒子的大小。
- 回调函数。在深度学习或者MindSponge分子动力学模拟的过程中,我们会使用到回调函数CallBack来对输出内容进行追踪。但是CallBack本身是不保存任何体系相关的信息的,因此追踪的内容其实也是从Molecule和ForceField内部进行回调。比如在Molecule中,可以调用get_atoms,get_coordinate,get_pbc_box等等函数,而如果直接使用MindSpore的Cell中所特有的construct函数,这里也会返回coordinate和pbc_box两个信息,这些都可以认为是Molecule类的“回调函数”。
从模板定义一个分子
关于MindSponge的安装和使用,在这里我们就不重复赘述了,假设大家已经完成了MindSponge的安装。但是需要提一句的是,在开始MindSponge模拟前,最好在python脚本的最前面加上这样一些环境变量的配置,否则容易报错:
import os
os.environ['GLOG_v']='4'
os.environ['MS_JIT_MODULES']='sponge'
接下来我们就可以简单的使用模板文件去创建一个新的分子:
from sponge import Molecule
system = Molecule(template='water.spce.yaml')
print ('The number of atoms in the system is: ', system.num_atoms)
print ('All the atom names in the system are: ', system.atom_name)
print ('The coordinates of atoms are: \n{}'.format(system.coordinate.asnumpy()))
输出的结果如下所示:
The number of atoms in the system is:  3
All the atom names in the system are:  [['O' 'H1' 'H2']]
The coordinates of atoms are:
[[[ 0.          0.          0.        ][ 0.08164904  0.0577359   0.        ][-0.08164904  0.0577359   0.        ]]]
这里因为water.spce.yaml是一个预置的模板,类似的还有water.tip3p.yaml。这种预置的模板我们可以直接当做template来创建,但如果是用户自行定义的模板文件,最好在这里写清楚yaml文件的绝对路径,否则会导致报错。相关yaml文件的内容如下所示:
template:base: water_3p.yamlWAT:atom_mass: [15.9994, 1.008, 1.008]atom_charge: [-0.8476, 0.4238, 0.4238]settle:mandatory: falselength_unit: nmdistance:OW-HW: 0.1HW-HW: 0.16330
molecule:residue:- WATlength_unit: nmcoordinate:- [0.0, 0.0, 0.0]- [0.081649043, 0.057735897, 0.0]- [-0.081649043, 0.057735897, 0.0]
这里的base是指向了另外一个较为基础的yaml参数文件:
template:WAT:atom_name: [O, H1, H2]atom_type: [OW, HW, HW]atom_mass: [16.00, 1.008, 1.008]atomic_number: [8, 1, 1]bond:- [0, 1]- [0, 2]head_atom: nulltail_atom: null
有了这些参考,用户就可以自行定义一些模板,用于计算。
从文件定义一个分子
MindSponge也支持一些特定格式的分子导入,比如mol2格式的分子和pdb格式的蛋白质分子,这个章节介绍一下如何将文件导入为一个MindSponge的Molecule。比如我这里有一个非常简单的pdb格式的多肽链:
REMARK   Generated By Xponge (Molecule)
ATOM      1    N ALA     1      -0.095 -11.436  -0.780
ATOM      2   CA ALA     1      -0.171 -10.015  -0.507
ATOM      3   CB ALA     1       1.201  -9.359  -0.628
ATOM      4    C ALA     1      -1.107  -9.319  -1.485
ATOM      5    O ALA     1      -1.682  -9.960  -2.362
ATOM      6    N ARG     2      -1.303  -8.037  -1.397
ATOM      7   CA ARG     2      -2.194  -7.375  -2.328
ATOM      8   CB ARG     2      -3.606  -7.943  -2.235
ATOM      9   CG ARG     2      -4.510  -7.221  -3.228
ATOM     10   CD ARG     2      -5.923  -7.789  -3.136
ATOM     11   NE ARG     2      -6.831  -7.111  -4.087
ATOM     12   CZ ARG     2      -8.119  -7.421  -4.205
ATOM     13  NH1 ARG     2      -8.686  -8.371  -3.468
ATOM     14  NH2 ARG     2      -8.844  -6.747  -5.093
ATOM     15    C ARG     2      -2.273  -5.882  -2.042
ATOM     16    O ARG     2      -1.630  -5.388  -1.119
ATOM     17    N ALA     3      -3.027  -5.119  -2.777
ATOM     18   CA ALA     3      -3.103  -3.697  -2.505
ATOM     19   CB ALA     3      -1.731  -3.041  -2.625
ATOM     20    C ALA     3      -4.039  -3.001  -3.483
ATOM     21    O ALA     3      -4.614  -3.643  -4.359
ATOM     22    N ALA     4      -4.235  -1.719  -3.394
ATOM     23   CA ALA     4      -5.126  -1.057  -4.325
ATOM     24   CB ALA     4      -6.538  -1.625  -4.233
ATOM     25    C ALA     4      -5.205   0.436  -4.039
ATOM     26    O ALA     4      -4.561   0.930  -3.116
ATOM     27  OXT ALA     4      -5.915   1.166  -4.728
TER
使用MindSponge来读取该pdb文件的方法为[*注:由于一般pdb文件中会忽略氢原子,因此加载的时候需要使用rebuild_hydrogen将其重构成一个完整的分子]:
from sponge import Protein
system = Protein('case1.pdb', rebuild_hydrogen=True)
print ('The number of atoms in the system is: ', system.num_atoms)
print ('All the atom names in the system are: ', system.atom_name)
相应的输出结果为:
[MindSPONGE] Adding 57 hydrogen atoms for the protein molecule in 0.007 seconds.
The number of atoms in the system is:  57
All the atom names in the system are:  [['N' 'CA' 'CB' 'C' 'O' 'H1' 'H2' 'H3' 'HA' 'HB1' 'HB2' 'HB3' 'N' 'CA''CB' 'CG' 'CD' 'NE' 'CZ' 'NH1' 'NH2' 'C' 'O' 'H' 'HA' 'HB2' 'HB3' 'HG2''HG3' 'HD2' 'HD3' 'HE' 'HH11' 'HH12' 'HH21' 'HH22' 'N' 'CA' 'CB' 'C''O' 'H' 'HA' 'HB1' 'HB2' 'HB3' 'N' 'CA' 'CB' 'C' 'O' 'OXT' 'H' 'HA''HB1' 'HB2' 'HB3']]
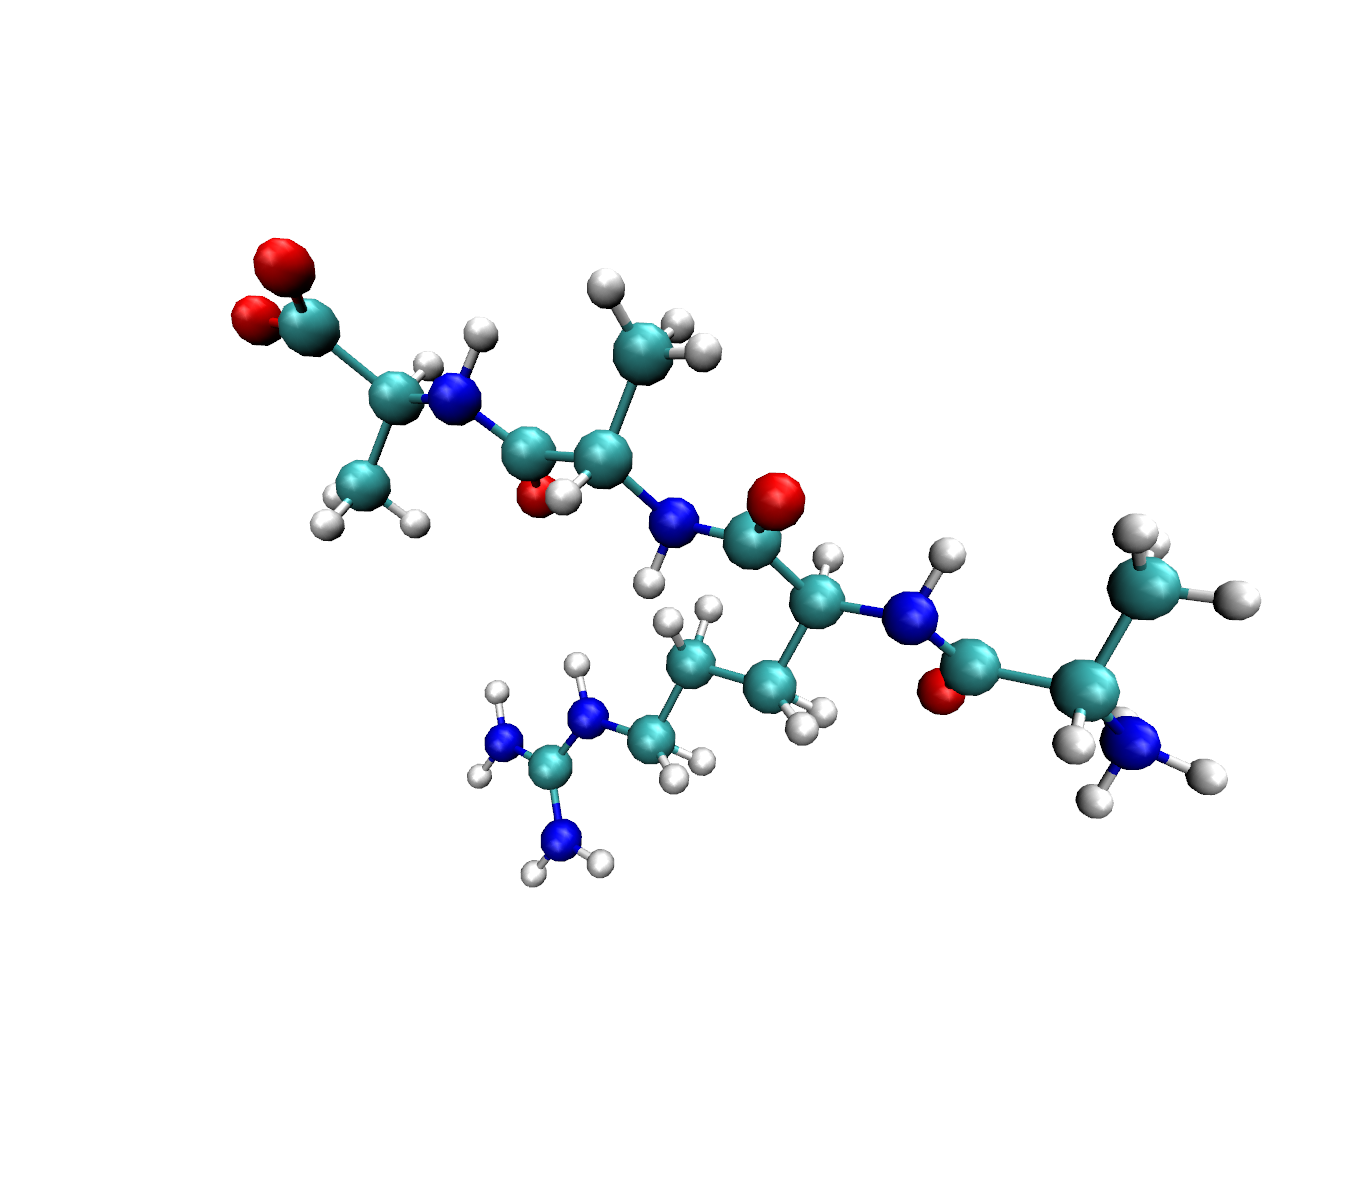
可以看到的是,在对应的位置上,我们将氢原子补在了一个相对合适的位置。一般情况下,重构完氢原子之后,需要对系统进行一个能量极小化,否则会导致初始系统的能量过于不稳定。具体的加氢效果可以看一下这个运行的结果:

其实加氢是很难做到一步到位的,但是我们可以尽可能的将氢原子摆放在一个相对合理的位置,便于后续的能量计算和优化。
自定义分子
由于python这一编程语言的灵活性,使得我们不仅支持从文件和模板文件中去定义一个分子系统,还可以直接用脚本的形式传一系列的python列表给Molecule来构建一个分子系统。比如我们只传原子类型和坐标还有键连关系,就能构建一个简单的水分子:
from sponge import Molecule
system = Molecule(atoms=['O', 'H', 'H'],coordinate=[[0, 0, 0], [0.1, 0, 0], [-0.0333, 0.0943, 0]],bonds=[[[0, 1], [0, 2]]])
print ('The number of atoms in the system is: ', system.num_atoms)
print ('All the atom names in the system are: ', system.atom_name)
print ('The coordinates of atoms are: \n{}'.format(system.coordinate.asnumpy()))
相应的输出结果如下所示:
The number of atoms in the system is:  3
All the atom names in the system are:  [['O' 'H' 'H']]
The coordinates of atoms are:
[[[ 0.      0.      0.    ][ 0.1     0.      0.    ][-0.0333  0.0943  0.    ]]]
总结概要
本文通过解析MindSponge的源码实现,详细介绍了在MindSponge中Molecule基础分子类的内置属性和内置函数,以及三种相应的分子系统定义方法:我们既可以使用yaml模板文件来定义一个分子系统,也可以从mol2和pdb文件格式中直接加载一个Molecule,还可以直接使用python列表的形式传入一些手动定义的内容,直接构建一个Molecule。有了最基础的分子系统之后,后面就可以开始定义一些能量项和迭代器,开始分子动力学模拟。


