黑马程序员JavaWeb开发教程
文章目录
- 一、页面原型
- 二、接口文档
- 三开发
- 1、controller
- 2、service
- (1)service接口层
- (2)Service实现层
- 3、 mapper
- 4、postman
- 优化
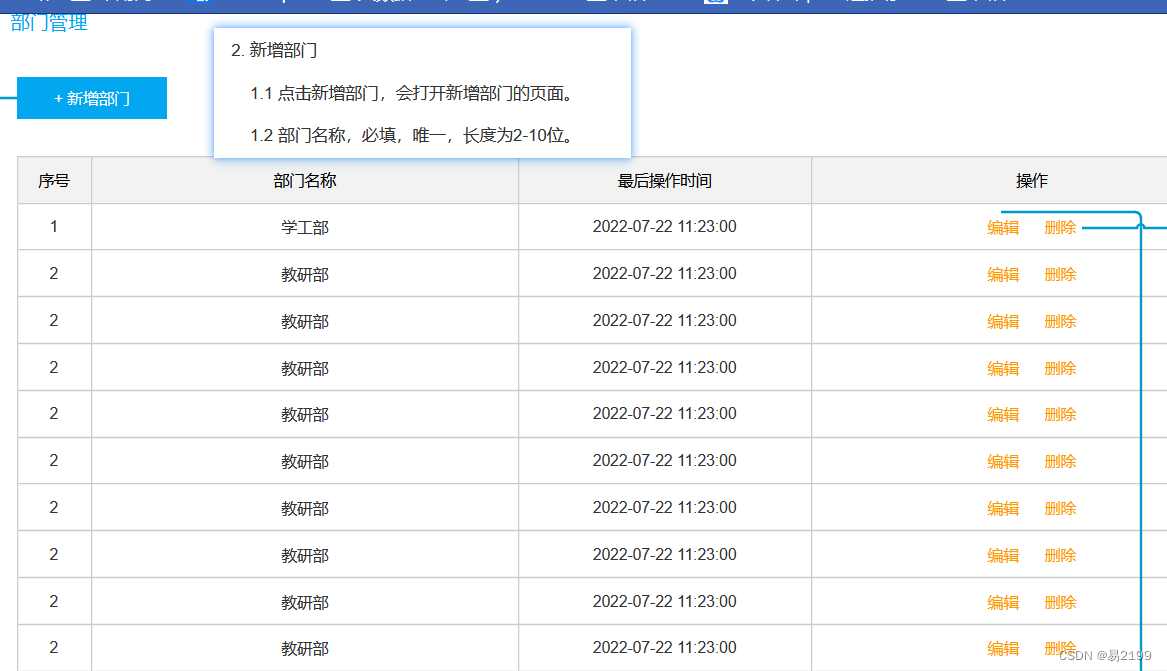
一、页面原型
二、接口文档
在这里插入图片描述
三开发
1、controller
- 请求方式是post,所以使用 @PostMapping 注解
- 传递的参数是JSON格式的所以使用 @RequestBody 注解
/*** 根据部门名称新增部门* @param dept 部门* @return*/@PostMapping("/depts")public Result insertDeptByName(@RequestBody Dept dept){//打印日志信息log.info("根据部门名称新增部门");//调用servicedeptService.insertDeptByName(dept);return Result.success();}
2、service
(1)service接口层
/*** 根据部门名称新增部门* @param dept*/void insertDeptByName(Dept dept);
(2)Service实现层
- 补充基础数据(因为前端页面只需要传递一个参数 name(部门名称))
- 调用Mapper接口新增数据
/*** 根据部门名称新增部门* @param dept*/@Overridepublic void insertDeptByName(Dept dept) {//补充基础数据dept.setCreateTime(LocalDateTime.now());dept.setUpdateTime(LocalDateTime.now());//调用Mapper接口新增数据deptMapper.insertDeptByName(dept);}
3、 mapper
- 因为SQL语句比较简单,直接使用注解即可
/*** 根据部门名称新增部门* @param dept*/@Insert("insert into dept(name,create_time,update_time) values(#{name},#{createTime},#{updateTime})")void insertDeptByName(Dept dept);
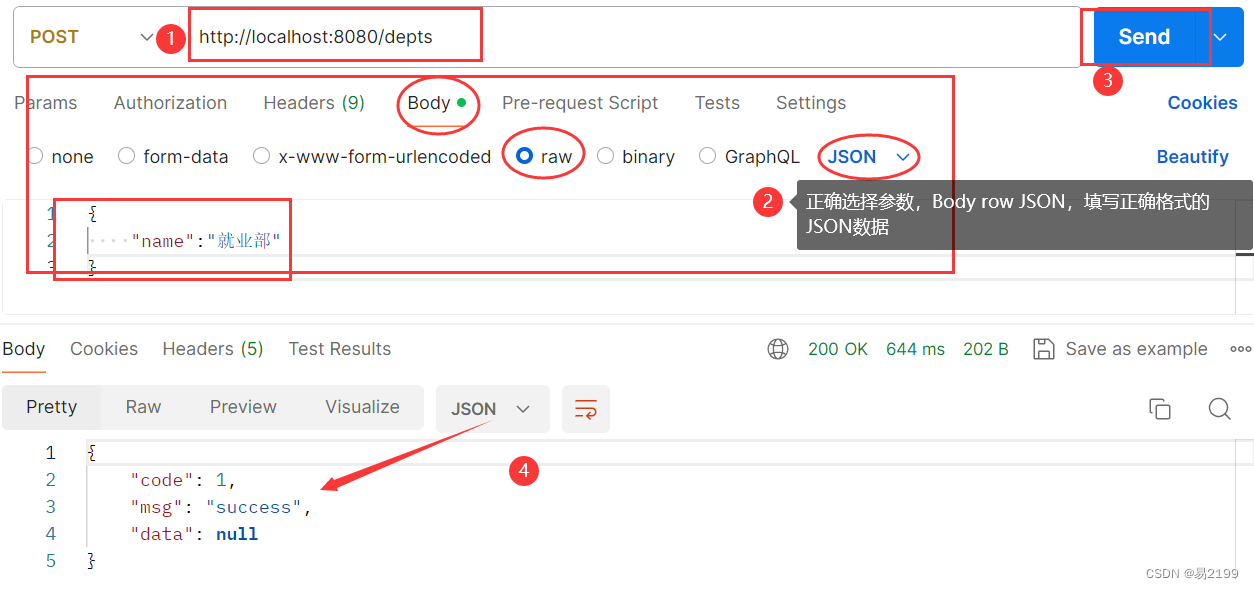
4、postman
优化
- 因为查询,删除,新增的请求路径中都有"/depts" 所以我们可以使用 @RequestMapping 注解,将这个路径抽取出来,代码如下
- 注意:一个完整的请求路径,应该是类上的@RequestMapping的value属性+方法上的@RequestMapping的vaule 属性(也就是访问的时候,路径还是和原来一样)
package com.itheima.controller;import com.itheima.pojo.Dept;
import com.itheima.pojo.Result;
import com.itheima.service.DeptService;
import lombok.extern.slf4j.Slf4j;
import org.apache.ibatis.annotations.Delete;
import org.springframework.beans.factory.annotation.Autowired;
import org.springframework.web.bind.annotation.*;import javax.websocket.server.PathParam;
import java.util.List;@Slf4j // 日志
@RestController
@RequestMapping("/depts")
public class DeptController {@Autowiredprivate DeptService deptService;/*** 查询全部部门数据** @return*/@GetMappingpublic Result list() {//打印日志信息log.info("查询全部部门数据");//调用service处理数据List<Dept> deptList = deptService.list();return Result.success(deptList);}/*** 根据id删除部门* @param id 部门id* @return*/@DeleteMapping("/{id}")public Result deleteDeptByID(@PathVariable Integer id) {log.info("根据id删除部门");//调用servicedeptService.deleteDeptById(id);return Result.success();}/*** 根据部门名称新增部门* @param dept 部门* @return*/@PostMappingpublic Result insertDeptByName(@RequestBody Dept dept){//打印日志信息log.info("根据部门名称新增部门");//调用servicedeptService.insertDeptByName(dept);return Result.success();}
}

![[C++ QT项目实战]----C++ QT系统登陆界面设计](https://img-blog.csdnimg.cn/direct/326a7b45aa3c4294ae76beb7926fef87.png)

