编辑:OAK中国
首发:oakchina.cn
喜欢的话,请多多👍⭐️✍
内容可能会不定期更新,官网内容都是最新的,请查看首发地址链接。
Hello,大家好,这里是OAK中国,我是Ashely。
专注科技,专注分享。
最近真的很忙,已经好久不发博客了。这个月有朋友问怎么在OAK相机上部署yolov9,正好给大家出个教程。
1.其他Yolo转换及使用教程请参考
2.检测类的yolo模型建议使用在线转换(地址),如果在线转换不成功,你再根据本教程来做本地转换。
▌.pt 转换为 .onnx
使用下列脚本(将脚本放到 YOLOv9 根目录中)将 pytorch 模型转换为 onnx 模型,若已安装 openvino_dev,则可进一步转换为 OpenVINO 模型:
示例用法:
python export_onnx.py -w <path_to_model>.pt -imgsz 640
export_onnx.py :
#!/usr/bin/env python3
# -*- coding:utf-8 -*-
import argparse
import json
import logging
import math
import os
import platform
import sys
import time
import warnings
from io import BytesIO
from pathlib import Pathimport torch
from torch import nnwarnings.filterwarnings("ignore")FILE = Path(__file__).resolve()
ROOT = FILE.parents[0]  # YOLO root directory
if str(ROOT) not in sys.path:sys.path.append(str(ROOT))  # add ROOT to PATH
if platform.system() != "Windows":ROOT = Path(os.path.relpath(ROOT, Path.cwd()))  # relativefrom models.experimental import attempt_load
from models.yolo import DDetect, Detect, DualDDetect, DualDetect, TripleDDetect, TripleDetect
from utils.torch_utils import select_devicetry:from rich import printfrom rich.logging import RichHandlerlogging.basicConfig(level="INFO",format="%(message)s",datefmt="[%X]",handlers=[RichHandler(rich_tracebacks=False,show_path=False,)],)
except ImportError:logging.basicConfig(level="INFO",format="%(asctime)s\t%(levelname)s\t%(message)s",datefmt="[%X]",)class DetectV9(nn.Module):"""YOLOv9 Detect head for detection models"""dynamic = False  # force grid reconstructionexport = False  # export modeshape = Noneanchors = torch.empty(0)  # initstrides = torch.empty(0)  # initdef __init__(self, old_detect):super().__init__()self.nc = old_detect.nc  # number of classesself.nl = old_detect.nl  # number of detection layersself.reg_max = old_detect.reg_max  # DFL channels (ch[0] // 16 to scale 4/8/12/16/20 for n/s/m/l/x)self.no = old_detect.no  # number of outputs per anchorself.stride = old_detect.stride  # strides computed during buildself.cv2 = old_detect.cv2self.cv3 = old_detect.cv3self.dfl = old_detect.dflself.f = old_detect.fself.i = old_detect.idef forward(self, x):shape = x[0].shape  # BCHWd1 = [torch.cat((self.cv2[i](x[i]), self.cv3[i](x[i])), 1) for i in range(self.nl)]box, cls = torch.cat([xi.view(shape[0], self.no, -1) for xi in d1], 2).split((self.reg_max * 4, self.nc), 1)box = self.dfl(box)cls_output = cls.sigmoid()# Get the maxconf, _ = cls_output.max(1, keepdim=True)# Concaty = torch.cat([box, conf, cls_output], dim=1)# Split to 3 channelsoutputs = []start, end = 0, 0for xi in x:end += xi.shape[-2] * xi.shape[-1]outputs.append(y[:, :, start:end].view(xi.shape[0], -1, xi.shape[-2], xi.shape[-1]))start += xi.shape[-2] * xi.shape[-1]return outputsdef bias_init(self):# Initialize Detect() biases, WARNING: requires stride availabilitym = self  # self.model[-1]  # Detect() modulefor a, b, s in zip(m.cv2, m.cv3, m.stride):  # froma[-1].bias.data[:] = 1.0  # boxb[-1].bias.data[: m.nc] = math.log(5 / m.nc / (640 / s) ** 2)  # cls (.01 objects, 80 classes, 640 img)class DualDetectV9(DetectV9):def __init__(self, old_detect):super().__init__(old_detect)self.cv4 = old_detect.cv4self.cv5 = old_detect.cv5self.dfl2 = old_detect.dfl2def forward(self, x):shape = x[0].shape  # BCHWd2 = [torch.cat((self.cv4[i](x[self.nl + i]), self.cv5[i](x[self.nl + i])), 1) for i in range(self.nl)]box2, cls2 = torch.cat([di.view(shape[0], self.no, -1) for di in d2], 2).split((self.reg_max * 4, self.nc), 1)box2 = self.dfl2(box2)cls_output2 = cls2.sigmoid()# Get the maxconf2, _ = cls_output2.max(1, keepdim=True)# Concaty2 = torch.cat([box2, conf2, cls_output2], dim=1)# Split to 3 channelsoutputs2 = []start2, end2 = 0, 0for _i, xi in enumerate(x[3:]):end2 += xi.shape[-2] * xi.shape[-1]outputs2.append(y2[:, :, start2:end2].view(xi.shape[0], -1, xi.shape[-2], xi.shape[-1]))start2 += xi.shape[-2] * xi.shape[-1]return outputs2def bias_init(self):# Initialize Detect() biases, WARNING: requires stride availabilitym = self  # self.model[-1]  # Detect() modulefor a, b, s in zip(m.cv2, m.cv3, m.stride):  # froma[-1].bias.data[:] = 1.0  # boxb[-1].bias.data[: m.nc] = math.log(5 / m.nc / (640 / s) ** 2)  # cls (5 objects and 80 classes per 640 image)for a, b, s in zip(m.cv4, m.cv5, m.stride):  # froma[-1].bias.data[:] = 1.0  # boxb[-1].bias.data[: m.nc] = math.log(5 / m.nc / (640 / s) ** 2)  # cls (5 objects and 80 classes per 640 image)class TripleDetectV9(DualDetectV9):def __init__(self, old_detect):super().__init__(old_detect)self.cv6 = old_detect.cv6self.cv7 = old_detect.cv7self.dfl3 = old_detect.dfl3def forward(self, x):shape = x[0].shape  # BCHWd3 = [torch.cat((self.cv6[i](x[self.nl * 2 + i]), self.cv7[i](x[self.nl * 2 + i])),1,)for i in range(self.nl)]box3, cls3 = torch.cat([di.view(shape[0], self.no, -1) for di in d3], 2).split((self.reg_max * 4, self.nc), 1)box3 = self.dfl3(box3)cls_output3 = cls3.sigmoid()# Get the maxconf3, _ = cls_output3.max(1, keepdim=True)# Concaty3 = torch.cat([box3, conf3, cls_output3], dim=1)# Split to 3 channelsoutputs3 = []start3, end3 = 0, 0for _i, xi in enumerate(x[6:]):end3 += xi.shape[-2] * xi.shape[-1]outputs3.append(y3[:, :, start3:end3].view(xi.shape[0], -1, xi.shape[-2], xi.shape[-1]))start3 += xi.shape[-2] * xi.shape[-1]return outputs3def bias_init(self):# Initialize Detect() biases, WARNING: requires stride availabilitym = self  # self.model[-1]  # Detect() modulefor a, b, s in zip(m.cv2, m.cv3, m.stride):  # froma[-1].bias.data[:] = 1.0  # boxb[-1].bias.data[: m.nc] = math.log(5 / m.nc / (640 / s) ** 2)  # cls (5 objects and 80 classes per 640 image)for a, b, s in zip(m.cv4, m.cv5, m.stride):  # froma[-1].bias.data[:] = 1.0  # boxb[-1].bias.data[: m.nc] = math.log(5 / m.nc / (640 / s) ** 2)  # cls (5 objects and 80 classes per 640 image)for a, b, s in zip(m.cv6, m.cv7, m.stride):  # froma[-1].bias.data[:] = 1.0  # boxb[-1].bias.data[: m.nc] = math.log(5 / m.nc / (640 / s) ** 2)  # cls (5 objects and 80 classes per 640 image)def parse_args():parser = argparse.ArgumentParser(description="Tool for converting Yolov9 models to the blob format used by OAK",formatter_class=argparse.ArgumentDefaultsHelpFormatter,)parser.add_argument("-m","-i","-w","--input_model",type=Path,required=True,help="weights path",)parser.add_argument("-imgsz","--img-size",nargs="+",type=int,default=[640, 640],help="image size",)  # height, widthparser.add_argument("-op", "--opset", type=int, default=12, help="opset version")parser.add_argument("-n","--name",type=str,help="The name of the model to be saved, none means using the same name as the input model",)parser.add_argument("-o","--output_dir",type=Path,help="Directory for saving files, none means using the same path as the input model",)parser.add_argument("-b","--blob",action="store_true",help="OAK Blob export",)parser.add_argument("-s","--spatial_detection",action="store_true",help="Inference with depth information",)parser.add_argument("-sh","--shaves",type=int,help="Inference with depth information",)parser.add_argument("-t","--convert_tool",type=str,help="Which tool is used to convert, docker: should already have docker (https://docs.docker.com/get-docker/) and docker-py (pip install docker) installed; blobconverter: uses an online server to convert the model and should already have blobconverter (pip install blobconverter); local: use openvino-dev (pip install openvino-dev) and openvino 2022.1 ( https://docs.oakchina.cn/en/latest /pages/Advanced/Neural_networks/local_convert_openvino.html#id2) to convert",default="blobconverter",choices=["docker", "blobconverter", "local"],)args = parser.parse_args()args.input_model = args.input_model.resolve().absolute()if args.name is None:args.name = args.input_model.stemif args.output_dir is None:args.output_dir = args.input_model.parentargs.img_size *= 2 if len(args.img_size) == 1 else 1  # expandif args.shaves is None:args.shaves = 5 if args.spatial_detection else 6return argsdef export(input_model, img_size, output_model, opset, **kwargs):t = time.time()# Load PyTorch modeldevice = select_device("cpu")# load FP32 modelmodel = attempt_load(input_model, device=device, inplace=True, fuse=True)labels = model.module.names if hasattr(model, "module") else model.names  # get class nameslabels = labels if isinstance(labels, list) else list(labels.values())# check num classes and labelsassert model.nc == len(labels), f"Model class count {model.nc} != len(names) {len(labels)}"# Replace with the custom Detection Headif isinstance(model.model[-1], (Detect, DDetect)):logging.info("Replacing model.model[-1] with DetectV9")model.model[-1] = DetectV9(model.model[-1])elif isinstance(model.model[-1], (DualDetect, DualDDetect)):logging.info("Replacing model.model[-1] with DualDetectV9")model.model[-1] = DualDetectV9(model.model[-1])elif isinstance(model.model[-1], (TripleDetect, TripleDDetect)):logging.info("Replacing model.model[-1] with TripleDetectV9")model.model[-1] = TripleDetectV9(model.model[-1])num_branches = model.model[-1].nl# Inputimg = torch.zeros(1, 3, *img_size).to(device)  # image size(1,3,320,320) Detectionmodel.eval()model(img)  # dry runs# ONNX exporttry:import onnxprint()logging.info(f"Starting ONNX export with onnx {onnx.__version__}...")output_list = ["output%s_yolov6r2" % (i + 1) for i in range(num_branches)]with BytesIO() as f:torch.onnx.export(model,img,f,verbose=False,opset_version=opset,input_names=["images"],output_names=output_list,)# Checksonnx_model = onnx.load_from_string(f.getvalue())  # load onnx modelonnx.checker.check_model(onnx_model)  # check onnx modeltry:import onnxsimlogging.info("Starting to simplify ONNX...")onnx_model, check = onnxsim.simplify(onnx_model)assert check, "assert check failed"except ImportError:logging.warning("onnxsim is not found, if you want to simplify the onnx, "+ "you should install it:\n\t"+ "pip install -U onnxsim onnxruntime\n"+ "then use:\n\t"+ f'python -m onnxsim "{output_model}" "{output_model}"')except Exception:logging.exception("Simplifier failure")onnx.save(onnx_model, output_model)logging.info(f"ONNX export success, saved as:\n\t{output_model}")except Exception:logging.exception("ONNX export failure")# generate anchors and sidesanchors = []# generate masksmasks = {}logging.info(f"anchors:\n\t{anchors}")logging.info(f"anchor_masks:\n\t{masks}")export_json = output_model.with_suffix(".json")export_json.write_text(json.dumps({"nn_config": {"output_format": "detection","NN_family": "YOLO","input_size": f"{img_size[0]}x{img_size[1]}","NN_specific_metadata": {"classes": model.nc,"coordinates": 4,"anchors": anchors,"anchor_masks": masks,"iou_threshold": 0.3,"confidence_threshold": 0.5,},},"mappings": {"labels": labels},},indent=4,))logging.info(f"Anchors data export success, saved as:\n\t{export_json}")# Finishlogging.info("Export complete (%.2fs).\n" % (time.time() - t))def convert(convert_tool, output_model, shaves, output_dir, name, **kwargs):t = time.time()export_dir: Path = output_dir.joinpath(name + "_openvino")export_dir.mkdir(parents=True, exist_ok=True)export_xml = export_dir.joinpath(name + ".xml")export_blob = export_dir.joinpath(name + ".blob")if convert_tool == "blobconverter":import blobconverterblobconverter.from_onnx(model=str(output_model),data_type="FP16",shaves=shaves,use_cache=False,version="2021.4",output_dir=export_dir,optimizer_params=["--scale=255","--reverse_input_channel",# "--use_new_frontend",],# download_ir=True,)"""with ZipFile(blob_path, "r", ZIP_LZMA) as zip_obj:for name in zip_obj.namelist():zip_obj.extract(name,export_dir,)blob_path.unlink()"""elif convert_tool == "docker":import dockerexport_dir = Path("/io").joinpath(export_dir.name)export_xml = export_dir.joinpath(name + ".xml")export_blob = export_dir.joinpath(name + ".blob")client = docker.from_env()image = client.images.pull("openvino/ubuntu20_dev", tag="2022.3.1")docker_output = client.containers.run(image=image.tags[0],command=f"bash -c \"mo -m {name}.onnx -n {name} -o {export_dir} --static_shape --reverse_input_channels --scale=255 --use_new_frontend && echo 'MYRIAD_ENABLE_MX_BOOT NO' | tee /tmp/myriad.conf >> /dev/null && /opt/intel/openvino/tools/compile_tool/compile_tool -m {export_xml} -o {export_blob} -ip U8 -VPU_NUMBER_OF_SHAVES {shaves} -VPU_NUMBER_OF_CMX_SLICES {shaves} -d MYRIAD -c /tmp/myriad.conf\"",remove=True,volumes=[f"{output_dir}:/io",],working_dir="/io",)logging.info(docker_output.decode("utf8"))else:import subprocess as sp# OpenVINO exportlogging.info("Starting to export OpenVINO...")OpenVINO_cmd = f"mo --input_model {output_model} --output_dir {export_dir} --data_type FP16 --scale 255 --reverse_input_channel"try:sp.check_output(OpenVINO_cmd, shell=True)logging.info(f"OpenVINO export success, saved as {export_dir}")except sp.CalledProcessError:logging.exception("")logging.warning("OpenVINO export failure!")logging.warning(f"By the way, you can try to export OpenVINO use:\n\t{OpenVINO_cmd}")# OAK Blob exportlogging.info("Then you can try to export blob use:")blob_cmd = ("echo 'MYRIAD_ENABLE_MX_BOOT ON' | tee /tmp/myriad.conf"+ f"compile_tool -m {export_xml} -o {export_blob} -ip U8 -d MYRIAD -VPU_NUMBER_OF_SHAVES {shaves} -VPU_NUMBER_OF_CMX_SLICES {shaves} -c /tmp/myriad.conf")logging.info(f"{blob_cmd}")logging.info("compile_tool maybe in the path: /opt/intel/openvino/tools/compile_tool/compile_tool, if you install openvino 2022.1 with apt")logging.info("Convert complete (%.2fs).\n" % (time.time() - t))if __name__ == "__main__":args = parse_args()logging.info(args)print()output_model = args.output_dir / (args.name + ".onnx")export(output_model=output_model, **vars(args))if args.blob:convert(output_model=output_model, **vars(args))
可以使用 Netron 查看模型结构:
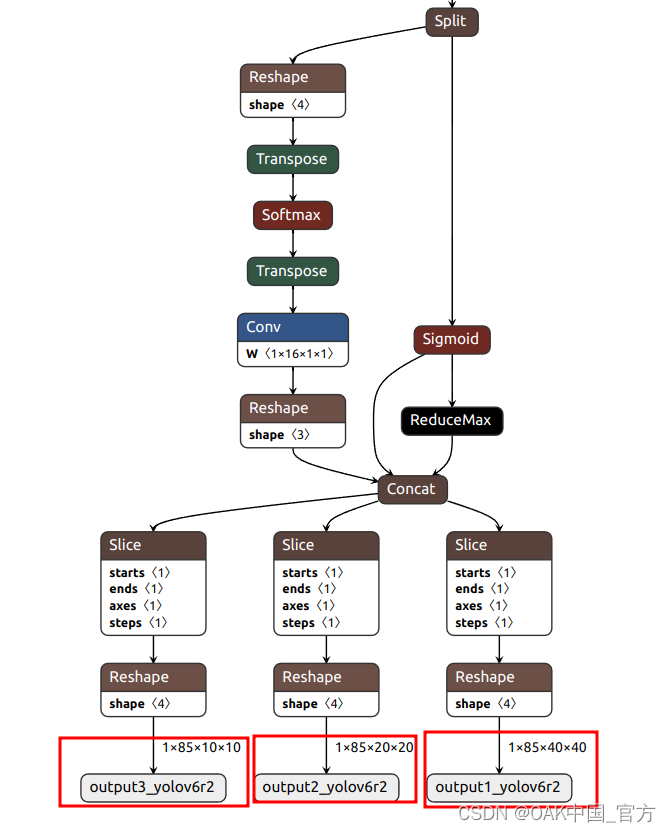
▌转换
openvino 本地转换
onnx -> openvino
mo 是 openvino_dev 2022.1 中脚本,安装命令为
pip install openvino-dev
mo --input_model yolov9-c.onnx --scale=255 --reverse_input_channel
openvino -> blob
compile_tool 是 OpenVINO Runtime 中脚本
<path>/compile_tool -m yolov9-c.xml
-ip U8 -d MYRIAD
-VPU_NUMBER_OF_SHAVES 6
-VPU_NUMBER_OF_CMX_SLICES 6
在线转换
blobconvert 网页 http://blobconverter.luxonis.com/
-
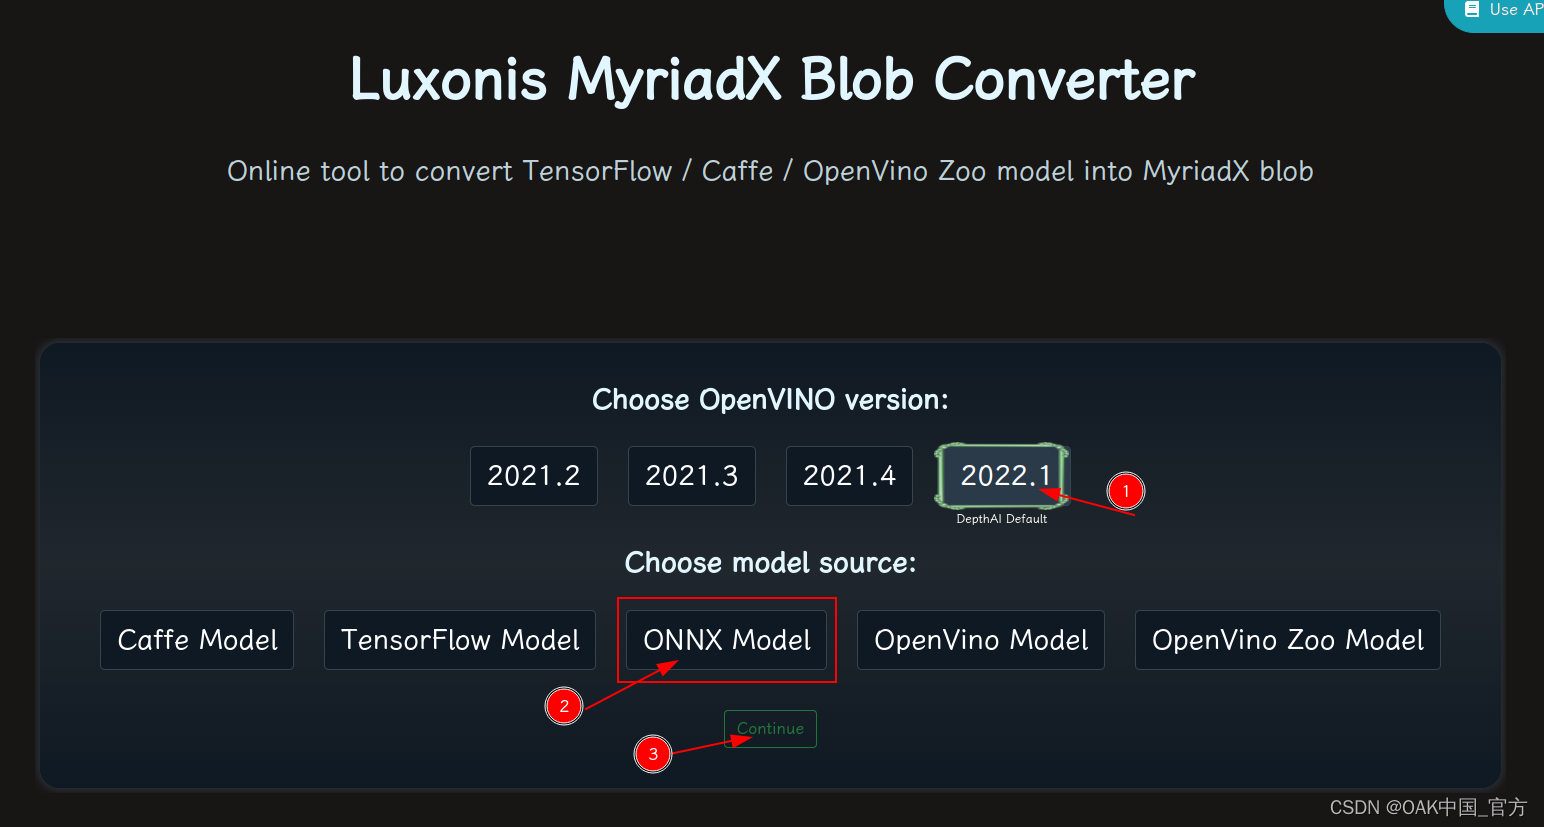
进入网页,按下图指示操作:
-
修改参数,转换模型:
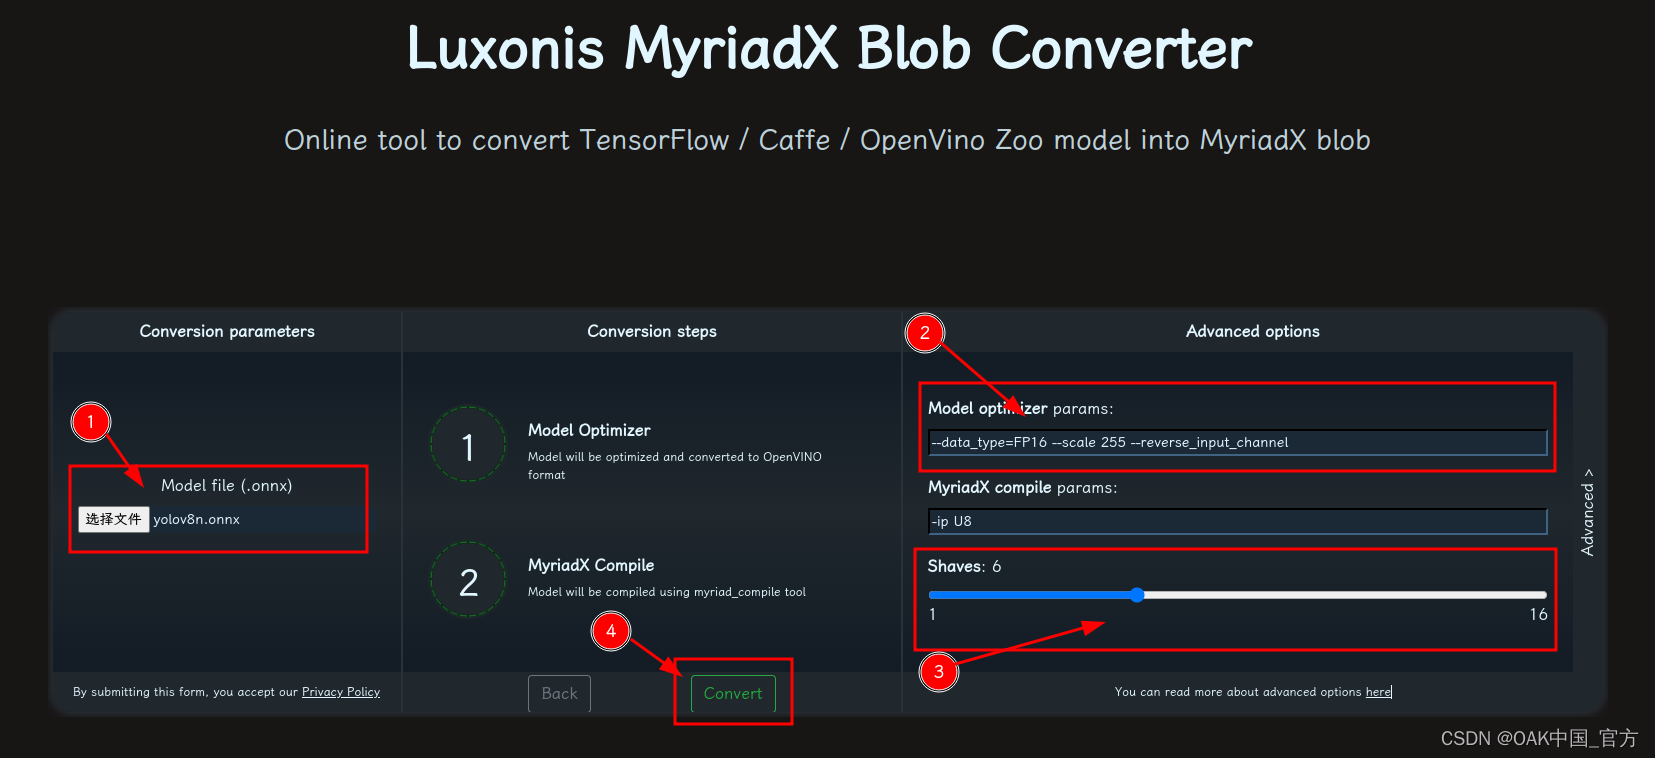
- 选择 onnx 模型
- 修改
optimizer_params为--data_type=FP16 --scale=255 --reverse_input_channel - 修改
shaves为6 - 转换
blobconverter python 代码:
blobconverter.from_onnx("yolov9-c.onnx", optimizer_params=["--scale=255","--reverse_input_channel",],shaves=6,)
blobconvert cli
blobconverter --onnx yolov9-c.onnx -sh 6 -o . --optimizer-params "scale=255 --reverse_input_channel"
▌DepthAI 示例
正确解码需要可配置的网络相关参数:
- setNumClasses – YOLO 检测类别的数量
- setIouThreshold – iou 阈值
- setConfidenceThreshold – 置信度阈值,低于该阈值的对象将被过滤掉
# coding=utf-8
import cv2
import depthai as dai
import numpy as npnumClasses = 80
model = dai.OpenVINO.Blob("yolov9-c.blob")
dim = next(iter(model.networkInputs.values())).dims
W, H = dim[:2]output_name, output_tenser = next(iter(model.networkOutputs.items()))
if "yolov6" in output_name:numClasses = output_tenser.dims[2] - 5
else:numClasses = output_tenser.dims[2] // 3 - 5labelMap = [# "class_1","class_2","...""class_%s" % ifor i in range(numClasses)
]# Create pipeline
pipeline = dai.Pipeline()# Define sources and outputs
camRgb = pipeline.create(dai.node.ColorCamera)
detectionNetwork = pipeline.create(dai.node.YoloDetectionNetwork)
xoutRgb = pipeline.create(dai.node.XLinkOut)
xoutNN = pipeline.create(dai.node.XLinkOut)xoutRgb.setStreamName("image")
xoutNN.setStreamName("nn")# Properties
camRgb.setPreviewSize(W, H)
camRgb.setResolution(dai.ColorCameraProperties.SensorResolution.THE_1080_P)
camRgb.setInterleaved(False)
camRgb.setColorOrder(dai.ColorCameraProperties.ColorOrder.BGR)# Network specific settings
detectionNetwork.setBlob(model)
detectionNetwork.setConfidenceThreshold(0.5)# Yolo specific parameters
detectionNetwork.setNumClasses(numClasses)
detectionNetwork.setCoordinateSize(4)
detectionNetwork.setAnchors([])
detectionNetwork.setAnchorMasks({})
detectionNetwork.setIouThreshold(0.5)# Linking
camRgb.preview.link(detectionNetwork.input)
camRgb.preview.link(xoutRgb.input)
detectionNetwork.out.link(xoutNN.input)# Connect to device and start pipeline
with dai.Device(pipeline) as device:# Output queues will be used to get the rgb frames and nn data from the outputs defined aboveimageQueue = device.getOutputQueue(name="image", maxSize=4, blocking=False)detectQueue = device.getOutputQueue(name="nn", maxSize=4, blocking=False)frame = Nonedetections = []# nn data, being the bounding box locations, are in <0..1> range - they need to be normalized with frame width/heightdef frameNorm(frame, bbox):normVals = np.full(len(bbox), frame.shape[0])normVals[::2] = frame.shape[1]return (np.clip(np.array(bbox), 0, 1) * normVals).astype(int)def drawText(frame, text, org, color=(255, 255, 255), thickness=1):cv2.putText(frame, text, org, cv2.FONT_HERSHEY_SIMPLEX, 0.5, (0, 0, 0), thickness + 3, cv2.LINE_AA)cv2.putText(frame, text, org, cv2.FONT_HERSHEY_SIMPLEX, 0.5, color, thickness, cv2.LINE_AA)def drawRect(frame, topLeft, bottomRight, color=(255, 255, 255), thickness=1):cv2.rectangle(frame, topLeft, bottomRight, (0, 0, 0), thickness + 3)cv2.rectangle(frame, topLeft, bottomRight, color, thickness)def displayFrame(name, frame):color = (128, 128, 128)for detection in detections:bbox = frameNorm(frame, (detection.xmin, detection.ymin, detection.xmax, detection.ymax))drawText(frame=frame,text=labelMap[detection.label],org=(bbox[0] + 10, bbox[1] + 20),)drawText(frame=frame,text=f"{detection.confidence:.2%}",org=(bbox[0] + 10, bbox[1] + 35),)drawRect(frame=frame,topLeft=(bbox[0], bbox[1]),bottomRight=(bbox[2], bbox[3]),color=color,)# Show the framecv2.imshow(name, frame)while True:imageQueueData = imageQueue.tryGet()detectQueueData = detectQueue.tryGet()if imageQueueData is not None:frame = imageQueueData.getCvFrame()if detectQueueData is not None:detections = detectQueueData.detectionsif frame is not None:displayFrame("rgb", frame)if cv2.waitKey(1) == ord("q"):break
▌参考资料
https://docs.oakchina.cn/en/latest/
https://www.oakchina.cn/selection-guide/
OAK中国
| OpenCV AI Kit在中国区的官方代理商和技术服务商
| 追踪AI技术和产品新动态
戳「+关注」获取最新资讯↗↗
