分析一下代码
model.py
①下面这个方法的作用是:将传入的ch(channel)的个数调整到离它最近的8的整数倍,这样做的目的是对硬件更加友好。
python">def _make_divisible(ch, divisor=8, min_ch=None):if min_ch is None:min_ch = divisornew_ch = max(min_ch, int(ch + divisor / 2) // divisor * divisor)if new_ch < 0.9 * ch:new_ch += divisorreturn new_ch②定义卷积BAN和激活函数的模块类,groups是用来控制卷积结构使用普通卷积结构还是使用Depwise卷积结构。
python">class ConvBNActivation(nn.Sequential):def __init__(self,in_planes: int,out_planes: int,kernel_size: int = 3,stride: int = 1,groups: int = 1,norm_layer: Optional[Callable[..., nn.Module]] = None,activation_layer: Optional[Callable[..., nn.Module]] = None):padding = (kernel_size - 1) // 2if norm_layer is None:norm_layer = nn.BatchNorm2dif activation_layer is None:activation_layer = nn.SiLUsuper(ConvBNActivation, self).__init__(nn.Conv2d(in_channels=in_planes,out_channels=out_planes,kernel_size=kernel_size,stride=stride,padding=padding,groups=groups,bias=False),norm_layer(out_planes),activation_layer())③定义InvertedResidualConfig模块,对应每一个MBConv模块的配置参数。
python">class InvertedResidualConfig:def __init__(self,kernel: int, # 3 or 5input_c: int,out_c: int,expanded_ratio: int, # 1 or 6stride: int, # 1 or 2use_se: bool, # Truedrop_rate: float,index: str, # 1a, 2a, 2b, ...width_coefficient: float):self.input_c = self.adjust_channels(input_c, width_coefficient)self.kernel = kernelself.expanded_c = self.input_c * expanded_ratioself.out_c = self.adjust_channels(out_c, width_coefficient)self.use_se = use_seself.stride = strideself.drop_rate = drop_rateself.index = index@staticmethoddef adjust_channels(channels: int, width_coefficient: float):return _make_divisible(channels * width_coefficient, 8)④定义InvertedResidual模块,即MBConv模块。
python">class InvertedResidual(nn.Module):def __init__(self,cnf: InvertedResidualConfig,norm_layer: Callable[..., nn.Module]):super(InvertedResidual, self).__init__()if cnf.stride not in [1, 2]:raise ValueError("illegal stride value.")self.use_res_connect = (cnf.stride == 1 and cnf.input_c == cnf.out_c)layers = OrderedDict()activation_layer = nn.SiLUif cnf.expanded_c != cnf.input_c:layers.update({"expand_conv": ConvBNActivation(cnf.input_c,cnf.expanded_c,kernel_size=1,norm_layer=norm_layer,activation_layer=activation_layer)})layers.update({"dwconv": ConvBNActivation(cnf.expanded_c,cnf.expanded_c,kernel_size=cnf.kernel,stride=cnf.stride,groups=cnf.expanded_c,norm_layer=norm_layer,activation_layer=activation_layer)})if cnf.use_se:layers.update({"se": SqueezeExcitation(cnf.input_c,cnf.expanded_c)})layers.update({"project_conv": ConvBNActivation(cnf.expanded_c,cnf.out_c,kernel_size=1,norm_layer=norm_layer,activation_layer=nn.Identity)})self.block = nn.Sequential(layers)self.out_channels = cnf.out_cself.is_strided = cnf.stride > 1# 只有在使用shortcut连接时才使用dropout层if self.use_res_connect and cnf.drop_rate > 0:self.dropout = DropPath(cnf.drop_rate)else:self.dropout = nn.Identity()def forward(self, x: Tensor) -> Tensor:result = self.block(x)result = self.dropout(result)if self.use_res_connect:result += xreturn result⑤接下来看看EfficientNet是如何实现的,网络参数如下:

代码如下:
python">class EfficientNet(nn.Module):def __init__(self,width_coefficient: float,depth_coefficient: float,num_classes: int = 1000,dropout_rate: float = 0.2,drop_connect_rate: float = 0.2,block: Optional[Callable[..., nn.Module]] = None,norm_layer: Optional[Callable[..., nn.Module]] = None):super(EfficientNet, self).__init__()default_cnf = [[3, 32, 16, 1, 1, True, drop_connect_rate, 1],[3, 16, 24, 6, 2, True, drop_connect_rate, 2],[5, 24, 40, 6, 2, True, drop_connect_rate, 2],[3, 40, 80, 6, 2, True, drop_connect_rate, 3],[5, 80, 112, 6, 1, True, drop_connect_rate, 3],[5, 112, 192, 6, 2, True, drop_connect_rate, 4],[3, 192, 320, 6, 1, True, drop_connect_rate, 1]]def round_repeats(repeats):return int(math.ceil(depth_coefficient * repeats))if block is None:block = InvertedResidualif norm_layer is None:norm_layer = partial(nn.BatchNorm2d, eps=1e-3, momentum=0.1)adjust_channels = partial(InvertedResidualConfig.adjust_channels,width_coefficient=width_coefficient)bneck_conf = partial(InvertedResidualConfig,width_coefficient=width_coefficient)b = 0num_blocks = float(sum(round_repeats(i[-1]) for i in default_cnf))inverted_residual_setting = []for stage, args in enumerate(default_cnf):cnf = copy.copy(args)for i in range(round_repeats(cnf.pop(-1))):if i > 0:cnf[-3] = 1cnf[1] = cnf[2]cnf[-1] = args[-2] * b / num_blocksindex = str(stage + 1) + chr(i + 97)inverted_residual_setting.append(bneck_conf(*cnf, index))b += 1layers = OrderedDict()layers.update({"stem_conv": ConvBNActivation(in_planes=3,out_planes=adjust_channels(32),kernel_size=3,stride=2,norm_layer=norm_layer)})for cnf in inverted_residual_setting:layers.update({cnf.index: block(cnf, norm_layer)})last_conv_input_c = inverted_residual_setting[-1].out_clast_conv_output_c = adjust_channels(1280)layers.update({"top": ConvBNActivation(in_planes=last_conv_input_c,out_planes=last_conv_output_c,kernel_size=1,norm_layer=norm_layer)})self.features = nn.Sequential(layers)self.avgpool = nn.AdaptiveAvgPool2d(1)classifier = []if dropout_rate > 0:classifier.append(nn.Dropout(p=dropout_rate, inplace=True))classifier.append(nn.Linear(last_conv_output_c, num_classes))self.classifier = nn.Sequential(*classifier)for m in self.modules():if isinstance(m, nn.Conv2d):nn.init.kaiming_normal_(m.weight, mode="fan_out")if m.bias is not None:nn.init.zeros_(m.bias)elif isinstance(m, nn.BatchNorm2d):nn.init.ones_(m.weight)nn.init.zeros_(m.bias)elif isinstance(m, nn.Linear):nn.init.normal_(m.weight, 0, 0.01)nn.init.zeros_(m.bias)def _forward_impl(self, x: Tensor) -> Tensor:x = self.features(x)x = self.avgpool(x)x = torch.flatten(x, 1)x = self.classifier(x)return xdef forward(self, x: Tensor) -> Tensor:return self._forward_impl(x)train.py
①导入模型
python">from model import efficientnet_b0 as create_model②不同版本的EfficientNet网络模型,对应不同的输入图像大小。
python">img_size = {"B0": 224,"B1": 240,"B2": 260,"B3": 300,"B4": 380,"B5": 456,"B6": 528,"B7": 600}num_model = "B0"③实例化模型部分,传入类别个数,然后添加设备。
python">model = create_model(num_classes=args.num_classes).to(device)④还有一个参数为是否冻结权重,如果为true,只会微调最后一层的1*1的卷积以及FC全连接层结构,如果为false,就会训练全部的网络结构。
python"> if args.freeze_layers:for name, para in model.named_parameters():if ("features.top" not in name) and ("classifier" not in name):para.requires_grad_(False)else:print("training {}".format(name))predict.py
①创建模型,num_classes的大小需要根据自己的数据集类别个数进行改变,不仅这里需要改变,训练时也需要改变。
python">model = create_model(num_classes=5).to(device)②导入之前训练的模型权重即可。
python">model_weight_path = "./weights/model-29.pth"开始训练
1. 在train.py脚本中将--data-path设置成解压后的视网膜病变数据集文件夹的绝对路径。
2.下载预训练权重,根据自己使用的模型下载对应预训练权重。
3. 在train.py脚本中将--weights参数设成下载好的预训练权重路径。
4. 设置好数据集的路径--data-path以及预训练权重的路径--weights就能使用train.py脚本开始训练了(训练过程中会自动生成class_indices.json文件)。
5. 在predict.py脚本中导入和训练脚本中同样的模型,并将model_weight_path设置成训练好的模型权重路径(默认保存在weights文件夹下)。
6. 在predict.py脚本中将img_path设置成你自己需要预测的图片绝对路径。
7. 设置好权重路径model_weight_path和预测的图片路径img_path就能使用predict.py脚本进行预测了。
8. 数据集必须按照视网膜病变数据集的文件结构进行摆放(即一个类别对应一个文件夹),并且将训练以及预测脚本中的num_classes设置成正确的数据类别数。
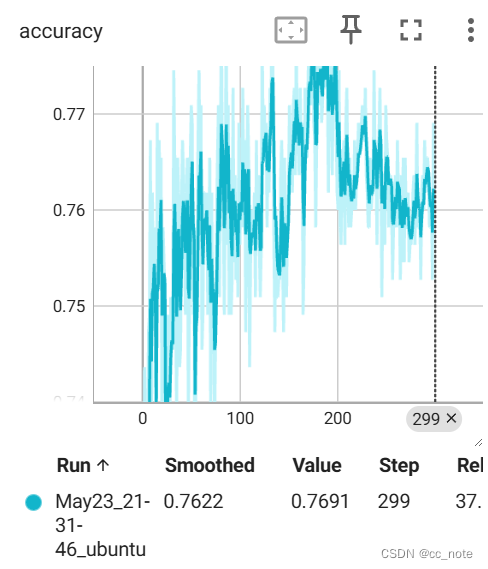
基于efficientnetb0.pth预训练权重的训练结果如下:
基于efficientnetb7.pth预训练权重的训练结果如下(粉色部分):

![NSSCTF | [SWPUCTF 2021 新生赛]no_wakeup](https://img-blog.csdnimg.cn/direct/2d5c559b1ca947058c5252bc03051a39.png)