目录
前言
项目分析
项目效果
项目流程
1. 先设置好文本编辑框的大小与名称
2.创建输入处理框
3.创建菜单栏
4.创建菜单按钮下的动作按钮
5.创建与动作按钮对应的槽函数
6.附件功能的实现
7.槽函数的实现
7.1文件处理读取
7.2关闭文本编辑框
7.3保存文本编辑框
7.4字体修改
7.5颜色修改
7.6没啥用的提示
全部代码
mainwindow.h
main.cpp
mainwindow.cpp
总结

前言
在Qt的学习过程中浏览CSDN时,发现关于基本代码实现功能开发的文章很少,经常需要浏览很多的文章才能解决问题,于是便萌发写该篇文章的想法。
本次项目时在 Qt 5.8 的基础上开发实现,本意想用 VS2022 联合开发,但是在 CSDN 上浏览了很多其他文章也没有解决相关问题,所以此处先挖个坑。待解决了后续会发文章出来。
本文提供保姆级教程,快快快发车了---------
项目分析
本次项目是用 Qt 来实现文本编辑框的功能,主体具体操作有:
文件操作:打开、保存文件的内容
字体操作:对字体进行修改
颜色操作:对字体的颜色进行修改
具体的操作要与槽对应起来,实现功能
项目效果

如果不会创建工程的话可以参考创建工程![]() https://blog.csdn.net/m0_51988927/article/details/119147492?ops_request_misc=%257B%2522request%255Fid%2522%253A%2522167940048816800217244171%2522%252C%2522scm%2522%253A%252220140713.130102334..%2522%257D&request_id=167940048816800217244171&biz_id=0&utm_medium=distribute.pc_search_result.none-task-blog-2~all~top_click~default-1-119147492-null-null.142%5Ev75%5Einsert_down1,201%5Ev4%5Eadd_ask,239%5Ev2%5Einsert_chatgpt&utm_term=qt%E5%88%9B%E5%BB%BA%E9%A1%B9%E7%9B%AE&spm=1018.2226.3001.4187
https://blog.csdn.net/m0_51988927/article/details/119147492?ops_request_misc=%257B%2522request%255Fid%2522%253A%2522167940048816800217244171%2522%252C%2522scm%2522%253A%252220140713.130102334..%2522%257D&request_id=167940048816800217244171&biz_id=0&utm_medium=distribute.pc_search_result.none-task-blog-2~all~top_click~default-1-119147492-null-null.142%5Ev75%5Einsert_down1,201%5Ev4%5Eadd_ask,239%5Ev2%5Einsert_chatgpt&utm_term=qt%E5%88%9B%E5%BB%BA%E9%A1%B9%E7%9B%AE&spm=1018.2226.3001.4187
项目流程
1. 先设置好文本编辑框的大小与名称
先做好前期的准备工作
//为了方便使用 此处将大小定死
this->setMaximumHeight(600);
this->setMinimumHeight(600);
this->setMaximumWidth(600);
this->setMinimumWidth(600);this->setWindowTitle("文本文件");
this->setWindowIcon(QIcon(":/jiasu.ico"));//此处为设置图标
最后一句代码不懂的话,可参考:图标操作![]() https://blog.csdn.net/weixin_38590041/article/details/126704322?ops_request_misc=%257B%2522request%255Fid%2522%253A%2522167939790016782425139591%2522%252C%2522scm%2522%253A%252220140713.130102334..%2522%257D&request_id=167939790016782425139591&biz_id=0&utm_medium=distribute.pc_search_result.none-task-blog-2~all~top_positive~default-1-126704322-null-null.142%5Ev74%5Einsert_down1,201%5Ev4%5Eadd_ask,239%5Ev2%5Einsert_chatgpt&utm_term=qt%E8%AE%BE%E7%BD%AE%E5%9B%BE%E6%A0%87&spm=1018.2226.3001.4187
https://blog.csdn.net/weixin_38590041/article/details/126704322?ops_request_misc=%257B%2522request%255Fid%2522%253A%2522167939790016782425139591%2522%252C%2522scm%2522%253A%252220140713.130102334..%2522%257D&request_id=167939790016782425139591&biz_id=0&utm_medium=distribute.pc_search_result.none-task-blog-2~all~top_positive~default-1-126704322-null-null.142%5Ev74%5Einsert_down1,201%5Ev4%5Eadd_ask,239%5Ev2%5Einsert_chatgpt&utm_term=qt%E8%AE%BE%E7%BD%AE%E5%9B%BE%E6%A0%87&spm=1018.2226.3001.4187
2.创建输入处理框
此处为文本处理的位置
le = new QTextEdit(this);     //新建一个输入框
le->setParent(this);          //设置输入框的状态
le->move(0,20);               //微调输入框的位置,看起来更加舒服
le->setMaximumHeight(600);    //将输入框的大小设置与整体框架的大小一致
le->setMaximumWidth(600);
le->setMinimumHeight(600);
le->setMinimumWidth(600);
3.创建菜单栏
在此处编写你要实现的菜单栏内容
建议字符串前都加上 tr 便于移植
menu_1 = new QMenu(tr("文件")); //创建菜单栏中的一个按钮
menu_2 = new QMenu(tr("编辑"));
menu_3 = new QMenu(tr("查看"));
menu_4 = new QMenu(tr("关于"));
menu_5 = new QMenu(tr("about"));menuBar()->addMenu(menu_1);    //将新创建的菜单按钮加入到菜单栏中
menuBar()->addMenu(menu_2);
menuBar()->addMenu(menu_3);
menuBar()->addMenu(menu_4);
menu_4->addMenu(menu_5);       //创建菜单按钮的子菜单按钮
4.创建菜单按钮下的动作按钮
用动作按钮来实现不同的功能
action_1 = new QAction(tr("新建")); //创建动作按钮
action_2 = new QAction(tr("打开"));
action_3 = new QAction(tr("退出"));
action_4 = new QAction(tr("保存"));
action_5 = new QAction(tr("字体"));
action_6 = new QAction(tr("颜色"));
action_7 = new QAction(tr("关于"));
action_8 = new QAction(tr("说明"));action_1->setShortcut(tr("ctrl+n"));//为动作按钮加上对应的快捷键 可自定义
action_2->setShortcut(tr("ctrl+o"));
action_3->setShortcut(tr("ctrl+q"));
action_4->setShortcut(tr("ctrl+s"));
action_5->setShortcut(tr("ctrl+w"));
action_6->setShortcut(tr("ctrl+h"));menu_1->addAction(action_1);        //把动作按钮加入到对应的菜单下
menu_1->addAction(action_2);
menu_1->addAction(action_4);
menu_1->addAction(action_3);
menu_2->addAction(action_5);
menu_2->addAction(action_6);
menu_5->addAction(action_7);
menu_5->addAction(action_8);
5.创建与动作按钮对应的槽函数
槽函数与动作按钮一一对应--------类似于 特定的钥匙只能开特定的门
QObject::connect(action_1,&QAction::triggered,this,&MainWindow::fun1);
QObject::connect(action_2,&QAction::triggered,this,&MainWindow::fun2);
QObject::connect(action_3,&QAction::triggered,this,&MainWindow::fun3);
QObject::connect(action_4,&QAction::triggered,this,&MainWindow::fun4);
QObject::connect(action_5,&QAction::triggered,this,&MainWindow::fun5);
QObject::connect(action_6,&QAction::triggered,this,&MainWindow::fun6);
QObject::connect(action_7,&QAction::triggered,this,&MainWindow::fun7);
QObject::connect(action_8,&QAction::triggered,this,&MainWindow::fun8);
6.附件功能的实现
此处粗糙的写了文本编辑框的状态信息,读者可在此基础上扩展
status = new QStatusBar(this);              //创建一个状态栏
this->setStatusBar(status);                 //加入状态栏
pWelCome = new QLabel(tr("没事别点我"));     //定义一个标签
pWelCome->setFrameShadow(QFrame::Sunken);
status->setMinimumSize(200,20);             //设置状态栏大小
status->addWidget(pWelCome);                //标签的位置plab = new QLabel;
timer = new QTimer;
connect(timer,&QTimer::timeout,this,&MainWindow::showTime);
timer->start(1000);
// 信号连接 每一秒执行一次槽函数
7.槽函数的实现
此处为本次项目的重点,也是 Qt 的重点,Qt 的精髓也在槽函数
7.1文件处理读取
循环将文件中的内容读取出来,读一行对应的就要加 \n 不然与源文件不符
void MainWindow::fun2(bool)
{QString path = QFileDialog::getOpenFileName(this,"open","./","*.txt");//打开一个自己选择的文件QFile file(path);file.open(QIODevice::ReadOnly | QIODevice::Text);//打开方式QTextStream stream(&file);if(!path.isEmpty()){QString str;while(!stream.atEnd()) //将文件的内容读取出来{str+=stream.readLine();str+="\n";}le->setText(str); //显示到你的编辑框中file.close(); //关闭文件
}
7.2关闭文本编辑框
此处很简单,但是有种说法是:单单 close() 进程还是存在,此处也挖个坑。
void MainWindow::fun3(bool)
{close();
}
7.3保存文本编辑框
本项目用的保存方法,会将原文件覆盖,重要数据谨慎保管
(作者就因为这个丢失了 几个重要的序列号 都是幸酸泪)
void MainWindow::fun4(bool)
{QString path = QFileDialog::getOpenFileName(this,"open","./","*.txt");QString fileName;QFile f(path);if(!f.open(QFile::WriteOnly|QFile::Truncate)){//追加写入 添加结束符\r\nQMessageBox::warning(this,tr("错误"),tr("打开文件失败,数据保存失败"));return ;}else{QString content =le->toPlainText();QByteArray cdata = content.toLocal8Bit();std::string str = std::string(cdata);const char *text = str.c_str();    //上面四句代码是将Qstring类型转换为char* 较为麻烦  但是write只能用char*f.write(text);QMessageBox::information(this,"保存","保存成功",QMessageBox::Ok );}f.close();
}
7.4字体修改
此处为简单的修改,仅可以修改在此之后的字体。
如果想全局修改的话可以将文本框里的内容重新显示。
void MainWindow::fun5(bool)
{bool ok;//获取lineedit的字体QFont ft = le->font();QFont temp = QFontDialog::getFont(&ok,ft,this,tr("字体"));if(ok){le->setFont(temp);}
}
7.5颜色修改
此处的限制同上
void MainWindow::fun6(bool)
{QColor cl(255,255,255);cl = QColorDialog::getColor(cl/*Qt::white*/,this,tr("color"));if(cl.isValid()){le->setTextColor(cl);qDebug()<< "设置了颜色"; //debug }
}
7.6没啥用的提示
void MainWindow::fun7(bool)
{QMessageBox::information(this,"关于","此玩意仅作为学习使用",QMessageBox::Yes);
}void MainWindow::fun8(bool)
{QMessageBox::information(this,"说明","作者真的很帅",QMessageBox::Yes);
}
代码写到就可以完结撒花啦--------------------------------------------------------------------------------------
代码实现 UI 只是来提升自己的编程能力和思维能力,要是真用 Qt 来开发项目的话,还是建议直接使用 UI 进行编写,效率起码快了5倍(没有看错!!!)
还是不清楚的话,下文将附上全部源代码
全部代码
mainwindow.h
头文件真的很多很多~
#ifndef MAINWINDOW_H
#define MAINWINDOW_H#include <QMenuBar>
#include <QMenu>
#include <QMainWindow>
#include <QFileDialog>
#include <QFile>
#include <QIODevice>
#include <QColorDialog>
#include <QColor>
#include <QDebug>
#include <QFontDialog>
#include <QMessageBox>
#include <QInputDialog>
#include <QLineEdit>
#include <QStatusBar>
#include <QLabel>
#include <QToolBar>
#include <QKeySequence>
#include <QDateTime>
#include <QTextEdit>
#include <QTextStream>
#include <QGridLayout>
#include <QMenuBar>
#include <QIcon>
#include <QByteArray>
#include <QAction>
#include <QProcess>
#include <QTimer>class MainWindow : public QMainWindow
{Q_OBJECTpublic:MainWindow(QWidget *parent = 0);~MainWindow();void tim();
private:QTextEdit* le;QMenu* menu_1;QMenu* menu_2;QMenu* menu_3;QMenu* menu_4;QMenu* menu_5;QAction* action_1;QAction* action_2;QAction* action_3;QAction* action_4;QAction* action_5;QAction* action_6;QAction* action_7;QAction* action_8;QAction* action_9;QStatusBar* status;QLabel* pWelCome;QLabel* plab;QTimer * timer;initStatus();
public slots:void fun1(bool);void fun2(bool);void fun3(bool);void fun4(bool);void fun5(bool);void fun6(bool);void fun7(bool);void fun8(bool);void showTime();
};#endif // MAINWINDOW_H
main.cpp
#include "mainwindow.h"
#include <QApplication>int main(int argc, char *argv[])
{QApplication a(argc, argv);MainWindow w;w.show();return a.exec();
}
mainwindow.cpp
#include "mainwindow.h"MainWindow::MainWindow(QWidget *parent): QMainWindow(parent)
{this->setMaximumHeight(600);this->setMinimumHeight(600);this->setMaximumWidth(600);this->setMinimumWidth(600);this->setWindowTitle("文本文件");this->setWindowIcon(QIcon(":/jiasu.ico"));le = new QTextEdit(this);le->setParent(this);le->move(0,20);le->setMaximumHeight(600);le->setMaximumWidth(600);le->setMinimumHeight(600);le->setMinimumWidth(600);menu_1 = new QMenu(tr("文件"));menu_2 = new QMenu(tr("编辑"));menu_3 = new QMenu(tr("查看"));menu_4 = new QMenu(tr("关于"));menu_5 = new QMenu(tr("about"));menuBar()->addMenu(menu_1);menuBar()->addMenu(menu_2);menuBar()->addMenu(menu_3);menuBar()->addMenu(menu_4);menu_4->addMenu(menu_5);action_1 = new QAction(tr("新建"));action_2 = new QAction(tr("打开"));action_3 = new QAction(tr("退出"));action_4 = new QAction(tr("保存"));action_5 = new QAction(tr("字体"));action_6 = new QAction(tr("颜色"));action_7 = new QAction(tr("关于"));action_8 = new QAction(tr("说明"));action_1->setShortcut(tr("ctrl+n"));action_2->setShortcut(tr("ctrl+o"));action_3->setShortcut(tr("ctrl+q"));action_4->setShortcut(tr("ctrl+s"));action_5->setShortcut(tr("ctrl+w"));action_6->setShortcut(tr("ctrl+h"));menu_1->addAction(action_1);menu_1->addAction(action_2);menu_1->addAction(action_4);menu_1->addAction(action_3);menu_2->addAction(action_5);menu_2->addAction(action_6);menu_5->addAction(action_7);menu_5->addAction(action_8);QObject::connect(action_1,&QAction::triggered,this,&MainWindow::fun1);QObject::connect(action_2,&QAction::triggered,this,&MainWindow::fun2);QObject::connect(action_3,&QAction::triggered,this,&MainWindow::fun3);QObject::connect(action_4,&QAction::triggered,this,&MainWindow::fun4);QObject::connect(action_5,&QAction::triggered,this,&MainWindow::fun5);QObject::connect(action_6,&QAction::triggered,this,&MainWindow::fun6);QObject::connect(action_7,&QAction::triggered,this,&MainWindow::fun7);QObject::connect(action_8,&QAction::triggered,this,&MainWindow::fun8);status = new QStatusBar(this);this->setStatusBar(status);pWelCome = new QLabel(tr("没事别点我"));pWelCome->setFrameShadow(QFrame::Sunken);status->setMinimumSize(200,20);status->addWidget(pWelCome);plab = new QLabel;timer = new QTimer;connect(timer,&QTimer::timeout,this,&MainWindow::showTime); // 信号连接 每一秒执行一次槽函数timer->start(1000);
}MainWindow::~MainWindow()
{}
void MainWindow::showTime()
{QString string;QDateTime Timedata = QDateTime::currentDateTime();   //  获取当前时间string = Timedata.toString("yyyy-MM-dd hh:mm:ss");   //  设置显示格式plab->setText(string);statusBar()->addWidget(plab);  // 添加至状态栏
}void MainWindow::fun1(bool)
{QMessageBox::information(this,"新建",action_1->text(),QMessageBox::Yes );
}void MainWindow::fun2(bool)
{QString path = QFileDialog::getOpenFileName(this,"open","./","*.txt");QFile file(path);file.open(QIODevice::ReadOnly | QIODevice::Text);QTextStream stream(&file);if(!path.isEmpty()){QString str;while(!stream.atEnd()){str+=stream.readLine();str+="\n";}le->setText(str);file.close();}//bytes类型读取
//    QString path = QFileDialog::getOpenFileName(this,"open","./","*.txt");
//    QFile file(path);
//    file.open(QIODevice::ReadOnly | QIODevice::Text);
//    QByteArray t = file.readAll();
//    le->setText(QString(t));//bytes类型读取,并转为QString类型
//    file.close();
}
void MainWindow::fun3(bool)
{close();
}void MainWindow::fun4(bool)
{QString path = QFileDialog::getOpenFileName(this,"open","./","*.txt");QString fileName;QFile f(path);if(!f.open(QFile::WriteOnly|QFile::Truncate)){//追加写入 添加结束符\r\nQMessageBox::warning(this,tr("错误"),tr("打开文件失败,数据保存失败"));return ;}else{QString content =le->toPlainText();QByteArray cdata = content.toLocal8Bit();std::string str = std::string(cdata);const char *text = str.c_str();f.write(text);QMessageBox::information(this,"保存","保存成功",QMessageBox::Ok );}f.close();
}void MainWindow::fun5(bool)
{bool ok;//获取lineedit的字体QFont ft = le->font();QFont temp = QFontDialog::getFont(&ok,ft,this,tr("字体"));if(ok){le->setFont(temp);}
}void MainWindow::fun6(bool)
{QColor cl(255,255,255);cl = QColorDialog::getColor(cl/*Qt::white*/,this,tr("color"));if(cl.isValid()){le->setTextColor(cl);qDebug()<< "设置了颜色";}
}
void MainWindow::fun7(bool)
{QMessageBox::information(this,"关于","此玩意仅作为学习使用",QMessageBox::Yes);
}void MainWindow::fun8(bool)
{QMessageBox::information(this,"说明","作者真的很帅",QMessageBox::Yes);
}
总结
Qt 的函数接口真的方便好用,如果不会使用其中某个函数或者对其有异议的话,可以查看 Qt 给出的帮助目录,下图
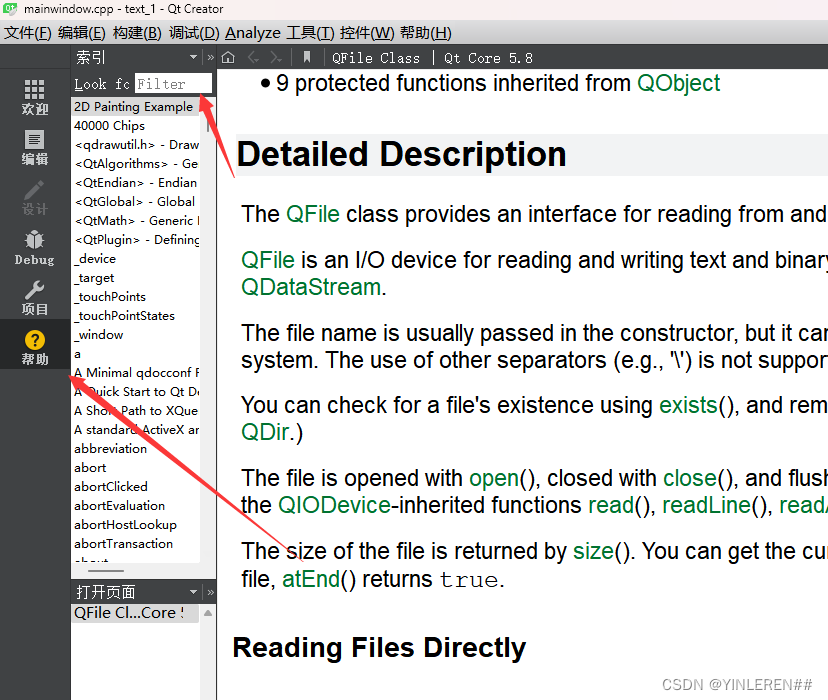
所有函数都在其中给出了,各种重载版本也在其中都有。
Qt 重在要细致,慢工出细活,加油!!!!!。