imac卸载
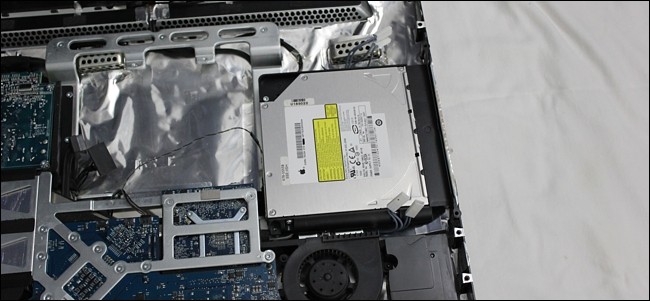
Whether you need to replace your optical drive or swap it out with a solid-state drive, here’s how to remove the DVD drive from an older iMac.
无论您是需要更换光盘驱动器还是将其换成固态驱动器,这都是从较旧的iMac上卸下DVD驱动器的方法。
After the optical drive died in my 2008 iMac, I decided to just simply remove it altogether and have just an empty drive bay sitting there for now, hoping for better airflow. There are kits you can buy that allow you to place a storage drive in the optical drive bay, but for now, I just wanted to remove the dead optical drive.
光盘驱动器在我的2008 iMac中死亡后,我决定只将其完全卸下,现在只坐在一个空的驱动器托架中,希望获得更好的气流。 您可以购买一些工具包,以将存储驱动器放入光盘驱动器托架中,但是现在,我只想卸下坏掉的光盘驱动器。
If you know your way around screws and connectors, the process is actually fairly easy, mostly because older iMacs aren’t heavily glue together like newer models are, so everything is held in place with Torx screws.
如果您了解螺丝和连接器的使用方法,则该过程实际上相当容易,主要是因为较旧的iMac不会像新型号那样将大量胶粘在一起,因此所有东西都可以用Torx螺丝固定到位。
你需要什么 (What You’ll Need)
Before you begin, you’ll need a few tools that you might not already have.
在开始之前,您将需要一些可能尚未拥有的工具。
Suction cups (iFixit sells a pair specifically for this kind of work)
吸盘( iFixit专门为此出售一对)
- A small Phillips-head screwdriver 十字螺丝刀
- A T6 Torx screwdriverT6梅花螺丝刀
- A T8 Torx screwdriverT8梅花螺丝刀
- Tweezers (Useful for when you accidentally drop screws in tight areas)镊子(当您不小心将螺钉掉入狭窄区域时很有用)
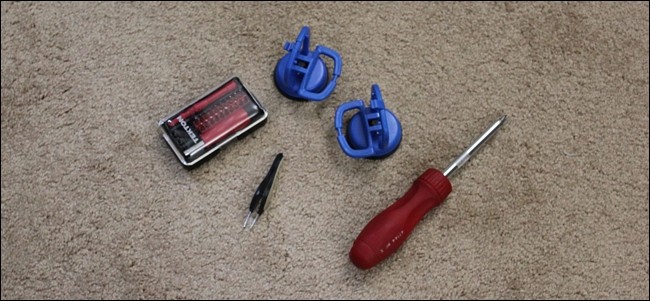
Depending on what year your iMac is, you might need different sizes of Torx screwdrivers, which is why it’s a good idea just to get a small set of specialty precision bits, that way you’ll have all the bits you need no matter what. For this how-to, I’m working on a 2008 iMac, and the specific tools listed above are the ones needed for this particular model, but it’s possible that yours might have different sizes of Torx screws. This page will help you find out what you need.
根据您iMac的年份,您可能需要不同大小的Torx螺丝刀,这就是为什么最好只购买一小组专业精度的钻头,这样一来,无论您需要什么,您都可以拥有所有的钻头。 对于此操作方法,我正在使用2008 iMac,上面列出的特定工具是该特定型号所需的工具,但是您的工具可能有不同尺寸的Torx螺钉。 此页面将帮助您找到所需的信息。
第一步:拆卸iMac (Step One: Disassemble Your iMac)
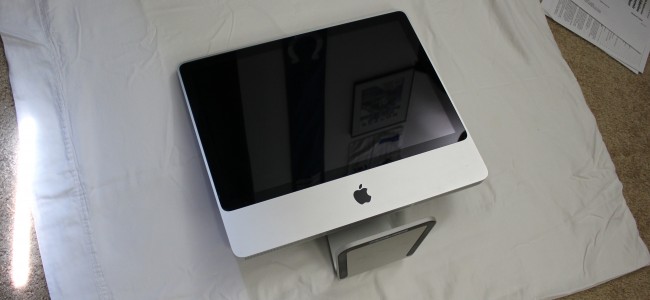
Unplug everything from your iMac and lay the machine down on a flat surface with the screen pointing up. The iMac will angle up a bit because of the stand, but that’s completely fine.
从iMac上拔下所有插头,然后将计算机向下放在平面上,屏幕朝上。 由于支架的原因,iMac会稍微倾斜一点,但这完全没问题。
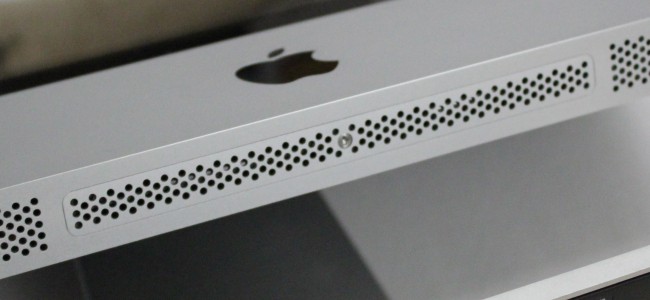
On the bottom edge of the iMac, take your Phillips screwdriver and remove the lone screw, which will allow the memory access plate to come off. The screw won’t come all the way out, so just loosen the screw and then pull the plate out.
在iMac的底部边缘,拿起Phillips螺丝刀,然后拧下单独的螺钉,这将使内存访问板脱落。 螺钉不会完全松开,因此只需松开螺钉,然后将板拉出即可。
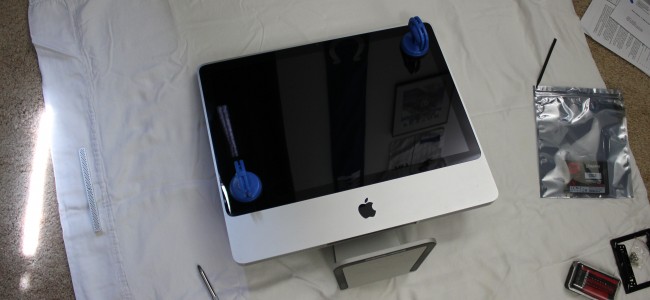
Next, take your suction cups and place them in opposite corners of the screen, making sure to lock them in place so that they grab on to the glass. The glass is simply held on by magnets, so all you have to do is lift straight up and the glass panel will come right off.
接下来,拿起吸盘并将它们放在屏幕的相对角,确保将它们锁定到位,以便它们抓住玻璃杯。 玻璃只需用磁铁固定即可,因此您所要做的就是直接向上提起玻璃面板。
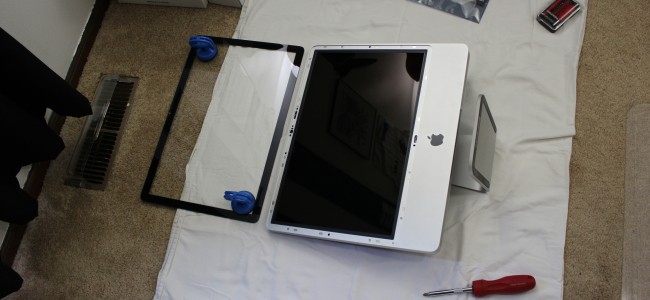
Place the glass panel off to the side. If you’re worried about scratching it, place it on a soft surface away from the work area and then lay a towel or sheet over it to prevent it from collecting dust.
将玻璃面板放在一边。 如果您担心刮擦它,请将其放在远离工作区域的柔软表面上,然后在上面铺上毛巾或床单以防止其积聚灰尘。
Next, there are twelve T8 Torx screws around the edge of the display that need removed. These hold the aluminum bezel in place. Be aware that the four screws along the bottom are longer than the rest, so make sure you put them back in the correct locations.
接下来,在显示屏边缘附近需要卸下十二颗T8 Torx螺钉。 这些将铝制挡板固定到位。 请注意,底部的四个螺钉比其余的要长,因此请确保将它们放回正确的位置。
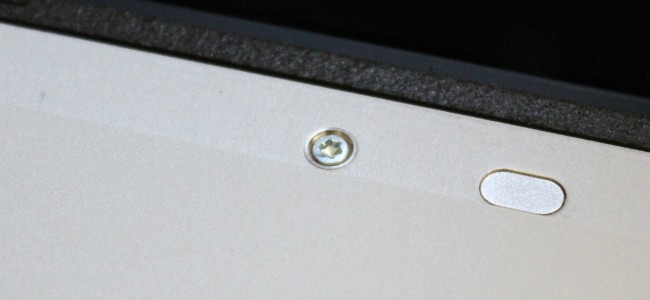
After you remove these screws, it’s time to remove the whole front bezel. The best way to do this is by starting in the upper corners. Place your thumb on the edge of the display unit and your fingers on the back side of the iMac. From there, push your thumb down as your pull up your fingers. This will loosen the bezel and you can begin to work your way down until the whole bezel lifts up. Do this very slowly and carefully, as there is a cable you’ll need to disconnect!
卸下这些螺钉之后,就该卸下整个前挡板了。 最好的方法是从上角开始。 将拇指放在人机界面的边缘,将手指放在iMac的背面。 从那里,在您拉起手指时将拇指向下推。 这将使挡板变松,您可以开始向下移动直到整个挡板抬起。 请非常缓慢且谨慎地执行此操作,因为您需要断开电缆连接!
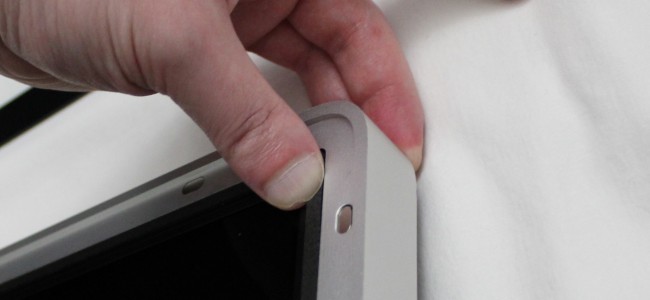
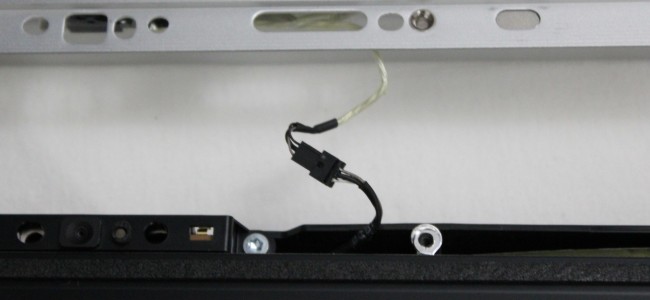
Before you can completely remove the bezel, you’ll need to disconnect the microphone cable at the top.
在完全卸下挡板之前,您需要先断开顶部的麦克风电缆。
Place the bezel off to the side, and you’ll now have access to the bottom portion of the internal components. Take this time to use some compressed air and clean out any dust that has collected.
将挡板放到一边,现在您可以使用内部组件的底部。 花点时间使用一些压缩空气并清除所有积聚的灰尘。
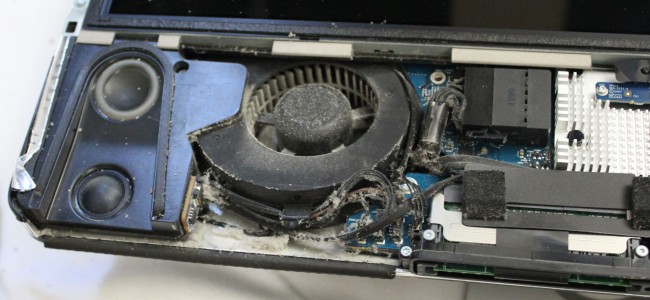
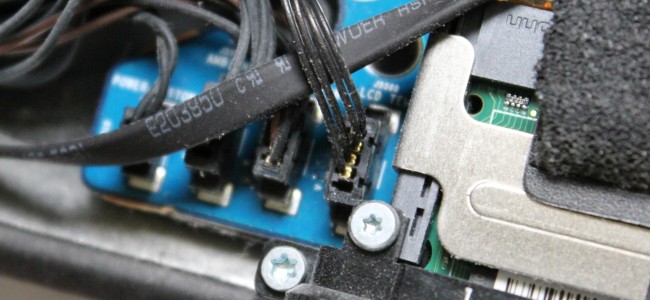
Next, remove the “LCD Temp” connector located just to the right of the left-hand side cooling fan toward the bottom.
接下来,将位于左侧冷却风扇右侧右侧的“ LCD Temp”连接器朝底部卸下。
After that, locate the connection for the display cable and remove the two T6 Torx screws on either side of the connector.
之后,找到显示电缆的连接,然后卸下连接器两侧的两颗T6 Torx螺钉。
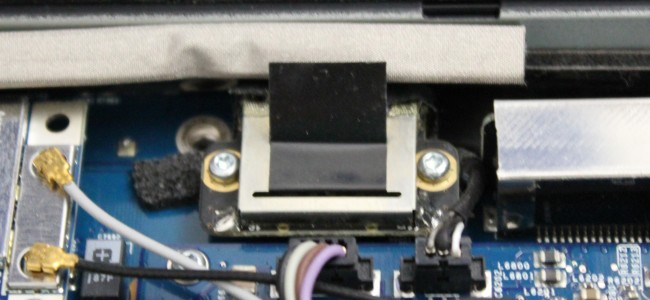
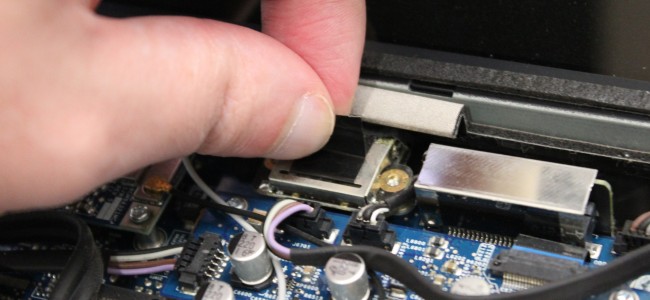
After that, pull up on the black tab to disconnect the display cable from the iMac’s logic board.
之后,向上拉黑色标签以断开显示电缆与iMac逻辑板上的连接。
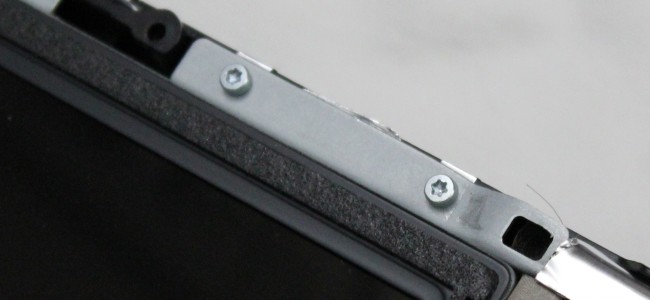
Now it’s time to remove the whole display unit. Unscrew the eight T8 Torx screws around the outer edge of the display. There are four screws on each side.
现在是时候卸下整个人机界面了。 拧开显示屏外侧边缘的八颗T8 Torx螺钉。 每侧有四个螺钉。
Next, from the left side, lift up on the display unit and open it like a book, leaving the right-side portion resting on the iMac. Either have a friend hold it up like that or use a stick or something to keep it propped it up.
接下来,从左侧抬起显示单元,将其像一本书一样打开,而将右侧部分放在iMac上。 像那样让一个朋友举起它,或者用棍子或其他东西将它支撑起来。
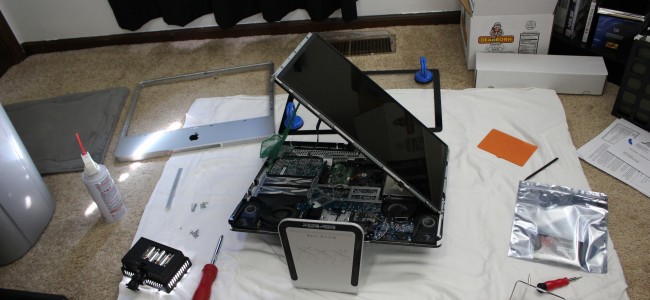
This is because the display is still connected to the iMac via four inverter cables. Simply unplug these.
这是因为显示器仍通过四根逆变器电缆连接到iMac。 只需拔下这些。
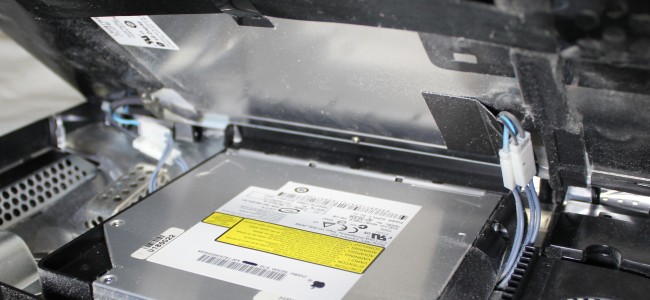
After that, you can completely remove the display unit and set it off to the side. This will finally get you access to all of the internal components, including the optical drive.
之后,您可以完全卸下人机界面并将其放在侧面。 最终,您将可以使用所有内部组件,包括光盘驱动器。
第二步:卸下光盘驱动器 (Step Two: Remove the Optical Drive)
To remove the optical drive, there’s just two T8 Torx screws holding it in place that you’ll need to remove.
要卸下光盘驱动器,只有两颗T8 Torx螺钉将其固定在需要卸下的位置。
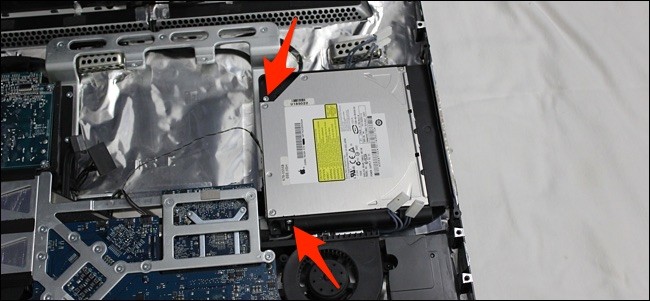
Next, you can slightly lift out the optical drive, but it will still be connected by the thermal sensor and the optical drive data and power connector. To remove the latter, simply remove the two T6 Torx screws holding the connector in place.
接下来,您可以稍微提起光盘驱动器,但仍将通过热传感器以及光盘驱动器数据和电源连接器进行连接。 要卸下后者,只需卸下将连接器固定到位的两颗T6 Torx螺钉。
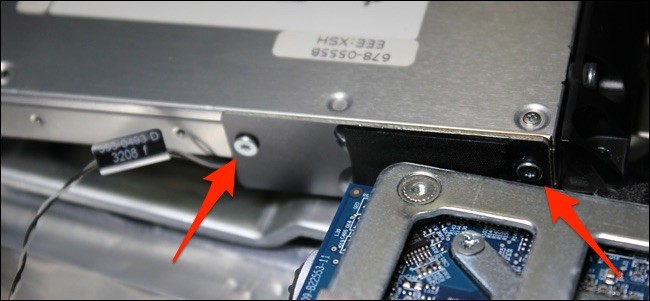
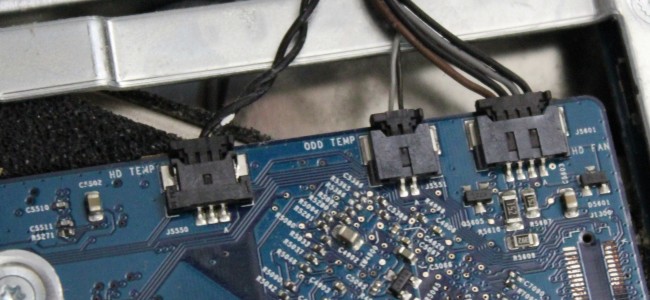
You’ll want to leave the thermal sensor plugged in (marked “ODD Temp” on the logic board), but you can remove the connection on the optical drive itself.
您需要保持热敏传感器的插入状态(在逻辑板上标记为“ ODD Temp”),但是可以删除光盘驱动器本身上的连接。
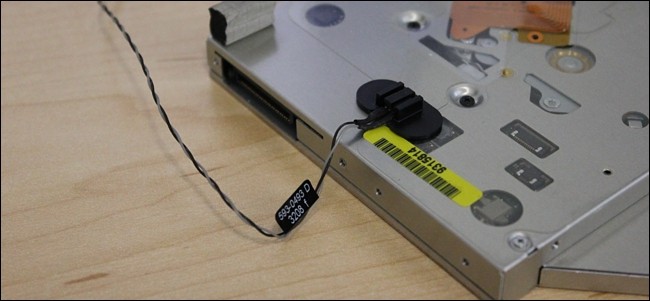
It’s connected to the drive with adhesive, so remove the foam covering the sensor and then use a spudger or something with a flat edge to pry off the temperature sensor assembly from the optical drive’s surface. Remember to leave the other end plugged into the logic board.
它通过粘合剂连接到驱动器,因此请除去覆盖传感器的泡沫,然后使用撬棒或平坦边缘的东西从光驱的表面撬起温度传感器组件。 切记将另一端插入逻辑板。
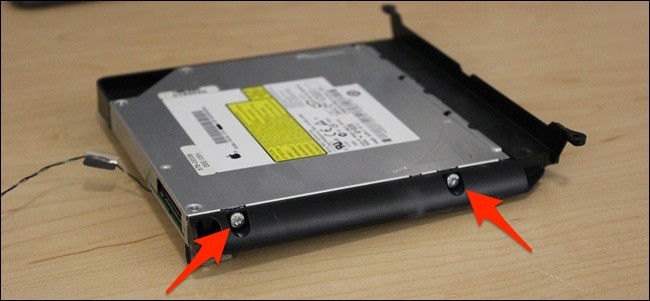
Next, you’ll need to remove the black bracket that holds the optical drive in place inside of the iMac. It’s held together with four T8 Torx screws, two on each side.
接下来,您需要卸下将光盘驱动器固定在iMac内部的黑色支架。 它与四个T8 Torx螺钉固定在一起,每侧两个。
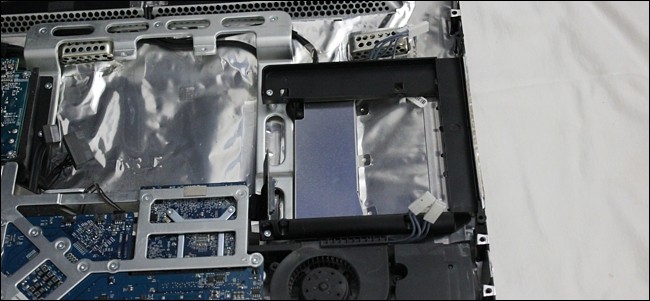
If you’re replacing the optical drive (either with another optical drive or a hard drive bay), screw it into the bracket now. Even if you aren’t, you’ll then need to take this bracket and install back into the iMac and secure it using the two original screws that you removed in order to take the optical drive out, since the bracket is integrated into the iMac’s assembly.
如果要更换光盘驱动器(用另一个光盘驱动器或硬盘驱动器托架),请现在将其拧入支架。 即使不是,您也需要拿起该支架,然后将其重新安装到iMac上,并使用卸下的两个原始螺钉将其固定以取出光盘驱动器,因为该支架已集成到iMac的部件。
第三步:重新组装iMac (Step Three: Reassemble Your iMac)
Now that you’ve removed the optical drive and put the bracket back in place (with or without something in it), it’s time to put everything back together. Luckily, reassembling it really isn’t any harder than taking it apart.
现在,您已经卸下了光盘驱动器并将支架放回原位(其中有或没有东西),现在该将所有部件放回原处。 幸运的是,重新组装它实际上并不比将其拆散更困难。
Start by placing the display unit back on top, making sure to rest the right edge on the iMac first as you prop up the left side, since you’ll need to plug the inverter cables back in. Luckily, these inverter cables are interchangeable, so it doesn’t matter which of the two you plug into the connectors on above and below the optical drive bay.
首先将人机界面放回顶部,确保您先将iMac的右边缘放在左侧,因为您需要重新插入逆变器电缆。幸运的是,这些逆变器电缆是可互换的,因此,插入光盘驱动器托架上方和下方的连接器中的哪一个都不重要。
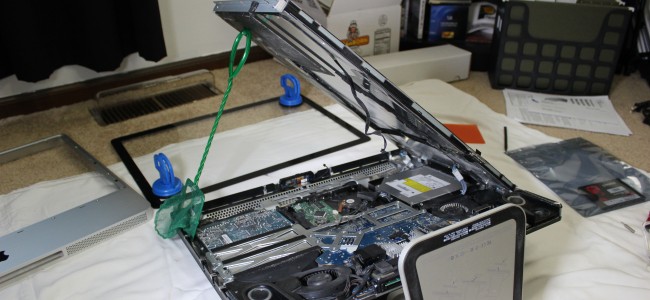
After you plug the inverter cables back in, you can mount the display unit back on the iMac and screw it all in. If it doesn’t sit flush, it’s likely the inverter cables getting in the way, so check to make sure they’re tucked in between components and sitting out of the way.
重新插入逆变器电缆后,您可以将人机界面重新安装到iMac上,然后将其全部拧紧。如果显示器没有齐平,则可能是逆变器电缆挡住了,因此请检查并确保它们正确安装。重新塞入组件之间并避开它们。
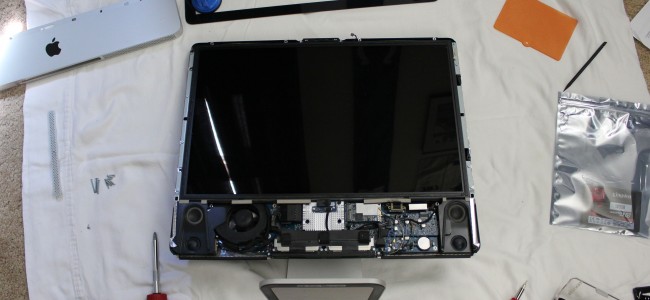
Next, Plug the display cable back in and screw in the two T6 Torx screws to secure it.
接下来,将显示电缆重新插入并拧紧两颗T6 Torx螺钉以将其固定。

Don’t forget about the LCD temperature sensor cable as well. If you don’t plug this back in, your iMac’s cooling fans will run at max speed nonstop.
也不要忘记LCD温度传感器电缆。 如果您不插回电源,您的iMac冷却风扇将以最大速度不间断运行。

Next, place the bezel back on and remember to reconnect the microphone cable.
接下来,重新放上挡板,并记住重新连接麦克风电缆。

When placing the bezel back on, remember that the four screws along the bottom are longer than the rest.
重新装上挡板时,请记住,底部的四个螺钉比其余的螺钉要长。
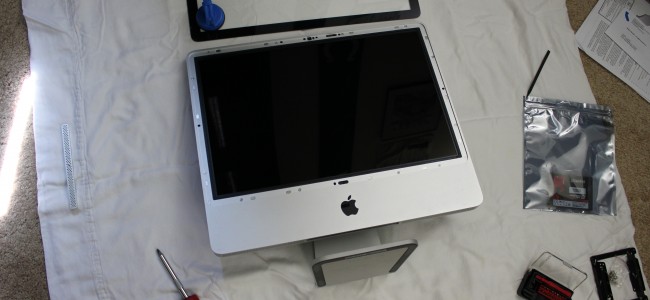
After the bezel in back in place, screw back in the memory slot plate on the bottom edge of the iMac.
将挡板放回原位后,将其拧回到iMac底部边缘的内存插槽板上。

Now it’s time to place the front glass panel back on, but before you do this, make sure there aren’t any fingerprints or dust on the display unit and on both sides of the glass. It’s not a huge issue if you forget to do this, since you just need to get the suction cups back out, but it’s better to do it now while it’s still torn apart.
现在是时候放回前玻璃面板了,但是在执行此操作之前,请确保人机界面上和玻璃的两边都没有任何指纹或灰尘。 如果您忘记这样做,这并不是一个大问题,因为您只需要取回吸盘,但是最好在它仍然被撕裂时立即进行操作。
With the suction cups still on the glass panel, slowly place it on the screen until the magnets take over and lock it into place.
在吸盘仍在玻璃面板上的情况下,将其慢慢放在屏幕上,直到磁铁占据并锁定到位。

Remove the suction cups and you’re good to go! Place the iMac back on your desk, reconnect any cables and power it up.
卸下吸盘,您就可以开始了! 将iMac放回您的桌上,重新连接所有电缆并打开电源。
翻译自: https://www.howtogeek.com/261630/how-to-remove-the-optical-drive-from-an-older-2007-2009-imac/
imac卸载
