安卓应用开发 MyWeChat(一)
- 项目gitee仓库
- 实现MyWeChat初步静态界面
- 静态界面首部(top)
- 静态界面底部(bottom)
- 静态界面中部(fragment)
- 综合整理静态界面
- 实现MyWeChat界面初步的显示与跳转
- fragment的显示
- fragment的隐藏与初始化
- 选中后frament的切换
- 综合整理MainActivity.java
- 一些小细节
- 图标的选择与导入
- 去除as自带的app标题框
- as中git插件上传的小问题
项目gitee仓库
相应项目gitee地址
实现MyWeChat初步静态界面
要完成的初步静态界面如下图所示:

根据想要完成的效果将整个界面分为三部分:首部(top)、中部(fragment)、底部(bottom)。

项目中res/layout结构如上图所示(top.xml、bottom.xml以及4个对应页面的fragment.xml)。
静态界面首部(top)

首部需要实现的效果很简单,在LinearLayout中使用textView写上相应标题即可实现。以下为top.xml:
<LinearLayout xmlns:android="http://schemas.android.com/apk/res/android"android:layout_width="match_parent"android:layout_height="wrap_content"android:background="@color/black"><TextViewandroid:id="@+id/textView"android:layout_width="match_parent"android:layout_height="70dp"android:layout_weight="1"android:gravity="center"android:text="MyWeChat"android:textColor="@color/white"android:textSize="26sp" />
</LinearLayout>
静态界面底部(bottom)

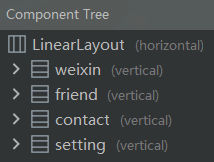
底部需要实现的效果是4个tab(这里未将4个tab置于底部,于activity_main中进行相应操作),4个tab分别作为LinearLayout(vertical)放置相应的图标和文字,再将4个tab组合在外层的LinearLayout(horizontal)中,结构如下图所示。

以下为bottom.xml:
<LinearLayout xmlns:android="http://schemas.android.com/apk/res/android"xmlns:app="http://schemas.android.com/apk/res-auto"android:layout_width="match_parent"android:layout_height="80dp"android:gravity="center"><LinearLayoutandroid:id="@+id/weixin"android:layout_width="wrap_content"android:layout_height="match_parent"android:layout_weight="1"android:background="@color/black"android:orientation="vertical"><ImageViewandroid:id="@+id/imageView1"android:layout_width="match_parent"android:layout_height="wrap_content"android:layout_weight="1"app:srcCompat="@drawable/barweixin" /><TextViewandroid:id="@+id/textView1"android:layout_width="match_parent"android:layout_height="wrap_content"android:layout_weight="1"android:gravity="center"android:textColor="@color/white"android:text="微信"android:textSize="16sp" /></LinearLayout>//其余3个tab同理,注意id之间的区分,此处省略。
</LinearLayout>
静态界面中部(fragment)
以第一个页面(fragment_weixin)为例。

很简单的一个textView实现,不再赘述,以下为fragment_weixin.xml:
<LinearLayout xmlns:android="http://schemas.android.com/apk/res/android"xmlns:tools="http://schemas.android.com/tools"android:layout_width="match_parent"android:layout_height="match_parent"tools:context=".weixinFragment"><!-- TODO: Update blank fragment layout --><TextViewandroid:layout_width="match_parent"android:layout_height="match_parent"android:gravity="center"android:text="这是微信页面"android:textSize="48sp" /></LinearLayout>
综合整理静态界面
在完成top.xml、bottom.xml以及4个fragment.xml后可以着手开始编写activity_main.xml了。
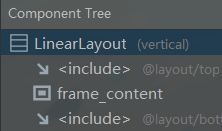
按照我们的设想,引入top.xml和bottom.xml作为首部和底部,中间的FrameLayout为之后的4个fragment占位置。

以下为activity_main.xml:
<LinearLayoutxmlns:android="http://schemas.android.com/apk/res/android"xmlns:tools="http://schemas.android.com/tools"android:layout_width="match_parent"android:layout_height="match_parent"android:orientation="vertical"tools:context=".MainActivity"><include layout="@layout/top"></include><FrameLayoutandroid:id="@+id/frame_content"android:layout_width="match_parent"android:layout_height="wrap_content"android:layout_weight="1" /><include layout="@layout/bottom"></include>
</LinearLayout>
这里要注意外层的LinearLayout是vertical方向布局,如果是horizontal会导致首部尾部都挤在上方。
实现MyWeChat界面初步的显示与跳转
需要实现的是将4个fragment显示在FrameLayout中,以及根据点击底部tab按钮实现tab之间的切换。
fragment的显示
首先我们要解决的问题是如何在之前预留的FrameLayout中显示fragment的内容,以下为显示中间图层的核心代码:
//初始化中间的部分的图层片段private void initFragment(){fm=getSupportFragmentManager();FragmentTransaction transaction=fm.beginTransaction();transaction.add(R.id.frame_content,weixinFragment);transaction.add(R.id.frame_content,friendFragment);transaction.add(R.id.frame_content,contactFragment);transaction.add(R.id.frame_content,settingFragment);//提交事务transaction.commit();}
fragment的隐藏与初始化
能够显示fragment后需要解决显示其中一个fragment时隐藏其他fragment的问题(不然会叠在一起),以下为隐藏功能的核心代码:
//隐藏所有图层分段private void hideView(FragmentTransaction transaction){transaction.hide(weixinFragment);transaction.hide(friendFragment);transaction.hide(contactFragment);transaction.hide(settingFragment);}
以下为fragment初始化:
//Fragmentprivate Fragment weixinFragment = new weixinFragment();private Fragment friendFragment = new friendFragment();private Fragment contactFragment = new contactFragment();private Fragment settingFragment = new settingFragment();//FragmentManagerprivate FragmentManager fm;
选中后frament的切换
采用监听器检测click事件,以下为初始化监听事件以及相应的选择页面功能:
//初始化点击监听事件private void initEvent(){linear_weixin.setOnClickListener(this);linear_friend.setOnClickListener(this);linear_contact.setOnClickListener(this);linear_setting.setOnClickListener(this);}//选择相应的图层分段private void selectFragment(int i){FragmentTransaction transaction=fm.beginTransaction();//调用隐藏所有图层函数hideView(transaction);switch (i){case 0:transaction.show(weixinFragment);break;case 1:transaction.show(friendFragment);break;case 2:transaction.show(contactFragment);break;case 3:transaction.show(settingFragment);break;default:break;}//提交转换事务transaction.commit();}
综合整理MainActivity.java
public class MainActivity extends AppCompatActivity implements View.OnClickListener{//Fragmentprivate Fragment weixinFragment = new weixinFragment();private Fragment friendFragment = new friendFragment();private Fragment contactFragment = new contactFragment();private Fragment settingFragment = new settingFragment();//FragmentManagerprivate FragmentManager fm;//底端菜单栏LinearLayoutprivate LinearLayout linear_weixin;private LinearLayout linear_friend;private LinearLayout linear_contact;private LinearLayout linear_setting;//底端菜单栏中的Imageviewprivate ImageView imageView_weixin;private ImageView imageView_friend;private ImageView imageView_contact;private ImageView imageView_setting;//底端菜单栏中的TextViewprivate TextView textView_weixin;private TextView textView_friend;private TextView textView_contact;private TextView textView_setting;@Overrideprotected void onCreate(Bundle savedInstanceState) {super.onCreate(savedInstanceState);requestWindowFeature(Window.FEATURE_NO_TITLE );setContentView(R.layout.activity_main);initView();initFragment();initEvent();selectFragment(0);//将第一个图标设为选中状态imageView_weixin.setImageResource(R.drawable.barweixin_selected);textView_weixin.setTextColor(getResources().getColor(R.color.select));}@Overridepublic void onClick(View view) {//每次点击之后,将所有的ImageView和TextView设置为未选中restartButton();switch(view.getId()){case R.id.weixin://选择所点击的菜单对应的图层片段selectFragment(0);//将该菜单的点击状态置为点击态imageView_weixin.setImageResource(R.drawable.barweixin_selected);textView_weixin.setTextColor(getResources().getColor(R.color.select));break;case R.id.friend:selectFragment(1);imageView_friend.setImageResource(R.drawable.barfriend_selected);textView_friend.setTextColor(getResources().getColor(R.color.select));break;case R.id.contact:selectFragment(2);imageView_contact.setImageResource(R.drawable.barcontact_selected);textView_contact.setTextColor(getResources().getColor(R.color.select));break;case R.id.setting:selectFragment(3);imageView_setting.setImageResource(R.drawable.barsetting_selected);textView_setting.setTextColor(getResources().getColor(R.color.select));break;default:break;}}//重置菜单的点击状态,设为未点击private void restartButton() {//设置为未点击状态//第一片段imageView_weixin.setImageResource(R.drawable.barweixin);textView_weixin.setTextColor(getResources().getColor(R.color.white));//第二片段imageView_friend.setImageResource(R.drawable.barfriend);textView_friend.setTextColor(getResources().getColor(R.color.white));//第三片段imageView_contact.setImageResource(R.drawable.barcontact);textView_contact.setTextColor(getResources().getColor(R.color.white));//第四片段imageView_setting.setImageResource(R.drawable.barsetting);textView_setting.setTextColor(getResources().getColor(R.color.white));}//初始化中间的部分的图层片段private void initFragment(){fm=getSupportFragmentManager();FragmentTransaction transaction=fm.beginTransaction();transaction.add(R.id.frame_content,weixinFragment);transaction.add(R.id.frame_content,friendFragment);transaction.add(R.id.frame_content,contactFragment);transaction.add(R.id.frame_content,settingFragment);//提交事务transaction.commit();}//初始化各底端的LinearLayout、ImageView和TextView组件private  void initView(){linear_weixin=findViewById(R.id.weixin);linear_friend=findViewById(R.id.friend);linear_contact=findViewById(R.id.contact);linear_setting=findViewById(R.id.setting);imageView_weixin=findViewById(R.id.imageView1);imageView_friend=findViewById(R.id.imageView2);imageView_contact=findViewById(R.id.imageView3);imageView_setting=findViewById(R.id.imageView4);textView_weixin=findViewById(R.id.textView1);textView_friend=findViewById(R.id.textView2);textView_contact=findViewById(R.id.textView3);textView_setting=findViewById(R.id.textView4);}//初始化点击监听事件private void initEvent(){linear_weixin.setOnClickListener(this);linear_friend.setOnClickListener(this);linear_contact.setOnClickListener(this);linear_setting.setOnClickListener(this);}//隐藏所有图层分段private void hideView(FragmentTransaction transaction){transaction.hide(weixinFragment);transaction.hide(friendFragment);transaction.hide(contactFragment);transaction.hide(settingFragment);}//选择相应的图层分段private void selectFragment(int i){FragmentTransaction transaction=fm.beginTransaction();//调用隐藏所有图层函数hideView(transaction);switch (i){case 0:transaction.show(weixinFragment);break;case 1:transaction.show(friendFragment);break;case 2:transaction.show(contactFragment);break;case 3:transaction.show(settingFragment);break;default:break;}//提交转换事务transaction.commit();}
}
一些小细节
图标的选择与导入
图标是在阿里矢量图标库iconfont中找的,找到合适的图标后下载svg格式导入到as项目中。

在res/drawable中新建Vector Asset

填写name,选择svg文件路径,选择相应大小与透明度即可生成相应的xml文件。
去除as自带的app标题框
找到res/values/themes.xml的style标签,修改成以下:
<style name="Theme.MyWeChat" parent="Theme.MaterialComponents.DayNight.NoActionBar">
即可去除自带的app标题框。
as中git插件上传的小问题
如果在项目文件夹中使用git bash能够commit及push,而as中的gitee插件不能push的话,在file->settings->VersionControl->Git中勾选Use credential helper。如果还是不能在插件中push,尝试在git bash中设置推送到仓库对应的账户与密码。


![[Android实例] android注册 登录+修改帐号密码+添加资料+给指定帐号充值 .....](http://static.oschina.net/uploads/img/201412/01094751_Gkeg.png)

