官网:
home | Sentinel
文档不是很全, 关于nacos的配置中心的使用完全没有
常见的限流算法
- 静态窗口限流: 即规定1秒内只能固定处理多少请求
- 动态窗口限流: 同样是规定1秒内处理多少请求, 但是统计方式与第一个不同, 比如2.5秒则是统计1.5秒到现在的请求数
- 漏桶限流: 进来可以大流量接收, 处理则是匀速处理
- 令牌桶算法: 漏桶放的是请求, 令牌桶则是放的令牌, 匀速生成令牌, 只有获取令牌的请求才能处理
- 令牌大闸: 比如车票, 最开始的数量是固定的, 一旦产生了足够的令牌就不再产生了
使用方法
如果是单机的SpringBoot可以使用sentinel官方的文档:
quick-start | Sentinel
如果是SpringCloud可以参考SpringCloudAlibaba的官方文档:
Sentinel · alibaba/spring-cloud-alibaba Wiki · GitHub
代码实现
添加pom依赖:
<!-- 限流熔断 -->
<dependency><groupId>com.alibaba.cloud</groupId><artifactId>spring-cloud-starter-alibaba-sentinel</artifactId>
</dependency>
限流方法处理:
注意降级的方法的入参和返回结果都需要保持一致
/*** 降级方法,需包含限流方法的所有参数和BlockException参数* @param req* @param e*/public void doConfirmBlock(ConfirmOrderDoReq req, BlockException e) {LOG.info("购票请求被限流:{}", req);throw new BusinessException(BusinessExceptionEnum.CONFIRM_ORDER_FLOW_EXCEPTION);}@SentinelResource(value = "doConfirm", blockHandler = "doConfirmBlock")public void doConfirm(ConfirmOrderDoReq req) {//do business....}
在main函数添加规则:
@SpringBootApplication
@ComponentScan("com.louye")
@MapperScan("com.louye.train.*.mapper")
@EnableFeignClients("com.louye.train.business.feign")
@EnableCaching
public class BusinessApplication {private static final Logger LOG = LoggerFactory.getLogger(BusinessApplication.class);public static void main(String[] args) {SpringApplication app = new SpringApplication(BusinessApplication.class);Environment env = app.run(args).getEnvironment();LOG.info("启动成功!!");LOG.info("地址: \thttp://127.0.0.1:{}{}/hello", env.getProperty("server.port"), env.getProperty("server.servlet.context-path"));// 限流规则(这里才是主要, 如果后续引入了sentinel控制台, 则可以直接在控制台进行规则的控制, 不需要代码形式定义限流规则)initFlowRules();LOG.info("已定义限流规则");}/*** 定义限流规则*/private static void initFlowRules(){List<FlowRule> rules = new ArrayList<>();FlowRule rule = new FlowRule();rule.setResource("doConfirm");// 资源名需要跟自己添加注解的地方的方法名一致rule.setGrade(RuleConstant.FLOW_GRADE_QPS);// Set limit QPS to 20.rule.setCount(1);rules.add(rule);FlowRuleManager.loadRules(rules);}}
搭建控台监控流量
参考: dashboard | Sentinel
使用官方jar包
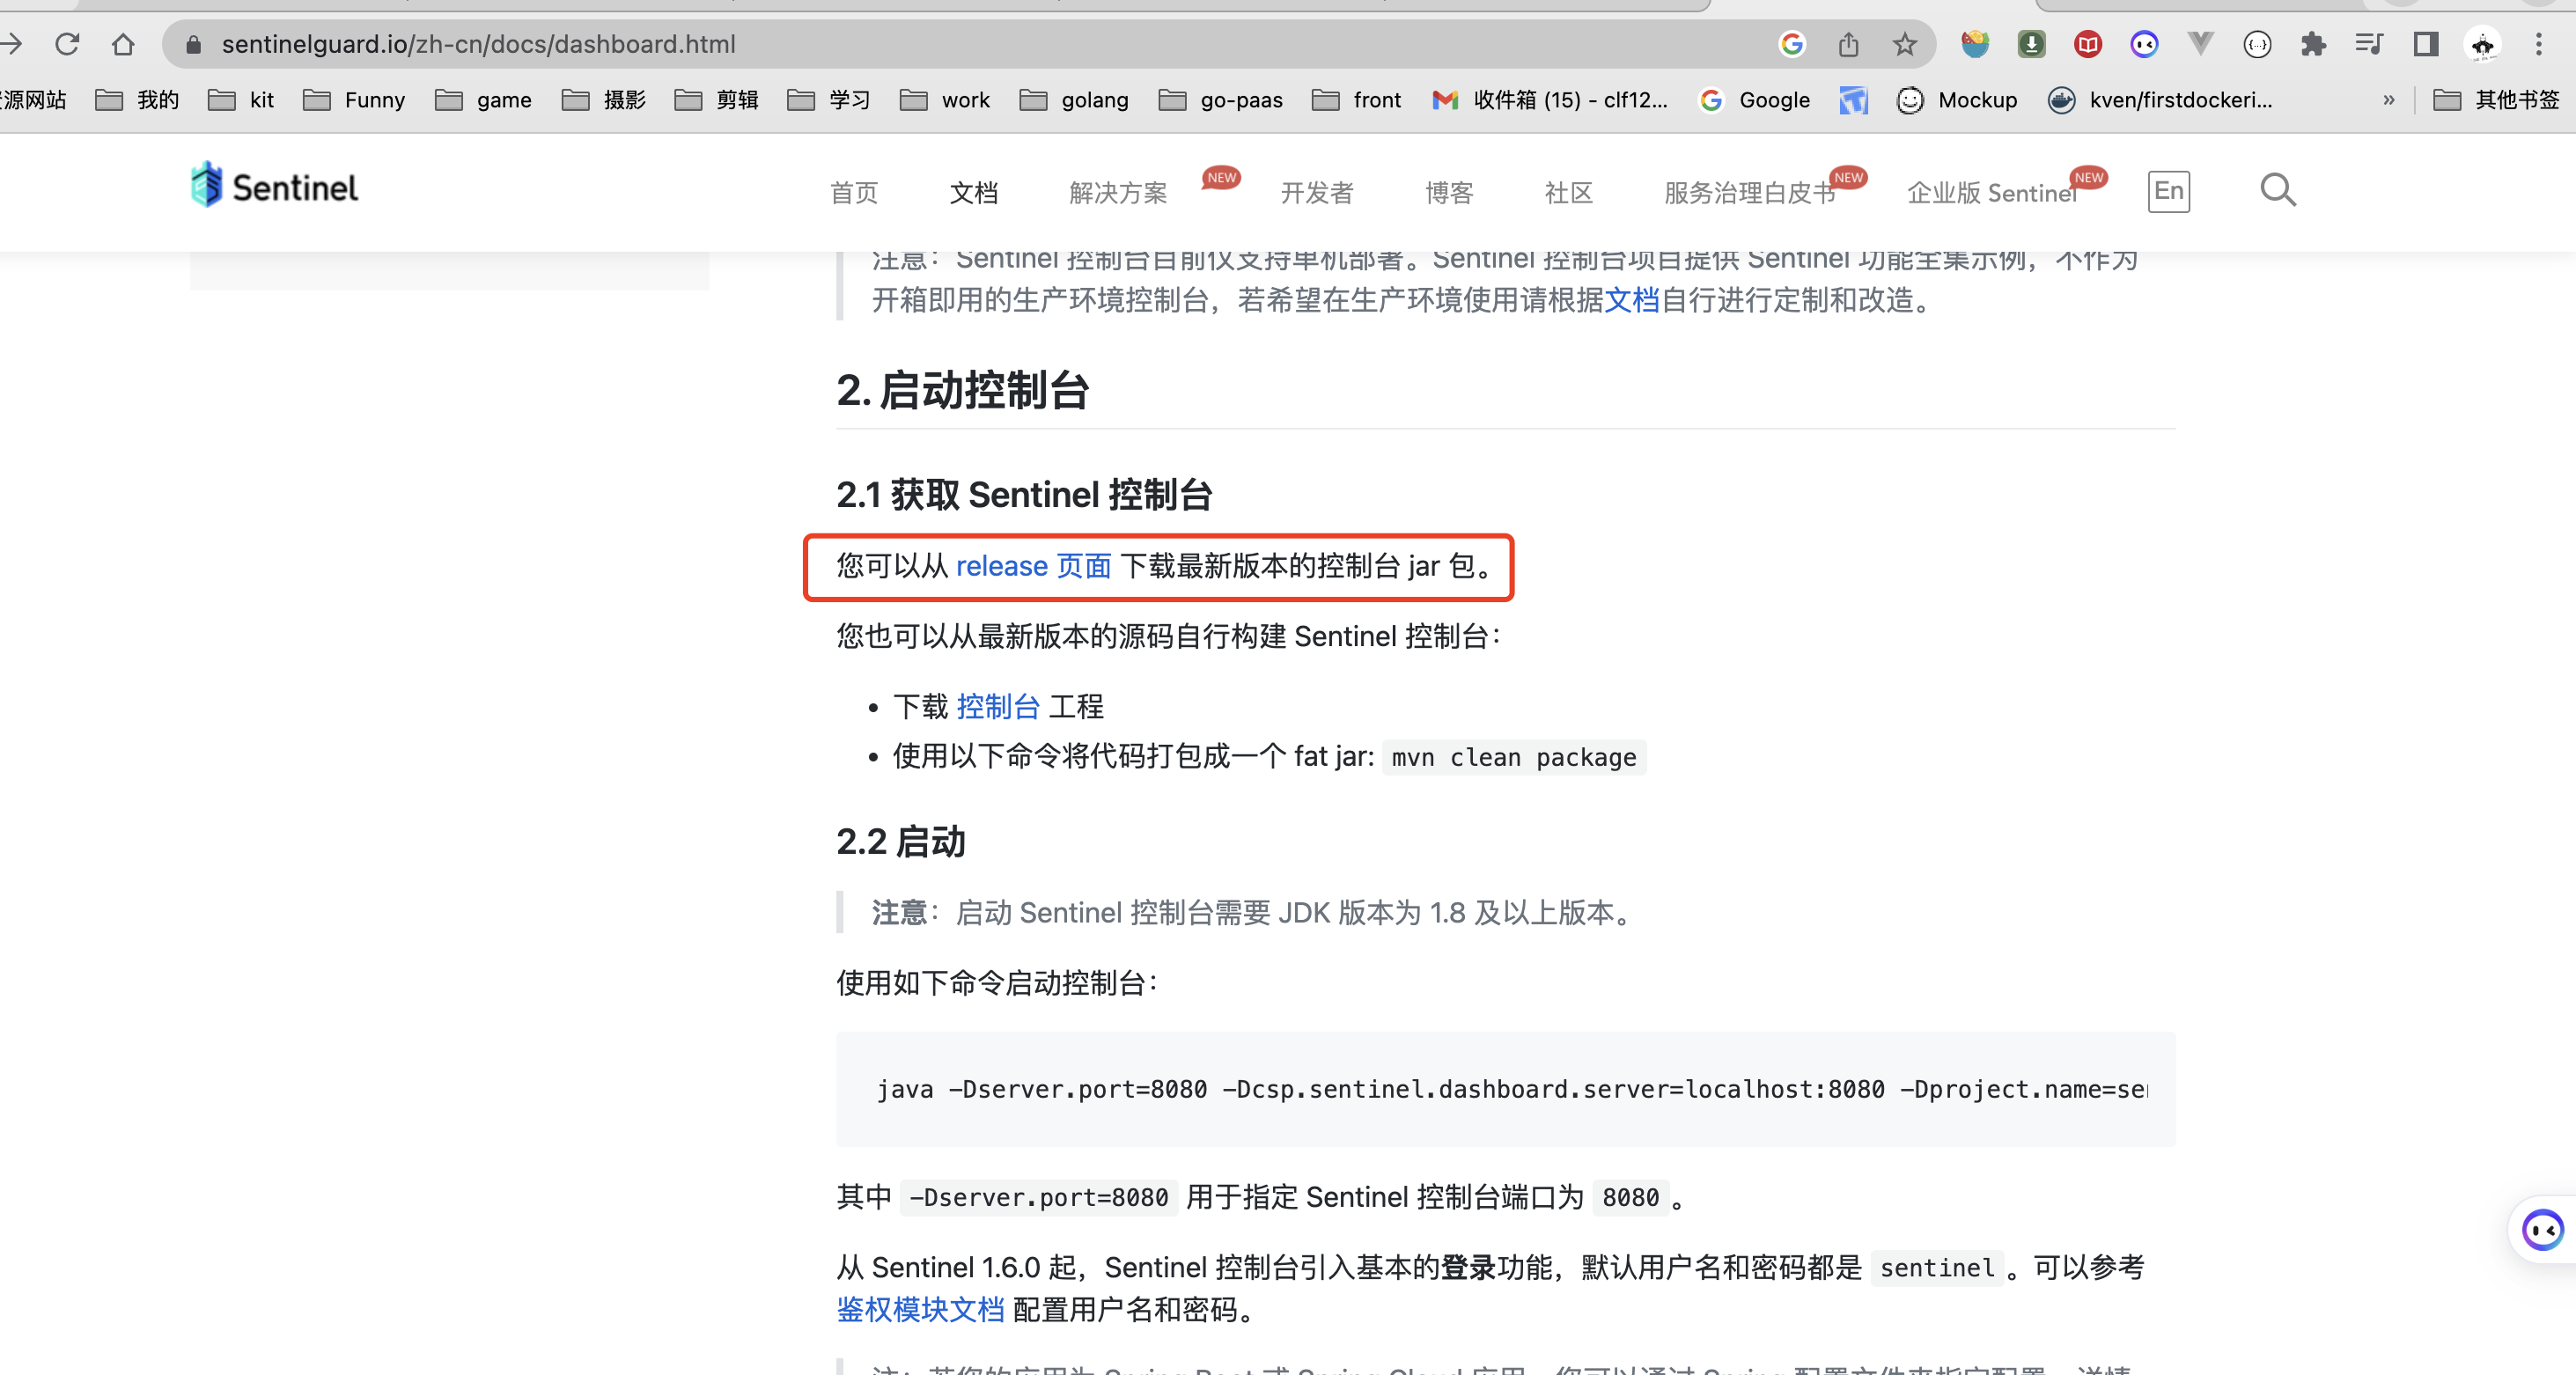
下载指定版本后, 启动:
java -Dserver.port=8080 -Dcsp.sentinel.dashboard.server=localhost:8080 -Dproject.name=sentinel-dashboard -jar sentinel-dashboard-1.8.6.jar

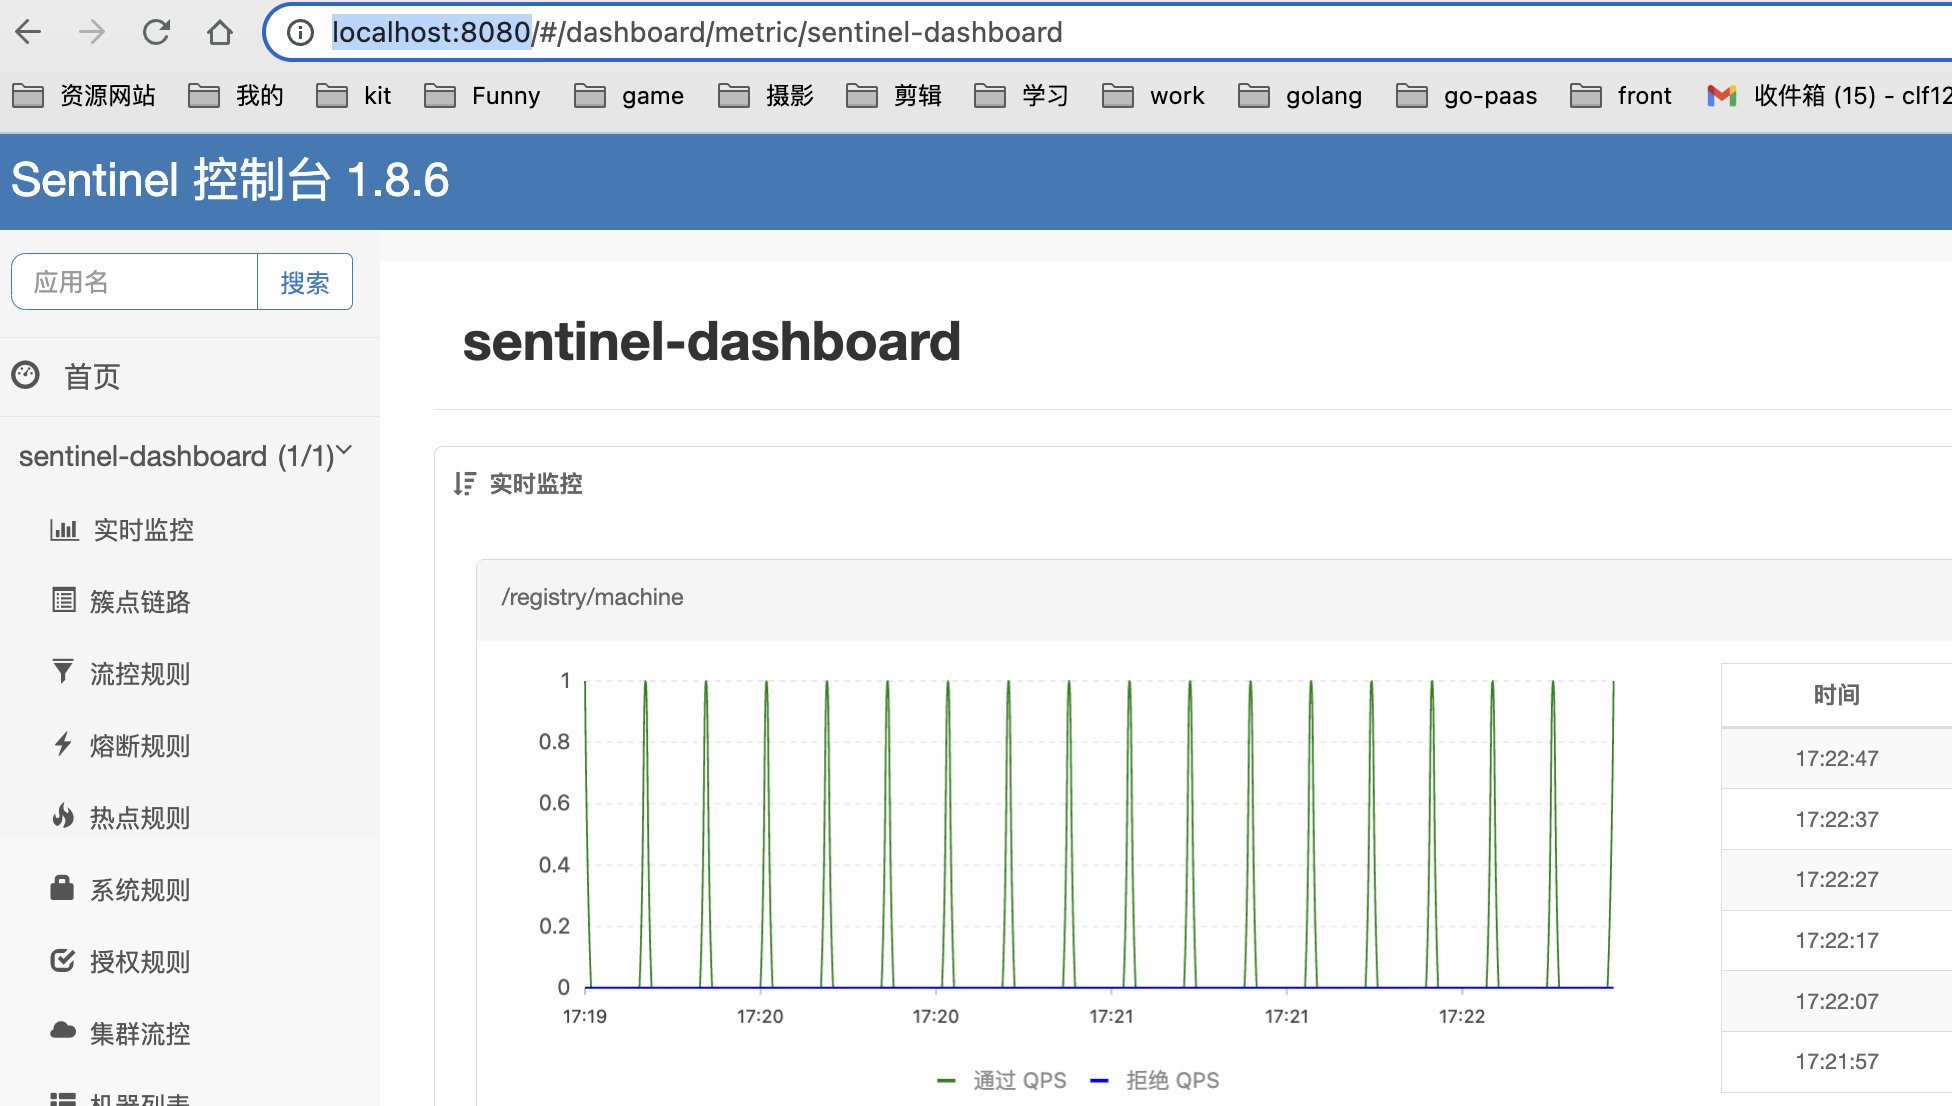
根据官方文档: 初始用户名: sentinel, 密码: sentinel

访问启动的端口即可: http://localhost:8080/
代码中需要增加的配置:
# sentinel
spring.cloud.sentinel.transport.port=8719
spring.cloud.sentinel.transport.dashboard=localhost:8080
控制台进行限流规则的控制:
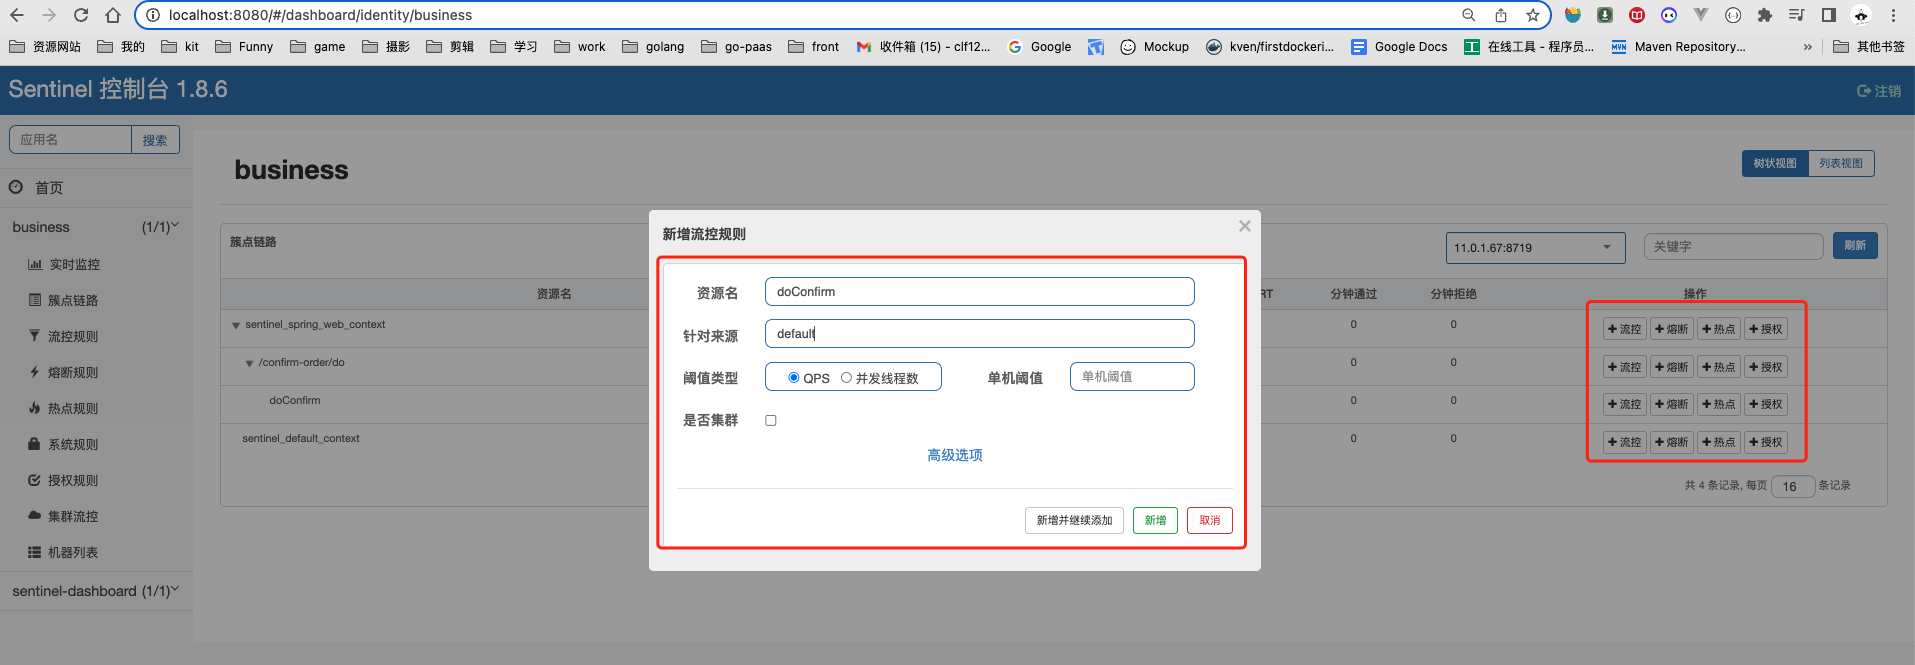
但是控制台这样定义的规则是保存在应用内存内部的, 应用一旦重启就没有了, 需要考虑规则的持久化
使用Docker构建镜像
官方目前还没有提供Docker镜像,可以根据需要自己构建镜像
参考博客:
【Mac M1+】Docker 安装 Sentinel - 掘金
下载jar包:https://github.com/alibaba/Sentinel/releases/download/1.8.6/sentinel-dashboard-1.8.6.jar
创建sentinel-dashboard-1.8.6目录, 将jar包下载到当前文件夹下,并且编写Dockerfile文件:
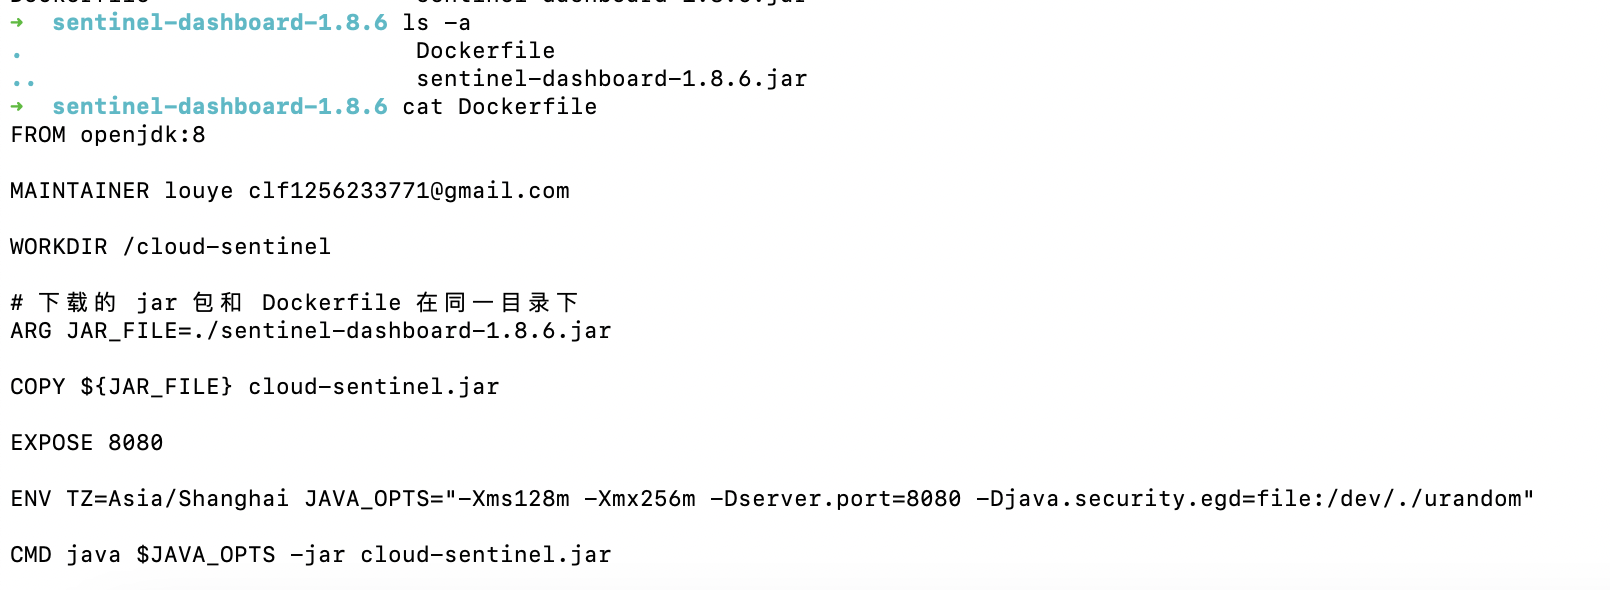
FROM openjdk:8MAINTAINER louye clf1256233771@gmail.comWORKDIR /cloud-sentinel# 下载的 jar 包和 Dockerfile 在同一目录下
ARG JAR_FILE=./sentinel-dashboard-1.8.6.jarCOPY ${JAR_FILE} cloud-sentinel.jarEXPOSE 8080ENV TZ=Asia/Shanghai JAVA_OPTS="-Xms128m -Xmx256m -Dserver.port=8080 -Djava.security.egd=file:/dev/./urandom"CMD java $JAVA_OPTS -jar cloud-sentinel.jar
构建镜像:
docker build -t sentinel:1.8.6 .

启动镜像:
docker run --name sentinel_1.8.6 --platform linux/arm64 -p 8080:8080 -d sentinel:1.8.6
使用nacos持久化sentinel的规则配置
添加依赖
<!-- sentinel + nacos -->
<dependency><groupId>com.alibaba.csp</groupId><artifactId>sentinel-datasource-nacos</artifactId>
</dependency>
添加配置到bootstrap.properties:
# sentinel + nacos
spring.cloud.sentinel.datasource.flow.nacos.serverAddr=127.0.0.1:8848
spring.cloud.sentinel.datasource.flow.nacos.namespace=train
spring.cloud.sentinel.datasource.flow.nacos.groupId=DEFAULT_GROUP
spring.cloud.sentinel.datasource.flow.nacos.dataId=sentinel-business-flow
spring.cloud.sentinel.datasource.flow.nacos.ruleType=flow
在nacos中配置sentinel的规则sentinel-business-flow, 类型选择json:
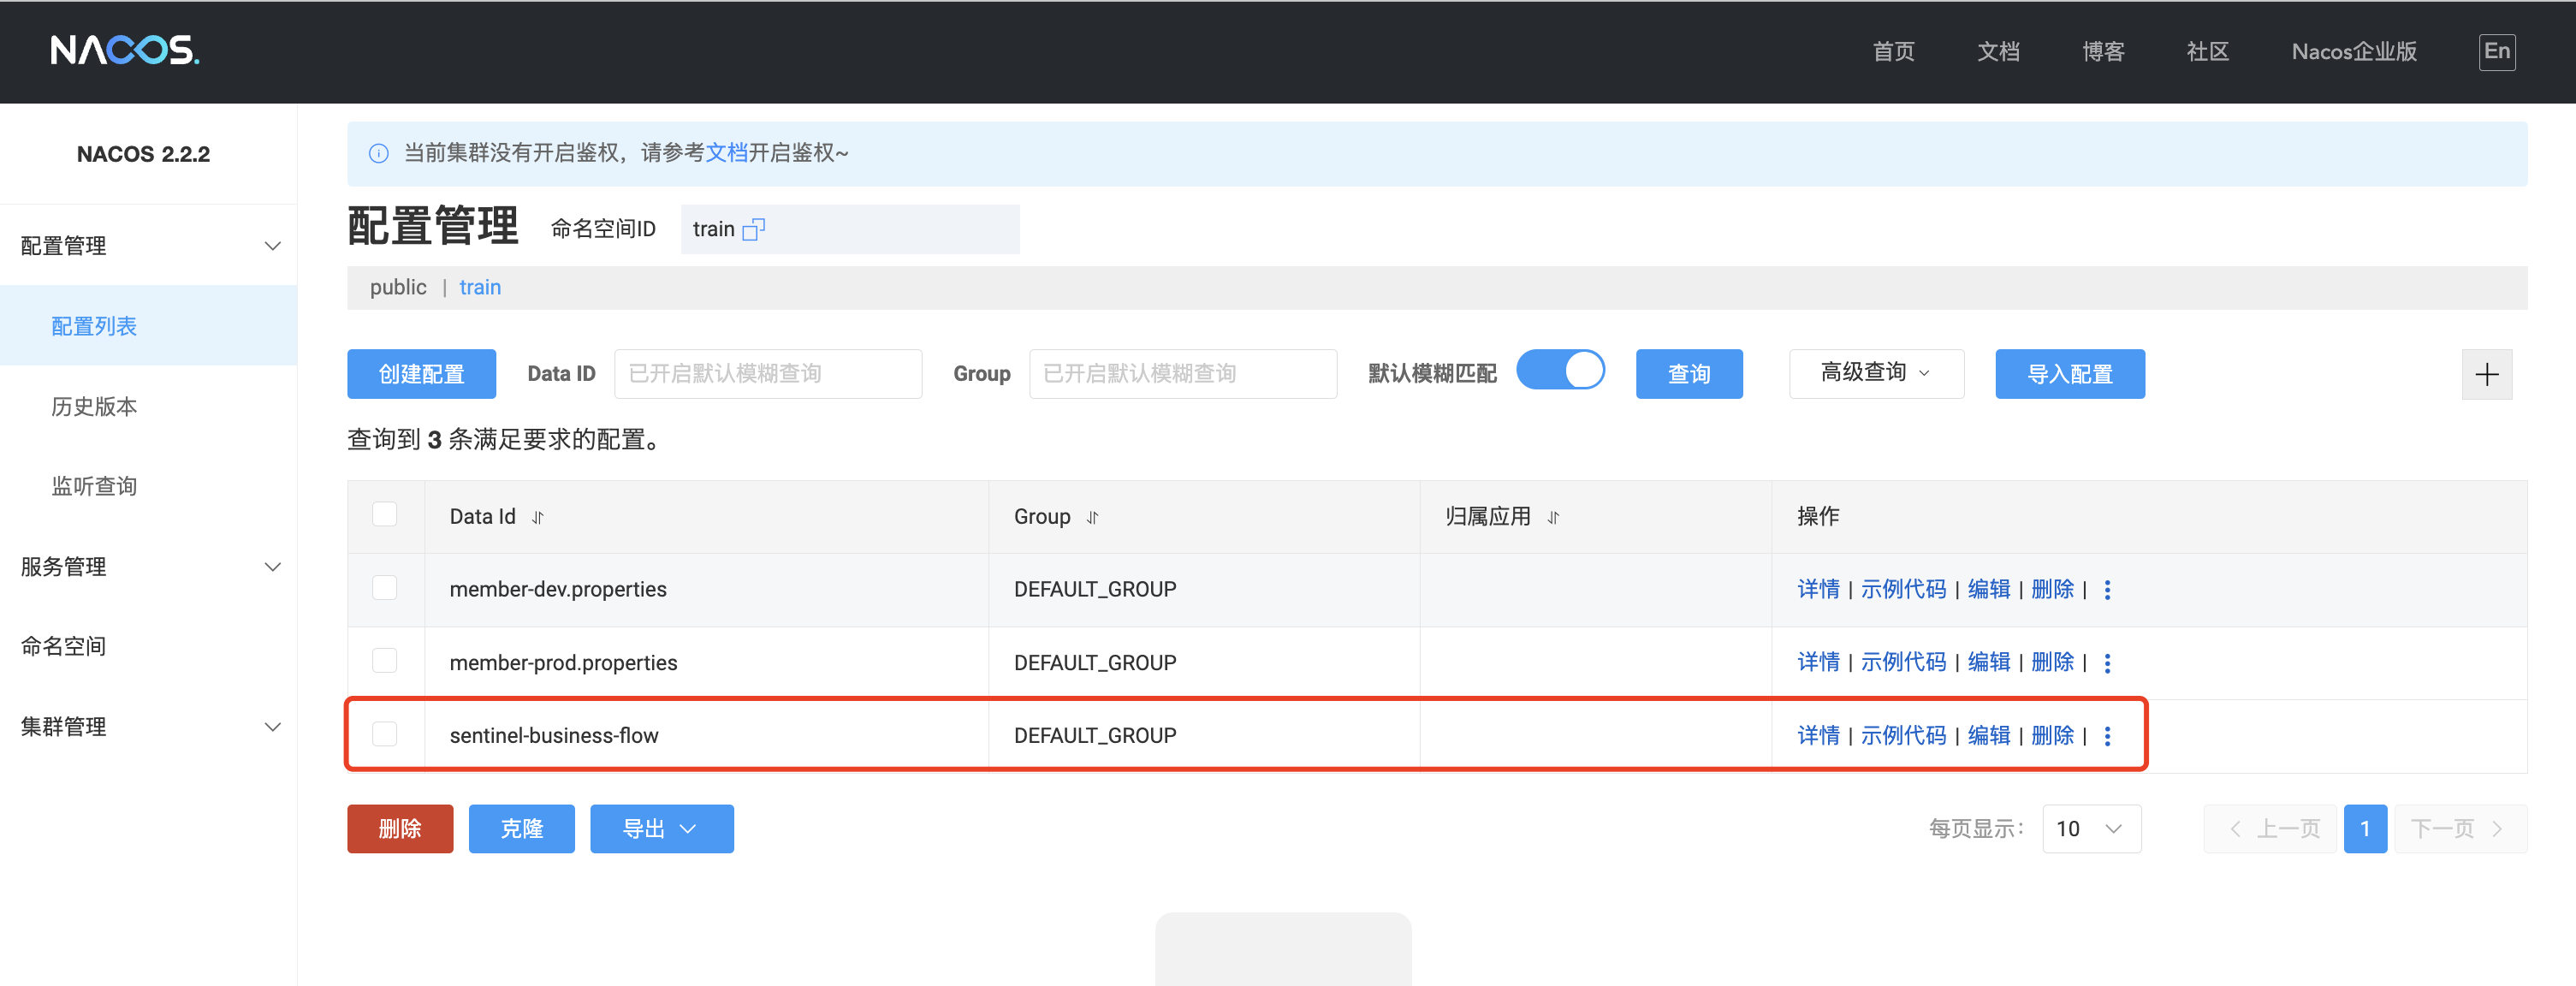
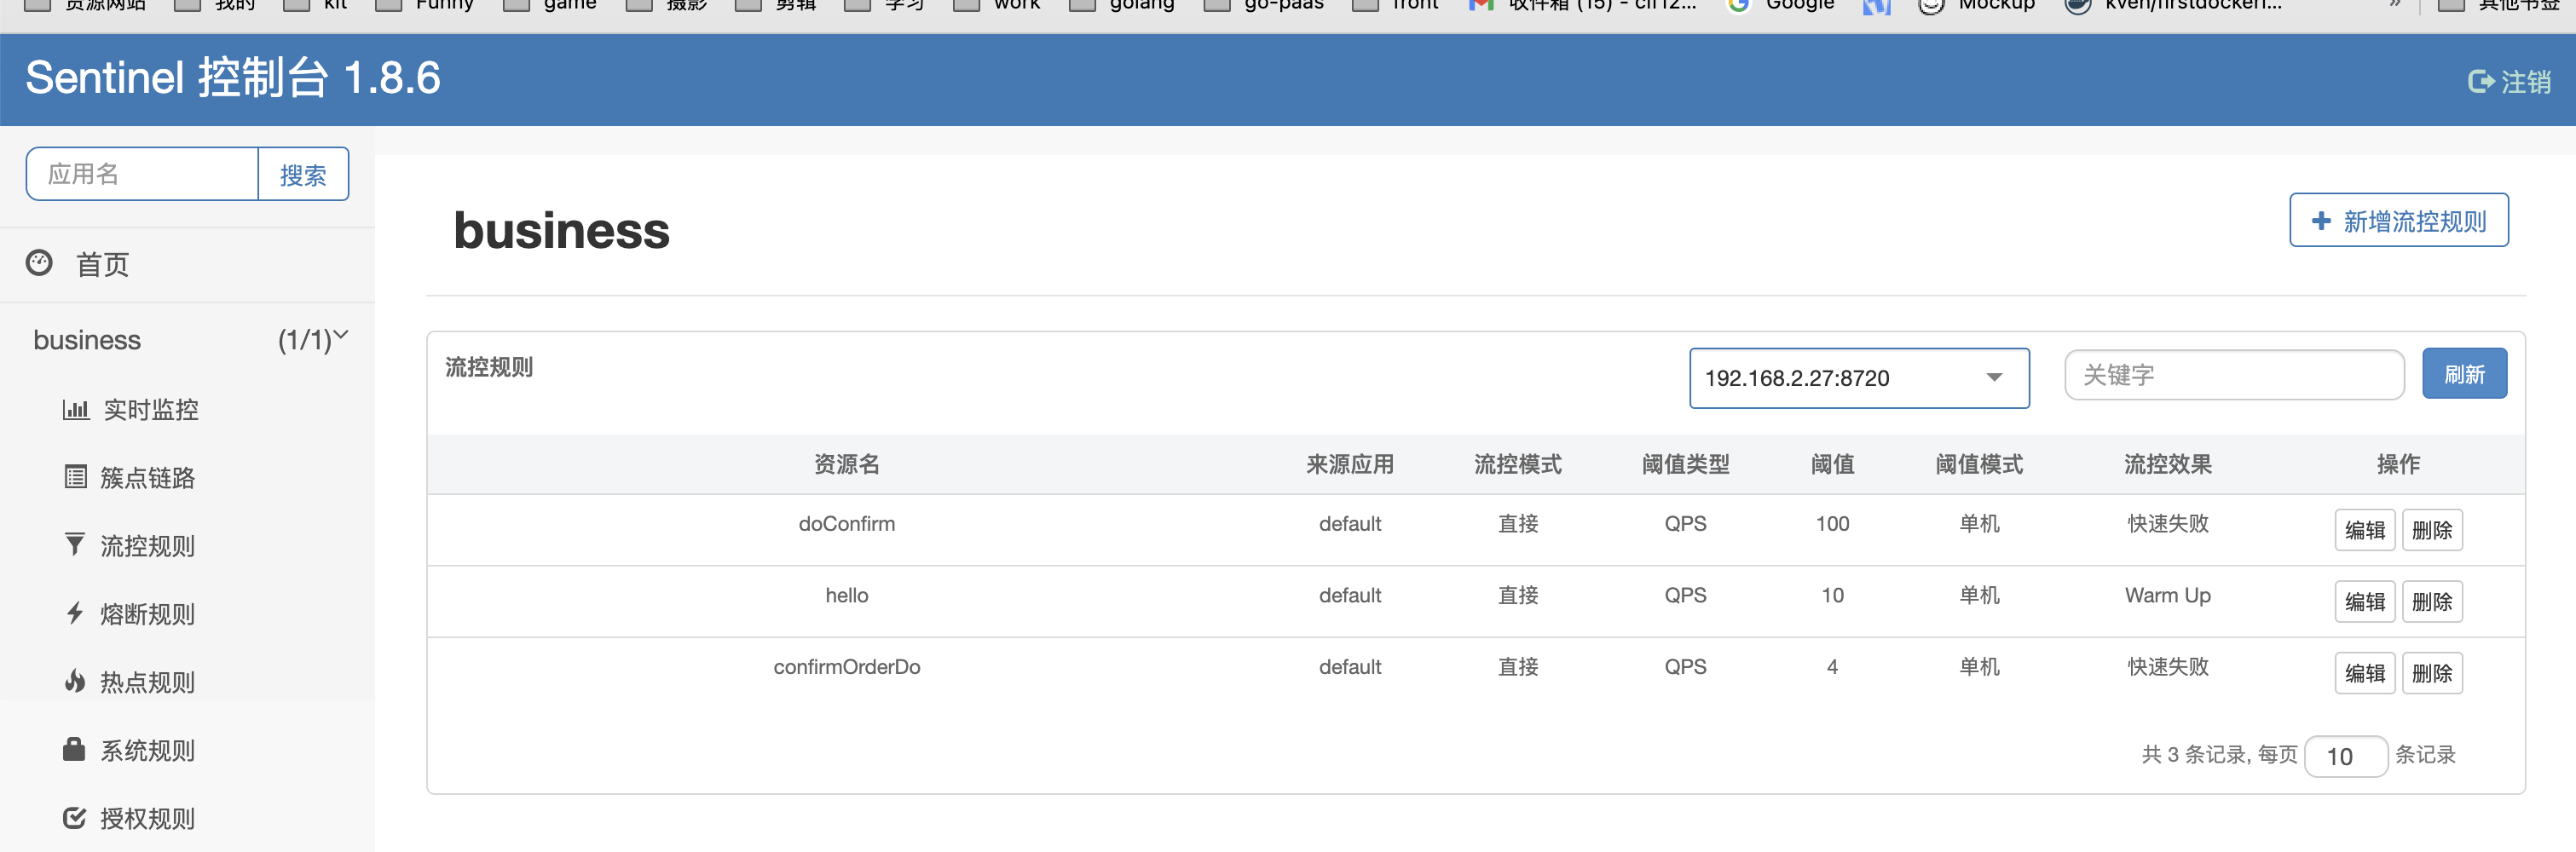
[{"resource": "doConfirm","limitApp": "default","grade": 1,"count": 100,"strategy": 0,"controlBehavior": 0,"clusterMode": false},{"resource": "confirmOrderDo","limitApp": "default","grade": 1,"count": 4,"strategy": 0,"controlBehavior": 0,"clusterMode": false},{"resource": "hello","limitApp": "default","grade": 1,"count": 10,"strategy": 0,"controlBehavior": 1,"warmUpPeriodSec": 2,"clusterMode": false}
]
- resource: 资源名, 添加注解@SentinelResource时定义的
- limitApp: 针对来源
- grade: 0: 并发线程数, 1: QPS
- count: 单机阈值
- strategy: 流控模式, 0: 直接, 1: 关联, 2: 链路
- controlBehavior: 流控效果, 0: 快速失败, 1: warm up(预热用于加载数据), 2: 排队等待
- clusterMode: 是否集群
配置后查看sentinel控制台就可以看到对应的限流规则:
不同限流的概念
- 关联限流: strategy=1, 在下单和支付的场景中, 这两个操作是不同的两个接口, 可能存在某些原因支付处理速度慢需要限流, 所以关联着下单的接口也会自动受到限流
- 链路限流: strategy=2, 在两个接口调用同一个Service的方法时, 我们只想对某一个方法的某个接口进行限流,但是并不影响另一个, 采用链路就可以只对某个链路的请求进行限制
熔断配置
场景, 服务A调用服务B, 这时候可能服务B处理很慢或者B服务出现异常, 熔断则直接不对服务B进行访问了然后继续往后走. 但是原有的调用逻辑怎么处理就需要我们补充备用方案.
引入基本依赖:
<!-- 限流熔断 -->
<dependency><groupId>com.alibaba.cloud</groupId><artifactId>spring-cloud-starter-alibaba-sentinel</artifactId>
</dependency><!-- sentinel + nacos -->
<dependency><groupId>com.alibaba.csp</groupId><artifactId>sentinel-datasource-nacos</artifactId>
</dependency>
bootstrap.properties添加配置:
# sentinel
spring.cloud.sentinel.transport.port=8719
spring.cloud.sentinel.transport.dashboard=localhost:8080
# sentinel + nacos, degrade这个名字可以自定义
spring.cloud.sentinel.datasource.degrade.nacos.serverAddr=127.0.0.1:8848
spring.cloud.sentinel.datasource.degrade.nacos.namespace=train
spring.cloud.sentinel.datasource.degrade.nacos.groupId=DEFAULT_GROUP
spring.cloud.sentinel.datasource.degrade.nacos.dataId=sentinel-batch-degrade
spring.cloud.sentinel.datasource.degrade.nacos.ruleType=degrade# sentinel 默认不监控feign, 需要配置才能监控feign
feign.sentinel.enabled=true
# 上面改成true后, 启动会报注入失败, 需要改成懒加载
spring.cloud.openfeign.lazy-attributes-resolution=true
nacos中配置降级规则:
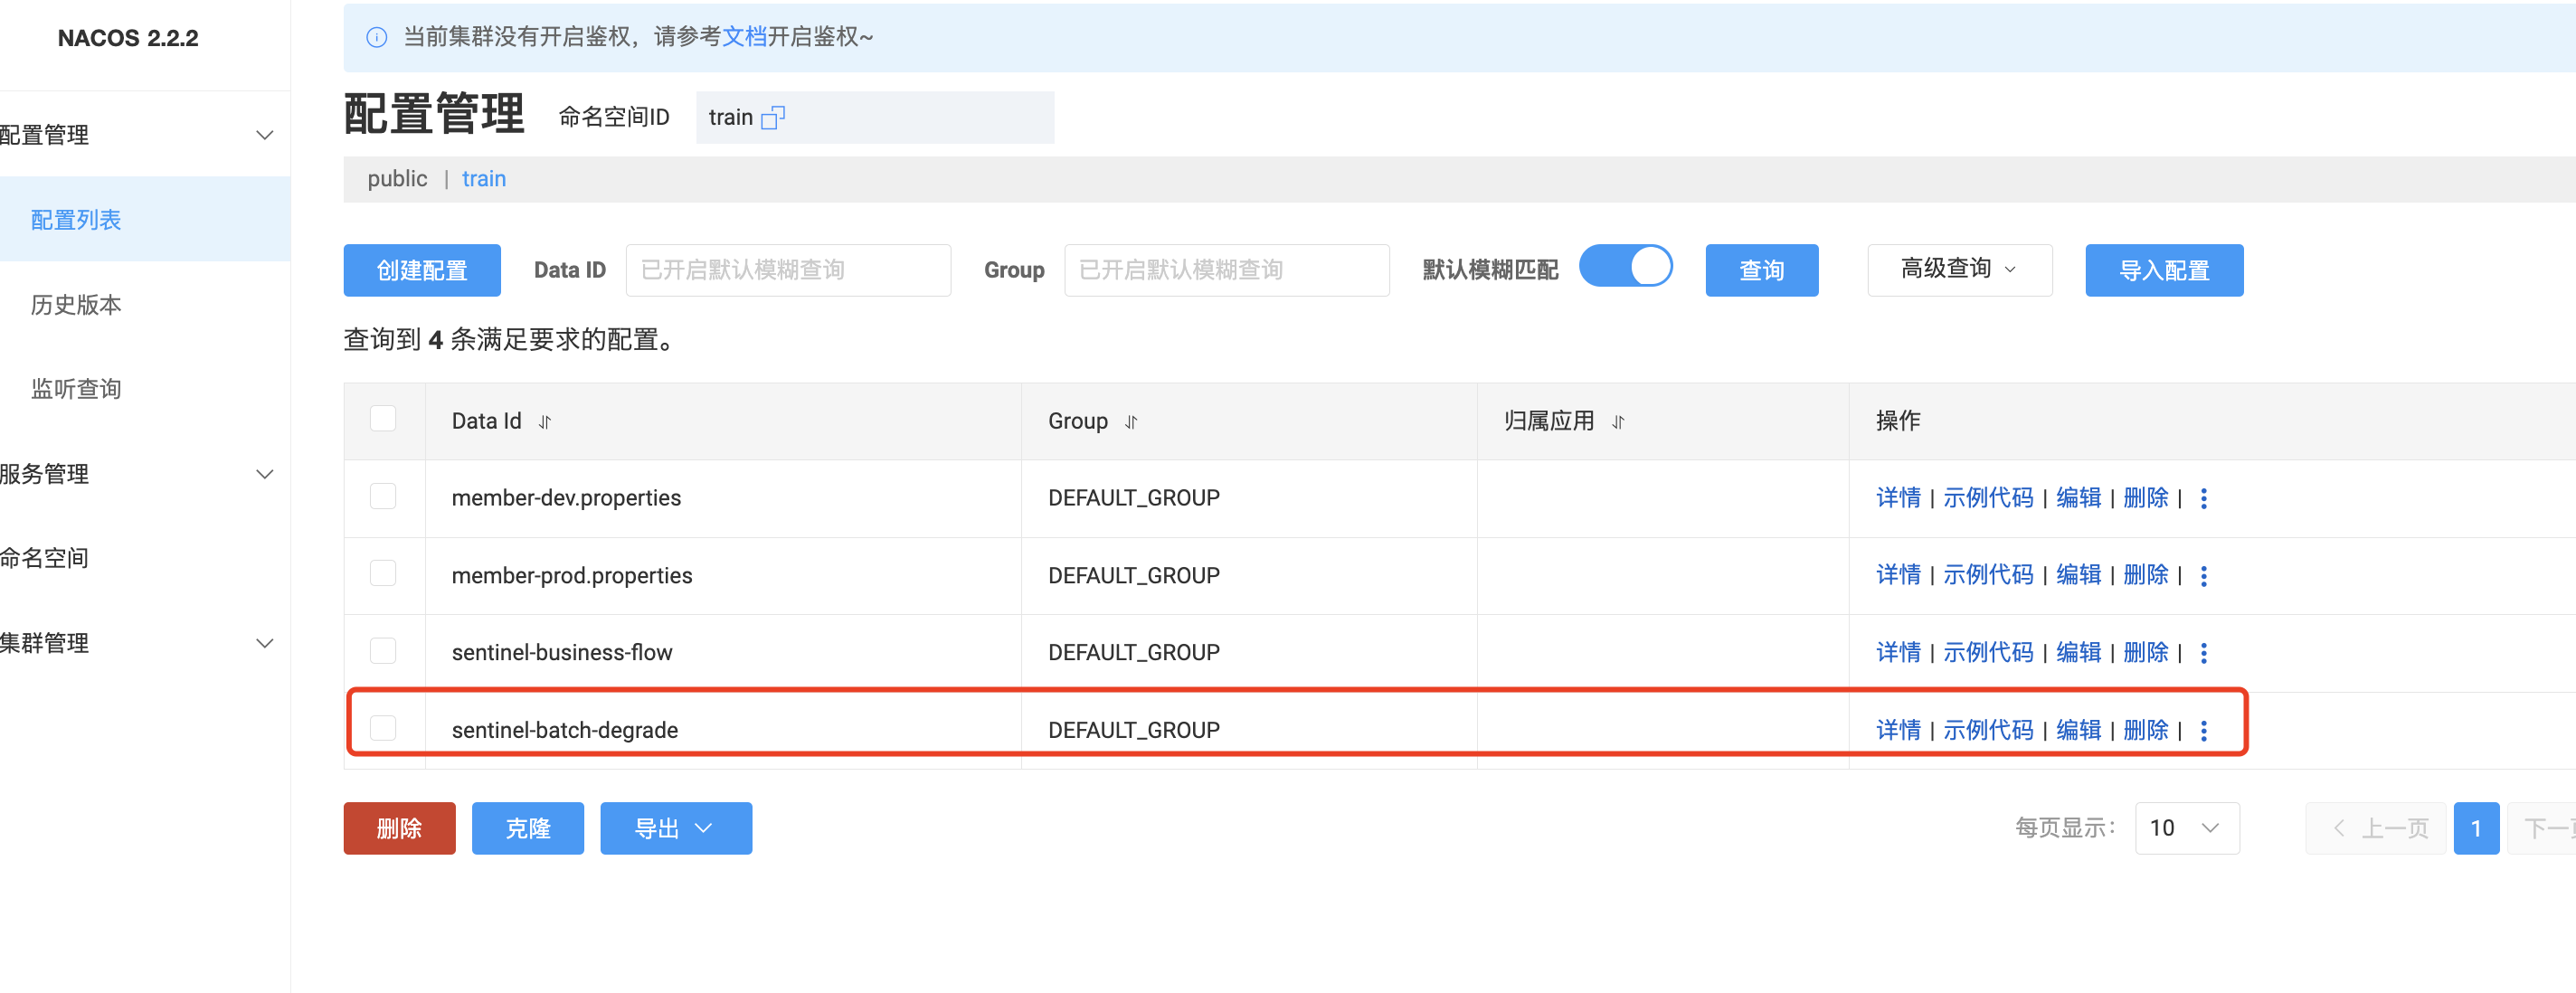
[{"resource": "GET:http://business/business/hello","grade": 0,"count": 201,"timeWindow": 11,"minRequestAmount": 6,"statIntervalMs": 1000,"slowRatioThreshold": 0.3
}]
对应的展示:
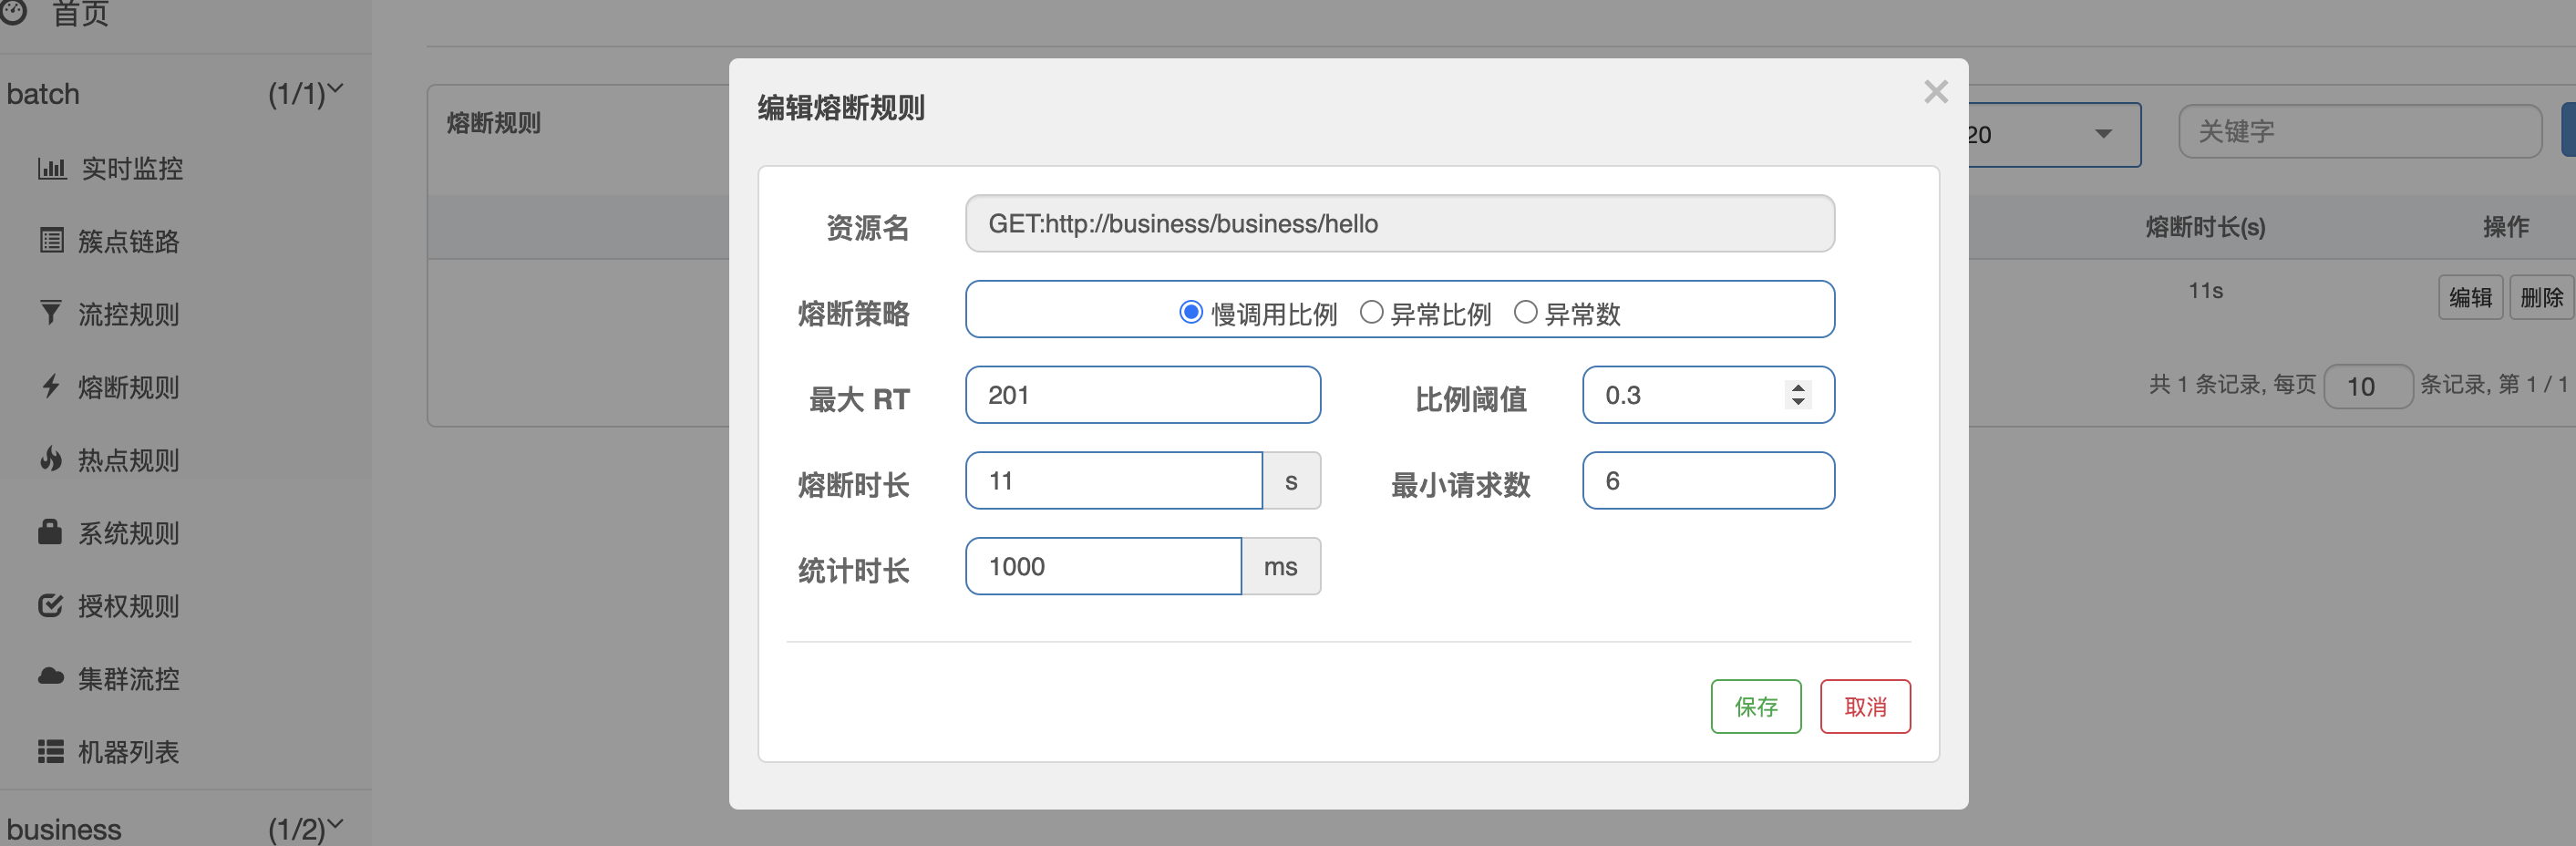
- resource: 资源名
- grade: 熔断策略
- count: 最大RT(响应时间), 超过这个时长则是慢调用
- timeWindow: 熔断时长
- minRequestAmount: 最小请求数
- statIntervalMs: 统计时长
- slowRatioThreshold: 比例阈值
降级处理配置:
编写fallback的方法实现:
@Component
public class BusinessFeignFallback implements BusinessFeign {@Overridepublic String hello() {return "Fallback";}
}
配置Feign, 添加熔断后的处理器:
@FeignClient(value = "business", fallback = BusinessFeignFallback.class)
public interface BusinessFeign {@GetMapping("/business/hello")String hello();
}
热点参数限流
Sentinel 热点参数限流原理 - 知乎


