一、准备工作
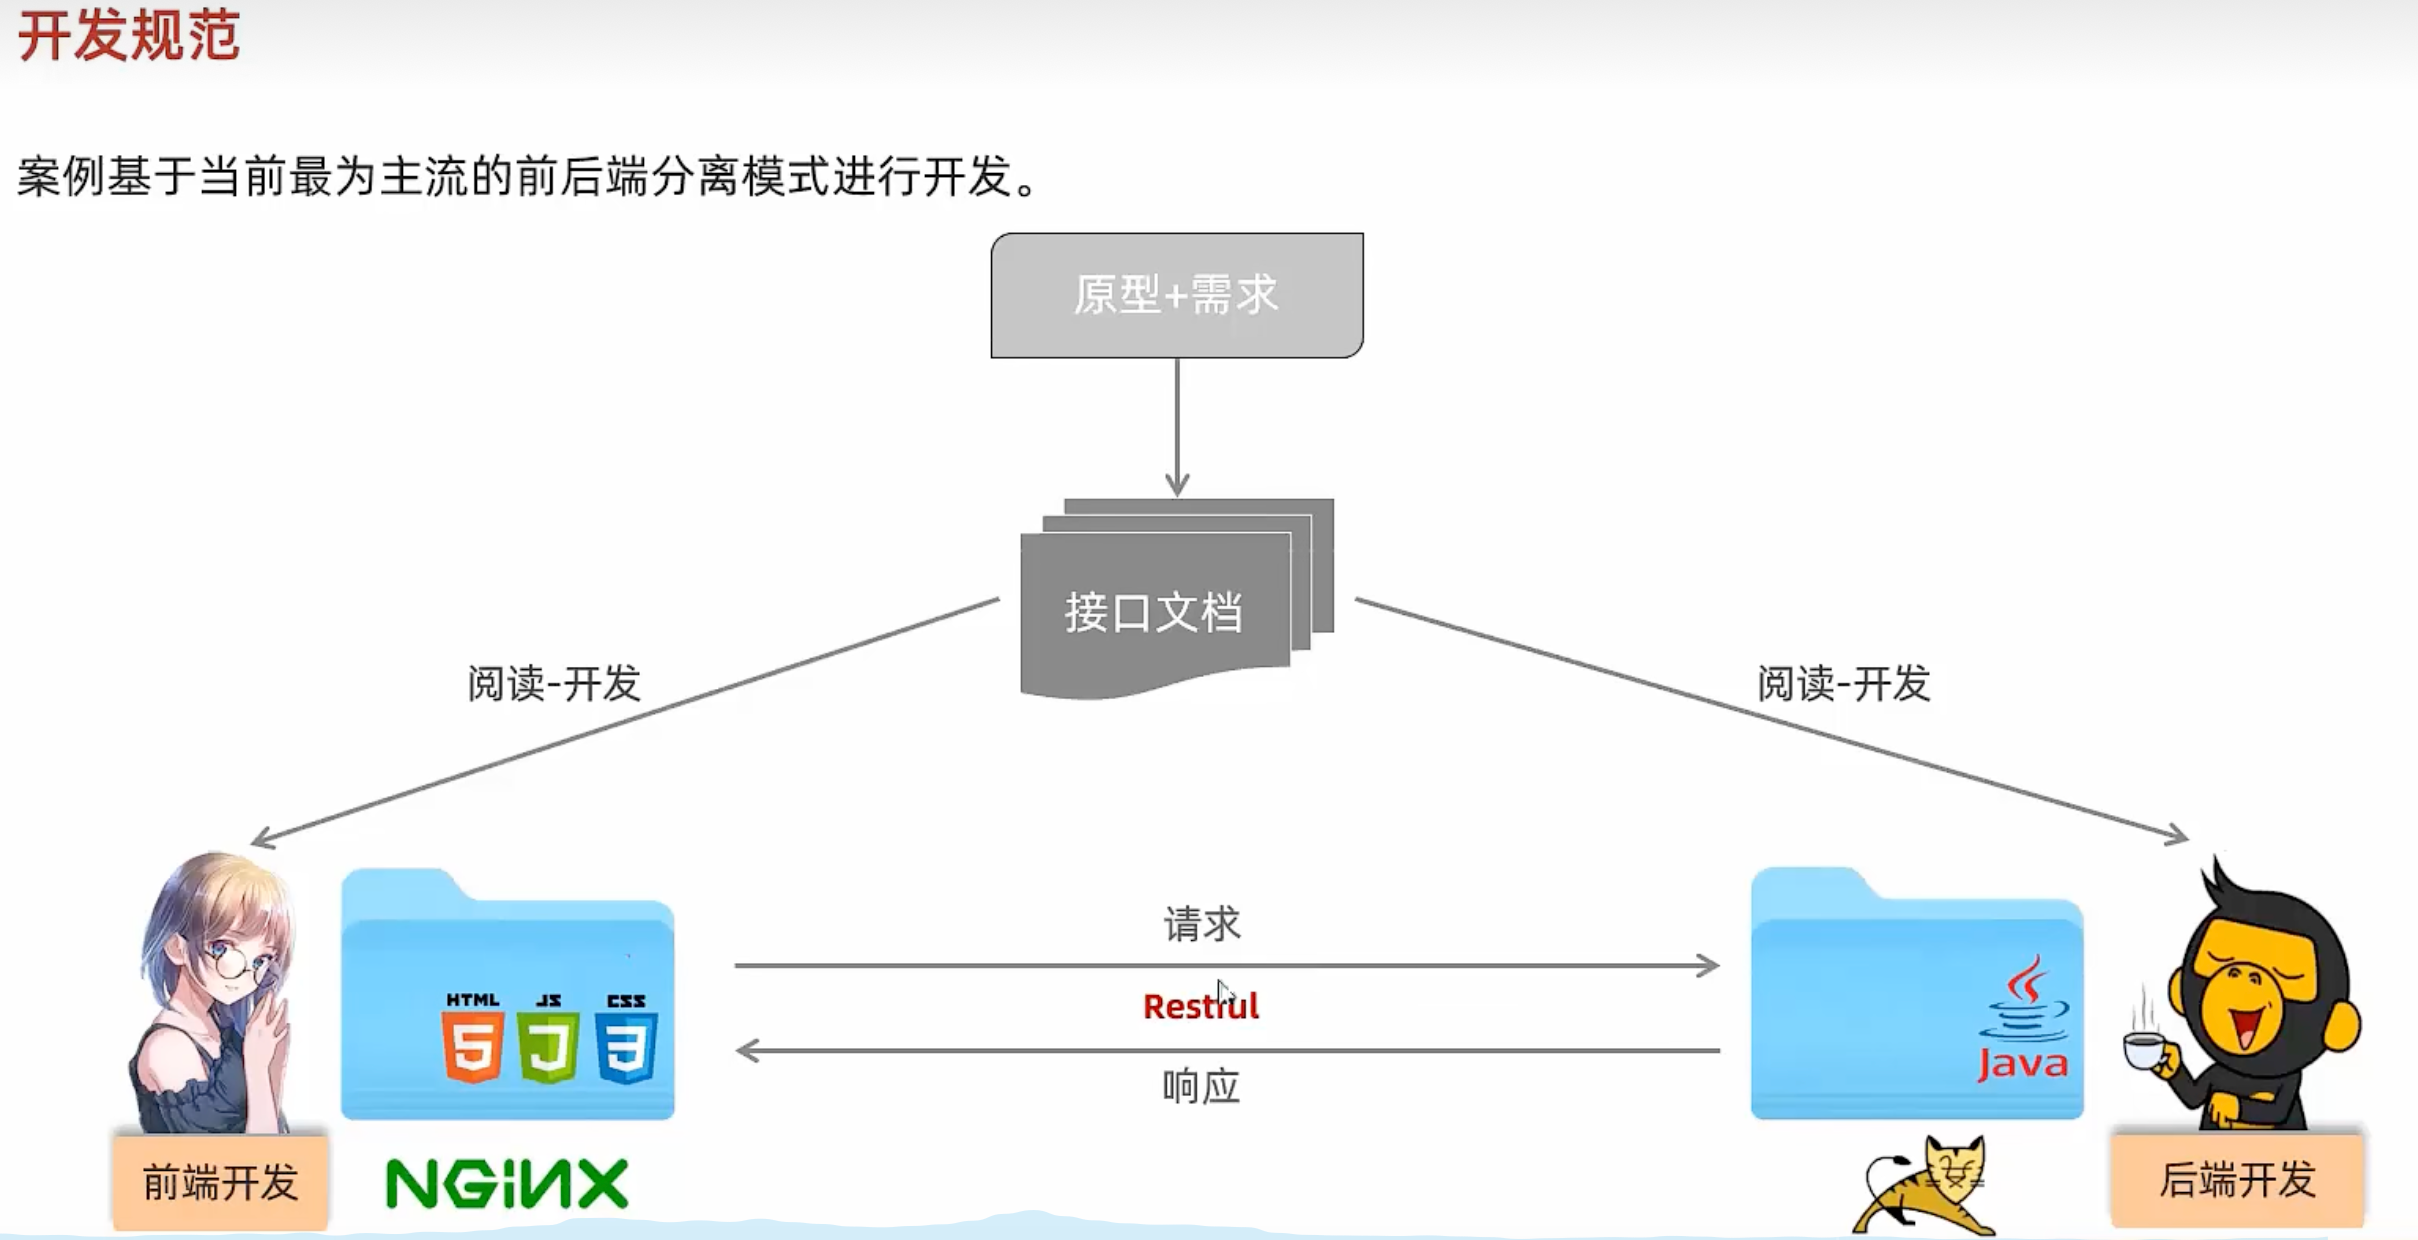
需要完成tlias的部门管理和员工管理
创建tlias数据库,导入
-- 部门管理
create table dept(id int unsigned primary key auto_increment comment '主键ID',name varchar(10) not null unique comment '部门名称',create_time datetime not null comment '创建时间',update_time datetime not null comment '修改时间'
) comment '部门表';insert into dept (id, name, create_time, update_time) values(1,'学工部',now(),now()),(2,'教研部',now(),now()),(3,'咨询部',now(),now()), (4,'就业部',now(),now()),(5,'人事部',now(),now());-- 员工管理(带约束)
create table emp (id int unsigned primary key auto_increment comment 'ID',username varchar(20) not null unique comment '用户名',password varchar(32) default '123456' comment '密码',name varchar(10) not null comment '姓名',gender tinyint unsigned not null comment '性别, 说明: 1 男, 2 女',image varchar(300) comment '图像',job tinyint unsigned comment '职位, 说明: 1 班主任,2 讲师, 3 学工主管, 4 教研主管, 5 咨询师',entrydate date comment '入职时间',dept_id int unsigned comment '部门ID',create_time datetime not null comment '创建时间',update_time datetime not null comment '修改时间'
) comment '员工表';INSERT INTO emp(id, username, password, name, gender, image, job, entrydate,dept_id, create_time, update_time) VALUES(1,'jinyong','123456','金庸',1,'1.jpg',4,'2000-01-01',2,now(),now()),(2,'zhangwuji','123456','张无忌',1,'2.jpg',2,'2015-01-01',2,now(),now()),(3,'yangxiao','123456','杨逍',1,'3.jpg',2,'2008-05-01',2,now(),now()),(4,'weiyixiao','123456','韦一笑',1,'4.jpg',2,'2007-01-01',2,now(),now()),(5,'changyuchun','123456','常遇春',1,'5.jpg',2,'2012-12-05',2,now(),now()),(6,'xiaozhao','123456','小昭',2,'6.jpg',3,'2013-09-05',1,now(),now()),(7,'jixiaofu','123456','纪晓芙',2,'7.jpg',1,'2005-08-01',1,now(),now()),(8,'zhouzhiruo','123456','周芷若',2,'8.jpg',1,'2014-11-09',1,now(),now()),(9,'dingminjun','123456','丁敏君',2,'9.jpg',1,'2011-03-11',1,now(),now()),(10,'zhaomin','123456','赵敏',2,'10.jpg',1,'2013-09-05',1,now(),now()),(11,'luzhangke','123456','鹿杖客',1,'11.jpg',5,'2007-02-01',3,now(),now()),(12,'hebiweng','123456','鹤笔翁',1,'12.jpg',5,'2008-08-18',3,now(),now()),(13,'fangdongbai','123456','方东白',1,'13.jpg',5,'2012-11-01',3,now(),now()),(14,'zhangsanfeng','123456','张三丰',1,'14.jpg',2,'2002-08-01',2,now(),now()),(15,'yulianzhou','123456','俞莲舟',1,'15.jpg',2,'2011-05-01',2,now(),now()),(16,'songyuanqiao','123456','宋远桥',1,'16.jpg',2,'2007-01-01',2,now(),now()),(17,'chenyouliang','123456','陈友谅',1,'17.jpg',NULL,'2015-03-21',NULL,now(),now());

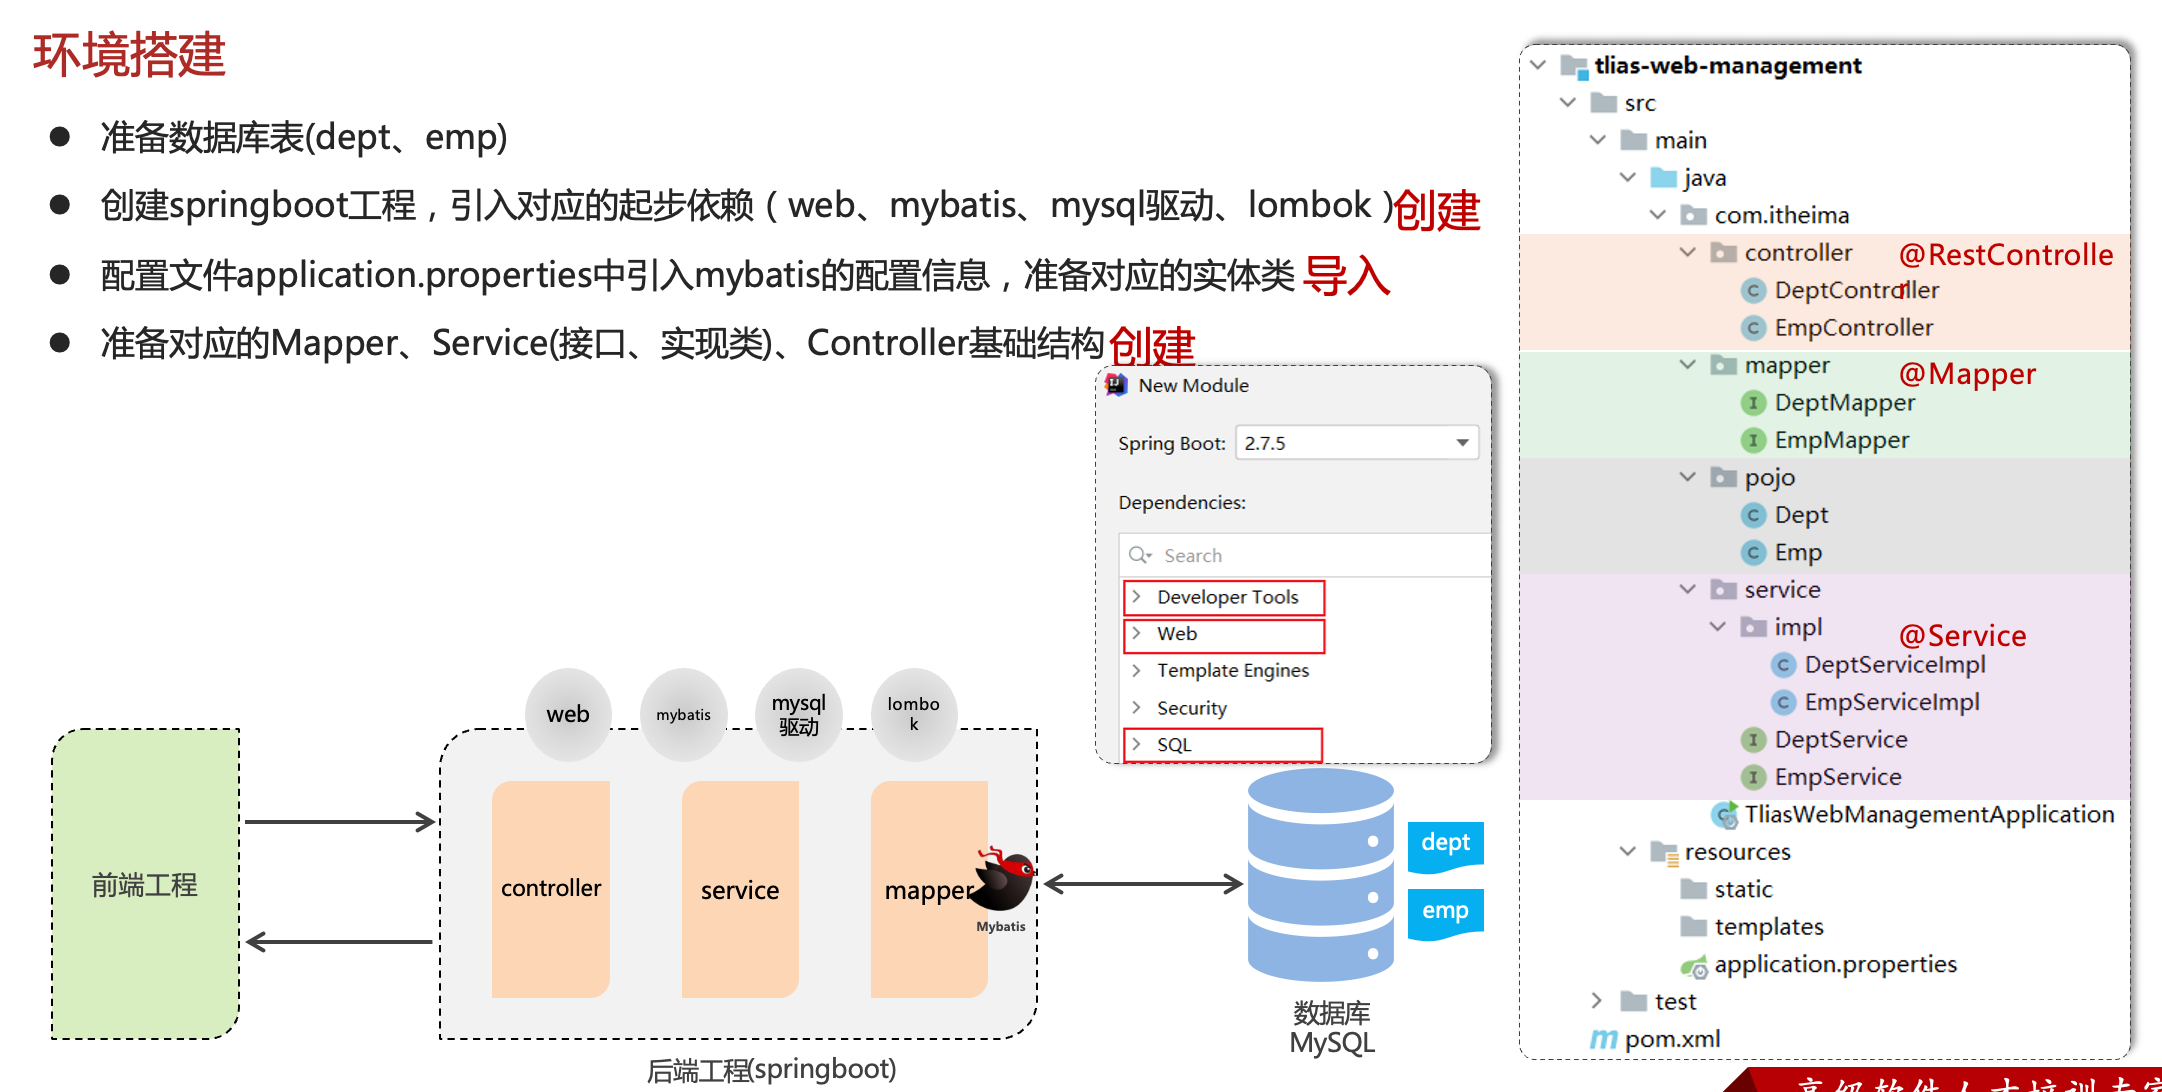

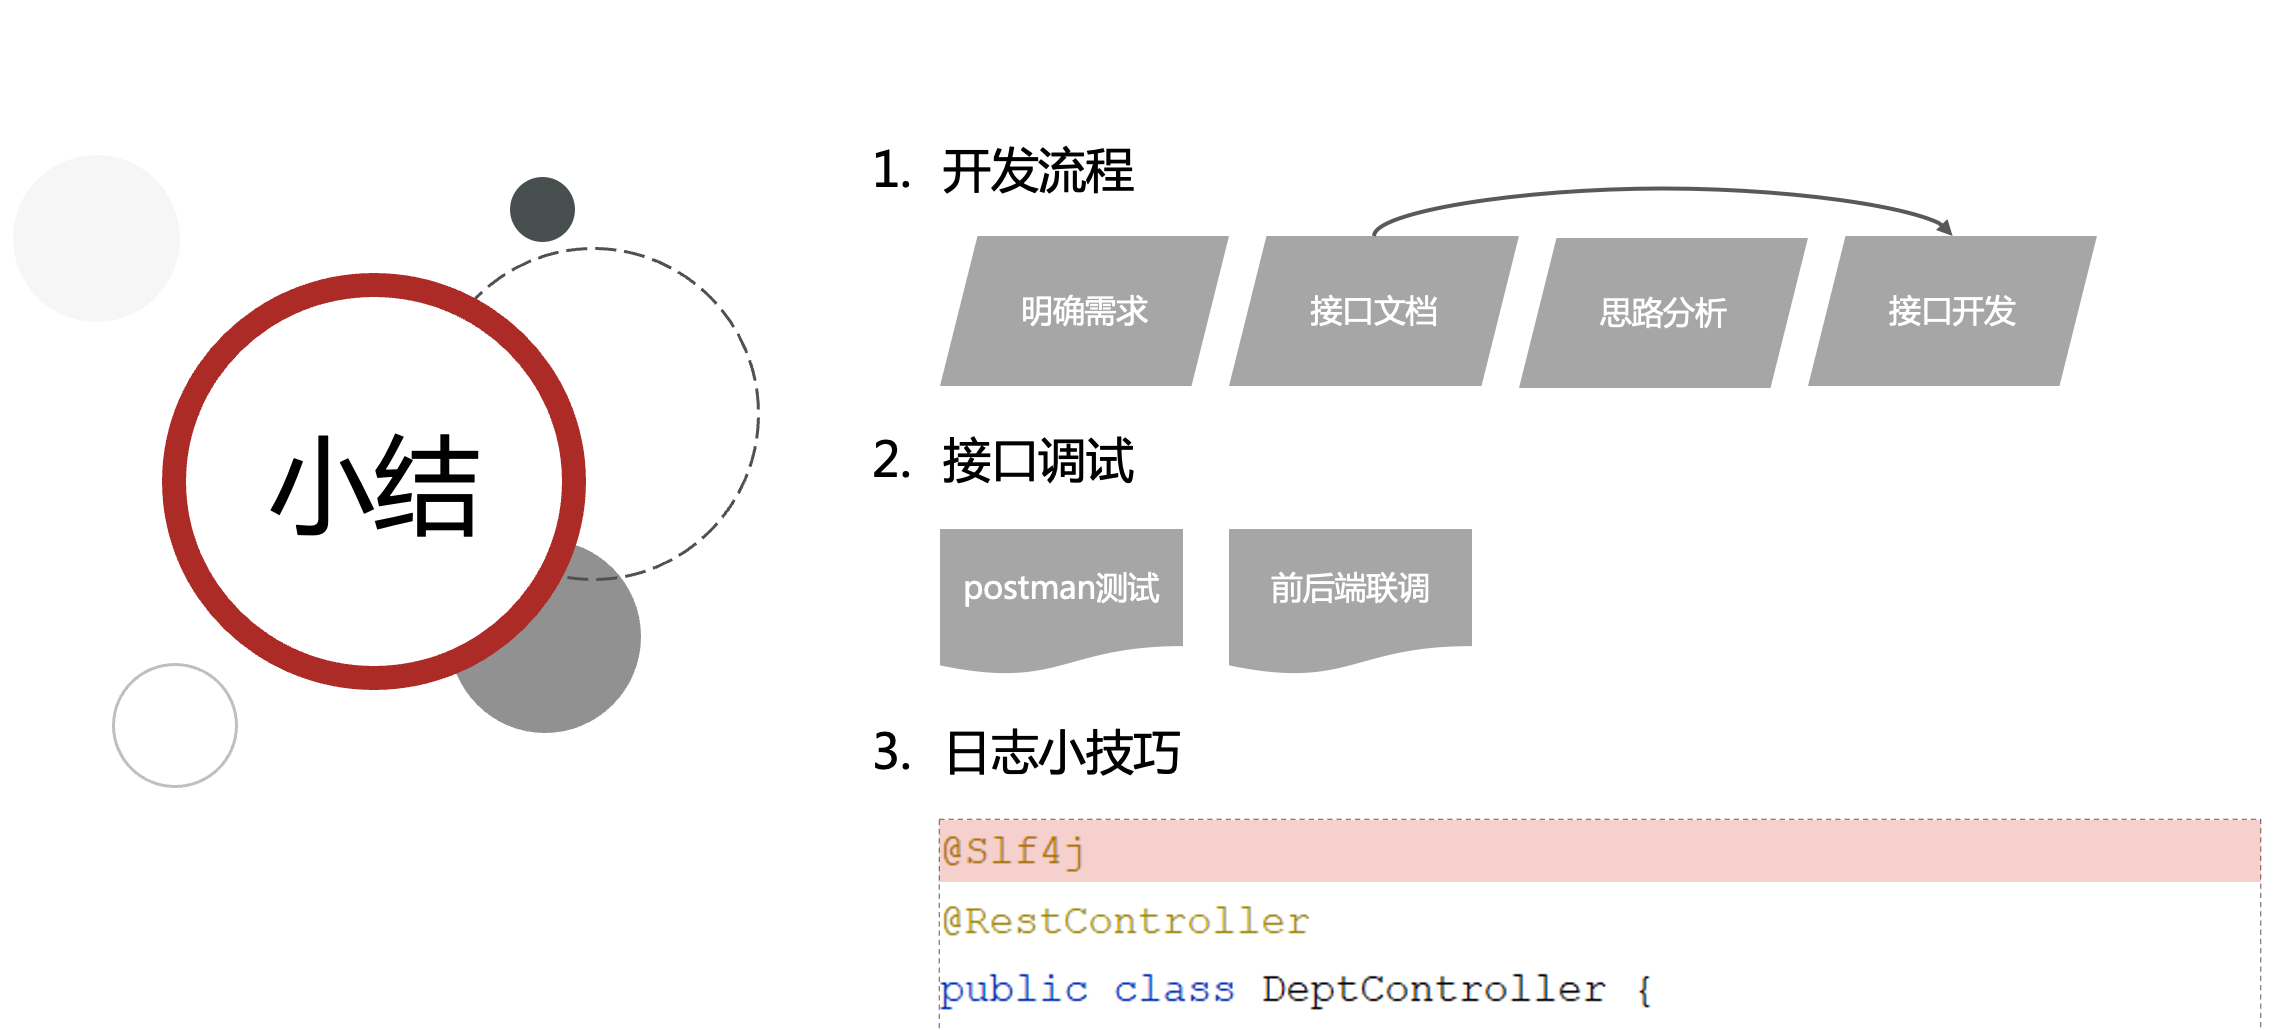
开发流程

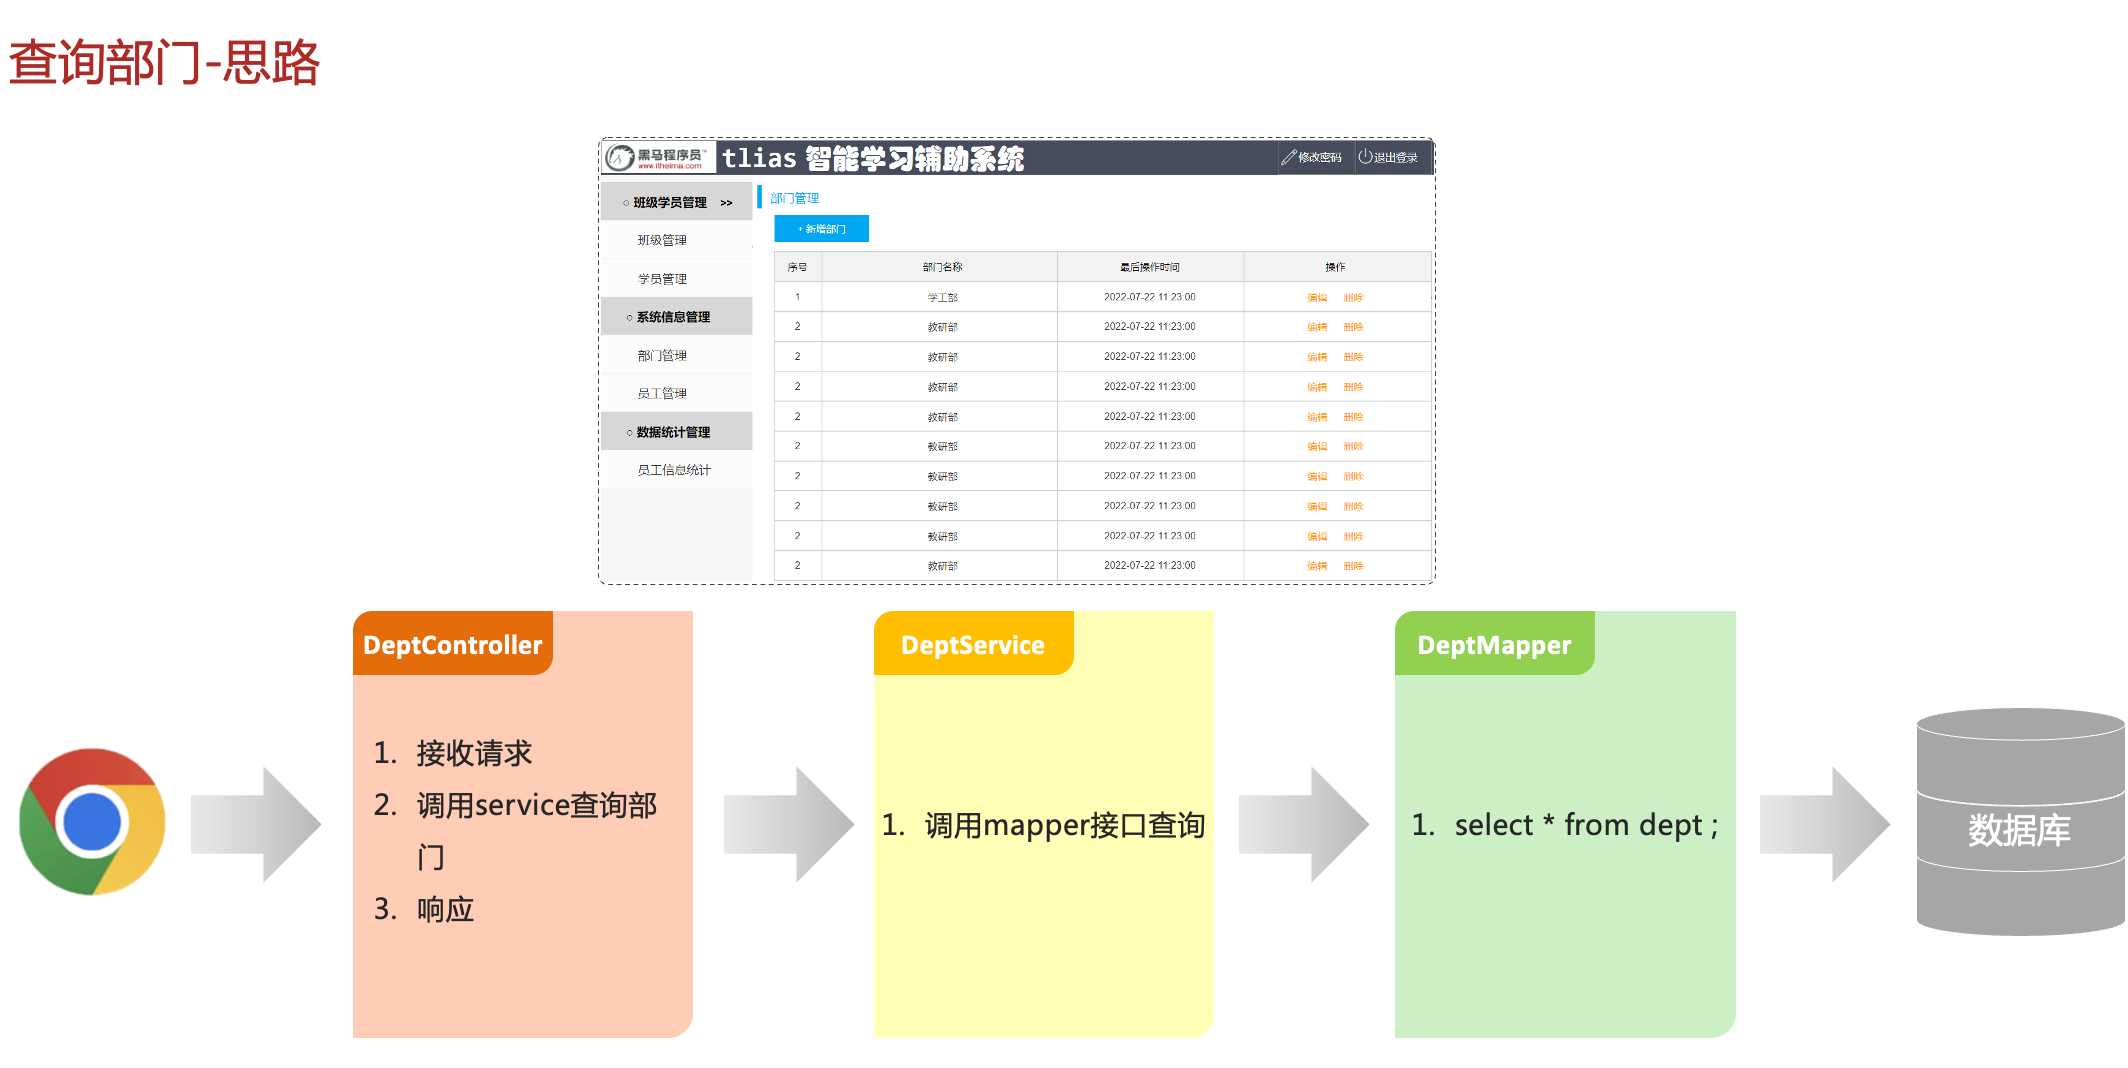
二、部门管理-查询
思路流程
coding
DeptController
package com.itheima.controller;import com.itheima.pojo.Dept;
import com.itheima.pojo.Result;
import com.itheima.service.DeptService;
import com.itheima.service.impl.DeptServiceImpl;
import lombok.extern.slf4j.Slf4j;
import org.slf4j.Logger;
import org.slf4j.LoggerFactory;
import org.springframework.beans.factory.annotation.Autowired;
import org.springframework.web.bind.annotation.GetMapping;
import org.springframework.web.bind.annotation.RequestMapping;
import org.springframework.web.bind.annotation.RequestMethod;
import org.springframework.web.bind.annotation.RestController;import java.util.List;/*** 部门管理Controller**/
@Slf4j  //会自动生成这段代码    private static Logger log = LoggerFactory.getLogger(DeptController.class);
@RestController
public class DeptController {//    日志记录对象
//    private static Logger log = LoggerFactory.getLogger(DeptController.class);@Autowiredprivate DeptService deptService;//    面向接口的对象@RequestMapping(value = "/depts",method = RequestMethod.GET)//接口文档要求GET
//    @GetMapping("/depts")public Result list(){log.info("查询所有部分");//   输出日志List<Dept> deptList = deptService.list();//   获取控制层返回的数据return Result.success(deptList);    //数据返回到前端响应}
}
DeptService接口
package com.itheima.service;import com.itheima.pojo.Dept;import java.util.List;public interface DeptService {
//    查询所有部门数据List<Dept> list();
}
DeptServiceImpl实现类
package com.itheima.service.impl;import com.itheima.mapper.DeptMapper;
import com.itheima.pojo.Dept;
import com.itheima.service.DeptService;
import org.springframework.beans.factory.annotation.Autowired;
import org.springframework.stereotype.Service;import java.util.List;@Service
public class DeptServiceImpl implements DeptService {@Autowiredprivate DeptMapper deptMapper;//        实现方法public List<Dept> list(){List<Dept> deptList = deptMapper.select();return deptList;}
}
DeptMapper
package com.itheima.mapper;import com.itheima.pojo.Dept;
import org.apache.ibatis.annotations.Mapper;
import org.apache.ibatis.annotations.Select;import java.util.List;//
@Mapper //在运行时,会自动生成该接口的实现类对象(代理对象),并将该对象交给IOC容器管理
public interface DeptMapper {@Select("select * from dept")List<Dept> select();
}
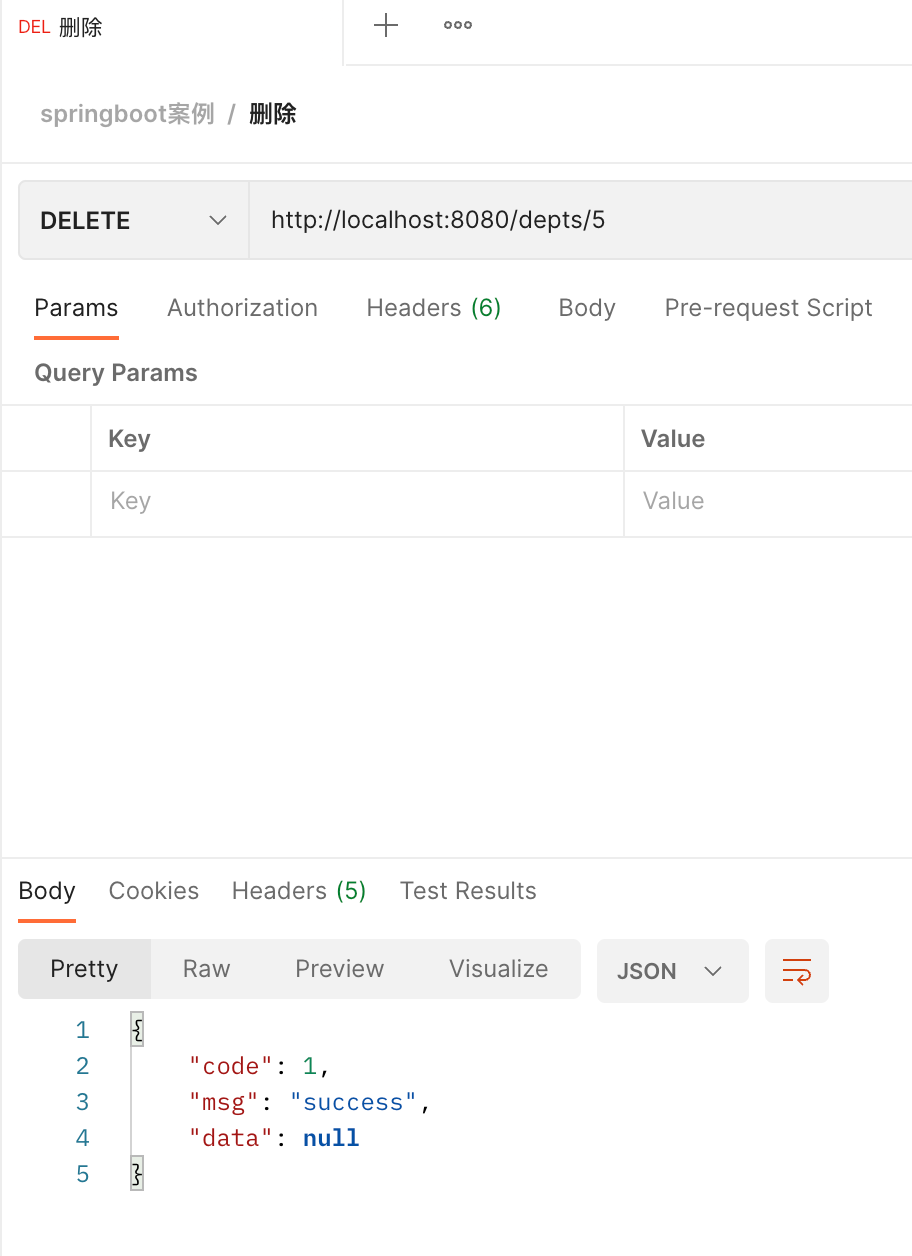
测试
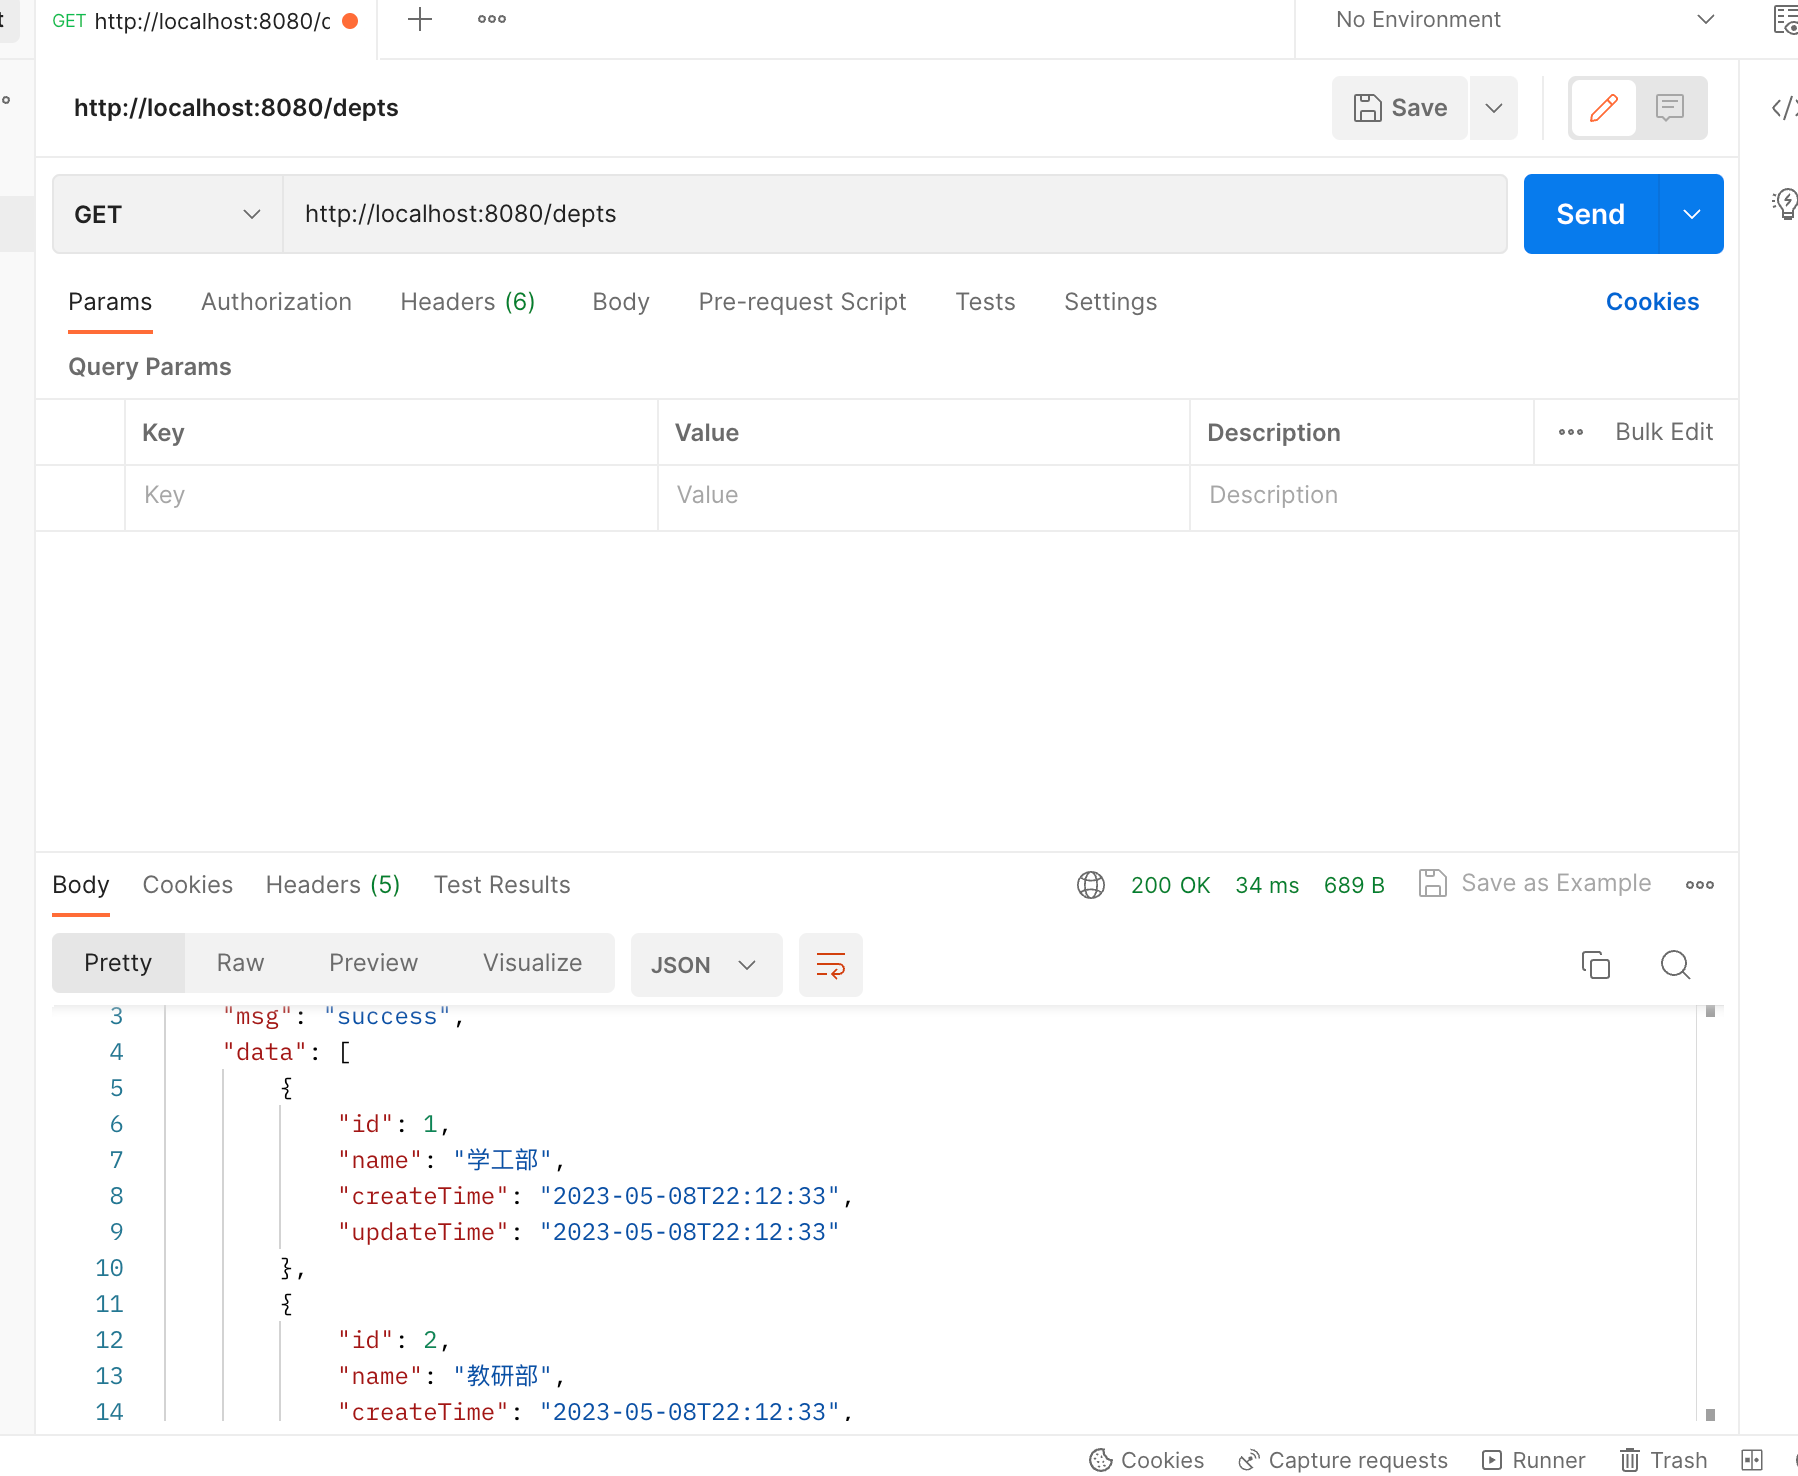
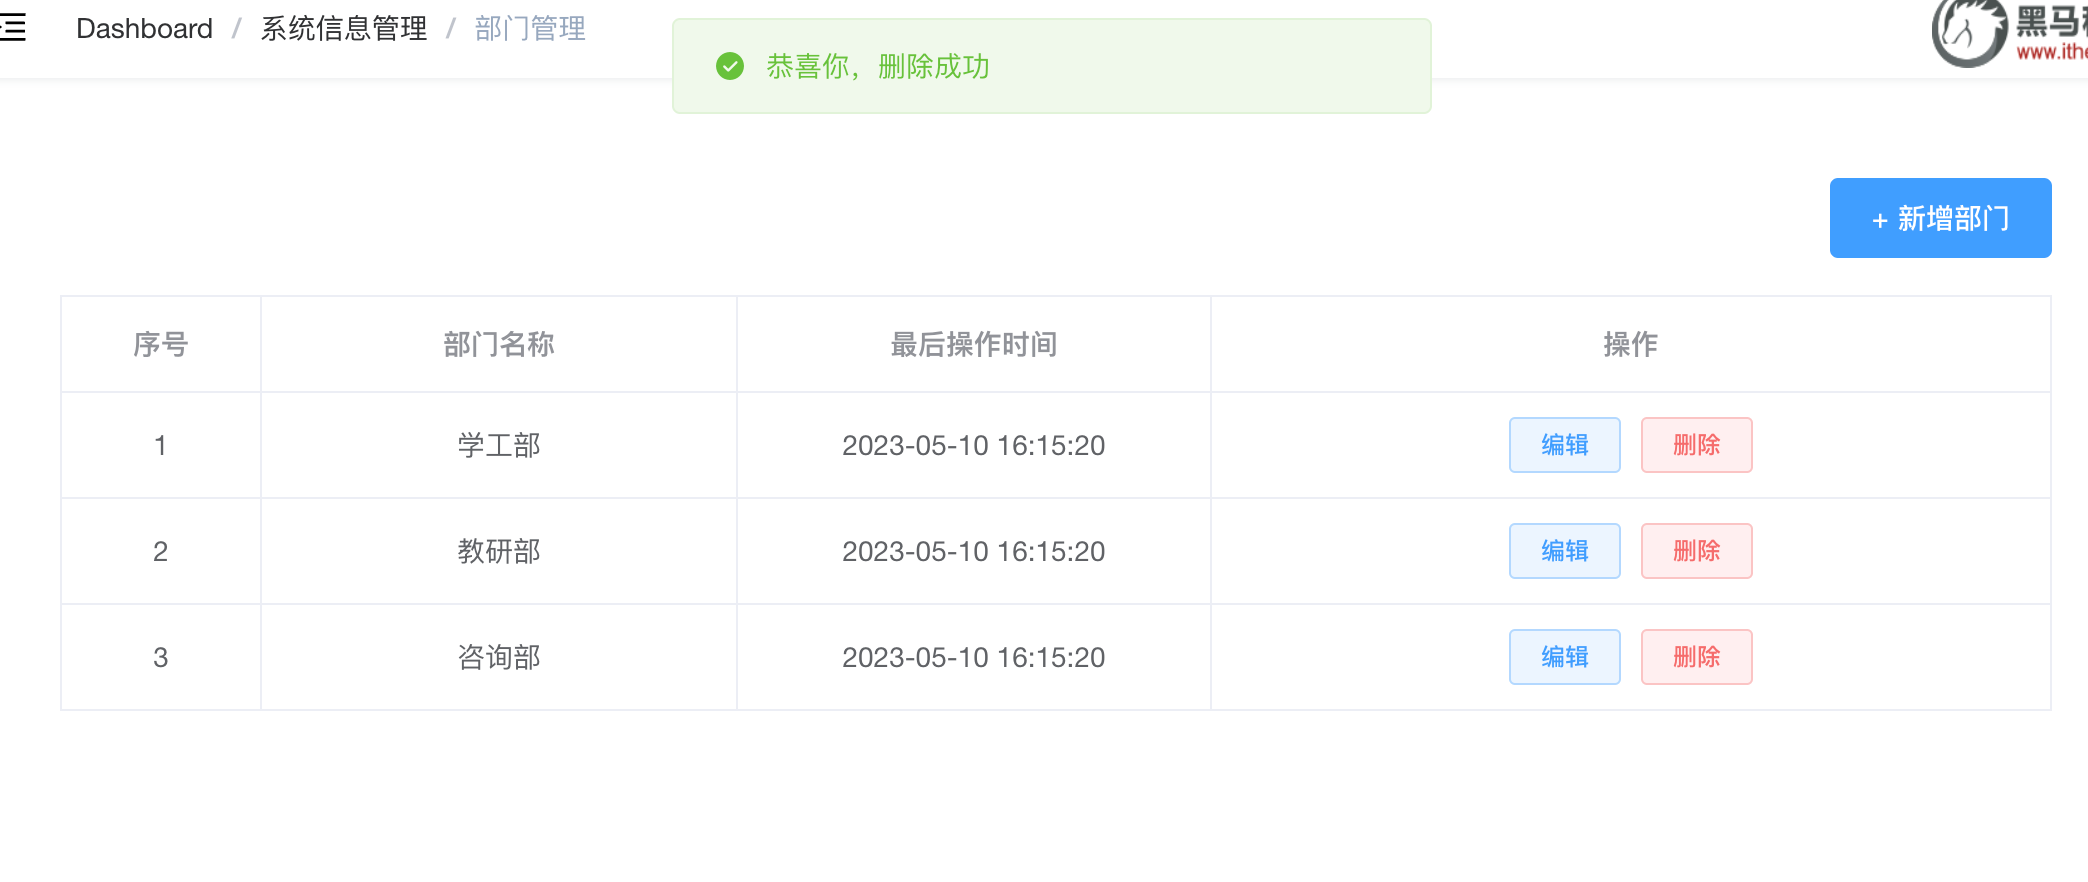
测试完毕。
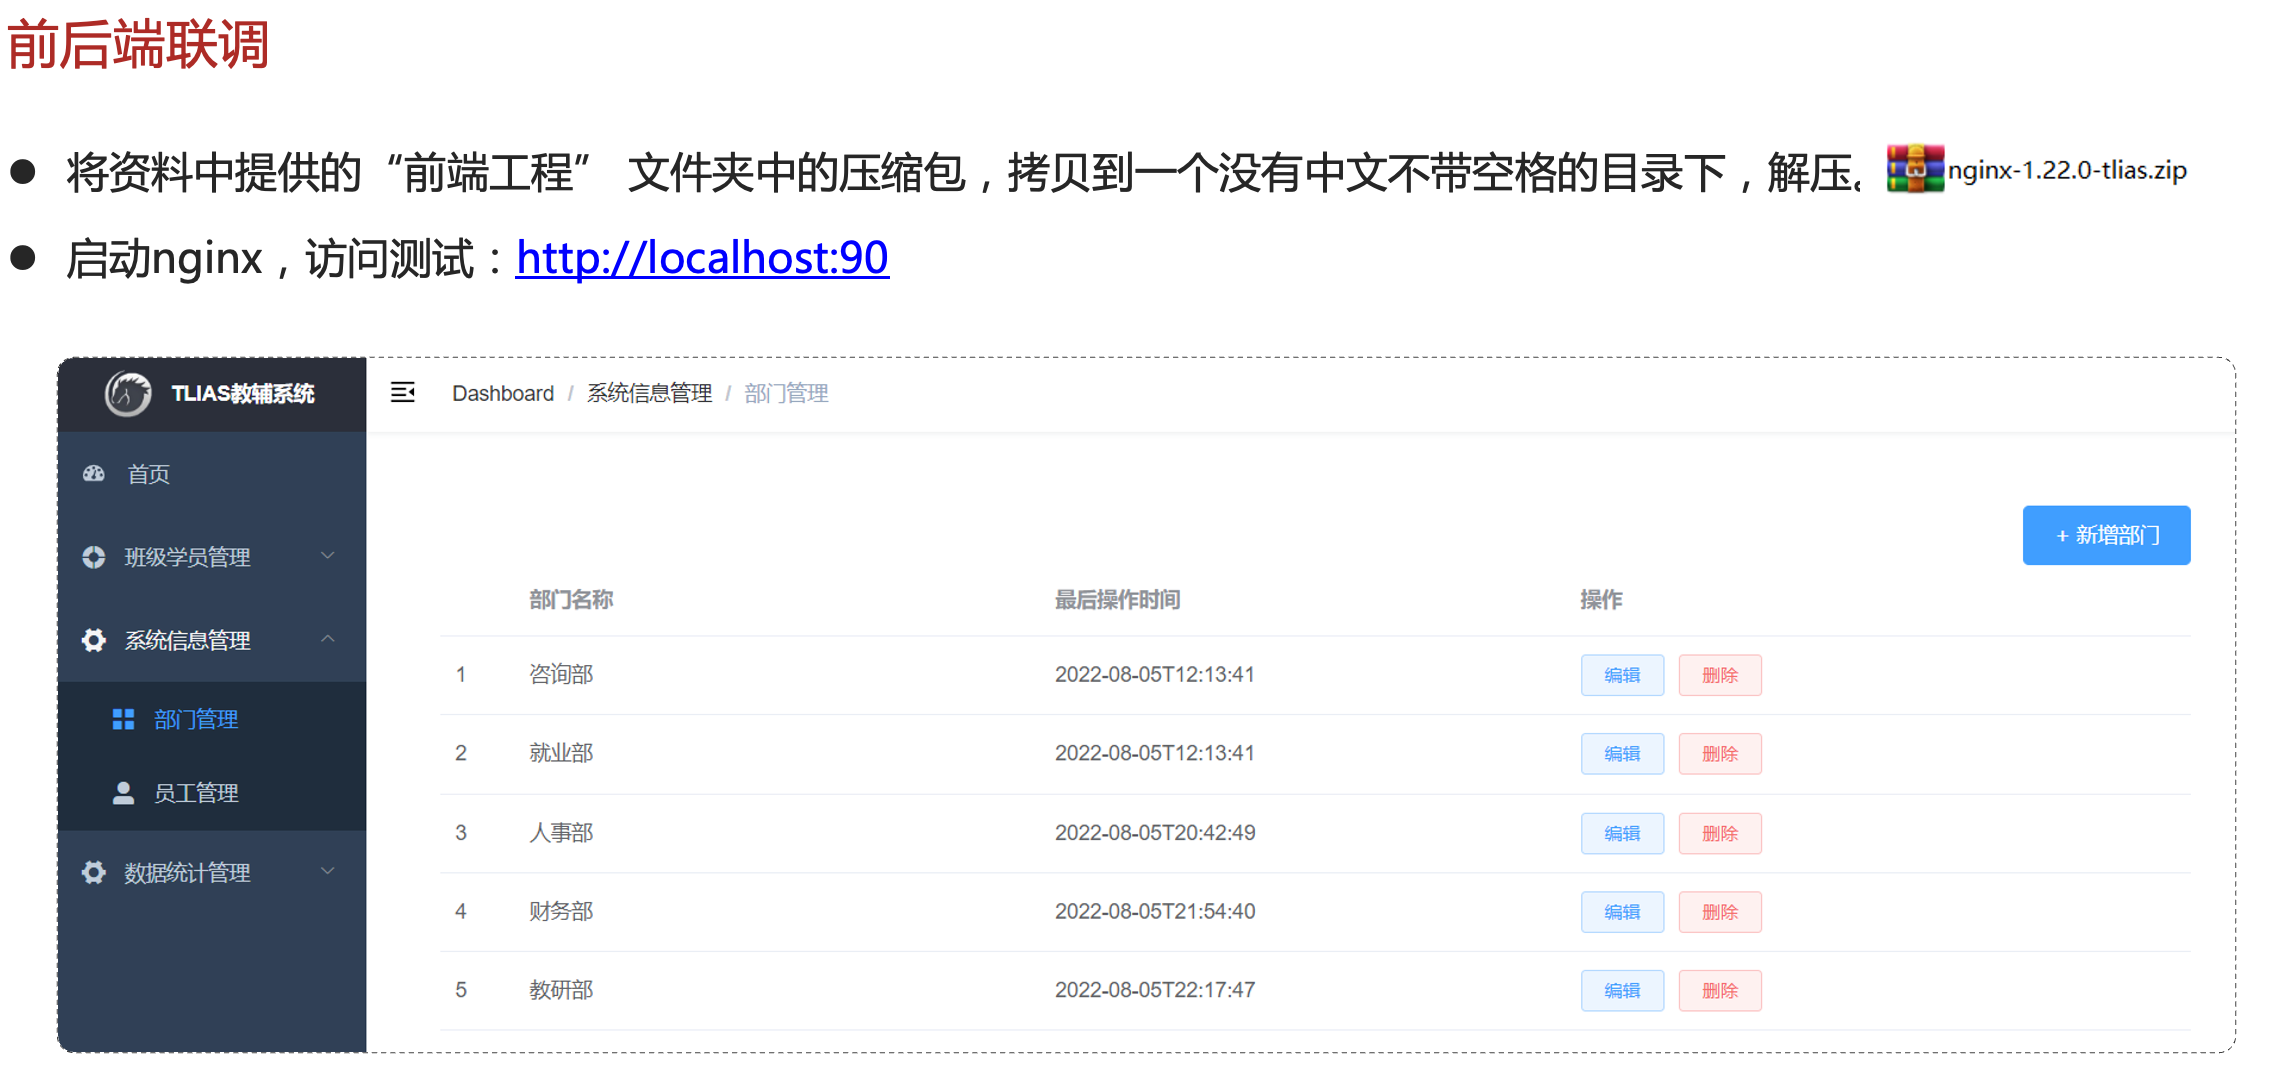
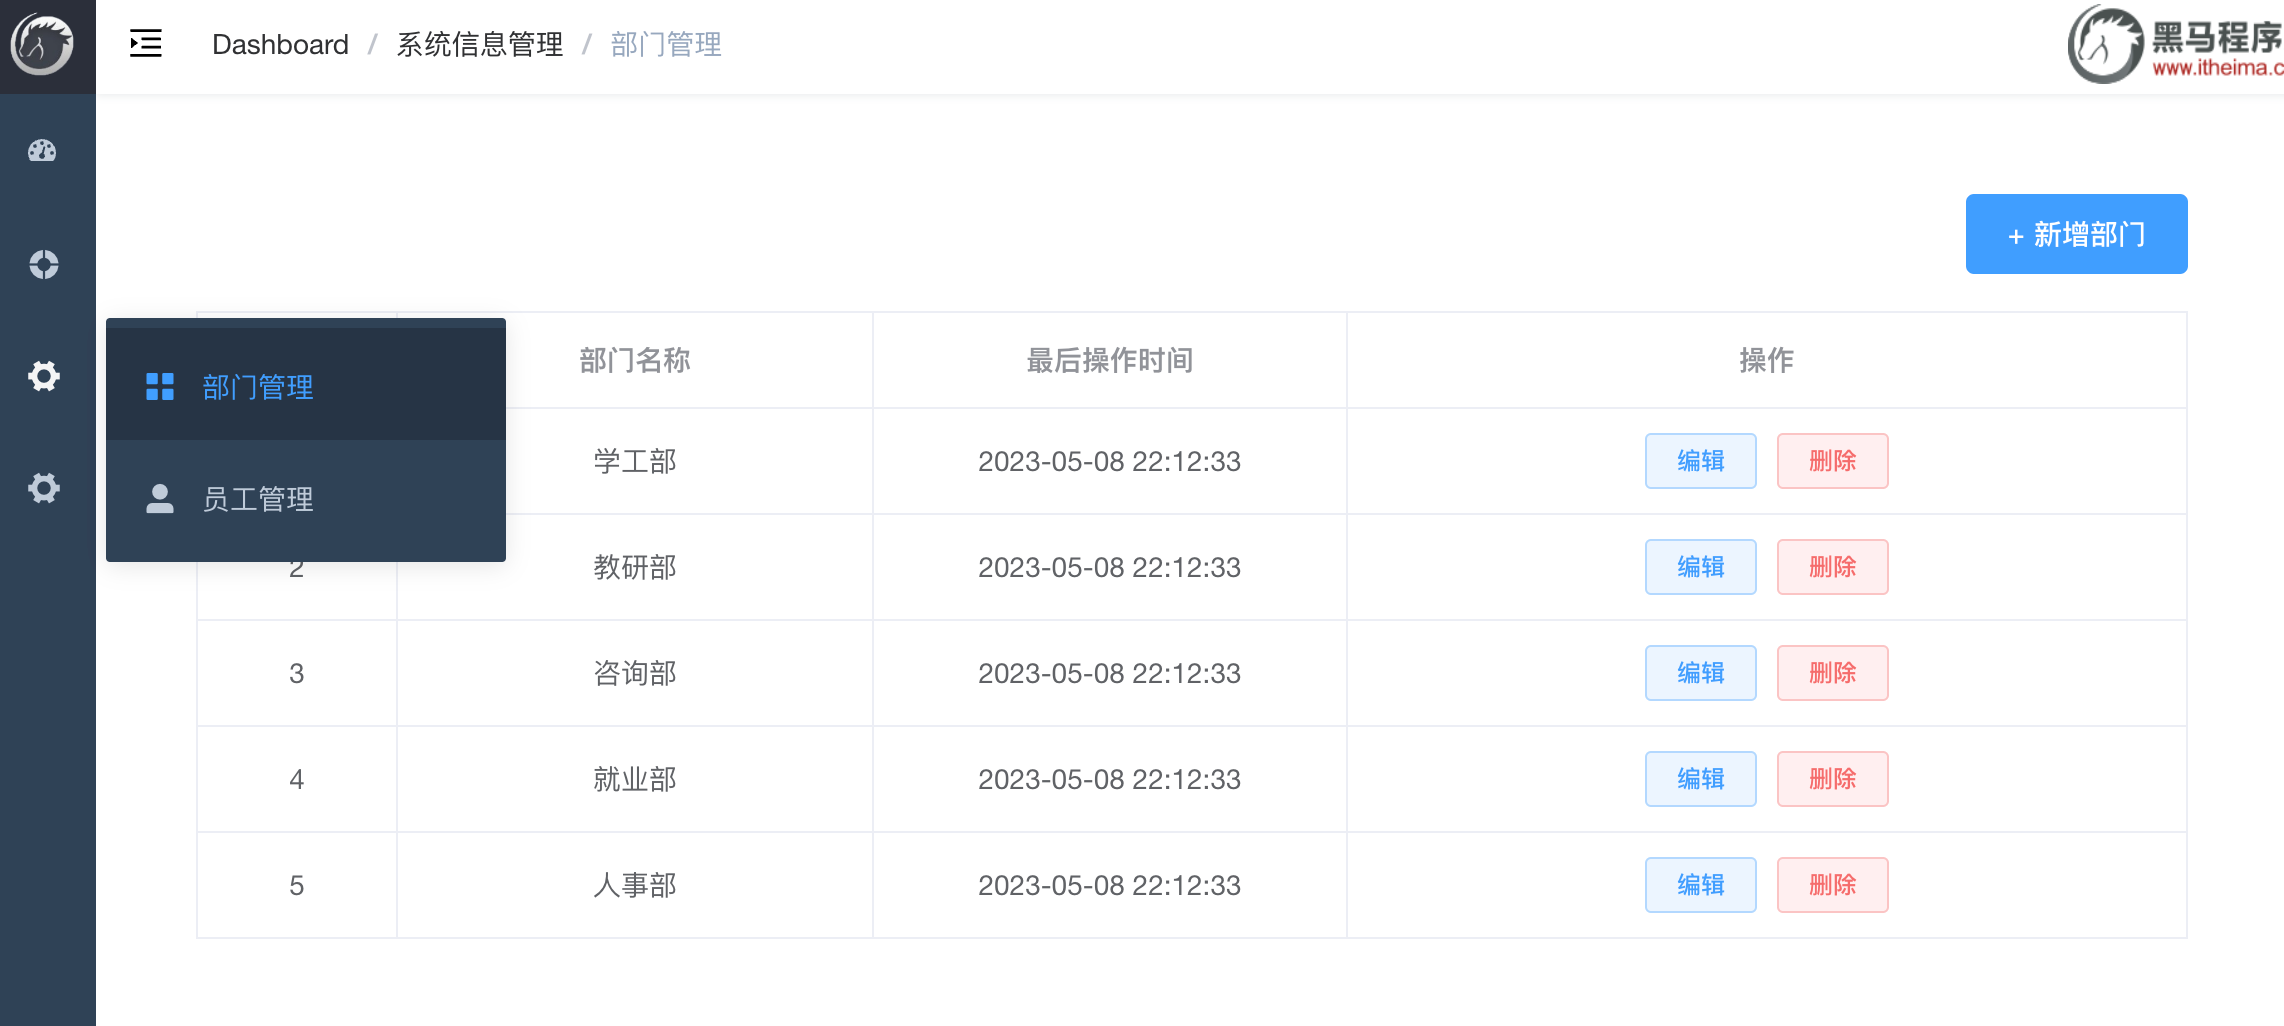
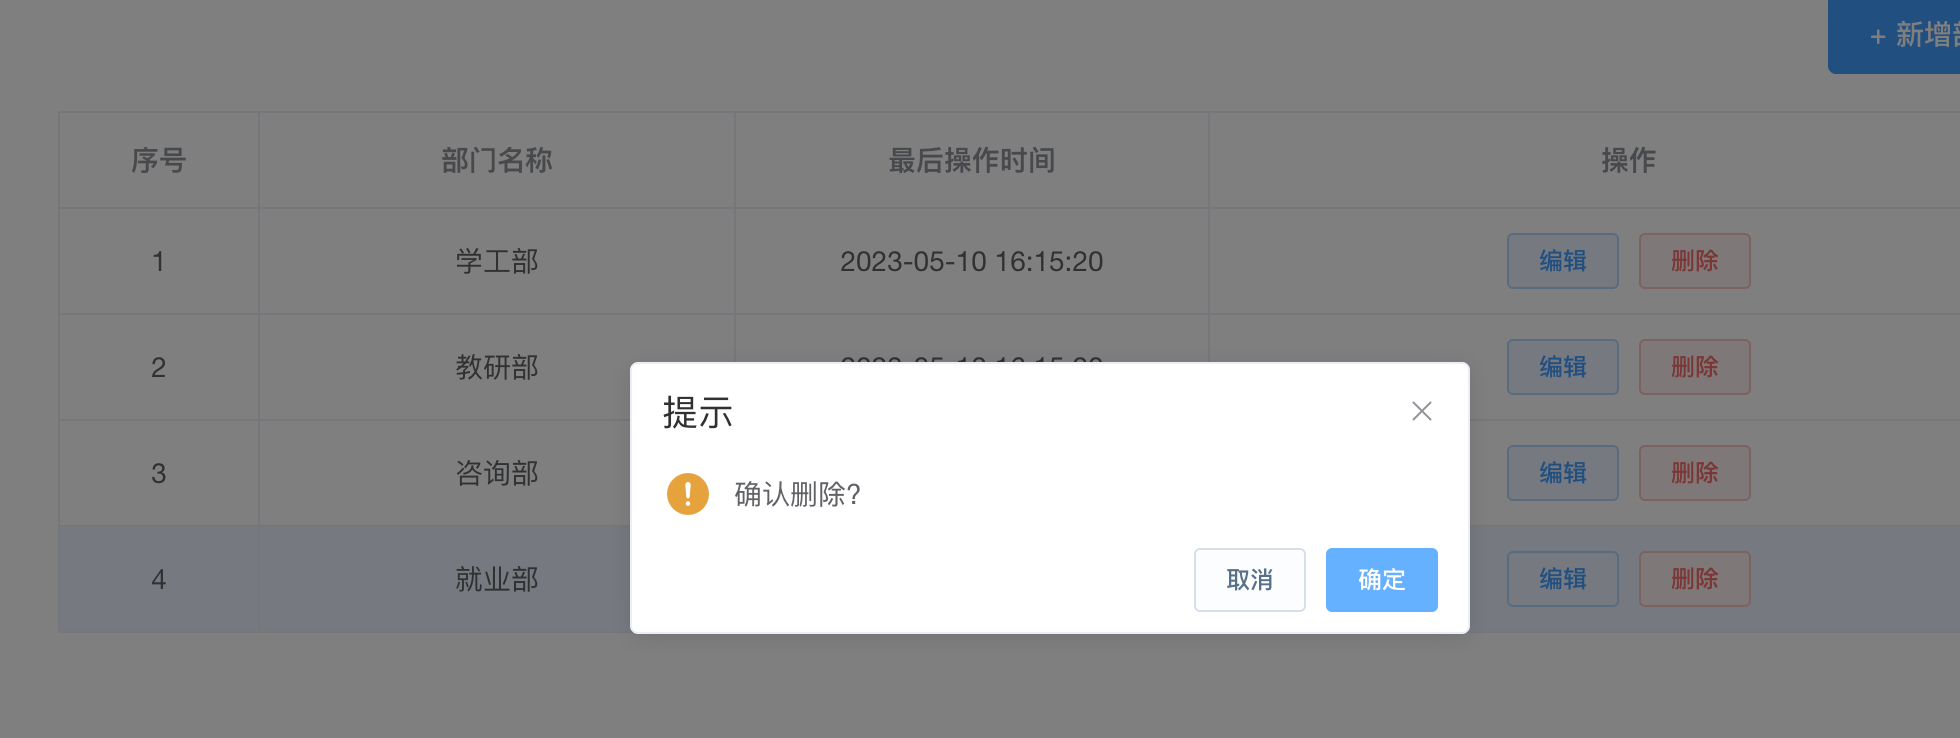
前后端联调
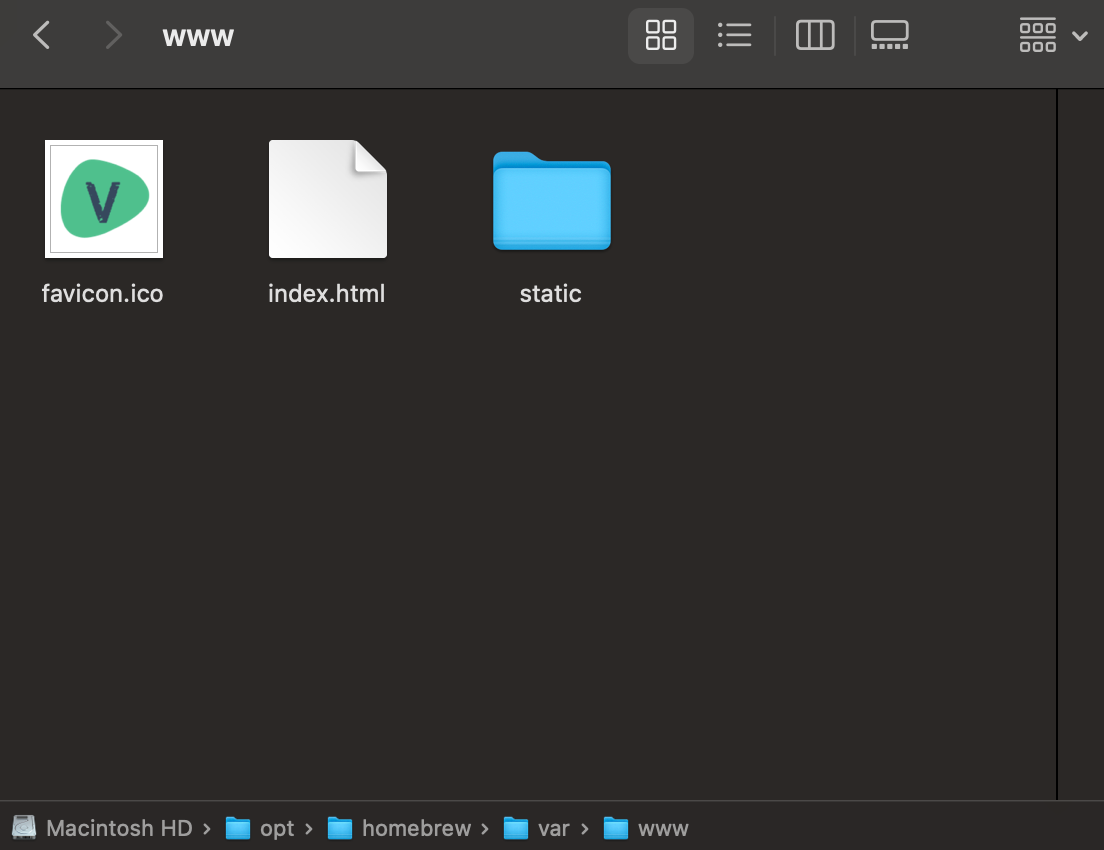
MacOS系统下,Nginx的服务器默认路径:/opt/homebrew/var/www
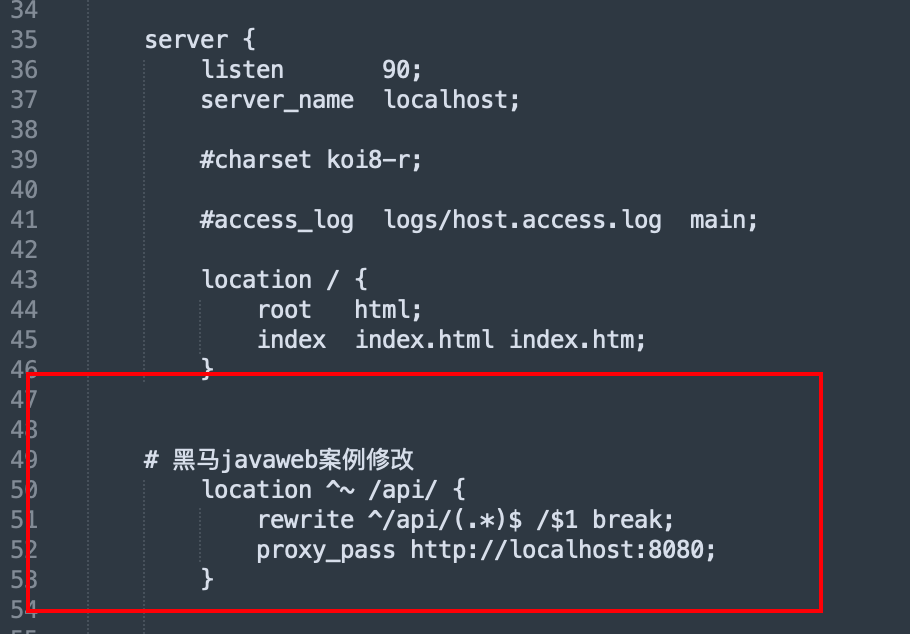
将老师提供的前端部署文件dist下的内容复制到这里,并修改nginx.conf文件,加上这一行
# 黑马javaweb案例修改location ^~ /api/ {rewrite ^/api/(.*)$ /$1 break;proxy_pass http://localhost:8080;}
小结
三、部门管理
删除
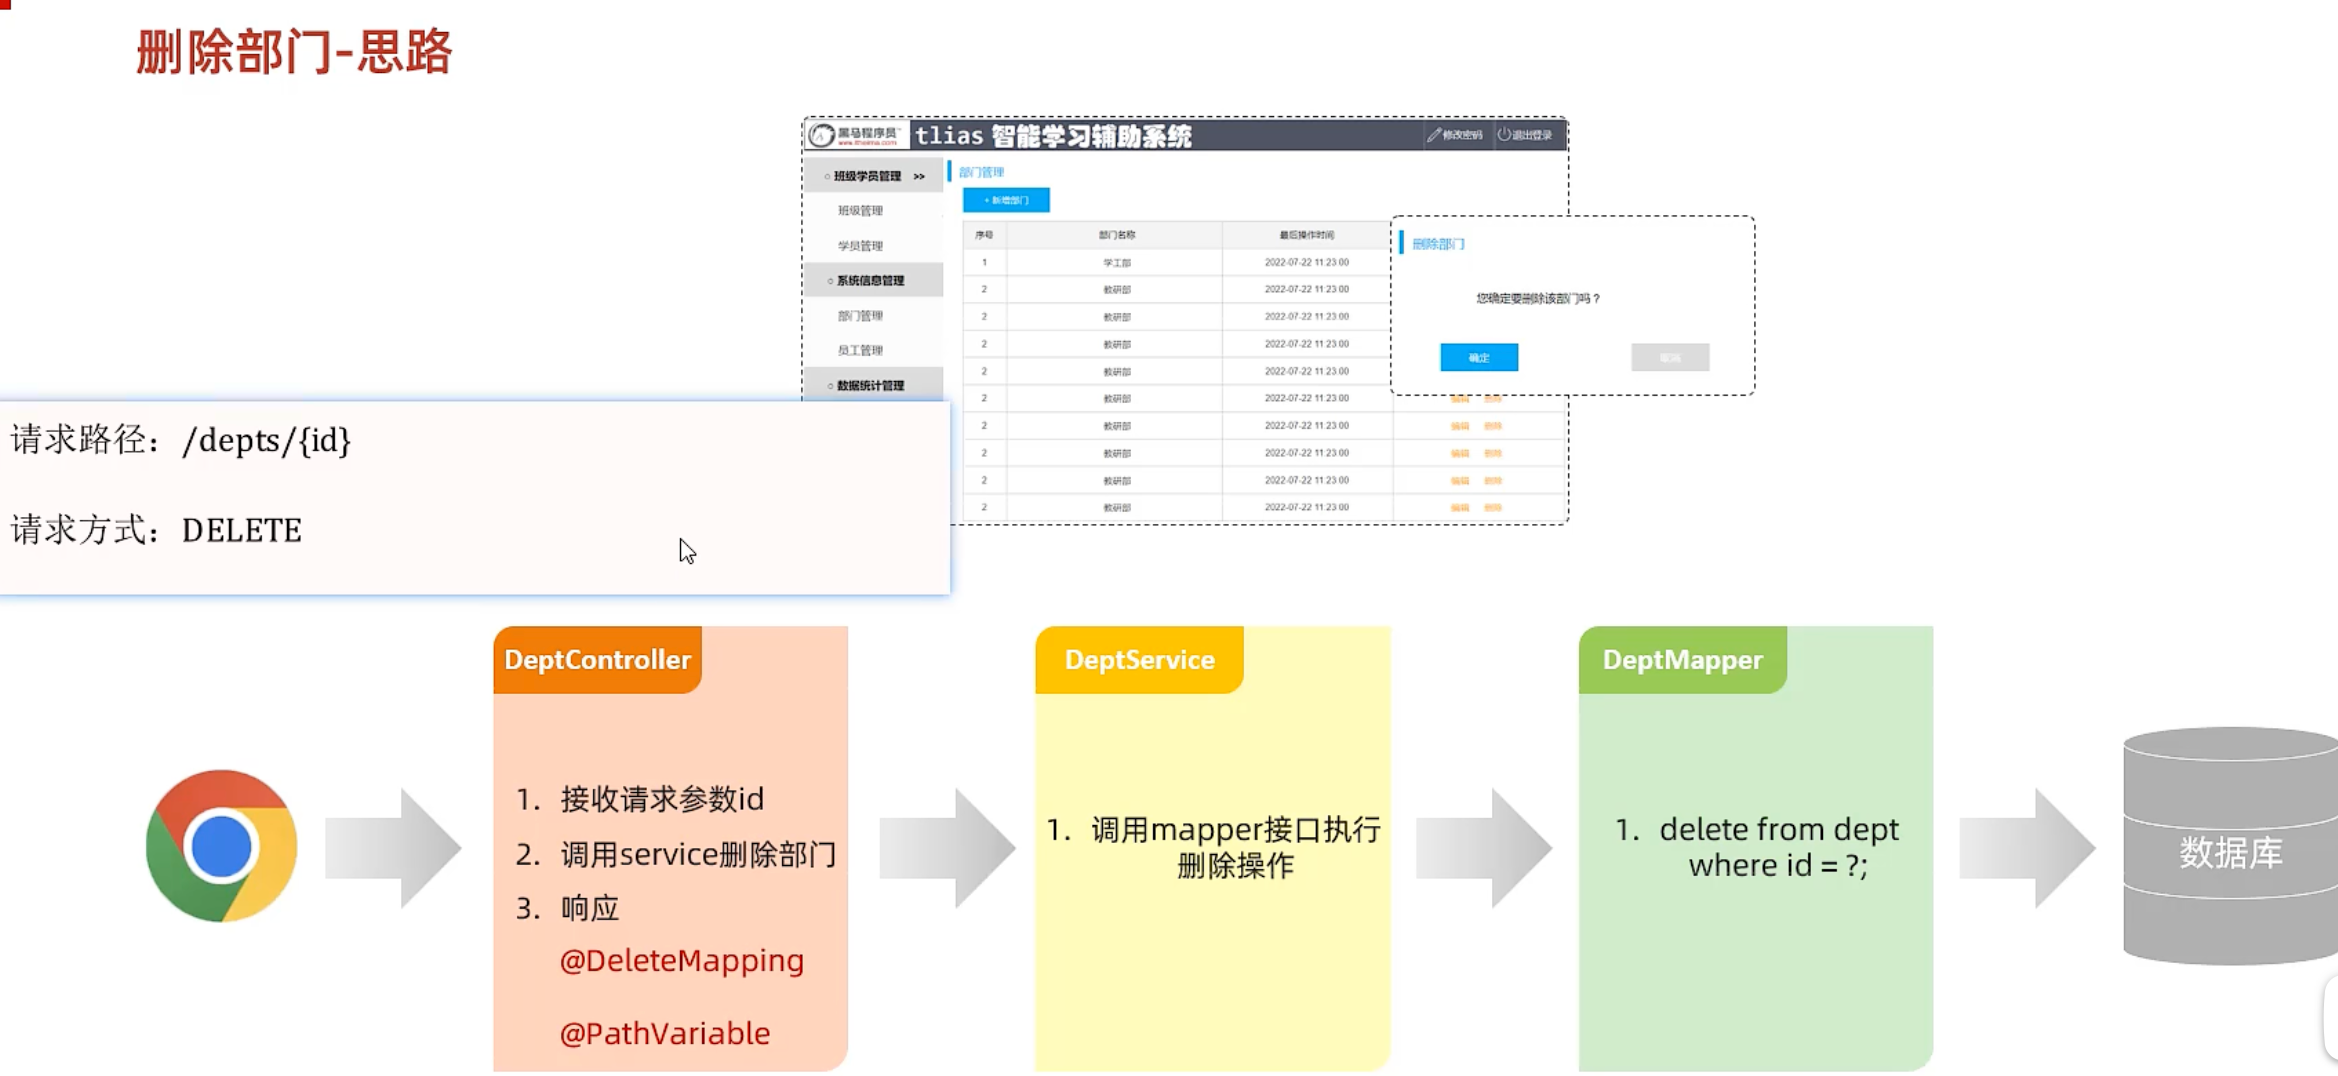
DeptController
/*删除操作*/
@DeleteMapping("/depts/{id}")
public Result delete(@PathVariable Integer id){deptService.deleteById(id);return Result.success();
}
DeptService
package com.itheima.service;import com.itheima.pojo.Dept;import java.util.List;public interface DeptService {
//    查询所有部门数据List<Dept> list();void deleteById(Integer id);
}
DeptServiceImpl
/*删除指定id
* */
@Override
public void deleteById(Integer id) {deptMapper.deleteById(id);
}
DeptMapper
@Mapper //在运行时,会自动生成该接口的实现类对象(代理对象),并将该对象交给IOC容器管理
public interface DeptMapper {@Select("select * from dept")List<Dept> select();@Delete("delete from dept where id=#{id}")void deleteById(Integer id);
}
新增
DeptController
/*新增部门*/
@PostMapping("/depts")
public Result add(@RequestBody Dept dept){//json格式的数据封装到实体类中,并添加注解log.info("新增部门{}",dept.getName());deptService.add(dept);return Result.success();
}
DeptService
public interface DeptService {
//    查询所有部门数据List<Dept> list();void deleteById(Integer id);void add(Dept dept);
}
DeptServiceImpl
/*3、新增部门*/
public void add(Dept dept){dept.setCreateTime(LocalDateTime.now());dept.setUpdateTime(LocalDateTime.now());deptMapper.insert(dept);
}
DeptMapper
/*添加部门*/
@Insert("insert into dept(name, create_time, update_time) values (#{name},#{createTime},#{updateTime})")
void insert(Dept dept);
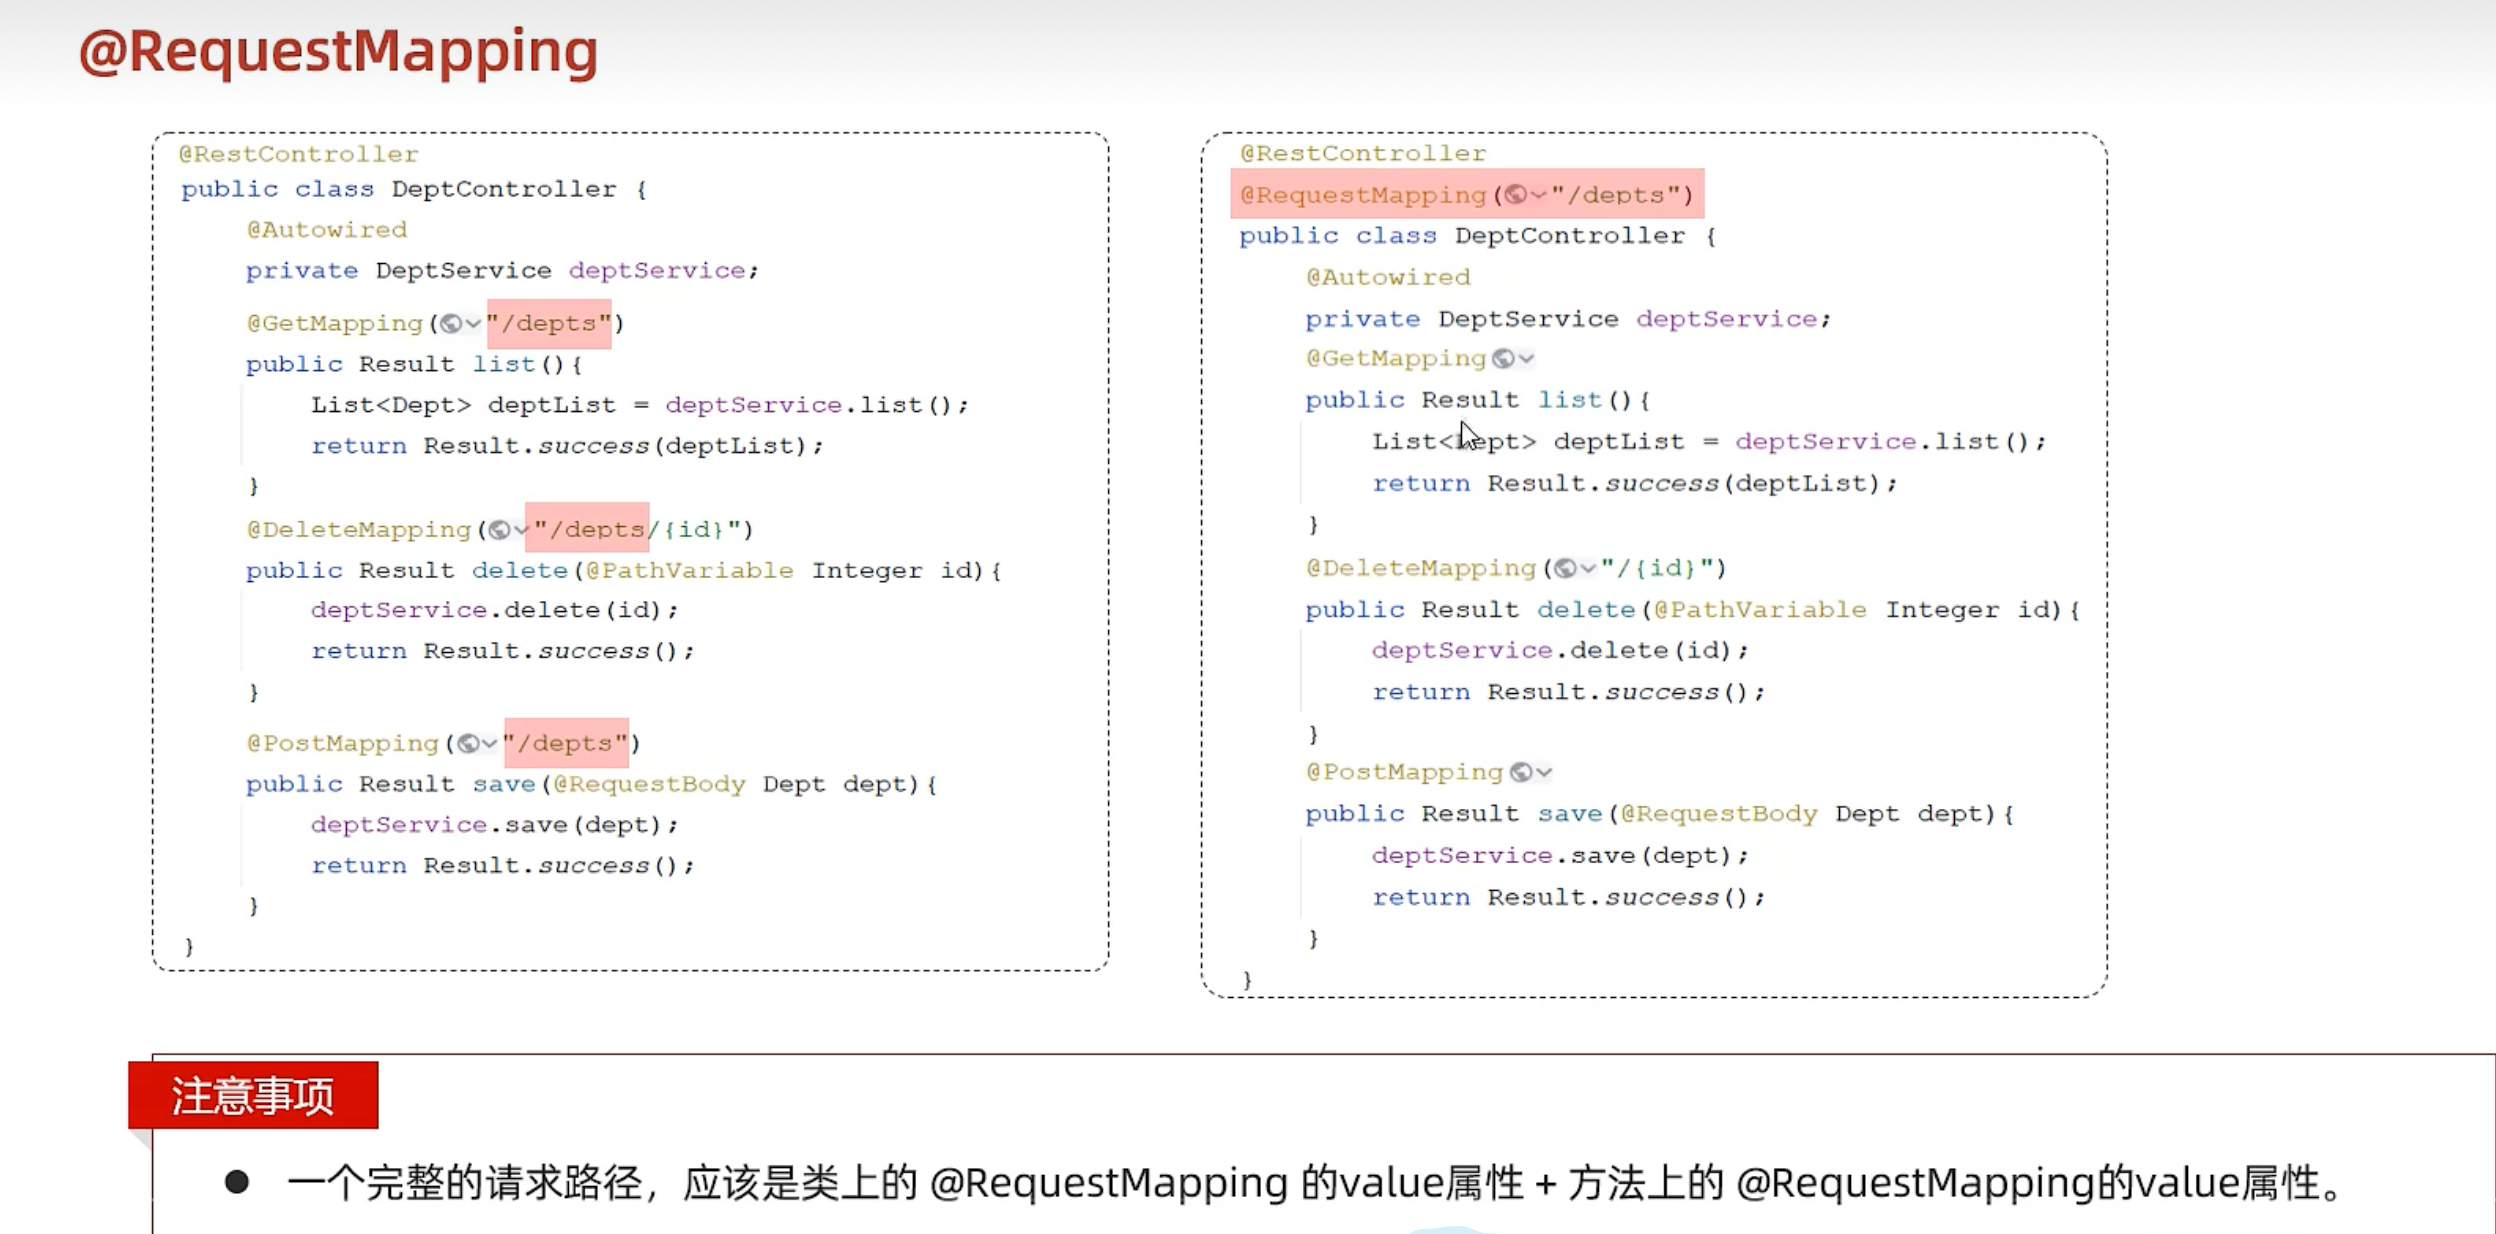
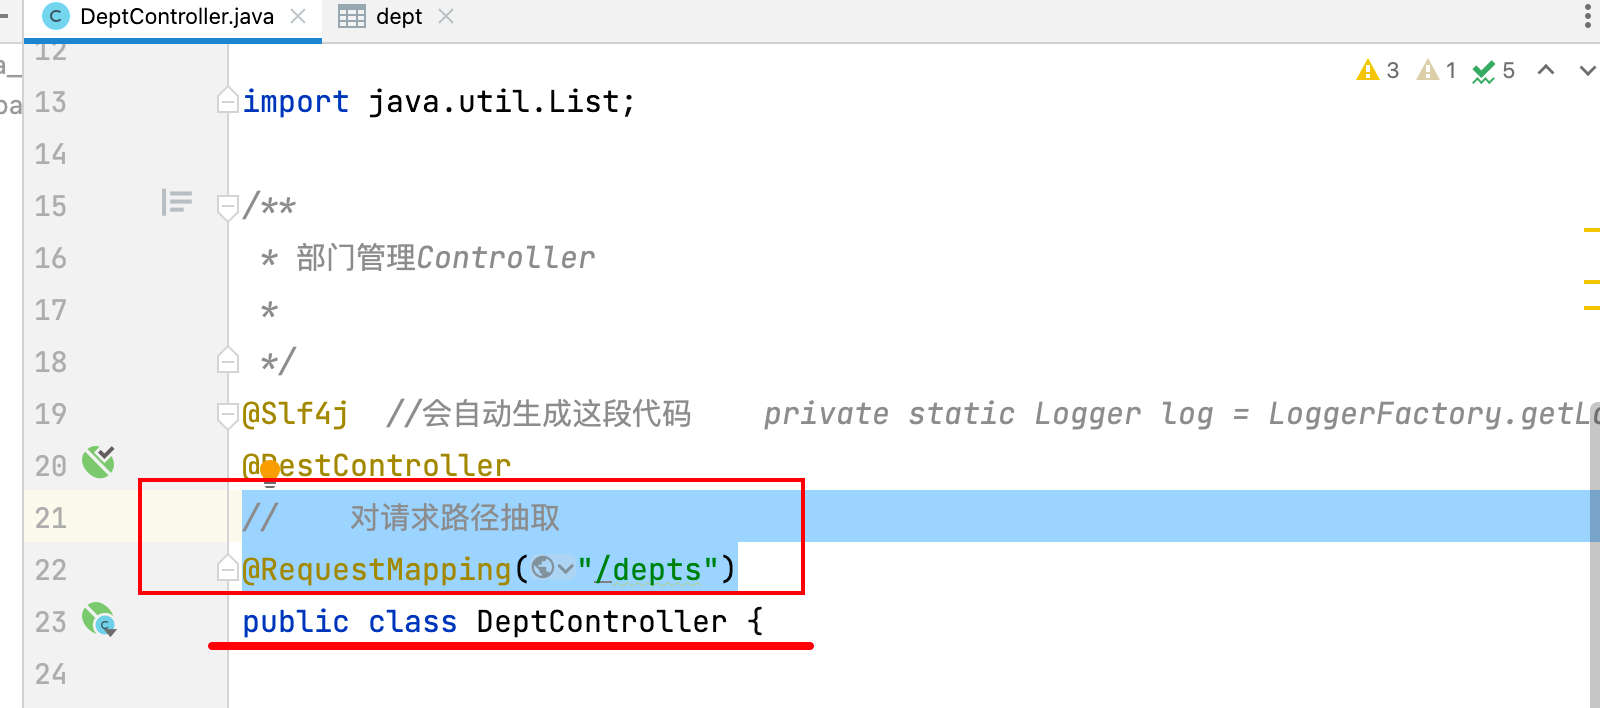
RequestMapping注解放在最上面
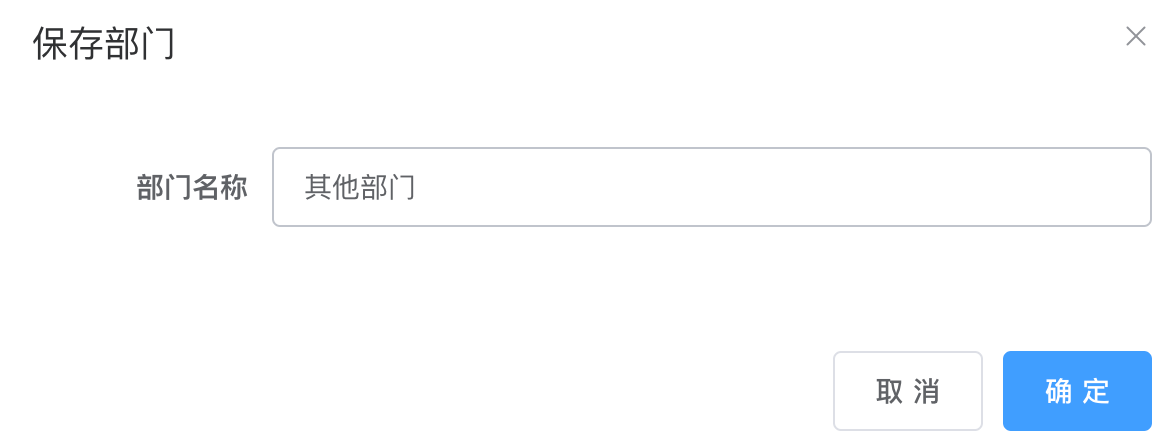
更改
DeptController
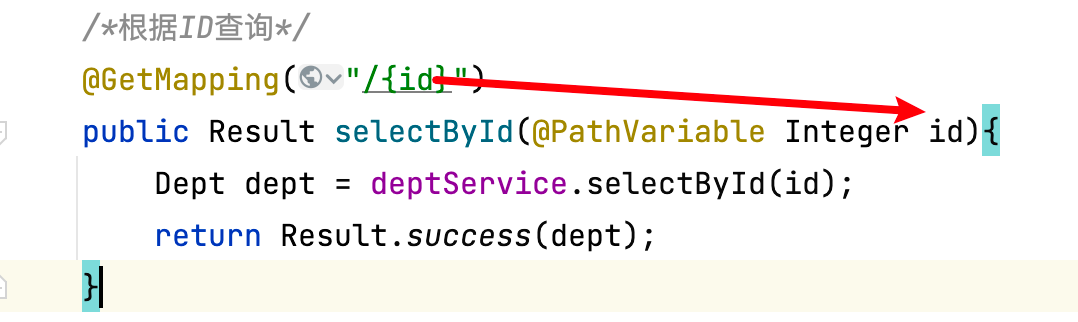
/*根据ID查询*/@GetMapping("/{id}")public Result selectById(@PathVariable Integer id){Dept dept = deptService.selectById(id);return Result.success(dept);}/*更改部门名称*/@PutMappingpublic Result update(@RequestBody Dept dept){log.info("修改部门名称:{}",dept.getName());deptService.update(dept);return Result.success();}
DeptService
//    根据ID查询Dept selectById(Integer id);
//    更新部门名称void update(Dept dept);
DeptServiceImpl
/*根据ID查询*/public Dept selectById(Integer id){Dept dept = deptMapper.selectById(id);return dept;}@Override/*更新部门名称*/public void update(Dept dept) {dept.setUpdateTime(LocalDateTime.now());dept.setCreateTime(LocalDateTime.now());deptMapper.update(dept);}
DeptMapper
/*根据ID查询部门*/@Select("select * from dept where id=#{id}")Dept selectById(Integer id);/*修改部门名称*/@Update("update dept set name=#{name},update_time=#{updateTime} where id=#{id}")void update(Dept dept);
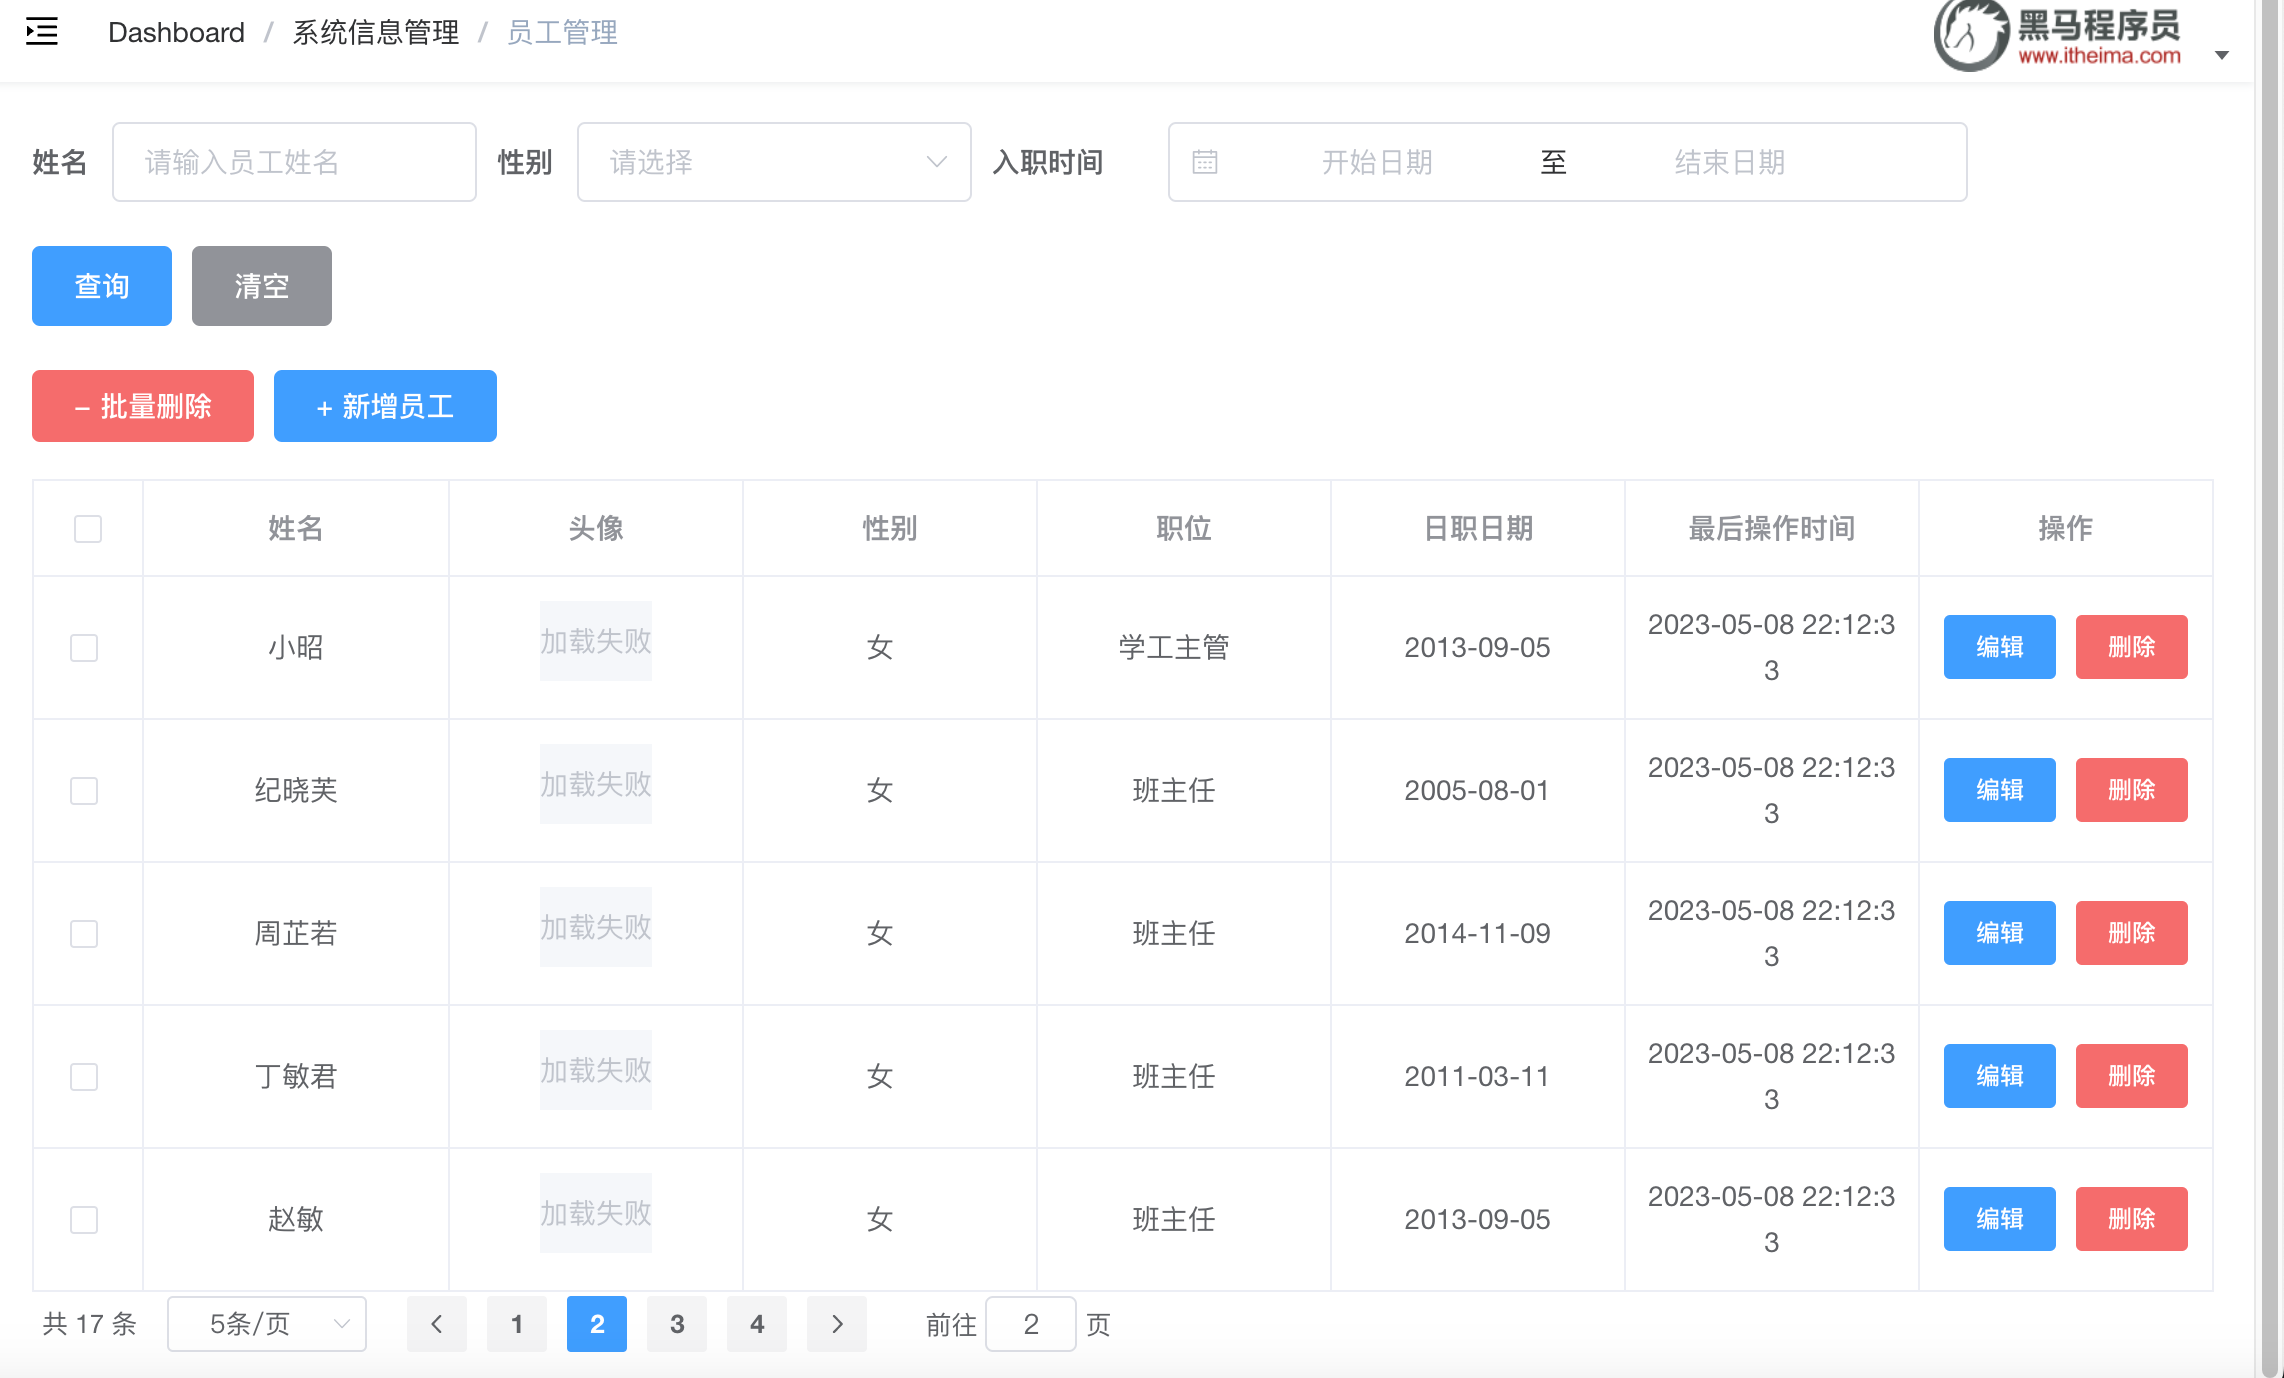
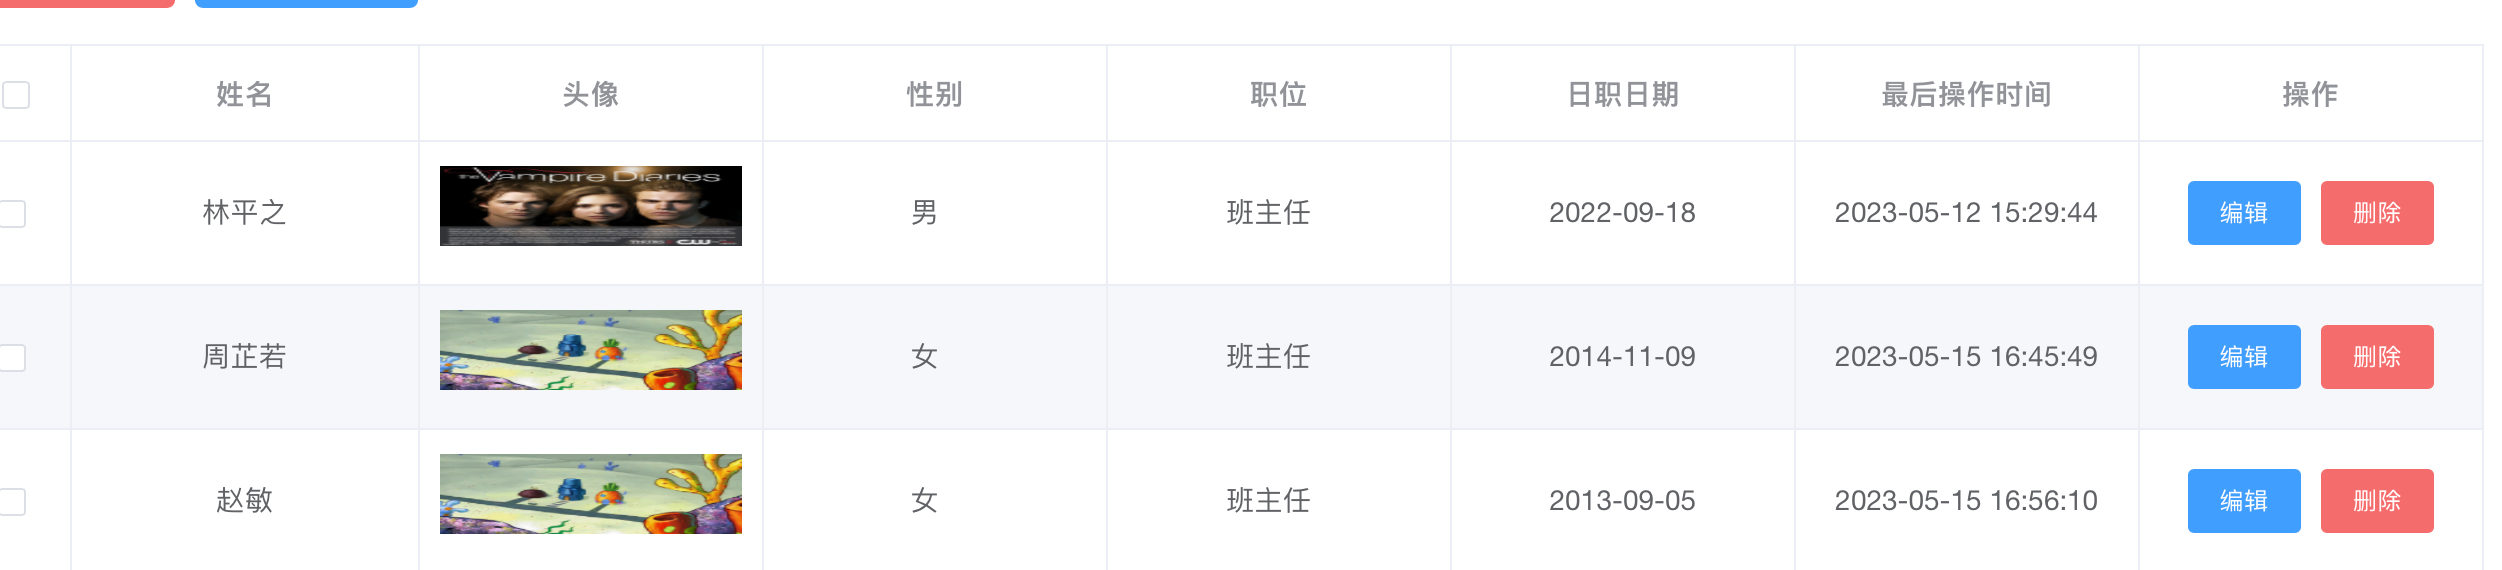
四、员工管理-分页查询
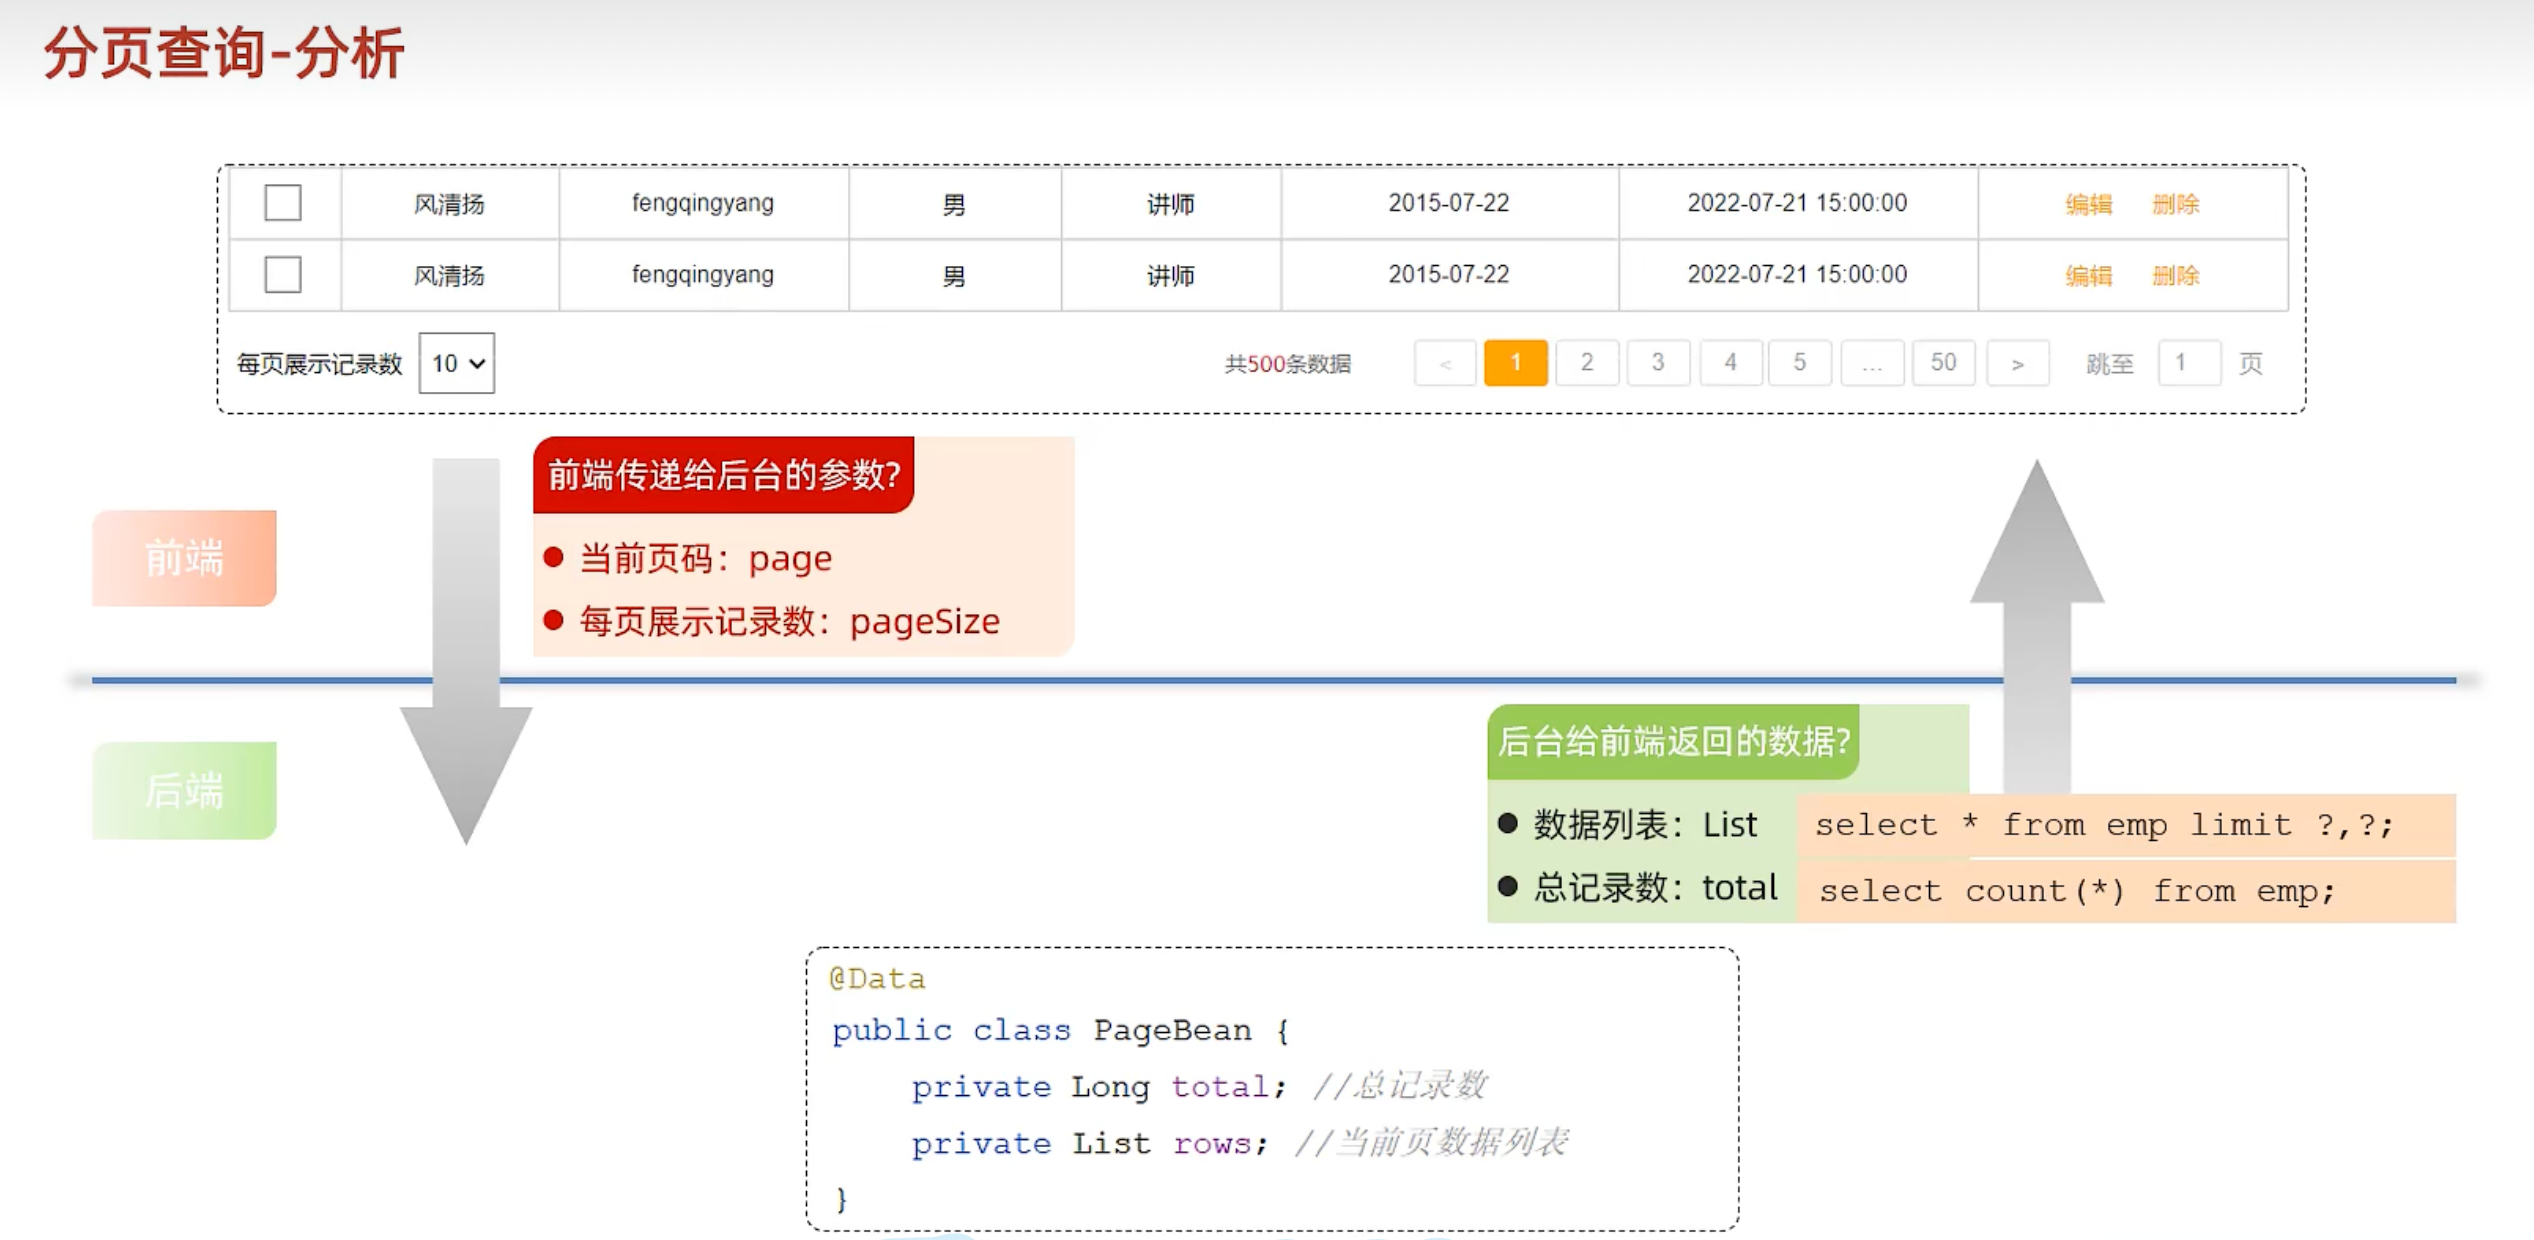
最重要的就是有思路!
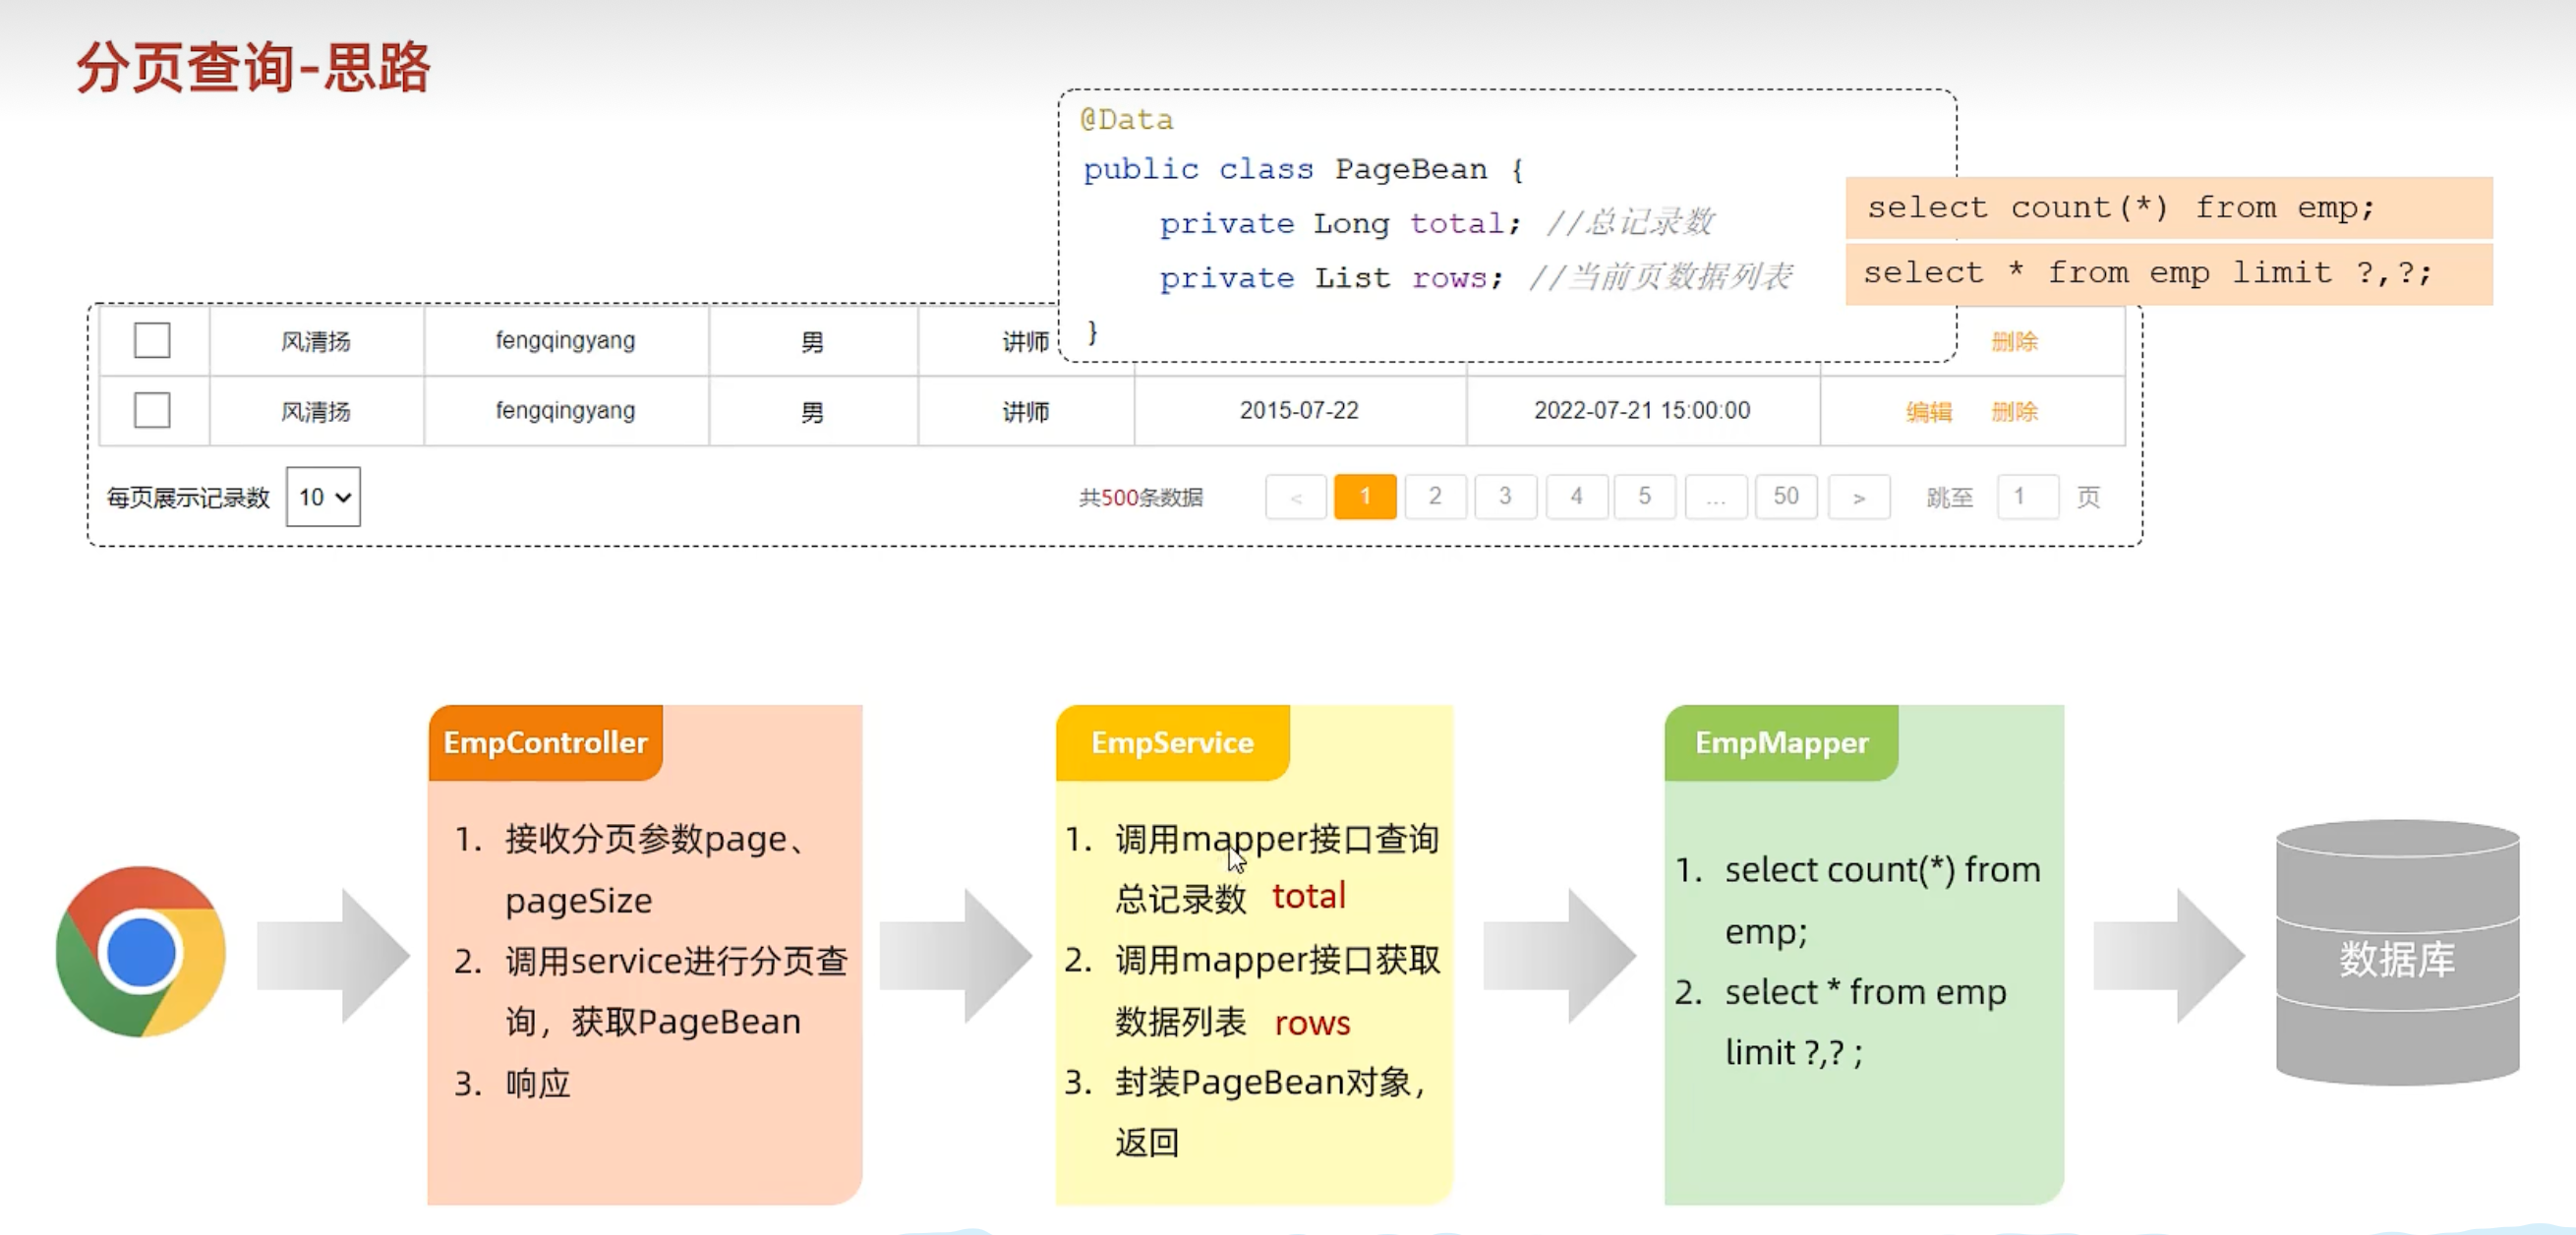
EmpController
package com.itheima.controller;import com.itheima.pojo.PageBean;
import com.itheima.pojo.Result;
import com.itheima.service.EmpService;
import lombok.extern.slf4j.Slf4j;
import org.springframework.beans.factory.annotation.Autowired;
import org.springframework.web.bind.annotation.GetMapping;
import org.springframework.web.bind.annotation.PathVariable;
import org.springframework.web.bind.annotation.RequestParam;
import org.springframework.web.bind.annotation.RestController;//员工管理层
@RestController
@Slf4j
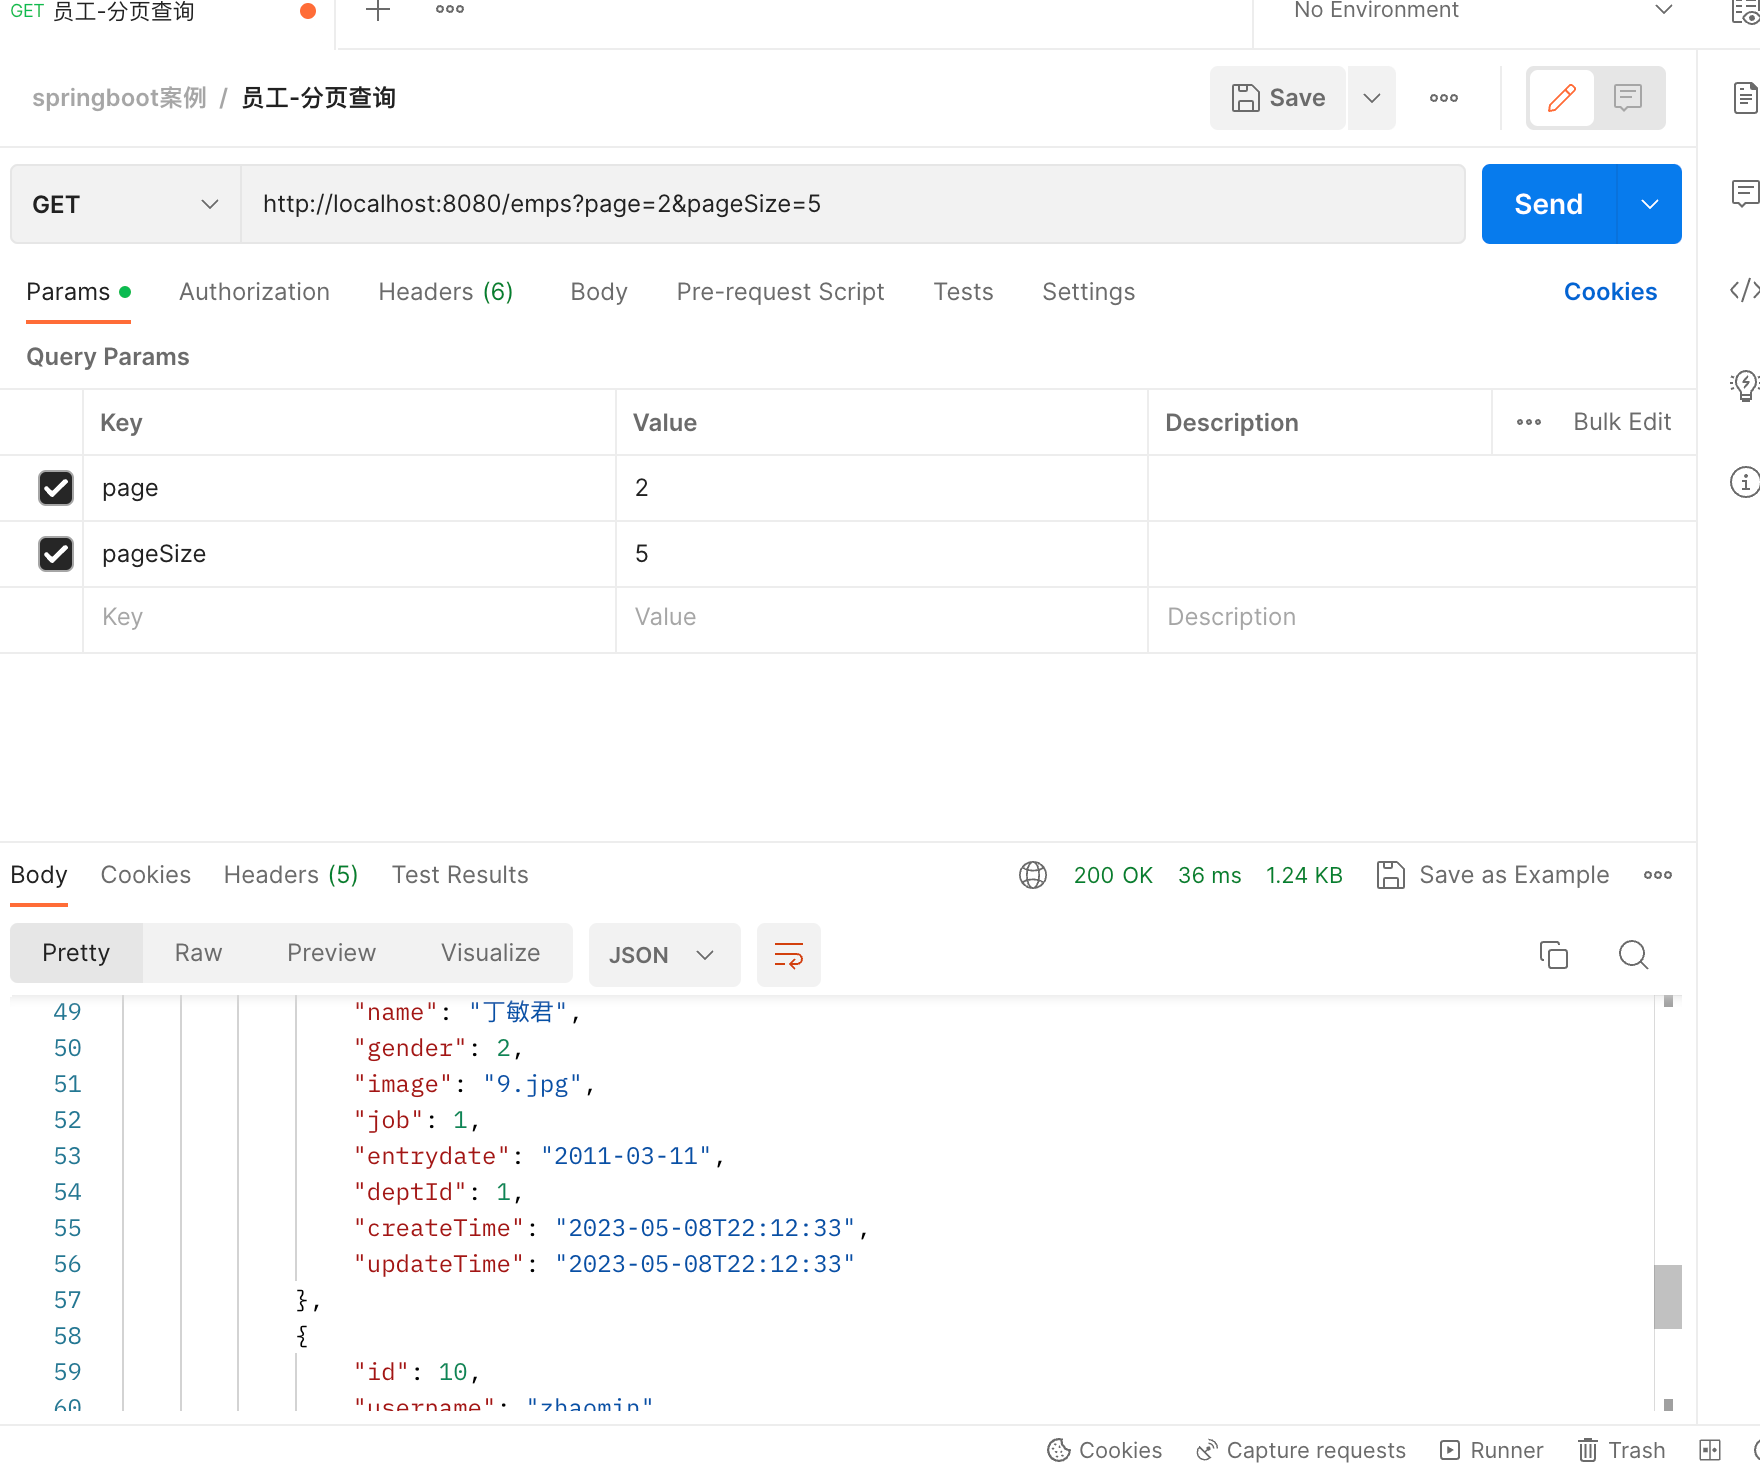
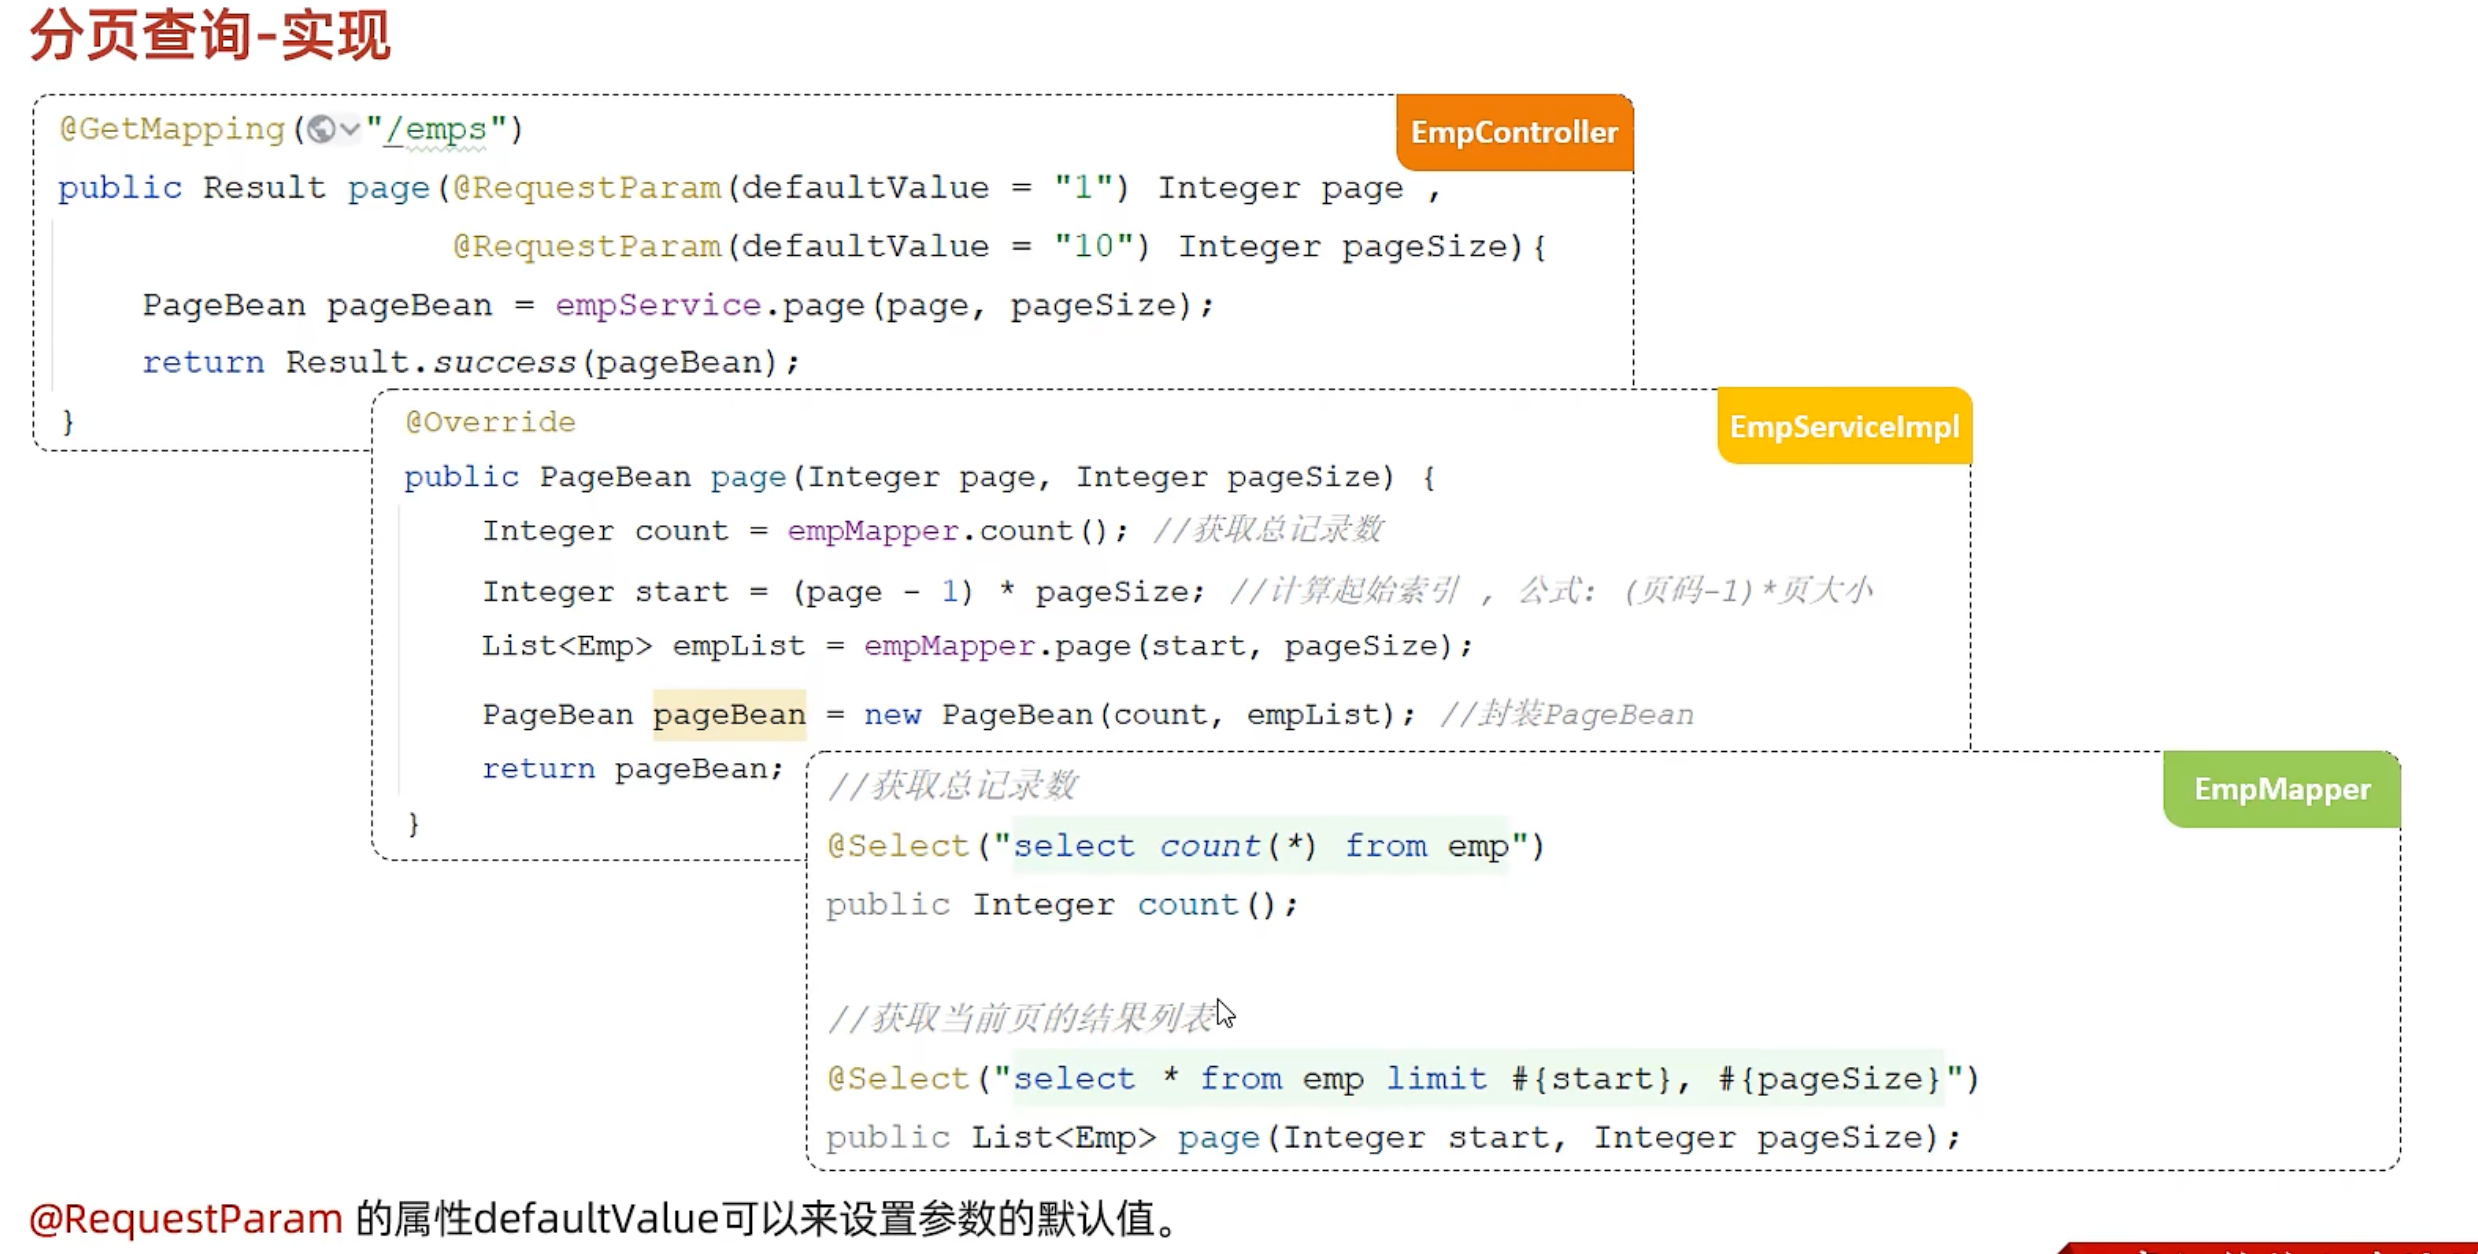
public class EmpController {@Autowired//依赖注入private EmpService empService;@GetMapping("/emps")public Result page(@RequestParam(defaultValue = "1") Integer page,@RequestParam(defaultValue = "10") Integer pageSize){log.info("查询的页码为:{},记录数为{}",page,pageSize);//日志记录PageBean pageBean = empService.page(page,pageSize);//返回PageBean类型的对象return Result.success(pageBean);}
}
EmpService
package com.itheima.service;import com.itheima.pojo.PageBean;public interface EmpService {
//    1、分页查询接口PageBean page(Integer page,Integer pageSize);
}
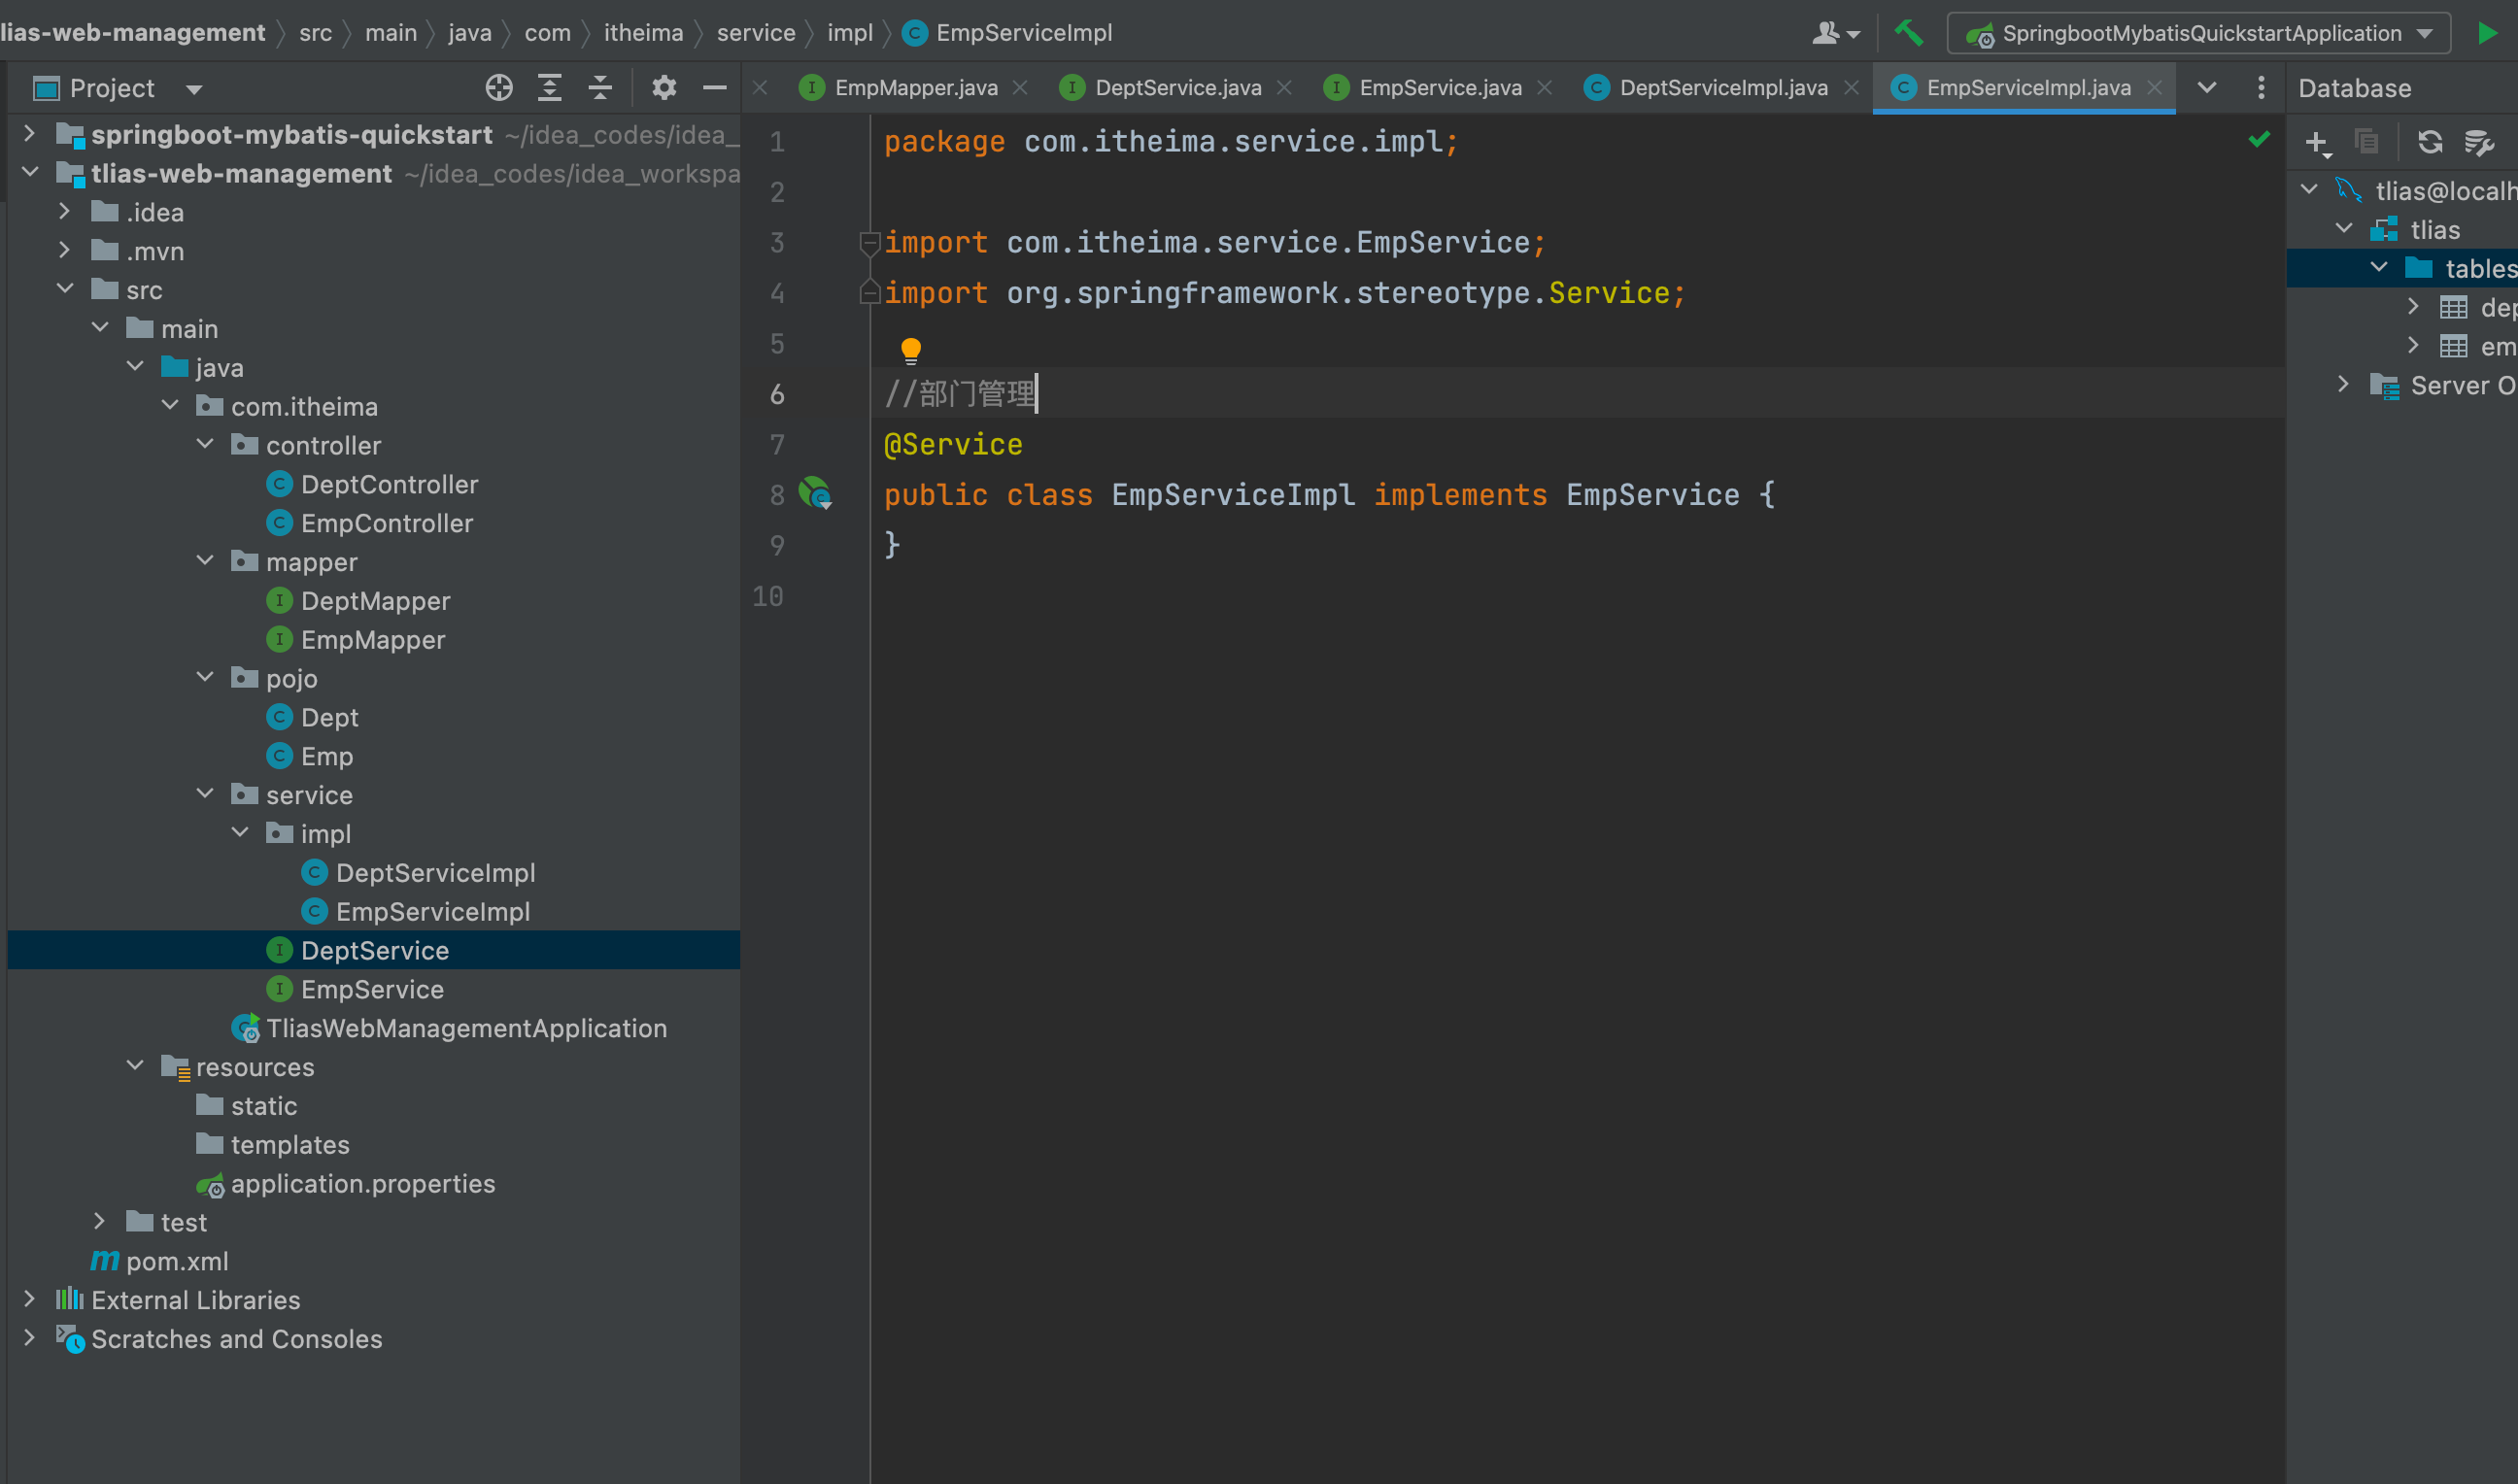
EmpServiceImpl
package com.itheima.service.impl;import com.itheima.mapper.EmpMapper;
import com.itheima.pojo.Emp;
import com.itheima.pojo.PageBean;
import com.itheima.service.EmpService;
import org.springframework.beans.factory.annotation.Autowired;
import org.springframework.stereotype.Service;import java.util.List;//部门管理
@Service
public class EmpServiceImpl implements EmpService {@AutowiredEmpMapper empMapper;
//    1、分页查询public PageBean page(Integer page,Integer pageSize){Long count = empMapper.selectCount();//记录查询到的总记录数Integer begin = (page-1)*pageSize;//起始索引:(当前页码-1)*每页记录数List<Emp> emp =  empMapper.selectPage(begin,pageSize);PageBean pageBean = new PageBean(emp,count);return pageBean;}
}
EmpMapper
package com.itheima.mapper;import com.itheima.pojo.Emp;
import com.itheima.pojo.PageBean;
import org.apache.ibatis.annotations.Mapper;
import org.apache.ibatis.annotations.Select;import java.util.List;@Mapper
public interface EmpMapper {//    查询总记录数@Select("select count(*) from emp")Long selectCount();//    查询分页记录@Select("select * from emp limit #{begin},#{pageSize}")List<Emp> selectPage(Integer begin, Integer pageSize);
}
@RequestParam、@RequestBody、@PathVariable
目前用到的功能就这些,其他属性还没有用到。
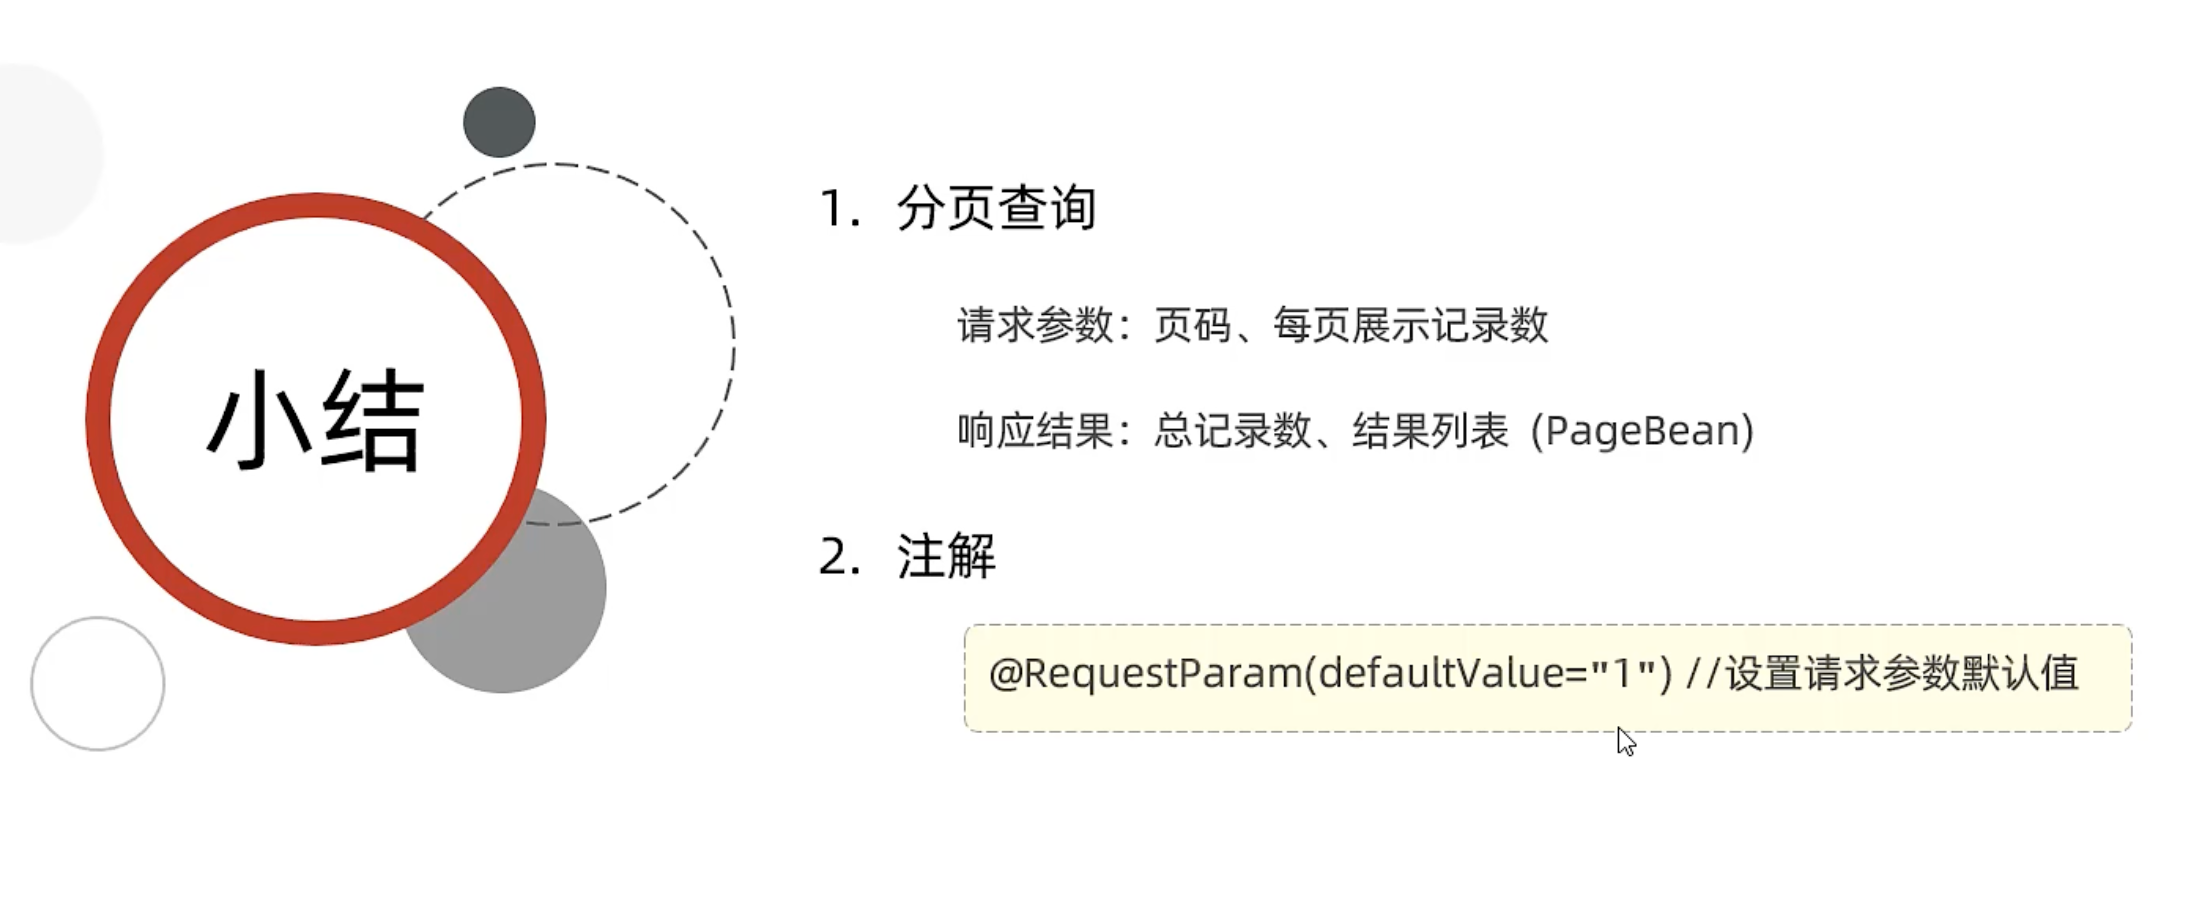
@RequestParam 参数默认值
@RequestParam 是传递参数的。
@RequestParam 用于将请求参数区数据映射到功能处理方法的参数上。
public String queryUserName(@RequestParam String userName)
在 url 中输入:localhost:8080/**/?userName=zhangsan
请求中包含 username 参数(如 /requestparam1?userName=zhang),则自动传入。
接下来我们看一下 @RequestParam 注解主要有哪些参数:
- value:参数名字,即入参的请求参数名字,如 username 表示请求的参数区中的名字为 username 的参数的值将传入;
- required:是否必须,默认是 true,表示请求中一定要有相应的参数,否则将报 404 错误码;
- defaultValue:默认值,表示如果请求中没有同名参数时的默认值,默认值可以是 SpEL 表达式,如 “#{systemProperties [‘java.vm.version’]}”。
@RequestBody 转化为json格式,封装到实体类中
@PathVariable 映射 URL 绑定的占位符
通过 @PathVariable 可以将 URL 中占位符参数绑定到控制器处理方法的入参中:URL 中的 {xxx} 占位符可以通过
@PathVariable(“xxx”) 绑定到操作方法的入参中。
五、员工管理-分页查询-pageHelper插件
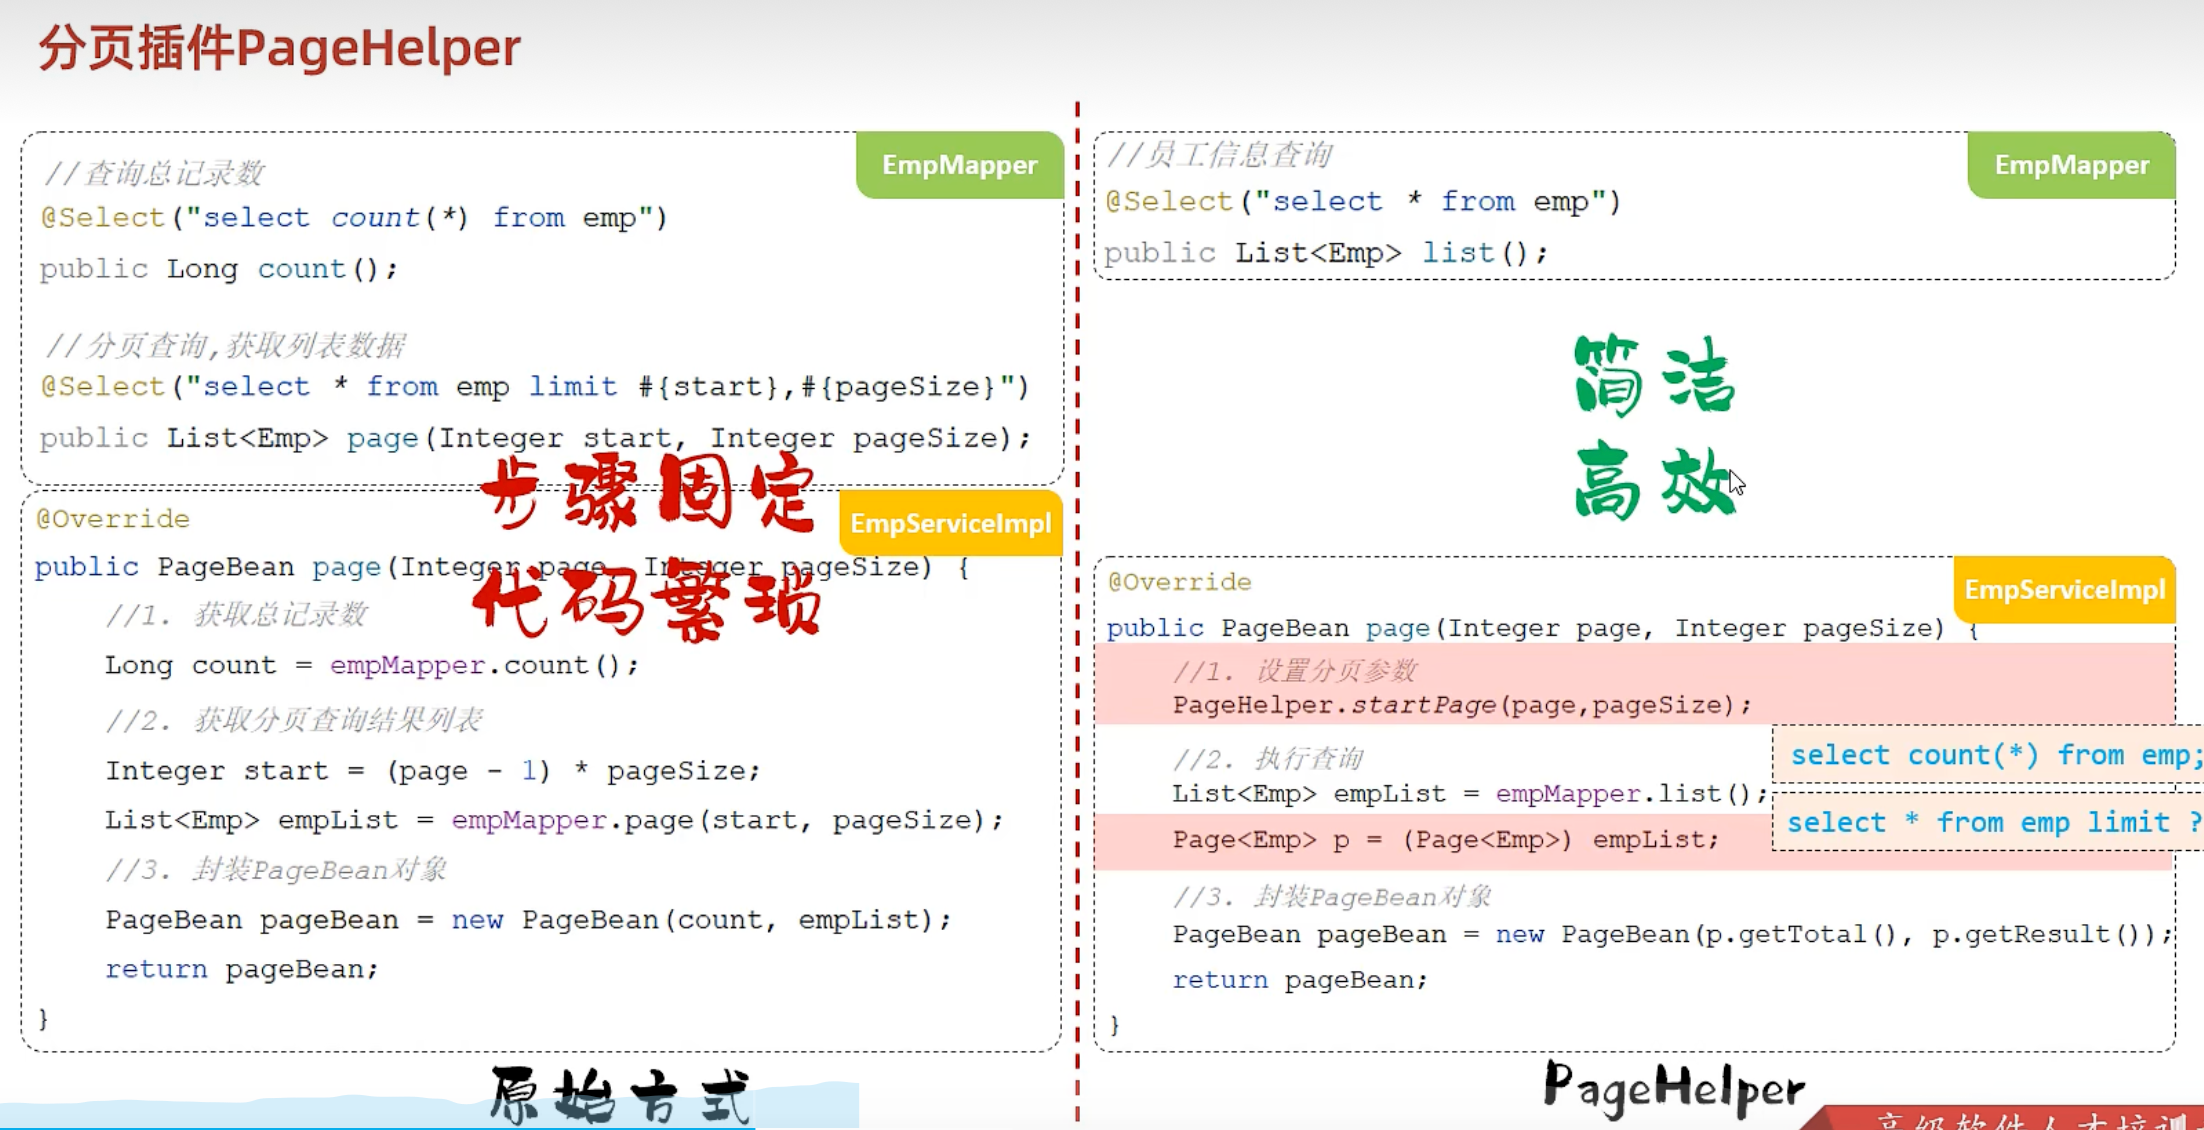
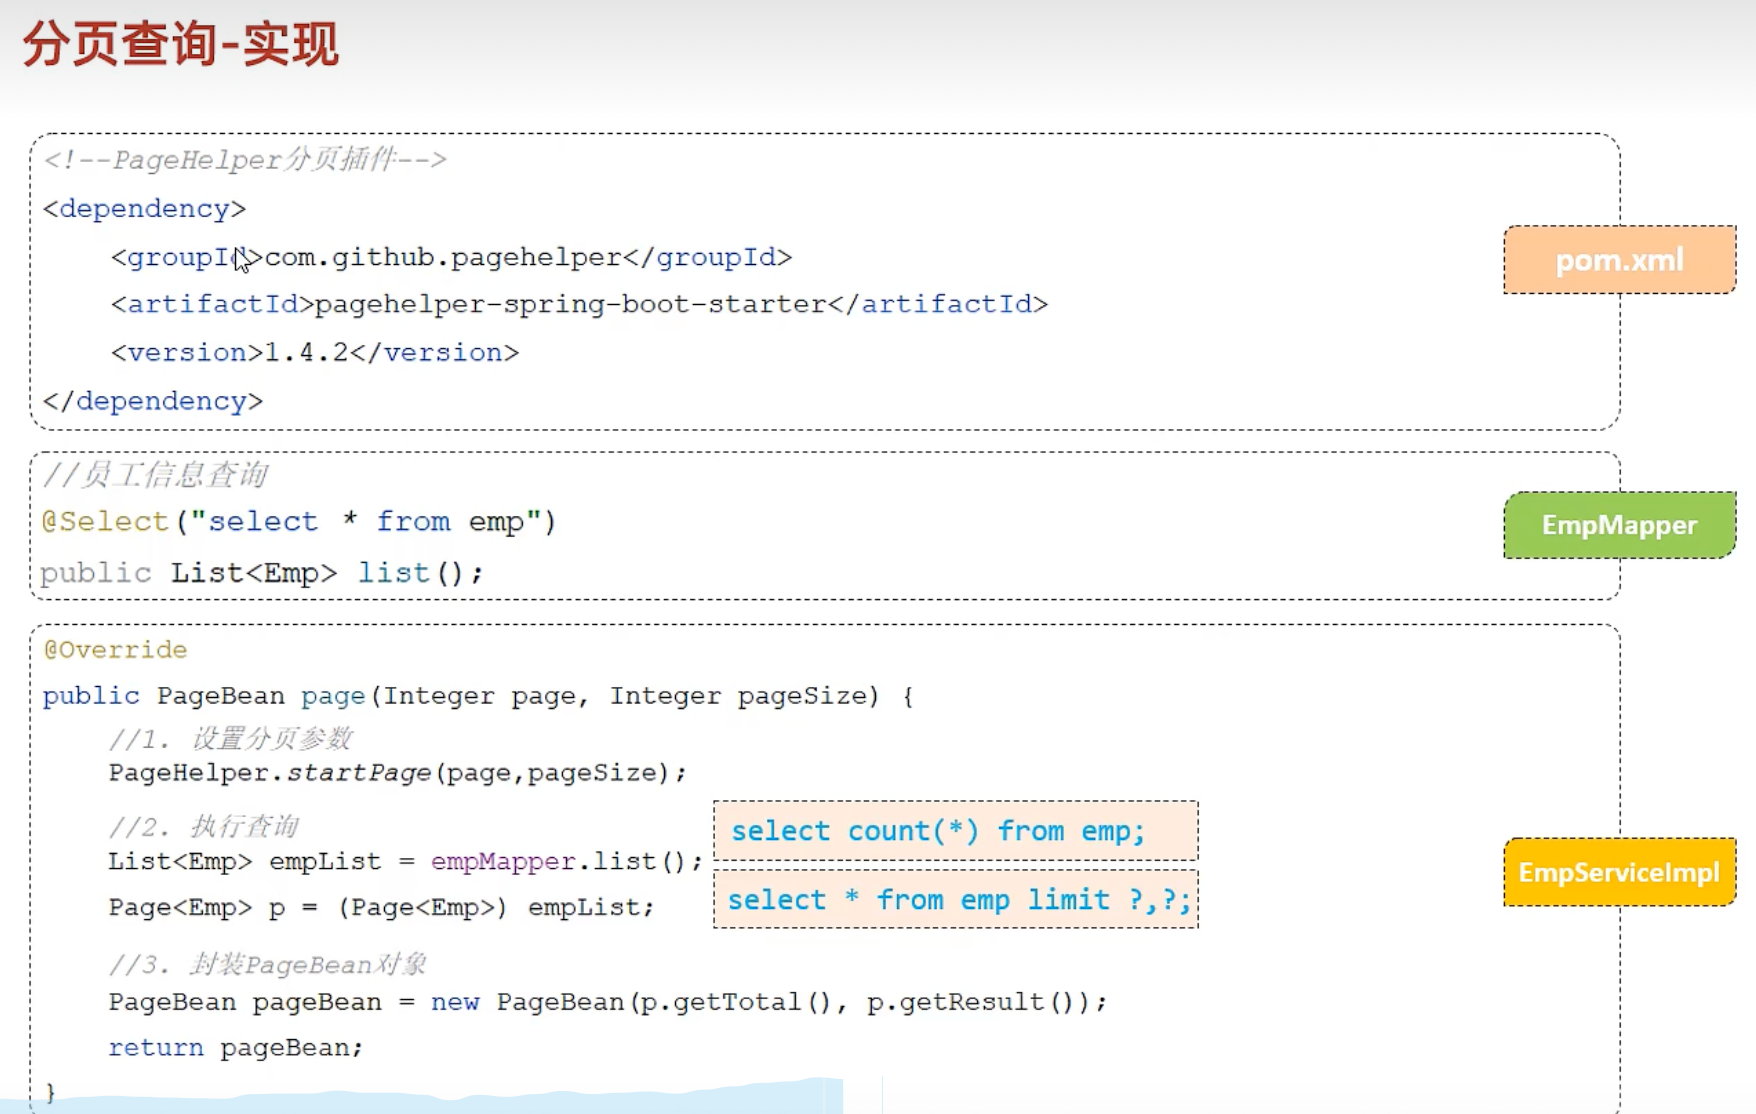
pageHelper使用之前,先配置依赖
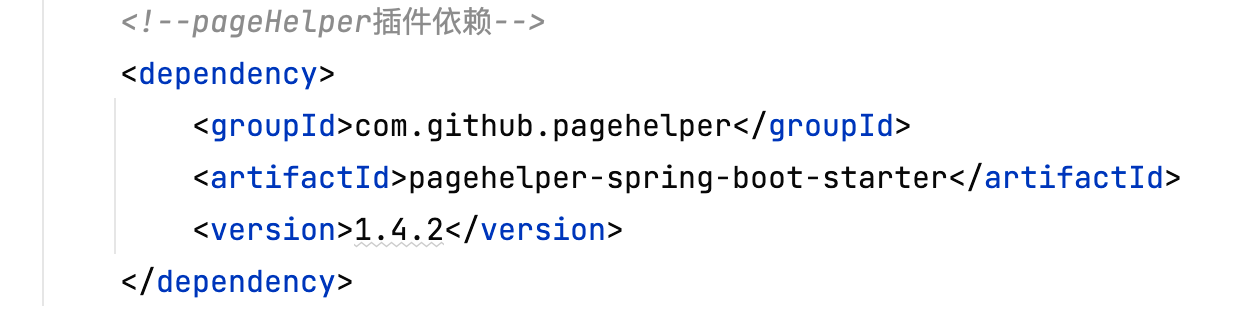
<dependency><groupId>com.github.pagehelper</groupId><artifactId>pagehelper-spring-boot-starter</artifactId><version>1.4.2</version>
</dependency>
修改EmpMapper
// 使用pageHelper分页查询@Select("select * from emp")public List<Emp> list();
修改EmpServiceImpl
//    使用pageHelperpublic PageBean page(Integer page,Integer pageSize){
//        1、设置分页参数PageHelper.startPage(page,pageSize);
//        2、分页查询List<Emp> empList = empMapper.list();
//        3、封装PageBean对象并返回Page<Emp> p = (Page<Emp>)empList;PageBean pageBean = new PageBean(p.getTotal(),p.getResult());return pageBean;}
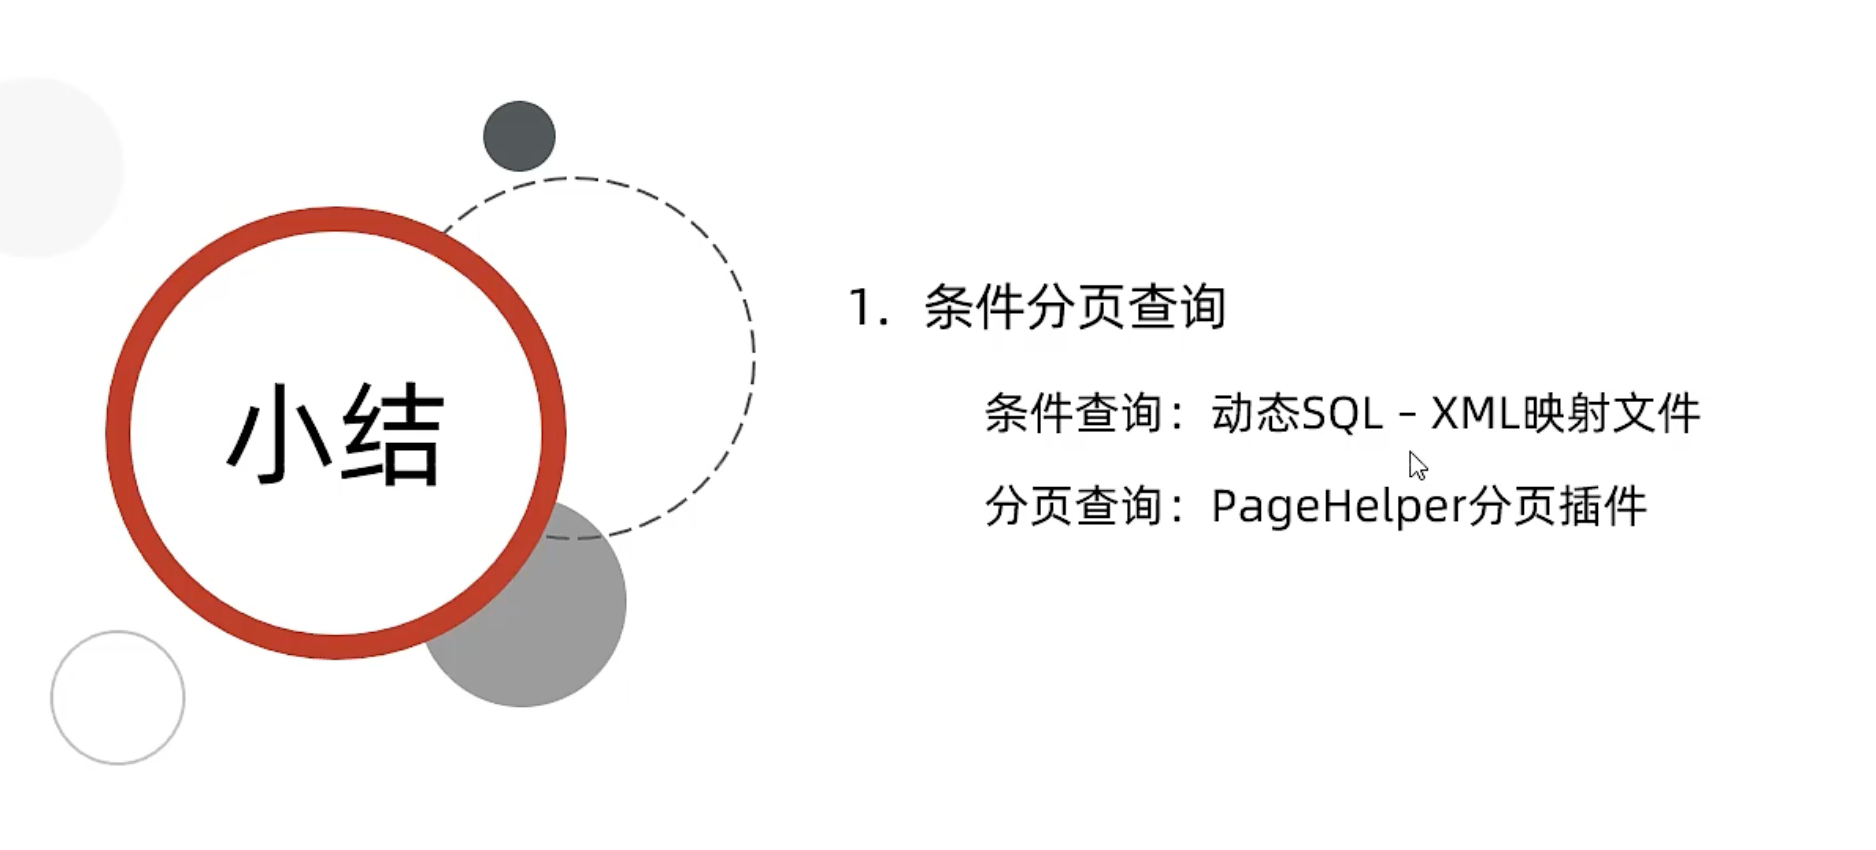
六、条件分页查询
EmpController
//    根据条件分页查询员工
@GetMapping("/emps")
public Result page(String name, Short gender,@DateTimeFormat(pattern = "yyyy-MM-dd") LocalDate begin,@DateTimeFormat(pattern = "yyyy-MM-dd") LocalDate end,@RequestParam(defaultValue = "1") Integer page, @RequestParam(defaultValue = "10") Integer pageSize) {log.info("查询的记录:{},{},{},{},{},{}",name,gender,begin,end,page,pageSize);//日志记录PageBean pageBean = empService.page(name, gender, begin, end, page, pageSize);return Result.success(pageBean);}
EmpService
package com.itheima.service;import com.itheima.pojo.PageBean;
import org.springframework.format.annotation.DateTimeFormat;import java.time.LocalDate;public interface EmpService {
//    1、分页查询接口PageBean page(String name, Short gender, LocalDate begin, LocalDate end,Integer page,Integer pageSize);
}
EmpServiceImpl
//    使用pageHelper进行分页条件查询public PageBean page(String name, Short gender,LocalDate begin, LocalDate end,Integer page,Integer pageSize){
//        pageHelper使用:
//        1、设置分页参数PageHelper.startPage(page,pageSize);
//        2、分页查询List<Emp> empList = empMapper.list(name, gender, begin, end);//这个时候已经是Page类了
//        3、封装PageBean对象并返回Page<Emp> p = (Page<Emp>)empList;PageBean pageBean = new PageBean(p.getTotal(),p.getResult());return pageBean;}
EmpMapper
//    使用pageHelper分页查询public List<Emp> list(String name, Short gender, LocalDate begin, LocalDate end);
}
EmpMapper.xml与EmpMapper.java同包同名
namespace配置、id配置
<?xml version="1.0" encoding="UTF-8" ?>
<!DOCTYPE mapperPUBLIC "-//mybatis.org//DTD Mapper 3.0//EN""http://mybatis.org/dtd/mybatis-3-mapper.dtd">
<mapper namespace="com.itheima.mapper.EmpMapper"><select id="list" resultType="com.itheima.pojo.Emp">select *from emp<where>
--             name是String类型,这里设置一个name!=''空字符串<if test="name != null and name != ''">name like concat('%', #{name}, '%')</if><if test="gender != null">and gender = #{gender}</if><if test="begin != null and end != null">and entrydate between #{begin} and #{end}</if></where>order by entrydate desc</select>
</mapper>
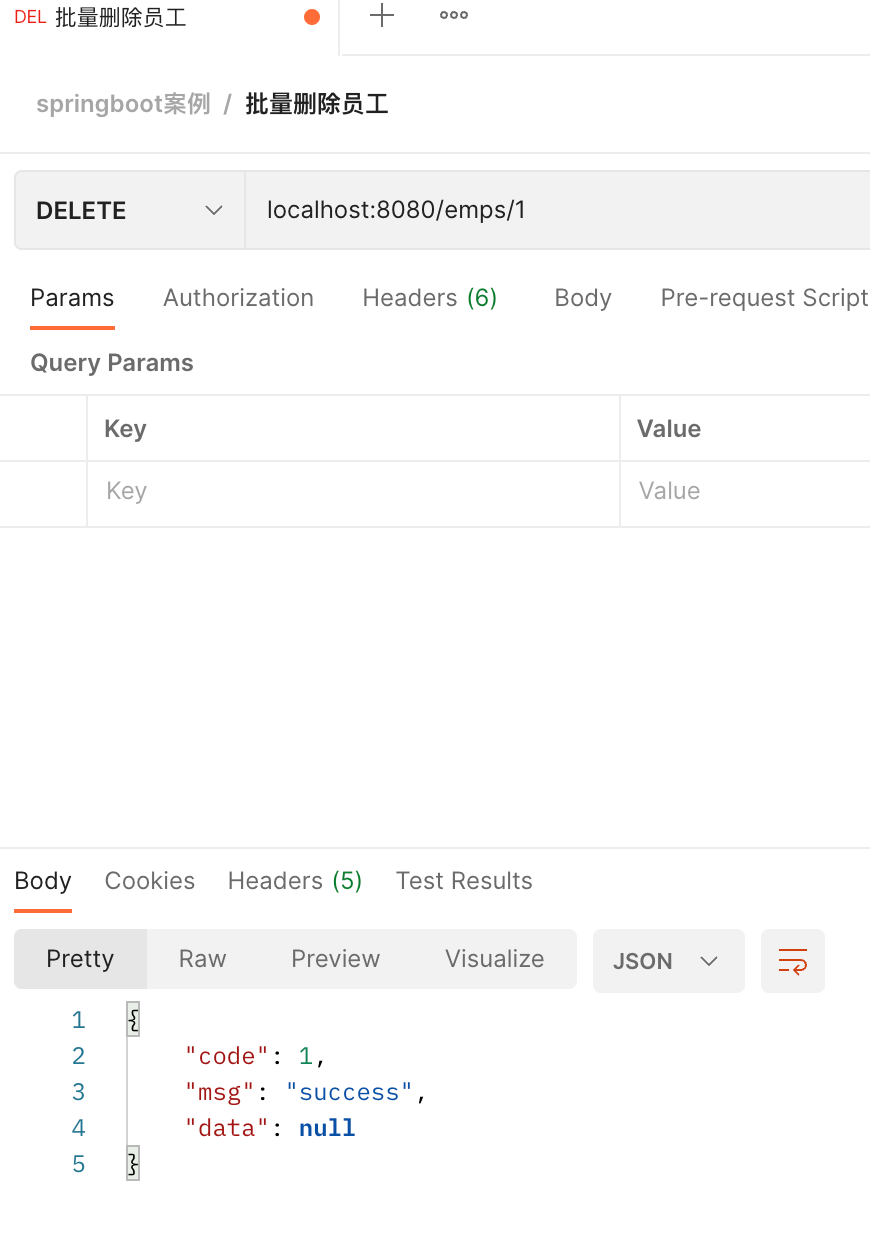
七、批量删除员工
EmpController
// 批量删除员工@DeleteMapping("/emps/{ids}")public Result delete(@PathVariable List<Integer> ids){for (Integer id:ids) {log.info("要删除的员工id:{}",id);}empService.delete(ids);return Result.success();}
EmpService
//    2、批量删除员工
void delete(List<Integer> ids);
EmpServiceImple
// 删除指定id员工public void delete(List<Integer> ids){empMapper.delete(ids);}
EmpMapper.java
// 批量删除员工void delete(List<Integer> ids);
EmpMapper.xml
<delete id="delete">delete from emp<where>id in<foreach collection="ids" item="id" separator="," open="(" close=")">#{id}</foreach></where>
</delete>
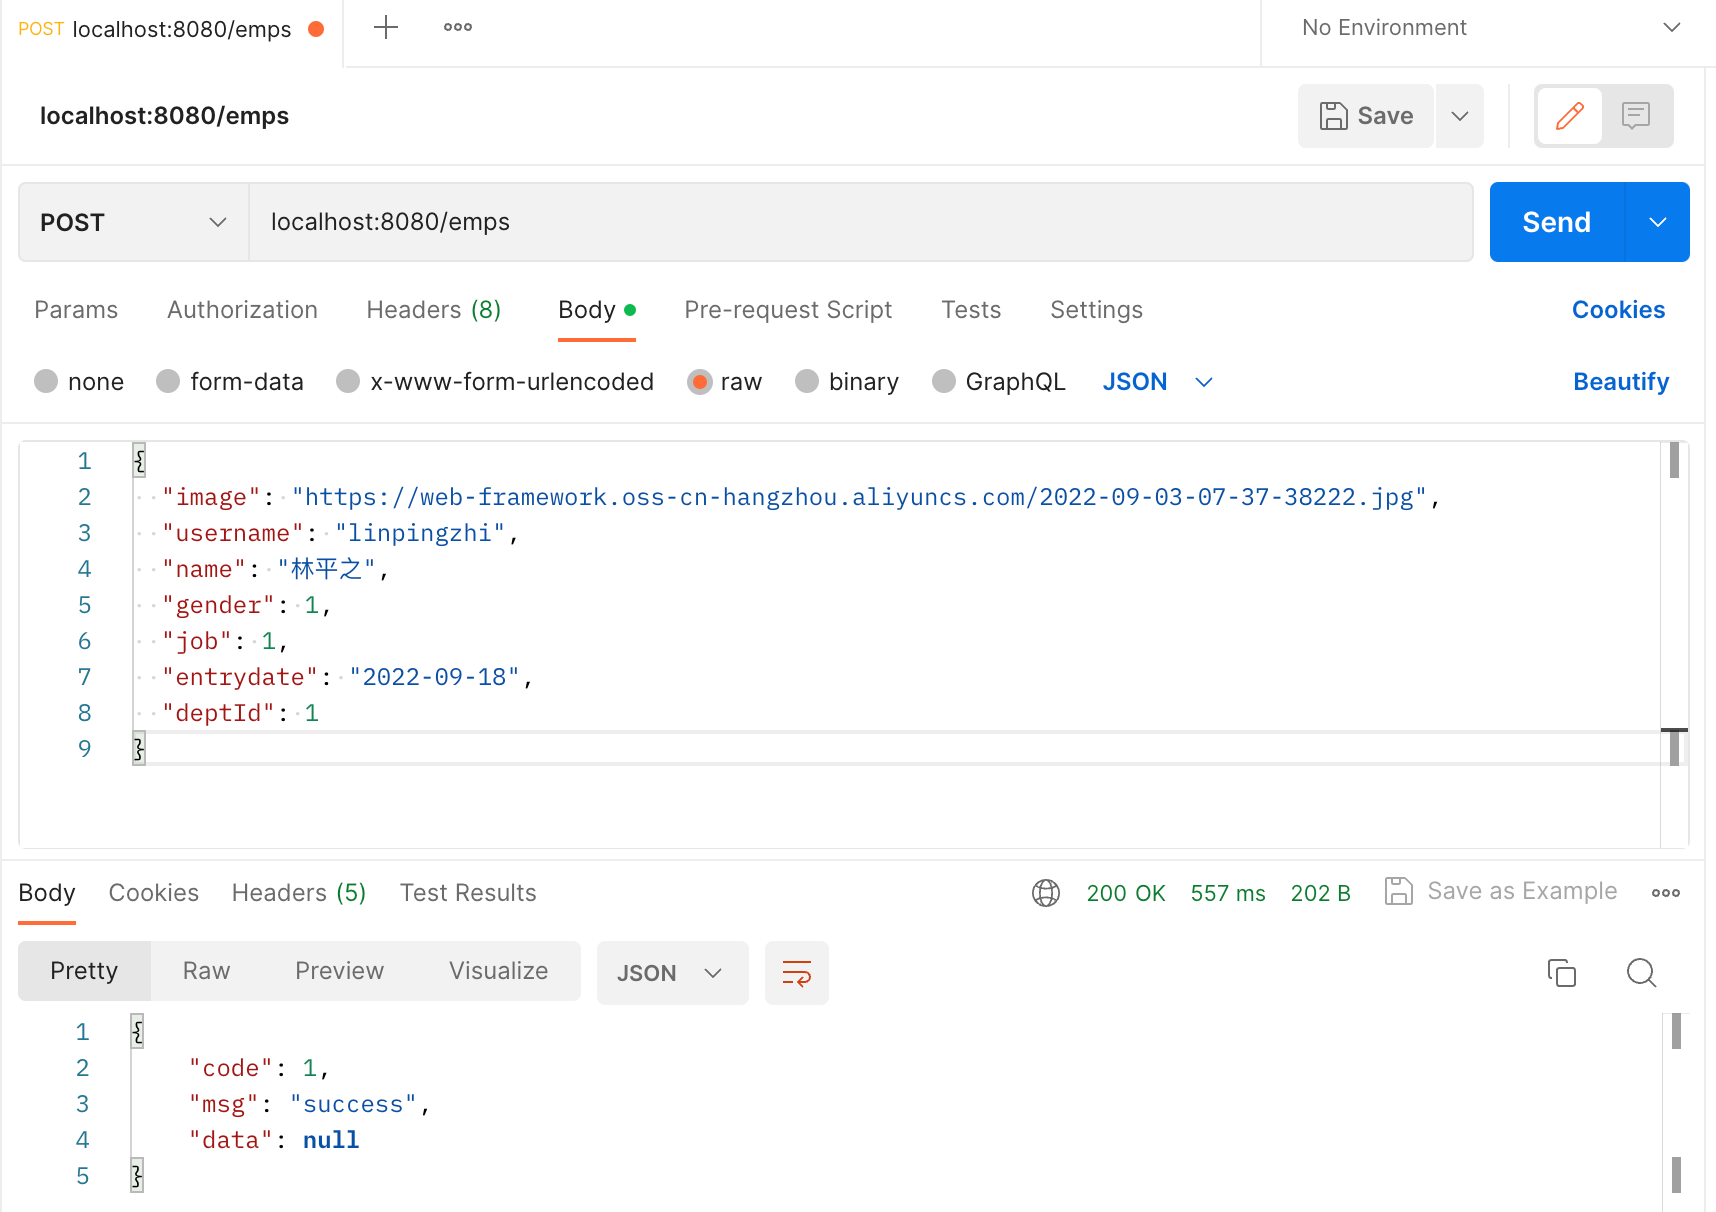
八、新增员工
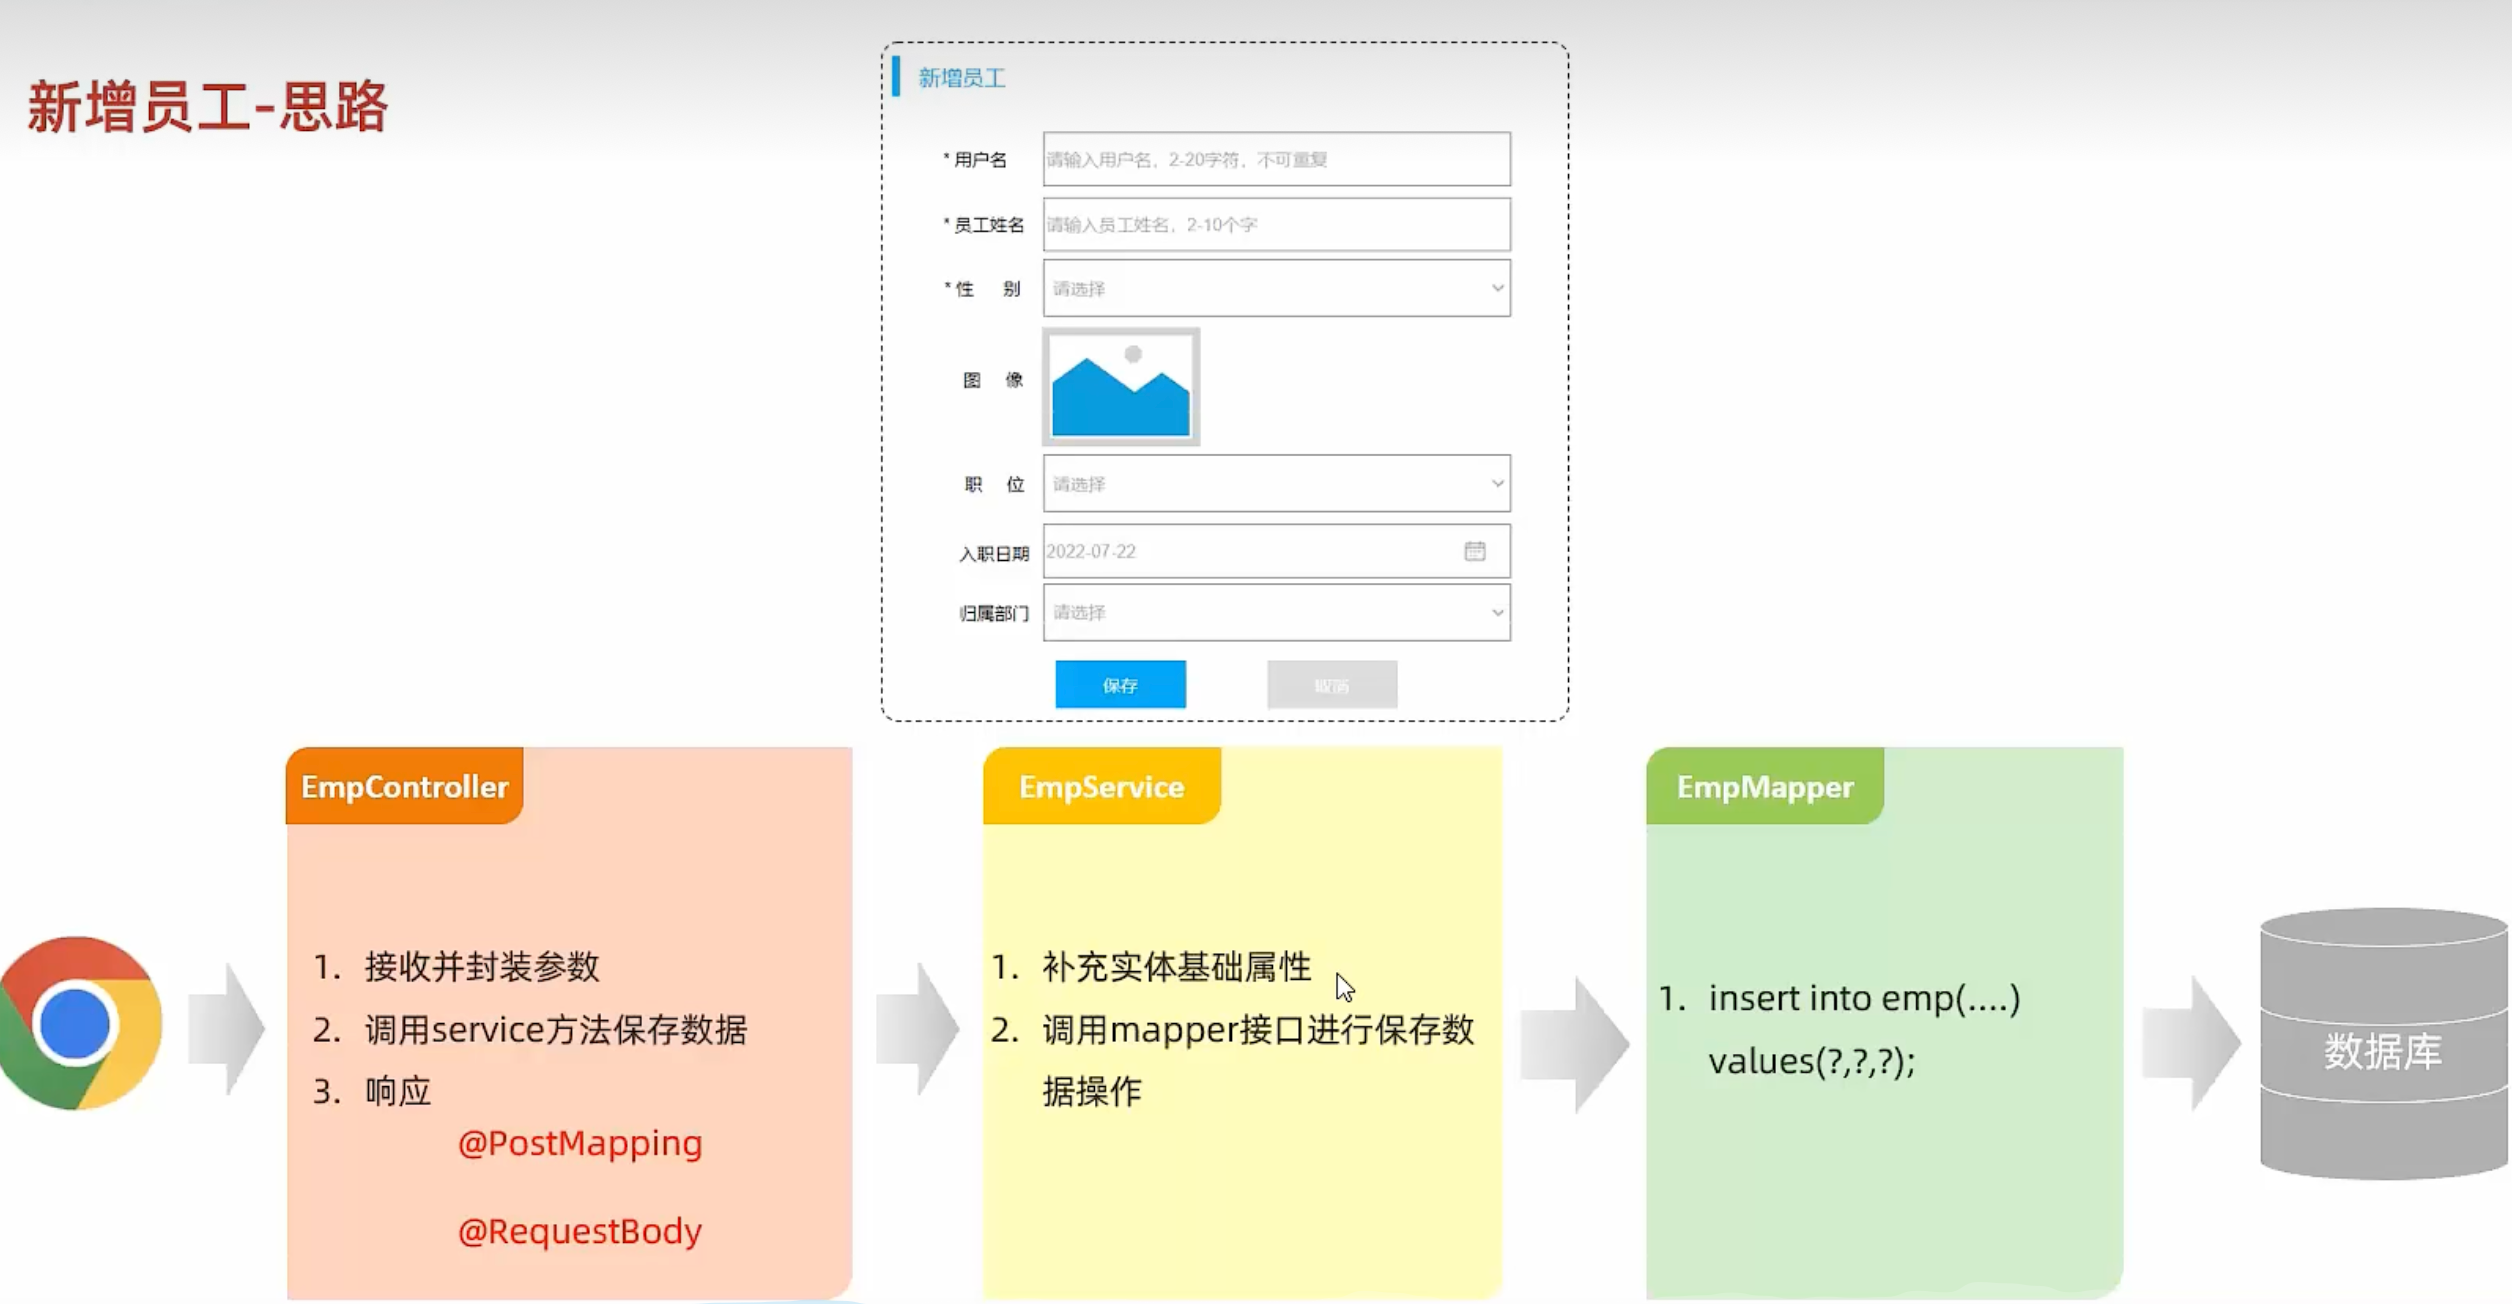
EmpController
// 新增员工@PostMapping("/emps")public Result insert(@RequestBody Emp emp){log.info("新增员工信息:{}",emp);empService.insert(emp);return Result.success();}
EmpService
// 新增员工信息void insert(Emp emp);
EmpServiceImpl
// 新增员工@Overridepublic void insert(Emp emp) {emp.setCreateTime(LocalDateTime.now());emp.setUpdateTime(LocalDateTime.now());empMapper.insert(emp);}
EmpMapper
//    新增员工
@Insert("insert into emp" +"(username, name, gender, image, job, entrydate, dept_id, create_time, update_time)" +" values (#{username},#{name},#{gender},#{image},#{job},#{entrydate},#{deptId},#{createTime},#{updateTime});")
void insert(Emp emp);
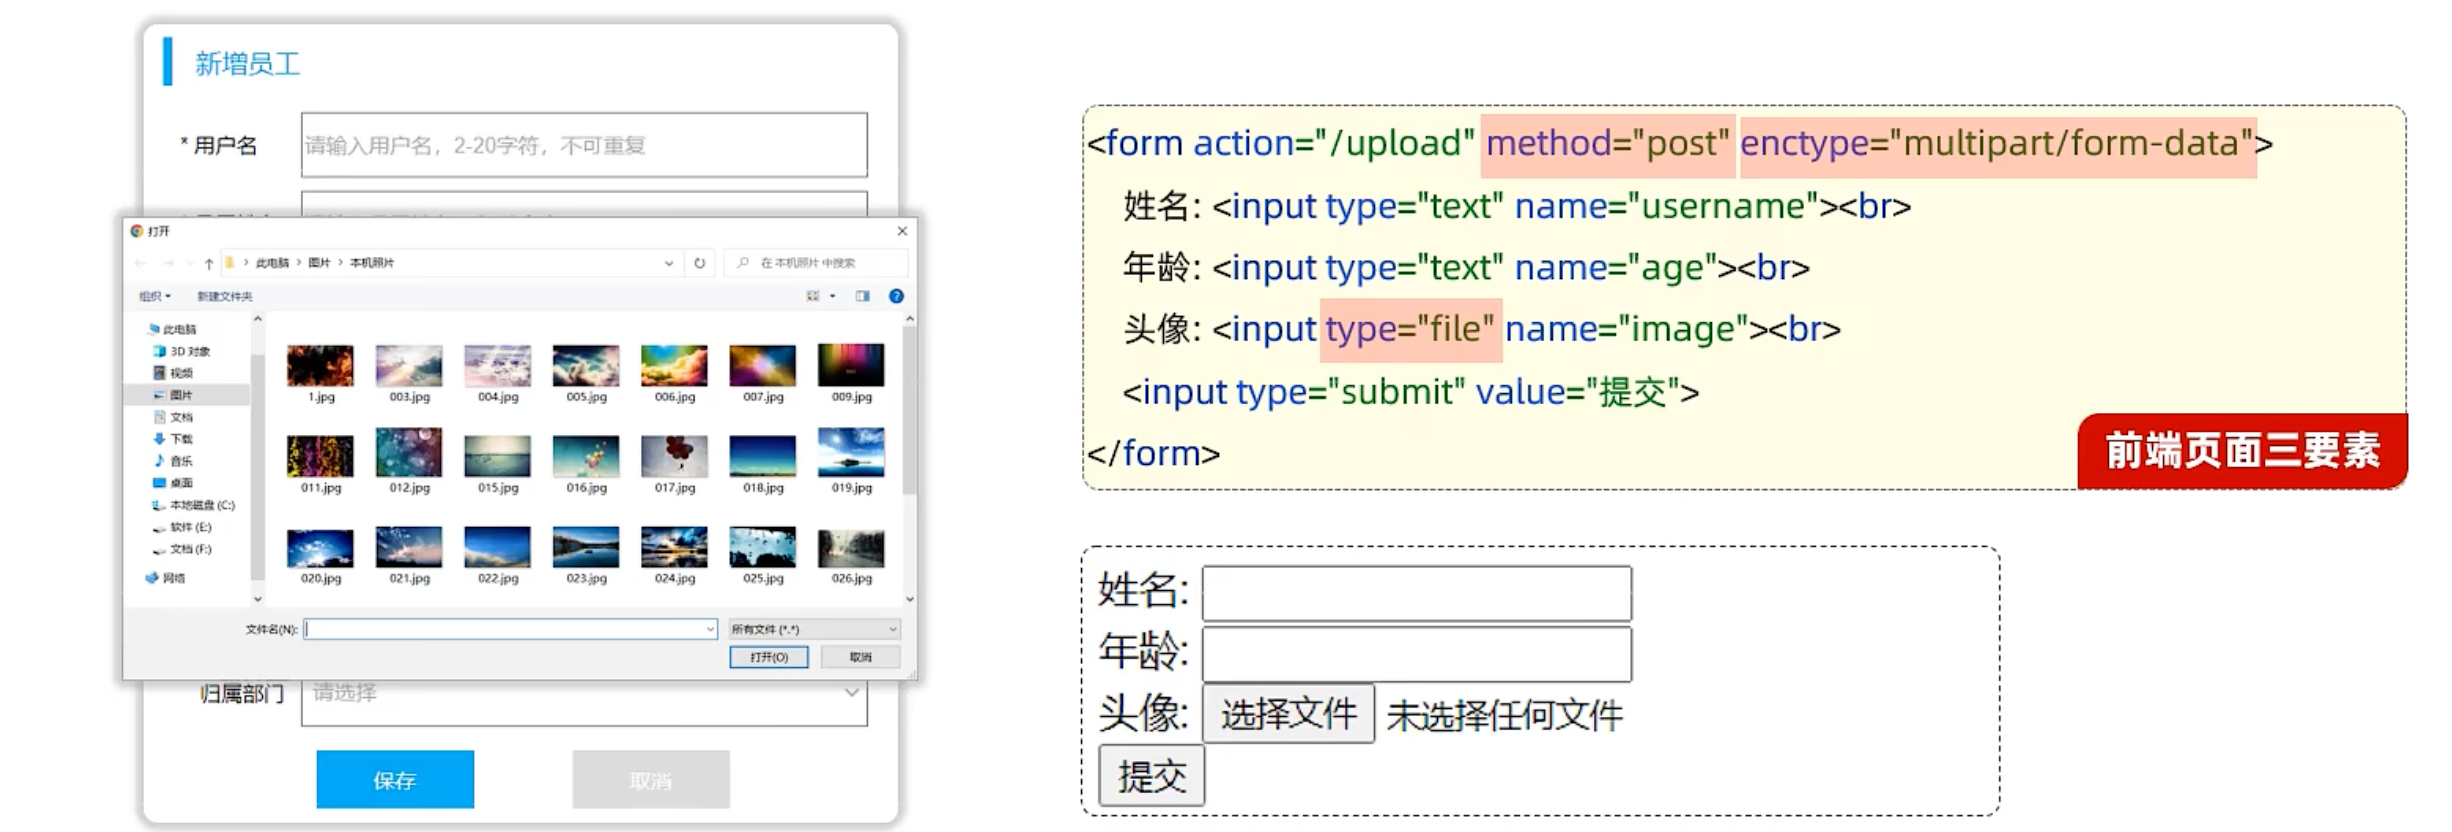
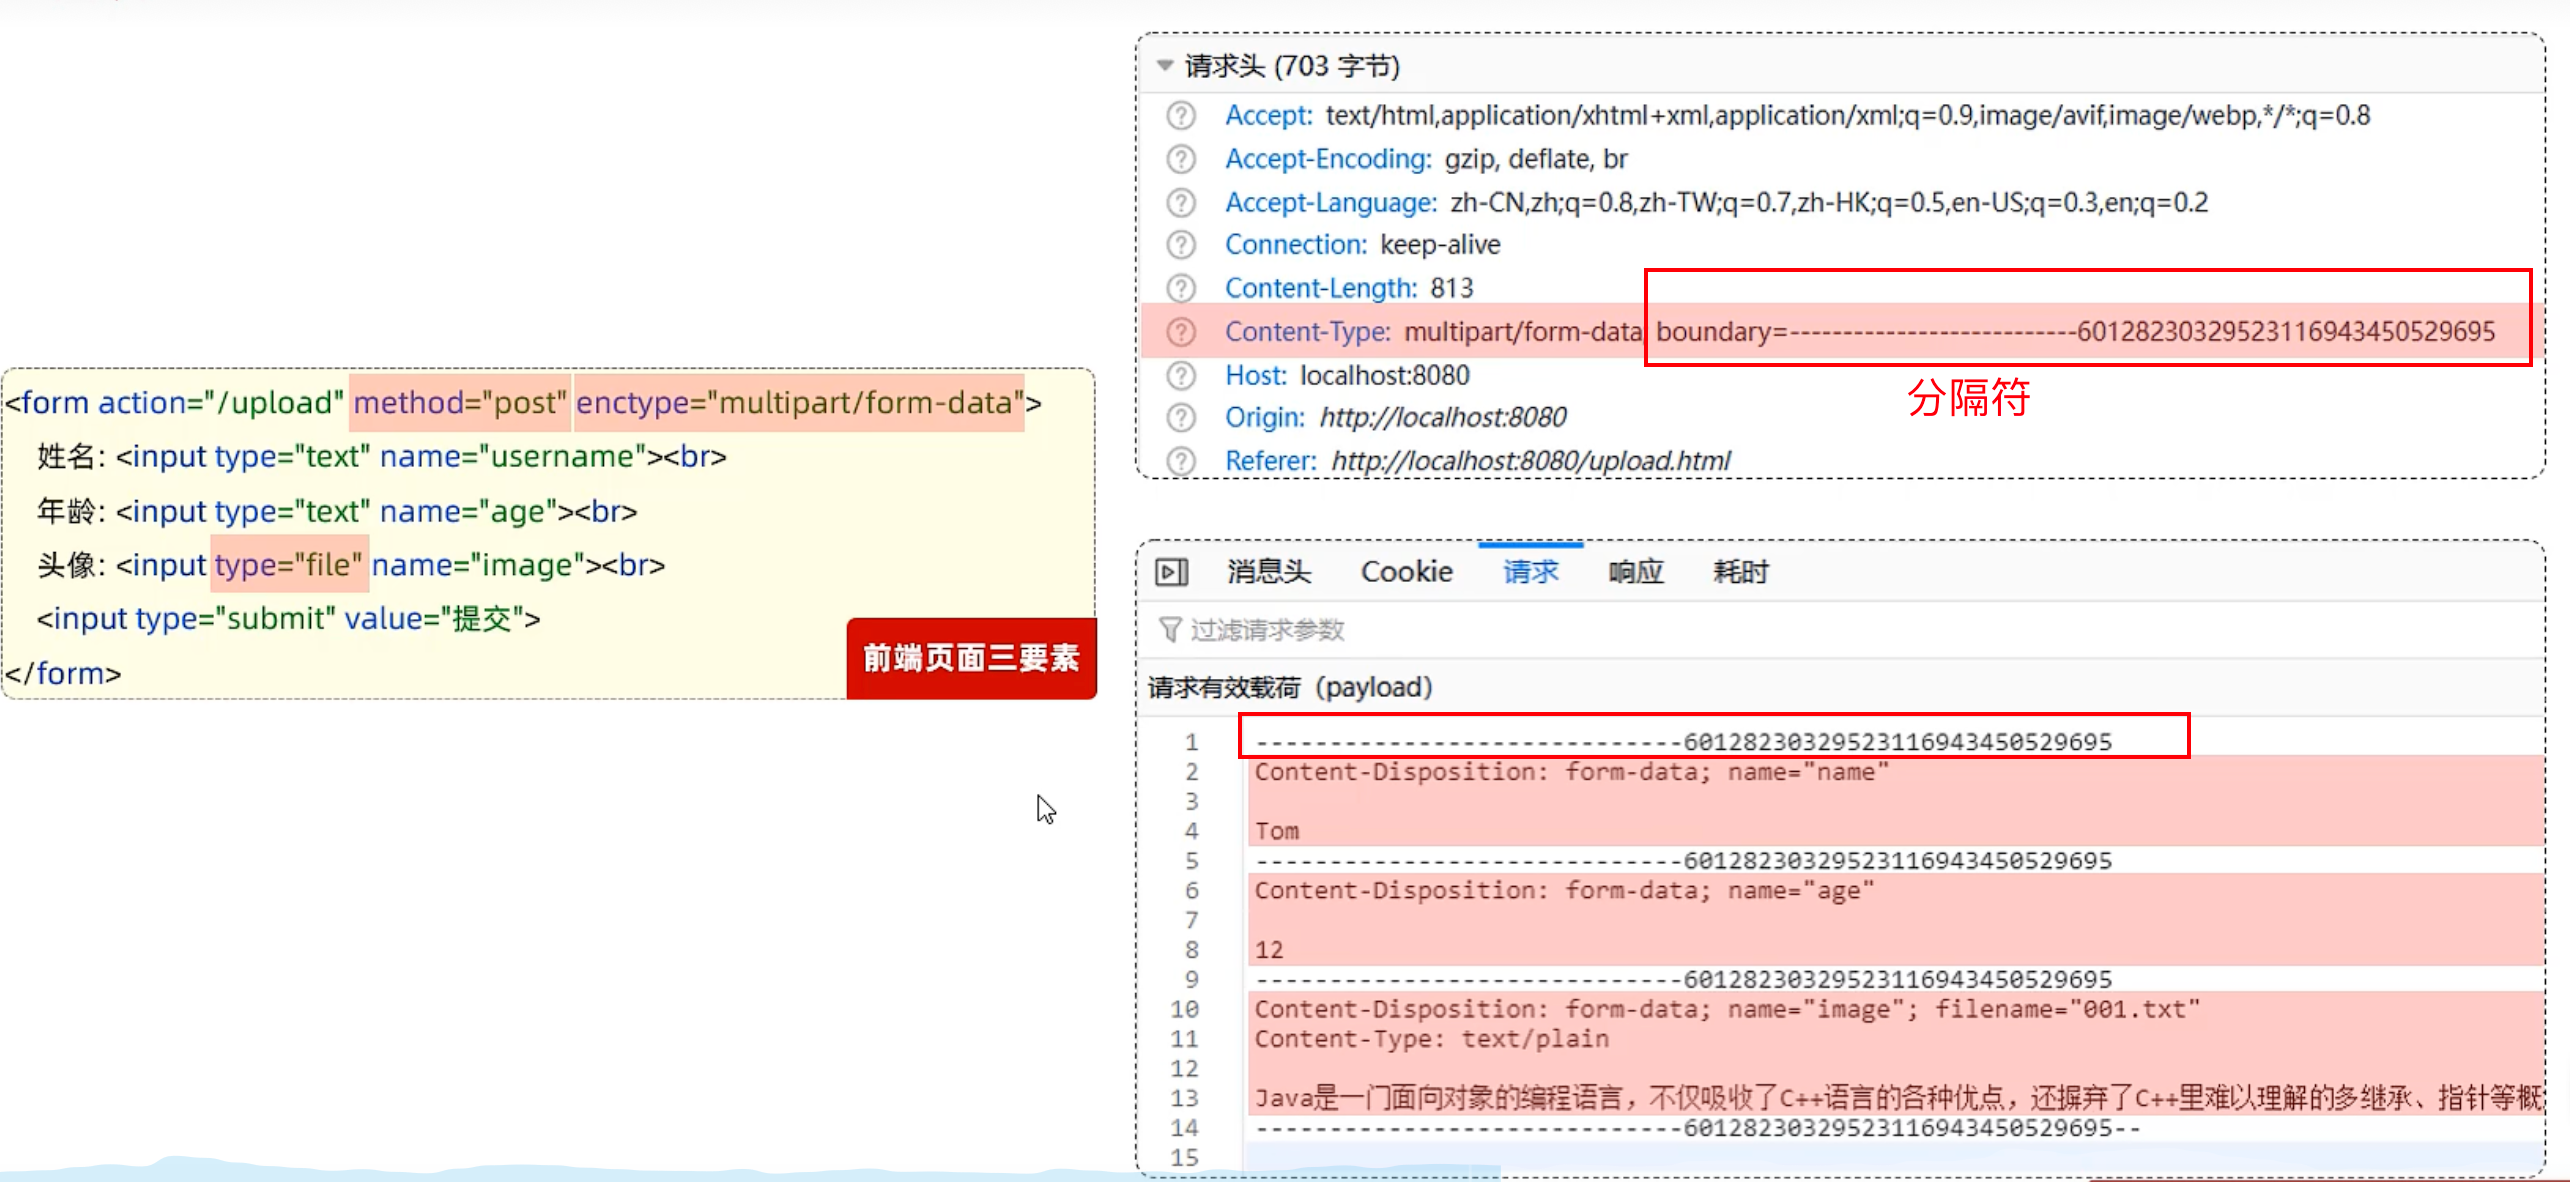
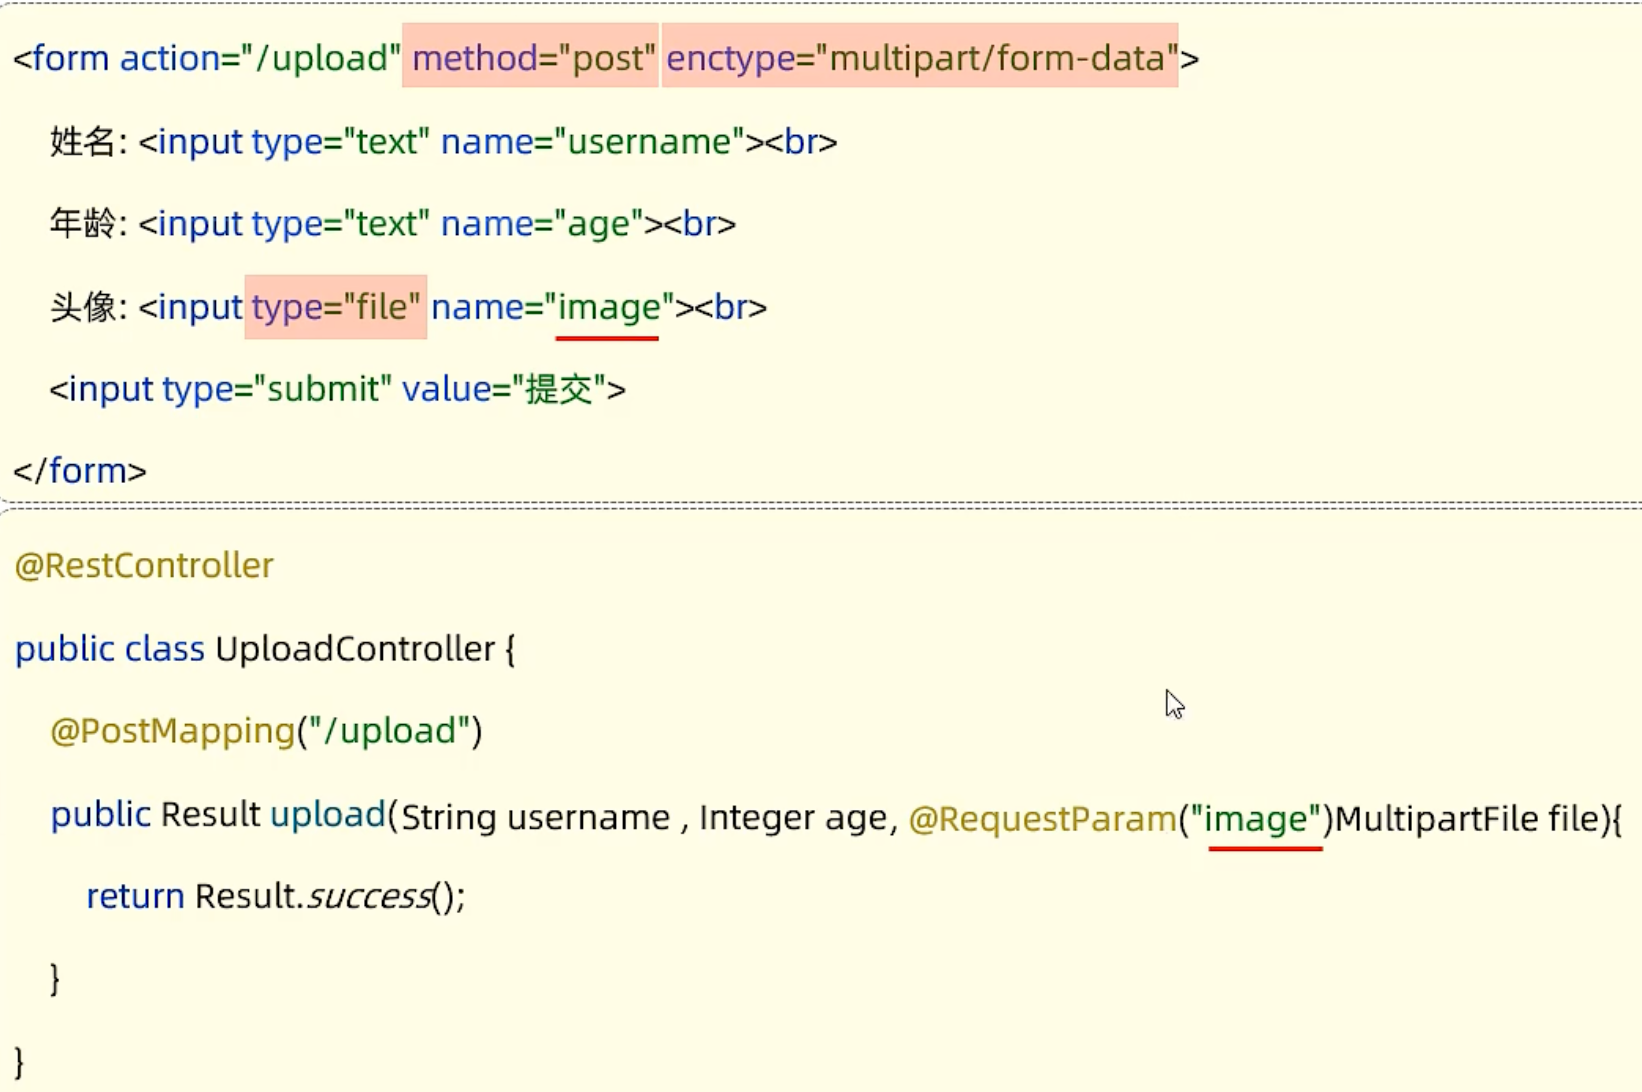
九、文件上传
1、简介


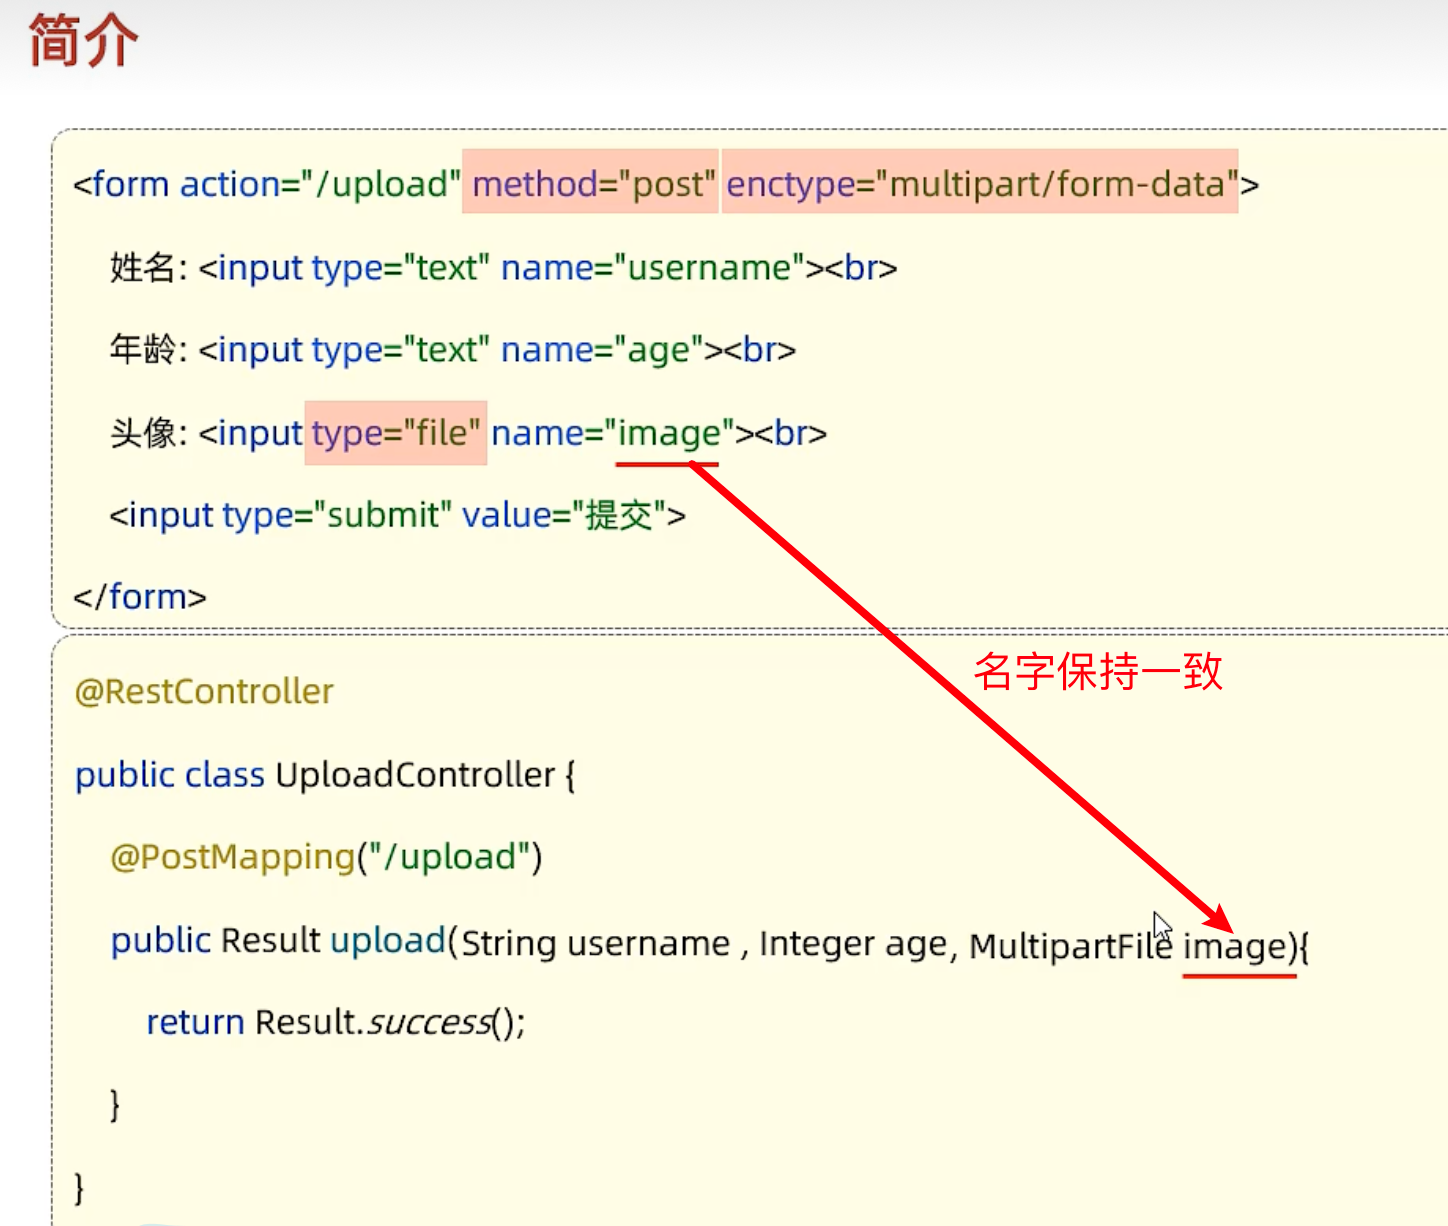
或者下面这样(一般不推荐)
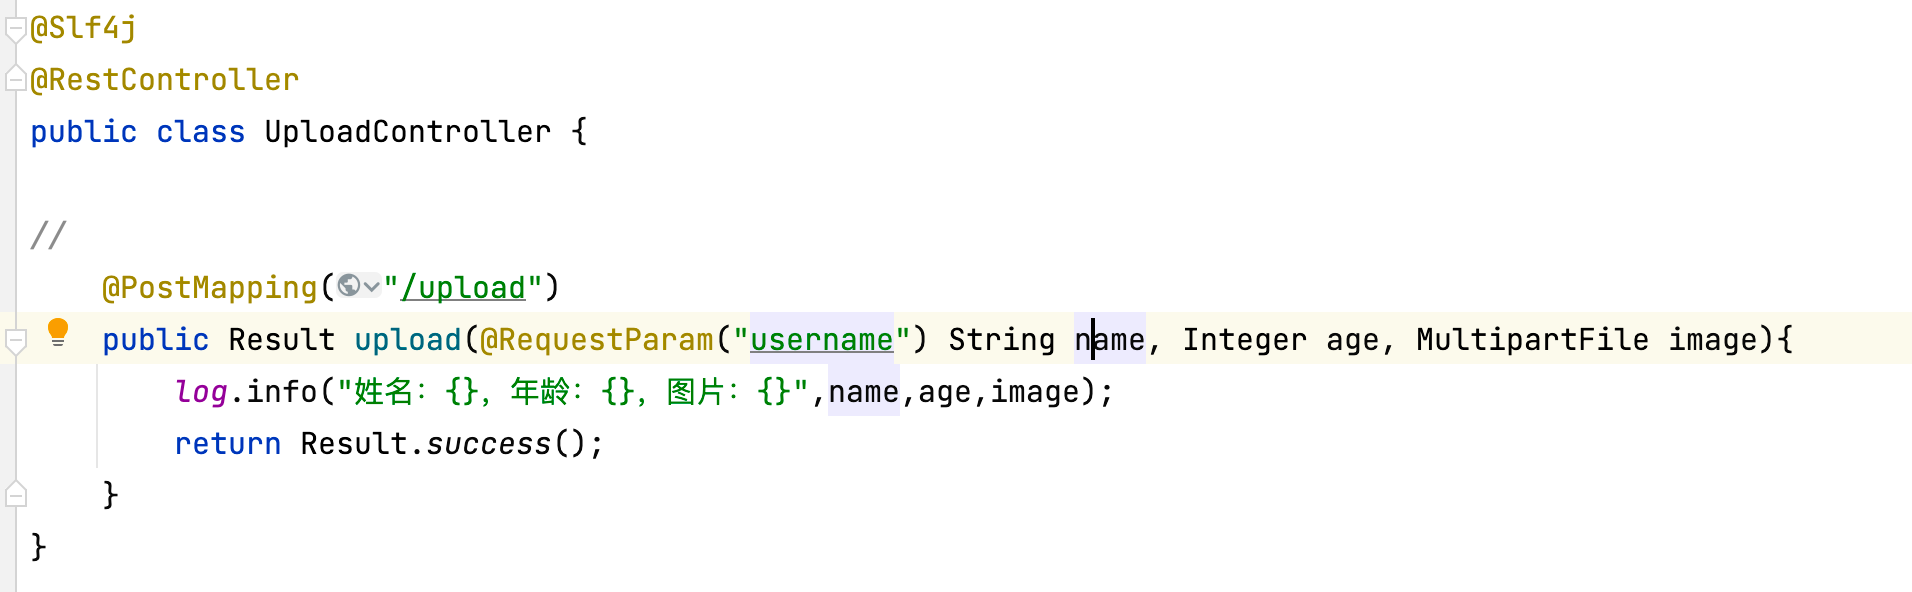
这里就是把前端的username传到name
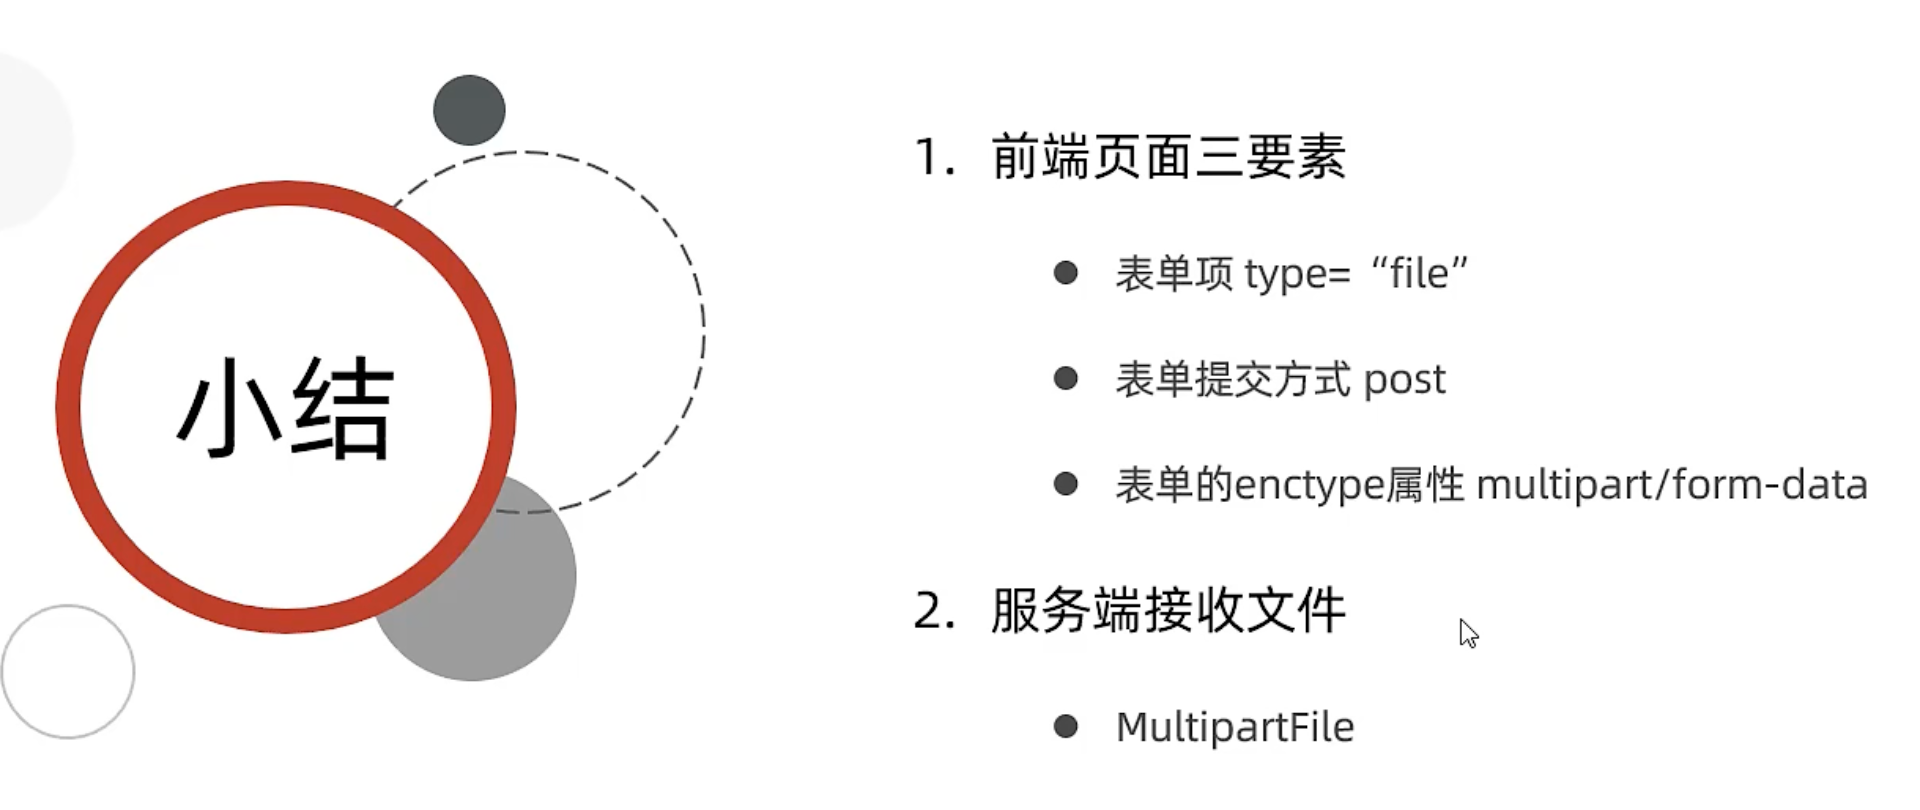
Upload.html
<!DOCTYPE html>
<html lang="en">
<head><meta charset="UTF-8"><title>上传文件</title>
</head>
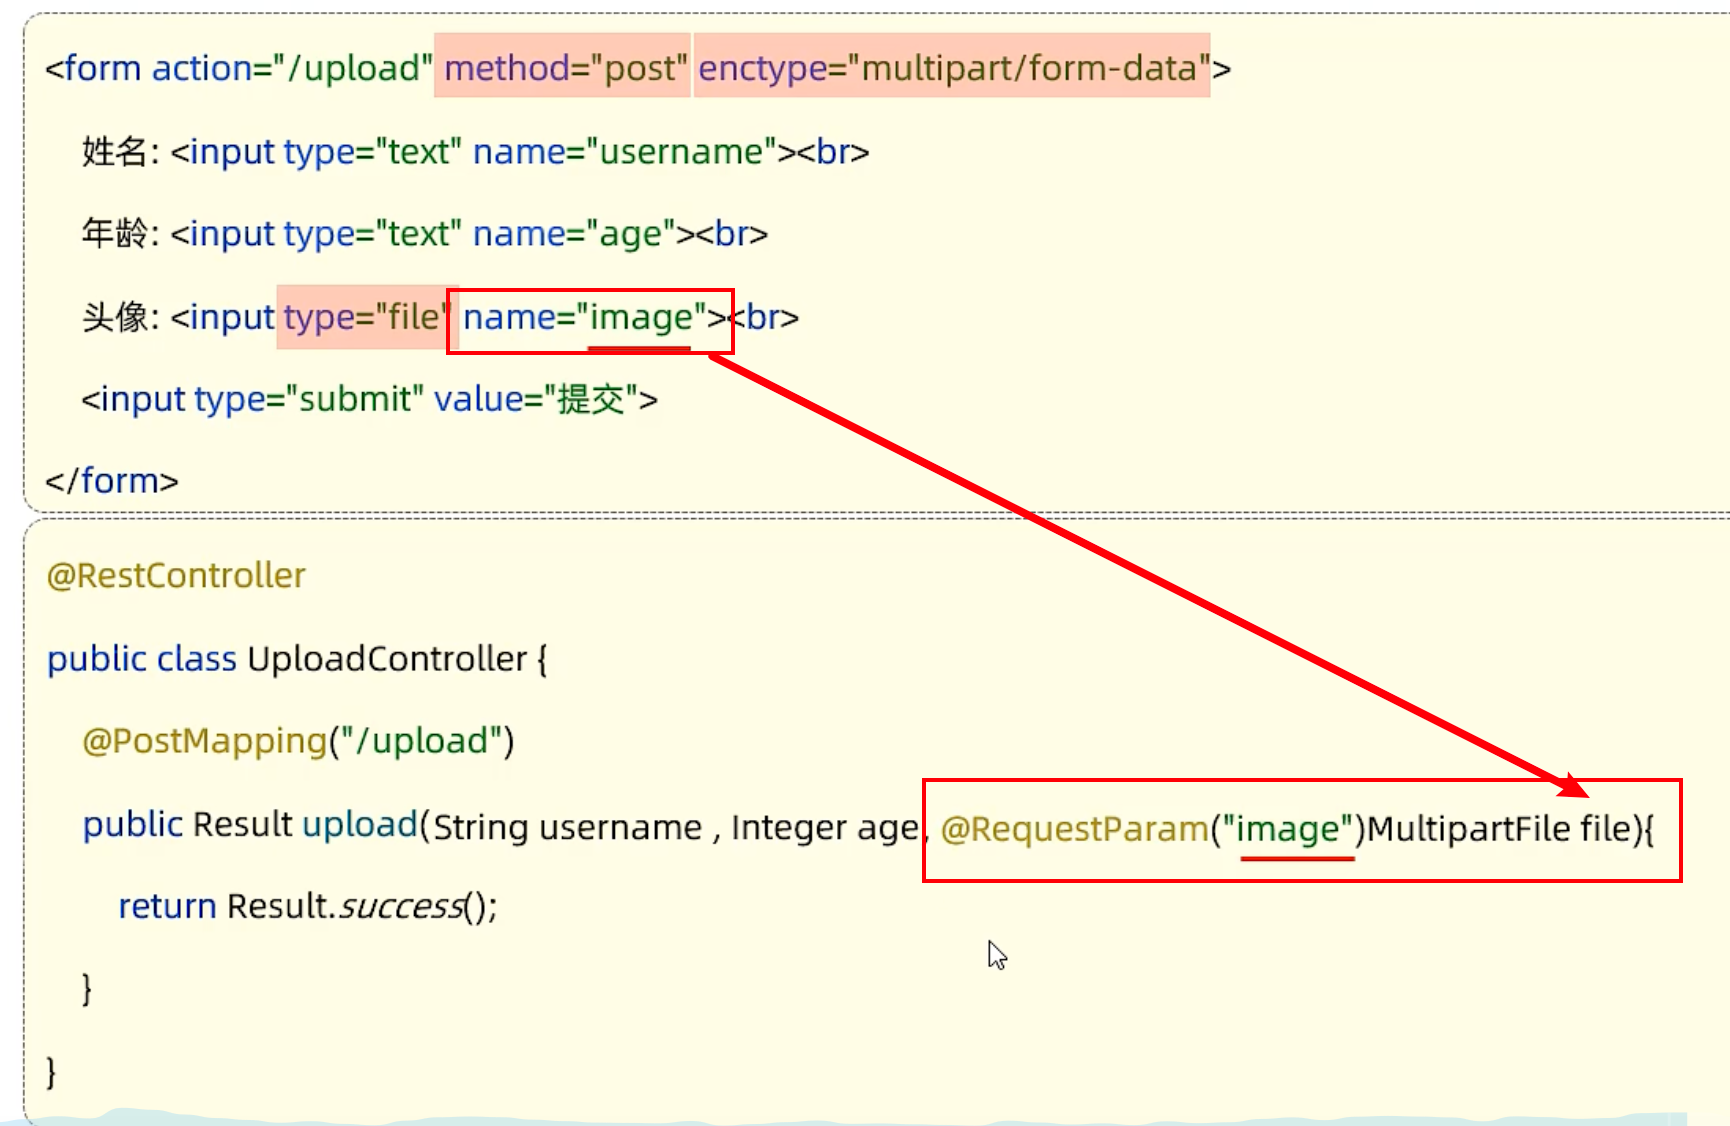
<body><form action="/upload" method="post" enctype="multipart/form-data">姓名: <input type="text" name="username"><br>年龄: <input type="text" name="age"><br>头像: <input type="file" name="image"><br><input type="submit" value="提交"></form></body>
</html>
UploadController
package com.itheima.controller;import com.itheima.pojo.Result;
import lombok.extern.slf4j.Slf4j;
import org.springframework.web.bind.annotation.PostMapping;
import org.springframework.web.bind.annotation.RequestParam;
import org.springframework.web.bind.annotation.RestController;
import org.springframework.web.multipart.MultipartFile;@Slf4j
@RestController
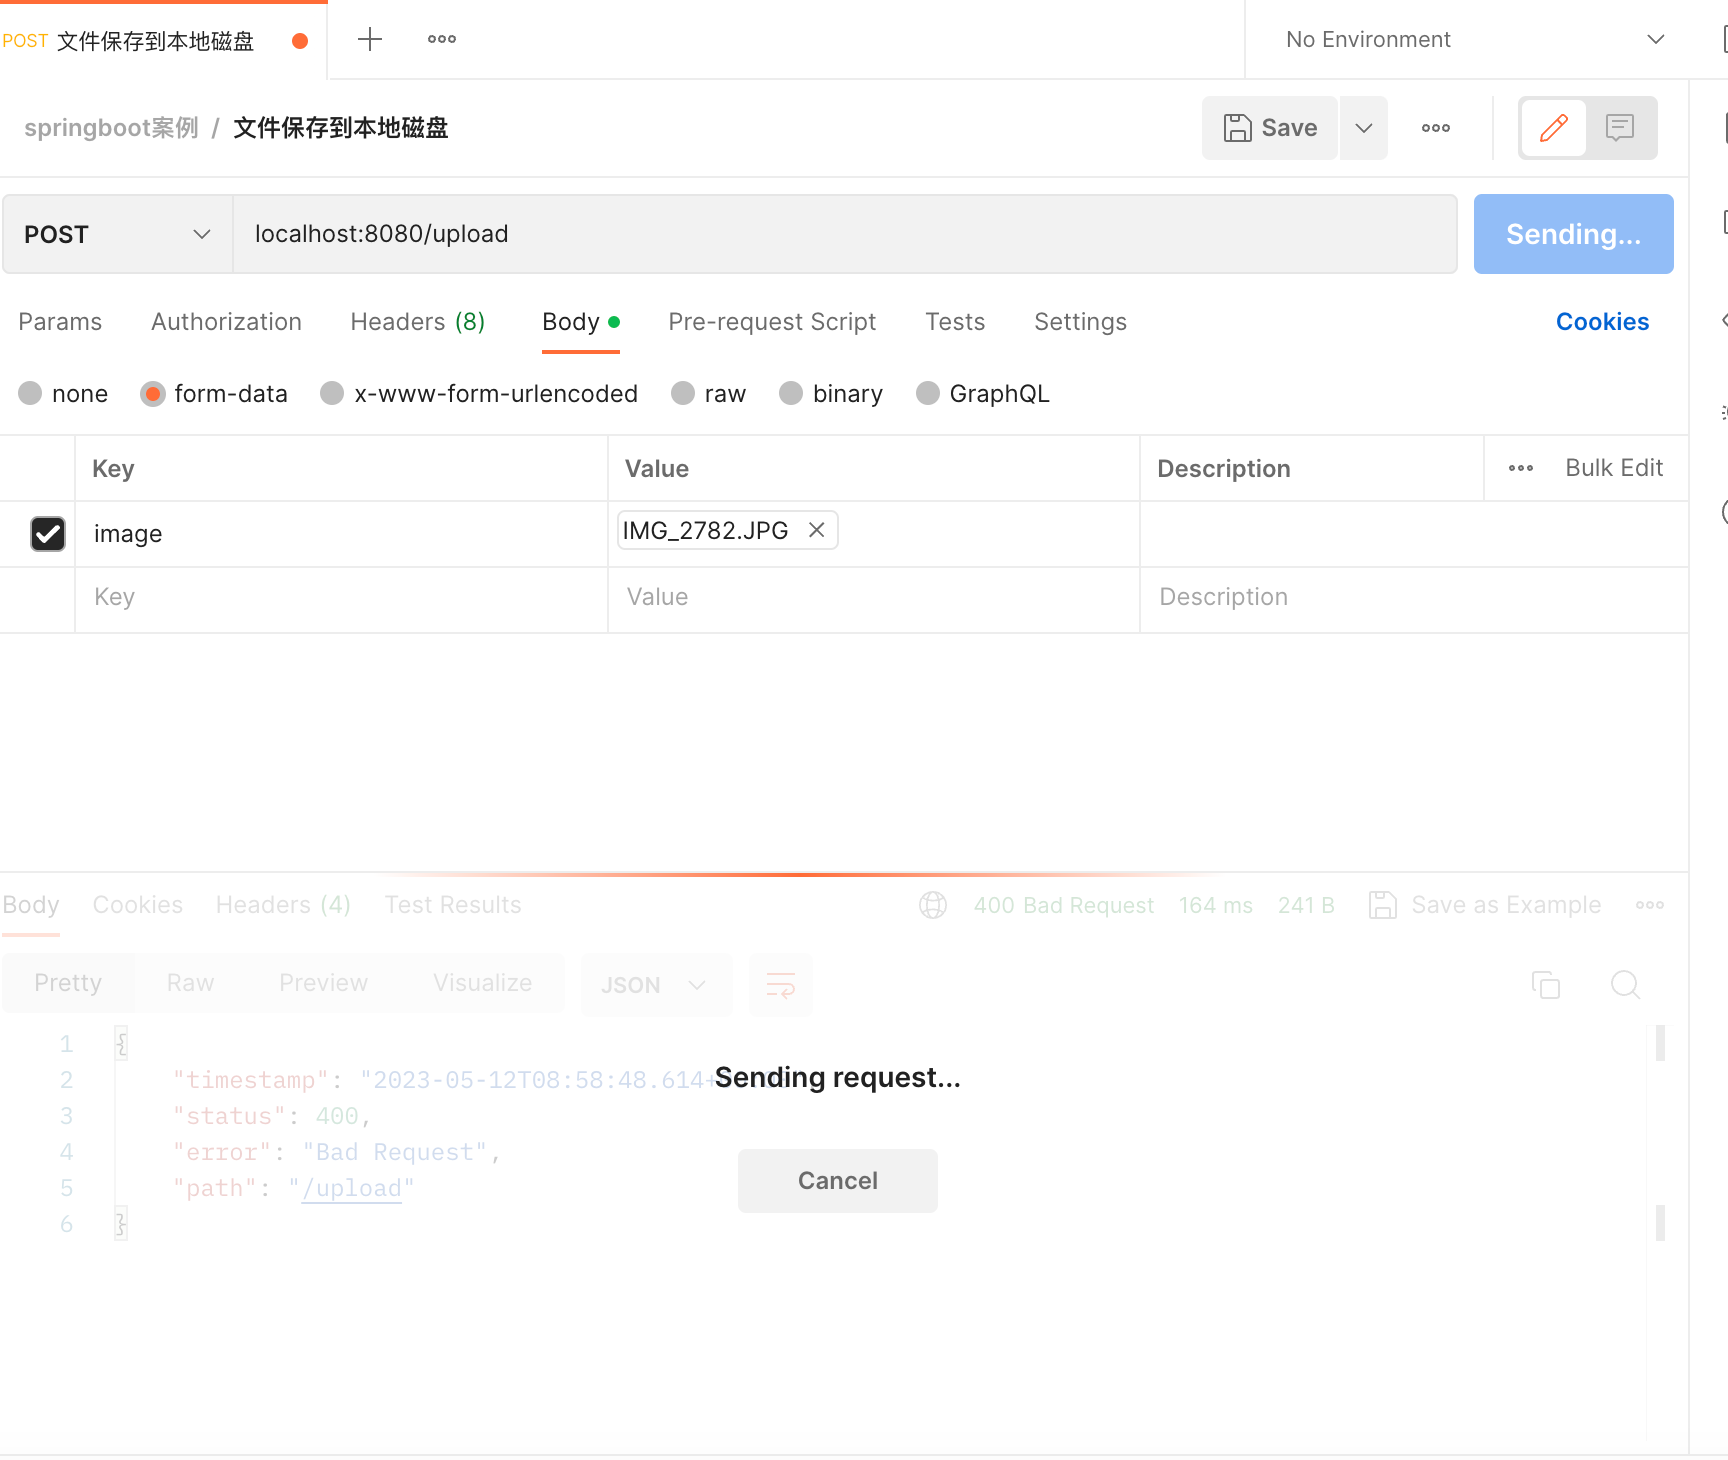
public class UploadController {//@PostMapping("/upload")public Result upload(@RequestParam("username") String name, Integer age, MultipartFile image){log.info("姓名:{},年龄:{},图片:{}",name,age,image);return Result.success();}
}
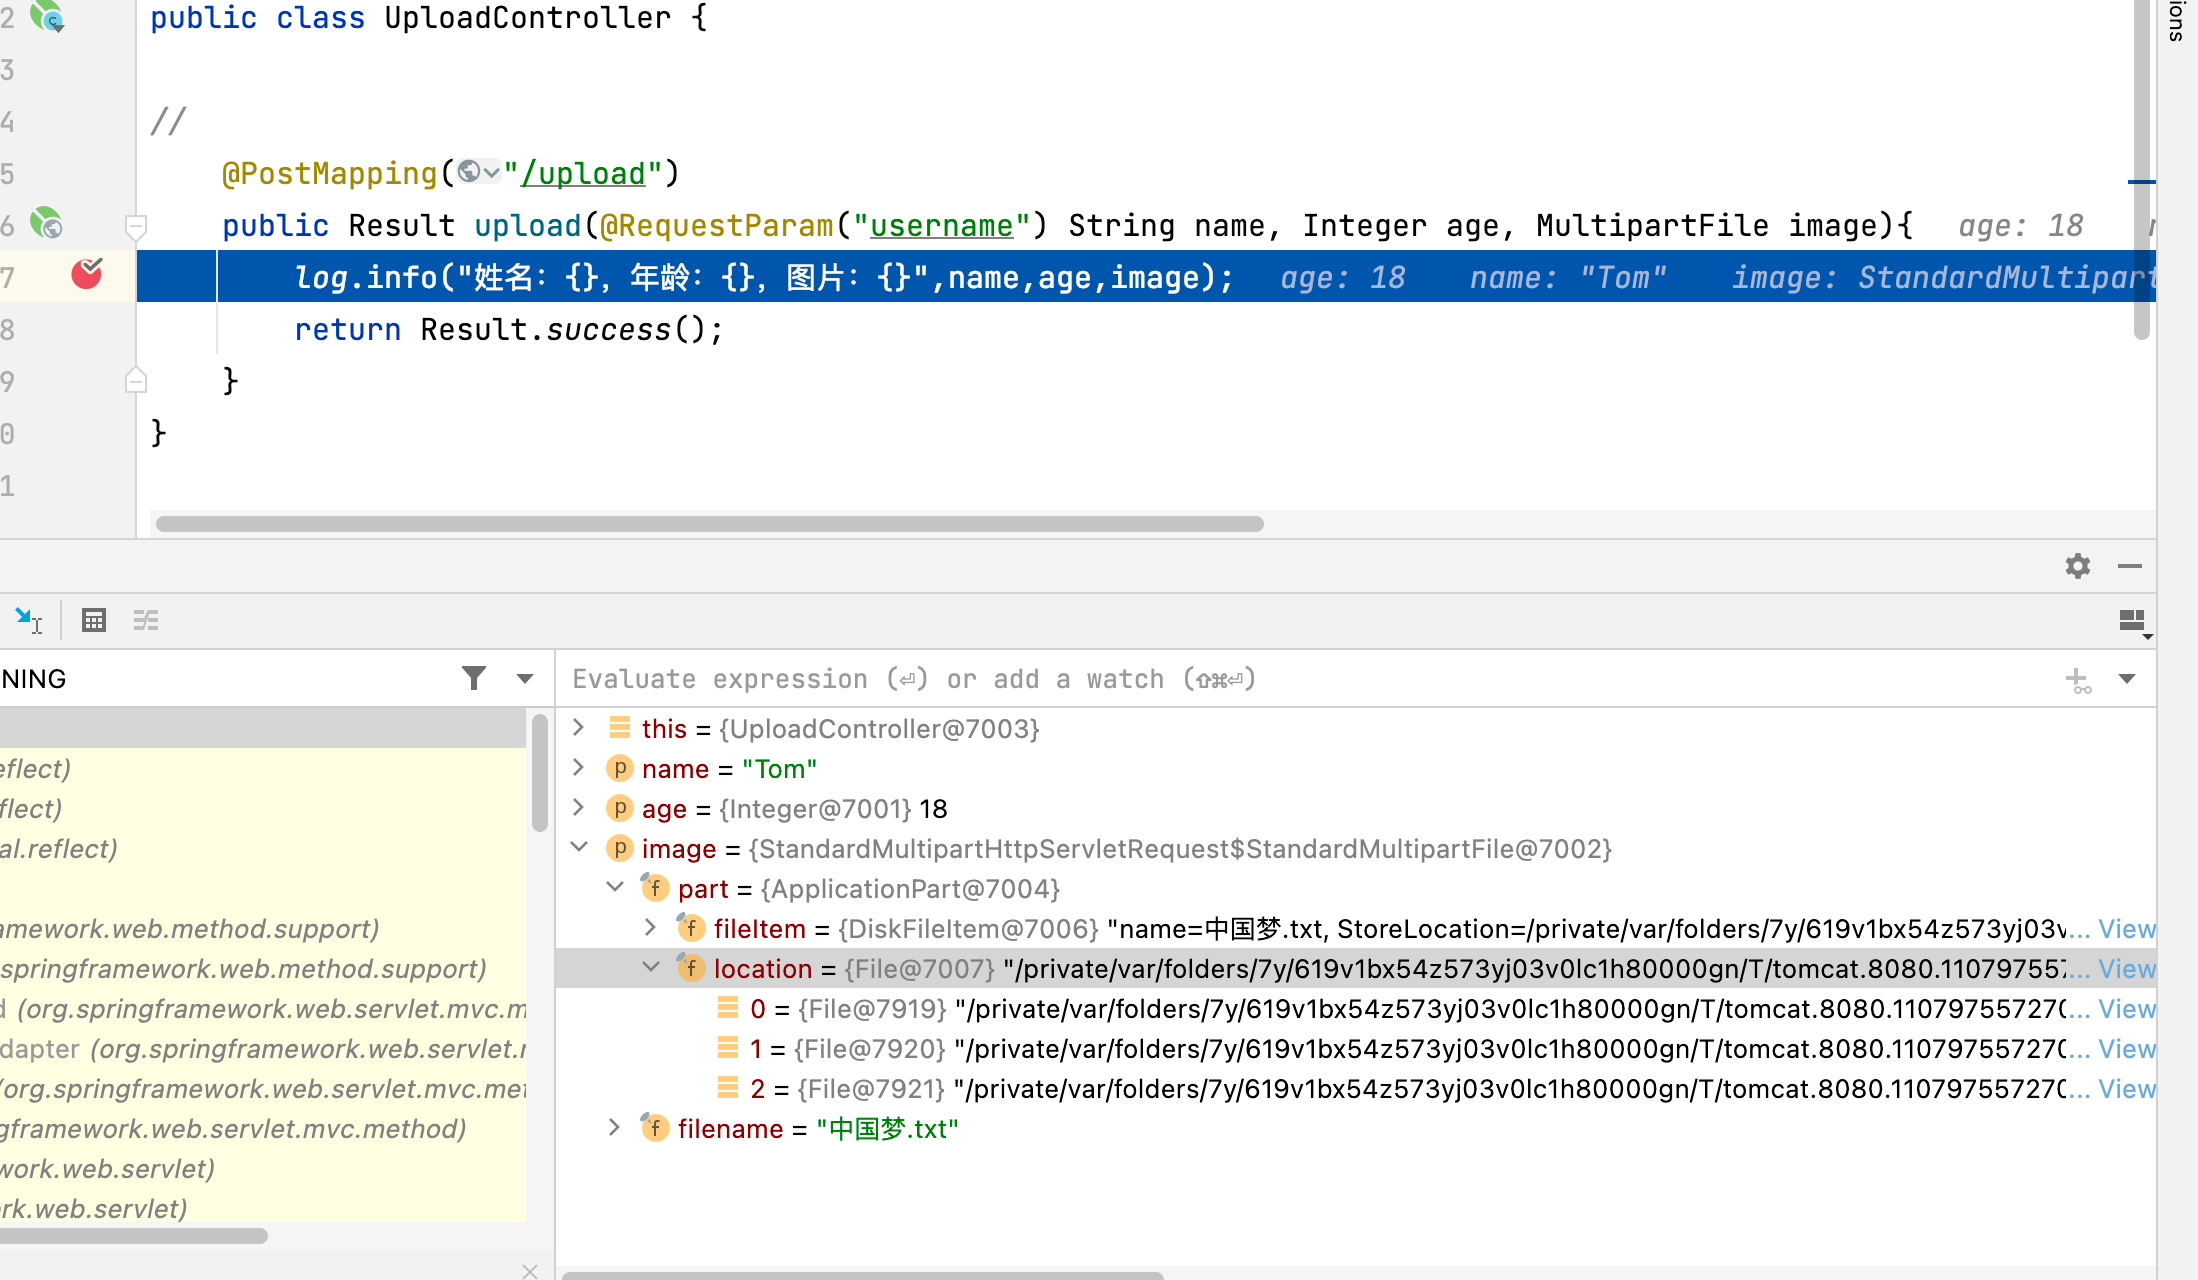
在本地接收到这个文件,是临时文件。
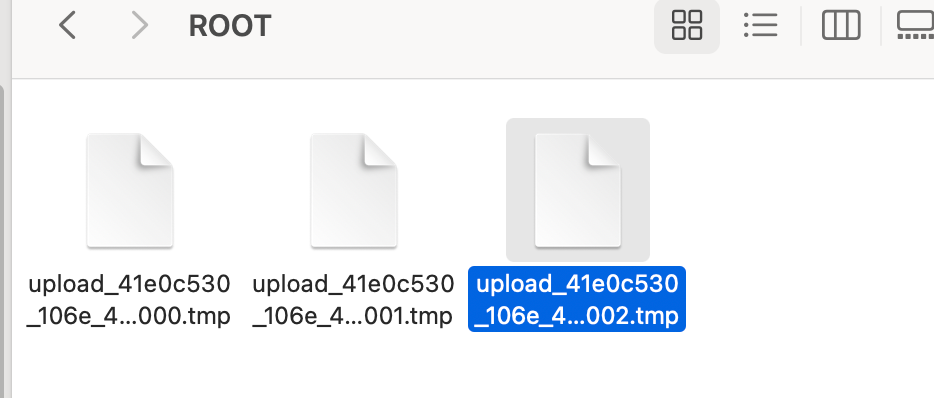
断点放行之后,临时文件被自动删除

所以,我们还需要保存文件
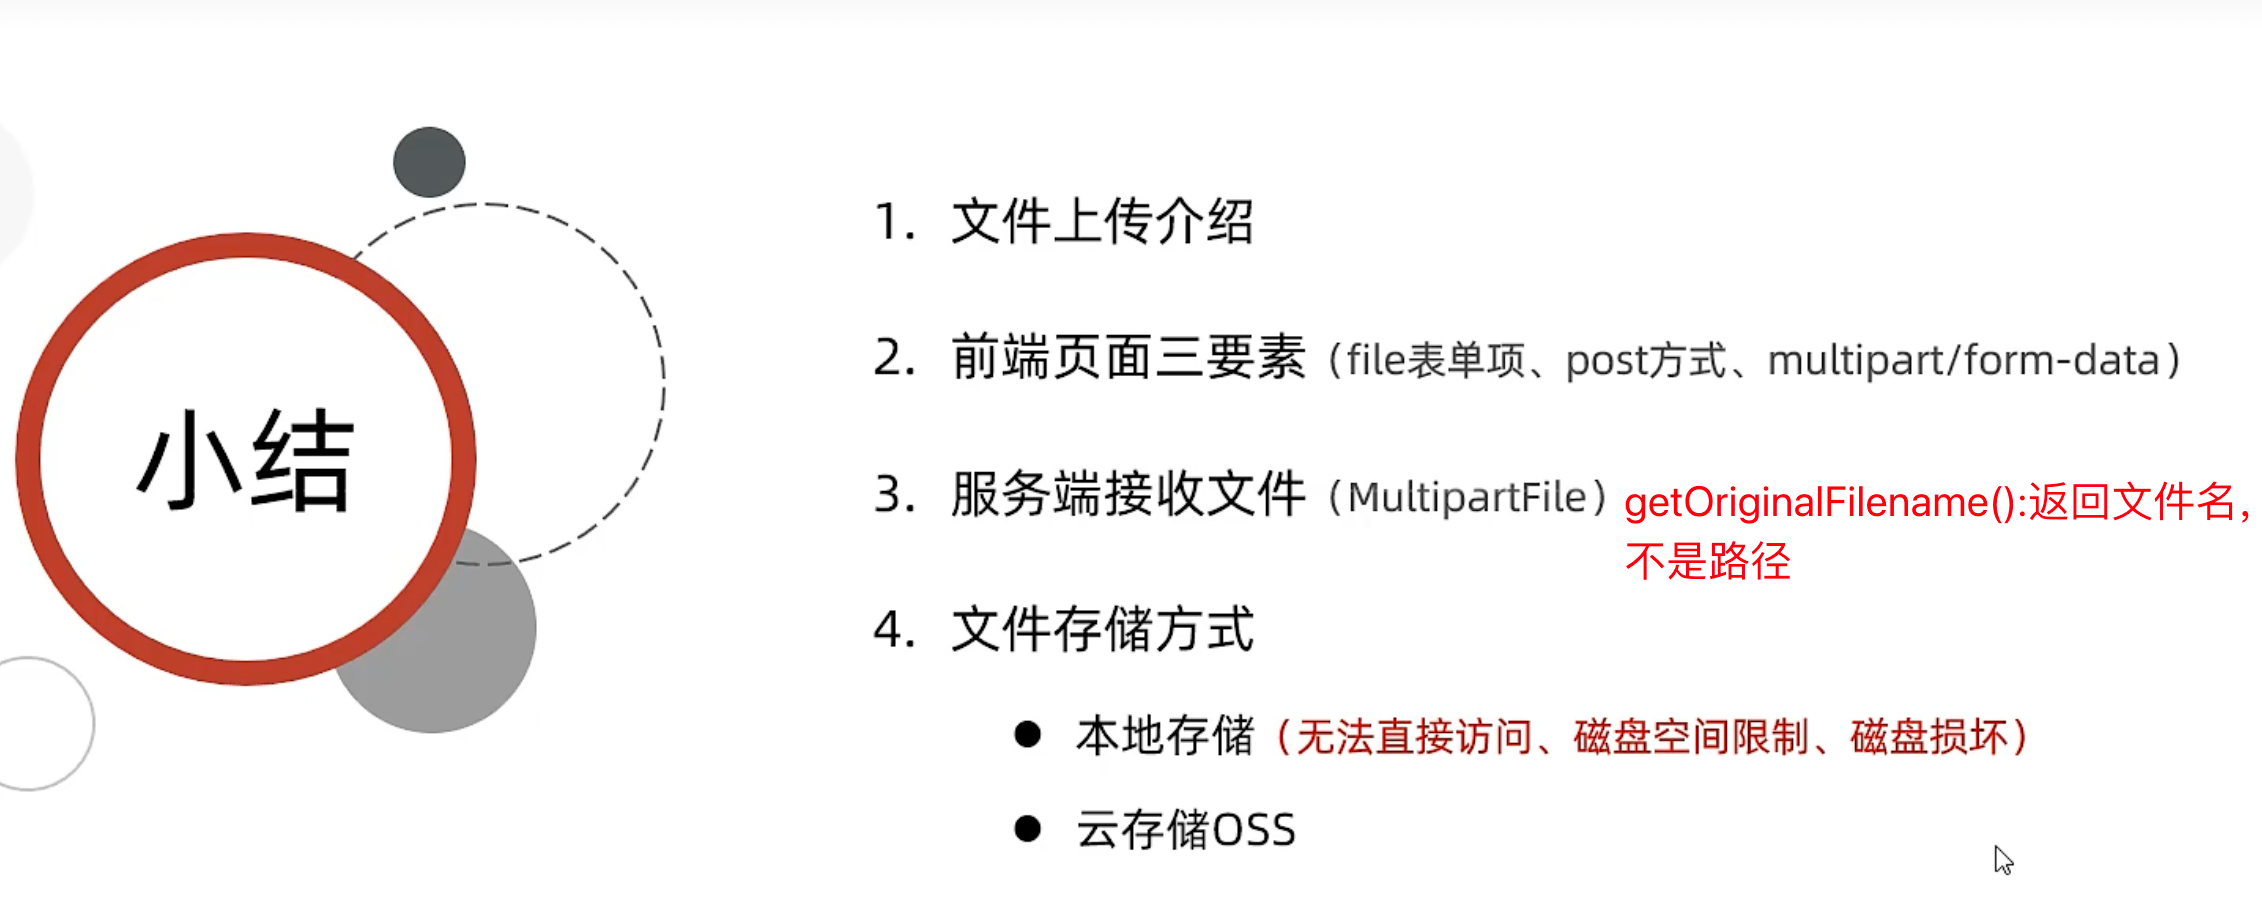
小结
2、本地存储
package com.itheima.controller;import com.itheima.pojo.Result;
import lombok.extern.slf4j.Slf4j;
import org.springframework.web.bind.annotation.PostMapping;
import org.springframework.web.bind.annotation.RequestParam;
import org.springframework.web.bind.annotation.RestController;
import org.springframework.web.multipart.MultipartFile;import java.io.File;
import java.io.IOException;@Slf4j
@RestController
public class UploadController {//@PostMapping("/upload")public Result upload(String username, Integer age, MultipartFile image) throws IOException {log.info("姓名:{},年龄:{},图片:{}", username, age, image);
// 将上传文件保存/Users/haoran/Desktop/Java web/image
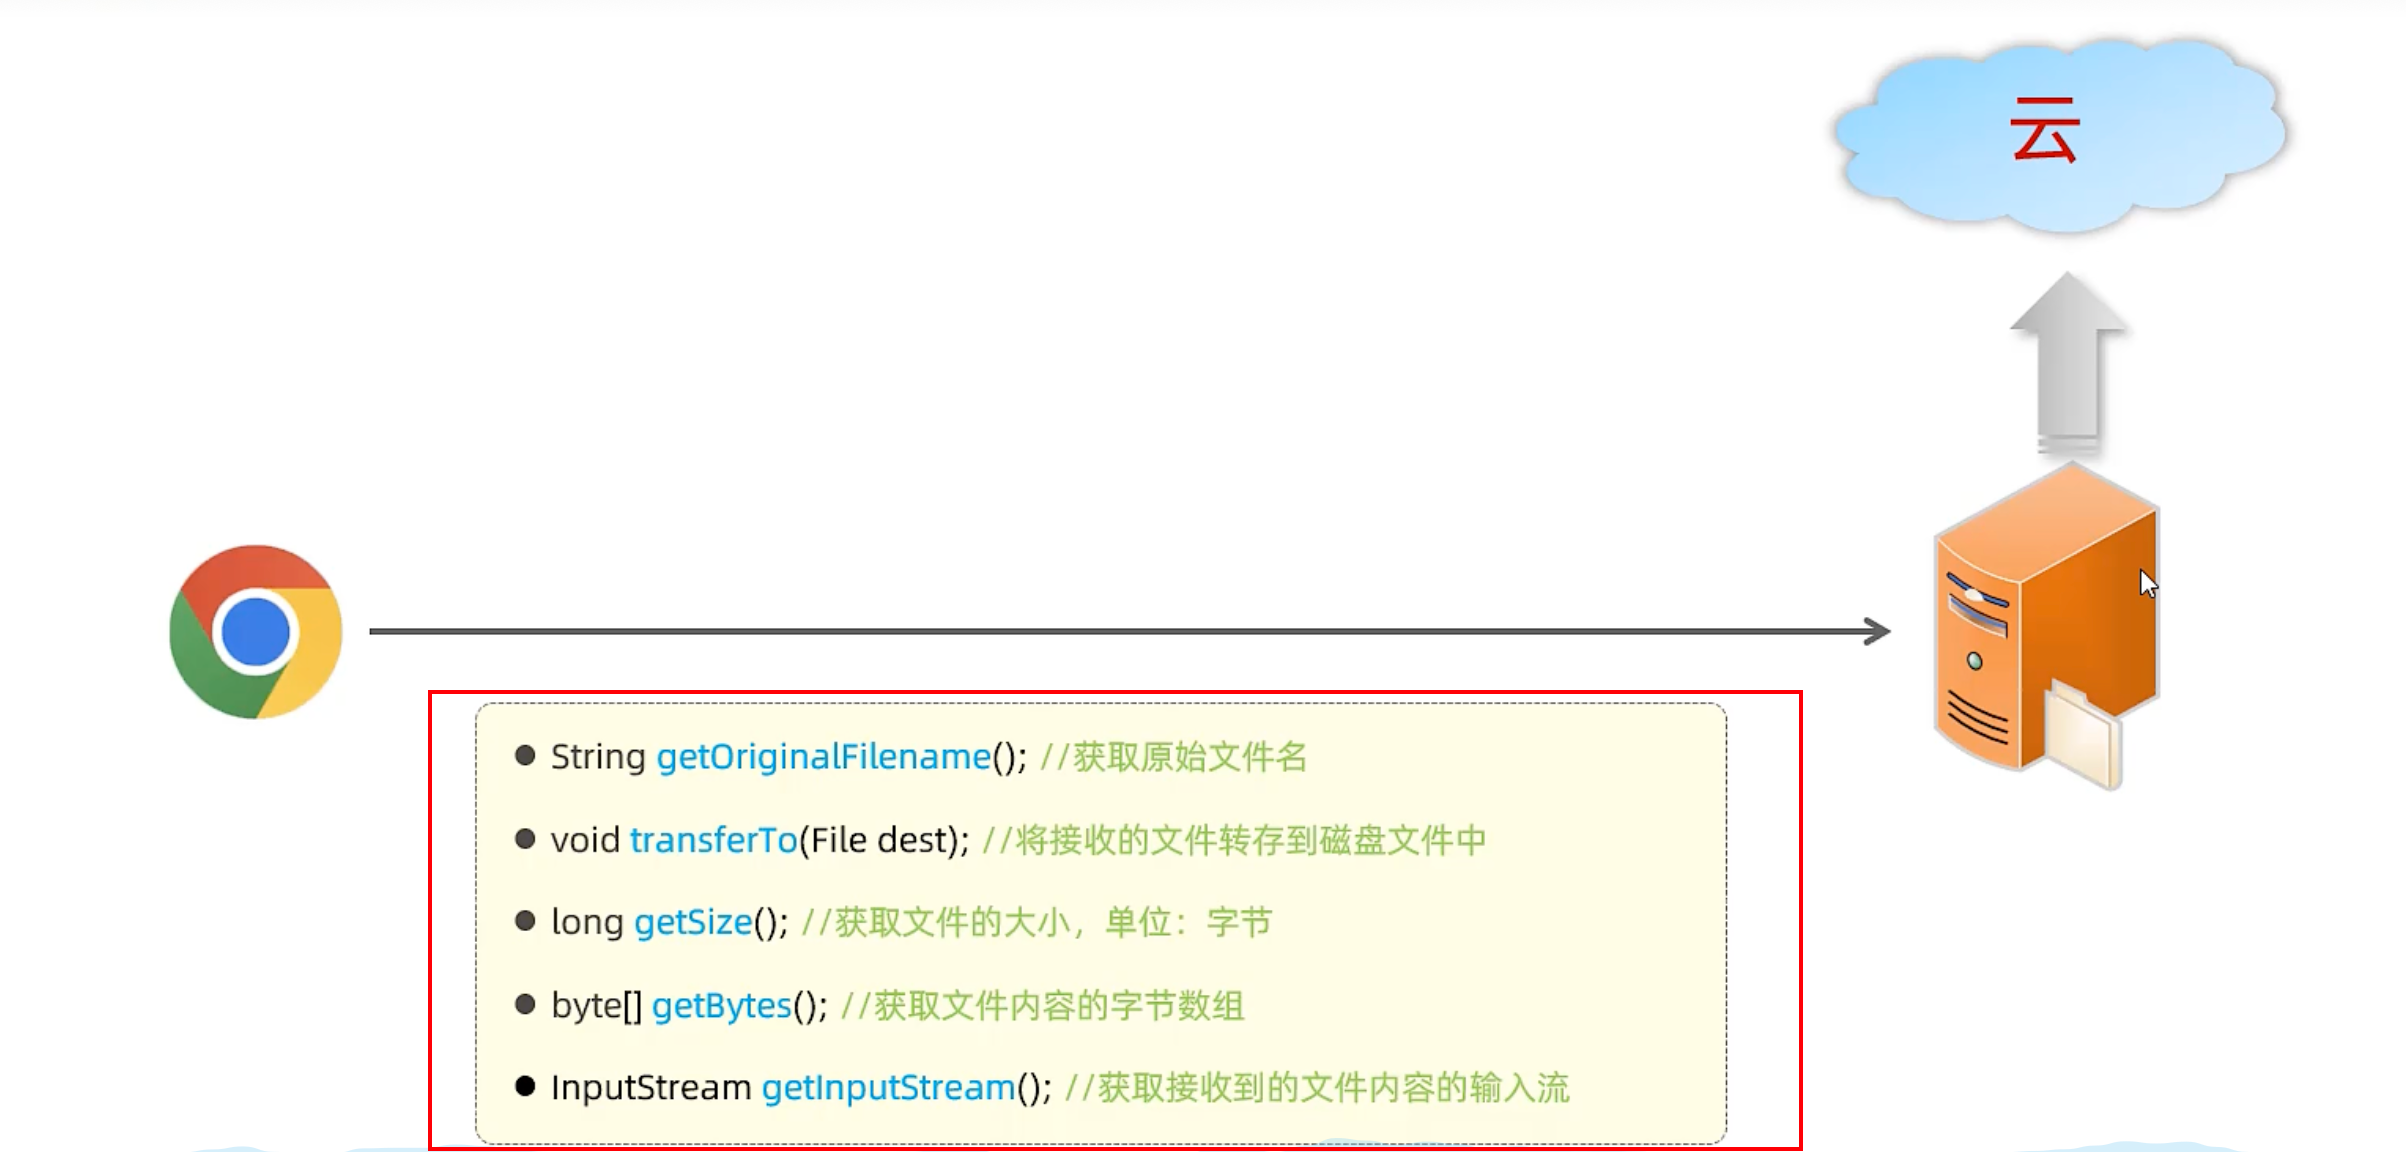
// 获取原始文件名String originalFilename = image.getOriginalFilename();image.transferTo(new File("/Users/haoran/Desktop/Java web/image/" +originalFilename));return Result.success();}
}
@RequestParam案例
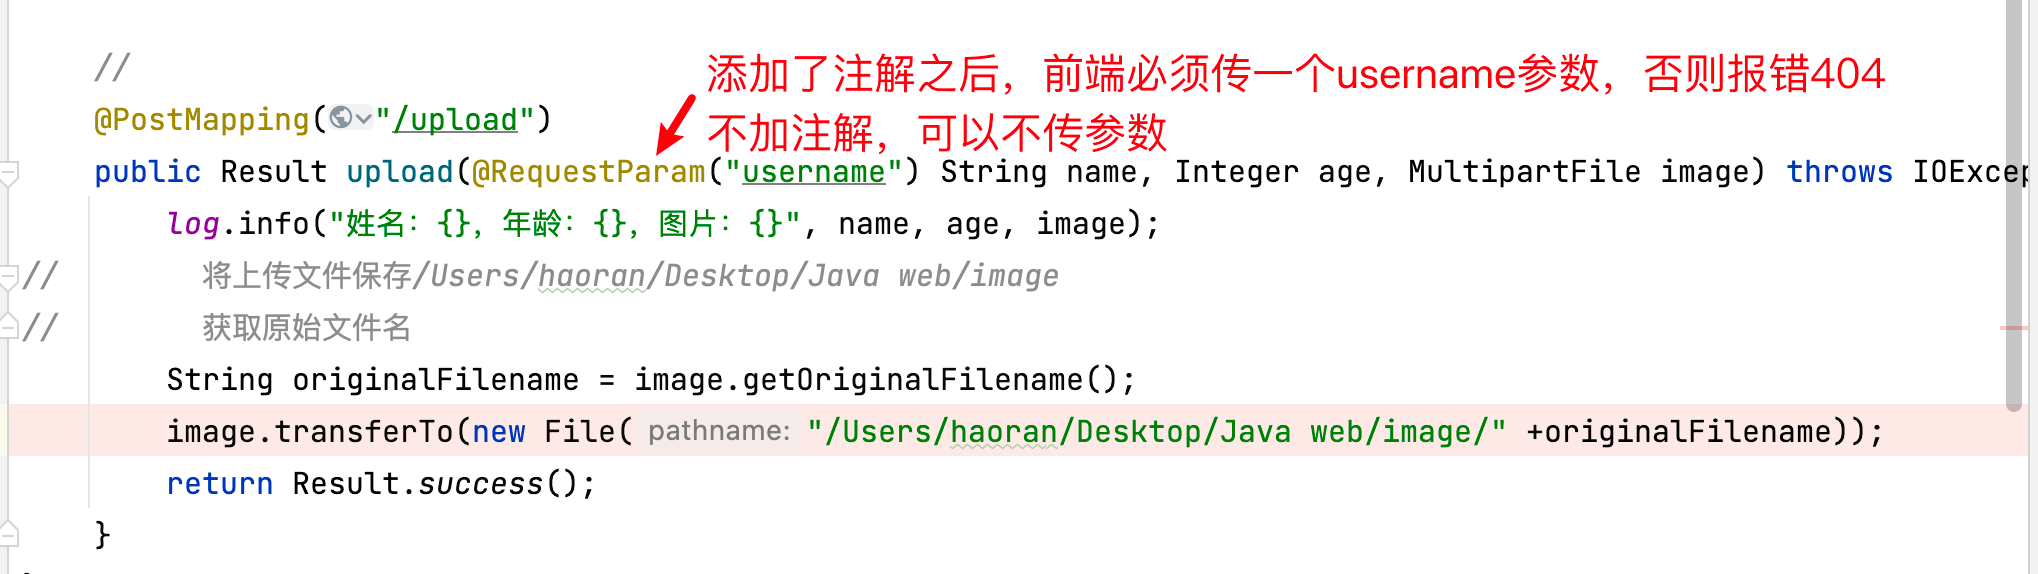
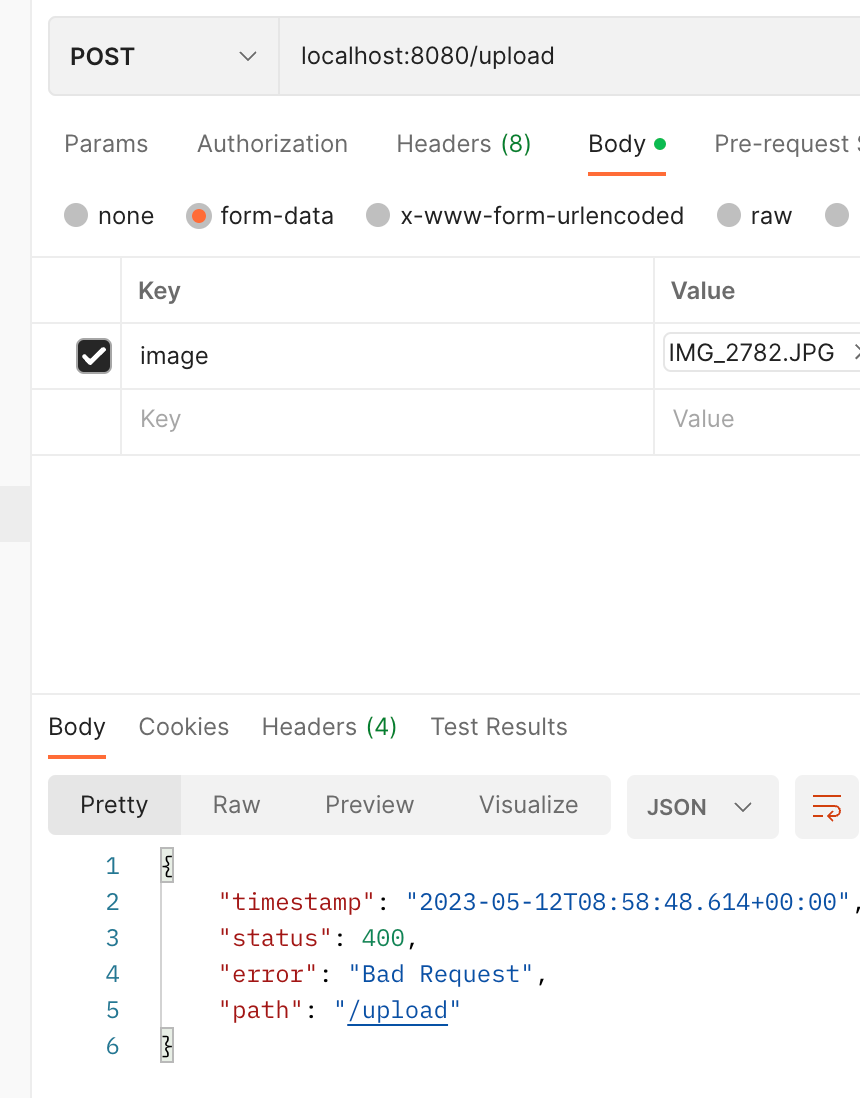
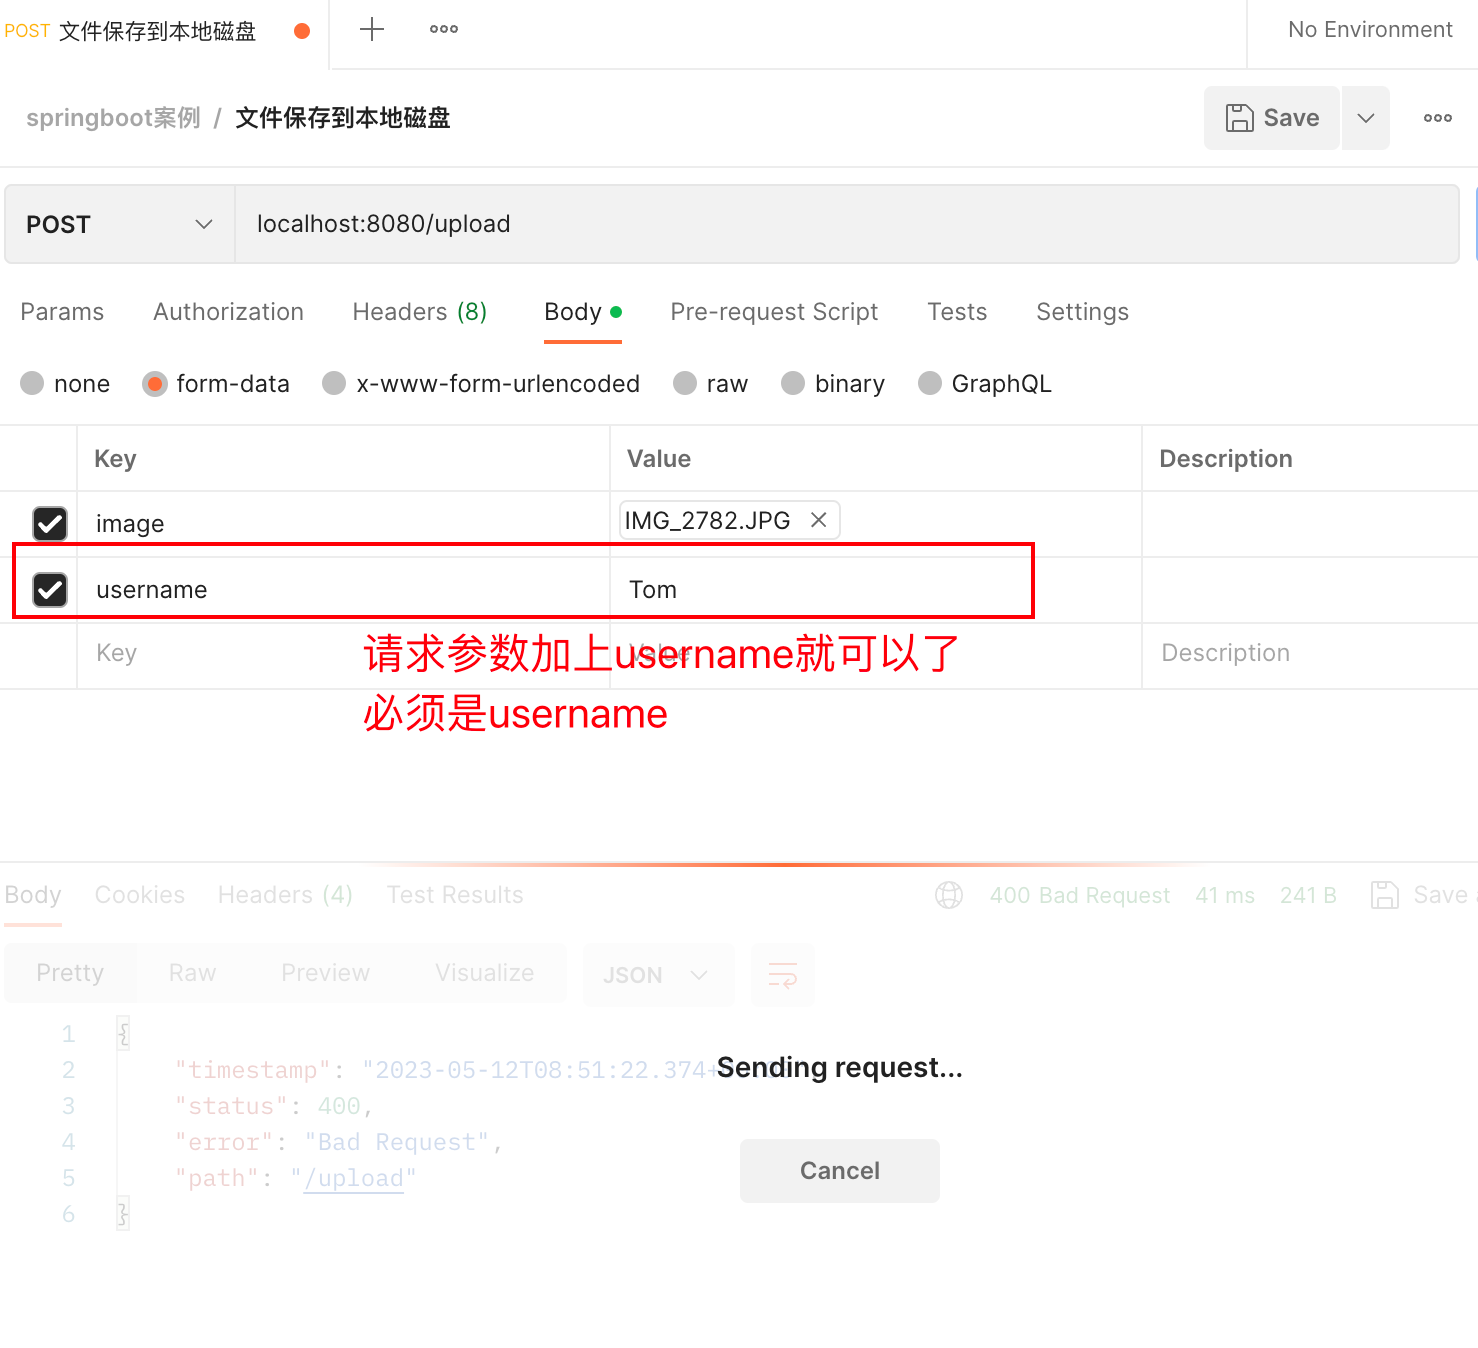
不加@RequestParam

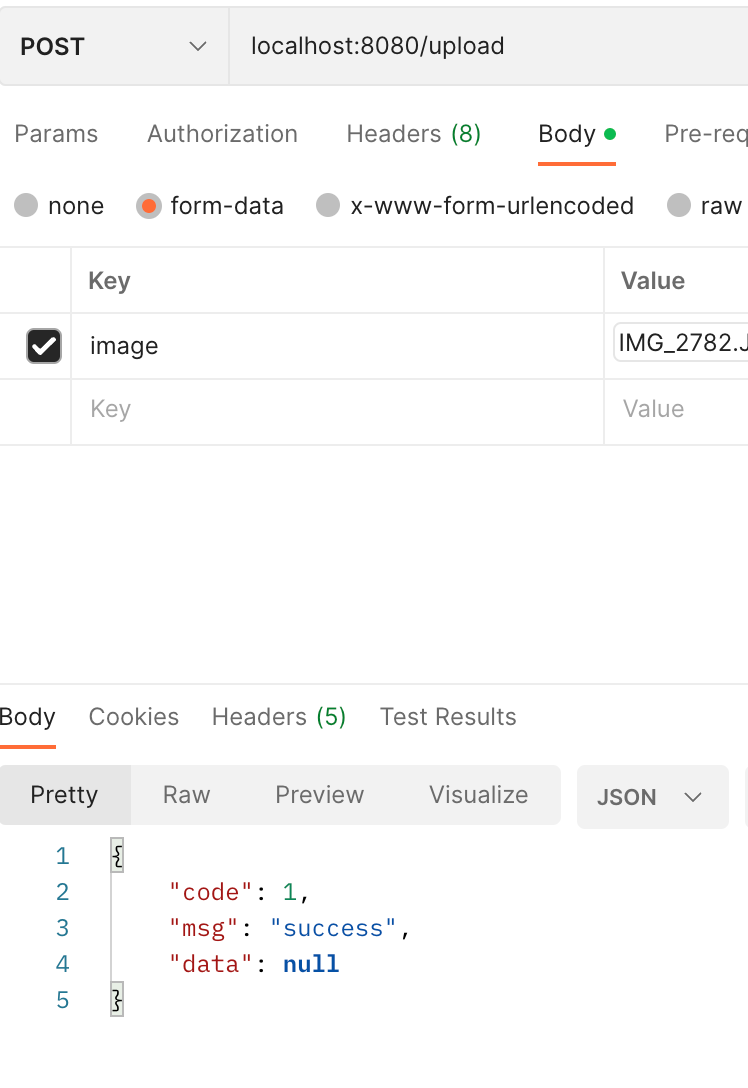
保存成功
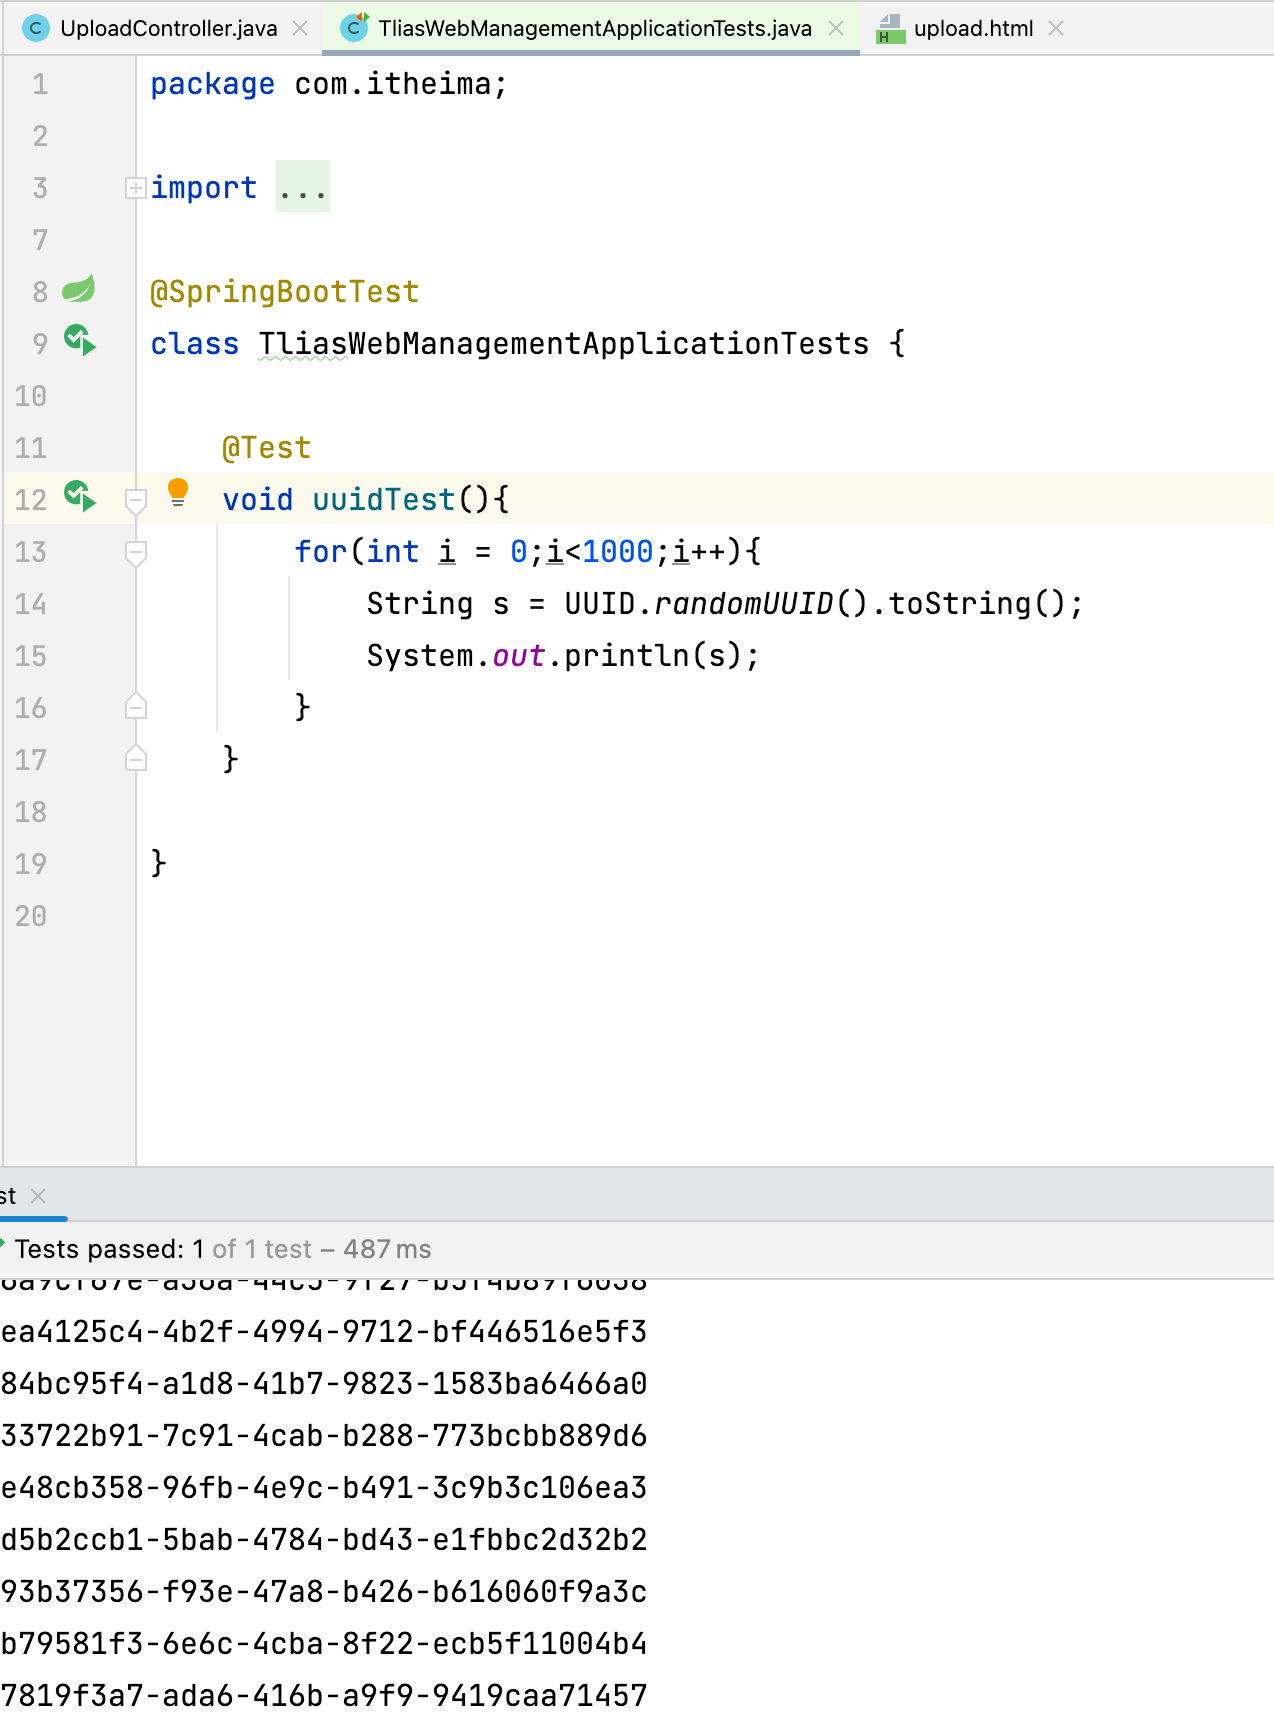
文件名唯一(uuid)
    //文件上传@PostMapping("/upload")public Result upload(String username, Integer age, MultipartFile image) throws IOException {log.info("姓名:{},年龄:{},图片:{}", username, age, image);
//        将上传文件保存/Users/haoran/Desktop/Java web/image
//        获取原始文件名String originalFilename = image.getOriginalFilename();//        构造唯一的文件名(不能重复)-uuid:通用唯一识别码,时间戳也不能保证int index = originalFilename.lastIndexOf('.');String extname = originalFilename.substring(index);
//        uuid,拼接新的文件名String uuid = UUID.randomUUID().toString();String newFileName = uuid+extname;log.info("新的文件名:{}",newFileName);//        保存文件到本地磁盘image.transferTo(new File("/Users/haoran/Desktop/Java web/image/" +newFileName));return Result.success();}
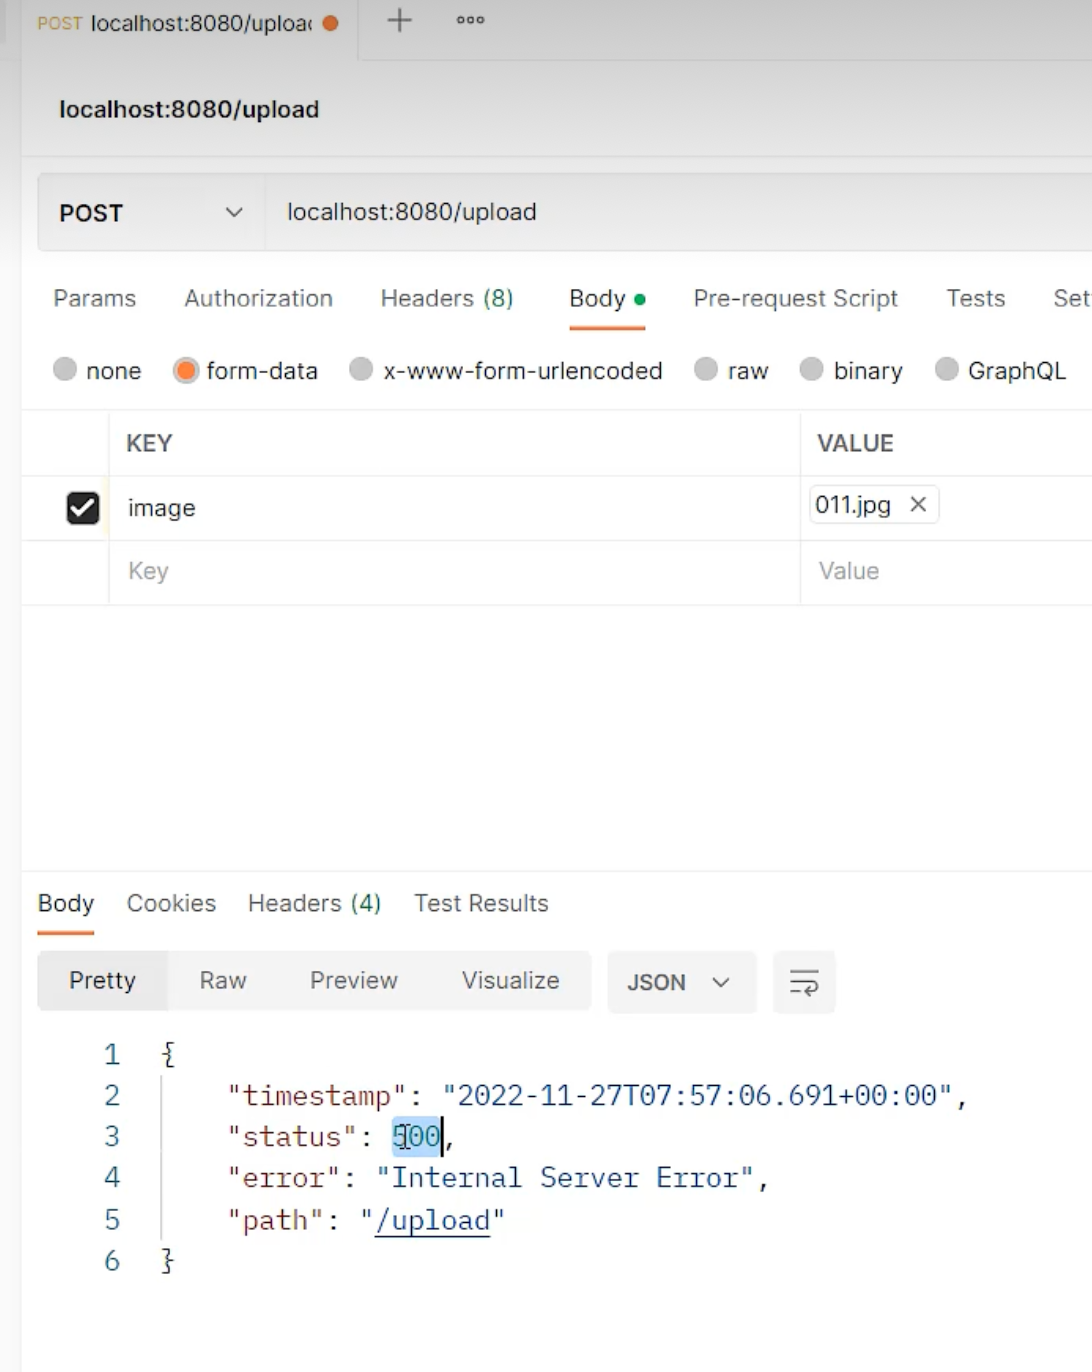
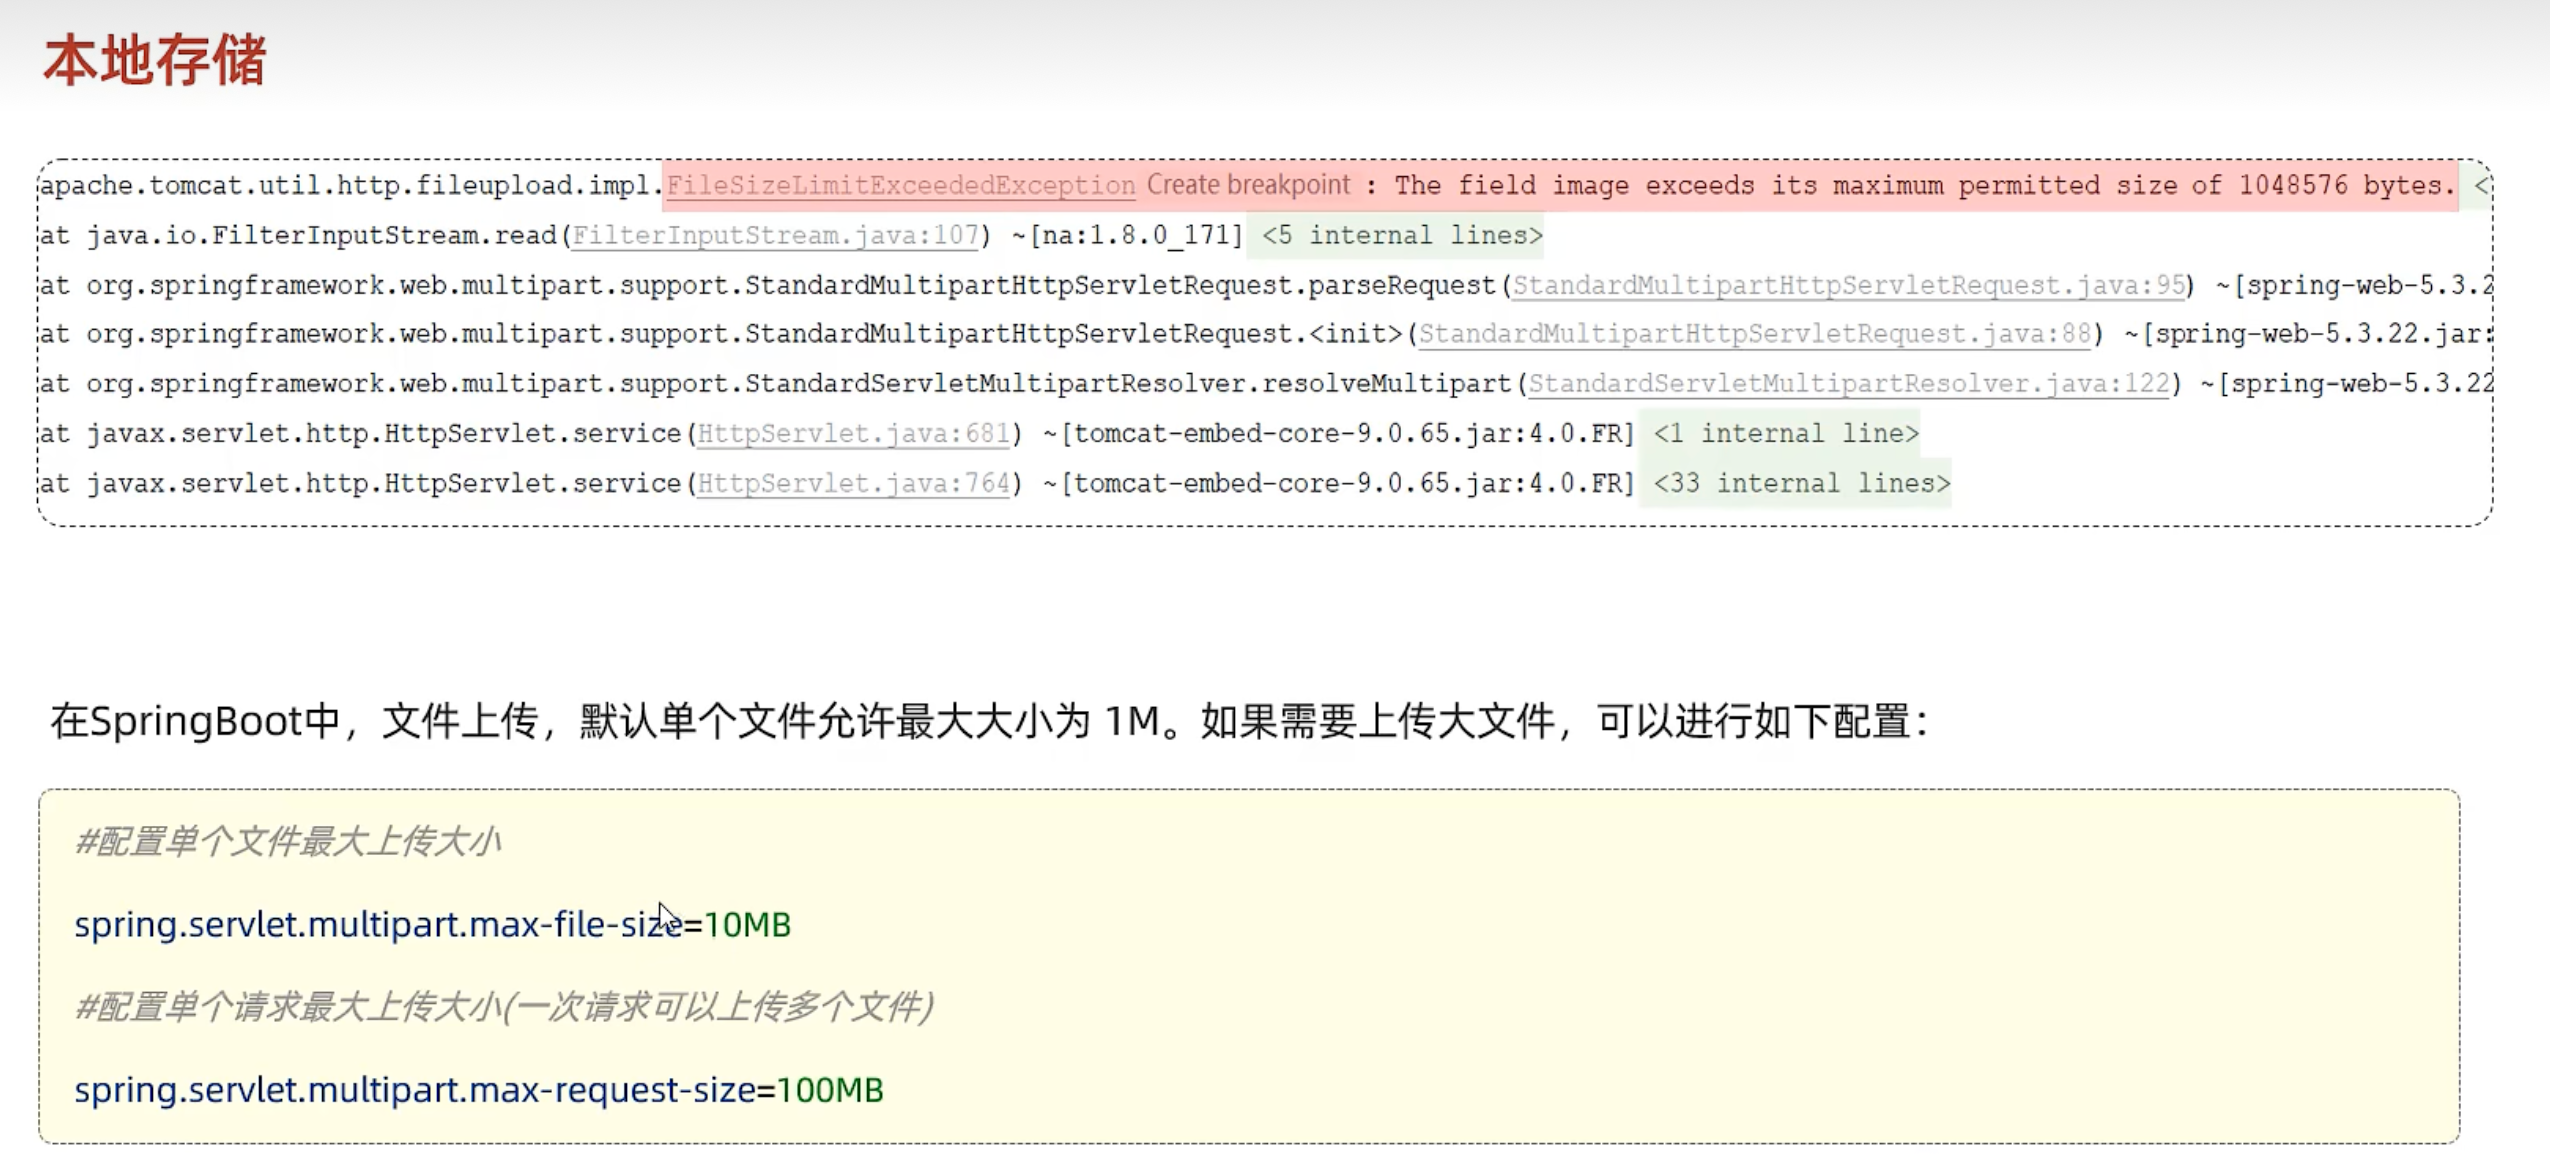
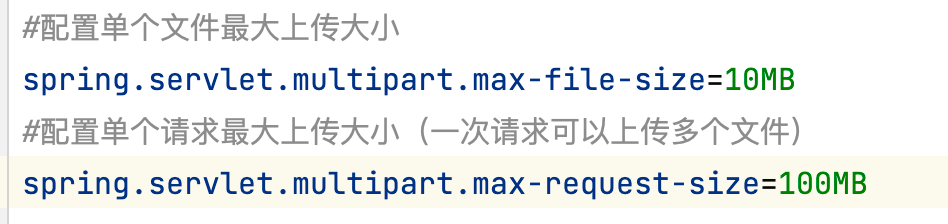
上传文件超过1M,会报错,500服务端异常
1048576/1024/1024 = 1M
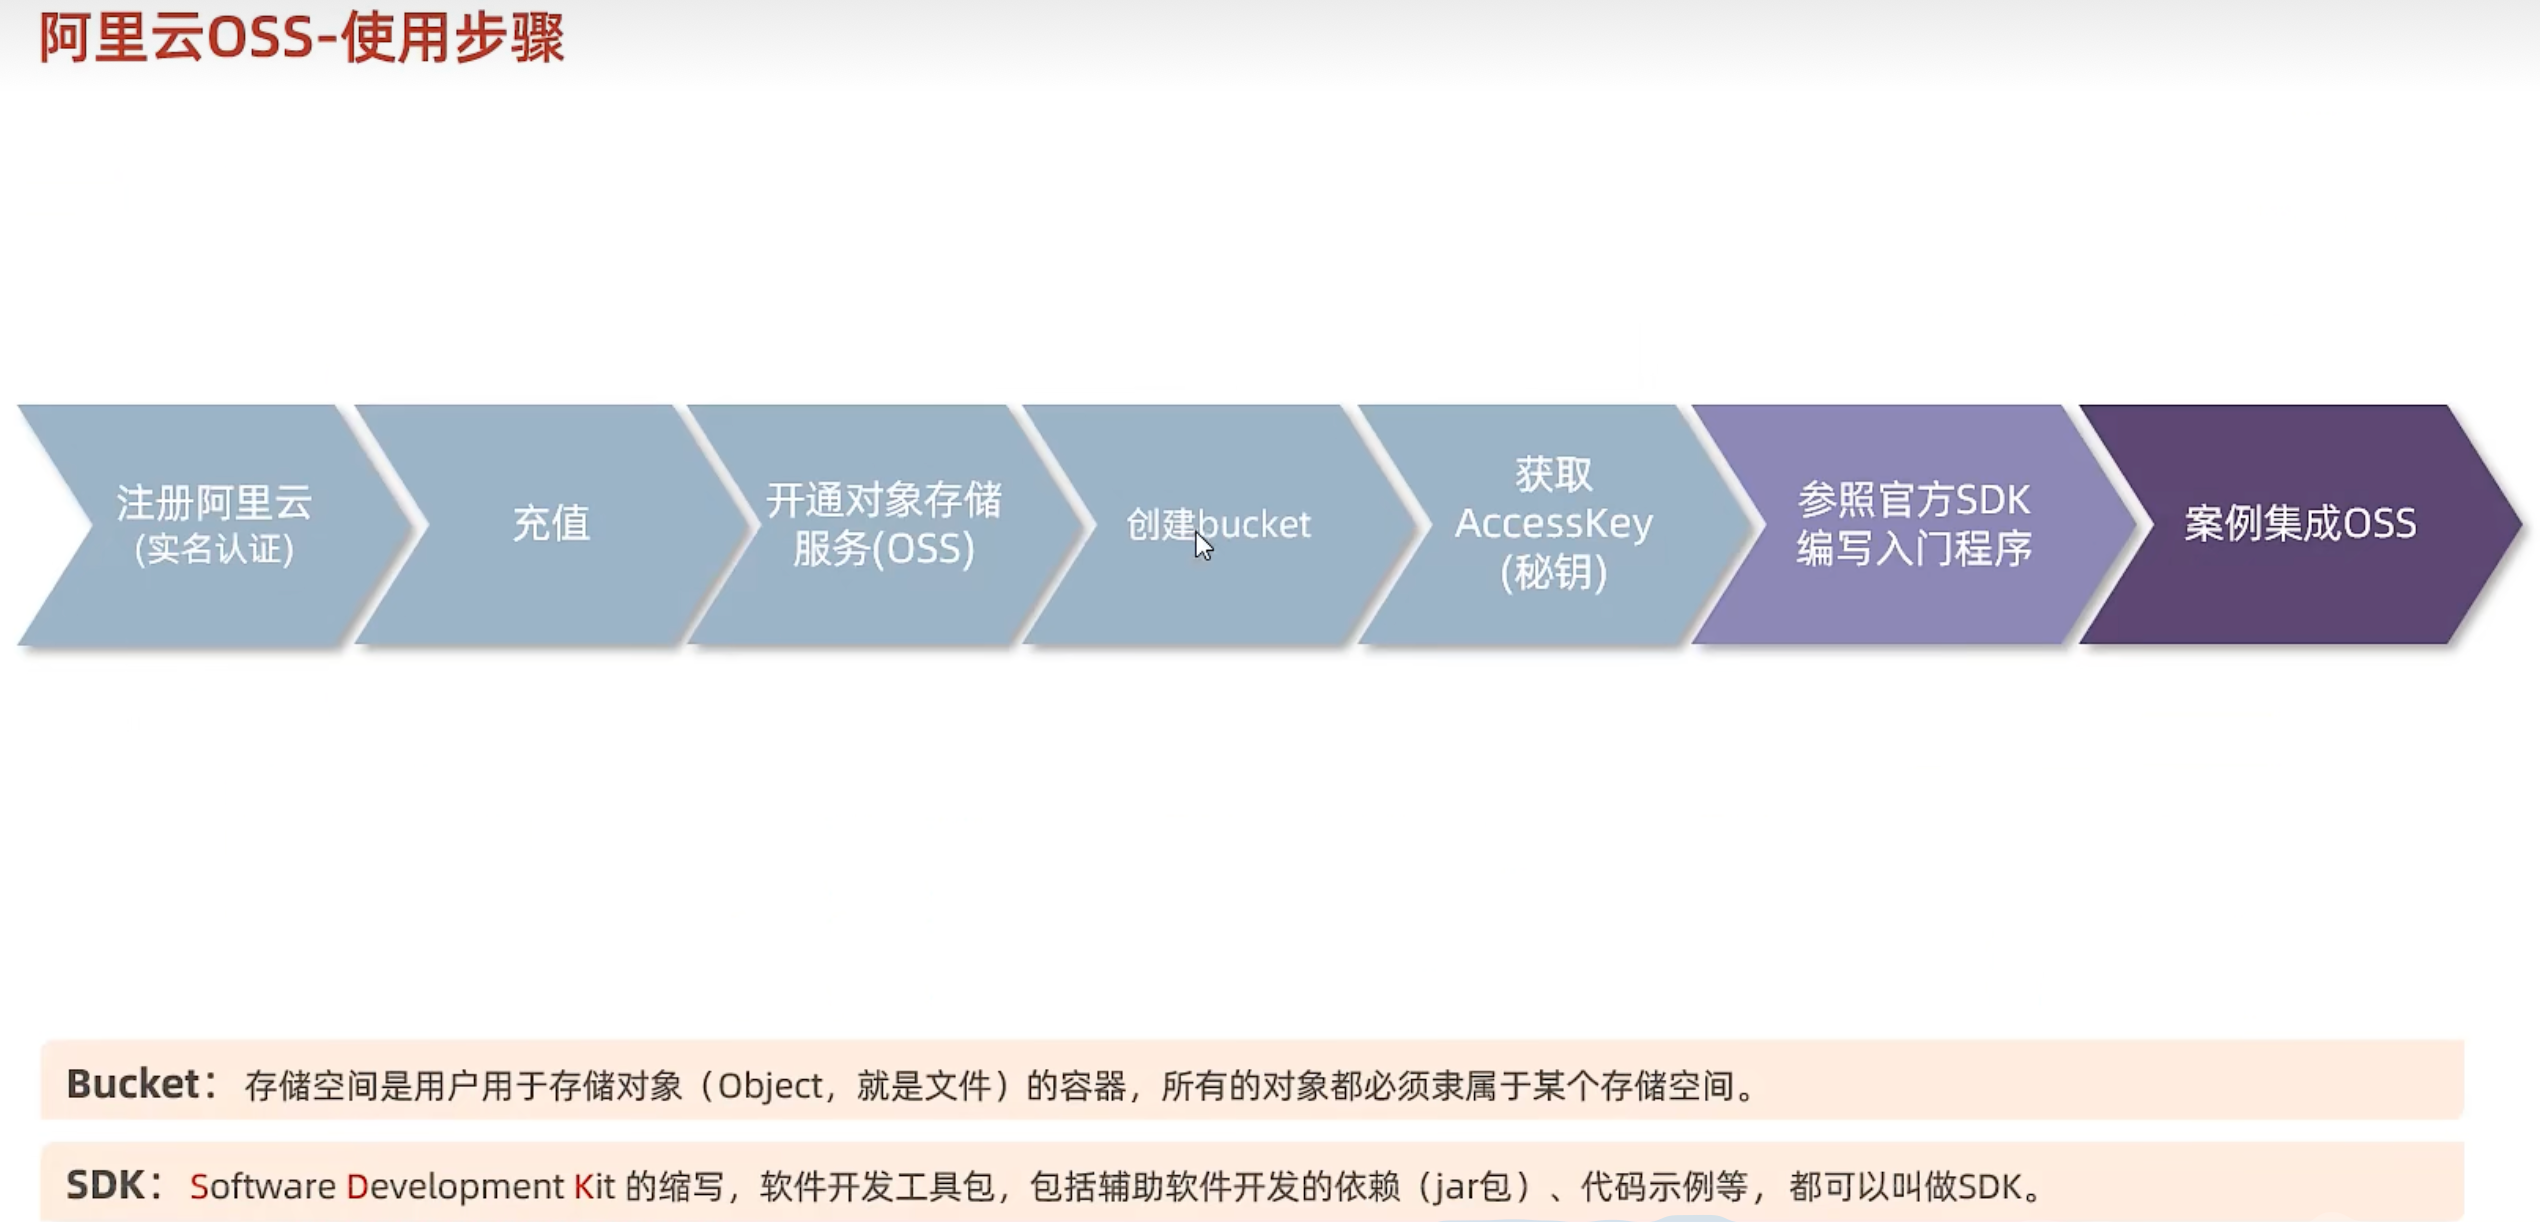
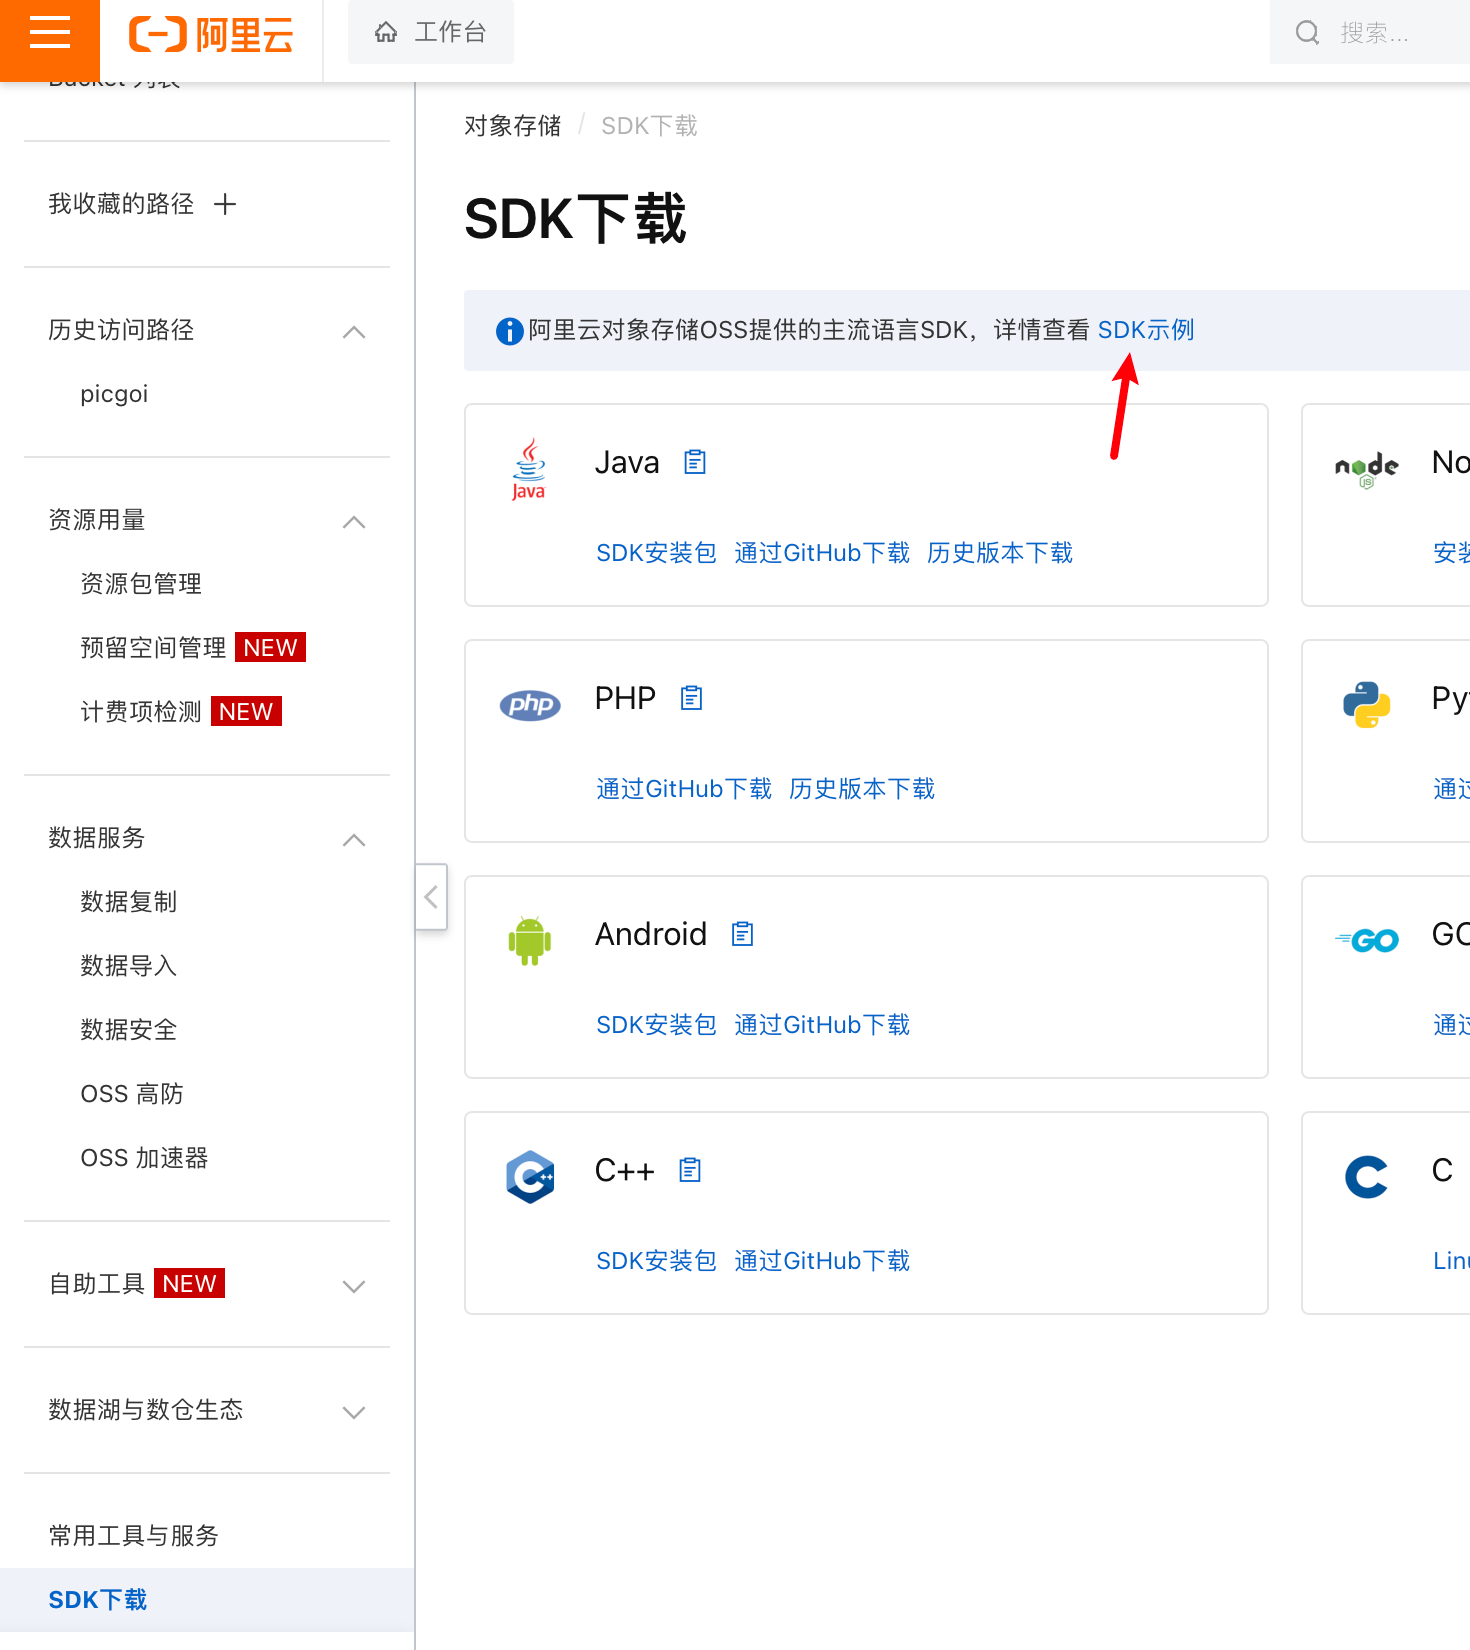
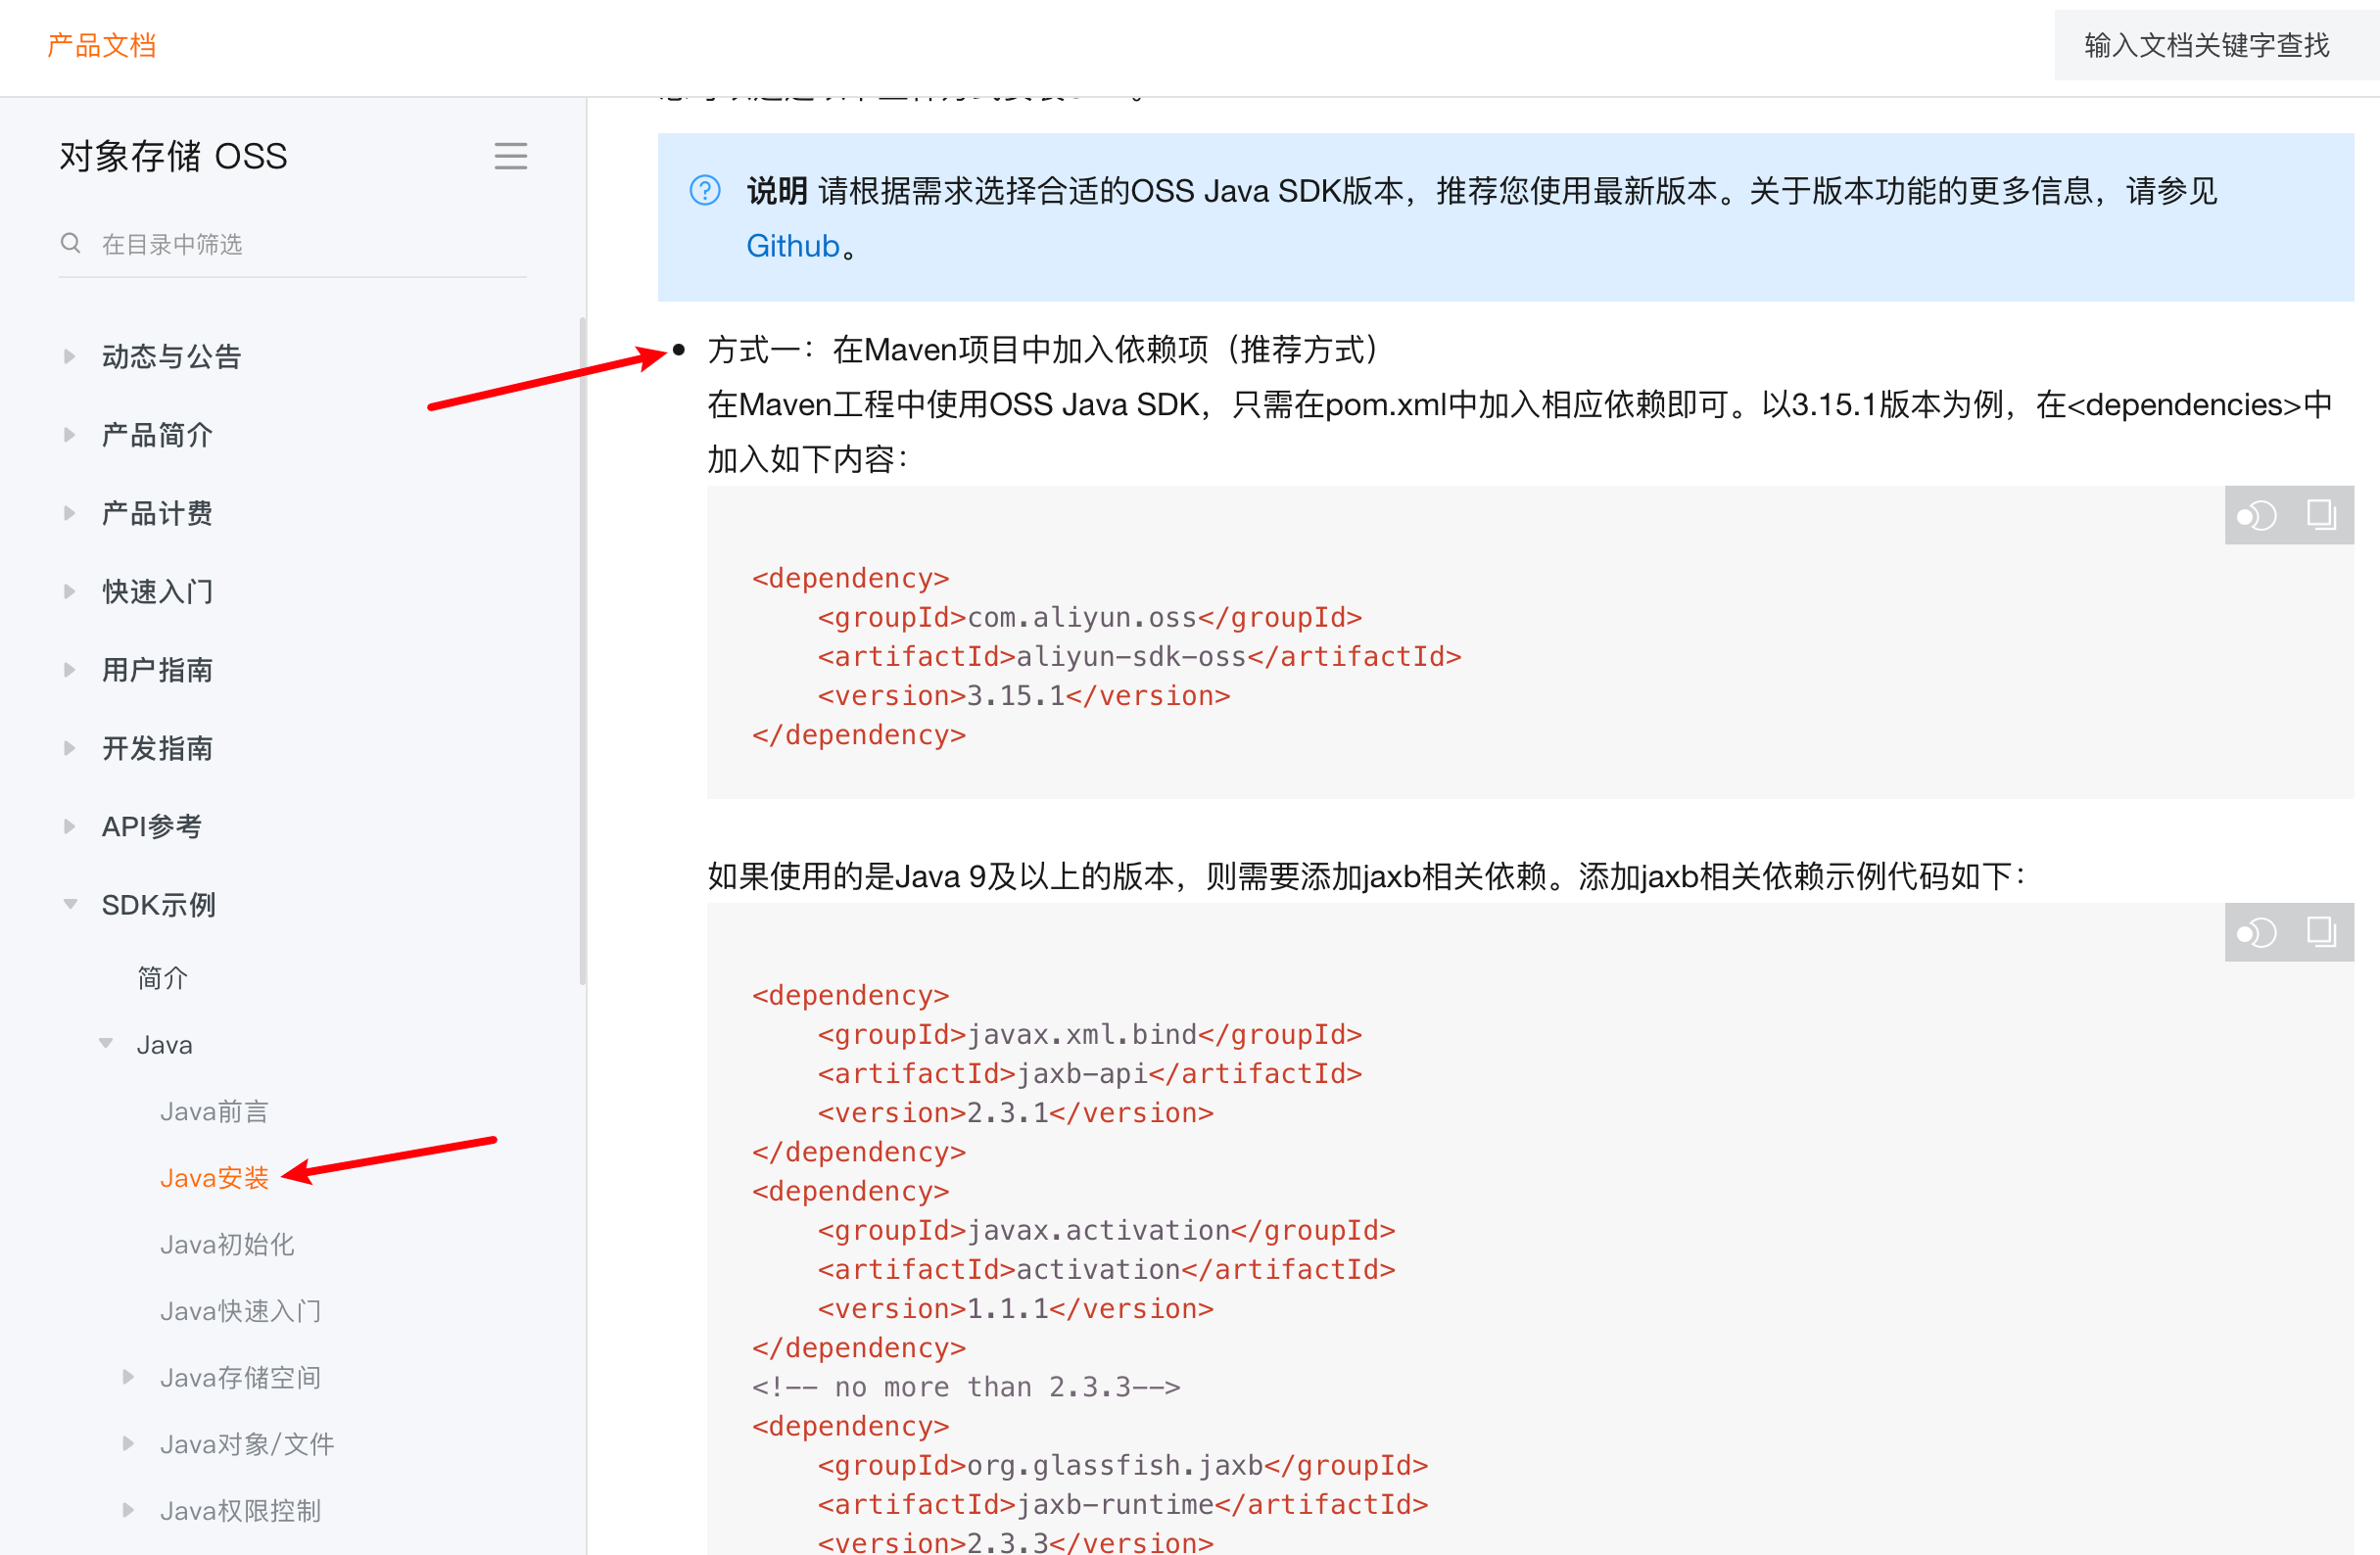
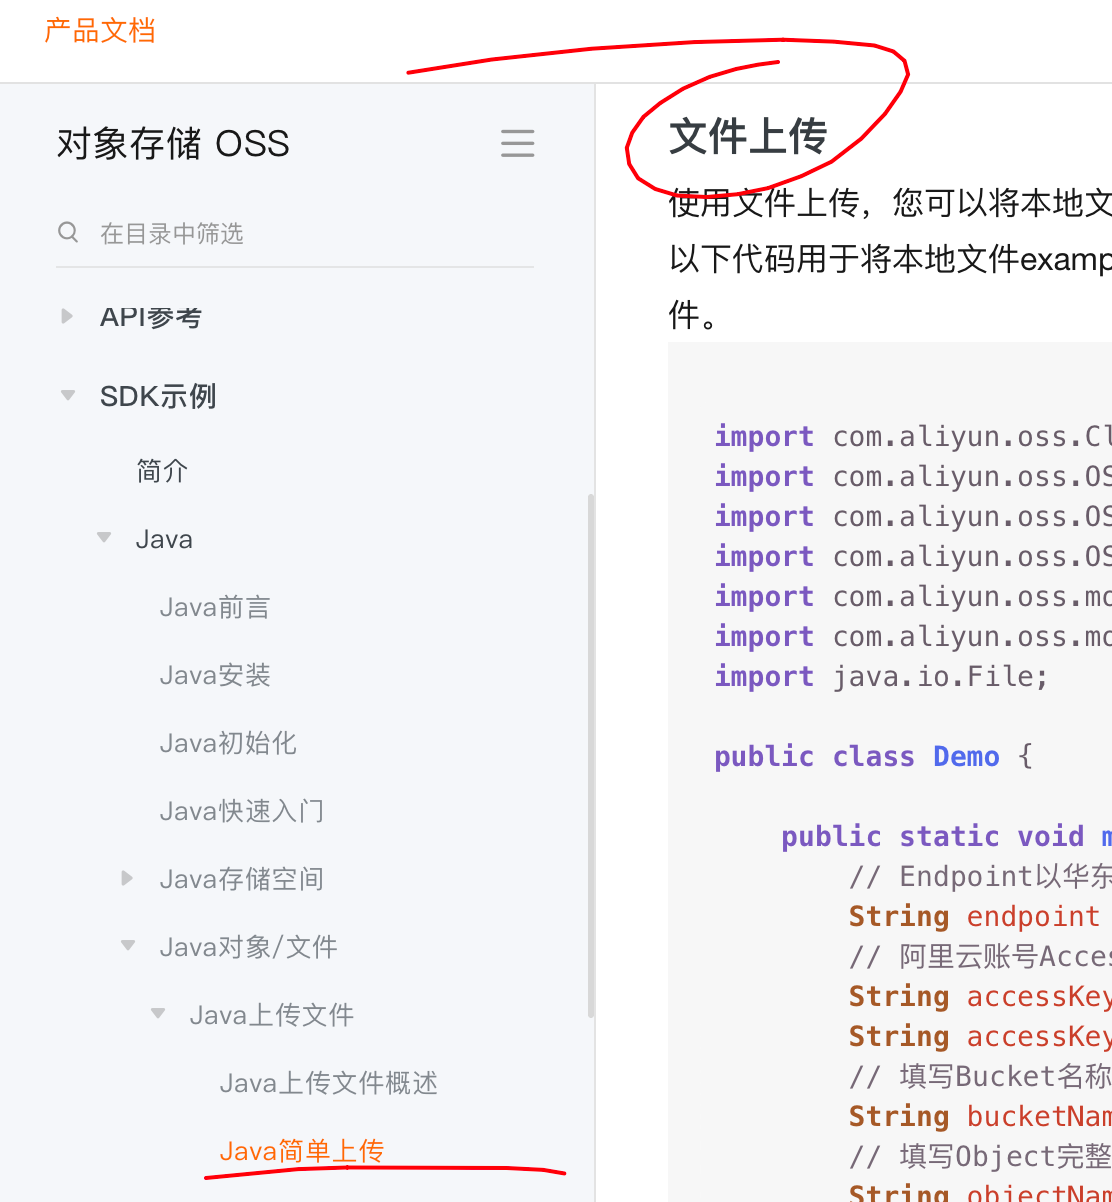
3、阿里云oss
import com.aliyun.oss.ClientException;
import com.aliyun.oss.OSS;
import com.aliyun.oss.OSSClientBuilder;
import com.aliyun.oss.OSSException;
import com.aliyun.oss.model.PutObjectRequest;
import com.aliyun.oss.model.PutObjectResult;
import java.io.File;public class Demo {public static void main(String[] args) throws Exception {// Endpoint以华东1(杭州)为例,其它Region请按实际情况填写。String endpoint = "https://oss-cn-hangzhou.aliyuncs.com";// 阿里云账号AccessKey拥有所有API的访问权限,风险很高。强烈建议您创建并使用RAM用户进行API访问或日常运维,请登录RAM控制台创建RAM用户。String accessKeyId = "yourAccessKeyId";String accessKeySecret = "yourAccessKeySecret";// 填写Bucket名称,例如examplebucket。String bucketName = "examplebucket";// 填写Object完整路径,完整路径中不能包含Bucket名称,例如exampledir/exampleobject.txt。String objectName = "exampledir/exampleobject.txt";// 填写本地文件的完整路径,例如D:\\localpath\\examplefile.txt。// 如果未指定本地路径,则默认从示例程序所属项目对应本地路径中上传文件。String filePath= "D:\\localpath\\examplefile.txt";// 创建OSSClient实例。OSS ossClient = new OSSClientBuilder().build(endpoint, accessKeyId, accessKeySecret);try {// 创建PutObjectRequest对象。PutObjectRequest putObjectRequest = new PutObjectRequest(bucketName, objectName, new File(filePath));// 如果需要上传时设置存储类型和访问权限,请参考以下示例代码。// ObjectMetadata metadata = new ObjectMetadata();// metadata.setHeader(OSSHeaders.OSS_STORAGE_CLASS, StorageClass.Standard.toString());// metadata.setObjectAcl(CannedAccessControlList.Private);// putObjectRequest.setMetadata(metadata);// 设置该属性可以返回response。如果不设置,则返回的response为空。putObjectRequest.setProcess("true");// 上传文件。PutObjectResult result = ossClient.putObject(putObjectRequest);// 如果上传成功,则返回200。System.out.println(result.getResponse().getStatusCode());} catch (OSSException oe) {System.out.println("Caught an OSSException, which means your request made it to OSS, "+ "but was rejected with an error response for some reason.");System.out.println("Error Message:" + oe.getErrorMessage());System.out.println("Error Code:" + oe.getErrorCode());System.out.println("Request ID:" + oe.getRequestId());System.out.println("Host ID:" + oe.getHostId());} catch (ClientException ce) {System.out.println("Caught an ClientException, which means the client encountered "+ "a serious internal problem while trying to communicate with OSS, "+ "such as not being able to access the network.");System.out.println("Error Message:" + ce.getMessage());} finally {if (ossClient != null) {ossClient.shutdown();}}}
}
package com.itheima.utils;import com.aliyun.oss.OSS;
import com.aliyun.oss.OSSClientBuilder;
import org.springframework.stereotype.Component;
import org.springframework.web.multipart.MultipartFile;
import java.io.*;
import java.util.UUID;/*** 阿里云 OSS 工具类*/
@Component
public class AliOSSUtils {private String endpoint = "https://oss-cn-qingdao.aliyuncs.com";private String accessKeyId = ";//填写自己的private String accessKeySecret = "";//填写自己的private String bucketName = "";//填写自己的/*** 实现上传图片到OSS*/public String upload(MultipartFile file) throws IOException {// 获取上传的文件的输入流InputStream inputStream = file.getInputStream();// 避免文件覆盖String originalFilename = file.getOriginalFilename();String fileName = "itheima_tlias/"+UUID.randomUUID().toString() + originalFilename.substring(originalFilename.lastIndexOf("."));//上传文件到 OSSOSS ossClient = new OSSClientBuilder().build(endpoint, accessKeyId, accessKeySecret);ossClient.putObject(bucketName, fileName, inputStream);//文件访问路径String url = endpoint.split("//")[0] + "//" + bucketName + "." + endpoint.split("//")[1] + "/"+fileName;// 关闭ossClientossClient.shutdown();return url;// 把上传到oss的路径返回}}
UploadController.java
// 文件上传,保存到阿里云oss@AutowiredAliOSSUtils aliOSSUtils;@PostMapping("/upload")public Result upload(MultipartFile image) throws IOException {String upload = aliOSSUtils.upload(image);log.info("文件上传路径:\n{}",upload);return Result.success(upload);}

小结
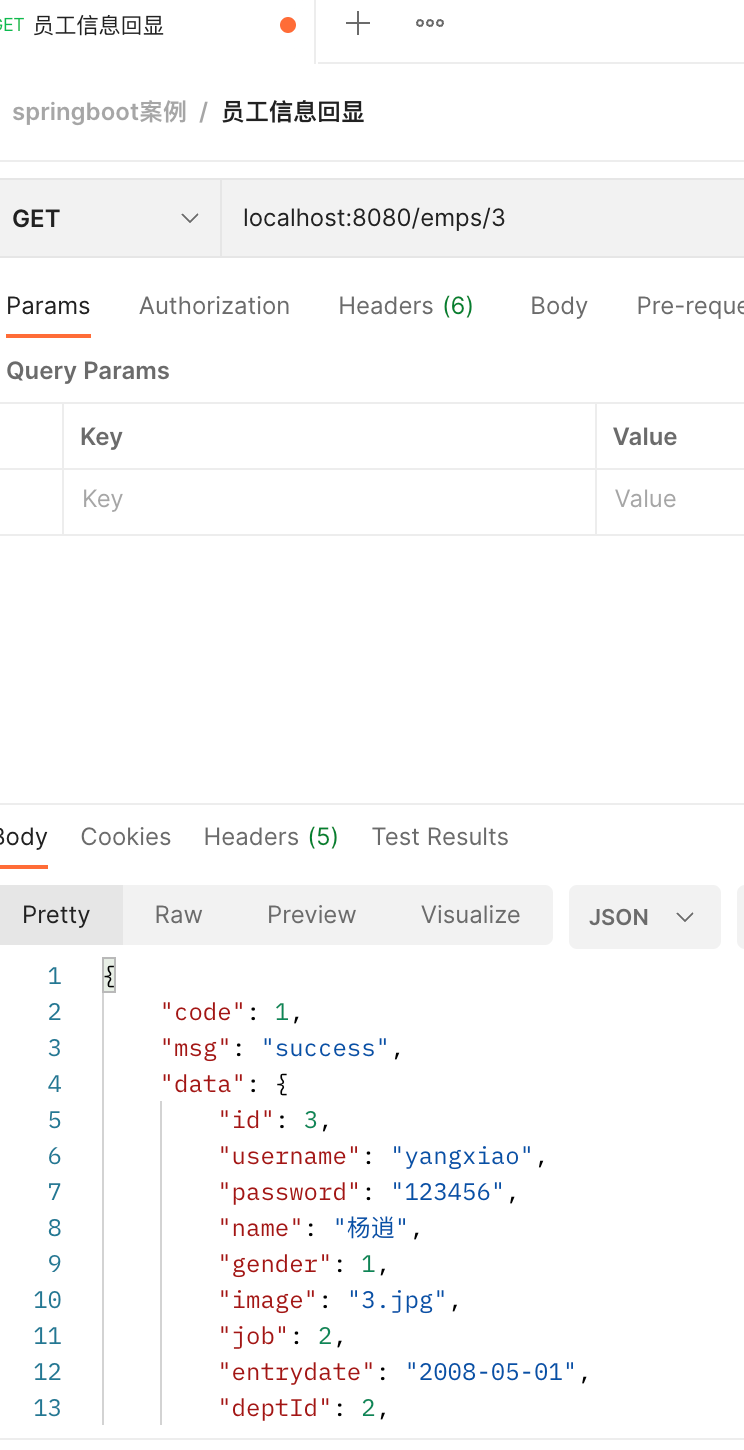
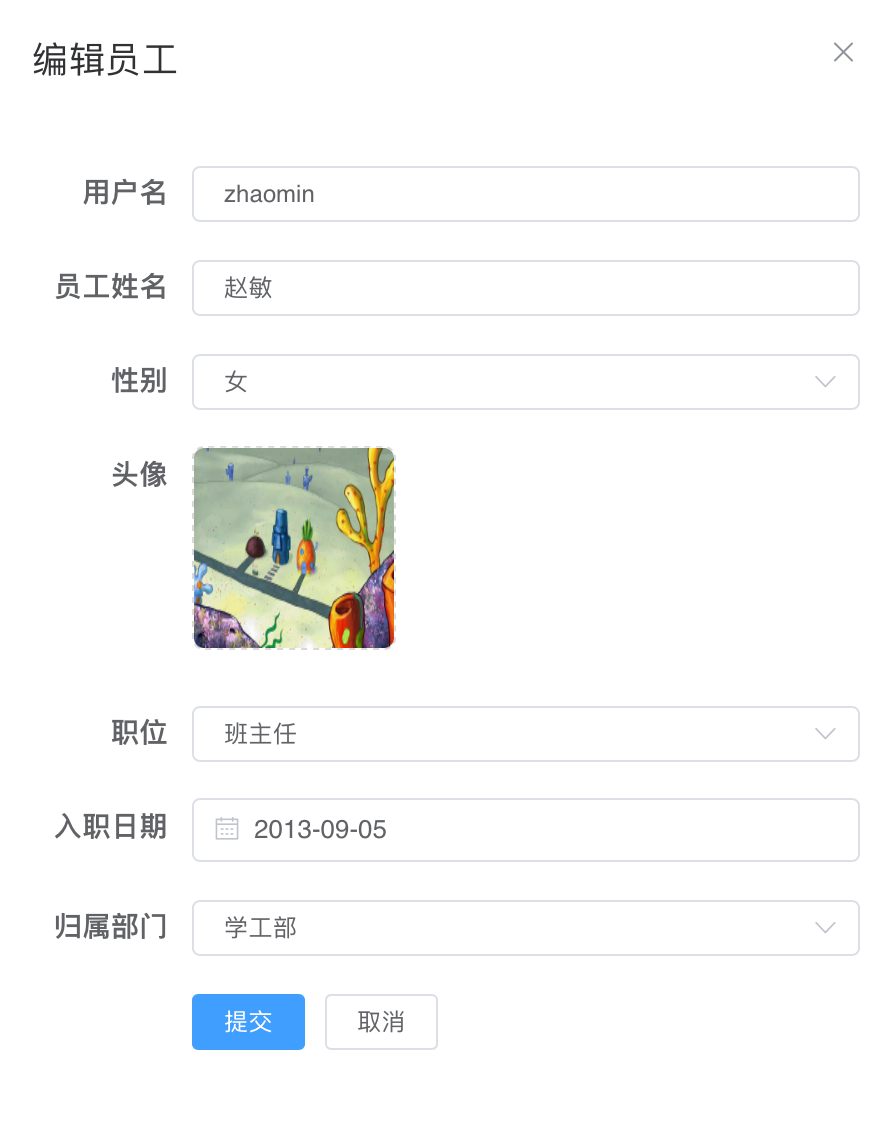
十、修改员工
1、查询回显
EmpController
// 查询回显@GetMapping("/emps/{id}")public Result getById(@PathVariable Integer id){Emp emp = empService.getById(id);return Result.success(emp);}
EmpService
// 信息回显Emp getById(Integer id);
EmpServiceImpl
// 员工信息回显public Emp getById(Integer id){Emp emp = empMapper.getById(id);return emp;}
EmpMapper.java
// 员工信息回显@Select("select * from emp where id=#{id}")Emp getById(Integer id);
2、修改员工信息
EmpController
// 修改员工信息@PutMapping("/emps")public Result update(@RequestBody Emp emp){empService.update(emp);return Result.success();}
EmpService
// 修改员工信息void update(Emp emp);
EmpServiceImpl
// 修改员工信息public void update(Emp emp){emp.setUpdateTime(LocalDateTime.now());empMapper.update(emp);}
EmpMapper.java
// 修改员工信息void update(Emp emp);
EmpMapper.xml
<update id="update">update emp<set><if test="username!=null and username!='' ">username=#{username},</if><if test="name!=null and name!='' ">name=#{name},</if><if test="gender!=null">gender=#{gender},</if><if test="image!=null and image!=''">image=#{image},</if><if test="job!=null">job=#{job},</if><if test="entrydate">entrydate=#{entrydate},</if><if test="deptId!=null">dept_id=#{deptId},</if><if test="updateTime">update_time=#{updateTime}</if></set>where id = #{id}
</update>
小结