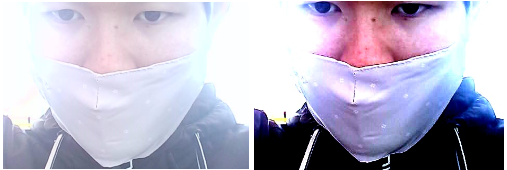
1.白化处理的作用
图像白化(whitening)可用于对过度曝光或低曝光的图片进行处理,减少光线对数据的动态影响,下图所示,左图是过分曝光,右图是白化后的结果;

2.白化处理的原理
处理的方式就是将图片分布变换为(0,1)的高斯分布。
3.白化处理的代码
def whitening(self, img_path):img = cv2.imread(img_path)img = img / 255.0m, dev = cv2.meanStdDev(img) # 返回均值和方差,分别对应3个通道img[:, :, 0] = (img[:, :, 0] - m[0]) / (dev[0]+1e-6)img[:, :, 1] = (img[:, :, 1] - m[1]) / (dev[1] + 1e-6)img[:, :, 2] = (img[:, :, 2] - m[2]) / (dev[2] + 1e-6)# 将 像素值 低于 值域区间[0, 255] 的 像素点 置0img = img*255img *= (img > 0)# 将 像素值 高于 值域区间[0, 255] 的 像素点 置255img = img * (img <= 255) + 255 * (img > 255)img = img.astype(np.uint8)cv2.imshow('result', img)cv2.waitKey(1000)cv2.destroyAllWindows()cv2.imwrite('result.jpg',img)
Pytorch中的线性变换可用于白化处理:
class torchvision.transforms.LinearTransformation(transformation_matrix)
#功能:对矩阵做线性变换,可用于白化处理
另:其中,将小于0的像素值置为0,大于255的像素置为255的代码很巧妙,举个例子,这里拎出来说一下,img > 0判断的输出如下,img与此矩阵相乘,大于0的值不变,小于0的地方即置为0,具体如下:
img = [[257,23,55],[-9,98,987],[78,43,21]]
img = np.asarray(img)
img
Out[24]:
array([[257,  23,  55],[ -9,  98, 987],[ 78,  43,  21]])
img > 0
Out[25]:
array([[ True,  True,  True],[False,  True,  True],[ True,  True,  True]])
img *= (img>0)
img
Out[27]:
array([[257,  23,  55],[  0,  98, 987],[ 78,  43,  21]])
img<=255
Out[28]:
array([[False,  True,  True],[ True,  True, False],[ True,  True,  True]])
img * (img<=255)
Out[29]:
array([[ 0, 23, 55],[ 0, 98,  0],[78, 43, 21]])
255 * (img>255)
Out[30]:
array([[255,   0,   0],[  0,   0, 255],[  0,   0,   0]])
img * (img<=255) + 255 * (img>255)
Out[31]:
array([[255,  23,  55],[  0,  98, 255],[ 78,  43,  21]])

