face_recognition人脸识别
face_recognition简介
这是世界上最简单的人脸识别库了。你可以通过Python引用或者命令行的形式使用它,来管理和识别人脸。
该软件包使用dlib中最先进的人脸识别深度学习算法,使得识别准确率在《Labled Faces in the world》测试基准下达到了99.38%。它同时提供了一个叫face_recognition的命令行工具,以便你可以用命令行对一个文件夹中的图片进行识别操作。
face_recognition安装
1.1 先安装 cmake 和 boost
pip  install  cmake
pip install boost
1.2 安装 dlib
pip install dlib
此处安装可能要几分钟。如安装出错,建议使用 whl 文件来安装
下载地址:https://pypi.org/simple/dlib/
然后输入pip install …whl
1.3 安装 face_recognition
face_recongnition 一般要配合 opencv 一起使用
pip install face_recognition
pip install opencv-python
人脸识别
(一)检测两张图片是否为同一个人
#人脸识别
import face_recognition
from PIL import Image
import matplotlib.pyplot as plt
known_image = face_recognition.load_image_file("images/train.jpg")
unknown_image = face_recognition.load_image_file("images/test.jpg")
img1 = Image.open("images/train.jpg")
plt.imshow(img1)
plt.axis('off')
plt.show()
img2 = Image.open("images/test.jpg")
plt.imshow(img2)
plt.axis('off')
plt.show()
baixiaona_encoding = face_recognition.face_encodings(known_image)[0]
unknown_encoding = face_recognition.face_encodings(unknown_image)[0]
results = face_recognition.compare_faces([baixiaona_encoding], unknown_encoding)
if results[0] == True:print ("Yes!")
else:print ("No!")
API说明:
图像载入函数——load_image_file
load_image_file(file, mode='RGB')加载一个图像文件到一个numpy array类型的对象上。参数:file:待加载的图像文件名字mode:转换图像的格式。只支持“RGB”(8位RGB, 3通道)和“L”(黑白)返回值:一个包含图像数据的numpy array类型的对象
人脸编码函数——face_encodings
face_encodings(face_image, known_face_locations=None, num_jitters=1)给定一个图像,返回图像中每个人脸的128脸部编码(特征向量)。参数:face_image:输入的人脸图像known_face_locations:可选参数,如果你知道每个人脸所在的边界框num_jitters=1:在计算编码时要重新采样的次数。越高越准确,但速度越慢(100就会慢100倍)返回值:一个128维的脸部编码列表
人脸匹配函数——compare_faces
compare_faces(known_face_encodings, face_encoding_to_check, tolerance=0.6)比较脸部编码列表和候选编码,看看它们是否匹配,设置一个阈值,若两张人脸特征向量的距离,在阈值范围之内,则认为其 是同一个人参数:known_face_encodings:已知的人脸编码列表face_encoding_to_check:待进行对比的单张人脸编码数据tolerance=0.6:两张脸之间有多少距离才算匹配。该值越小对比越严格,0.6是典型的最佳值返回值:一个 True或者False值的列表,该表指示了known_face_encodings列表的每个成员的匹配结果

人脸标注
import face_recognition
from PIL import Image, ImageDraw
import numpy as npdef draws():baixiaona_image = face_recognition.load_image_file("images/test3.jpg")baixiaona_face_encoding = face_recognition.face_encodings(baixiaona_image)[0]known_face_encodings = [baixiaona_face_encoding]known_face_names = ["Bai"]unknown_image = face_recognition.load_image_file("images/test1.jpg")face_locations = face_recognition.face_locations(unknown_image)face_encodings = face_recognition.face_encodings(unknown_image, face_locations)pil_image = Image.fromarray(unknown_image)draw = ImageDraw.Draw(pil_image)for (top, right, bottom, left), face_encoding in zip(face_locations, face_encodings):matches = face_recognition.compare_faces(known_face_encodings, face_encoding)name = "Unknown"if matches[0]==True:name = known_face_names[0]#print(matches[0])draw.rectangle(((left, top), (right, bottom)), outline=(0, 0, 255))text_width, text_height = draw.textsize(name)draw.rectangle(((left, bottom - text_height - 10), (right, bottom)), fill=(0, 0, 255), outline=(0, 0, 255))draw.text((left + 6, bottom - text_height - 5), name, fill=(255, 255, 255, 255))del drawpil_image.show()pil_image.save("images/image_with_boxes.jpg")
draws()

人脸定位函数——face_locations
face_locations(face_image,number_of_times_to_upsample=1,model="hog")利用CNN深度学习模型或方向梯度直方图(Histogram of Oriented Gradient, HOG)进行人脸提取。返回值是一个数组(top, right, bottom, left)表示人脸所在边框的四条边的位置。参数:face_image:输入的人脸图像number_of_times_to_upsample=1:从图片的样本中查找多少次人脸,该参数的值越高的话越能发现更小的人脸model="hog":使用哪种人脸检测模型。“hog” 准确率不高,但是在CPU上运行更快,“cnn” 更准确更深度(且GPU/CUDA加速,如果有GPU支持的话),默认是“hog”返回值:一个元组列表,列表中的每个元组包含人脸的四边位置(top, right, bottom, left)
批次人脸定位函数(GPU)——batch_face_locations
batch_face_locations(face_images,number_of_times_to_upsample=1,batch_size=128)使用CNN人脸检测器返回一个包含人脸特征的二维数组,如果使用了GPU,这个函数能够更快速的返回结果;如果不使用GPU的话,该函数就没必要使用参数:face_images:输入多张人脸图像组成的listnumber_of_times_to_upsample=1:从图片的样本中查找多少次人脸,该参数的值越高的话越能发现更小的人脸batch_size=128:每个GPU一次批处理多少个image返回值:一个元组列表,列表中的每个元组包含人脸的四边位置(top, right, bottom, left)人脸特征向量距离函数——face_distance
face_distance(face_encodings,face_to_compare)
给定一组面部编码,将它们与已知的面部编码进行比较,得到欧氏距离。对于每一个比较的脸,欧氏距离代表了这些脸有多相似。参数:face_encodings:输入的人脸图片face_to_compare:待进行对比的单张人脸编码数据tolerance:比对阈值,即两张脸之间有多少距离才算匹配。该值越小对比越严格,0.6是典型的最佳值返回值:一个numpy ndarray,数组中的欧式距离与faces数组的顺序一一对应
人脸化妆
import face_recognition
from PIL import Image, ImageDraw
import numpy as np
#将图片文件加载到 numpy 数组中,然后将人脸中的面部所有特征识别到一个列表中
image = face_recognition.load_image_file("images/test1.jpg")
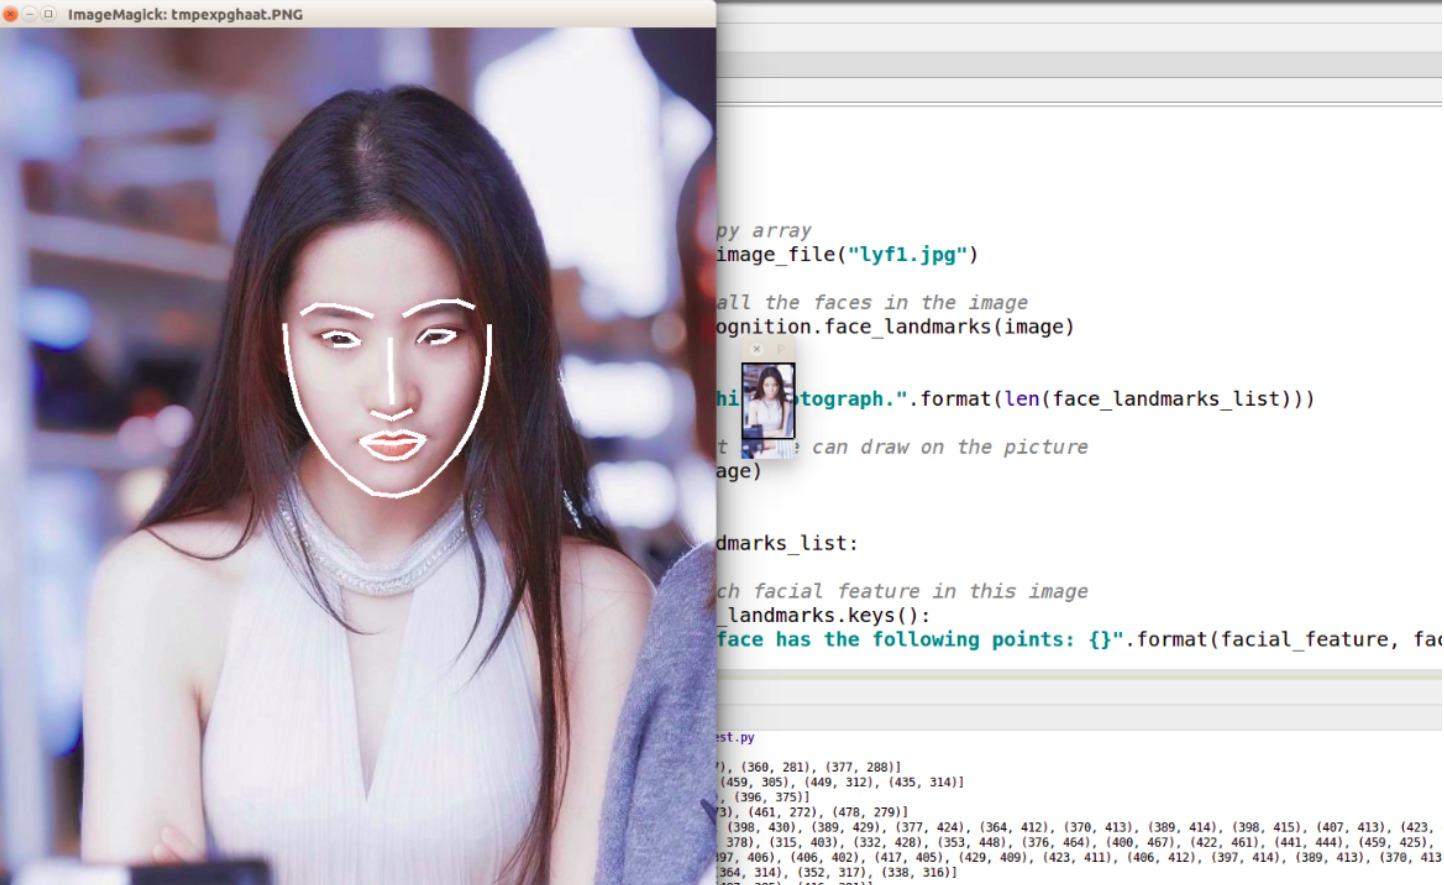
face_landmarks_list = face_recognition.face_landmarks(image)print(face_landmarks_list)pil_image = Image.fromarray(image)
d = ImageDraw.Draw(pil_image)#遍历列表中的元素
for face_landmarks in face_landmarks_list:# 打印出图片中每个脸部特征的位置for facial_feature in face_landmarks.keys():print ("The {} in this face has the following points: {}".format(facial_feature, face_landmarks[facial_feature]))#修改眉毛
# d.polygon(face_landmarks['left_eyebrow'], fill=(68, 54, 39, 128))
# d.polygon(face_landmarks['right_eyebrow'], fill=(68, 54, 39, 128))
# d.line(face_landmarks['left_eyebrow'], fill=(68, 54, 39, 150), width=5)
# d.line(face_landmarks['right_eyebrow'], fill=(68, 54, 39, 150), width=5)#给人脸涂口红
# d.polygon(face_landmarks['top_lip'], fill=(150, 0, 0, 128))
# d.polygon(face_landmarks['bottom_lip'], fill=(150, 0, 0, 128))
# d.line(face_landmarks['top_lip'], fill=(150, 0, 0, 64), width=8)
# d.line(face_landmarks['bottom_lip'], fill=(150, 0, 0, 64), width=8)#增加眼线
# d.polygon(face_landmarks['left_eye'], fill=(255, 255, 255, 30))
# d.polygon(face_landmarks['right_eye'], fill=(255, 255, 255, 30))
# d.line(face_landmarks['left_eye'] + [face_landmarks['left_eye'][0]], fill=(0, 0, 0, 110), width=6)
# d.line(face_landmarks['right_eye'] + [face_landmarks['right_eye'][0]], fill=(0, 0, 0, 110), width=6)
# Show the picture
pil_image.show()
人脸特征提取函数——face_landmarks
face_landmarks(face_image,face_locations=None,model="large")给定一个图像,提取图像中每个人脸的脸部特征位置参数:face_image:输入的人脸图片face_locations=None:可选参数,默认值为None,代表默认解码图片中的每一个人脸。若输入face_locations()[i]可指定人脸进行解码model="large":输出的特征模型,默认为“large”,可选“small”。当选择为"small"时,只提取左眼、右眼、鼻尖这三种脸部特征。返回值:返回值类型为:List[Dict[str,List[Tuple[Any,Any]]]],是由各个脸部特征关键点位置组成的字典记录列表,一个Dict对象对应图片中的一个人脸,其key为某个脸部特征(如输出中的nose_bridge、left_eye等),value是由该脸部特征各个关键点位置组成的List,关键点位置是一个Tuple(如上输出中,nose_bridge对应的关键点位置组成的列表为[(881L, 128L), (880L, 141L), (880L, 154L), (879L, 167L)] )