一、react 视频
##1、循环播放
import React, { useEffect, useState, useRef } from "react";
const videoRef= useRef(null);
const showVideoClass = { display: "block", width: "100%", height: "100%" }
const hindVideoClass = { display: "none", width: "100%", height: "100%" }//布局中使用: 主要是 loop
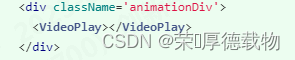
<videostyle={showVideoClass}src={require("../../../static/video/0.mp4")}mutedloopautoPlayref={videoRef}/>##2、两个视频交替播放
import React, { useEffect, useState, useRef } from "react";const oneVideo = "/static/video/1.mp4";
const twoVideo ="/static/video/2.mp4";function VideoPlay() {const [vidIndex, setVidIndex] = useState(0);const oneRef = useRef(null);const twoRef = useRef(null);useEffect(() => {console.log("当前index",vidIndex)if (vidIndex === 0 && oneRef.current) {oneRef.current.play();}if (vidIndex === 1 && twoRef.current) {twoRef.current.play();}}, [oneRef,twoRef, vidIndex]);return (<div className="videoShowDiv"><videostyle={{ display: vidIndex === 1 ? "none" : "block", width: "100%", height: "100%" }}src={oneVideo }mutedonEnded={() => setVidIndex((idx) => idx + 1)}ref={oneRef}/><videostyle={{ display: vidIndex === 0 ? "none" : "block", width: "100%", height: "100%" }}src={twoVideo}mutedonEnded={() => setVidIndex((idx) => idx -1)}ref={twoRef}/></div>);
}export default VideoPlay
![]()
##3、选择播放
import React, { useEffect, useState, useRef } from "react";function VideoPlay(props) {const { menuClickIndex } = props;const [vidIndex, setVidIndex] = useState(0);const oneRef = useRef(null);const twoRef = useRef(null);useEffect(() => {console.log("当前index", vidIndex)console.log("当前menuClickIndex", menuClickIndex)//menuClickIndex 为指定数,视频就指定播放那个视频if (menuClickIndex != undefined) {if (menuClickIndex == 0) {if (oneRef.current) {oneRef.current.play();}}if (menuClickIndex == 1) {if (twoRef.current) {twoRef.current.play();}}}//menuClickIndex 为空,视频就循环切换else {if (vidIndex === 0 && oneRef.current) {oneRef.current.play();}if (vidIndex === 1 && twoRef.current) {twoRef.current.play();}}}, [oneRef, twoRef, vidIndex]);const showVideoClass = { display: "block", width: "100%", height: "100%" }const hindVideoClass = { display: "none", width: "100%", height: "100%" }return (<div>{menuClickIndex == undefined &&<div className="videoShowDiv"><videostyle={{ display: vidIndex === 1 ? "none" : "block", width: "100%", height: "100%" }}src={require("../../../static/video/one.mp4")}mutedonEnded={() => setVidIndex((idx) => idx + 1)}ref={oneRef}/><videostyle={{ display: vidIndex === 0 ? "none" : "block", width: "100%", height: "100%" }}src={require("../../../static/video/two.mp4")}mutedonEnded={() => setVidIndex((idx) => idx - 1)}ref={twoRef}/></div>}{menuClickIndex == 0 &&<div className="videoShowDiv"><videostyle={showVideoClass}src={require("../../../static/video/one.mp4")}mutedloopautoPlayref={oneRef}/></div>}{menuClickIndex == 1 &&<div className="videoShowDiv"><videostyle={showVideoClass}src={require("../../../static/video/two.mp4")}mutedloopautoPlayref={oneRef}/></div>}</div>);
}export default VideoPlay
overAndOutMenu = (index) => {this.setState({menuClickIndex: index})
}//在布局中
<divonMouseOver={() => {this.overAndOutMenu(0)}}>菜单0
</div><divonMouseOver={() => {this.overAndOutMenu(1)}}>菜单1
</div>
二、预览拖动
transform的使用 :CSS 变形(CSS3) transform_css transform_快乐de馒头的博客-CSDN博客
##1、缩放
给图片 加 transform: scale(1.4)

onWheel={(e) => { if (isModelPreview) { handleWheelImage(e) } }} const handleWheelImage = (event) => {const bigger = event.deltaY > 0 ? -1 : 1;//向上为负,向下为正if (bigger > 0 && rate < 5) {const enlargeRate = rate + SCALE;setImgStyle({...imgStyle,'transformOrigin': 'center','transform': `scale( ${enlargeRate}) rotate(${oldRotate}deg)`});setRate(enlargeRate);} else if (bigger < 0 && rate > 1) {const shrinkRate = rate - SCALE;setImgStyle({...imgStyle,'transformOrigin': 'center','transform': `scale( ${shrinkRate}) rotate(${oldRotate}deg)`});setRate(shrinkRate);}}加动画:

##2、旋转
给图片 加 transform: rotate(90deg) 90,180,270,360 为选择方向

const childHandleClickRotate = () => {if (rotate == 90) {setOldRotate(90)setRotate(90 * 2)}if (rotate == 180) {setOldRotate(180)setRotate(90 * 3)}if (rotate == 270) {setOldRotate(270)setRotate(90 * 4)}if (rotate == 360) {setOldRotate(360)setRotate(90)}setImgStyle({...imgStyle,'transformOrigin': 'center','transform': `scale(${rate}) rotate(${rotate}deg)`});}##3、matrix 平移
给图片加
transform: matrix(2.2, 0, 0, 2.2, -89, 186)
matrix(2.2, 0, 0, 2.2, -89, 186)的值 ,2,2为 缩放, -89 和 186 为移动的偏移位置
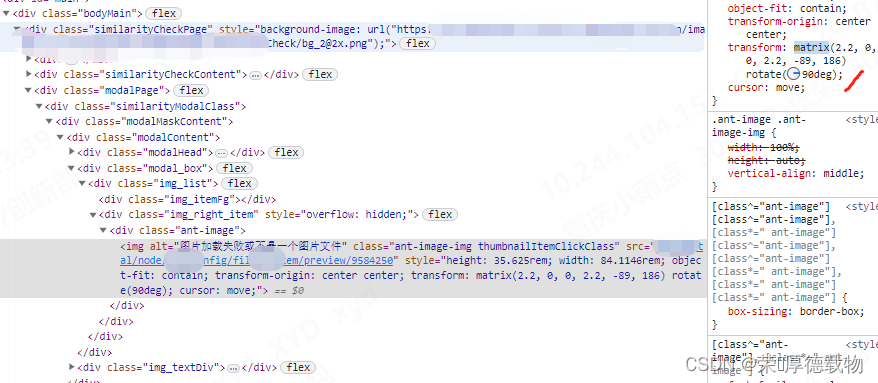
拖动时,结合鼠标事件,结合matrix 做图片平移
onMouseDown={(e) => { if (isModelPreview) { handleMouseDown(e) } }}
onMouseMove={(e) => { if (isModelPreview) { handleMouseMove(e) } }}
onMouseUp={(e) => { if (isModelPreview) { handleMouseUp(e) } }}const handleMouseDown = (event) => {event.preventDefault();event.stopPropagation();const { pageX, pageY } = event;setMouseDowmFlag(true); // 控制只有在鼠标按下后才会执行mousemovesetMouseDowmPos({x: pageX,y: pageY,});}const handleMouseMove = (event) => {// console.log("获取的move对象:",event)event.preventDefault()event.stopPropagation()const { pageX, pageY } = event;const diffX = pageX - mouseDowmPos.x;const diffY = pageY - mouseDowmPos.y;if (!mouseDowmFlag || (diffX === 0 && diffY === 0)) return;const offsetX = parseInt(`${diffX}`);const offsetY = parseInt(`${diffY}`);//具体移动 偏移 x和y 可自行计算setImgStyle({...imgStyle,'cursor': 'move','transformOrigin': 'center','transform': `matrix(${rate}, 0, 0, ${rate}, ${offsetX + matrixPos.x}, ${offsetY + matrixPos.y})  rotate(${oldRotate}deg)`});setMatrixPos({x: offsetX,y: offsetY,});}const handleMouseUp = (event) => {event.preventDefault();event.stopPropagation();setMouseDowmFlag(false);}
学习文章:react移动端svg等图片拖拽缩放 - 灰信网(软件开发博客聚合) (freesion.com)
学习文章:https://www.saoniuhuo.com/question/detail-2609566.htmlreact图片缩放、平移(position、transform实现) - React那点事儿 - SegmentFault 思否