前言
2022-06-22,成都,夜晚,下雨,个人博客搭建完毕!个人博客链接在此,欢迎访问~
第一部分根据 搭建笔记 中的方法完成 Hexo + Shoka 主题 + Github 博客部署。
2022-07-02,成都,下午,继续更新全局搜索 + 评论 ~
第二部分根据 Hexo 主题 Shoka & mumulti-markdown-it 渲染器使用说明 完成全局搜索 + 评论。
2022-07-10,成都,夜晚,高温红色预警。
第三部分根据 Hexo 框架 (六):SEO 优化及站点被搜索引擎收录设置 文章中的方法完成百度站点收录。
开始
首先简单介绍一下 Hexo ,Hexo 是一个快速、简洁且高效的博客框架。Hexo 使用 Markdown 或其他渲染引擎解析文章,在几秒内,即可利用靓丽的主题生成静态网页。现在我们开始搭建 Hexo ,详细步骤可参考官网指南。
安装
安装 Hexo 相当简单,只需要先安装下列应用程序即可:
- Node.js (Node.js 版本需不低于 10.13,建议使用 Node.js 12.0 及以上版本)
- Git
如果你的电脑中已经安装上述必备程序,那么可以直接开始执行以下命令安装 Hexo。
$ npm install -g hexo-cli
建站
安装 Hexo 完成后,请执行下列命令,Hexo 将会在指定文件夹中新建所需要目录文件。
$ hexo init <folder>
$ cd <folder>
$ npm install
eg.
$ hexo init D:\theDeveloping\hexo
新建完成后,指定文件夹的生成目录如下:
.
├── _config.yml
├── package.json
├── scaffolds
├── source
|   ├── _drafts
|   └── _posts
└── themes
全局配置文件 _config.yml 保存网站的 配置 信息,你可以在此配置大部分的参数。项目清单文件 package.json 存储所有已安装软件包的名称和版本信息。
{"name": "hexo-site","version": "0.0.0","private": true,"hexo": {"version": ""},"dependencies": {"hexo": "^3.8.0","hexo-generator-archive": "^0.1.5","hexo-generator-category": "^0.1.3","hexo-generator-index": "^0.2.1","hexo-generator-tag": "^0.2.0","hexo-renderer-ejs": "^0.3.1","hexo-renderer-stylus": "^0.3.3","hexo-renderer-marked": "^0.3.2","hexo-server": "^0.3.3"}
}
如果要更换 Hexo 版本,修改 package.json 中 dependencies 配置项。
"hexo": "^5.0.0"
执行 npm update 命令更新版本。
$ npm update
依赖
Hexo 构建目录下执行安装依赖。
$ npm i
插件
Hexo 构建目录下执行安装插件。
$ npm install hexo-deployer-git --save
启动
启动服务,默认访问网址为: http://localhost:4000/。
$ hexo server
部署
我们继续将 Hexo 博客部署至 Github。
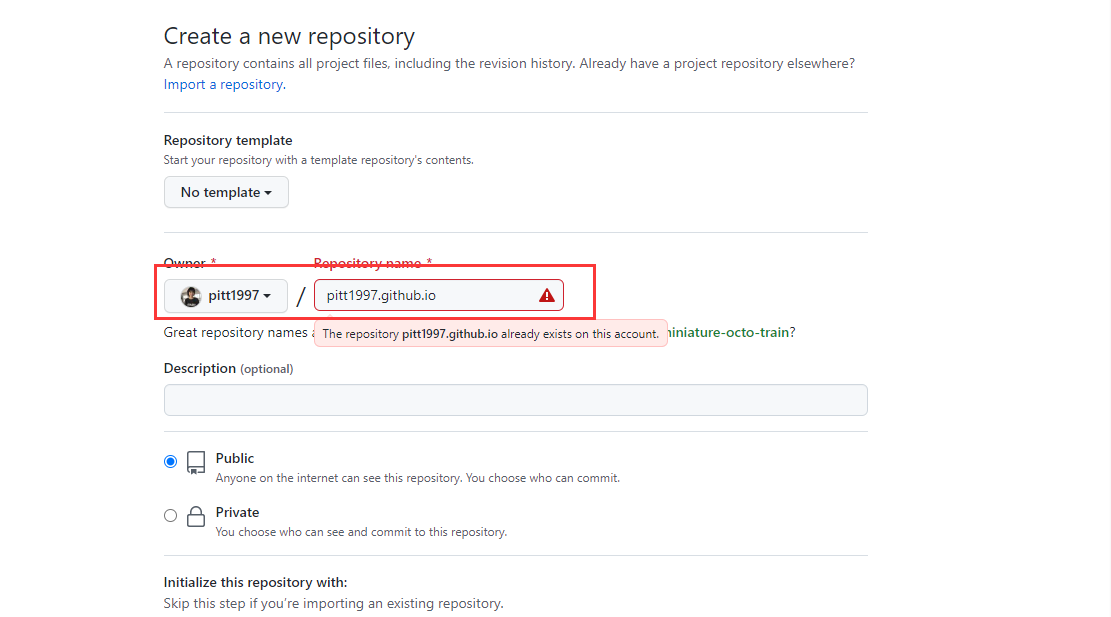
1.在 Github 创建一个名称为 pitt1997.github.io 的仓库,注意最好使用个人 Github 账号名称来创建。
2.Github 仓库创建完成之后,修改 Hexo 全局配置文件 _config.yml ,在末尾追加以下配置项, repo 填写个人仓库对应地址。
deploy:type: gitrepo: git@github.com:pitt1997/pitt1997.github.io.gitbranch: main
3.部署代码到 GitHub,需要提前配置 Github SSH 密钥,如果已经设置可不用再配置,如果没有配置可参考该文章,配置完成之后执行以下命令部署。
$ hexo clean
$ hexo g	# 生成静态文件
$ hexo d	# 部署代码到GitHub上
4.浏览器输入 https://pitt1997.github.io/ 就可以访问到我们的个人博客,如果部署后立即访问发现访问不到,那么需要再过一会再访问。
主题
我们已经完成 Hexo 默认安装以及部署,现在我们使用其他主题加载我们的个人博客。
Theme Shoka
Shoka 主题相关链接如下。
主题主页:https://shoka.lostyu.me/
文档说明:https://shoka.lostyu.me/computer-science/note/theme-shoka-doc/
基本配置: https://shoka.lostyu.me/computer-science/note/theme-shoka-doc/config/
页面配置: https://shoka.lostyu.me/computer-science/note/theme-shoka-doc/display/
依赖插件: https://shoka.lostyu.me/computer-science/note/theme-shoka-doc/dependents/
1、快速安装
1、在 Hexo 构建目录下执行 Git 命令下载主题。
$ git clone https://github.com/amehime/hexo-theme-shoka.git ./themes/shoka
2、让这个主题生效,需要修改全局配置文件 /_config.yml ,把主题改为 shoka 。
theme: shoka
2、快速开始
Shoka 主题需要的相关依赖插件。
| 插件名称 | npm 地址 | 功能 | 依赖程度 |
|---|---|---|---|
| hexo-renderer-multi-markdown-it | 链接 | md 文件渲染器,压缩 css/js/html | 必需 |
| hexo-autoprefixer | 链接 | 给生成的 css 文件们添加浏览器前缀 | 必需 |
| hexo-algoliasearch | 链接 | 站内搜索功能 | 搜索按钮失灵 |
| hexo-symbols-count-time | 链接 | 文章或站点字数及阅读时间统计 | 统计没有 |
| hexo-feed | 链接 | 生成 Feed 文件 | Feed 文件没有 |
没有正确安装以上插件的话,本主题会报错 or 无法正确显示 or 部分功能失效。 hexo-renderer-multi-markdown-it 请注意升级到最新版
npm 源可能存在无法正常下载的情况,这里提前设置 npm 源。
$ npm config set registry https://registry.npm.taobao.org
依次执行 npm 安装命令开始安装相关依赖插件。
$ npm i hexo-renderer-multi-markdown-it --save
$ npm i hexo-autoprefixer --save
$ npm i hexo-algolia --save
$ npm i hexo-algoliasearch --save
$ npm i hexo-symbols-count-time --save
$ npm i hexo-feed --save
3、主题配置文件
Shoka 主题配置文件 /shoka/_config.yml,以下是我个人配置文件参考:
# Alternate site name 站点名称
alternate: pitt1997open_graph:
#twitter_id:
#google_plus:
#fb_admins:
#fb_app_id:# Assets
statics: https://fastly.jsdelivr.net/gh/pitt1997/pitt1997.github.io@latest/    #/ #//cdn.jsdelivr.net/gh/username/RepositoryName@latest/
css: css
js: js
images: images# themes/shoka/source/images/***
favicon:apple_touch_icon: /apple-touch-icon.png#safari_pinned_tab: /logo.svg#android_manifest: /manifest.json#ms_browserconfig: /browserconfig.xml# Dark Mode
# By default, the page judges whether to turn on the dark mode according to the device settings or user selection
# if `true`, the page will be displayed directly as Dark Mode, unless the user makes another choice
# 夜间模式
darkmode: false# By default the page will automatically scroll to the last viewed position
# if `false`, automatic positioning will be turned off
# 自动定位 自动定位到上次浏览的位置
auto_scroll: true# Whether to show the loading cat
# 是否显示页面加载动漫 就是每次都看到的那个猫猫
loader:start: false # When entering the pageswitch: false # When switching to another page# click with Firework
# 页面特效 单击页面的烟花效果
fireworks:enable: truecolor:# - "rgba(255,182,185,.9)"# - "rgba(250,227,217,.9)"# - "rgba(187,222,214,.9)"# - "rgba(138,198,209,.9)"# 加载谷歌字体
font:enable: true# Font options:# `external: true` will load this font family from `host` above.# `family: Times New Roman`. Without any quotes.# `size: x.x`. Use `em` as unit. Default: 1 (16px)# Global font settings used for all elements inside <body>.global:external: truefamily: Mulishsize:# Font settings for alternate title.# 备用字体logo:external: truefamily: Fredericka the Greatsize: 3.5# Font settings for site title.# 站点字体title:external: truefamily: Noto Serif JPsize: 2.5# Font settings for headlines (<h1> to <h6>).headings:external: truefamily: Noto Serif SCsize:# Font settings for posts.posts:external: truefamily:# Font settings for <code> and code blocks.codes:external: truefamily: Inconsolata# project of https://www.iconfont.cn/
# //at.alicdn.com/t/font_1832207_c8i9n1ulxlt.css => 1832207_c8i9n1ulxlt
iconfont: "1832207_igi8uaupcus"# 菜单
menu:首页: / || home关于: /about/ || user文章:default: / || feather归档: /archives/ || list-alt分类: /categories/ || th标签: /tags/ || tags
#  friends: /friends/ || heart
#  links: /links/ || magic# Social Links
# Usage: `Key: permalink || icon || color`
# Key is the link label showing to end users.
# Value before `||` delimiter is the target permalink,
# secend value is the name of Font icon.
social:github: https://github.com/pitt1997 || github || "#191717"#google: https://plus.google.com/yourname || google#twitter: https://twitter.com/yourname || twitter || "#00aff0"#zhihu: https://www.zhihu.com/people/yourname || zhihu || "#1e88e5"#music: https://music.163.com/#/user/home?id=yourid || cloud-music || "#e60026"#weibo: https://weibo.com/yourname || weibo || "#ea716e"#about: https://about.me/yourname || address-card || "#3b5998"#email: mailto:yourname@mail.com || envelope || "#55acd5"#facebook: https://www.facebook.com/yourname || facebook#stackoverflow: https://stackoverflow.com/yourname || stack-overflow#youtube: https://youtube.com/yourname || youtube#instagram: https://instagram.com/yourname || instagram#skype: skype:yourname?call|chat || skype#douban: https://www.douban.com/people/yourname/ || doubansidebar:# Sidebar Position.# position: leftposition: right# Replace the default avatar image and set the url here.avatar: avatar.jpgwidgets:# if true, will show random posts# 显示随机文章random_posts: true# if true, will show recent comments# 显示最近评论recent_comments: truefooter:# Specify the date when the site was setup. If not defined, current year will be used.# 页尾全站统计局since: 2010icon:name: sakura rotate# Change the color of icon, using Hex Code.color: "#ffc0cb"# Dependencies: https://github.com/theme-next/hexo-symbols-count-timecount: truepowered: true# 文章界面统计
post:# Dependencies: https://github.com/theme-next/hexo-symbols-count-timecount: true# 奖励 这里我不需要
# Reward (Donate)
#reward:
#  # If true, reward will be displayed in every article by default.
#  enable: true
#  account:
#    wechatpay: /wechatpay.png
#    alipay: /alipay.png
#    paypal: /paypal.png# TagCloud settings for tags page.
tagcloud:# All values below are same as default, change them by yourself.min: 16 # Minimun font size in pxmax: 22 # Maxium font size in pxstart: "#72cecf" # Start color (hex, rgba, hsla or color keywords)end: "#ffbac3" # End color (hex, rgba, hsla or color keywords)amount: 200 # Amount of tags, change it if you have more than 200 tags# ---------------------------------------------------------------
# Third Party Plugins & Services Settings
# ---------------------------------------------------------------# Creative Commons 4.0 International License.
# See: https://creativecommons.org/share-your-work/licensing-types-examples
# Available values of license: by | by-nc | by-nc-nd | by-nc-sa | by-nd | by-sa | zero
# You can set a language value if you prefer a translated version of CC license, e.g. deed.zh
# CC licenses are available in 39 languages, you can find the specific and correct abbreviation you need on https://creativecommons.org
creative_commons:license: by-nc-salanguage: zh-CN  # deed.zh# Comments
# Valine
# For more information: https://github.com/amehime/MiniValine
valine:appId: appId # 配置你的appIdappKey: appKey # 配置你的appKeyplaceholder: ヽ(○´∀`)ノ♪ # Comment box placeholderavatar: mp # Gravatar style : mp, identicon, monsterid, wavatar, robohash, retropageSize: 10 # Pagination sizelang: zh-CNvisitor: true # Article reading statistic 文章阅读量统计NoRecordIP: false # Whether to record the commenter IP 不记录 IPserverURLs: https://tmxxs.lc-cn-n1-shared.com # When the custom domain name is enabled, fill it in here (it will be detected automatically by default, no need to fill in)powerMode: truetagMeta:visitor: 新朋友master: 主人friend: 小伙伴investor: 金主粑粑tagColor:master: "var(--color-orange)"friend: "var(--color-aqua)"investor: "var(--color-pink)"tagMember:master:# - hash of master@email.com# - hash of master2@email.comfriend:# - hash of friend@email.com# - hash of friend2@email.cominvestor:# - hash of investor1@email.com# bgm 背景音乐
audio:- title: 列表1list:- https://music.163.com/#/playlist?id=2943811283- https://music.163.com/#/playlist?id=2297706586- title: 列表2list:- https://music.163.com/#/playlist?id=2031842656# random image api
# 随机图库
image_server: # "https://acg.xydwz.cn/api/api.php"# Algolia Search
# For more information: https://www.algolia.com
search:hits:per_page: 10# Dependencies: https://github.com/amehime/hexo-renderer-multi-markdown-it
pangu: false# Quicklink Support
# For more information: https://github.com/GoogleChromeLabs/quicklink
quicklink:# Custom a time in milliseconds by which the browser must execute prefetching.timeout: 3000# Default (true) will attempt to use the fetch() API if supported (rather than link[rel=prefetch]).priority: true# For more flexibility you can add some patterns (RegExp, Function, or Array) to ignores.# See: https://github.com/GoogleChromeLabs/quicklink#custom-ignore-patternsignores:# ---------------------------------------------------------------
# analytics & SEO Settings
# ---------------------------------------------------------------
baidu_analytics: # <app_id># Disable Baidu transformation on mobile devices.
disable_baidu_transformation: true# Automatically add external URL with Base64 encrypt & decrypt.
exturl: true# Google Webmaster tools verification.
# See: https://www.google.com/webmasters
google_site_verification:# Bing Webmaster tools verification.
# See: https://www.bing.com/webmaster
bing_site_verification:# Yandex Webmaster tools verification.
# See: https://webmaster.yandex.ru
yandex_site_verification:# Baidu Webmaster tools verification.
# See: https://ziyuan.baidu.com/site
baidu_site_verification:# Enable baidu push so that the blog will push the url to baidu automatically which is very helpful for SEO.
baidu_push: false# minify 配置,压缩css/js/html
minify:html:enable: trueexclude: # 排除 hexo-feed 用到的模板文件- '**/json.ejs'- '**/atom.ejs'- '**/rss.ejs'css:enable: trueexclude:- '**/*.min.css'js:enable: truemangle:toplevel: trueoutput:compress:exclude:- '**/*.min.js'# 代码高亮
highlight:enable: falseprismjs:enable: falseautoprefixer:exclude:- '*.min.css'keywords: java,git,cas #站点关键词,用 “,” 分隔feed:limit: 20order_by: "-date"tag_dir: falsecategory_dir: falserss:enable: truetemplate: "themes/shoka/layout/_alternate/rss.ejs"output: "rss.xml"atom:enable: truetemplate: "themes/shoka/layout/_alternate/atom.ejs"output: "atom.xml"jsonFeed:enable: truetemplate: "themes/shoka/layout/_alternate/json.ejs"output: "feed.json"#! ---------------------------------------------------------------
#! DO NOT EDIT THE FOLLOWING `vendors` SETTINGS
#! UNLESS YOU KNOW WHAT YOU ARE DOING
#! Script dependencies will be combined with jsDelivr (cdn.jsdelivr.net)
#! ---------------------------------------------------------------
vendors:css:katex: npm/katex@0.12.0/dist/katex.min.csscomment: css/comment.cssfancybox: combine/npm/@fancyapps/fancybox@3.5.7/dist/jquery.fancybox.min.css,npm/justifiedGallery@3.8.1/dist/css/justifiedGallery.min.cssjs:pace: npm/pace-js@1.0.2/pace.min.jspjax: npm/pjax@0.2.8/pjax.min.jsfetch: npm/whatwg-fetch@3.4.0/dist/fetch.umd.min.jsanime: npm/animejs@3.2.0/lib/anime.min.jsalgolia: npm/algoliasearch@4/dist/algoliasearch-lite.umd.jsinstantsearch: npm/instantsearch.js@4/dist/instantsearch.production.min.jslazyload: npm/lozad@1/dist/lozad.min.jsquicklink: npm/quicklink@2/dist/quicklink.umd.jsfancybox: combine/npm/jquery@3.5.1/dist/jquery.min.js,npm/@fancyapps/fancybox@3.5.7/dist/jquery.fancybox.min.js,npm/justifiedGallery@3.8.1/dist/js/jquery.justifiedGallery.min.jsvaline: gh/amehime/MiniValine@4.2.2-beta10/dist/MiniValine.min.jscopy_tex: npm/katex@0.12.0/dist/contrib/copy-tex.min.jschart: npm/frappe-charts@1.5.0/dist/frappe-charts.min.iife.min.js
4、全局配置文件
全局配置文件 _config.yml 的使用参考官网,基本照着官网来就好,个人全局配置文件参考:
# Hexo Configuration
## Docs: https://hexo.io/docs/configuration.html
## Source: https://github.com/hexojs/hexo/# Site
title:
subtitle: '真正的大师永远都怀着一颗学徒的心'
description: '欢迎来到 pitt1997 的个人博客!'
keywords:
author: pitt1997
language: zh-CN
timezone: 'Asia/Shanghai'# URL
## Set your site url here. For example, if you use GitHub Page, set url as 'https://username.github.io/project'
url: https://pitt1997.github.io
permalink: :year/:month/:day/:title/
permalink_defaults:
pretty_urls:trailing_index: true # Set to false to remove trailing 'index.html' from permalinkstrailing_html: true # Set to false to remove trailing '.html' from permalinks# Directory
source_dir: source
public_dir: public
tag_dir: tags
archive_dir: archives
category_dir: categories
code_dir: downloads/code
i18n_dir: :lang
skip_render:# Writing
new_post_name: :title.md # File name of new posts
default_layout: post
titlecase: false # Transform title into titlecase
external_link:enable: true # Open external links in new tabfield: site # Apply to the whole siteexclude: ''
filename_case: 0
render_drafts: false
post_asset_folder: false
relative_link: false
future: true
# highlight:
#   enable: true
#   line_number: true
#   auto_detect: false
#   tab_replace: ''
#   wrap: true
#   hljs: false
# prismjs:
#   enable: false
#   preprocess: true
#   line_number: true
#   tab_replace: ''
highlight:enable: false # edit for Theme.shokaline_number: trueauto_detect: truetab_replace: ''
prismjs:enable: false # edit for Theme.shoka# Home page setting
# path: Root path for your blogs index page. (default = '')
# per_page: Posts displayed per page. (0 = disable pagination)
# order_by: Posts order. (Order by date descending by default)
index_generator:path: ''per_page: 10order_by: -date# Category & Tag
# 这里配置分类和标签
default_category: uncategorized
category_map:Java基础: javaHexo: Hexo微服务: javamore
tag_map:# Metadata elements
## https://developer.mozilla.org/en-US/docs/Web/HTML/Element/meta
meta_generator: true# Date / Time format
## Hexo uses Moment.js to parse and display date
## You can customize the date format as defined in
## http://momentjs.com/docs/#/displaying/format/
date_format: YYYY-MM-DD
time_format: HH:mm:ss
## updated_option supports 'mtime', 'date', 'empty'
updated_option: 'mtime'# Pagination
## Set per_page to 0 to disable pagination
per_page: 10
pagination_dir: page# Include / Exclude file(s)
## include:/exclude: options only apply to the 'source/' folder
include:
exclude:
ignore:# Extensions
## Plugins: https://hexo.io/plugins/
## Themes: https://hexo.io/themes/
theme: shoka# Deployment
## Docs: https://hexo.io/docs/one-command-deployment
deploy:type: gitrepo: git@github.com:pitt1997/pitt1997.github.io.gitbranch: main# edit for Theme.shoka
autoprefixer:exclude:- '*.min.css'markdown:render: # 渲染器设置html: false # 过滤 HTML 标签xhtmlOut: true # 使用 '/' 来闭合单标签 (比如
)。breaks: true # 转换段落里的 '\n' 到 <br>。linkify: true # 将类似 URL 的文本自动转换为链接。typographer:quotes: '“”‘’'plugins: # markdown-it插件设置- plugin:name: markdown-it-toc-and-anchorenable: trueoptions: # 文章目录以及锚点应用的class名称,shoka主题必须设置成这样tocClassName: 'toc'anchorClassName: 'anchor'- plugin:name: markdown-it-multimd-tableenable: trueoptions:multiline: truerowspan: trueheaderless: true- plugin:name: ./markdown-it-furiganaenable: trueoptions:fallbackParens: "()"- plugin:name: ./markdown-it-spoilerenable: trueoptions:title: "你知道得太多了"minify:html:enable: truestamp: falseexclude:- '**/json.ejs'- '**/atom.ejs'- '**/rss.ejs'css:enable: truestamp: falseexclude:- '**/*.min.css'js:enable: truestamp: falsemangle:toplevel: trueoutput:compress:exclude:- '**/*.min.js'plugins:- hexo-algoliasearchalgolia:appId: "appId"apiKey: "apiKey"adminApiKey: "adminApiKey"chunkSize: 5000indexName: "hexo-index"fields:- title #必须配置- path #必须配置- categories #推荐配置- content:strip:truncate,0,2000- gallery- photos- tagsfilter:- titlefeed:limit: 20order_by: "-date"tag_dir: falsecategory_dir: falserss:enable: truetemplate: "themes/shoka/layout/_alternate/rss.ejs"output: "rss.xml"atom:enable: truetemplate: "themes/shoka/layout/_alternate/atom.ejs"output: "atom.xml"jsonFeed:enable: truetemplate: "themes/shoka/layout/_alternate/json.ejs"output: "feed.json"symbols_count_time:symbols: truetime: truetotal_symbols: truetotal_time: trueexclude_codeblock: falseawl: 4wpm: 275suffix: "mins."
5、编译部署
配置文件修改完成之后再执行一遍 hexo clean & hexo deploy 即可重新部署。
$ hexo clean
$ hexo deploy
6、全局搜索
全局搜索 Algolia 的配置参考以下文章:
Hexo 集成 Algolia
Hexo 增加 Algolia 功能
完成 Algolia 注册之后,在全局配置文件中完成相关配置项:
algolia:appId: #Your appIdapiKey: #Your apiKeyadminApiKey: #Your adminApiKeychunkSize: 5000indexName: #"shoka"fields:- title #必须配置- path #必须配置- categories #推荐配置- content:strip:truncate,0,2000- gallery- photos- tags
7、评论系统
无后端评论系统 Valine ,首先完成 如何获取 LeanCloud 的 appId 和 appKey。
完成注册之后开始主题配置文件中完成相关配置项:
valine:appId: #Your_appIdappKey: #Your_appkeyplaceholder: ヽ(○´∀`)ノ♪ # Comment box placeholderavatar: mp # Gravatar style : mp, identicon, monsterid, wavatar, robohash, retropageSize: 10 # Pagination sizelang: zh-CNvisitor: true # 文章访问量统计NoRecordIP: false # 不记录 IPserverURLs: # When the custom domain name is enabled, fill it in here (it will be detected automatically by default, no need to fill in)powerMode: true # 默认打开评论框输入特效tagMeta:visitor: 新朋友master: 主人friend: 小伙伴investor: 金主粑粑tagColor:master: "var(--color-orange)"friend: "var(--color-aqua)"investor: "var(--color-pink)"tagMember:master:# - hash of master@email.com# - hash of master2@email.comfriend:# - hash of friend@email.com# - hash of friend2@email.cominvestor:# - hash of investor1@email.com
8、图片 & 头像
要修改一些图片如头像,可以在\themes\shoka\source\images路径下修改,直接替换,要同名!
发布博客
部署完成之后我们开始写一篇文章,该步骤参考文章。
创建文章
其中 title 为文章的标题。
$ hexo new "title"
执行完成后 hexo 会根据目录下 scaffolds/post.md,在source/_posts 文件夹下创建一个名为 title.md 的文件。
---
title: hello-world
date: 2022-06-23 01:03:24
tags:
---balabala......
接下来你就可以正式开始写文章了。
部署文章
$ hexo g -c
$ hexo s
$ hexo d
执行完成之后再次访问就可以看到内容了~
访问博客
个人域名访问
我们的博客已经可以通过 https://pitt1997.github.io/ 链接的形式进行访问,那么如何以其他域名的形式进行访问呢?首先需要注册一个腾讯云账户,在腾讯云上买一个域名,例如域名为 pitt1997.cloud,然后设置登录 GitHub,进入之前创建的仓库,点击 Settings - Code and automation - Pages 设置 Custom domain,输入你的域名,然后直接访问 http://pitt1997.cloud 就可以访问到博客。
SEO 优化 & 站点收录
很多程序员朋友都有在 GitHub Pages 上搭建自己的个人博客,对于个人博客,没有被搜索引擎收录的话,别人基本是是看不到的。那么如何查看个人博客网站是否被收录?
site:你的网站
比如我的:site:pitt1997.github.io
通过在百度中搜索结果如下则代表还没有被收录。

站点地图
首先介绍一下站点地图,即 sitemap, 是一个页面,上面放置了网站上需要搜索引擎抓取的所有页面的链接。站点地图可以告诉搜索引擎网站上有哪些可供抓取的网页,以便搜索引擎可以更加智能地抓取网站。所以我们首先需要生成一个站点地图。
安装百度和 Google 的站点地图生成插件:
$ npm install hexo-generator-baidu-sitemap --save
$ npm install hexo-generator-sitemap --save
全局配置文件_config.yml 添加站点目录,在下面添加:
# 站点地图
sitemap:path: sitemap.xml
baidusitemap:path: baidusitemap.xml
Hexo 命令 hexo clean & hexo deploy 然后重新推送到服务器,在访问如下 URL:
https://你的域名/sitemap.xml
https://你的域名/baidusitemap.xml
看看有没有 XML 内容,有的话就成功。

百度收录
1、添加网站
登录百度站长平台,在站点管理中添加你自己的网站。
验证网站有三种方式:文件验证、HTML 标签验证、CNAME 验证,我们选择 HTML 标签验证。

然后需要验证网站,我选择的是 https://,这根据你前面是否添加 SSL 证书来选择。并且我使用的是不带 www 的,看个人。然后到第三步,我使用的 HTML 标签验证。
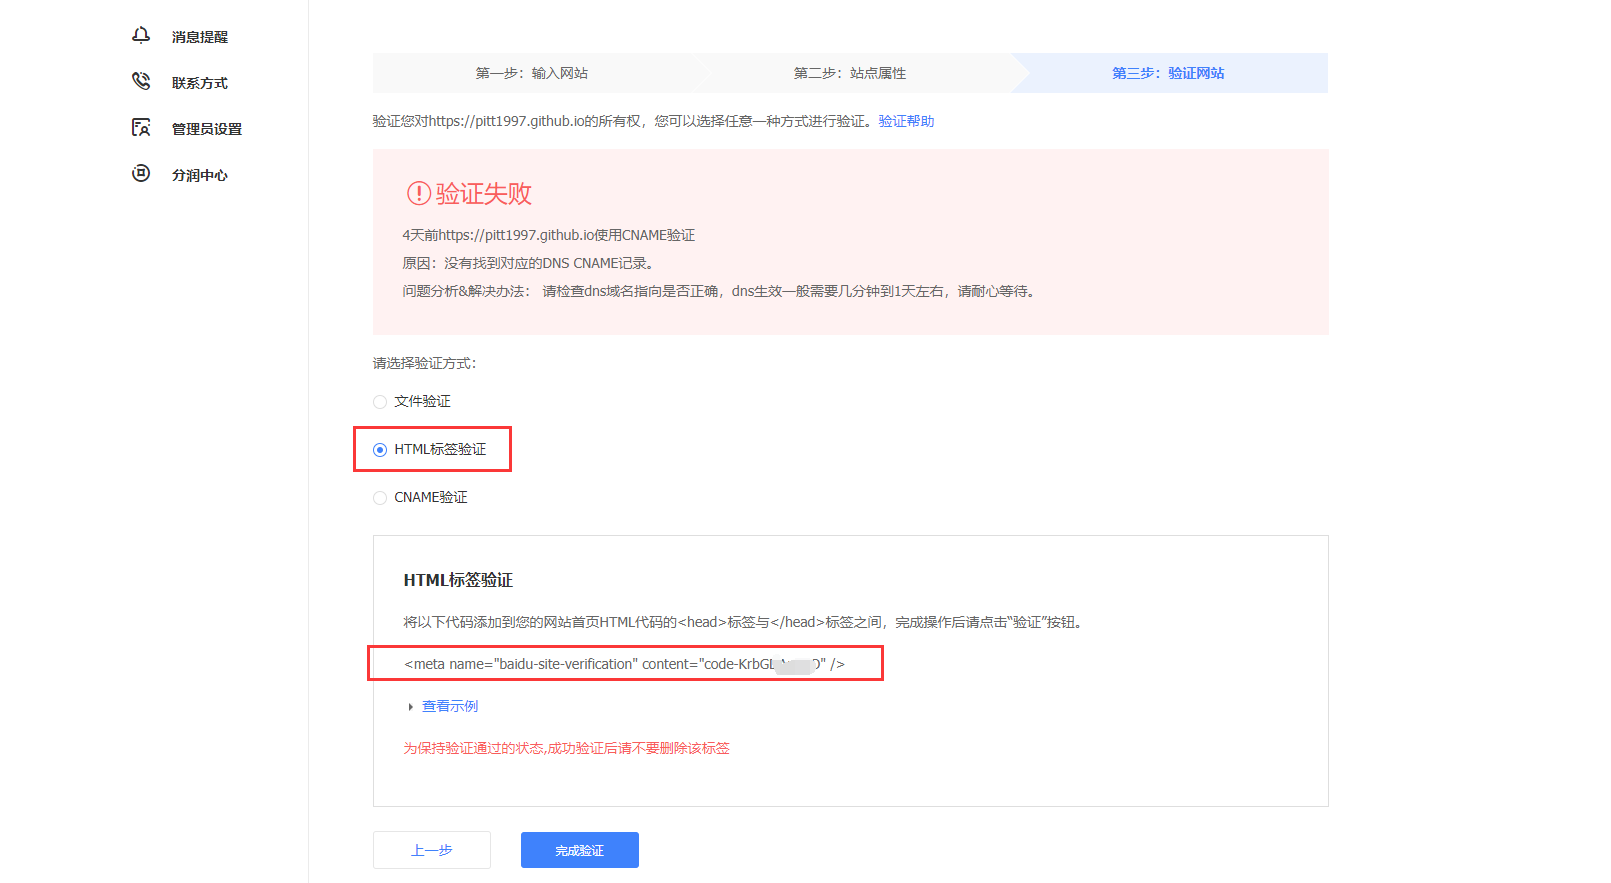
把 content 中的字符串复制到主题配置文件中的 baidu_site_verification 下,主题配置文件 _config.yml 配置如下:
# Baidu Webmaster tools verification.
# See: https://ziyuan.baidu.com/site
baidu_site_verification: code-xxxsite_verification:- name: baidu_site_verificationcontent: code-xxx
2、验证成功
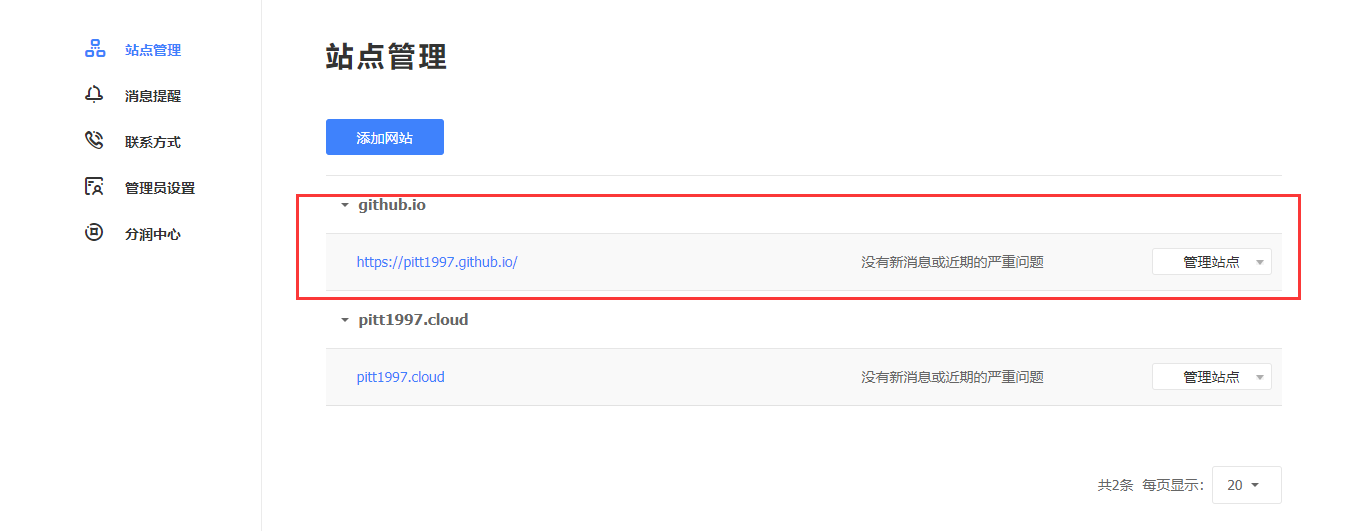
配置站点完成后重新 hexo deploy 部署到网站,然后点击上一步中的 “完成验证” 按钮,出现验证成功则完成验证,再次查看站点管理情况如下:
完成验证之后,会生成一个 token ,我们进入普通收录,获取 token。
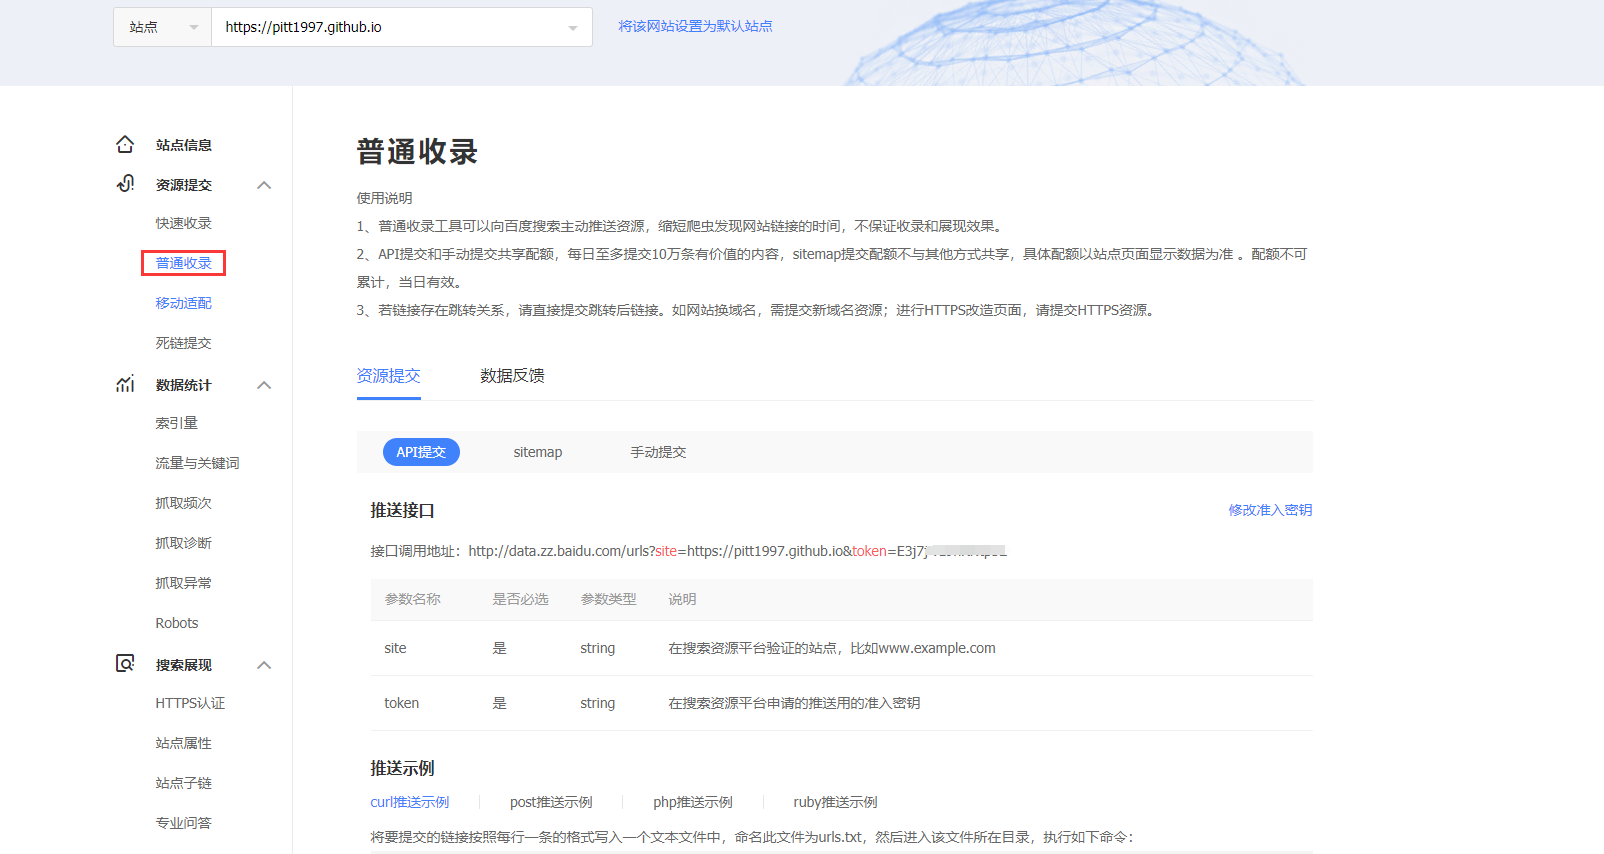
可以看到我们使用资源提交的方式是 API 提交,也可使用 sitemap 和 手动提交的方式,具体可参考该文章。
3、提交链接
百度站长平台的链接提交方式分为自动提交和手动提交两种,此处只讲自动提交,手动提交按照要求操作即可。
主动推送
主动推送最为快速的提交方式,是被百度收录最快的推送方式。主动推送可以通过安装插件实现:
$ npm install hexo-baidu-url-submit --save
然后到全局配置文件_config.yml,添加以下内容:
# 主动推送百度,被百度收录
baidu_url_submit:count: 10 # 提交最新的10个链接host: # 百度站长平台中注册的域名token: # 秘钥,百度站长平台 > 推送接口 > 接口调用地址中token字段path: baidu_urls.txt # 文本文档的地址, 新链接会保存在此文本文档里,不用改
host 配置就是我们博客的域名,即 https://pitt1997.github.io ,token 就是完成验证之后由站点生成的。其次,记得查看_config.yml 文件中 url 的值, 必须包含是百度站长平台注册的域名, 比如:
# URL
url: https://pitt1997.github.io
然后,修改全局配置文件,修改 deploy配置项,之前的配置项如下:
deploy:type: gitrepo: git@github.com:pitt1997/pitt1997.github.io.gitbranch: main
修改为:
deploy:- type: gitrepo: git@github.com:pitt1997/pitt1997.github.io.gitbranch: main- type: baidu_url_submitter
再次 hexo deploy 重新部署,可以看到推送成功的日志。
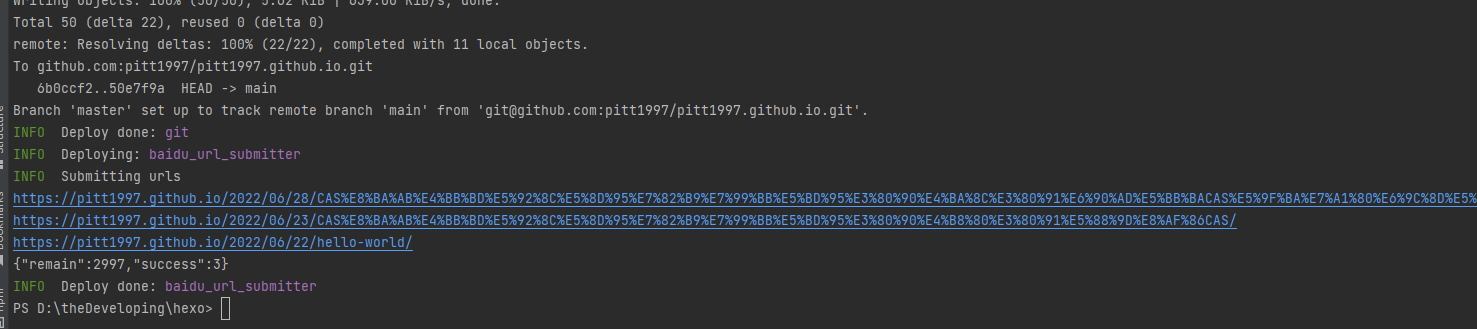
响应参数意义如下:

success:成功推送条数
remain:当天剩余可推送条数
主动推送的实现原理如下:
新链接的产生, hexo generate 会产生一个文本文件,里面包含最新的链接;新链接的提交, hexo deploy 会从上述文件中读取链接,提交至百度搜索引擎。
至此百度收录已经完成,后续通过 site:pitt1997.github.io 进行查询是否收录完成,然后就是百度的收录比较慢,其他网站的收录方式可参考该文章。
谷歌收录
提交谷歌搜索引擎比较简单,在提交之前,我们依然可以使用 site:域名 查看网站是否被收录。进入谷歌站长,登录你的谷歌账号。然后如下操作,要是第一次就弹出一个让你输入域名的提示框,就直接输入你要收录的网站域名就行。首先开始使用,请先选择资源类型操作,具体链接。
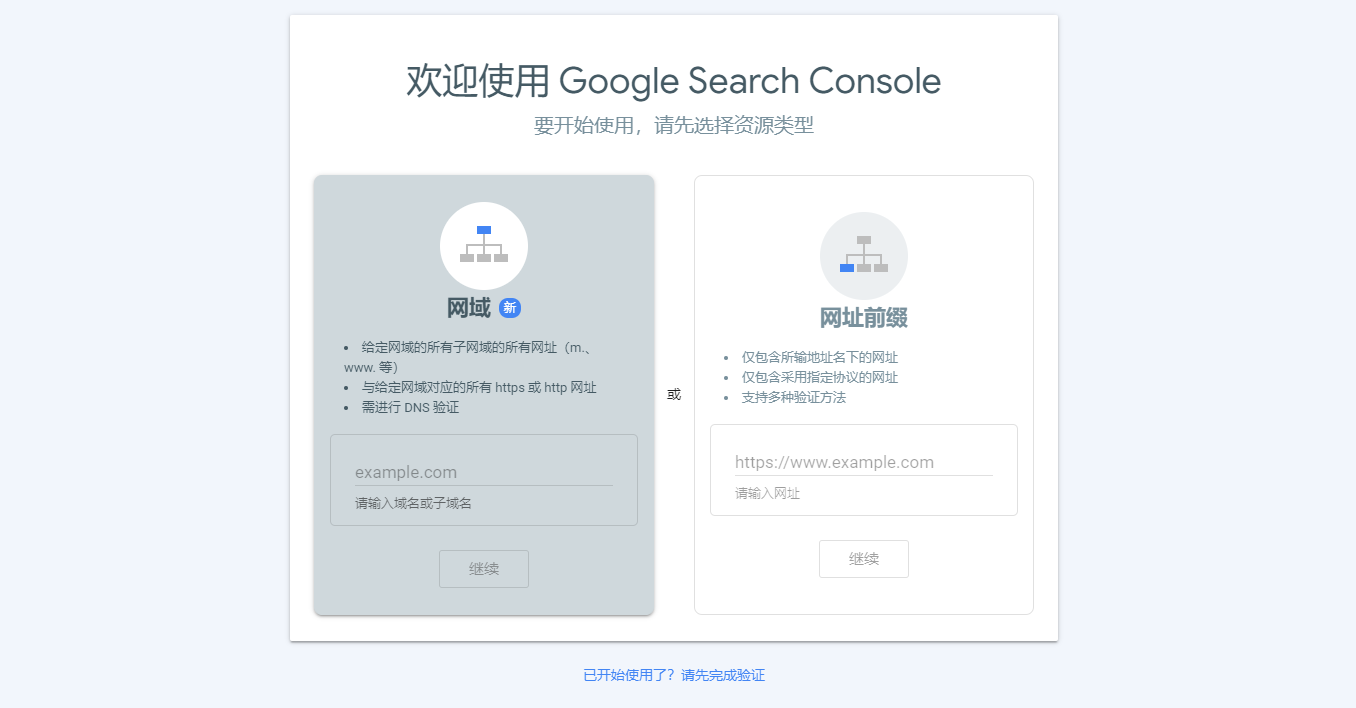
填写网站域名,然后继续。
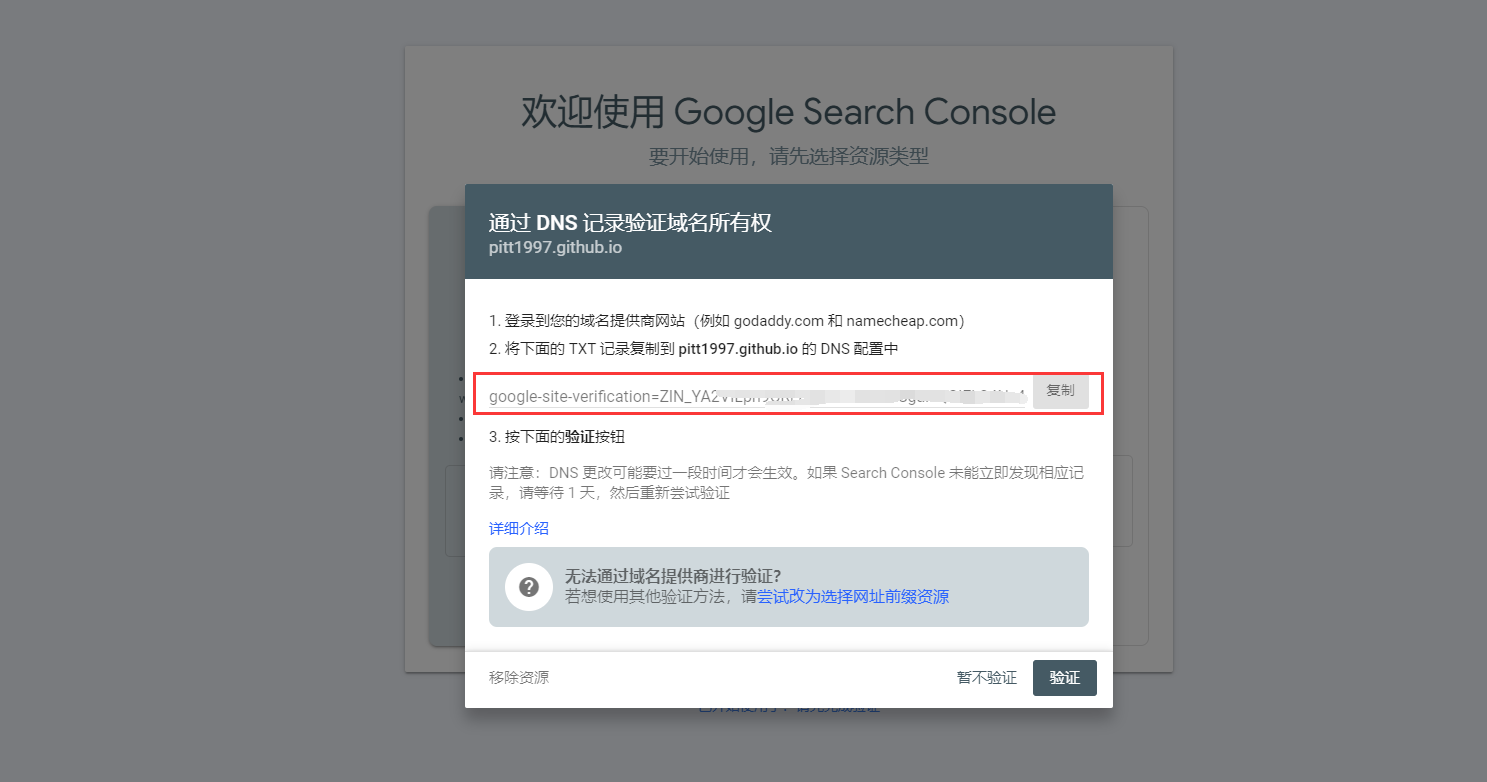
步骤基本同百度收录。
维护博客
如果你现在在自己的笔记本上写的博客,部署在了网站上,那么你在家里用台式机,或者实验室的台式机,发现你电脑里面没有博客的文件,此时可以把博客的源码放到 Git 的私有仓库进行个人维护。
相关参考
- hexo 史上最全博客搭建
- Hexo+shoka主题+github部署
- 使用 zeit.co 托管 hexo 静态博客
- 如何让百度收录 GitHub Pages 个人博客
- Hexo 框架 (六):SEO 优化及站点被搜索引擎收录设置