文章目录
- 1、简介
- 2、下载和安装
- 2.1 平台支持
- 2.2 MongoDB Community Server
- 2.3 MongoDB Shell
- 2.4 MongoDB Compass
- 2.5 pymongo库
- 3、概念
- 3.1 数据库
- 3.2 文档(Document)
- 3.3 集合(Collection)
- 3.4 元数据
- 3.5 数据类型
- 4、Python代码测试
- 4.1 连接数据库
- 4.2 指定数据库和集合
- 4.3 插入数据
- 4.4 删除数据
- 4.5 修改数据
- 4.6 查询数据
- 结语
1、简介
MongoDB是一个文档数据库,旨在简化应用程序 开发和扩展。
官网地址:
https://www.mongodb.com/
MongoDB 是一个基于分布式文件存储的数据库。由 C++ 语言编写。旨在为 WEB 应用提供可扩展的高性能数据存储解决方案。

MongoDB 是一个介于关系数据库和非关系数据库之间的产品,是非关系数据库当中功能最丰富,最像关系数据库的。
MongoDB 是由C++语言编写的,是一个基于分布式文件存储的开源数据库系统。
MongoDB 旨在为WEB应用提供可扩展的高性能数据存储解决方案。在高负载的情况下,添加更多的节点,可以保证服务器性能。
MongoDB 将数据存储为一个文档,数据结构由键值(key=>value)对组成。MongoDB 文档类似于 JSON 对象。字段值可以包含其他文档,数组及文档数组。
MongoDB 数据库主要用于海量存储,常被用在数据采集项目中。数据存储不需要固定模式,不需要多余操作就可以横向扩展,低成本,没有复杂的关系,安装简单,支持各种编程语言等。
2、下载和安装
2.1 平台支持
MongoDB 6.0 Community Edition 支持以下 64 位版本的 Windowsx86_64。
MongoDB仅支持这些平台的64位版本。
- Windows Server 2019
- Windows 10 / Windows Server 2016
2.2 MongoDB Community Server
MongoDB有两个服务器版本: 社区版和商业版。
其中社区版又分为如下几种:
- 在 Linux 上安装
安装 MongoDB 社区版和所需的依赖项 Linux。- Install MongoDB Community Edition on Red Hat or CentOS
- Install MongoDB Community Edition on Ubuntu
- Install MongoDB Community Edition on Debian
- Install MongoDB Community Edition on SUSE
- Install MongoDB Community Edition on Amazon Linux
- 在 macOS 上安装
从MongoDB在macOS系统上安装MongoDB社区版 档案。- Install MongoDB Community Edition on macOS
- 在Windows上安装
在Windows系统上安装MongoDB社区版,并 (可选)将MongoDB作为Windows服务启动。- Install MongoDB Community Edition on Windows
- 使用 Docker 安装
安装 MongoDB Community Docker 容器。- Install MongoDB Community with Docker
这里以Windows为例说明。
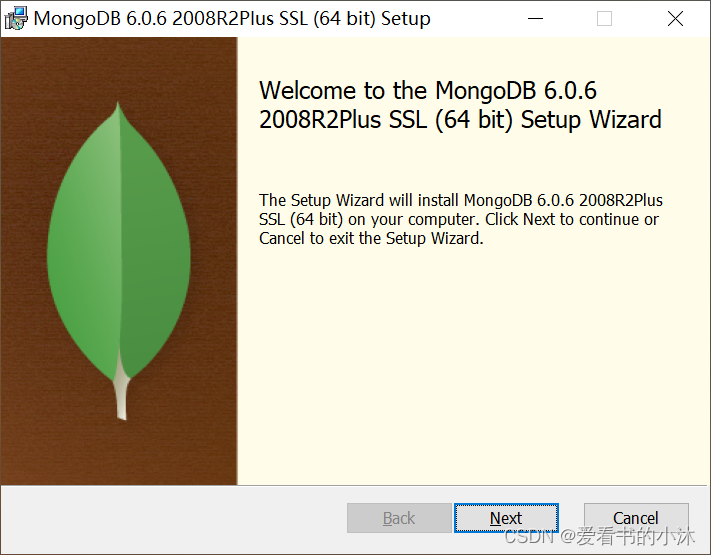
直接运行安装程序mongodb-windows-x86_64-6.0.6-signed.msi,最开始界面如下:
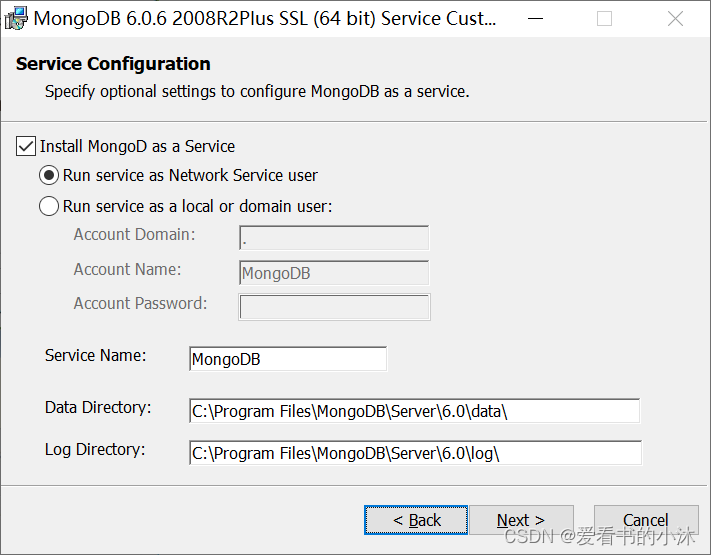
4.0之后,可以再MongoDB安装期间将MongoDB配置为服务。把MongoDB配置为Windows服务。勾选Install MongoD as a Service(默认勾选),如果不勾选就只安装二进制文件,不作为服务。 然后选择 Run Service as Network Service user(以网络服务用户的身份运行)(默认)
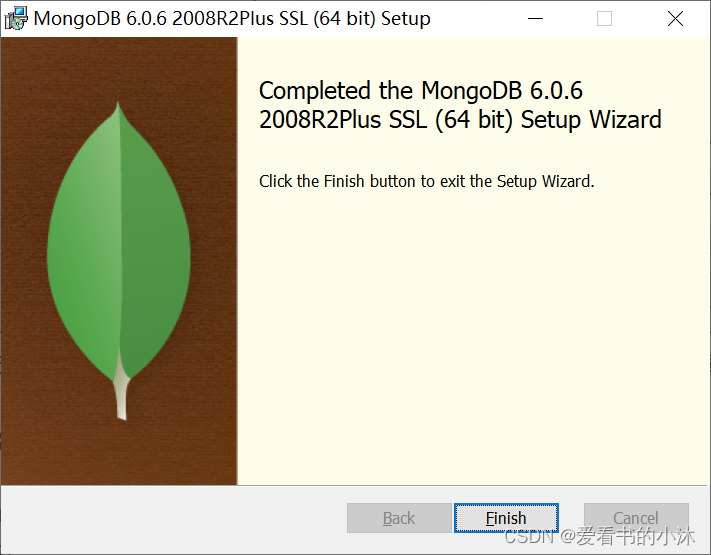
点击next后把 Install MongoDB Compass勾选给去掉。一般建议单独下载安装。最后安装完成如下:
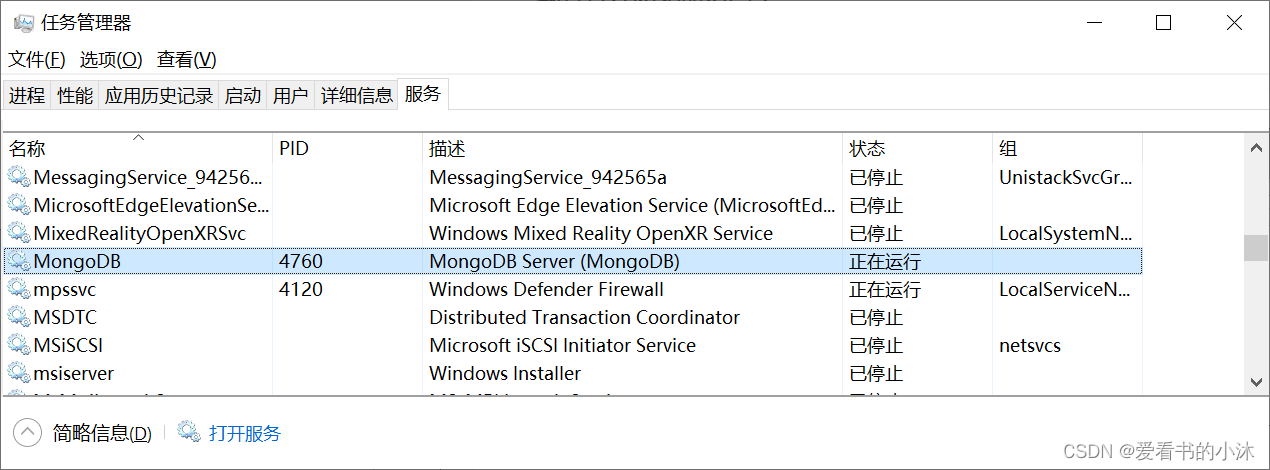
按 Ctrl + Shfit + Esc,打开任务管理器,切换到服务选项卡,下拉找到 MongoDB 服务。在这里可以观察到 MongoDB 的状态,默认是自动启动,即开机自启。
或者打开浏览器访问 :
http://localhost:27017

显示如上信息,说明MongoDB服务启动成功。
# 开始MongoDB服务
net start mongodb
# 关闭MongoDB服务
net stop mongodb
您可以配置mongod和mongos实例位于 使用配置文件启动。配置文件包含 等效于mongod和mongos命令行选项。
mongod --config <configuration file>
mongod --config /etc/mongod.conf
mongos --config /etc/mongos.conf
mongod -f /etc/mongod.conf
mongos -f /etc/mongos.conf
以下是一个示例配置文件:
systemLog:destination: filepath: "/var/log/mongodb/mongod.log"logAppend: true
storage:journal:enabled: true
processManagement:fork: true
net:bindIp: 127.0.0.1port: 27017
setParameter:enableLocalhostAuthBypass: false
...
YAML 不支持缩进制表符:请改用空格。
2.3 MongoDB Shell
打开MongoDB 的安装目录,默认是 C:/Program Files/MongoDB/Server/6.0
MongoDB 目录如下:

其中,bin 是 MongoDB 提供的可执行程序的目录,data 是数据存储的目录,log 是日志存储的目录。后两者在过去都需要开发者手动创建。现在安装程序会自动创建。
现在查看bin 目录:

其中,mongod.exe 用来启动 MongoDB 服务,mongos.exe 用来管理分片集群。
在 MongDB 6 以前,这个目录下会有很多可执行程序,比如最常用的 mongo.exe,它用来连接到 MongoDB 服务,是一个 shell 环境的客户端工具。但是现在需要单独进行安装。
MongoDB Shell是连接(和使用)MongoDB的最快方式。使用这个可扩展的现代命令行界面轻松查询数据、配置设置和执行其他操作 - 充满了语法突出显示、智能自动完成、上下文帮助和错误消息。
注意:MongoDB Shell是一个开源(Apache 2.0),独立于MongoDB服务器开发的独立产品。
https://www.mongodb.com/try/download/shell

mongosh-1.10.1-win32-x64.zip
解压之后,打开bin文件夹如下:

将上面两个文件复制到MongoDB 服务器安装文件夹的bin里面:
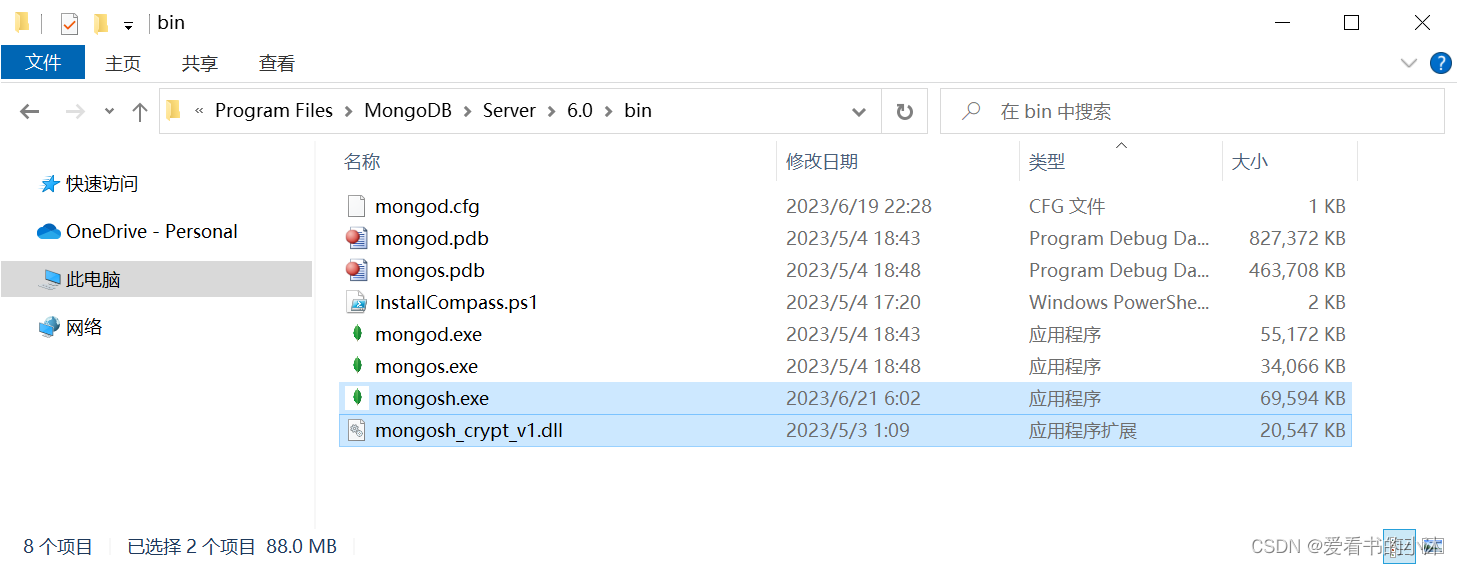
如果使用 Shell 命令的形式打开 MongoDB,最好先配置环境变量。
将上面的MongoDB服务器的bin文件夹路径添加到 Path 变量里面。
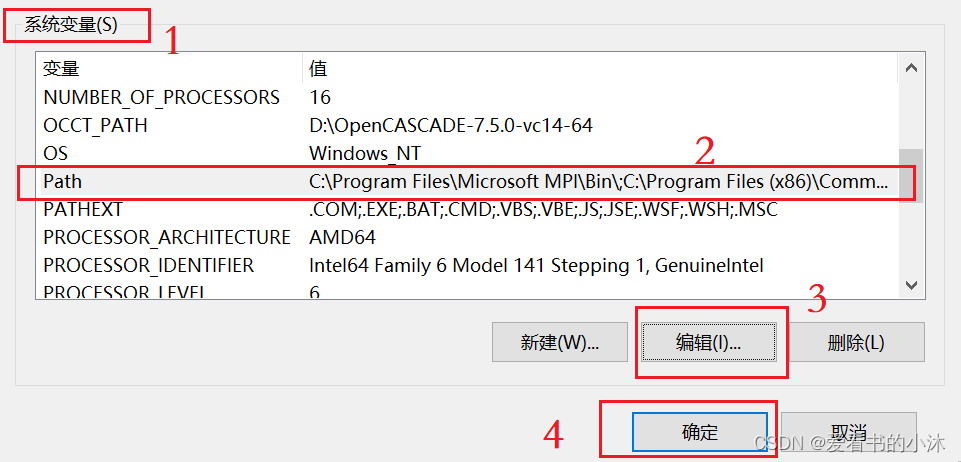
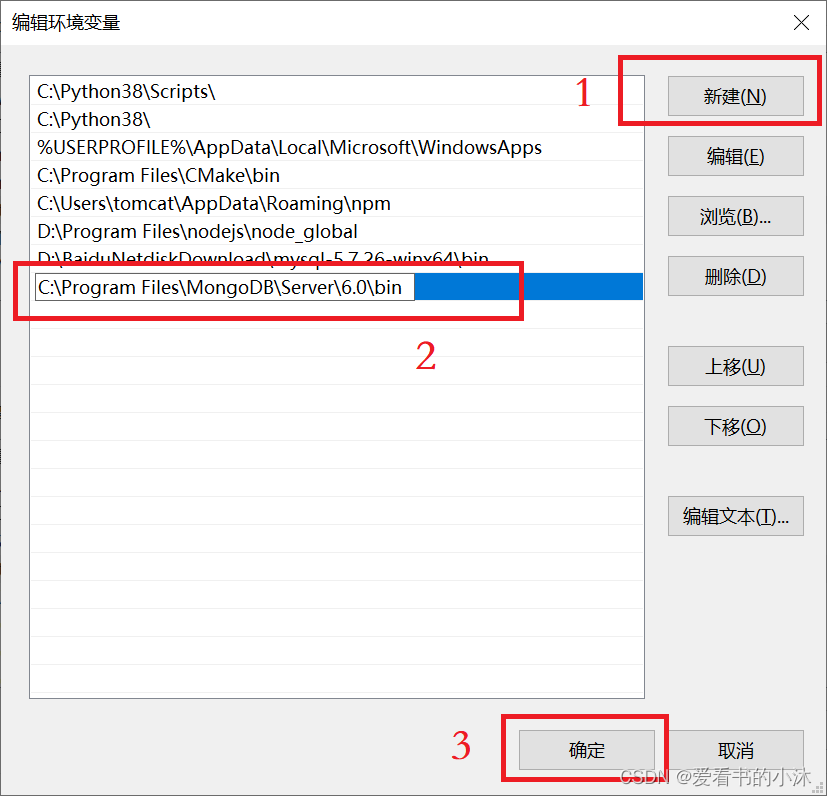
之后就可以在任意路径下使用 mongosh、mongod 等命令了。
- 连接mongodb服务器
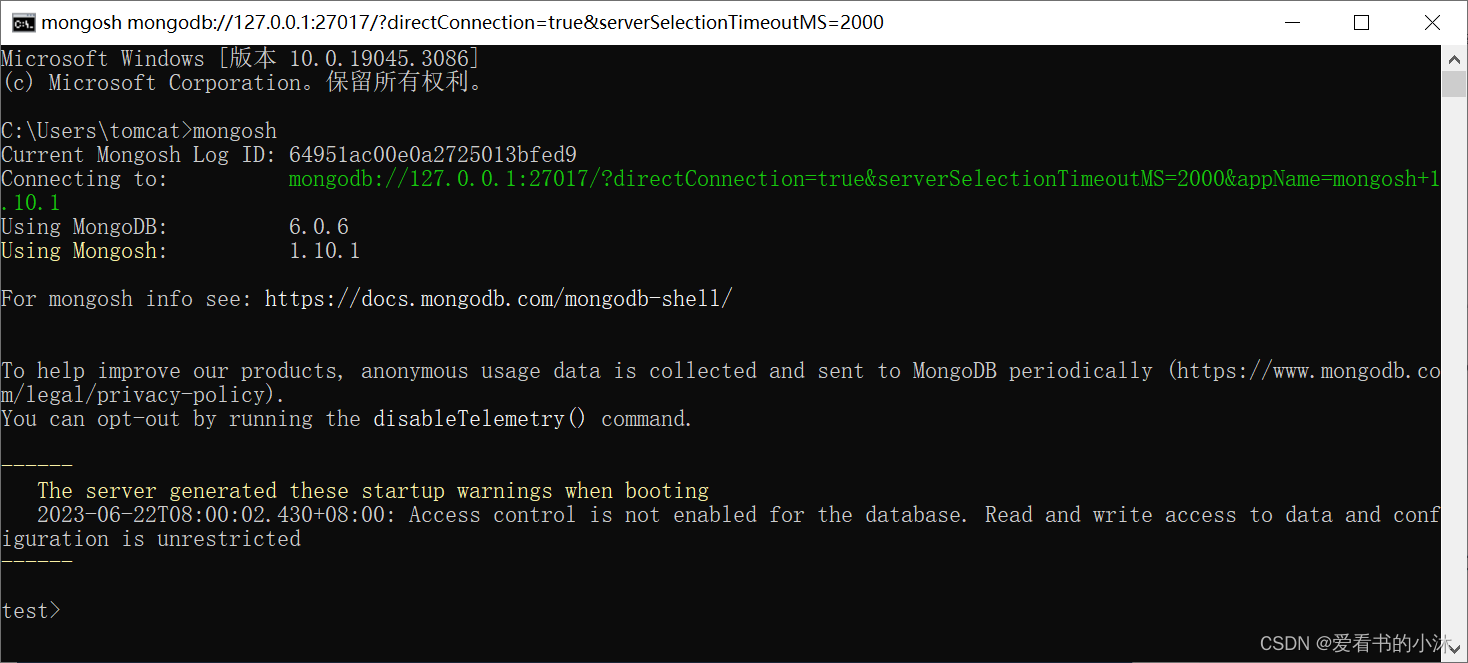
打开命令行工具,执行 mongosh.exe ,默认会连接 mongodb://localhost:27017 的 MongoDB 服务:
mongosh
# or
mongosh --port 27017
- 查看mongodb所有的数据库:
show databases
# or
show dbs

2.4 MongoDB Compass
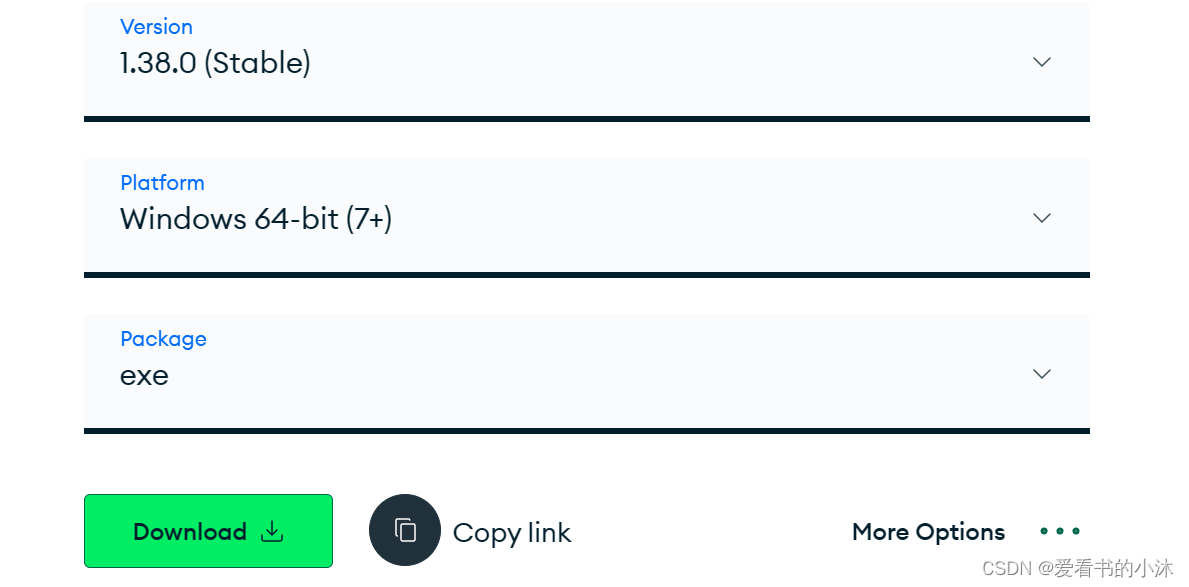
使用Compass(MongoDB的GUI)轻松探索和操作数据库。Compass 直观而灵活,提供详细的模式可视化、实时性能指标、复杂的查询功能等等。
请注意,MongoDB Compass有三个版本:具有所有功能的完整版本,没有写入或删除功能的只读版本,以及唯一网络连接与MongoDB实例的隔离版本。
https://www.mongodb.com/try/download/compass
2.5 pymongo库
python -m pip install pymongo
# or
python -m pip install pymongo==3.11
# or
python -m pip install --upgrade pymongo
3、概念
Mongo中的一些概念:
| SQL术语/概念 | MongoDB术语/概念 | 解释/说明 |
|---|---|---|
| database | database | 数据库 |
| table | collection | 数据库表/集合 |
| row | document | 数据记录行/文档 |
| column | field | 数据字段/域 |
| index | index | 索引 |
| table joins | 表连接,MongoDB不支持 | |
| primary key | primary key | 主键,MongoDB自动将_id字段设置为主键 |
3.1 数据库
一个mongodb中可以建立多个数据库。
MongoDB的默认数据库为"db",该数据库存储在data目录中。
MongoDB的单个实例可以容纳多个独立的数据库,每一个都有自己的集合和权限,不同的数据库也放置在不同的文件中。
- 命令:show dbs
命令可以显示所有数据的列表。

- 命令:db
命令可以显示当前数据库对象或集合。

- 命令:use
可以连接到一个指定的数据库。如果数据库不存在,则创建数据库,否则切换到指定数据库。

数据库名可以是满足以下条件的任意UTF-8字符串:
不能是空字符串("")。
不得含有' '(空格)、.、$、/、\和\0 (空字符)。
应全部小写。
最多64字节。
特殊作用的数据库:
admin: 从权限的角度来看,这是"root"数据库。要是将一个用户添加到这个数据库,这个用户自动继承所有数据库的权限。一些特定的服务器端命令也只能从这个数据库运行,比如列出所有的数据库或者关闭服务器。
local: 这个数据永远不会被复制,可以用来存储限于本地单台服务器的任意集合
config: 当Mongo用于分片设置时,config数据库在内部使用,用于保存分片的相关信息。
- 添加用户名和密码
设置超级管理员账号和密码:
use admindb.createUser({user: 'admin',    // 用户名(自定义)pwd: '123456',  // 密码(自定义)roles:[{role: 'root',   // 使用超级用户角色db: 'admin'     // 指定数据库}]
})
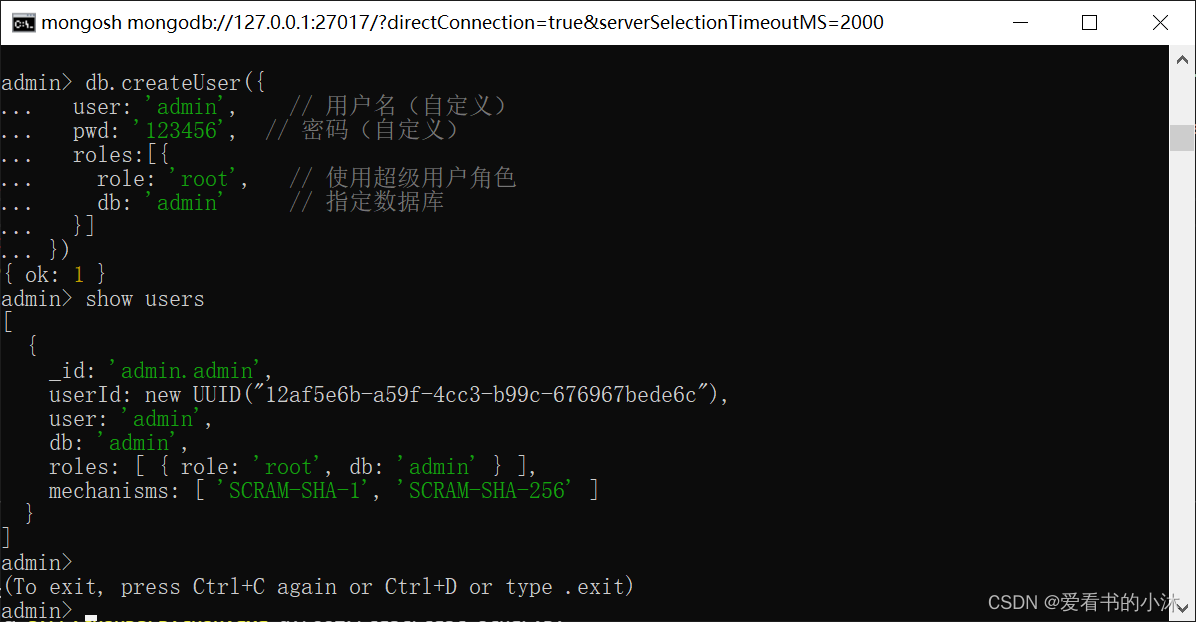
找到MongoDB安装目录下的bin目录中的mongod.cfg文件,开启权限验证功能:
security:authorization: enabled
重启MongoDB服务。连接数据库,并登录超级管理员账号。
除了设置超级管理员账号以外,还可以为每个数据库单独设置账号:
# 为自定义的数据库myMongoDB创建了一个用户hello,它具有对这个数据库的读写权限。
use myMongoDB  // 跳转到需要添加用户的数据库db.createUser({user: 'hello',          // 用户名pwd: '123456',      // 密码roles:[{role: 'readWrite',  // 读写权限角色db: 'myMongoDB'     // 数据库名}]
})
| 角色描述 | 角色标识 |
|---|---|
| 数据库用户角色 | read、readWrite |
| 数据库管理角色 | dbAdmin、dbOwner、userAdmin |
| 集群管理角色 | clusterAdmin、clusterManager、clusterMonitor、hostManager |
| 备份恢复角色 | backup、restore |
| 所有数据库角色 | readAnyDatabase、readWriteAnyDatabase、userAdminAnyDatabase、 dbAdminAnyDatabase |
| 超级用户角色 | root |
- 命令:db.help()
Display help for database methods.
db.help()

-
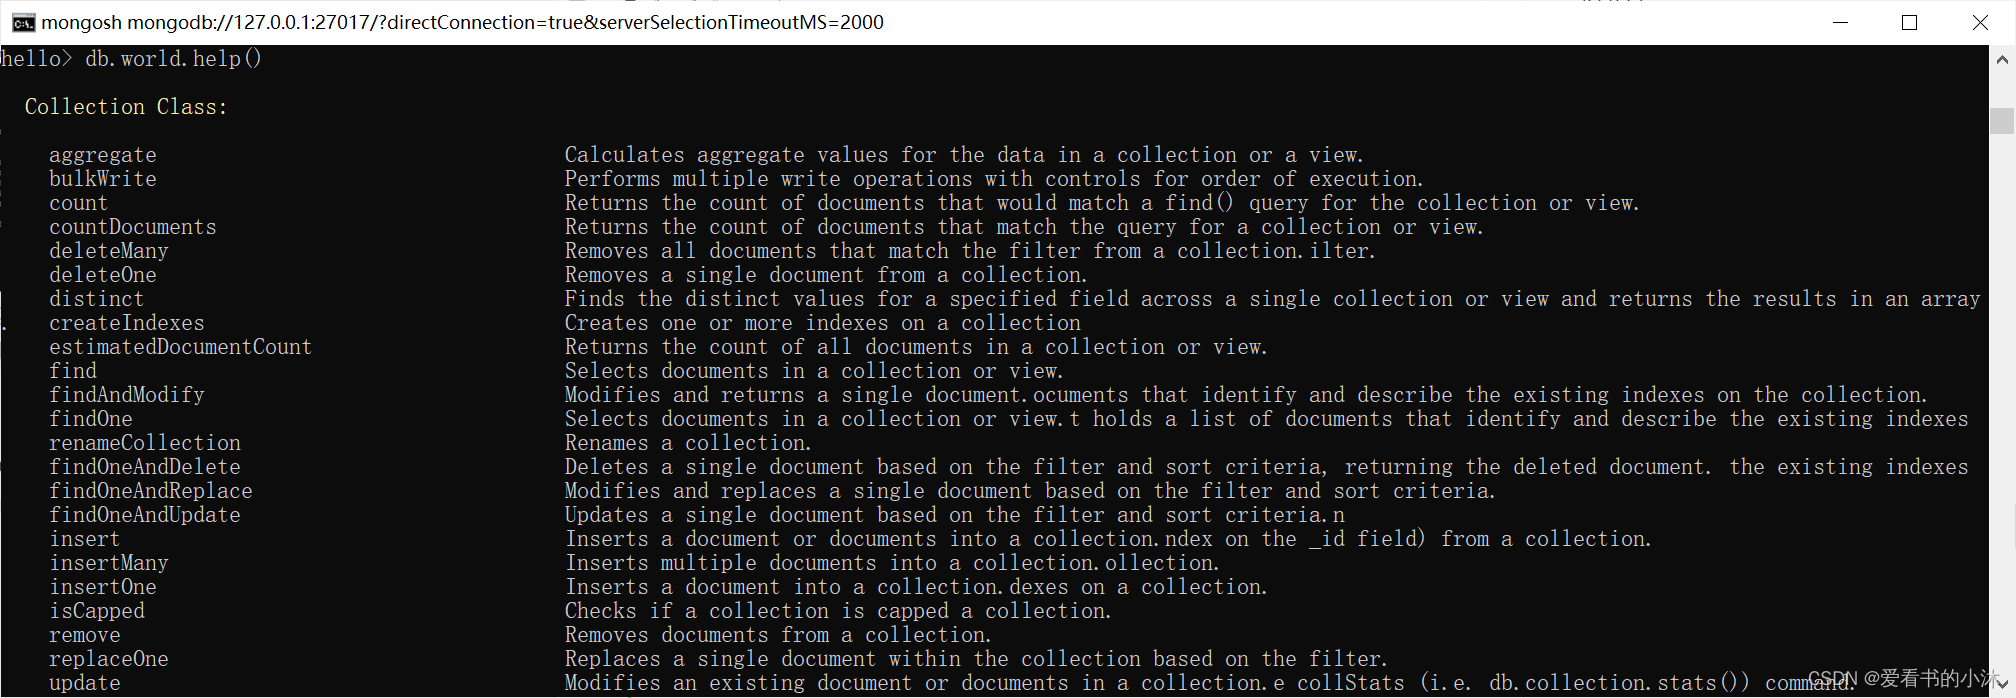
命令:db.collection.help()
Display help on collection methods. The can be the name of an existing collection or a non-existing collection.
-
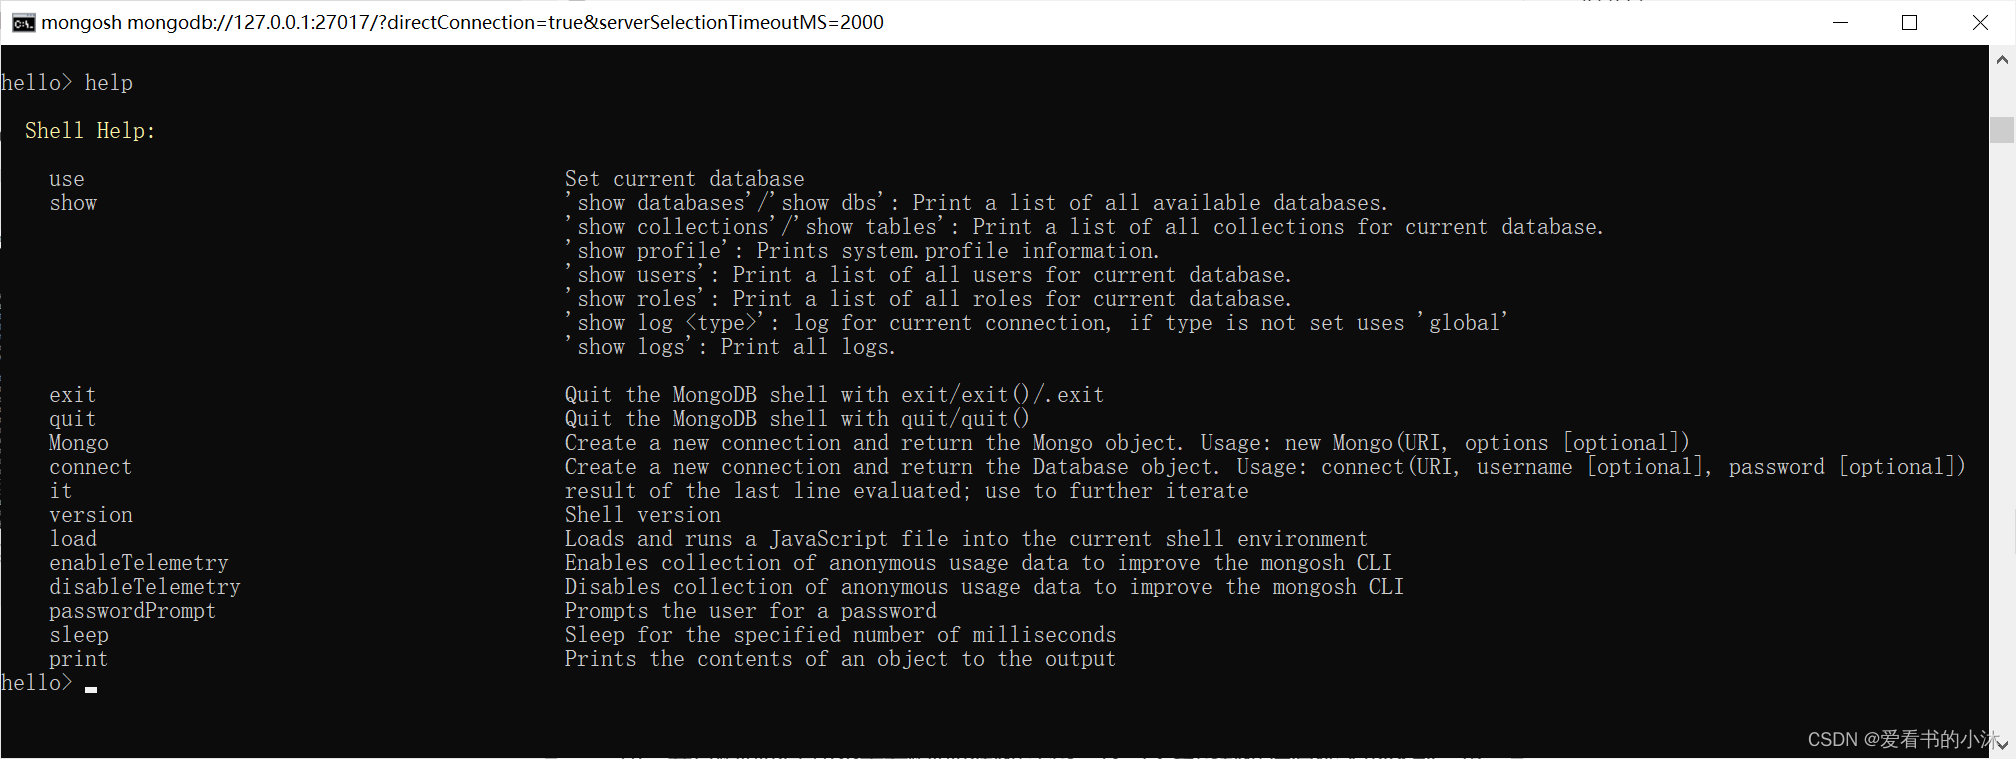
命令:help
Display help.
-
命令:show collections
Display a list of all collections for current database.

-
命令:show dbs
Display a list of all databases on the server.

-
命令:show tables
Display a list of collections in the current database. See show collections. -
命令:show users
Display a list of users for current database.

3.2 文档(Document)
文档是一组键值(key-value)对(即 BSON)。MongoDB 的文档不需要设置相同的字段,并且相同的字段不需要相同的数据类型,这与关系型数据库有很大的区别,也是 MongoDB 非常突出的特点。
一个简单的文档例子如下:

MongoDB中的记录是一个文档,它是一个数据结构组成 字段和值对。MongoDB文档类似于JSON。 对象。字段的值可能包括其他文档、数组、 和文档数组。
| RDBMS | MongoDB |
|---|---|
| 数据库 | 数据库 |
| 表格 | 集合 |
| 行 | 文档 |
| 列 | 字段 |
| 表联合 | 嵌入文档 |
| 主键 | 主键 (MongoDB 提供了 key 为 _id ) |
- 创建一个新数据库和集合
use myNewDatabase
db.myCollection.insertOne( { x: 1 } );

- 添加一个Document
db.collection.insertOne()
use sample_mflix
db.movies.insertOne({title: "The Favourite",genres: [ "Drama", "History" ],runtime: 121,rated: "R",year: 2018,directors: [ "Yorgos Lanthimos" ],cast: [ "Olivia Colman", "Emma Stone", "Rachel Weisz" ],type: "movie"}
)
#插入一条数据:
db.stu.insert({name:'zhangsan','age':20});
#插入一条数据,指定主键:
db.stu.insert({_id:3,'name':'lisi','age':28});
#增加多条数据:
db.stu.insert(
[{name:'wangyi','age':18},{'name':'sunwu','age':25}])
- 添加多个Documents
db.collection.insertMany()
use sample_mflix
db.movies.insertMany([{title: "Jurassic World: Fallen Kingdom",genres: [ "Action", "Sci-Fi" ],runtime: 130,rated: "PG-13",year: 2018,directors: [ "J. A. Bayona" ],cast: [ "Chris Pratt", "Bryce Dallas Howard", "Rafe Spall" ],type: "movie"},{title: "Tag",genres: [ "Comedy", "Action" ],runtime: 105,rated: "R",year: 2018,directors: [ "Jeff Tomsic" ],cast: [ "Annabelle Wallis", "Jeremy Renner", "Jon Hamm" ],type: "movie"}
])
- 读取一个Collection所有的Documents
db.collection.find()
use sample_mflixdb.movies.find()
- 指定相等条件读取Documents
use sample_mflixdb.movies.find( { "title": "Titanic" } )
- 指定操作符条件读取Documents
use sample_mflixdb.movies.find( { rated: { $in: [ "PG", "PG-13" ] } } )
- 指定与或逻辑条件读取Documents
use sample_mflixdb.movies.find( { countries: "Mexico", "imdb.rating": { $gte: 7 } } )
- 更新Documents
db.collection.updateOne().
db.collection.updateMany().
db.collection.replaceOne().
use sample_mflixdb.movies.updateOne( { title: "Twilight" },
{$set: {plot: "A teenage girl risks everything–including her life–when she falls in love with a vampire."},$currentDate: { lastUpdated: true }
})
- 删除Documents
db.collection.deleteMany()
db.collection.deleteOne()
use sample_mflixdb.movies.deleteMany({})
db.movies.deleteMany( { title: "Titanic" } )
db.movies.deleteOne( { cast: "Brad Pitt" } )
3.3 集合(Collection)
集合就是 MongoDB 文档组,类似于 RDBMS 中的表格。
集合存在于数据库中,集合没有固定的结构,这意味着你在对集合可以插入不同格式和类型的数据,但通常情况下我们插入集合的数据都会有一定的关联性。
当第一个文档插入时,集合就会被创建。
MongoDB将文档存储在集合。集合类似于关系数据库中的表。
3.4 元数据
数据库的信息是存储在集合中。它们使用了系统的命名空间:
dbname.system.*
在MongoDB数据库中名字空间 .system.* 是包含多种系统信息的特殊集合(Collection)。
3.5 数据类型
下表为MongoDB中常用的几种数据类型。
| 数据类型 | 描述 |
|---|---|
| String | 字符串。存储数据常用的数据类型。在 MongoDB 中,UTF-8 编码的字符串才是合法的。 |
| Integer | 整型数值。用于存储数值。根据你所采用的服务器,可分为 32 位或 64 位。 |
| Boolean | 布尔值。用于存储布尔值(真/假)。 |
| Double | 双精度浮点值。用于存储浮点值。 |
| Min/Max keys | 将一个值与 BSON(二进制的 JSON)元素的最低值和最高值相对比。 |
| Array | 用于将数组或列表或多个值存储为一个键。 |
| Timestamp | 时间戳。记录文档修改或添加的具体时间。 |
| Object | 用于内嵌文档。 |
| Null | 用于创建空值。 |
| Symbol | 符号。该数据类型基本上等同于字符串类型,但不同的是,它一般用于采用特殊符号类型的语言。 |
| Date | 日期时间。用 UNIX 时间格式来存储当前日期或时间。你可以指定自己的日期时间:创建 Date 对象,传入年月日信息。 |
| Object ID | 对象 ID。用于创建文档的 ID。 |
| Binary Data | 二进制数据。用于存储二进制数据。 |
| Code | 代码类型。用于在文档中存储 JavaScript 代码。 |
| Regular expression | 正则表达式类型。用于存储正则表达式。 |
4、Python代码测试
4.1 连接数据库
mongodb://localhost
mongodb://localhost:port
mongodb://sysop:moon@localhost
import pymongo
# myclient = pymongo.MongoClient()
# myclient = pymongo.MongoClient("mongodb://localhost:27017")
# myclient = pymongo.MongoClient('mongodb://admin:123456@localhost:27017/?authSource=admin')
myclient = pymongo.MongoClient('localhost',27017)
print(myclient.list_database_names())
import pymongo
myclient = pymongo.MongoClient('localhost', 27017)
db = mongo_client.admin
db.authenticate('用户名', '密码')
4.2 指定数据库和集合
#获取数据库
db = client.test_database
# or
db = client["test-database"]#指定集合
collection = db.test_collection
# or
collection = db["test-collection"]
4.3 插入数据
#增加一条
stu1={'id':'001','name':'zhangsan','age':10}
result = collection.insert_one(stu1)#增加多条
stu2={'id':'002','name':'lisi','age':15}
stu3={'id':'003','name':'wangwu','age':20}
result = collection.insert_many([stu2,stu3])import datetime
post = {"author": "Mike","text": "My first blog post!","tags": ["mongodb", "python", "pymongo"],"date": datetime.datetime.now(tz=datetime.timezone.utc),
}
posts = db.posts
post_id = posts.insert_one(post).inserted_id
db.list_collection_names()import pprint
pprint.pprint(posts.find_one())
pprint.pprint(posts.find_one({"author": "Mike"}))
pprint.pprint(posts.find_one({"author": "Eliot"}))
pprint.pprint(posts.find_one({"_id": post_id}))

# Bulk Inserts
new_posts = [{"author": "Mike","text": "Another post!","tags": ["bulk", "insert"],"date": datetime.datetime(2009, 11, 12, 11, 14),},{"author": "Eliot","title": "MongoDB is fun","text": "and pretty easy too!","date": datetime.datetime(2009, 11, 10, 10, 45),},
]
result = posts.insert_many(new_posts)
result.inserted_ids# Querying for More Than One Document
for post in posts.find():pprint.pprint(post)# Counting
posts.count_documents({})
posts.count_documents({"author": "Mike"})# Range Queries
d = datetime.datetime(2009, 11, 12, 12)
for post in posts.find({"date": {"$lt": d}}).sort("author"):pprint.pprint(post)
from pymongo import MongoClient# Replace the uri string with your MongoDB deployment's connection string.
uri = "mongodb://localhost:27017"client = MongoClient(uri)# database and collection code goes here
db = client.sample_guides
coll = db.cometscoll.drop()# insert code goes here
docs = [{"name": "Halley's Comet", "officialName": "1P/Halley", "orbitalPeriod": 75, "radius": 3.4175, "mass": 2.2e14},{"name": "Wild2", "officialName": "81P/Wild", "orbitalPeriod": 6.41, "radius": 1.5534, "mass": 2.3e13},{"name": "Comet Hyakutake", "officialName": "C/1996 B2", "orbitalPeriod": 17000, "radius": 0.77671, "mass": 8.8e12},]result = coll.insert_many(docs)# display the results of your operation
print(result.inserted_ids)# Close the connection to MongoDB when you're done.
client.close()
4.4 删除数据
#可以直接使用remove方法删除指定的数据
result = collection.remove({'name': 'zhangsan'})#使用delete_one()删除一条数据
result = collection.delete_one({"name":"zhangsan"})#delete_many()删除多条数据
result = collection.delete_many({"age":{'$lt':20}})
from pymongo import MongoClient# Replace the uri string with your MongoDB deployment's connection string.
uri = "mongodb://localhost:27017"client = MongoClient(uri)# database and collection code goes here
db = client.sample_guides
coll = db.comets# delete code goes here
doc = {"orbitalPeriod": {"$gt": 5,"$lt": 85}
}
result = coll.delete_many(doc)# amount deleted code goes here
print("Number of documents deleted: ", result.deleted_count)# Close the connection to MongoDB when you're done.
client.close()
4.5 修改数据
#update_one,第 2 个参数需要使用$类型操作符作为字典的键名
#姓名为zhangsan的记录,age修改为22
condition = {'name': 'zhangsan'}
res = collection.find_one(condition)
res['age'] = 22
result = collection.update_one(condition, {'$set': res})
print(result) #返回结果是UpdateResult类型
print(result.matched_count,result.modified_count) #获得匹配的数据条数1、影响的数据条数1#update_many,所有年龄为15的name修改为xixi
condition = {'age': 15}
res = collection.find_one(condition)
res['age'] = 30
result = collection.update_many(condition, {'$set':{'name':'xixi'}})
print(result) #返回结果是UpdateResult类型
print(result.matched_count,result.modified_count) #获得匹配的数据条数3、影响的数据条数3
from pymongo import MongoClient
# Replace the uri string with your MongoDB deployment's connection string.
uri = "mongodb://localhost:27017"
client = MongoClient(uri)
# database and collection code goes here
db = client.sample_guides
coll = db.comets
# update code goes here
doc = {"$mul": {"radius": 1.60934}}
result = coll.update_many({}, doc)
# display the results of your operation
print("Number of documents updated: ", result.modified_count)
# Close the connection to MongoDB when you're done.
client.close()
4.6 查询数据
rets = collection.find({"age":20}),
for ret in rets:print(ret)# 查询结果有多少条数据count = collection.find().count()# 查询结果按年龄升序排序
results = collection.find().sort('age', pymongo.ASCENDING)
print([result['age'] for result in results])ret =collection.find_one({'name': 'zhangsan'})
from pymongo import MongoClient# Replace the uri string with your MongoDB deployment's connection string.
uri = "mongodb://localhost:27017"
client = MongoClient(uri)# database and collection code goes here
db = client.sample_guides
coll = db.planets# find code goes here
cursor = coll.find({"hasRings": True})
# iterate code goes here
for doc in cursor:print(doc)# find code goes here
cursor = coll.find({"surfaceTemperatureC.mean": {"$lt": 15}})
for doc in cursor:print(doc)# Close the connection to MongoDB when you're done.
client.close()
结语
如果您觉得该方法或代码有一点点用处,可以给作者点个赞,或打赏杯咖啡;╮( ̄▽ ̄)╭
如果您感觉方法或代码不咋地//(ㄒoㄒ)//,就在评论处留言,作者继续改进;o_O???
如果您需要相关功能的代码定制化开发,可以留言私信作者;(✿◡‿◡)
感谢各位大佬童鞋们的支持!( ´ ▽´ )ノ ( ´ ▽´)っ!!!
