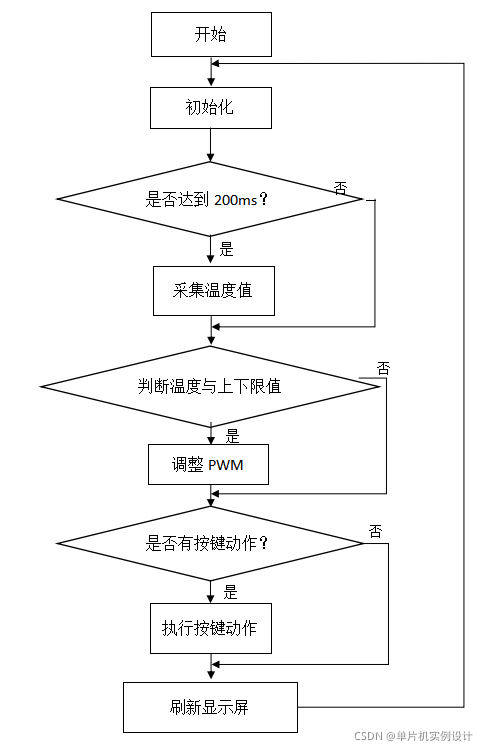
原理
读取/sys/class/thermal/thermal_zone0/temp文件,返回树莓派温度,控制GPIO产生PWM,从而实现温控风扇的控制。
C/C++代码
命令行操作
cd /home/pi/code/basic/fan
nano fan.c
#复制代码
gcc fan.c -o fan -lwiringPi
./fan
#include <stdio.h>
#include <stdlib.h>
#include <sys/types.h>
#include <sys/stat.h>
#include <fcntl.h>
#include "wiringPi.h"     //添加库文件
#include "softPwm.h"     //添加库文件#define TEMP_PATH "/sys/class/thermal/thermal_zone0/temp"
#define MAX_SIZE 32#define PWM_Pin 25         //定义PWM_Pin引脚static int GetDuty(int temp);
unsigned int Duty = 0;int main(void)
{int fd;double temp = 0;char buf[MAX_SIZE];wiringPiSetup();//初始化wiringPisoftPwmCreate(PWM_Pin,0,100);//当前pwmRange为100,频率为100Hz,若pwmRange为50时,频率为200,若pwmRange为2时,频率为5000。softPwmWrite(PWM_Pin,50);//占空比 = value/pwmRange,当前占空比 = 50/100 = 50%while(1){// 打开/sys/class/thermal/thermal_zone0/tempfd = open(TEMP_PATH, O_RDONLY);if (fd < 0) {fprintf(stderr, "failed to open thermal_zone0/temp\n");return -1;}// 读取内容if (read(fd, buf, MAX_SIZE) < 0) {fprintf(stderr, "failed to read temp\n");return -1;}// 转换为浮点数打印temp = atoi(buf) / 1000.0;// 关闭文件close(fd);Duty = GetDuty(temp);softPwmWrite(PWM_Pin,Duty);printf("temp: %.2f,Duty: %d\n", temp, Duty);delay(1000*10);}
}static int GetDuty(int temp)
{if(temp >= 60){return 100;}else if(temp >= 55){return 90;}else if(temp >= 53){return 80;}else if(temp >= 50){return 70;}else if(temp >= 45){return 60;}else{return 50;}
}
python程序
import RPi.GPIO as GPIO  #导入gpio口驱动模块
import time              #导入时间模块
pwm_pin = 26             #定义pwm输出引脚(注意BCM编码的对应关系)GPIO.setmode(GPIO.BCM)   #定义树莓派gpio引脚以BCM方式编号
GPIO.setup(pwm_pin,GPIO.OUT)  #使能gpio口为输出
pwm = GPIO.PWM(pwm_pin,100)   #定义pwm输出频率
pwm.start(50)   #占空比(范围:0.0 <=  >= 100.0)while(1):# 打开文件file = open("/sys/class/thermal/thermal_zone0/temp")# 读取结果,并转换为浮点数temp = float(file.read()) / 1000# 关闭文件file.close()if(temp >= 60):Duty = 100elif(temp >= 55):Duty = 90elif(temp >= 53):Duty = 80elif(temp >= 50):Duty = 70   elif(temp >= 45):Duty = 60else:Duty = 50pwm.ChangeDutyCycle(Duty)# 向控制台打印print("temp : %.1f,duty : %d" %(temp,Duty))time.sleep(10)
开机自启动
制作sh脚本
#!/bin/bash
/home/pi/code/basic/fan/fan
通过桌面自启动
mkdir .config/autostart
nano .config/autostart/fan.desktop#内容
[Desktop Entry]
Type=Application
Name=fan
NoDisplay=true
Exec=/home/pi/code/basic/fan/fan.shsudo reboot
参考:
[1]https://blog.csdn.net/xukai871105/article/details/38349209
[2]https://blog.csdn.net/weixin_42078116/article/details/119329536
[3]https://www.yahboom.com/build.html?id=4182&cid=308
[4]https://www.yahboom.com/build.html?id=2679&cid=308
[5]https://blog.csdn.net/qq_42714905/article/details/97131771