环境
ubuntu 18.04 64bit
pytorch 1.7.1 + cu101
简介
BackgroundMattingV2 是一个实时的、可应用于高分辨率的背景移除器。论文地址:https://arxiv.org/abs/2012.07810

算法体验
# 下载源码
git clone https://github.com/PeterL1n/BackgroundMattingV2.git
cd BackgroundMattingV2# 安装pytorch gpu版
pip install torch==1.7.1+cu101 torchvision==0.8.2+cu101 torchaudio==0.7.2 -f https://download.pytorch.org/whl/torch_stable.html
模型下载地址
链接:https://pan.baidu.com/s/1GsPQtCI2HpD_kRlWWhhIfQ
提取码:p1r1
解压后放在源码根目录,其中 Resource 有下文要用到的视频及背景图片
工程中提供了三个演示程序:
inference_images.py: 图片背景移除inference_video.py: 视频背景移除inference_webcam.py: 从摄像头读取进行背景移除
这里以视频背景移除为例,其它2个示例类似,执行命令
# 没有gpu的,device处就写cpu或不写这个参数
python inference_video.py --model-type mattingrefine --model-backbone resnet50 --model-backbone-scale 0.25 --model-refine-mode sampling --model-refine-sample-pixels 80000 --model-checkpoint BackgroundMattingV2models/PyTorch/pytorch_resnet50.pth --device cuda --video-src d2.mp4 --video-bgr d2.png --output-dir video_output --output-types com
处理完毕得到的视频,原背景已经被消除了,换成了默认的绿色
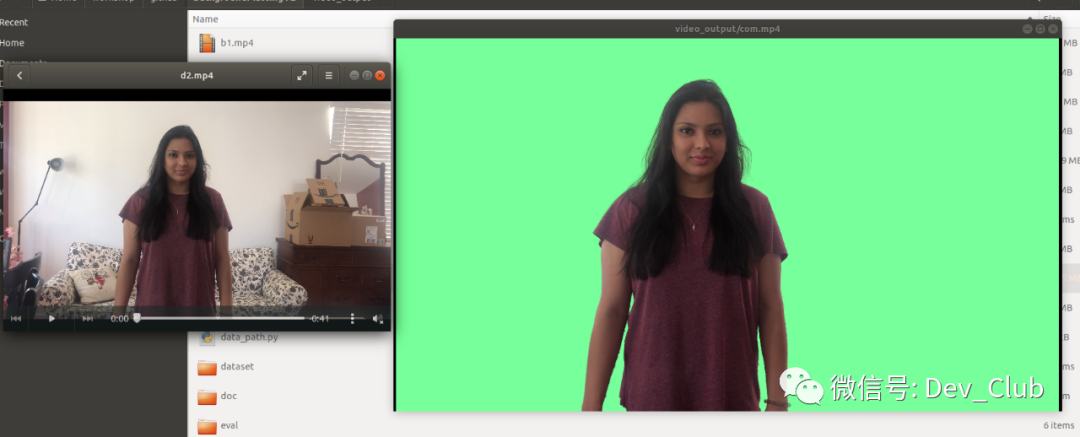
如果想要自定义背景,可以通过添加参数 --video-target-bgr images/background.jpg 来实现,不过这里,会报错,出错信息如下
Traceback (most recent call last):File "inference_video.py", line 182, in <module>for input_batch in tqdm(DataLoader(dataset, batch_size=1, pin_memory=True)):File "/home/xugaoxiang/anaconda3/envs/pytorch1.7/lib/python3.8/site-packages/tqdm/std.py", line 989, in __init__total = len(iterable)File "/home/xugaoxiang/anaconda3/envs/pytorch1.7/lib/python3.8/site-packages/torch/utils/data/dataloader.py", line 397, in __len__return len(self._index_sampler)File "/home/xugaoxiang/anaconda3/envs/pytorch1.7/lib/python3.8/site-packages/torch/utils/data/sampler.py", line 243, in __len__return (len(self.sampler) + self.batch_size - 1) // self.batch_size  # type: ignoreFile "/home/xugaoxiang/anaconda3/envs/pytorch1.7/lib/python3.8/site-packages/torch/utils/data/sampler.py", line 70, in __len__return len(self.data_source)File "/home/xugaoxiang/workshop/github/BackgroundMattingV2/dataset/zip.py", line 14, in __len__return max(len(d) for d in self.datasets)File "/home/xugaoxiang/workshop/github/BackgroundMattingV2/dataset/zip.py", line 14, in <genexpr>return max(len(d) for d in self.datasets)
ValueError: __len__() should return >= 0
Exception ignored in: <function tqdm.__del__ at 0x7ff206daf9d0>
Traceback (most recent call last):File "/home/xugaoxiang/anaconda3/envs/pytorch1.7/lib/python3.8/site-packages/tqdm/std.py", line 1147, in __del__self.close()File "/home/xugaoxiang/anaconda3/envs/pytorch1.7/lib/python3.8/site-packages/tqdm/std.py", line 1266, in closeif self.disable:
AttributeError: 'tqdm' object has no attribute 'disable'
在 tqdm 的 issue 里也看到了这个问题,很多人反馈,貌似,问题还是存在,讨论链接:https://github.com/tqdm/tqdm/issues/487
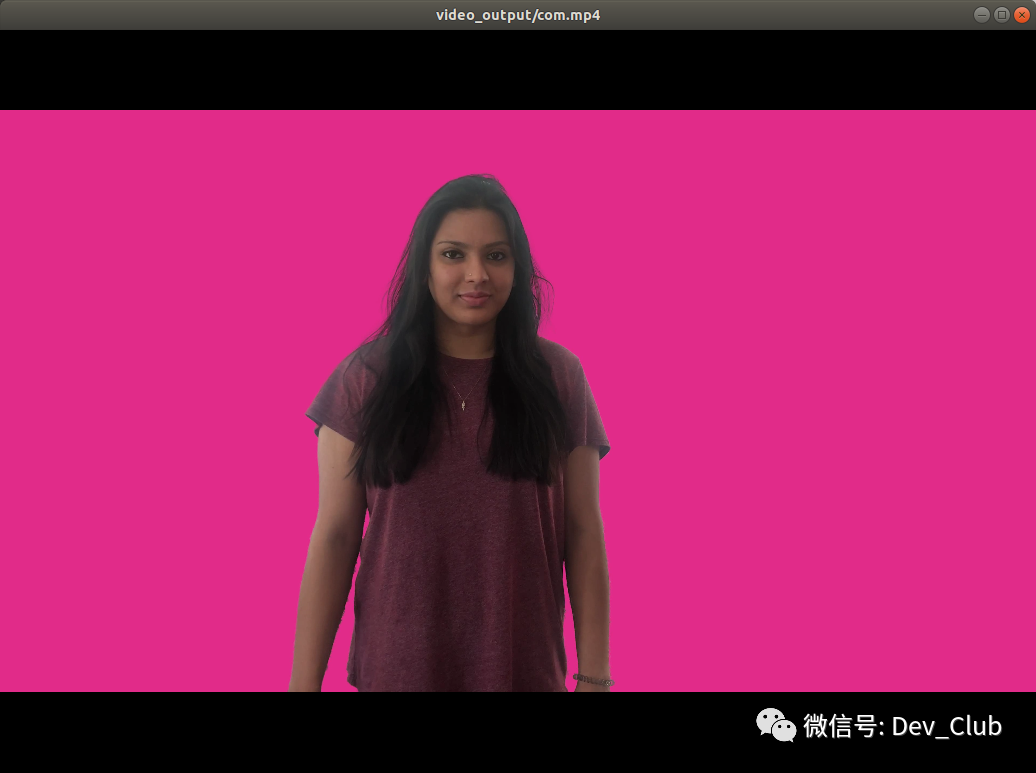
如果是改纯色背景的话,我们就不用这个参数 --video-target-bgr,然后直接去修改代码 inference_video.py,如下,(120, 255, 155)是默认的绿色,自行替换就可以了

比如将颜色改为 (226, 43, 138),效果如下
上例中使用的是 pytorch 的模型,BackgroundMattingV2 还支持 TorchScript、TensorFlow 和 ONNX,至于它们的使用方法,可以参考文档 https://github.com/PeterL1n/BackgroundMattingV2/blob/master/doc/model_usage.md
插件应用
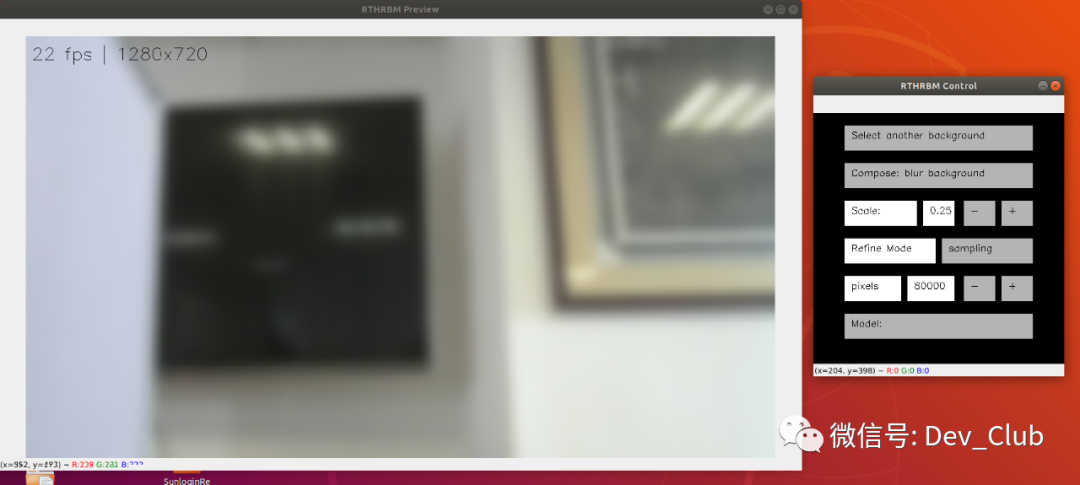
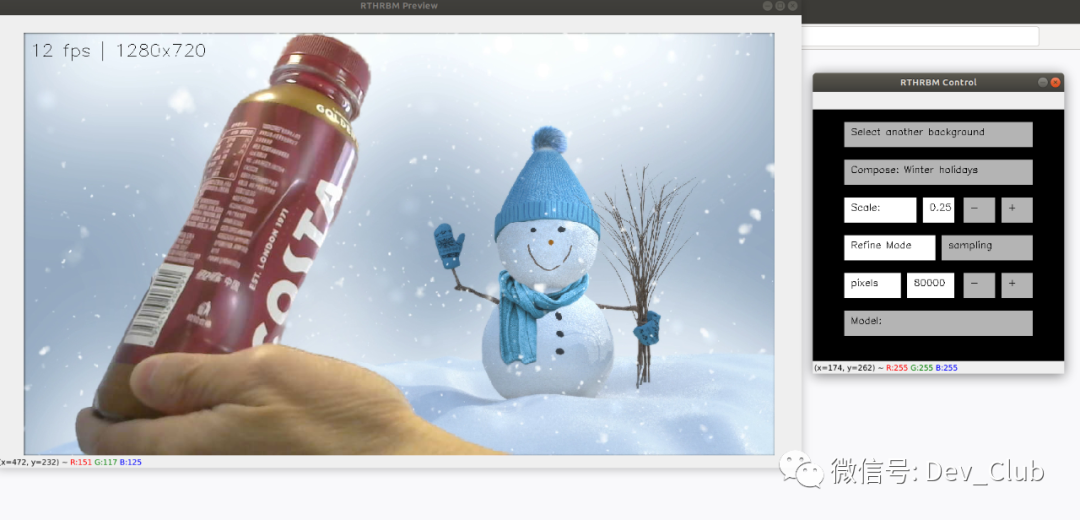
BackgroundMattingV2 还提供了一个插件( plugin )程序来处理摄像头的数据,目前这个插件只能运行在 linux 平台上,ok,下面我们也来体验一下
首先还是下载源码
git clone https://github.com/andreyryabtsev/BGMv2-webcam-plugin-linux.git
cd BGMv2-webcam-plugin-linux
插件依赖于内核模块 v4l2loopback ,通过这个模块来创建并串流到虚拟的视频设备节点
首先安装工具
sudo apt-get install v4l2loopback-utils -y如果已经安装过了 BackgroundMattingV2 的环境,那就只需要再装个 pyfakewebcam,否则就执行 pip install -r requirements.txt
pip install pyfakewebcam接下来就开始创建设备节点
sudo modprobe v4l2loopback devices=1但是这里报错了
(base) xugaoxiang@1070Ti:~/workshop/github/BackgroundMattingV2/BGMv2-webcam-plugin-linux$ sudo modprobe v4l2loopback devices=1
modprobe: ERROR: could not insert 'v4l2loopback': Bad address
解决方法如下,首先卸载掉原来安装的包
sudo apt-get remove v4l2loopback-dkms然后,下载 v4l2loopback 源码
git clone https://github.com/umlaeute/v4l2loopback.git编译源码,生成内核模块 ko 文件
make
最后安装
sudo make install
安装过程中出现了 ssl 相关的错误,可以忽略
为了让模块在系统启动时自动加载,执行
sudo depmod -adepmod 命令用于生成 modules.dep 和 map 文件,用于在启动时模块的自动加载。
再次创建设备节点 sudo modprobe v4l2loopback devices=1
最后执行
python demo_webcam.py --model-checkpoint ../BackgroundMattingV2models/TorchScript/torchscript_resnet50_fp32.pth但是,我这里报错了
Corrupt JPEG data: 4 extraneous bytes before marker 0xd6
Corrupt JPEG data: 1 extraneous bytes before marker 0xd2
Corrupt JPEG data: 2 extraneous bytes before marker 0xd6
Corrupt JPEG data: 2 extraneous bytes before marker 0xd6
Corrupt JPEG data: 4 extraneous bytes before marker 0xd6
Traceback (most recent call last):File "demo_webcam.py", line 586, in <module>fake_camera = pyfakewebcam.FakeWebcam(args.camera_device, cam.width, cam.height)File "/home/xugaoxiang/anaconda3/envs/pytorch1.7/lib/python3.8/site-packages/pyfakewebcam/pyfakewebcam.py", line 54, in __init__fcntl.ioctl(self._video_device, _v4l2.VIDIOC_S_FMT, self._settings)
OSError: [Errno 22] Invalid argument
Corrupt JPEG data: 1 extraneous bytes before marker 0xd2
FATAL: exception not rethrown
Aborted (core dumped)
通过命令 v4l2-ctl --list-devices 查看设备节点信息
(pytorch1.7) xugaoxiang@1070Ti:~/workshop/github/BackgroundMattingV2/BGMv2-webcam-plugin-linux$ v4l2-ctl --list-devices
Dummy video device (0x0000) (platform:v4l2loopback-000):/dev/video2UVC Camera (046d:081b) (usb-0000:00:14.0-8):/dev/video0/dev/video1
可以看到 v4l2loopback 节点是 /dev/video2,因此需要去修改下源码 demo_webcam.py,将默认的设备节点由原来的 dev/video1 改为 dev/video2
parser.add_argument('--camera-device', type=str, default='/dev/video2)然后,再次执行命令 python demo_webcam.py --model-checkpoint ../BackgroundMattingV2models/TorchScript/torchscript_resnet50_fp32.pth
模糊背景效果
自定义背景效果
备注
要求测试图片或者视频分辨率要能够被4整除,否则报错
Traceback (most recent call last):File "inference_images.py", line 132, in <module>pha, fgr, _, _, err, ref = model(src, bgr)File "/home/xugaoxiang/anaconda3/envs/pytorch1.7/lib/python3.8/site-packages/torch/nn/modules/module.py", line 727, in _call_implresult = self.forward(*input, **kwargs)File "/home/xugaoxiang/workshop/github/BackgroundMattingV2/model/model.py", line 163, in forwardassert src.size(2) // 4 * 4 == src.size(2) and src.size(3) // 4 * 4 == src.size(3), \
AssertionError: src and bgr must have width and height that are divisible by 4
测试图片及视频
下载地址: https://drive.google.com/drive/folders/16H6Vz3294J-DEzauw06j4IUARRqYGgRD
关联阅读
backgroundremover去背
rembg去背
https://github.com/PeterL1n/BackgroundMattingV2
https://github.com/umlaeute/v4l2loopback
https://github.com/andreyryabtsev/BGMv2-webcam-plugin-linux


