1:资源准备
1.1百度离线文件
链接: https://pan.baidu.com/s/1-3tZ6eZvp2vdCsWLi-9MAg
提取码: vjxa
1.2瓦片数据下载器
链接: https://pan.baidu.com/s/1MZjWobc1DQGX_ApYBNtROg
提取码: pxd1
2:构建vue的空项目
此步直接略过,不会的自行解决
3:在vue2.x中使用
3.1 把下载的1.1中的百度离线文件解压到 public/static下,static文件夹自己新建一个

3.2 在index.html中引入mao_load.js 文件
记住文件路径不要用相对路径 会报 Uncaught SyntaxError: Unexpected token < 错误

<script src="<%= BASE_URL %>static/map_load.js"></script>3.3 完了之后就新建文件,开始在页面上使用,这里我直接在HelloWorld.vue组件中使用的,做的demo
<template><div class="hello"><h1>{{ msg }}</h1><p>For a guide and recipes on how to configure / customize this project,<br />check out the<ahref="https://cli.vuejs.org"target="_blank"rel="noopener">vue-cli documentation</a>.</p><div class="wrap"><div id="container"></div><div id="container2"></div></div></div>
</template><script>
export default {name: "HelloWorld",props: {msg: String},mounted() {this.builmap();},methods: {builmap() {let map = new window.BMap.Map("container");let point = new window.BMap.Point(114.28398, 30.601327);map.centerAndZoom(point, 12);map.enableScrollWheelZoom(true);map.addEventListener("click", function(e) {console.log(e.point.lng + "," + e.point.lat);});let map2 = new window.BMap.Map("container2");let point2 = new window.BMap.Point(114.28398, 30.601327);map2.centerAndZoom(point2, 12);map2.enableScrollWheelZoom(true);map2.addEventListener("click", function(e) {console.log(e.point.lng + "," + e.point.lat);});}}
};
</script><!-- Add "scoped" attribute to limit CSS to this component only -->
<style scoped>ul {list-style-type: none;padding: 0;
}
li {display: inline-block;margin: 0 10px;
}
a {color: #42b983;
}
.wrap {display: flex;justify-content: space-around;
}
#container {width: 500px;height: 500px;border: 1px solid red;
}
#container2 {width: 500px;height: 500px;border: 3px solid pink;
}
</style>
直接把代码贴出来了
4:瓦片做nginx代理
4.1 先下载nginx,博主直接放到桌面解压出来的,进入conf文件夹,直接用vscode打开nginx.conf文件,修改如下:

别的不用做修改,第36行是监听你的端口号,根据自己的实际情况做对应的修改
#user  nobody;
worker_processes  1;#error_log  logs/error.log;
#error_log  logs/error.log  notice;
#error_log  logs/error.log  info;#pid        logs/nginx.pid;events {worker_connections  1024;
}http {include       mime.types;default_type  application/octet-stream;#log_format  main  '$remote_addr - $remote_user [$time_local] "$request" '#                  '$status $body_bytes_sent "$http_referer" '#                  '"$http_user_agent" "$http_x_forwarded_for"';#access_log  logs/access.log  main;sendfile        on;#tcp_nopush     on;#keepalive_timeout  0;keepalive_timeout  65;#gzip  on;server {listen       80;server_name  localhost;#charset koi8-r;#access_log  logs/host.access.log  main;location / {root   E:/IMChenng/download/bmap_offline_demo/tiles; #瓦片地址}#error_page  404              /404.html;# redirect server error pages to the static page /50x.html#error_page   500 502 503 504  /50x.html;location = /50x.html {root   html;}# proxy the PHP scripts to Apache listening on 127.0.0.1:80##location ~ \.php$ {#    proxy_pass   http://127.0.0.1;#}# pass the PHP scripts to FastCGI server listening on 127.0.0.1:9000##location ~ \.php$ {#    root           html;#    fastcgi_pass   127.0.0.1:9000;#    fastcgi_index  index.php;#    fastcgi_param  SCRIPT_FILENAME  /scripts$fastcgi_script_name;#    include        fastcgi_params;#}# deny access to .htaccess files, if Apache's document root# concurs with nginx's one##location ~ /\.ht {#    deny  all;#}}# another virtual host using mix of IP-, name-, and port-based configuration##server {#    listen       8000;#    listen       somename:8080;#    server_name  somename  alias  another.alias;#    location / {#        root   html;#        index  index.html index.htm;#    }#}# HTTPS server##server {#    listen       443 ssl;#    server_name  localhost;#    ssl_certificate      cert.pem;#    ssl_certificate_key  cert.key;#    ssl_session_cache    shared:SSL:1m;#    ssl_session_timeout  5m;#    ssl_ciphers  HIGH:!aNULL:!MD5;#    ssl_prefer_server_ciphers  on;#    location / {#        root   html;#        index  index.html index.htm;#    }#}}
4.2 打开 bmap_offline_api_v3.0_min.js 文件 ,定位到 6518 行,根据自己实际情况,做如下的修改:

4.3 启动nginx,启动vue这个项目,就会发现,离线地图加载出来了,
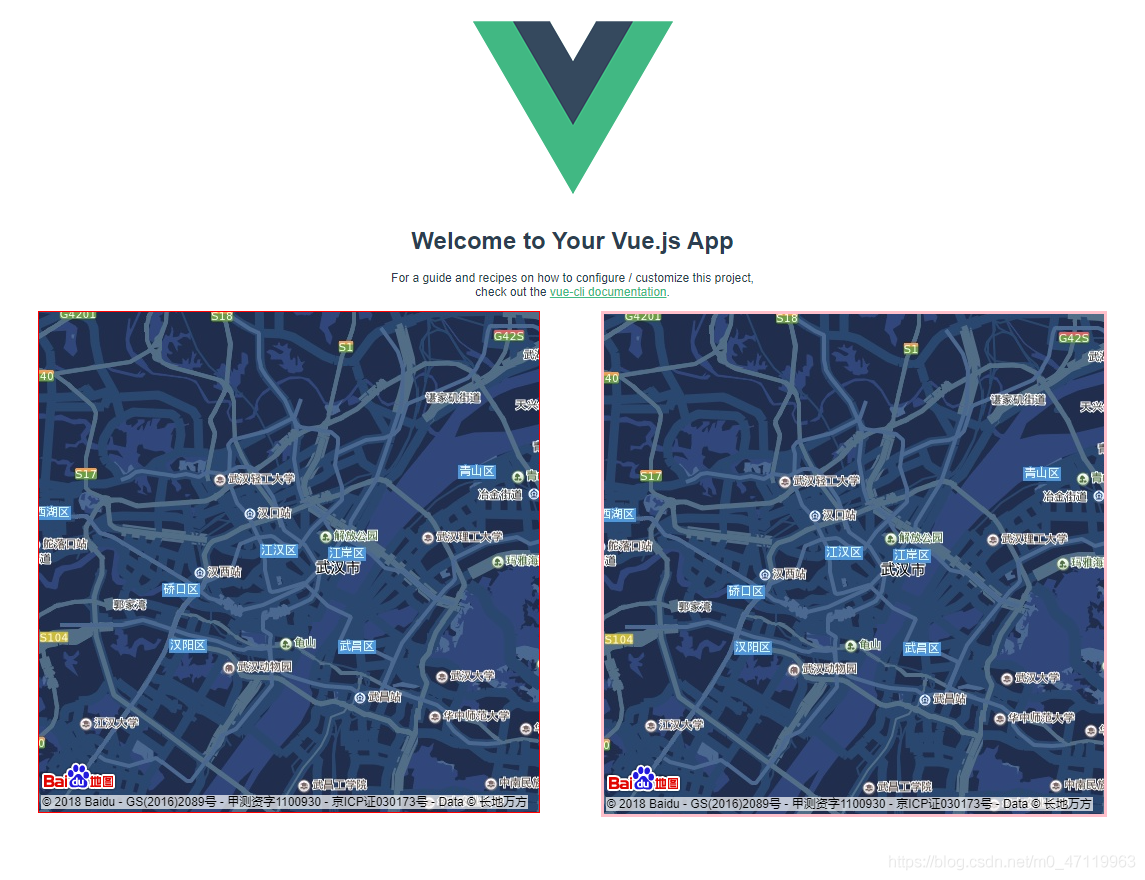
控制台也不会报错,只要你下载了对应的瓦片数据。