目录
sum
Pytrans
BWBA
Poisoned_tea_CHELL
第一种找程序加密函数的方法
第二种找程序加密函数的方法
解密
这次的春季赛仍是被打爆了,re只做出了一题,发现自己还是太菜了,好在在后期复盘中又收获了许多新知识了,不亏。
sum
获取题目附件,64位,无壳。

用IDA对程序进行反编译,找到关键的main函数。
int __cdecl main(int argc, const char **argv, const char **envp)
{char *v3; // rbpint v4; // r14dunsigned int v5; // r12d__int64 i; // rbxchar v7; // alint v8; // eaxconst char *v9; // raxv3 = &matrix;v4 = 1;v5 = 0;puts("Welcome to Solver!");do{for ( i = 0LL; i != 9; ++i ){if ( !v3[i] ){v7 = getchar();if ( (v7 - 49) > 8u )v4 = 0;elsev3[i] = v7 - 48;}v8 = v3[i];v5 += v8;}v3 += 9;}while ( v3 != &matrix + 81 );if ( v4 && verify("Welcome to Solver!", argv) ){puts("You Win!");__snprintf_chk(buf, 32LL, 1LL, 32LL, "%d", v5);v9 = str2md5(buf, strlen(buf));__printf_chk(1LL, "flag is: flag{%s}\n\n", v9);exit(0);}puts("Again~");return 0;
}
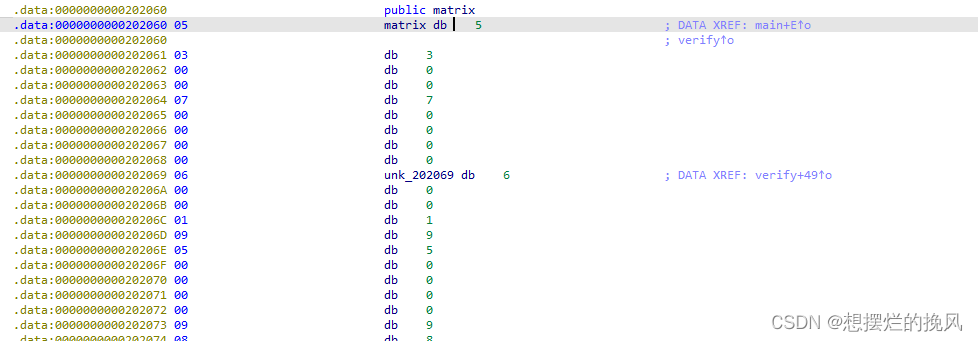
v7是来获取输入内容的,matrix中存放着一些值,长度为81,一开始以为是一个9*9的迷宫题,但发现matrix中存放的不只有0和1,还有一些其他值,不像是迷宫题。
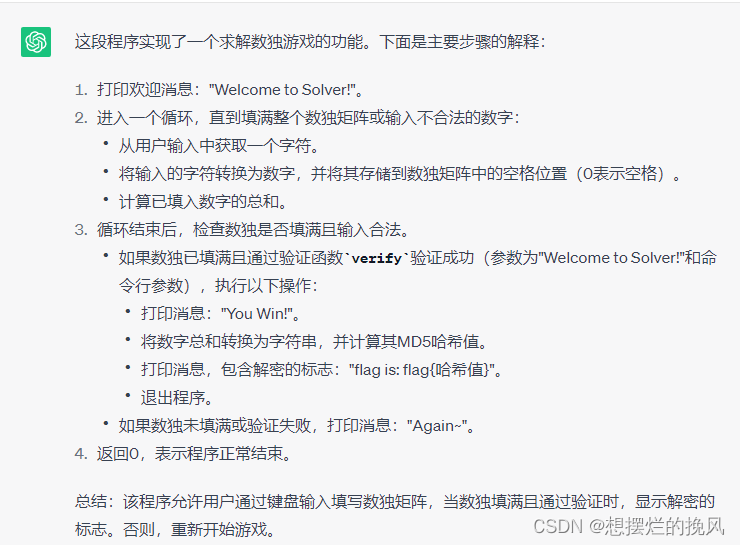
用Chatgpt帮忙辅助分析了一下,才知道这是一个九宫格数独游戏。
因此,明白了matrix中存放的是九宫格中已知的值,写脚本dump出数独:
maze = [5, 3, 0, 0, 7, 0, 0, 0, 0, 6, 0, 0, 1, 9, 5, 0, 0, 0, 0, 9, 8, 0, 0, 0, 0, 6, 0, 8, 0, 0, 0, 6, 0, 0, 0, 3, 4, 0, 0, 8, 0, 3, 0, 0, 1, 7, 0, 0, 0, 2, 0, 0, 0, 6, 0, 6, 0, 0, 0, 0, 2, 8, 0, 0, 0, 0, 4, 1, 9, 0, 0, 5, 0, 0, 0, 0, 8, 0, 0, 7, 9]for i in range(0,len(maze)):if i % 9 == 0:print('\n')print(maze[i],end=" ")5 3 0 0 7 0 0 0 0 6 0 0 1 9 5 0 0 0 0 9 8 0 0 0 0 6 0 8 0 0 0 6 0 0 0 3 4 0 0 8 0 3 0 0 1 7 0 0 0 2 0 0 0 60 6 0 0 0 0 2 8 00 0 0 4 1 9 0 0 50 0 0 0 8 0 0 7 9 数独中的0就是需要填的位置,找到一个在线解数独的网站在线数独求解器 (gwalker.cn)
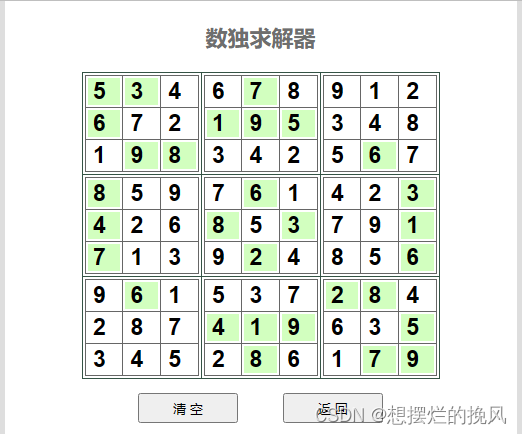
这里想吐槽一下自己太粗心了,把绿色块当成是解出来的值,实际白色块才是解出来的。
468912723481342575971422657913948591537428763345261接着将解出的值输入到程序中即可拿到flag。

FLAG:flag{bbcbff5c1f1ded46c25d28119a85c6c2}
Pytrans
获取题目文件,64位,无壳。

根据题目介绍猜测是用python编写的程序,所以可以直接用pyinstxtractor转成pyc文件,再用uncompyle6转成py文件。
# uncompyle6 version 3.9.0
# Python bytecode version base 3.8.0 (3413)
# Decompiled from: Python 3.9.6 (tags/v3.9.6:db3ff76, Jun 28 2021, 15:26:21) [MSC v.1929 64 bit (AMD64)]
# Embedded file name: run.py
import base64, zlib, ctypes
try:mylib = ctypes.cdll.LoadLibrary('./mylib.so')
except:print('file no exit!')
else:a = []
try:sstr = input("Please enter the 10 digits and ending with '\\n': ").split(' ')if len(sstr) == 10:for i in sstr:a.append(int(i))mylib.check.argtypes = (ctypes.POINTER(ctypes.c_int), ctypes.c_int)mylib.check.restype = ctypes.c_char_pscrambled_code_string = mylib.check((ctypes.c_int * len(a))(*a), len(a))try:decoded_data = base64.b64decode(scrambled_code_string)uncompressed_data = zlib.decompress(decoded_data)exec(__import__('marshal').loads(uncompressed_data))except:print('Incorrect input caused decryption failure!')except:pass
# okay decompiling run.pyc
可以看见程序调用了一个mylib.so库,从pyinstxtractor导出的文件中找到mylib.so库。
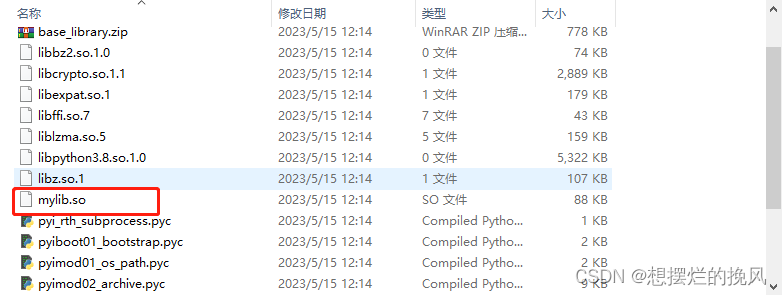
放入IDA中进行分析,找到check函数。
void *__fastcall check(_DWORD *x)
{void *v2; // [rsp+18h] [rbp-28h]char v3[24]; // [rsp+20h] [rbp-20h] BYREFunsigned __int64 v4; // [rsp+38h] [rbp-8h]v4 = __readfsqword(0x28u);sub_1239();if ( -27 * x[7] + -11 * x[6] + 16 * x[5] + *x + 2 * x[1] - x[2] + 8 * x[3] - 14 * x[4] + 26 * x[8] + 17 * x[9] != 14462|| -30 * x[8] + 13 * x[5] + x[3] + x[1] + 2 * *x - 15 * x[4] - 24 * x[6] + 16 * x[7] + 36 * x[9] != -2591|| 16 * x[6] + -21 * x[5] + 7 * x[3] + 3 * x[1] - *x - x[2] + 12 * x[4] - 23 * x[7] + 25 * x[8] - 18 * x[9] != 2517|| -6 * x[6] + 2 * x[2] - x[1] + 2 * x[5] + 9 * x[7] + 2 * x[8] - 5 * x[9] != 203|| -5 * x[8] + 6 * x[7] + 3 * x[1] - x[3] - x[5] + x[6] + 5 * x[9] != 3547|| -9 * x[8] + x[4] + x[2] + x[7] - 5 * x[9] != -7609|| 2 * x[5] + -x[3] - x[4] + x[8] + 6 * x[9] != 4884|| x[6] - x[7] + 2 * x[8] != 1618|| x[4] - x[6] + 2 * x[9] != 1096|| x[8] + x[4] + x[3] + x[2] + x[1] + *x - x[5] - x[6] - x[7] - x[9] != 711|| 2 * (2 * x[4] + x[3]) + 5 * x[5] != 7151 ){return 0LL;}v3[0] = 0;v3[1] = 0;v3[2] = 0;v3[3] = 0;v3[4] = 0;v3[5] = 0;v3[6] = 0;v3[7] = 0;v3[8] = 0;v3[9] = 0;v3[10] = 0;v3[11] = 0;v3[12] = 0;v3[13] = 0;v3[14] = 0;v3[15] = x[4] % 255;v2 = malloc(0x4F0uLL);sub_27E4(&unk_62C0, v2, v3);return v2;
}
这里对输入值进行了比较,可以用z3进行求解来得出正确的输入值,脚本如下:
from z3 import *
def main():x = [BitVec("x%d"%i,16)for i in range(10)]s = Solver()s.add( -27 * x[7] + -11 * x[6] + 16 * x[5] + x[0] + 2 * x[1] - x[2] + 8 * x[3] - 14 * x[4] + 26 * x[8] + 17 * x[9] == 14462)s.add( -30 * x[8] + 13 * x[5] + x[3] + x[1] + 2 * x[0] - 15 * x[4] - 24 * x[6] + 16 * x[7] + 36 * x[9] == -2591)s.add( 16 * x[6] + -21 * x[5] + 7 * x[3] + 3 * x[1] - x[0] - x[2] + 12 * x[4] - 23 * x[7] + 25 * x[8] - 18 * x[9] == 2517)    s.add( -6 * x[6] + 2 * x[2] - x[1] + 2 * x[5] + 9 * x[7] + 2 * x[8] - 5 * x[9] == 203)s.add( -5 * x[8] + 6 * x[7] + 3 * x[1] - x[3] - x[5] + x[6] + 5 * x[9] == 3547)s.add( -9 * x[8] + x[4] + x[2] + x[7] - 5 * x[9] == -7609)s.add( 2 * x[5] + -x[3] - x[4] + x[8] + 6 * x[9] == 4884)  s.add( x[6] - x[7] + 2 * x[8] == 1618)s.add( x[4] - x[6] + 2 * x[9] == 1096)   s.add( x[8] + x[4] + x[3] + x[2] + x[1] + x[0] - x[5] - x[6] - x[7] - x[9] == 711)    s.add( 2 * (2 * x[4] + x[3]) + 5 * x[5] == 7151)if s.check() == sat:value = s.model()for i in range(10):print(value[x[i]],end=" ")if __name__ == '__main__':main()
获得正确的输入值。
511 112 821 949 517 637 897 575 648 738将这串值输入程序,以为能直接拿到flag了,结果发现还有内容需要输入。

根据内容,猜测是走迷宫,但在这里就被卡住了,一直在mylib.so中找实现走迷宫部分的函数,结果没找到,虽然注意到了check函数中的sub_27E4函数,但不知如何去动调获取数据。
后来,看到其他师傅写的wp时,我才知道dump出来的py文件实际就已经将内容解密并执行了。
mylib.check.argtypes = (ctypes.POINTER(ctypes.c_int), ctypes.c_int)mylib.check.restype = ctypes.c_char_pscrambled_code_string = mylib.check((ctypes.c_int * len(a))(*a), len(a))try:decoded_data = base64.b64decode(scrambled_code_string)uncompressed_data = zlib.decompress(decoded_data)exec(__import__('marshal').loads(uncompressed_data))uncompressed_data 中存放的就是解密后的内容,输出uncompressed_data。
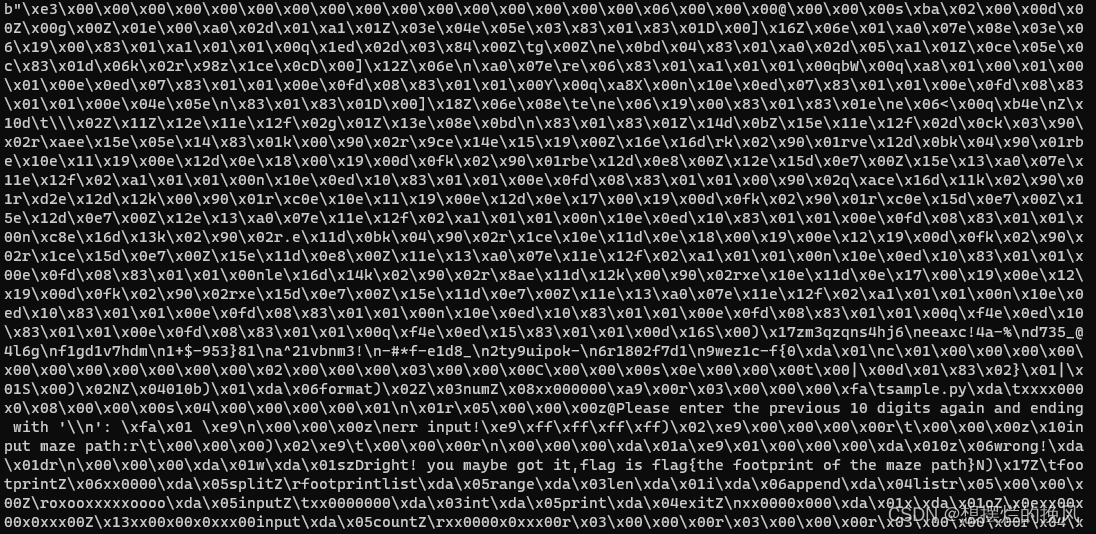
猜测这是一个文件,将其写入进一个文件中。
# uncompyle6 version 3.9.0
# Python bytecode version base 3.8.0 (3413)
# Decompiled from: Python 3.9.6 (tags/v3.9.6:db3ff76, Jun 28 2021, 15:26:21) [MSC v.1929 64 bit (AMD64)]
# Embedded file name: run.py
import base64, zlib, ctypes
try:mylib = ctypes.cdll.LoadLibrary('./mylib.so')
except:print('file no exit!')
else:a = []
try:sstr = input("Please enter the 10 digits and ending with '\\n': ").split(' ')if len(sstr) == 10:for i in sstr:a.append(int(i))mylib.check.argtypes = (ctypes.POINTER(ctypes.c_int), ctypes.c_int)mylib.check.restype = ctypes.c_char_pscrambled_code_string = mylib.check((ctypes.c_int * len(a))(*a), len(a))try:decoded_data = base64.b64decode(scrambled_code_string)uncompressed_data = zlib.decompress(decoded_data)# print(uncompressed_data)file1 = open("./second","+ab")file1.write(uncompressed_data)file1.close()exec(__import__('marshal').loads(uncompressed_data))except:print('Incorrect input caused decryption failure!')except:pass
# okay decompiling run.pyc
写入后,将这个文件放入Winhex中查看,像是一个缺少文件头的pyc文件。
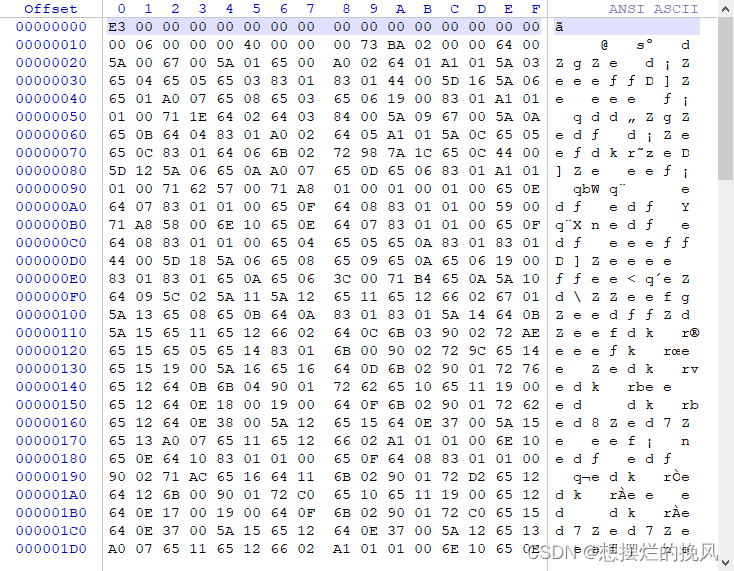
将之前dump出来的pyc文件的文件头粘贴到这个文件里,再用uncompyle6来转成py文件,就可以得到以下内容:
# uncompyle6 version 3.9.0
# Python bytecode version base 3.8.0 (3413)
# Decompiled from: Python 3.9.6 (tags/v3.9.6:db3ff76, Jun 28 2021, 15:26:21) [MSC v.1929 64 bit (AMD64)]
# Embedded file name: sample.py
footprint = '3qzqns4hj6\neeaxc!4a-%\nd735_@4l6g\nf1gd1v7hdm\n1+$-953}81\na^21vbnm3!\n-#*f-e1d8_\n2ty9uipok-\n6r1802f7d1\n9wez1c-f{0'
xx0000 = []
footprintlist = footprint.split('\n')
for i in range(len(footprintlist)):xx0000.append(list(footprintlist[i]))
else:def xxxx000x0(num):xx000000 = format(num, '010b')return xx000000oxooxxxxxoooo = []xx0000000 = input("Please enter the previous 10 digits again and ending with '\\n': ").split(' ')if len(xx0000000) == 10:try:for i in xx0000000:oxooxxxxxoooo.append(int(i))except:print('err input!')exit(-1)else:print('err input!')exit(-1)for i in range(len(oxooxxxxxoooo)):oxooxxxxxoooo[i] = list(xxxx000x0(oxooxxxxxoooo[i]))else:xx0000x000 = oxooxxxxxooooprint(xx0000x000)x, o = (0, 0)xx00x00x0xxx00 = [(x, o)]xx00x00x0xxx00input = list(input('input maze path:'))count = 0while (x, o) != (9, 9):if count < len(xx00x00x0xxx00input):xx0000x0xxx00 = xx00x00x0xxx00input[count]if xx0000x0xxx00 == 'a':if o > 0 and xx0000x000[x][o - 1] == '0':o -= 1count += 1xx00x00x0xxx00.append((x, o))else:print('wrong!')exit(-1)elif xx0000x0xxx00 == 'd':if o < 9 and xx0000x000[x][o + 1] == '0':count += 1o += 1xx00x00x0xxx00.append((x, o))else:print('wrong!')exit(-1)else:if xx0000x0xxx00 == 'w':if x > 0 and xx0000x000[x - 1][o] == '0':count += 1x -= 1xx00x00x0xxx00.append((x, o))else:print('wrong!')exit(-1)else:if xx0000x0xxx00 == 's':if x < 9 and xx0000x000[x + 1][o] == '0':count += 1x += 1xx00x00x0xxx00.append((x, o))else:print('wrong!')exit(-1)else:print('wrong!')exit(-1)else:print('wrong!')exit(-1)print('right! you maybe got it,flag is flag{the footprint of the maze path}')
# okay decompiling second.pyc
数组oxooxxxxxoooo存放的是地图,将之前解出的10个值输入,再将oxooxxxxxoooo输出,即可获得地图。
[['0', '1', '1', '1', '1', '1', '1', '1', '1', '1'],['0', '0', '0', '1', '1', '1', '0', '0', '0', '0'],['1', '1', '0', '0', '1', '1', '0', '1', '0', '1'],['1', '1', '1', '0', '1', '1', '0', '1', '0', '1'],['1', '0', '0', '0', '0', '0', '0', '1', '0', '1'],['1', '0', '0', '1', '1', '1', '1', '1', '0', '1'],['1', '1', '1', '0', '0', '0', '0', '0', '0', '1'],['1', '0', '0', '0', '1', '1', '1', '1', '1', '1'],['1', '0', '1', '0', '0', '0', '1', '0', '0', '0'],['1', '0', '1', '1', '1', '0', '0', '0', '1', '0']]按要求从左上角走到右下角即可。
sddsdssdddwwwddsssssaaaaassddsddwdds输入程序中,显示正确。

接着按照程序给出的提示,将走过路径的对应字符取过来即可,脚本如下:
footprint = '3qzqns4hj6\neeaxc!4a-%\nd735_@4l6g\nf1gd1v7hdm\n1+$-953}81\na^21vbnm3!\n-#*f-e1d8_\n2ty9uipok-\n6r1802f7d1\n9wez1c-f{0'
footprintlist = footprint.split('\n')
cipher = "sddsdssdddwwwddsssssaaaaassddsddwdds"
x = 0
y = 0
flag = ""
flag += footprintlist[x][y]
for c in cipher:if c == 'w':x -= 1flag += footprintlist[x][y]elif c == 's':x += 1flag += footprintlist[x][y]elif c == 'a':y -= 1flag += footprintlist[x][y]elif c == 'd':y += 1flag += footprintlist[x][y]
print(flag)# 3eea35d-953744a-6d838d1e-f9802c-f7d10
这一题学到了不少,通过这道题也顺便知道了如何去调用动态库中函数,也获得了一些解题经验,收获颇丰。
FLAG:flag{3eea35d-953744a-6d838d1e-f9802c-f7d10}
BWBA
获取题目附件,64位,无壳,而enc文件猜测是密文。

用IDA进行分析,查看main函数。
int __cdecl main(int argc, const char **argv, const char **envp)
{__int64 v3; // raxint v4; // ebxunsigned int v5; // eax__int64 v6; // rax__int64 v7; // raxunsigned __int64 v8; // rbxdouble v10; // [rsp+8h] [rbp-488h]char v11[248]; // [rsp+10h] [rbp-480h] BYREF__int64 v12; // [rsp+108h] [rbp-388h] BYREFchar v13[256]; // [rsp+210h] [rbp-280h] BYREF__int64 v14; // [rsp+310h] [rbp-180h] BYREFchar v15[32]; // [rsp+420h] [rbp-70h] BYREFchar v16[32]; // [rsp+440h] [rbp-50h] BYREFchar v17[16]; // [rsp+460h] [rbp-30h] BYREFchar v18[12]; // [rsp+470h] [rbp-20h] BYREFint i; // [rsp+47Ch] [rbp-14h]std::ifstream::basic_ifstream(v13, "flag.txt", 8LL);if ( std::ios::operator!(&v14) ){v3 = std::operator<<<std::char_traits<char>>(&std::cerr, "Failed to open input file.");std::ostream::operator<<(v3, &std::endl<char,std::char_traits<char>>);v4 = 1;}else{std::string::string(v18);std::getline<char,std::char_traits<char>,std::allocator<char>>(v13, v18);std::ifstream::close(v13);pad_string(v17);str_to_ascii(v16);encrypt(v15, v16);v5 = std::operator|(16LL, 32LL);std::ofstream::basic_ofstream(v11, "enc", v5);if ( std::ios::operator!(&v12) ){v6 = std::operator<<<std::char_traits<char>>(&std::cerr, "Failed to open output file.");std::ostream::operator<<(v6, &std::endl<char,std::char_traits<char>>);v4 = 1;}else{for ( i = 0; ; ++i ){v8 = i;if ( v8 >= std::vector<double>::size(v15) )break;v10 = *std::vector<double>::operator[](v15, i);v7 = std::ostream::operator<<(v11, v10);std::operator<<<std::char_traits<char>>(v7, 32LL);}std::ofstream::close(v11);v4 = 0;}std::ofstream::~ofstream(v11);std::vector<double>::~vector(v15);std::vector<int>::~vector(v16);std::string::~string(v17);std::string::~string(v18);}std::ifstream::~ifstream(v13);return v4;
}
可以看出关键在encrypt函数里,查看encrypt函数。
__int64 __fastcall encrypt(__int64 a1, __int64 a2)
{double *v2; // raxdouble *v3; // raxdouble v5; // [rsp+8h] [rbp-38h]double v6; // [rsp+8h] [rbp-38h]double v7; // [rsp+8h] [rbp-38h]char v8; // [rsp+23h] [rbp-1Dh] BYREFint v9; // [rsp+24h] [rbp-1Ch]int j; // [rsp+28h] [rbp-18h]int i; // [rsp+2Ch] [rbp-14h]v9 = std::vector<int>::size(a2);std::allocator<double>::allocator(&v8);std::vector<double>::vector<int>(a1, v9, 0LL, &v8);std::allocator<double>::~allocator(&v8);for ( i = 0; i < v9; ++i ){for ( j = 0; j < v9; ++j ){v5 = *std::vector<int>::operator[](a2, j);v6 = cos((j + 0.5) * (3.141592653589793 * i) / v9) * v5;v2 = std::vector<double>::operator[](a1, i);*v2 = *v2 + v6;}if ( i )v7 = sqrt(2.0 / v9);elsev7 = sqrt(1.0 / v9);v3 = std::vector<double>::operator[](a1, i);*v3 = *v3 * v7;}return a1;
}
是一个没见过的算法,一开始想尝试着将它逆过来,但是失败了,在这里被困住了。
后来看到其他师傅的wp时才知道,这是一个DCT(离散余弦变换),属于是自己的知识盲区了,知道sqrt是平方根,知道cos是余弦,知道3.14是圆周率,但是凑在却是一点也看不明白了,看来要学的知识还有很多很多。
了解到了IDCT(离散余弦逆变换)是DCT的逆算法,在scipy库和cv2库中都有这两种算法,这里调用cv2库,脚本如下:
import cv2
import numpy
def main():cipher = [370.75, 234.362, -58.0834, 59.8212, 88.8221, -30.2406, 21.8316, 49.9781, -33.5259, 2.69675, 43.5386, -30.2925, -28.0754, 27.593, -2.53962, -27.1883, -5.60777, -0.263937, 6.80326, 8.03022, -6.34681, -0.89506, -6.80685, -13.6088, 27.0958, 29.8439, -21.7688, -20.6925, -13.2155, -37.0994, 2.23679, 37.6699, -3.5, 9.85188, 57.2806, 13.5715, -20.7184, 8.6816, 3.59369, -4.5302, 4.22203, -28.8166, -23.695, 31.2268, 6.58823, -39.9966, -20.7877, -19.7624, -22.031, 16.3285, 2.07557, -26.2521, 16.1914, 18.3976, -26.9295, 3.03769, 41.0412, 20.2598, 14.991, 6.99392, -22.3752, -7.24466, 8.96299, -10.4874, ]value = numpy.array(cipher)value1 = cv2.idct(value)    # value1接受到的是一个二维数组value2 = value1.ravel()     # 将二维数组转成一维数组for i in range(len(value2)):print(chr(round(value2[i])),end="")     # 用round函数对数组中的值进行四舍五入
if __name__ == '__main__':main()# flag{9ab488a7-5b11-1b15-04f2-c230704ecf72}
FLAG:flag{9ab488a7-5b11-1b15-04f2-c230704ecf72}
Poisoned_tea_CHELL
获取题目附件,通过ExeinfoPe进行查壳发现没有壳。
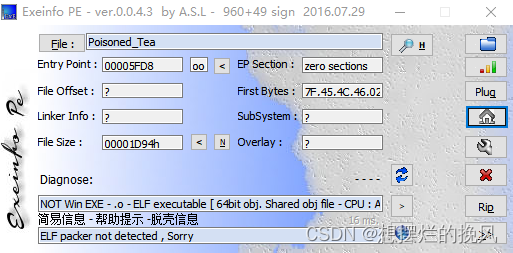
但用die进行查壳时发现了UPX壳。
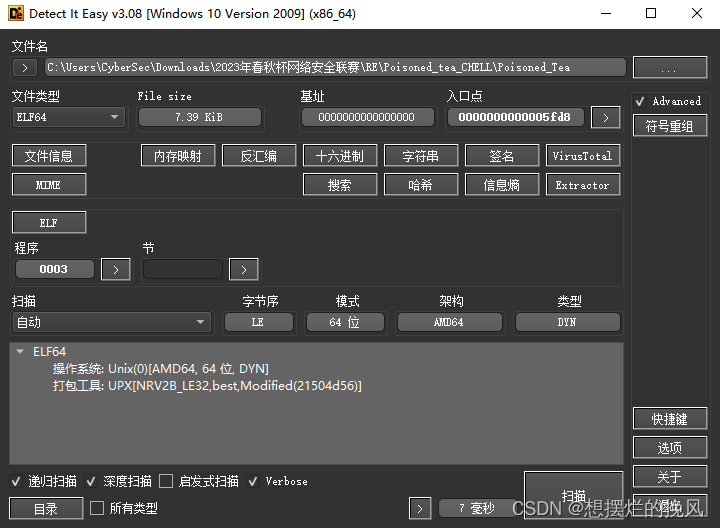
可以猜测出修改了UPX壳的特征码。用UPX指令无法对其进行脱壳。

这里学到了两种方法来找到程序中的加密函数。
第一种找程序加密函数的方法
将程序放入WinHex中进行查看,看见明显被修改的痕迹。
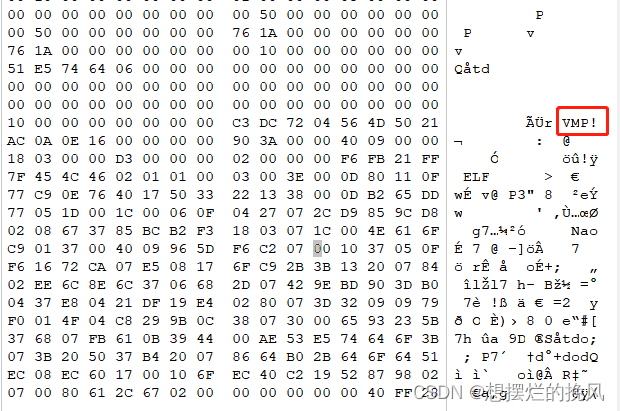
将其中所有的“VMP”全部修改为“UPX”,像这样

这样即可对程序进行脱壳。
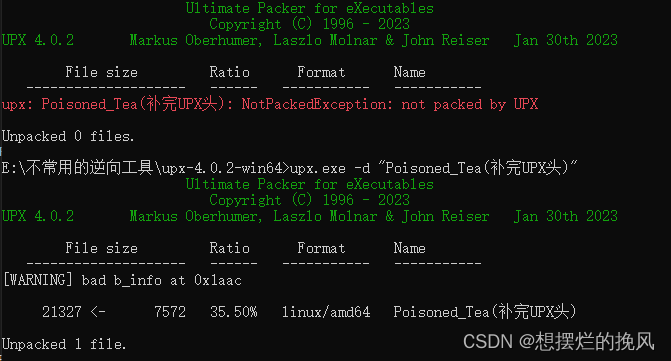
接下来放到IDA中即可进行正常的分析了。
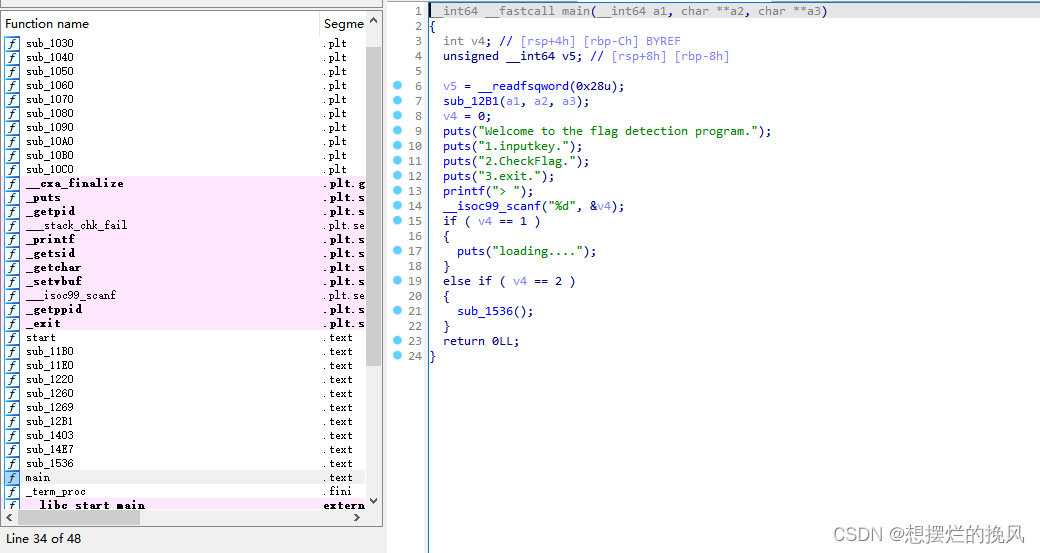
加密函数就在sub_1536函数中的sub_1403函数中
__int64 sub_1536()
{int v1; // [rsp+8h] [rbp-468h]int i; // [rsp+Ch] [rbp-464h]int j; // [rsp+10h] [rbp-460h]int v4; // [rsp+14h] [rbp-45Ch] BYREFint v5; // [rsp+18h] [rbp-458h]int v6; // [rsp+1Ch] [rbp-454h]int v7[8]; // [rsp+20h] [rbp-450h] BYREFint v8; // [rsp+40h] [rbp-430h]int v9; // [rsp+44h] [rbp-42Ch]int v10; // [rsp+48h] [rbp-428h]int v11; // [rsp+4Ch] [rbp-424h]int v12; // [rsp+50h] [rbp-420h]int v13[258]; // [rsp+60h] [rbp-410h] BYREFunsigned __int64 v14; // [rsp+468h] [rbp-8h]v14 = __readfsqword(0x28u);v1 = 1;v7[0] = 5;v7[1] = 2;v7[2] = dword_4020;v7[3] = dword_4010;v7[4] = 0;memset(v13, 0, 0x400uLL);puts("##############");printf("\ninput flag: ");__isoc99_scanf("%s", v13);getchar();v4 = 0;v5 = 0;v6 = 0;for ( i = 0; v13[i]; i += 2 ){v4 = v13[i];v5 = v13[i + 1];sub_1403(dword_4030, &v4, v7);v13[i] = v4;v13[i + 1] = v5;}v8 = 0;v9 = 0;v10 = 0;v11 = 0;v12 = 0;for ( j = 0; v13[j]; j += 2 ){v8 = dword_41E0[j];v9 = dword_41E0[j + 1];v10 = v13[j];v11 = v13[j + 1];if ( v8 != v10 || v9 != v11 ){v1 = 0;break;}}if ( v1 )puts("Your input is correct.");elseputs("Your input is incorrect.");return 0LL;
}
__int64 __fastcall sub_1403(int a1, unsigned int *a2, __int64 a3)
{__int64 result; // raxint i; // [rsp+24h] [rbp-14h]unsigned int v5; // [rsp+28h] [rbp-10h]unsigned int v6; // [rsp+2Ch] [rbp-Ch]unsigned int v7; // [rsp+30h] [rbp-8h]v5 = *a2;v6 = a2[1];v7 = 0;for ( i = 0; i < a1; ++i ){v5 += (v6 + ((v6 >> 5) ^ (16 * v6))) ^ (*(4LL * (v7 & 3) + a3) + v7);v7 -= 0x41104111;v6 += (v5 + ((v5 >> 5) ^ (16 * v5))) ^ (*(4LL * ((v7 >> 11) & 3) + a3) + v7);}*a2 = v5;result = v6;a2[1] = v6;return result;
}第二种找程序加密函数的方法
不对程序进行UPX壳特征码修复,打开IDA,不往其中放文件。通过远程连接来抓执行的进程进行动态调试。

因为是elf文件,所以需要linux系统进行执行,选择“Remote Linux debugger”,填上用来执行程序的虚拟机ip地址。
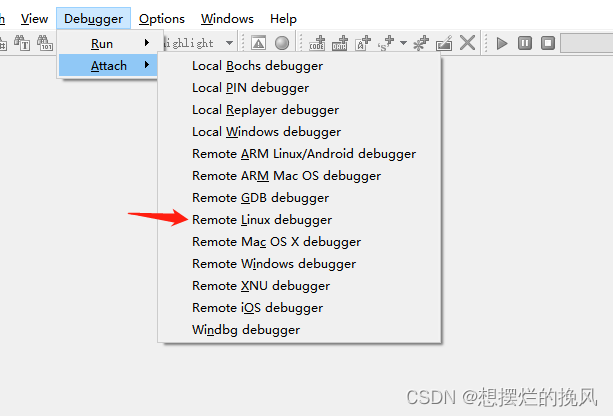
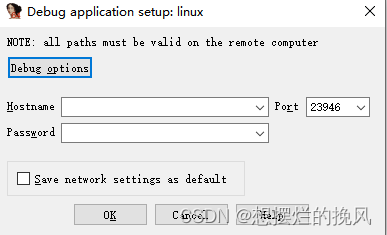
同时在虚拟机中执行题目程序。

找到虚拟机中执行的进程,附加到IDA中。

进来后就到了这个位置。
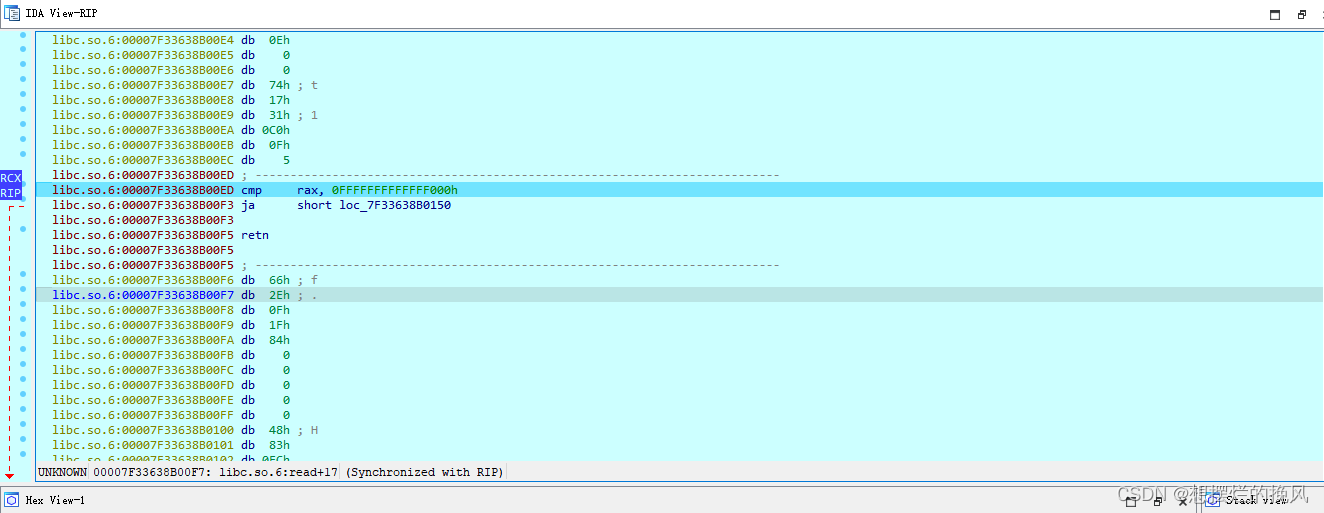
虚拟机中程序选择第二个选项。

然后即可开始动调,进行单步步入,直到找到这一处地方。
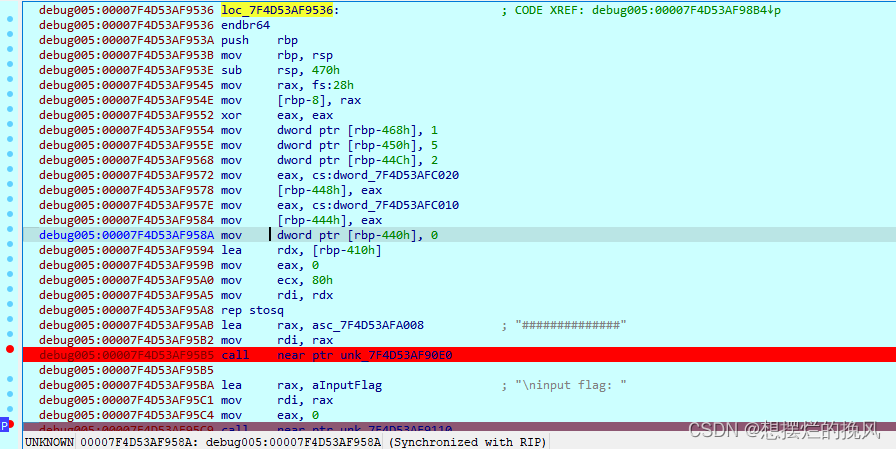
按P生成函数,再按F5转成伪C代码,即可找到加密函数。
__int64 __fastcall sub_7FC907D16536(__int64 a1, __int64 a2)
{__int64 result; // raxint v3; // [rsp+8h] [rbp-468h]int i; // [rsp+Ch] [rbp-464h]int j; // [rsp+10h] [rbp-460h]int v6; // [rsp+14h] [rbp-45Ch] BYREFint v7; // [rsp+18h] [rbp-458h]int v8; // [rsp+1Ch] [rbp-454h]int v9[8]; // [rsp+20h] [rbp-450h] BYREFint v10; // [rsp+40h] [rbp-430h]int v11; // [rsp+44h] [rbp-42Ch]int v12; // [rsp+48h] [rbp-428h]int v13; // [rsp+4Ch] [rbp-424h]int v14; // [rsp+50h] [rbp-420h]int v15[258]; // [rsp+60h] [rbp-410h] BYREFunsigned __int64 v16; // [rsp+468h] [rbp-8h]v16 = __readfsqword(0x28u);v3 = 1;v9[0] = 5;v9[1] = 2;v9[2] = dword_7FC907D19020;v9[3] = dword_7FC907D19010;v9[4] = 0;memset(v15, 0, 0x400uLL);(unk_7FC907D160E0)("##############", a2, v15);(unk_7FC907D16110)("\ninput flag: ");(unk_7FC907D16150)(&unk_7FC907D17025, v15);(unk_7FC907D16130)();v6 = 0;v7 = 0;v8 = 0;for ( i = 0; v15[i]; i += 2 ){v6 = v15[i];v7 = v15[i + 1];(unk_7FC907D16403)(dword_7FC907D19030, &v6, v9);v15[i] = v6;v15[i + 1] = v7;}v10 = 0;v11 = 0;v12 = 0;v13 = 0;v14 = 0;for ( j = 0; v15[j]; j += 2 ){v10 = dword_7FC907D191E0[j];v11 = dword_7FC907D191E0[j + 1];v12 = v15[j];v13 = v15[j + 1];if ( v10 != v12 || v11 != v13 ){v3 = 0;break;}}if ( v3 )(unk_7FC907D160E0)("Your input is correct.");else(unk_7FC907D160E0)("Your input is incorrect.");result = 0LL;if ( v16 != __readfsqword(0x28u) )return (unk_7FC907D16100)();return result;
}而进行tea系列算法加密的位置就在unk_7FC907D16403中,将其中内容按P生成函数后再用F5转成伪C代码,即可看见整个tea系列算法加密过程。
__int64 __fastcall sub_7FC907D16403(int a1, unsigned int *a2, __int64 a3)
{__int64 result; // raxint i; // [rsp+24h] [rbp-14h]unsigned int v5; // [rsp+28h] [rbp-10h]unsigned int v6; // [rsp+2Ch] [rbp-Ch]unsigned int v7; // [rsp+30h] [rbp-8h]v5 = *a2;v6 = a2[1];v7 = 0;for ( i = 0; i < a1; ++i ){v5 += (v6 + ((v6 >> 5) ^ (16 * v6))) ^ (*(4LL * (v7 & 3) + a3) + v7);v7 -= 1091584273;v6 += (v5 + ((v5 >> 5) ^ (16 * v5))) ^ (*(4LL * ((v7 >> 11) & 3) + a3) + v7);}*a2 = v5;result = v6;a2[1] = v6;return result;
}解密
这里拿脱完壳的程序进行分析,程序很明显可以找到一个像是用来参与加密的v7数组(key数组),此时数组中内容为[5, 2, 8, 7],但通过动调后会发现,后面数组中内容被改成了[5, 2, 9, 7]。
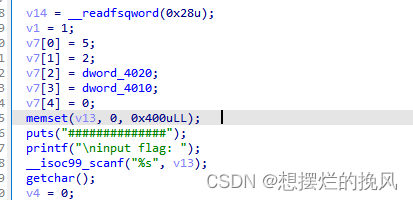
接着就是后面的两个,一个是算法加密的函数,一个是放密文的数组。
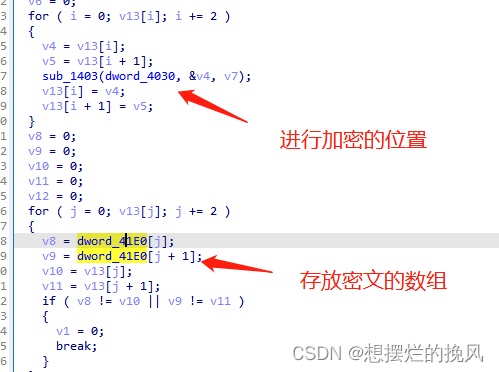
先查看sub_1403函数,可以看出函数的第一个参数是来确定加密循环次数的,其中存放的值为0x1F(也就是31),但是通过动调发现,这个也被修改了,实际循环次数是0x24(也就是36)。
__int64 __fastcall sub_1403(int a1, unsigned int *a2, __int64 a3)
{__int64 result; // raxint i; // [rsp+24h] [rbp-14h]unsigned int v5; // [rsp+28h] [rbp-10h]unsigned int v6; // [rsp+2Ch] [rbp-Ch]unsigned int v7; // [rsp+30h] [rbp-8h]v5 = *a2;v6 = a2[1];v7 = 0;for ( i = 0; i < a1; ++i ){v5 += (v6 + ((v6 >> 5) ^ (16 * v6))) ^ (*(4LL * (v7 & 3) + a3) + v7);v7 -= 0x41104111;v6 += (v5 + ((v5 >> 5) ^ (16 * v5))) ^ (*(4LL * ((v7 >> 11) & 3) + a3) + v7);}*a2 = v5;result = v6;a2[1] = v6;return result;
}tea系列算法会有一个DELTA值,而程序中的0x41104111就是其中的DELTA值,"v7 -= 0x41104111"也可以看作"v7 += 0xBEEFBEEF"(将0x41104111进行了取反)。
接着即可开始写解密脚本了。脚本如下:
C语言版解密脚本:
#include<stdio.h>
#include<Windows.h>
void main()
{UINT32 value[] = { 0xECFDA301, 0x61BECDF5, 0xB89E6C7D, 0xCE36DC68, 0x4B6E539E, 0x642EB504, 0x54F9D33C, 0x6D06E365, 0xEA873D53,0xA4618507, 0xD7B18E30, 0xC45B4042 };UINT32 v0 = 0;UINT32 v1 = 0;UINT32 sum = 0xbeefbeef * 36;UINT32 DELTA = 0xbeefbeef;UINT32 k[] = { 5,2,9,7 };int i = 0;int j = 0;for (i = 0; i < 12; i+=2){v0 = value[i];v1 = value[i+1];sum = 0xbeefbeef * 36;for (j = 0; j < 36; j++){v1 -= (v0 + ((v0 >> 5) ^ (16 * v0))) ^ (*(((sum >> 11) & 3) + k) + sum);sum -= 0xbeefbeef;v0 -= (v1 + ((v1 >> 5) ^ (16 * v1))) ^ (*((sum & 3) + k) + sum);}printf("%c", (v0 & 0xff) >> (4 * 8));printf("%c", (v0 & 0xff00) >> (5 * 8));printf("%c", (v0 & 0xff0000) >> (6 * 8));printf("%c", (v0 & 0xff000000) >> (7 * 8));printf("%c", (v1 & 0xff) >> (4 * 8));printf("%c", (v1 & 0xff00) >> (5 * 8));printf("%c", (v1 & 0xff0000) >> (6 * 8));printf("%c", (v1 & 0xff000000) >> (7 * 8));}
}
python版解密脚本:
import ctypes
def tea_decode(v,k): flag = []DELTA = 0xbeefbeefsum = DELTA * 36sum = ctypes.c_uint32(sum)for i in range(0,12,2):v0 = ctypes.c_uint32(v[i])v1 = ctypes.c_uint32(v[i+1])sum.value = DELTA * 36for j in range(36):v1.value -= (v0.value + ((v0.value >> 5) ^ (16 * v0.value))) ^ (k[(((sum.value >> 11) & 3))] + sum.value)sum.value -= DELTAv0.value -= (v1.value + ((v1.value >> 5) ^ (16 * v1.value))) ^ (k[((sum.value & 3))] + sum.value)flag.append(v0.value)flag.append(v1.value)return flagdef main():value = [0xECFDA301, 0x61BECDF5, 0xB89E6C7D, 0xCE36DC68, 0x4B6E539E, 0x642EB504, 0x54F9D33C, 0x6D06E365, 0xEA873D53,0xA4618507, 0xD7B18E30, 0xC45B4042]key = [5,2,9,7]flag = tea_decode(value,key)flag_hex = ""flag_value = ""for i in range(len(flag)):flag_hex += hex((flag[i] & 0xff) >> (0 * 8))[2:].zfill(2)flag_hex += hex((flag[i] & 0xff00) >> (1 * 8))[2:].zfill(2)flag_hex += hex((flag[i] & 0xff0000) >> (2 * 8))[2:].zfill(2)flag_hex += hex((flag[i] & 0xff000000) >> (3 * 8))[2:].zfill(2)for j in range(0,len(flag_hex),2):print(chr(int(flag_hex[j] + flag_hex[j+1], 16)),end="")
if __name__ == '__main__':main()
做题的时候写解密脚本总出问题,就尝试了C语言和python语言两种语言来写两个版本的解密脚本,后来仍然出问题,最后发现问题所在,解密算法中取key数组中值那部分,也就是伪代码程序中“v6 += (v5 + ((v5 >> 5) ^ (16 * v5))) ^ (*(4LL * ((v7 >> 11) & 3) + a3) + v7);”这里要将其中“4LL * ”给在脚本中删去。
大致想到为什么伪代码中需要“4LL * ”了,因为伪代码中是用地址去取值,int型数组中每个元素占4个字节,则需要“4LL * ”才能找到对应位置的元素,而在脚本中直接用数组下标了,所以无需再进行“4LL * ”。
这一道题学到了不少新东西,原先做题的时候还以为题目文件是个动态链接库,因此陷入难题,不知道密文,看到其他师傅写的wp才知道是个去掉UPX特征码的程序,也是第一次知道IDA可以通过远程调试抓到虚拟机中的进程。
FLAG:Thisisflag{cdfec405-3f4b-457e-92fe-f6446098ee2e}


