一、下载并安装Ubuntu20.04
- 阿里云下载ubuntu系统官方镜像;(阿里云的此镜像我已验证可顺利安装ros)
- Index of /ubuntu-releases/20.04/
下载:ubuntu-20.04.3-desktop-amd64.iso
3.也可以在autolabor官网下载他们做好的ros开源镜像
ROS软件包下载 - Autolabor开源ROS机器人底盘 - 官方网站
3.用软碟通ultraISO制作系统U盘

具体安装参考:联想拯救者Legion Y7000P 2020款(10代INTEL+GTX1650)安装ubuntu16.04(双系统)_苏凯的博客-CSDN博客
修改hosts文件
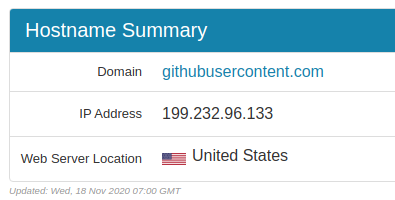
打开此链接:https://githubusercontent.com.ipaddress.com/raw.githubusercontent.com
将其中显示的IP Address地址复制到粘贴板,这里为199.232.96.133

编辑系统的hosts文件:
sudo gedit /etc/hosts把以下内容追加到末尾即可:
199.232.96.133 raw.githubusercontent.com上面哪条IP是旧的,需要自己查询,或者把这是最新的加进去:
185.199.110.133  raw.githubusercontent.com
151.101.228.133 raw.github.com
编辑 apt下载源
gedit /etc/apt/sources.list永久指定安装源
每次临时指定源地址比较麻烦,可以通过以下方式配置永久源
在主目录创建.pip文件夹
mkdir ~/.pip
编写~/.pip/pip.conf
已复制
sudo gedit ~/.pip/pip.conf
并添加以下内容
[global]
trusted-host=pypi.douban.com
index-url=https://mirrors.aliyun.com/pypi/simple/
timeout=6000
此时,默认pip install xxx已经可以自动走镜像地址, 但是sudo模式下的pip和pip3并不能使用此镜像。所以要把这个pip.conf复制到/root/.pip目录下
sudo mkdir -p /root/.pip
sudo cp ~/.pip/pip.conf /root/.pip/
可用的源有:
清华大学:https://pypi.tuna.tsinghua.edu.cn/simple
阿里云:http://mirrors.aliyun.com/pypi/simple/
中国科技大学 https://pypi.mirrors.ustc.edu.cn/simple/
华中理工大学:http://pypi.hustunique.com/
山东理工大学:http://pypi.sdutlinux.org/
豆瓣:https://pypi.douban.com/simple/
ros-noetic安装
添加ros软件源:
sudo sh -c 'echo "deb http://packages.ros.org/ros/ubuntu $(lsb_release -sc) main" > /etc/apt/sources.list.d/ros-latest.list'
安装公钥:
sudo apt-key adv --keyserver 'hkp://keyserver.ubuntu.com:80' --recv-key C1CF6E31E6BADE8868B172B4F42ED6FBAB17C654
更新:
sudo apt update
安装ros-noetic
sudo apt install ros-$ROS_DISTRO-desktop-full
设置ros版本:
apt search ros-$ROS_DISTRO
环境设置:
echo "source /opt/ros/noetic/setup.bash" >> ~/.bashrc
source ~/.bashrc
初始化ROS
- 首先需要先初始化 rosdep,具体如下:
sudo apt install python3-rosdep2
sudo apt install python3-rosdep
sudo rosdep init
2.rosdep update
rosdep update
rosdep init ROS安装问题解决方案
问题简述
ERROR: default sources list file already exists:/etc/ros/rosdep/sources.list.d/20-default.list
Please delete if you wish to re-initialize
解决:
sudo rm /etc/ros/rosdep/sources.list.d/20-default.list问题简述
ERROR: cannot download default sources list from:
https://raw.githubusercontent.com/ros/rosdistro/master/rosdep/sources.list.d/20-default.list
Website may be down.
ping一下这个网址
ping raw.githubusercontent.com
改hosts文件
sudo gedit /etc/hosts185.199.110.133  raw.githubusercontent.com
151.101.228.133 raw.github.com
修改:20-default.list
sudo su //或者su root 然后输入密码切换至root用户
sudo gedit /etc/ros/rosdep/sources.list.d/20-default.list
把 raw.githubusercontent.com改 raw.github.com
# os-specific listings first
yaml https://raw.githubusercontent.com/ros/rosdistro/master/rosdep/osx-homebrew.yaml osx# generic
yaml https://raw.githubusercontent.com/ros/rosdistro/master/rosdep/base.yaml
yaml https://raw.githubusercontent.com/ros/rosdistro/master/rosdep/python.yaml
yaml https://raw.githubusercontent.com/ros/rosdistro/master/rosdep/ruby.yaml
gbpdistro https://raw.githubusercontent.com/ros/rosdistro/master/releases/fuerte.yaml fuerte# newer distributions (Groovy, Hydro, ...) must not be listed anymore, they are being fetched from the rosdistro index.yaml instead
改:
# os-specific listings first
yaml https://raw.github.com/ros/rosdistro/master/rosdep/osx-homebrew.yaml osx# generic
yaml https://raw.github.com/ros/rosdistro/master/rosdep/base.yaml
yaml https://raw.github.com/ros/rosdistro/master/rosdep/python.yaml
yaml https://raw.github.com/ros/rosdistro/master/rosdep/ruby.yaml
gbpdistro https://raw.github.com/ros/rosdistro/master/releases/fuerte.yaml fuerte# newer distributions (Groovy, Hydro, ...) must not be listed anymore, they are being fetched from the rosdistro index.yaml instead
或
# os-specific listings first
yaml https://ghproxy.com/https://raw.githubusercontent.com/ros/rosdistro/master/rosdep/osx-homebrew.yaml osx# generic
yaml https://ghproxy.com/https://raw.githubusercontent.com/ros/rosdistro/master/rosdep/base.yaml
yaml https://ghproxy.com/https://raw.githubusercontent.com/ros/rosdistro/master/rosdep/python.yaml
yaml https://ghproxy.com/https://raw.githubusercontent.com/ros/rosdistro/master/rosdep/ruby.yaml
gbpdistro https://ghproxy.com/https://raw.githubusercontent.com/ros/rosdistro/master/releases/fuerte.yaml fuerte# newer distributions (Groovy, Hydro, ...) must not be listed anymore, they are being fetched from the rosdistro index.yaml instead
网站https://ghproxy.com/支持github的资源代理,非常好用,我们将用此代理加速rosdep对Github Raw的访问,进而解决rosdep update超时问题。
定位rosdep资源下载函数
rosdep超时
解决ROS系统 rosdep update超时问题的新方法_leida_wt的博客-CSDN博客_rosdep update 超时
先获取根文件的访问权限
sudo nautilus1:修改这函数
sudo gedit /usr/lib/python3/dist-packages/rosdep2/sources_list.py 18.04ros1的目录 /usr/lib/python2.7/dist-packages/rosdep2311行添加:
if 'file' not in url:url="https://ghproxy.com/"+url
[说明: yaml file:///home/iimt/.ros/rosdep.yaml 这个文件前面不需要加 GitHub Proxy 代理加速 这个所以需要 加个判断 if 'file' not in url ]
应用ghproxy的代理服务

2:修改函数
sudo gedit /usr/lib/python3/dist-packages/rosdistro/__init__.py69 行
DEFAULT_INDEX_URL = 'https://ghproxy.com/https://raw.githubusercontent.com/ros/rosdistro/master/index-v4.yaml'3:修改函数
同样的方法把“https://ghproxy.com/”添加到网址前
sudo gedit /usr/lib/python3/dist-packages/rosdep2/gbpdistro_support.py 36行
FUERTE_GBPDISTRO_URL = 'https://ghproxy.com/https://raw.githubusercontent.com/ros/rosdistro/' \'master/releases/fuerte.yaml'4:修改函数
sudo gedit /usr/lib/python3/dist-packages/rosdep2/sources_list.py72行
DEFAULT_SOURCES_LIST_URL = 'https://ghproxy.com/https://raw.githubusercontent.com/ros/rosdistro/master/rosdep/sources.list.d/20-default.list'5:修改函数
sudo gedit /usr/lib/python3/dist-packages/rosdep2/rep3.py 39行
REP3_TARGETS_URL = 'https://ghproxy.com/https://raw.githubusercontent.com/ros/rosdistro/master/releases/targets.yaml'6:修改函数
sudo gedit /usr/lib/python3/dist-packages/rosdistro/manifest_provider/github.py 68行
url = 'https://ghproxy.com/https://raw.githubusercontent.com/%s/%s/package.xml' % (path, release_tag)119行
url = 'https://ghproxy.com/https://raw.githubusercontent.com/%s/%s/%s' % \(path, cache.ref(), package_xml_path + '/package.xml' if package_xml_path else 'package.xml')7:修改函数
sudo gedit /usr/lib/python3/dist-packages/rosdep2/gbpdistro_support.py 第204行
gbpdistro_url = "https://ghproxy.com/" + gbpdistro_url 207rosdep
sudo rosdep init
rosdep update
用户在本机上运行,可以指定localhost
# Set ROS Network# Set ROS Network#export ROS_HOSTNAME=xxx.xxx.xxx.xxx#export ROS_MASTER_URI=http://${ROS_HOSTNAME}:11311export ROS_HOSTNAME=localhostexport ROS_MASTER_URI=http://localhost:11311
安装rosinstall
这是安装ROS各种功能包的程序。很有用的工具,务必安装
sudo apt install python3-rosinstall python3-rosinstall-generator python3-wstool build-essential# sudo apt install python3-roslaunch
sudo apt-get install ros-$ROS_DISTRO-roslaunch
3.安装其它依赖及软件
更新命令
sudo apt-get update
sudo apt-get upgrade
sudo apt-get dist-upgrade
sudo apt-get -f install
ros中添加qt 增加Qt5SerialPor库
sudo apt-get install libxcb-xinerama0
sudo apt-get install libcppunit-dev
sudo apt-get install ros-$ROS_DISTRO-qt-create
sudo apt-get install ros-$ROS_DISTRO-qt-build
sudo apt install libqt5serialport5-dev  # 注意安装qt5依赖后需要在 cmakelist.txt 中配置 3处
sudo apt-get install qtmultimedia5-dev
sudo apt-get install libqt5websockets5-dev
sudo apt-get install libqt5webchannel5-dev
sudo apt-get install libqt5multimedia5-plugins
sudo apt-get install sqlitebrowser
sudo apt-get install ros-$ROS_DISTRO-navigation
sudo apt-get install ros-$ROS_DISTRO-serial #https://blog.csdn.net/Shushan1/article/details/118976650
sudo apt-get install ros-$ROS_DISTRO-libuvc
sudo apt-get install ros-$ROS_DISTRO-tf2-sensor-msgs
sudo apt-get install ros-$ROS_DISTRO-control-toolbox
sudo apt-get install ros-$ROS_DISTRO-ecl-threads
sudo apt-get install ros-$ROS_DISTRO-pcl-ros
sudo apt-get install ros-$ROS_DISTRO-image-transport
sudo apt-get install ros-$ROS_DISTRO-interactive-markers
sudo apt install ros-$ROS_DISTRO-network-interface
sudo apt install pcl-tools
sudo apt-get install -y patchelf
sudo apt-get install libxcb-xinerama0
sudo apt install aria2
sudo apt install net-tools
sudo apt-get install terminator
sudo apt install node-grunt-cli
图像转svg
sudo apt install potrace
sudo apt-get install rar
sudo apt install gimp
u盘
sudo apt-get install exfat-fuse
虚拟显示器
sudo apt-get install  xserver-xorg-core-hwe-18.04
sudo apt-get install  xserver-xorg-video-dummy-hwe-18.04
-------------------------------------------------------
sudo apt-get install ros-$ROS_DISTRO-gazebo-ros
sudo apt-get install ros-$ROS_DISTRO-rviz
sudo apt-get install ros-$ROS_DISTRO-xacro
sudo apt-get install ros-$ROS_DISTRO-camera-info-manager
sudo apt install ros-$ROS_DISTRO-gazebo-ros-control
sudo apt install ros-$ROS_DISTRO-position-controllers
sudo apt-get install ros-$ROS_DISTRO-turtlebot3-autorace-coresudo apt-get install ros-$ROS_DISTRO-turtlebot3-autorace-driving
sudo apt-get install ros-$ROS_DISTRO-rqt
sudo apt-get install ros-$ROS_DISTRO-rqt*
sudo apt-get install ros-$ROS_DISTRO-rqt-graph
sudo apt-get install ros-$ROS_DISTRO-rqt-common-plugins
sudo apt-get install ros-$ROS_DISTRO-tf*
sudo apt install liburdfdom-tools
sudo apt-get install unicode
sudo apt install python3-pip
pip install -i https://pypi.tuna.tsinghua.edu.cn/simple gym
sudo apt install python3-git
sudo apt-get install ros-$ROS_DISTRO-controller-manager-msgs
sudo apt-get install libdmtx-dev libdmtx-utils
sudo apt-get install libzbar-dev
--------------------------
sudo apt-get install \python3-vcstool  \
pyqt5-dev-tools \
libbluetooth-dev libspnav-dev \libcwiid-dev \
cmake gcc g++ \
libusb-dev libftdi-dev \
python3-defusedxml python3-vcstool \
ros-$ROS_DISTRO-octomap-msgs        \
ros-$ROS_DISTRO-joy                 \
ros-$ROS_DISTRO-geodesy             \
ros-$ROS_DISTRO-octomap-ros         \
ros-$ROS_DISTRO-control-toolbox     \
ros-$ROS_DISTRO-pluginlib	       \
ros-$ROS_DISTRO-trajectory-msgs     \
ros-$ROS_DISTRO-control-msgs	       \
ros-$ROS_DISTRO-std-srvs 	       \
ros-$ROS_DISTRO-nodelet	       \
ros-$ROS_DISTRO-urdf		       \
ros-$ROS_DISTRO-rviz		       \
ros-$ROS_DISTRO-kdl-conversions     \
ros-$ROS_DISTRO-eigen-conversions   \
ros-$ROS_DISTRO-tf2-sensor-msgs     \
ros-$ROS_DISTRO-pcl-ros \
ros-$ROS_DISTRO-navigation \
ros-$ROS_DISTRO-sophus-----------------------
pip install launchpadlib
sudo pip install gym
sudo apt-get install python3-skimage
sudo pip install h5py
pip install tensorflow-gpu (如果你没有gpu则用这条指令: pip install tensorflow)
sudo pip install keras
右键 管理员编辑文件功能
# 打开终端,执行以下命令进行安装:
sudo apt install nautilus-admin# 安装结束,重启Nautilus
nautilus -q
注意安装qt5依赖后需要在 cmakelist.txt 中配置 3处
1.
find_package(Qt5 COMPONENTS Core Gui Widgets PrintSupport Network SerialPort Sql WebSockets WebChannel REQUIRED)
2.
include_directories(include${catkin_INCLUDE_DIRS}${OpenCV_INCLUDE_DIRS}${Qt5Core_INCLUDE_DIRS}${Qt5Gui_INCLUDE_DIRS}${Qt5Widgets_INCLUDE_DIRS}${Qt5Network_INCLUDE_DIRS}${Qt5SerialPort_INCLUDE_DIRS}${Qt5Sql_INCLUDE_DIRS}${Qt5WebSockets_INCLUDE_DIRS}${Qt5WebChannel_INCLUDE_DIRS})3.
SET(QT_LIBRARIES ${Qt5Core_LIBRARIES} ${Qt5Gui_LIBRARIES} ${Qt5Widgets_LIBRARIES} ${Qt5OpenGL_LIBRARIES}${Qt5Network_LIBRARIES} ${Qt5Xml_LIBRARIES} ${Qt5Qml_LIBRARIES} ${Qt5SerialPort_LIBRARIES} ${Qt5Sql_LIBRARIES} ${Qt5WebSockets_LIBRARIES} ${Qt5WebChannel_LIBRARIES} )
此处忘记配置会报找不到对应的库
/usr/bin/ld: WebSocketClient.cpp:(.text+0x28e): undefined reference to `QWebSocket::open(QUrl const&)'
启动rosrun时出现的问题
Command 'rosrun' not found, but can be installed with:
sudo apt install rosbash
下列软件包有未满足的依赖关系:
rosbash : 依赖: catkin 但是它将不会被安装
E: 无法修正错误,因为您要求某些软件包保持现状,就是它们破坏了软件包间的依赖关系。
解决方法:重新安装ros版本
sudo apt install ros-noetic-desktop-full
安装支持SSH
sudo apt install openssh-server
sudo systemctl status ssh
安装rosbridge,支持java与ROS通信
sudo apt-get install ros-$ROS_DISTRO-rosbridge-server测试:rosbridge
启动
roscoreroscd rosbridge_serverroslaunch rosbridge_server rosbridge_websocket.launch#列出所有节点,可见增加了rosbridge_websocketrosnode list成功运行后可见,默认9090端口:
Rosbridge WebSocket server started at ws://0.0.0.0:9090
- 3、测试
下载java_rosbridge,该工程只支持topic通信,需要自己扩展下service通信,然后运行工程的RosTest,另外消息结构也需要根据需要扩展,以及自己实现重连机制。
#列出所有主题,可见主题增加了java_to_ros和ros_to_java
rostopic list
#输出主题消息
rostopic echo /java_to_ros
#发布主题消息
rostopic pub /ros_to_java std_msgs/String  "helloJAVA"
rostopic pub /java_to_ros std_msgs/String  "helloROS"
#列出所有服务,可代码调用默认的/rosapi/get_time
rosservice list
rosservice call /rosapi/get_time
4、rosbridge协议
底层为websocket通信,在这之上封装具体的数据格式,具体见:
Rosbridge协议定义
rosbridge_suite
查看当前gcc版本
gcc -v常用命令
#进入ROS目录
roscd
#运营
roslaunch
rosrun
#节点
rosnode list
#主题
rostopic list
#服务
rosservice list
rosservice call /rosapi/get_time
#消息
rosmsg list
#查看消息定义
rosed geometry_msgs Twist.msg
#消息的存储和重新发布
rosbag
#参数
rosparam list
安装 gcc g++
sudo apt install build-essentialapt-get install p7zip-full解压7z:使用方法:7z x file file是你要解压的文件名。解压tar.bz2: sudo tar -jxvf file.tar.bz2。解压tar: sudo tar -zxvf file.tar。ubuntu 20.04 ROS Noetic 无serial包解决方法
cd ~/3rdparty/
git clone https://github.com/wjwwood/serial.git
进入serial目录编译,安装
cd serial
make
make install
对CMakeLists.txt进行如下修改
find_package(catkin REQUIRED COMPONENTSroscppserial# 。。。
)## Include headers
include_directories(include)
## 改成
## Include headers
include_directories(include  ${catkin_INCLUDE_DIRS})# .bashrc  source ~/3rdparty/serial/build/devel/setup.sh
安装gym-gazebo:
cd ~
git clone git clone https://github.com/erlerobot/gym-gazebo.git
cd gym-gazebo
sudo pip install -e .
运行bash文件,构建ros工作区:
cd gym-gazebo/gym_gazebo/envs/installation
#注意版本
bash setup_melodic.bash
4、源码安装sophus
git clone https://github.com/stonier/sophus -b release/0.9.1-kinetic
cd sophus
git checkout 1.2.x
mkdir build
cd build
cmake ..
make
sudo make install
.bashrc
source /opt/ros/noetic/setup.bash
export TURTLEBOT3_MODEL=waffleexport CAMERA_TYPE=astrapro
#export CAMERA_TYPE=astrapro
export ROS_PACKAGE_PATH=${ROS_PACKAGE_PATH}:~/3rdparty/ORB_SLAM2/Examples/ROS#export ROS_PACKAGE_PATH=${ROS_PACKAGE_PATH}:~/3rdparty/serial
source ~/3rdparty/serial/build/devel/setup.sh
alias cw='cd ~/workspace/workspace_ros_foodcar_jicui '
alias cs='cd ~/workspace/workspace_ros_foodcar_jicui/src'
alias cm='cd ~/workspace/workspace_ros_foodcar_jicui  && catkin_make'
alias sd='source devel/setup.sh'
alias sm='catkin_make && source devel/setup.sh'
alias cws='cd ~/workspace/workspace_ros_foodcar_jicui && source devel/setup.sh'
alias smc='catkin_make_isolated --install --use-ninja'
alias sdc='source install_isolated/setup.bash'#docker
alias dexec='sudo docker exec -it melodic_rviz /bin/bash'
alias dsta='sudo docker start melodic_rviz'
alias drsts='sudo docker restart melodic_rviz'
alias drun='sudo docker run -it -v$(pwd):/data --device=/dev/dri --group-add video --volume=/tmp/.X11-unix:/tmp/.X11-unix  --env="DISPLAY=$DISPLAY" --env="QT_X11_NO_MITSHM=1" --privileged -p 2222:22 -p 8080:8080 -p 11311:11311  -p 9003:9003   -p 9001:9001  -p 3306:3306 -p 34567:34567  -v /home/sukai:/home --name=melodic_rviz fishros2/ros:melodic-desktop-full'## 编译ros项目时要注释掉 /home/iimt/.bashrc 以下3条;打包项目时需要打开注释
#export PATH=/home/iimt/3rdparty/qt/bin:$PATH
#export LIB_PATH=/home/iimt/3rdparty/qt/lib:$LIB_PATH
#export PLUGIN_PATH=/home/iimt/3rdparty/qt/plugins:$PLUGIN_PATH## ubuntu20.04 使用以下;编译ros项目时要注释掉 /home/iimt/.bashrc 以下3条;打包项目时需要打开注释
#export PATH=/home/iimt/Qt5.9.9/5.9.9/gcc_64/bin:$PATH
#export LD_LIBRARY_PATH=/home/iimt/Qt5.9.9/5.9.9/gcc_64/lib:$LD_LIBRARY_PATH
#export QT_PLUGIN_PATH=/home/iimt/Qt5.9.9/5.9.9/gcc_64/plugins:$QT_PLUGIN_PATH
#export QML2_IMPORT_PATH=/home/iimt/Qt5.9.9/5.9.9/gcc_64/qml:$QML2_IMPORT_PATH##export QML2_PATH=/home/maoypeng/Applications/Qt5.1.1/5.1.1/gcc/qml:$QML2_PATHexport ROS_HOSTNAME=127.0.0.1
export ROS_MASTER_URI=http://127.0.0.1:11311
# linuxdeployqt打包,编译问题
#export LD_LIBRARY_PATH=/home/iimt/Qt5.9.9/5.9.9/gcc_64/lib
安装 dconf-editor 系统配置编辑器
打开一个终端,输入下面的命令,安装系统配置编辑器
sudo apt-get install dconf-editorvnc远程桌面安装
https://www.realvnc.com/en/connect/download/viewer/
ubuntu下使用vnc viewer - 屁屁撒花啦啦啦 - 博客园
Ubuntu 20.04 自带远程桌面体验 - 知乎
sudo gedit /usr/share/X11/xorg.conf.d/xorg.conf 没用!!!!!
Section "ServerLayout"Identifier     "X.org Configured"Screen      0  "Screen0" 0 0Screen      1  "Screen1" 0 0
EndSectionSection "Files"ModulePath   "/usr/lib/xorg/modules"FontPath     "/usr/share/fonts/X11/misc"FontPath     "/usr/share/fonts/X11/cyrillic"FontPath     "/usr/share/fonts/X11/100dpi/:unscaled"FontPath     "/usr/share/fonts/X11/75dpi/:unscaled"FontPath     "/usr/share/fonts/X11/Type1"FontPath     "/usr/share/fonts/X11/100dpi"FontPath     "/usr/share/fonts/X11/75dpi"FontPath     "built-ins"
EndSectionSection "Module"Load  "glx"
EndSectionSection "InputDevice"Identifier  "Keyboard0"Driver      "kbd"
EndSectionSection "InputDevice"Identifier  "Mouse0"Driver      "mouse"Option	    "Protocol" "auto"Option	    "Device" "/dev/input/mice"Option	    "ZAxisMapping" "4 5 6 7"
EndSectionSection "Monitor"Identifier   "Monitor0"VendorName   "Monitor Vendor"ModelName    "Monitor Model"
EndSectionSection "Device"### Available Driver options are:-### Values: <i>: integer, <f>: float, <bool>: "True"/"False",### <string>: "String", <freq>: "<f> Hz/kHz/MHz",### <percent>: "<f>%"### [arg]: arg optional#Option     "Accel"              	# [<bool>]#Option     "AccelMethod"        	# <str>#Option     "Backlight"          	# <str>#Option     "CustomEDID"         	# <str>#Option     "DRI"                	# <str>#Option     "Present"            	# [<bool>]#Option     "ColorKey"           	# <i>#Option     "VideoKey"           	# <i>#Option     "Tiling"             	# [<bool>]#Option     "LinearFramebuffer"  	# [<bool>]#Option     "HWRotation"         	# [<bool>]#Option     "VSync"              	# [<bool>]#Option     "PageFlip"           	# [<bool>]#Option     "SwapbuffersWait"    	# [<bool>]#Option     "TripleBuffer"       	# [<bool>]#Option     "XvPreferOverlay"    	# [<bool>]#Option     "HotPlug"            	# [<bool>]#Option     "ReprobeOutputs"     	# [<bool>]#Option     "XvMC"               	# [<bool>]#Option     "ZaphodHeads"        	# <str>#Option     "VirtualHeads"       	# <i>#Option     "TearFree"           	# [<bool>]#Option     "PerCrtcPixmaps"     	# [<bool>]#Option     "FallbackDebug"      	# [<bool>]#Option     "DebugFlushBatches"  	# [<bool>]#Option     "DebugFlushCaches"   	# [<bool>]#Option     "DebugWait"          	# [<bool>]#Option     "BufferCache"        	# [<bool>]Identifier  "Card0"Driver      "intel"BusID       "PCI:0:2:0"
EndSectionSection "Screen"Identifier "Screen0"Device     "Card0"Monitor    "Monitor0"SubSection "Display"Viewport   0 0Depth     1EndSubSectionSubSection "Display"Viewport   0 0Depth     4EndSubSectionSubSection "Display"Viewport   0 0Depth     8EndSubSectionSubSection "Display"Viewport   0 0Depth     15EndSubSectionSubSection "Display"Viewport   0 0Depth     16EndSubSectionSubSection "Display"Viewport   0 0Depth     24EndSubSection
EndSectionSection "Monitor"Identifier "Monitor1"HorizSync   1.0 - 2000.0VertRefresh 1.0 - 200.0# Add 16:9 modes, others are automatically detected.Modeline "1280x720" 74.48 1280 1336 1472 1664 720 721 724 746Modeline "1920x1080" 172.80 1920 2040 2248 2576 1080 1081 1084 1118
EndSectionSection "Device"Identifier "Card1"Driver "dummy"VideoRam 256000
EndSectionSection "Screen"DefaultDepth 24Identifier "Screen1"Device "Card1"Monitor "Monitor1"SubSection "Display"Depth 24Modes "1920x1080"EndSubSection
EndSection
安装完毕后在应用程序中可以找到新增的这个应用
dconf
启动这个应用时会有这样的警告,所以一定小心使用,不要修改本文提到的选项之外的任何选项!
按照如下路径
/org/gnome/desktop/remote-access找到 requlre-encryption,把原先默认的开启状态改为关闭
解决编译“robot_pose_ekf”package时遇到的问题:No package 'orocos-bfl' found
解决编译“robot_pose_ekf”package时遇到的问题 - 简书
git clone https://salsa.debian.org/science-team/orocos-bfl.git# 2. 解压源代码后,编译安装
$ mkdir build
$ cd build
$ cmake ..
$ make
$ sudo make install
# 拷贝头文件到/usr/local/include/ocl
# 拷贝库文件到/usr/local/lib/
# 拷贝orocos-bfl.pc到usr/local/lib/pkgconfig/orocos-bfl.pc3.编译robot_pose_ekf
# 进入catkin_ws文件夹之后,运行
$ catkin_make我不做这下面3步也编译过了
# 拷贝头文件到/usr/local/include/ocl
# 拷贝库文件到/usr/local/lib/
# 拷贝orocos-bfl.pc到usr/local/lib/pkgconfig/orocos-bfl.pc--------------------------------
ERROR
-- Looking for Cppunit - not found
-- You will not be able to build tests. To build tests, first set the path where cppunit can be found using CMAKE_INCLUDE_PATH and CMAKE_LIBRARY_PATH.
svn: E155007: “/home/iimt/3rdparty/orocos-bfl”不是工作副本安装libcppunit-dev (sudo apt-get install libcppunit-dev 或者类似的包)
安装qtcreate
在Ubuntu下搭建Qt开发环境和Qt creator_花花的博客-CSDN博客
ROS与C++入门教程-搭建开发环境(QT+ros_qtc_plugin) - 创客智造
Index of /
下载qt : Index of /archive/qt/5.9/5.9.9
cd /usr/lib/x86_64-linux-gnu/qt-default/qtchooser
sudo gedit default.conf sudo gedit /usr/lib/x86_64-linux-gnu/qt-default/qtchooser/default.conf
sudo gedit /usr/lib/x86_64-linux-gnu/qt-default/qtchooser/default.conf
/home/iimt/Qt5.12.11/5.12.11/gcc_64/bin
/home/iimt/Qt5.12.11/5.12.11/
/home/iimt/Qt5.9.9/5.9.9/gcc_64/bin
/home/iimt/Qt5.9.9/5.9.9/
/home/iimt/3rdparty/qt/bin
/home/iimt/3rdparty/qt/
安装ros_qtc_plugin插件
Ubuntu18安装 ros-qtc-plugin并在qt中配置ros环境_mhrobot的博客-CSDN博客
How to Install (Users) — ROS Qt Creator Plug-in documentation
sudo add-apt-repository ppa:levi-armstrong/qt-libraries-trusty
sudo add-apt-repository ppa:levi-armstrong/ppa
sudo apt-get update && sudo apt-get install qt57creator-plugin-ros
sudo gedit /usr/bin/qtcreator#!/bin/sh
export QT_HOME=/home/iimt/Qt5.9.9/Tools/QtCreator/bin
$QT_HOME/qtcreator $*sudo chmod 777 /usr/bin/qtcreator启动 : qtcreatorlinuxdeployqt打包,编译问题
KylinV10上qt5.9开发应用打包步骤(四)--linuxdeployqt源码编译_WenCoo的博客-CSDN博客
export LD_LIBRARY_PATH=/home/iimt/Qt5.9.9/5.9.9/gcc_64/lib
安装opengl
sudo apt-get update
sudo apt-get -f install
安装opengl
sudo apt install mesa-common-dev安装opengl
sudo apt-get install libgl1-mesa-dev安装opengl
sudo apt-get install mesa-common-dev
sudo apt-get install libgl1-mesa-dev libglu1-mesa-devsudo apt install cmake
克隆导航包:
https://github.com/ros-planning/navigation.git
3、安装依赖;
sudo apt-get install ros-$ROS_DISTRO-navigation*
sudo apt-get install ros-$ROS_DISTRO-pointcloud-to-laserscan
4.安装turtlebot3仿真
https://github.com/ROBOTIS-GIT/turtlebot3_msgs
5.报错
Joint state with name: "wheel_left_joint" was received but not found in URDF
Joint state with name: “base_l_wheel_joint” was received but not found in URDF_Big_cai的博客-CSDN博客
6. cartographer 建图算法
安装指导:
1.优先看问题解决方案2-------------ros的 Cartographer,ninja,ceres-solver,cartographer_ros安装及其问题,附上最好的安装方法(亲测有效)_帅某Plus的博客-CSDN博客
2.后看
最新cartographer安装:使用ubuntu20.04 + ROS Noetic_yqziqian2的博客-CSDN博客![]() https://blog.csdn.net/yqziqian2/article/details/118100338
https://blog.csdn.net/yqziqian2/article/details/118100338
先安装依赖软件:
sudo apt-get update
sudo apt-get install -y python3-wstool python3-rosdep ninja-build stow
sudo apt-get install autoconf autogen
sudo apt install libgmock-dev #https://blog.csdn.net/xiaokai1999/article/details/113937073
sudo apt install google-mock
sudo apt-get -y --force-yes install libgoogle-glog-dev
sudo apt-get install -y google-mock libboost-all-dev libeigen3-dev libgflags-dev libgoogle-glog-dev liblua5.2-dev libprotobuf-dev libsuitesparse-dev libwebp-dev ninja-build protobuf-compiler python3-sphinx libatlas-base-dev libsuitesparse-dev liblapack-devgoogle gflags安装:
google gflags 库完全使用_Just Coding!-CSDN博客
安装google的gflags和glog
安装google的gflags和glog_sunshine-CSDN博客
把gflags编译成共享库:
cmake .. -DGFLAGS_NAMESPACE=google -DCMAKE_CXX_FLAGS=-fPIC ..源码可能安装不上直接安装glog:
sudo apt-get -y --force-yes install libgoogle-glog-dev clone三个代码包
git config --global http.postBuffer 2000000000git clone https://github.com/googlecartographer/cartographer_ros.gitgit clone https://github.com/googlecartographer/cartographer.gitgit clone https://github.com/ceres-solver/ceres-solver.gitgit clone https://github.com/protocolbuffers/protobuf.git
以上都是要安装的具体看官网;
如果报找不到就改:
1.安装编译 ceres-solver
注意ceres-solver需要1.14版本而不是最新版本,一般没什么问题
2. sudo gedit /usr/local/lib/cmake/Ceres/CeresConfig.cmakecd ceres-solvergit checkout 1.14.0
编译后看问题如果找不到就改:set(Ceres_FOUND TRUE)set(CERES_FOUND TRUE)
卸载
sudo rm -r /usr/local/lib/cmake/Ceres
sudo rm -rf /usr/local/include/ceres /usr/local/lib/libceres.a
以上不行就换
git clone https://github.com/hitcm/ceres-solver-1.11.0.git参考博客:
Cartographer最新版完整安装教程(2020.8.7成功安装)_历尽千帆_SLAM的博客-CSDN博客_cartographer安装
安装ceres-solver - anobscureretreat - 博客园
官方:
Cartographer — Cartographer documentation
GitHub - cartographer-project/cartographer_ros: Provides ROS integration for Cartographer.
Cartographer ROS Integration — Cartographer ROS documentation
修改 cartographer/cartographer_ros/cartographer_ros/configuration_files/revo_lds.lua
后要编译:
catkin_make_isolated --install --use-ninja
source install_isolated/setup.bash
使用 cartographer :
更改 map_server
GitHub - HaoQChen/map_server: map_server for Cartographer
用自己的机器人实现cartographer建图测试与地图保存应该这样做_「小白学移动机器人」一个专注分享移动机器人相关知识的公众号!-CSDN博客_cartographer建图
演示:
roslaunch cartographer_ros demo_backpack_2d.launch bag_filename:=${HOME}/Downloads/cartographer_paper_deutsches_museum.bag
地图坐标与里程计坐标关系 map2odom
/home/iimt/workspace/workspace_ros_foodcar_jicui/src/controlmaster/launch/move_mapbuild.launch<!--########################## sukai #########################--><!-- <node name="map2odom" pkg="tf" type="static_transform_publisher" args="0 0 0 0 0 0 map odom 50"/>-->boost库的安装和使用
boost库安装和使用 - CTHON - 博客园
根据报错显示说明为Boost库存在问题,此处只需要进行安装该库文件并在CMakeLists内制定库文件目录即可。
解决方案:
1.安装库文件
前往该库文件的官网(https://www.boost.org/)点击下载所需版本即可。
此处下载当前(2021.4.4)最新稳定版本(1.75.0),点击 boost_1_75_0.tar.gz 进行下载压缩包。随后将其解压并进入命令行进行源码安装。
安装运行脚本命令如下,需要使用root权限进行运行。
sudo ./bootstrap.sh
sudo ./b2
修改CMakeList.txt
根据报错提示,找到报错的位置,打开文件进行修改。
set(Boost_INCLUDE_DIRS /usr/include/boost)
ros_web
社区: Robot Web Tools
介绍:
rosbridge_suite入门教程-rosbridge_suite介绍 - 创客智造
安装:
sudo apt-get update
sudo apt-get install ros-$ROS_DISTRO-rosbridge-suite ros-$ROS_DISTRO-robot-pose-publisher ros-$ROS_DISTRO-tf2-web-republisher
sudo apt-get install ros-$ROS_DISTRO-robot-state-publisher
与web交互参考:
ros与web的交互 - Yang-hao - 博客园
工具的准备
首先介绍以下所需要的工具包:rosbridge_suite功能包,roslibjs,ros2djs,ros3djs。
● rosbridge_suite:实现Web浏览器与ROS之间的数据交互;
● roslibjs:实现了ROS中的部分功能,如Topic,Service,URDF等;
● ros2djs:提供了二维可视化的管理工具,可以用来在Web浏览器中显示二维地图;
● ros3djs:提供了三维可视化的管理工具,可以在Web端显示三维模型。
在这几个功能包中,rosbridge_suite是最重要的,它是Web和ROS沟通的桥梁,roslibjs也是必须的,它能实现ROS中最基本的功能,下面的例程就是用它来实现的,至于ros2djs和ros3djs是后期开发所需要的,对于新手来说可以暂时不用下载。它们的下载安装方法如下,在终端中分别输入以下指令:
sudo apt-get install ros-kinetic-rosbridge-suite
sudo apt install node-grunt-cli
git clone https://github.com/RobotWebTools/roslibjs.git
git clone https://github.com/RobotWebTools/ros2djs
git clone https://github.com/RobotWebTools/ros3djs
使用ROS Web的时候,我们首先要运行一个launch文件,便于Web端能够连接到ROS主机上,在终端中运行:
roslaunch rosbridge_server rosbridge_websocket.launch在运行了这个launch文件后,我们只需要在浏览器中打开我们设计的html文件就能够实现Web端与ROS的交互了。
安装rosbridge,支持java与ROS通信
sudo apt-get install ros-$ROS_DISTRO-rosbridge-server- 2、启动
roscoreroscd rosbridge_serverroslaunch rosbridge_server rosbridge_websocket.launch#列出所有节点rosbridge_websocketrosnode list与 Java测试 ,下载java_rosbridge
参考
在Ubuntu20.04中安装ROS Noetic - 简书
nginx安装:
ubuntu安装nginx及使用_laiyuan999的博客-CSDN博客_ubuntu安装nginx
systemback
Ubuntu 20.04上使用Systemback
在Ubuntu 20.04上使用Systemback_bluewhalerobot的博客-CSDN博客
GitHub - BluewhaleRobot/systemback: fork of sysmteback, a useful system backup tool
笔记:
看内存情况:
lsblk
df -hl
df -ia
删除:
sudo apt autoremove --purge snapd
sudo snap remove <package-name>
sudo apt-get install snapd
sudo apt-get install snapcraft
-------------------------------------------
sudo apt-get remove --purge ninja
sudo apt-get remove --purge ninja*
sudo apt install ninja-build
插入了一个10G的u盘后,使用如下命令
mount /dev/sdb1 /tmp
把它的分区也挂载到/tmp下就可以了,前提是文件系统可以识别,否则需要先格式化
===============================================================
ros noetic打包deb:
执行前按照我以上安装ros的配置一样安装ros
1.改动说明
1所有的ros包、msg、srv名称改成小写
2所有的路径更改为相对路径
2.安装bloom-generate
sudo apt-get install python3-bloom fakeroot3.添加自定义的消息
执行
sudo gedit ~/.ros/rosdep.yaml添加消息:
注意格式
lslidar_n301_msgs:ubuntu: [ros-noetic-lslidar-n301-msgs]
disinfect_msg:ubuntu: [ros-noetic-disinfect-msg]
disinfect_srvs:ubuntu: [ros-noetic-disinfect-srvs]
qrcode_srvs:ubuntu: [ros-noetic-qrcode-srvs]
qrcode_msg:ubuntu: [ros-noetic-qrcode-msg]
cartographer_ros_msgs:ubuntu: [ros-noetic-cartographer-ros-msg]
4.执行
sudo gedit /etc/ros/rosdep/sources.list.d/50-my-default.list
添加
yaml file:///home/iimt/.ros/rosdep.yaml4.sudo rosdep init
出现ERROR: default sources list file already exists:/etc/ros/rosdep/sources.list.d/20-default.list
Please delete if you wish to re-initialize
接着输入
sudo rm /etc/ros/rosdep/sources.list.d/20-default.list5.执行
sudo gedit /etc/ros/rosdep/sources.list.d/20-default.list添加
# os-specific listings first
yaml https://raw.github.com/ros/rosdistro/master/rosdep/osx-homebrew.yaml osx# generic
yaml https://raw.github.com/ros/rosdistro/master/rosdep/base.yaml
yaml https://raw.github.com/ros/rosdistro/master/rosdep/python.yaml
yaml https://raw.github.com/ros/rosdistro/master/rosdep/ruby.yaml
gbpdistro https://raw.github.com/ros/rosdistro/master/releases/fuerte.yaml fuerte# newer distributions (Groovy, Hydro, ...) must not be listed anymore, they are being fetched from the rosdistro index.yaml instead
6.执行
sudo gedit /usr/lib/python3/dist-packages/rosdep2/sources_list.py 311行添加:
if 'file' not in url:url="https://ghproxy.com/"+url
7.执行
sudo gedit /usr/lib/python3/dist-packages/rosdistro/__init__.py改:
#DEFAULT_INDEX_URL = 'https://raw.githubusercontent.com/ros/rosdistro/master/index-v4.yaml'DEFAULT_INDEX_URL = 'https://ghproxy.com/https://raw.githubusercontent.com/ros/rosdistro/master/index-v4.yaml'7.执行
rosdep update8.ros打包命令
进入包根目录 roscd slamservice/
执行:
bloom-generate rosdebian --os-name ubuntu --ros-distro noetic执行:
fakeroot debian/rules binary出现问题:
undefined reference to`pthread_create'
undefined reference to `pthread_detach'
undefined reference to `pthread_join'
/usr/bin/ld: 找不到 -lpthreads
/usr/bin/ld: CMakeFiles/cmTC_f7d70.dir/src.c.o: in function `main':
./obj-x86_64-linux-gnu/CMakeFiles/CMakeTmp/./obj-x86_64-linux-gnu/CMakeFiles/CMakeTmp/src.c:11: undefined reference to `pthread_create'
/usr/bin/ld: ./obj-x86_64-linux-gnu/CMakeFiles/CMakeTmp/./obj-x86_64-linux-gnu/CMakeFiles/CMakeTmp/src.c:12: undefined reference to `pthread_detach'
/usr/bin/ld: ./obj-x86_64-linux-gnu/CMakeFiles/CMakeTmp/./obj-x86_64-linux-gnu/CMakeFiles/CMakeTmp/src.c:13: undefined reference to `pthread_join'
collect2: error: ld returned 1 exit status/usr/bin/ld: 找不到 -lpthreads
collect2: error: ld returned 1 exit status
make[3]: *** [CMakeFiles/cmTC_ec8bc.dir/build.make:87:cmTC_ec8bc] 错误 1
make[3]: 离开目录“/home/iimt/workspace/workspace_ros_foodcar_noetic/src/slamservice/slamservice/obj-x86_64-linux-gnu/CMakeFiles/CMakeTmp”
make[2]: *** [Makefile:121:cmTC_ec8bc/fast] 错误 2
make[2]: 离开目录“/home/iimt/workspace/workspace_ros_foodcar_noetic/src/slamservice/slamservice/obj-x86_64-linux-gnu/CMakeFiles/CMakeTmp”dh_auto_configure: error: cd obj-x86_64-linux-gnu && cmake -DCMAKE_INSTALL_PREFIX=/usr -DCMAKE_BUILD_TYPE=None -DCMAKE_INSTALL_SYSCONFDIR=/etc -DCMAKE_INSTALL_LOCALSTATEDIR=/var -DCMAKE_EXPORT_NO_PACKAGE_REGISTRY=ON -DCMAKE_FIND_PACKAGE_NO_PACKAGE_REGISTRY=ON "-GUnix Makefiles" -DCMAKE_VERBOSE_MAKEFILE=ON -DCMAKE_AUTOGEN_VERBOSE=ON -DCMAKE_INSTALL_LIBDIR=lib/x86_64-linux-gnu -DCATKIN_BUILD_BINARY_PACKAGE=1 -DCMAKE_INSTALL_PREFIX=/opt/ros/noetic -DCMAKE_PREFIX_PATH=/opt/ros/noetic .. returned exit code 1
make[1]: *** [debian/rules:28:override_dh_auto_configure] 错误 255
make[1]: 离开目录“/home/iimt/workspace/workspace_ros_foodcar_noetic/src/slamservice/slamservice”
make: *** [debian/rules:22:binary] 错误 2
解决问题:
把项目需要的msg消息包先打成deb文件后先安装msg包,而后打包项目包
安装ros包
sudo dpkg -i ***.deb卸载:
sudo dpkg -r ros-noetic-slamservicedocker中配置使用
sudo apt-get update && \
apt-get install -y \
build-essential \
libgl1-mesa-dev \
libglew-dev \
libsdl2-dev \
libsdl2-image-dev \
libglm-dev \
libfreetype6-dev \
libglfw3-dev \
libglfw3 \
libglu1-mesa-dev \
freeglut3-dev \
vim
显卡驱动要与宿主机安装的驱动版本一致,我这里安装的是510
sudo apt-get install libnvidia-gl-470sudo apt-get install libnvidia-gl-510sudo ldconfig -p | grep -i gl.so
sudo find / -iname "*libGL.so*".bashrc
alias dexec='sudo docker exec -it melodic_rviz /bin/bash'
alias dsta='sudo docker start melodic_rviz'
alias drsts='sudo docker restart melodic_rviz'
alias drun='sudo docker run -it -v$(pwd):/data --device=/dev/dri --group-add video --volume=/tmp/.X11-unix:/tmp/.X11-unix  --env="DISPLAY=$DISPLAY" --env="QT_X11_NO_MITSHM=1" --privileged -p 2222:22 -p 8080:8080 -p 11311:11311  -p 9003:9003   -p 9001:9001  -p 3306:3306 -p 34567:34567  -v /home/sukai:/home --name=melodic_rviz fishros2/ros:melodic-desktop-full'


