环境:opencv-4.0,python,c++
方法:opencv_createsamples,opencv_traincascade,haar特征或者lbp特征+cascade分类器
流程:
- 收集样本,处理样本
- 训练分类器
- 目标检测
收集样本,处理样本
收集正样本
关于正样本的收集,一张或多张都可以,首先对样本进行处理,我收集了50个正样本。

处理正样本
处理样本,灰度化,归一化,大小为(50, 50)
path = "/home/yk/project/pyCharm/train/true/"
for i in range(1, 51):print(path+str(i)+'.jpg')img = cv2.imread(path+str(i)+'.jpg', cv2.IMREAD_GRAYSCALE)img5050 = cv2.resize(img, (50, 50))cv2.imshow("img", img5050)cv2.waitKey(20)cv2.imwrite('/home/yk/project/pyCharm/train/pos/'+str(i)+'.jpg', img5050)
处理后效果

收集负样本
关于负样本,只要不含有正样本图片即可,最好是识别场景的图片。
我找到一个负样本下载链接。https://pythonprogramming.net/static/images/opencv/negative-background-images.zip
下载后如图

生成描述文件
正负样本描述文件生成。
import os
def create_pos_n_neg():for file_type in ['neg']:for img in os.listdir(file_type):if (file_type == 'neg'):line = file_type + '/' + img + '\n'with open('bg.txt', 'a') as f:f.write(line)elif (file_type == 'pos'):line = file_type + '/' + img + ' 1 0 0 50 50\n'with open('info.txt', 'a') as f:f.write(line)if __name__ == '__main__':create_pos_n_neg()
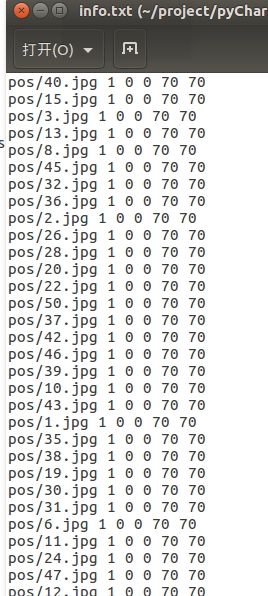
- 正样本描述文件

内容

- 负样本描述文件

内容

合成正样本vec
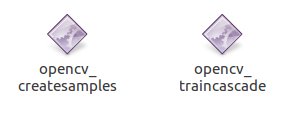
首先将opencv的两个自带工具复制到文件夹中,opencv_createsamples用于处理生成样本,opencv_traincascade用于训练分类器。

- 如果用单个样本生成vec执行命令
mkdir info
opencv_createsamples -img pos/1.jpg -bg bg.txt -info info/info.lst -pngoutput info -maxxangle 0.5 -maxyangle 0.5 -maxzangle 0.5 -num 1950
运行后显示Done,表示成功。
打开文件夹info

在最下面还有info.lst
输入命令
opencv_createsamples -info info/info.lst -num 1950 -w 50 -h 50 -vec pos.vec

完成。
- 如果用多个样本生成vec
使用工具createsample.pl合成正样本的vec。

代码
#!/usr/bin/perl
use File::Basename;
use strict;
##########################################################################
# Create samples from an image applying distortions repeatedly
# (create many many samples from many images applying distortions)
#
#  perl createtrainsamples.pl <positives.dat> <negatives.dat> <vec_output_dir>
#      [<totalnum = 7000>] [<createsample_command_options = ./createsamples -w 20 -h 20...>]
#  ex) perl createtrainsamples.pl positives.dat negatives.dat samples
#
# Author: Naotoshi Seo
# Date  : 09/12/2008 Add <totalnum> and <createsample_command_options> options
# Date  : 06/02/2007
# Date  : 03/12/2006
#########################################################################
my $cmd = './createsamples -bgcolor 0 -bgthresh 0 -maxxangle 1.1 -maxyangle 1.1 maxzangle 0.5 -maxidev 40 -w 20 -h 20';
my $totalnum = 7000;
my $tmpfile  = 'tmp';if ($#ARGV < 2) {print "Usage: perl createtrainsamples.pl\n";print "  <positives_collection_filename>\n";print "  <negatives_collection_filename>\n";print "  <output_dirname>\n";print "  [<totalnum = " . $totalnum . ">]\n";print "  [<createsample_command_options = '" . $cmd . "'>]\n";exit;
}
my $positive  = $ARGV[0];
my $negative  = $ARGV[1];
my $outputdir = $ARGV[2];
$totalnum     = $ARGV[3] if ($#ARGV > 2);
$cmd          = $ARGV[4] if ($#ARGV > 3);open(POSITIVE, "< $positive");
my @positives = <POSITIVE>;
close(POSITIVE);open(NEGATIVE, "< $negative");
my @negatives = <NEGATIVE>;
close(NEGATIVE);# number of generated images from one image so that total will be $totalnum
my $numfloor  = int($totalnum / $#positives);
my $numremain = $totalnum - $numfloor * $#positives;# Get the directory name of positives
my $first = $positives[0];
my $last  = $positives[$#positives];
while ($first ne $last) {$first = dirname($first);$last  = dirname($last);if ( $first eq "" ) { last; }
}
my $imgdir = $first;
my $imgdirlen = length($first);for (my $k = 0; $k < $#positives; $k++ ) {my $img = $positives[$k];my $num = ($k < $numremain) ? $numfloor + 1 : $numfloor;# Pick up negative images randomlymy @localnegatives = ();for (my $i = 0; $i < $num; $i++) {my $ind = int(rand($#negatives));push(@localnegatives, $negatives[$ind]);}open(TMP, "> $tmpfile");print TMP @localnegatives;close(TMP);#system("cat $tmpfile");!chomp($img);my $vec = $outputdir . substr($img, $imgdirlen) . ".vec" ;print "$cmd -img $img -bg $tmpfile -vec $vec -num $num" . "\n";system("$cmd -img $img -bg $tmpfile -vec $vec -num $num");
}
unlink($tmpfile);
输入命令
先生成正样本目录,再生成vec文件
find ./neg -iname "*.jpg" >neg.txt
find ./pos -iname "*.jpg" >pos.txt
perl bin/createsamples.pl pos.txt neg.txt samples 1500   "opencv_createsamples -bgcolor 0 -bgthresh 0 -maxxangle 1.1 -maxyangle 1.1 -maxzangle 0.5 -maxidev 40 -w 50 -h 50"
运行后打开samples文件夹,可以看到vec文件

再用mergevec工具将这些vec文件合成到一个vec文件中
###############################################################################
# Copyright (c) 2014, Blake Wulfe
#
# Permission is hereby granted, free of charge, to any person obtaining a copy
# of this software and associated documentation files (the "Software"), to deal
# in the Software without restriction, including without limitation the rights
# to use, copy, modify, merge, publish, distribute, sublicense, and/or sell
# copies of the Software, and to permit persons to whom the Software is
# furnished to do so, subject to the following conditions:
#
# The above copyright notice and this permission notice shall be included in
# all copies or substantial portions of the Software.
#
# THE SOFTWARE IS PROVIDED "AS IS", WITHOUT WARRANTY OF ANY KIND, EXPRESS OR
# IMPLIED, INCLUDING BUT NOT LIMITED TO THE WARRANTIES OF MERCHANTABILITY,
# FITNESS FOR A PARTICULAR PURPOSE AND NONINFRINGEMENT. IN NO EVENT SHALL THE
# AUTHORS OR COPYRIGHT HOLDERS BE LIABLE FOR ANY CLAIM, DAMAGES OR OTHER
# LIABILITY, WHETHER IN AN ACTION OF CONTRACT, TORT OR OTHERWISE, ARISING FROM,
# OUT OF OR IN CONNECTION WITH THE SOFTWARE OR THE USE OR OTHER DEALINGS IN
# THE SOFTWARE.
###############################################################################"""
File: mergevec.py
Author: blake.w.wulfe@gmail.com
Date: 6/13/2014
File Description:This file contains a function that merges .vec files called "merge_vec_files".I made it as a replacement for mergevec.cpp (created by Naotoshi Seo.See: http://note.sonots.com/SciSoftware/haartraining/mergevec.cpp.html)in order to avoid recompiling openCV with mergevec.cpp.To use the function:(1) Place all .vec files to be merged in a single directory (vec_directory).(2) Navigate to this file in your CLI (terminal or cmd) and type "python mergevec.py -v your_vec_directory -o your_output_filename".The first argument (-v) is the name of the directory containing the .vec filesThe second argument (-o) is the name of the output fileTo test the output of the function:(1) Install openCV.(2) Navigate to the output file in your CLI (terminal or cmd).(2) Type "opencv_createsamples -w img_width -h img_height -vec output_filename".This should show the .vec files in sequence."""import sys
import glob
import struct
import argparse
import tracebackdef exception_response(e):exc_type, exc_value, exc_traceback = sys.exc_info()lines = traceback.format_exception(exc_type, exc_value, exc_traceback)for line in lines:print(line)def get_args():parser = argparse.ArgumentParser()parser.add_argument('-v', dest='vec_directory')parser.add_argument('-o', dest='output_filename')args = parser.parse_args()return (args.vec_directory, args.output_filename)def merge_vec_files(vec_directory, output_vec_file):"""Iterates throught the .vec files in a directory and combines them.(1) Iterates through files getting a count of the total images in the .vec files(2) checks that the image sizes in all files are the sameThe format of a .vec file is:4 bytes denoting number of total images (int)4 bytes denoting size of images (int)2 bytes denoting min value (short)2 bytes denoting max value (short)ex: 	6400 0000 4605 0000 0000 0000hex		6400 0000  	4605 0000 		0000 		0000# images  	size of h * w		min		maxdec	    	100     	1350			0 		0:type vec_directory: string:param vec_directory: Name of the directory containing .vec files to be combined.Do not end with slash. Ex: '/Users/username/Documents/vec_files':type output_vec_file: string:param output_vec_file: Name of aggregate .vec file for output.Ex: '/Users/username/Documents/aggregate_vec_file.vec'"""# Check that the .vec directory does not end in '/' and if it does, remove it.if vec_directory.endswith('/'):vec_directory = vec_directory[:-1]# Get .vec filesfiles = glob.glob('{0}/*.vec'.format(vec_directory))# Check to make sure there are .vec files in the directoryif len(files) <= 0:print('Vec files to be mereged could not be found from directory: {0}'.format(vec_directory))sys.exit(1)# Check to make sure there are more than one .vec filesif len(files) == 1:print('Only 1 vec file was found in directory: {0}. Cannot merge a single file.'.format(vec_directory))sys.exit(1)# Get the value for the first image sizeprev_image_size = 0try:with open(files[0], 'rb') as vecfile:content = b''.join((line) for line in vecfile.readlines())val = struct.unpack('<iihh', content[:12])prev_image_size = val[1]except IOError as e:print('An IO error occured while processing the file: {0}'.format(f))exception_response(e)# Get the total number of imagestotal_num_images = 0for f in files:try:with open(f, 'rb') as vecfile:content = b''.join((line) for line in vecfile.readlines())val = struct.unpack('<iihh', content[:12])num_images = val[0]image_size = val[1]if image_size != prev_image_size:err_msg = """The image sizes in the .vec files differ. These values must be the same. \n The image size of file {0}: {1}\nThe image size of previous files: {0}""".format(f, image_size, prev_image_size)sys.exit(err_msg)total_num_images += num_imagesexcept IOError as e:print('An IO error occured while processing the file: {0}'.format(f))exception_response(e)# Iterate through the .vec files, writing their data (not the header) to the output file# '<iihh' means 'little endian, int, int, short, short'header = struct.pack('<iihh', total_num_images, image_size, 0, 0)try:with open(output_vec_file, 'wb') as outputfile:outputfile.write(header)for f in files:with open(f, 'rb') as vecfile:content = b''.join((line) for line in vecfile.readlines())outputfile.write(bytearray(content[12:]))except Exception as e:exception_response(e)if __name__ == '__main__':vec_directory, output_filename = get_args()if not vec_directory:sys.exit('mergvec requires a directory of vec files. Call mergevec.py with -v /your_vec_directory')if not output_filename:sys.exit('mergevec requires an output filename. Call mergevec.py with -o your_output_filename')merge_vec_files(vec_directory, output_filename)
输入命令
python ./tools/mergevec.py -v samples/ -o pos.vec

到此,样本准备工作结束。下面可以开始训练自己的分类器了。
训练分类器
创建data文件夹,用于存放分类器数据
mkdir data
训练
opencv_traincascade -data data -vec pos.vec -bg neg.txt -numStages 20 -minHitRate 0.999 -maxFalseAlarmRate 0.5 -numPos 1000 -numNeg 600 -w 50 -h 50 -mode ALL

等待运行结束,打开data就可以看见我们训练的分类器了。

参数解释
- data data:训练后data目录下会存储训练过程中生成的文件
- vec pos.vec:Pos.vec是通过opencv_createsamples生成的vec文件,命令opencv_createsamples -vec pos.vec -info info.txt -bg bg.txt -w 70 -h 70
其中pos.txt中t除了存放图片名外,还存放了图像中目标的boundingbox的Rect。 - bg bg.txt:bg.txt是负样本文件的数据
- numPos :正样本的数目,这个数值一定要比准备正样本时的数目少,不然会报can not get new positive sample.
- numNeg :
- numStages :训练分类器的级数
- w 50:必须与opencv_createsample中使用的-w值一致
- h 50:必须与opencv_createsample中使用的-h值一致
注:-w和-h的大小对训练时间的影响非常大,我测试了两个不同尺寸下的训练,分别是Size(50,50)和Size(70,70),后者所用的时间至少是前者的4-5倍。网上有博客说-w和-h的比例必须符合真实目标的比例。 - minHitRate 0.9999:分类器的每一级希望得到的最小检测率,总的最大检测率大约为min_hit_ratenumber_of_stages
minHitRate:影响每个强分类器阈值,当设置为0.95时如果正训练样本个数为10000个,那么其中的500个就很可能背叛别为负样本,第二次选择的时候必须多选择后面的500个,按照这种规律为后面的每级多增加numPosminHitRate个正样本,根据训练的级数可以得到如下公式
numPos+(numStages-1)numPos(1-minHitRate)<=准备的训练样本 - featureType LBP: 训练时,提取图像特征的类型,目前只支持LBP、HOG、Haar三种特征。但是HAAR训练非常非常的慢,而LBP则相对快很多,因为HAAR需要浮点运算,精度自然比LBP更高,但是LBP的效果也基本能达到HAAR的效果,所以我选择使用LBP。
- maxFalseAlarmRate 0.2:分类器的每一级希望得到的最大误检率,总的误检率大约为max_false_rate*number_of_stages
- mode ALL:选择用来训练的haar特征集的种类。basic仅仅使用垂直特征。all使用垂直和45度角旋转特征。
目标检测
代码
//
// Created by yk on 19-8-29.
//
#include "opencv2/objdetect.hpp"
#include "opencv2/highgui.hpp"
#include "opencv2/imgproc.hpp"#include <iostream>using namespace std;
using namespace cv;void detectAndDisplay(Mat frame);
//使用级联分类器类加载视频中对象
CascadeClassifier face_cascade;					//face
CascadeClassifier eyes_cascade;					//eyes
CascadeClassifier helmet_cascade;               //helmetint main(int argc, const char** argv)
{CommandLineParser parser(argc, argv,"{face_cascade|/home/yk/install/opencv/data/haarcascades/haarcascade_frontalface_alt.xml|Path to face cascade.}""{helmet_cascade|/home/yk/project/CLion/test/cascade/cascade.xml|Path to helmet cascade.}");String face_cascade_name = parser.get<String>("face_cascade");String helmet_cascade_name = parser.get<String>("helmet_cascade");if (!face_cascade.load(face_cascade_name)){cout << "无法加载face cascade\n";return -1;};if (!helmet_cascade.load(helmet_cascade_name)){cout << "无法加载helmet cascade\n";return -1;};Mat frame = imread("/home/yk/project/CLion/test/pic/14.jpg");detectAndDisplay(frame);return 0;
}void detectAndDisplay(Mat frame)
{double scale(1.3);Mat gray, smallImg(cvRound(frame.rows/scale), cvRound(frame.cols/scale), CV_8UC1);  //缩小图片cvtColor(frame, gray, COLOR_BGR2GRAY);					                            //转灰度图resize(gray, smallImg, smallImg.size())equalizeHist(gray, gray);							                                //直方图等化std::vector<Rect> faces;face_cascade.detectMultiScale(gray, faces);std::vector<Rect> helmets;helmet_cascade.detectMultiScale(gray, helmets);for (size_t k = 0; k < helmets.size(); k++){cout<<helmets[k];rectangle(frame, helmets[k], Scalar(0, 0, 255), 4);putText(frame, "helmet", Point(helmets[k].x,helmets[k].y), FONT_HERSHEY_COMPLEX, 1, Scalar(255,23,0),4,8);}for (size_t i = 0; i < faces.size(); i++){Point top_left(faces[i].x, faces[i].y);Point low_right(faces[i].x + faces[i].width, faces[i].y + faces[i].height);rectangle(frame, top_left, low_right, Scalar(0, 0, 255), 4);putText(frame, "face", Point(faces[i].x+50,faces[i].y), FONT_HERSHEY_COMPLEX, 1, Scalar(255,23,0),4,8);}imshow("Capture", frame);waitKey(0);
}
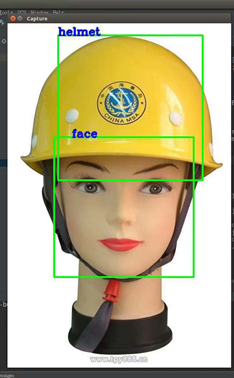
识别效果


