一。概述
vector是我们经常用的一个容器,其本质是一个线性数组。通过对动态内存的管理,增删改查数据,达到方便使用的目的。
作为一个线性表,控制元素个数,容量,开始位置的指针分别是:
start  /*是数组的首地址*/
finish /*是数组元素的终止位置,看下图*/
end_of_storage/*是数组元素的总容量,看下图*/
大概的样子:
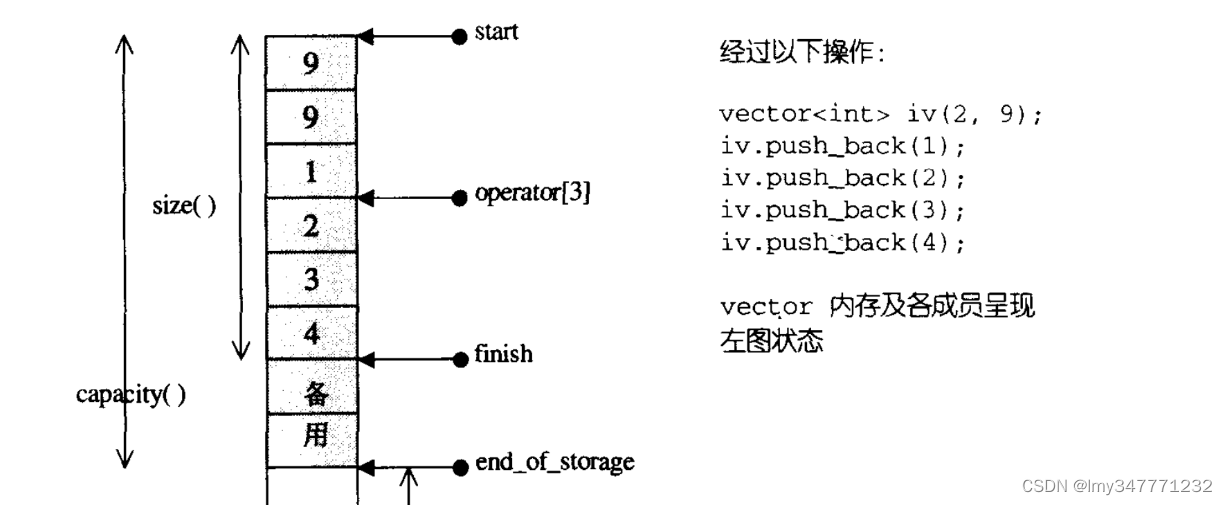
我们通过操作此三个指针和内存的增加减少或者复制转移的方式完成vector的成员方法。
下面是类成员定义的展示:
template<class _Ty> #类模板中没 有内存分配器,我们在函数中自己malloc实现#
class MyVector
{
public:typedef _Ty				value_type;typedef _Ty* pointer;typedef const _Ty* const_pointer;typedef _Ty& reference;typedef const _Ty& const_reference;typedef pointer        iterator;typedef const_pointer  const_iterator;typedef unsigned  int  size_type;
private:_Ty* _M_start;_Ty* _M_finish;_Ty* _M_end_of_storage;public:MyVector() :_M_start(nullptr), _M_finish(nullptr), _M_end_of_storage(nullptr) {}~MyVector() {clear();free(_M_start);}reference at(size_type pos){assert(pos >= 0 && pos < size());//return (*(pos + _M_start));return (_M_start[pos]);}const_reference at(size_type pos) const{assert(pos >= 0 && pos < size());return (*(pos + _M_start));}reference operator[](size_type pos){if (pos >= 0 && pos < size()) {return _M_start[pos];}else {std::cout << "error operator[]";exit(1);}}const_reference operator[](size_type pos) const{if (pos >= 0 && pos < size()) {return _M_start[pos];}else {std::cout << "error operator[]";exit(1);}}reference front(){return *_M_start;}const_reference front() const{return *_M_start;}reference back(){return *(_M_finish -1);}const_reference back() const{return *(_M_finish - 1);}_Ty* data(){return begin(); }const _Ty* data() const{return begin();}public:// 容量size_t size() const{return (size_t)(_M_finish - _M_start);}size_t capacity() const{return (size_t)(_M_end_of_storage - _M_start);}/*2/14*/bool empty()const{return size() > 0 ? true : false;}
二。重点成员方法解析
1.push_back尾部添加元素
不管pushback进的值是内置类型还是类类型,都应该是先创建一个空间,在此基础上生成对象实例化。实例化是在构造函数中进行的。
我们也要知道的是,一个进程的地址空间是4G,给定的数据(只读或是读、写数据)是固定大小,一旦容器像临时数组arr[100]的定义,那么的成员所占的内存如果过大或是动态的增减的难度,那么势必会不方便容器的使用,也不方便管理,所以使用动态内存来进行管理。
void push_back(const _Ty& val){if (_M_finish != _M_end_of_storage){new(_M_finish)_Ty(val);++_M_finish;}else {_M_insert_aux(end(),val);}}
_M_insert_aux 函数实现
_M_insert_aux函数中有一部分是从源空间的元素复制到新位置,此时挨个遍历,原位构造的方式相比于连续空间的赋值构造,我猜测后者效率更高一些(从cpuj计算的角度)。
void _M_insert_aux(iterator pos, const _Ty& val) //{//const size_t oldsize = size();const size_t len = size() != 0 ? (size() * 1.5 + 1) : 1;//iterator new_start = (_Ty*)malloc(sizeof(_Ty) * len);iterator start2 = (_Ty*)malloc(sizeof(_Ty) * len);//eg1:开始复制数据到新内存iterator newstart = start2;iterator newfinsh = _M_start;/*while (newfinsh != pos){new(newstart)_Ty(*newfinsh);++newstart;++newfinsh;}*//*new(newstart)_Ty(val);++newstart;*///eg1的另一种写法,测试:while (newfinsh != pos){memcpy(start2, _M_start, sizeof(_Ty)*(_M_finish-_M_start));newstart = _M_finish - _M_start + start2;newfinsh = _M_finish;}new(newstart)_Ty(val);++newstart;iterator it = _M_finish;while (newfinsh != _M_end_of_storage){++newfinsh;++newstart;}for (iterator it = _M_start; it != _M_finish; it++){it->~_Ty();}free(_M_start);_M_finish = newstart;_M_end_of_storage = len + start2;_M_start = start2;}
**2.operator =移动赋值
次函数需要注意的是什么形式时编译器调用的是赋值重载,什么形式时会调用拷贝构造。
隐式的拷贝构造:在创建对象性时的赋值,比如;
MyVector<Int> tmp= arr;
显示的拷贝构造则是:
MyVector<Int> tmp(arr);
如果你使用vector时的写法是隐式的,那么会调用拷贝构造完成对像的复制;
相反你使用显示的方式创建对象,也是会调用拷贝构造。
当你在创建对象后的赋值运算符的重载时才会调用vector的移动赋值函数
MyVector& operator= (const MyVector& V1)//在赋值运算符重载中不能在调用拷贝构造//因为this已经是一个对象,再拷贝构造创建一个对象,//是没什么意义的事情。{//arr.operator(V1);if (V1._M_start == nullptr&&_M_start ==nullptr) {return *this;}else if (this->_M_start == nullptr) { //拷贝构造/*iterator start = (_Ty*)malloc(sizeof(_Ty) * V1.capacity());_M_start = start;*/const_iterator it = V1.begin();while (it != V1._M_finish) {this->push_back(*it);++it;}/*_M_finish = ( _Ty* )it;_M_end_of_storage = V1.capacity()+_M_start;*/return *this;}else if (this->_M_start != nullptr) {if (this->size() >= V1.size()){/*for (iterator it = _M_start; it != _M_finish; ++it){it->~_Ty();}*/this->clear();iterator it = (_Ty*)V1.begin();while (it != V1._M_finish) {this->push_back(*it);++it;}return *this;}else {this->clear();free(_M_start);_M_start = nullptr;_M_finish = nullptr;this->_M_end_of_storage = nullptr;/* iterator start = (_Ty*)malloc(sizeof(_Ty) * V1.capacity());_M_start = start;*/iterator it = (_Ty*)V1.begin();//iterator it =V1._M_start;while (it != V1._M_finish) {this->push_back(*it);++it;}/*_M_finish = it;_M_end_of_storage = V1.capacity() + _M_start;*/return *this;}}}
3.拷贝构造
注意:在类的成员方法内部不要在类中几个默认的成员函数(构造,析构,赋值重载,取地址运算符的重载)中调用拷贝构造,没有什么意义。从面向对象编程的角度讲不符合现实世界的逻辑。
MyVector(const MyVector& V1){cout << this << endl;iterator start = (_Ty*)malloc(sizeof(_Ty) * V1.capacity());if (start == nullptr){std::cout << "malloc error" << std::endl;exit(1);}iterator finish = start;iterator p = V1._M_start;_M_start = start;while (p != V1._M_finish){new(finish)_Ty(*p);++p;++finish;}_M_finish = finish;_M_end_of_storage = _M_start + V1.capacity();}
4.erase
iterator erase(iterator _F, iterator _L){if (_F != _L){if (_L != _M_finish) copy(_L, _M_finish, _F);_M_finish = _M_finish - (_L - _F);memset(_M_finish , 0x00, sizeof(_Ty) * (_L - _F));}return _L;}iterator erase(iterator pos)//有返回值,迭代器返回{return erase(pos, pos + 1);/*if (pos != end()) //这个代码可被erase(pos,pos+1)替代{copy(pos+1,_M_finish,pos);(--_M_finish)->~_Ty();}return pos;*/}
需要注意的是,上面使用到memcpy/memmove/copy函数时,不能保证对有虚函数的类(能产生多态的类)可以继续使用多态。原因是虚函数表和虚表指针丢失,无法找到函数指针(虚表指针应该不丢失)。