Lab2: 实验目的:给xv6添加新的系统调用
并理解系统调用是如何工作的,并理解xv6内核的一些内部特征
实验准备:
- 阅读xv6的第2章以及第4章的4.3,4.3小节
- 熟悉下面的源码
- 用户态相关的代码:
user/user.h和user/usys.pl - 内核态相关的代码:
kernel/syscall.h和kernel/syscall.h - 进程相关的代码:
kernel/proc.和kernel/proc.c
3. 阅读KR大佬C语言书的如下章节
2.9 (Bitwise operators) and 5.1 (Pointers and addresses) through 5.6 (Pointer arrays) and 6.4 (pointers to structures) by Kernighan and Ritchie (K&R)
任务1:系统调用跟踪功能 System call tracing (moderate)
In this assignment you will add a system call tracing feature that may help you when debugging later labs. You’ll create a new trace system call that will control tracing. It should take one argument, an integer “mask”, whose bits specify which system calls to trace. For example, to trace the fork system call, a program calls trace(1 << SYS_fork), where SYS_fork is a syscall number from kernel/syscall.h. You have to modify the xv6 kernel to print out a line when each system call is about to return, if the system call’s number is set in the mask. The line should contain the process id, the name of the system call and the return value; you don’t need to print the system call arguments. The trace system call should enable tracing for the process that calls it and any children that it subsequently forks, but should not affect other processes.
在本作业中,你需要添加一个系统调用跟踪功能,该功能可能会在以后调试实验室时对您有所帮助。您将创建一个新的“trace”系统调用来控制跟踪。它应该有一个参数,一个int 类型的“mask”,其bits位说明要跟踪的系统调用。例如,为了跟踪fork系统调用,程序调用trace(1 << SYS_fork),其中SYS_fork是来自kernel/syscall.h的系统调用号。如果在mask中设置了系统调用的编号,则必须修改xv6内核,以便在每个系统调用即将返回时打印出一行数据。该行应包含进程id、系统调用的名称和返回值;不需要打印系统调用参数。trace这个系统调用函数应启用对调用它的进程及其随后fork的任何子进程的跟踪,但不应影响其他进程。
我们提供了一个用户态的trace程序,它运行另一个启用了跟踪的程序(参见user/trace.c)。完成后,您应该看到如下输出:
$ trace 32 grep hello README
3: syscall read -> 1023
3: syscall read -> 966
3: syscall read -> 70
3: syscall read -> 0
$
$ trace 2147483647 grep hello README
4: syscall trace -> 0
4: syscall exec -> 3
4: syscall open -> 3
4: syscall read -> 1023
4: syscall read -> 966
4: syscall read -> 70
4: syscall read -> 0
4: syscall close -> 0
$
$ grep hello README
$
$ trace 2 usertests forkforkfork
usertests starting
test forkforkfork: 407: syscall fork -> 408
408: syscall fork -> 409
409: syscall fork -> 410
410: syscall fork -> 411
409: syscall fork -> 412
410: syscall fork -> 413
409: syscall fork -> 414
411: syscall fork -> 415
...
$
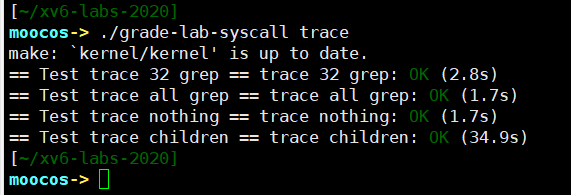
在上面的第一个例子中,trace调用grep tracing,而仅仅是read系统调用。32是1<<SYS_read(1<<5 = 2^5=32)的结果。在第二个例子中,trace在跟踪所有系统调用时运行grep;2147583647具有全部31个低位(2^31 = 2147583647)。在第三个示例中,程序没有被跟踪,因此没有打印跟踪输出。在第四个示例中,跟踪usertests(forkforkfork)程序中所有的fork系统调用(包含所有的子进程)。如果你的程序的输出如上所示,则解决方案是正确的(尽管进程ID可能不同)。
我们需要增加一个trace的系统调用,trace 接受一个int型参数,用来设置具体哪些系统调用函数需要跟踪到;
例如 trace 32意思SYS_read 函数需要被跟踪,32是1<<SYS_read(1<<5 = 2^5=32)的结果 ;
具体修改如下所示:
-
Add
$U/_traceto UPROGS in Makefile -
运行
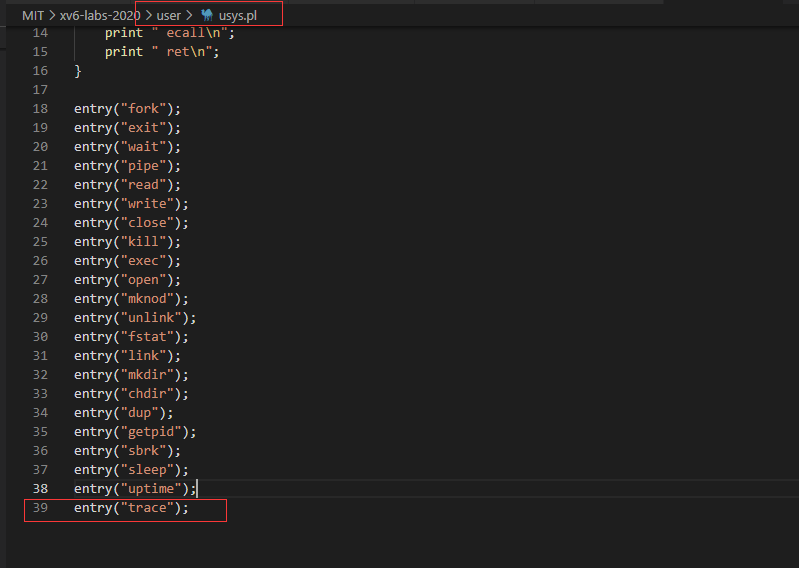
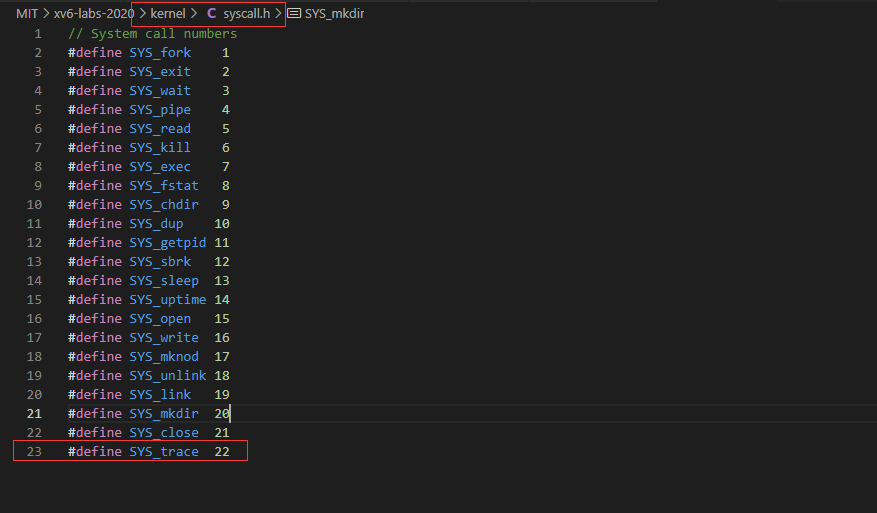
make qemu,你将看到编译器无法编译user/trace.c,因为系统调用的用户空间存根还不存在:将系统调用的原型添加到user/user.h,将存根添加到user/usys.pl,以及对应的syscall编号添加到kernel/syscall.h。Makefile会先调用perl脚本user/usys.pl,它生成user/usys.S,即实际的系统调用存根,它使用RISC-v的ecall指令转换到内核。一旦你修复了编译问题,运行trace32 grep hello README;它将失败,因为您尚未在内核中实现系统调用。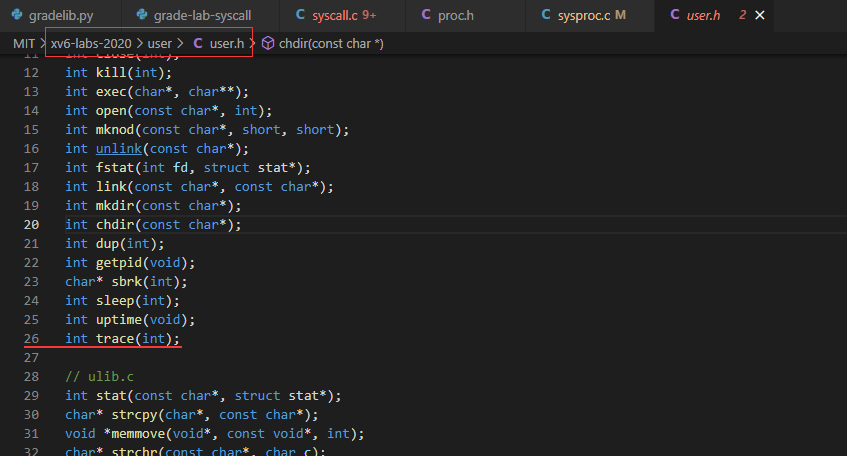
-
在
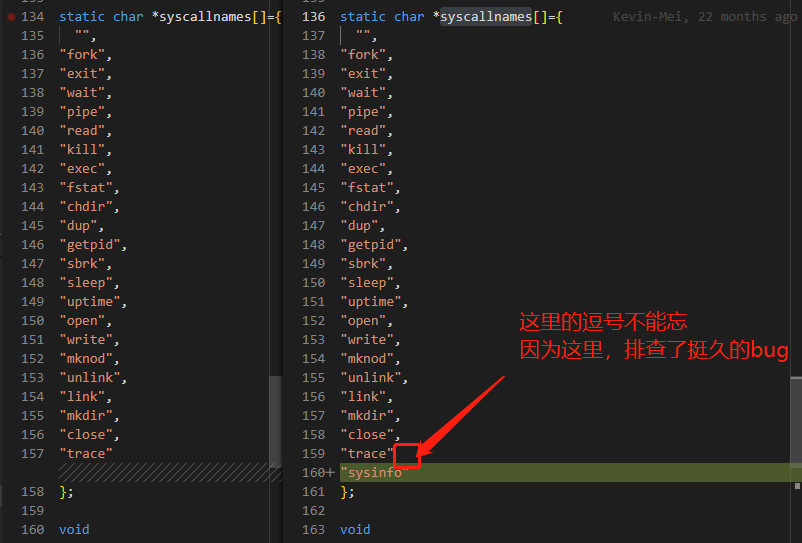
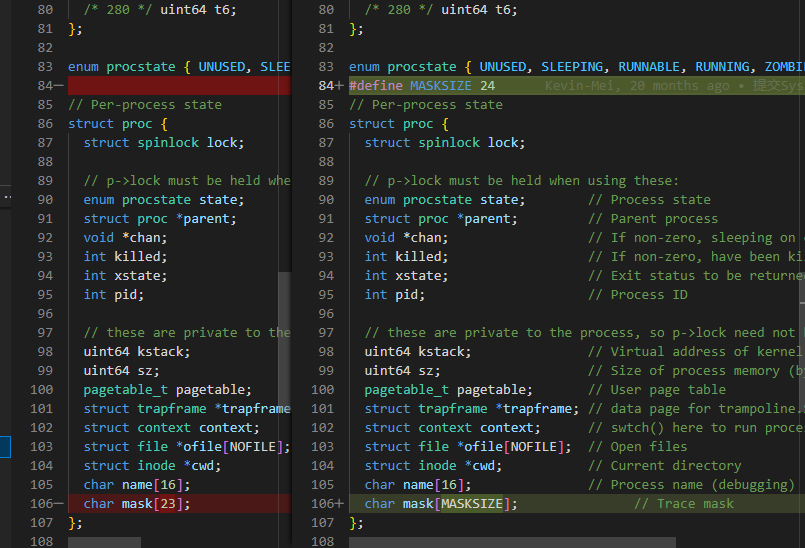
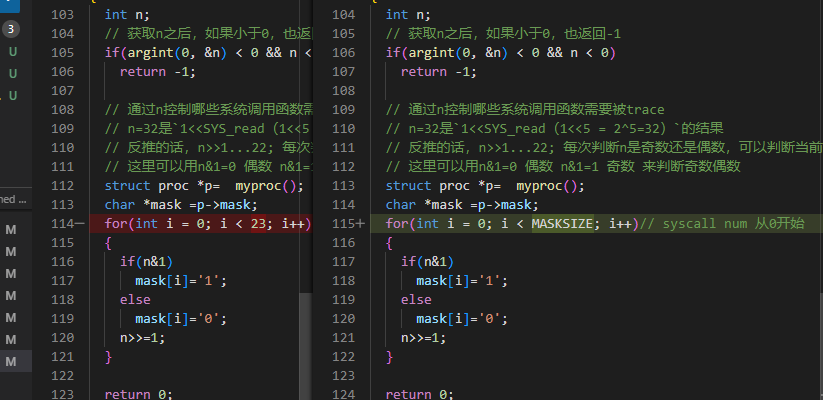
kernel/sysproc.c中添加一个sys_trace()函数,通过在proc结构体的新增加一个变量,我们这里用的是char mask[23]中记住其参数来实现新的系统调用(kernel/proc.h)。这个函数需要从用户空间检索系统调用的参数kernel/syscall.c中,你可以在kernel/sysproc.c中看到它们的使用示例。// kernel/sysproc.c 增加下面函数 uint64 sys_trace(void) {int n;// 获取n之后,如果小于0,也返回-1if(argint(0, &n) < 0 && n < 0)return -1;// 通过n控制哪些系统调用函数需要被trace // n=32是`1<<SYS_read(1<<5 = 2^5=32)`的结果 // 反推的话,n>>1...22; 每次判断n是奇数还是偶数,可以判断当前位是多少// 这里可以用n&1=0 偶数 n&1=1 奇数 来判断奇数偶数struct proc *p= myproc();char *mask =p->mask;for(int i = 0; i < 23; i++)// syscall num 从0开始{if(n&1)mask[i]='1';elsemask[i]='0';n>>=1;}return 0; }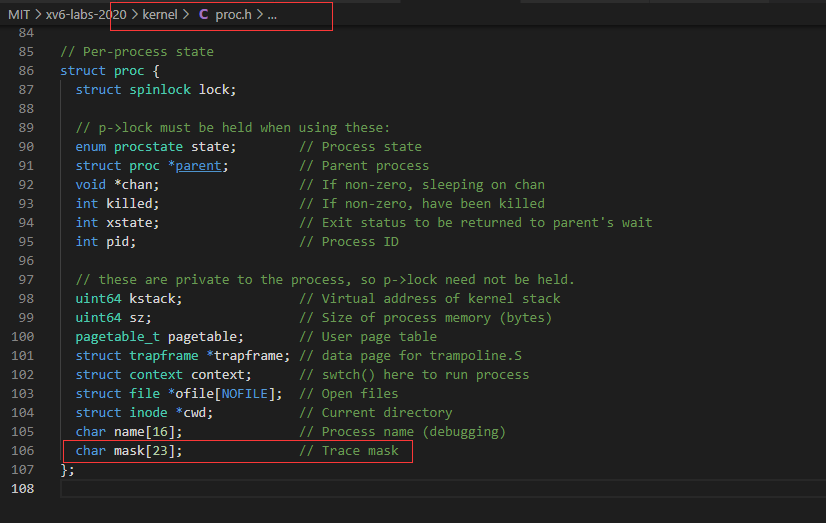
-
修改
fork()(参见kernel/proc.c)将trace mask参数从父进程复制到子进程。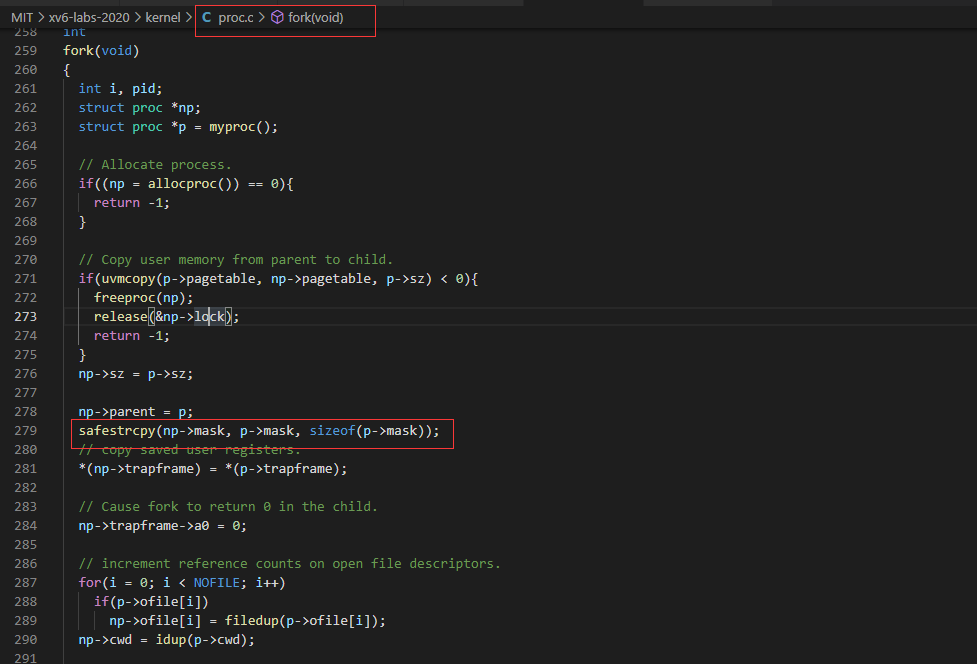
-
修改
kernel/syscall.c中的syscall()函数以打印跟踪输出。你需要添加一个syscall名称数组来进行索引。
// kernel/syscall.cvoidsyscall(void){int num;struct proc *p = myproc();num = p->trapframe->a7;if(num > 0 && num < NELEM(syscalls) && syscalls[num]) {p->trapframe->a0 = syscalls[num]();if('1' == p->mask[num]) // p->mask 只有trace的时候才会修改它,见kernel/sysproc.c->sys_traceprintf("%d: syscall %s -> %d\n", p->pid, syscallnames[num], p->trapframe->a0);} else {printf("%d %s: unknown sys call %d\n",p->pid, p->name, num);p->trapframe->a0 = -1;}}
总结 遇到的一点小坑:
-
"%d: syscall %s -> %d\n这里冒号后面需要加上空格,第一次没加上空格,死活匹配不过去,发现后被自己气死; -
trace children案例有超时时间,31s的时候就time out了,鉴于我ubuntu14,还是虚拟机,碍于性能问题总是跑超时,其实答案是对的,修改gradelib.py, 增加了判题的超时时间,就过去了;
贴下这道题的完结图:
$ export PATH=$PATH:/home/moocos/riscv-gnu-toolchain/bin/bin //路径可以替换为你自己的路径
//然后编译xv6
$ make
$ make qemu
...
mkfs/mkfs fs.img README user/_cat user/_echo user/_forktest user/_grep user/_init user/_kill user/_ln user/_ls user/_mkdir user/_rm user/_sh user/_stressfs user/_usertests user/_wc user/_zombie user/_cow
nmeta 46 (boot, super, log blocks 30 inode blocks 13, bitmap blocks 1) blocks 954 total 1000
balloc: first 497 blocks have been allocated
balloc: write bitmap block at sector 45
qemu-system-riscv64 -machine virt -kernel kernel/kernel -m 3G -smp 3 -nographic -drive file=fs.img,if=none,format=raw,id=x0 -device virtio-blk-device,drive=x0,bus=virtio-mmio-bus.0
hart 0 starting
hart 2 starting
hart 1 starting
Sysinfo (moderate)
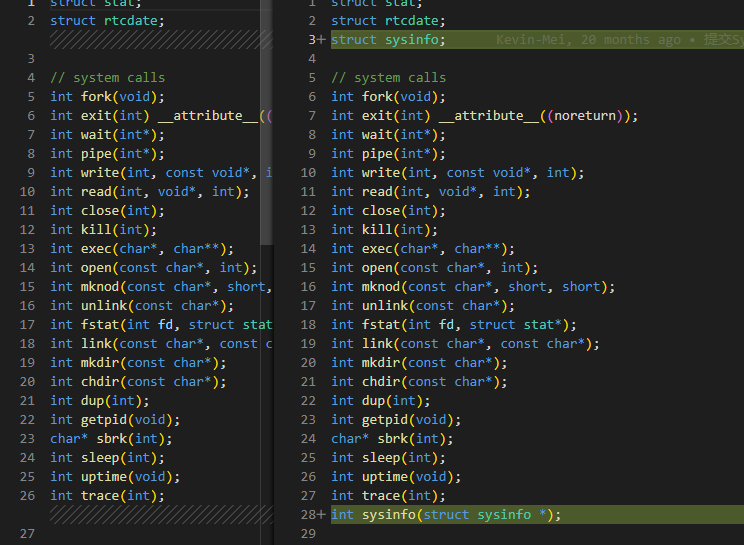
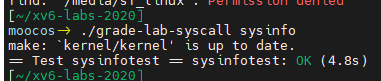
In this assignment you will add a system call, sysinfo, that collects information about the running system. The system call takes one argument: a pointer to a struct sysinfo (see kernel/sysinfo.h). The kernel should fill out the fields of this struct: the freemem field should be set to the number of bytes of free memory, and the nproc field should be set to the number of processes whose state is not UNUSED. We provide a test program sysinfotest; you pass this assignment if it prints “sysinfotest: OK”.
在本作业中,您将添加一个系统调用sysinfo,用于收集有关正在运行的系统的信息。系统调用有一个参数:一个指向struct sysinfo的指针 (参见kernel/sysinfo.h)。内核应填写此结构的字段:freemem字段应设置为可用内存的字节数,nproc 字段应设置为状态 不是UNUSED的进程数。我们提供了一个测试程序sysinfotest;如果它输出“sysinfotest:OK”,则通过此作业。
一些提示:
- 按照上次添加systrace的步骤,添加sysinfo
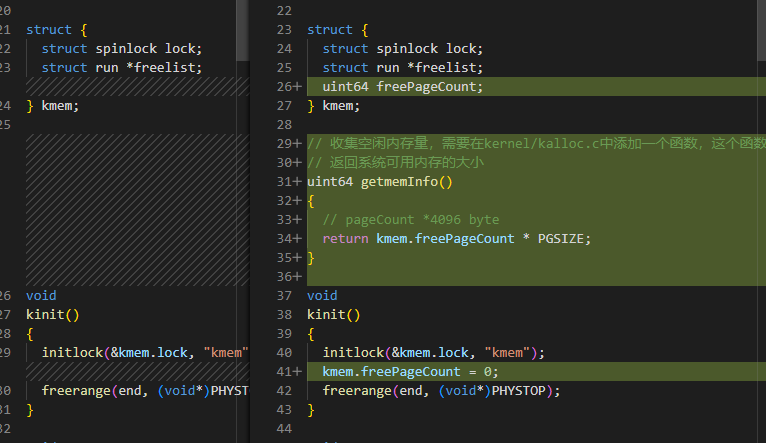
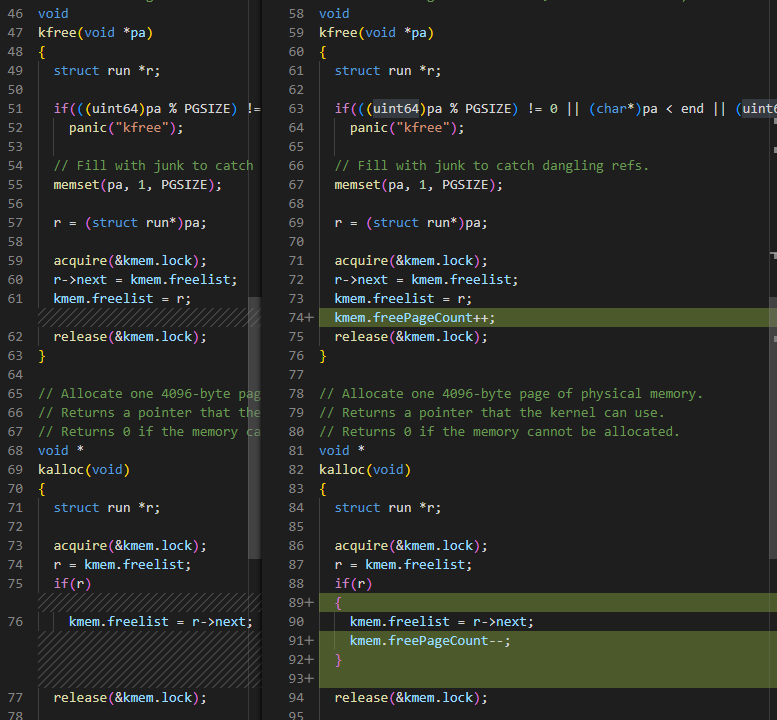
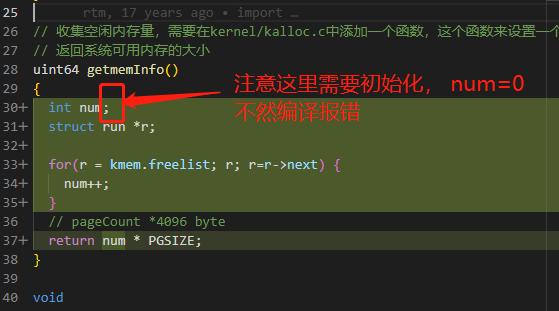
- 收集空闲内存量,需要在kernel/kalloc.c中添加一个函数,这个函数来获取一个全局变量,标识内存量
- 收集进程数,需要在kernel/proc.c中添加一个函数,这个函数来获取一个全局变量,标识进程数
- 然后内核函数sysinfo(info)读取上面两个变量,然后将struct sysinfo 的值从内核空间拷贝到用户空间(copyout),完成调用
具体修改点如下
-
makefile增加_sysinfotest编译项:

-
user/usys.pl增加sysinfo的入口

-
user/user.h 增加sysinfo结构体和函数声明
-
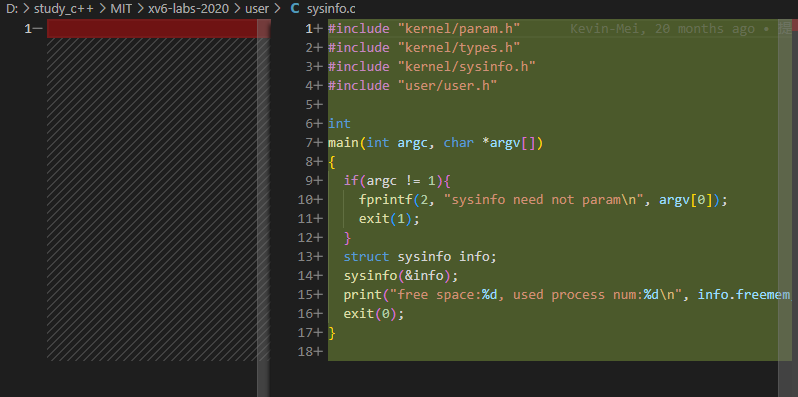
创建user/sysinfo.c ,进入xv6可以执行,sysinfo查看系统内存,相当于新增一个shell函数
-
kernel/sysproc.c 增加头文件及sysinfo的函数实现,这里是内核态的实现,需要通过argaddr获取用户态调用的传参,并把内核态的数据通过copyout拷贝给用户态

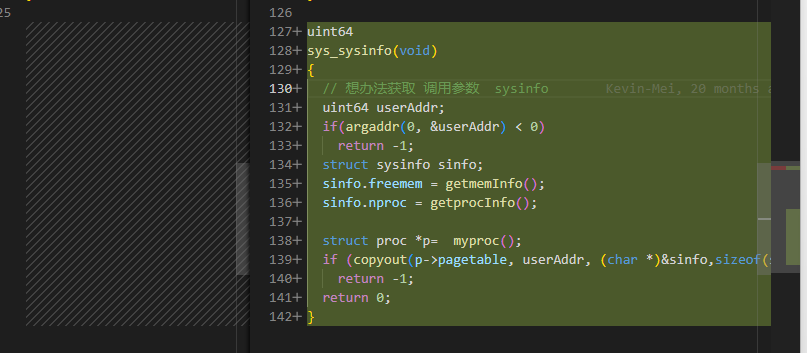
-
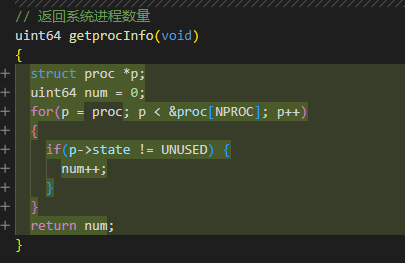
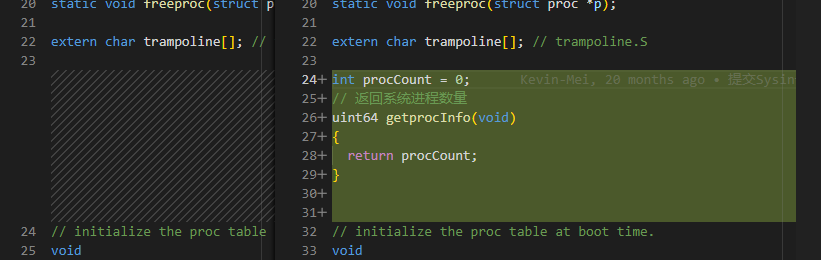
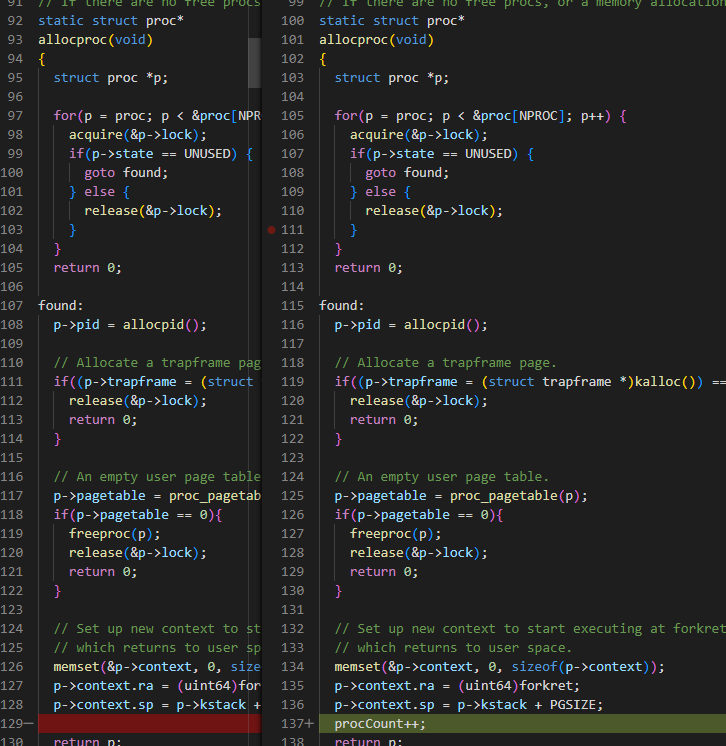
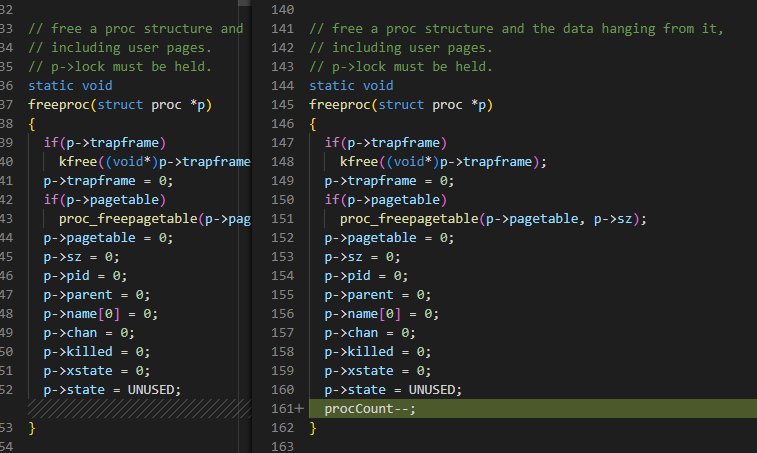
kernel/proc.c 返回系统的进程数量,推荐作法新增函数直接遍历获取。
-
kernel/kalloc.c 增加函数返回内存使用量
-
kernel/def.h里增加函数声明
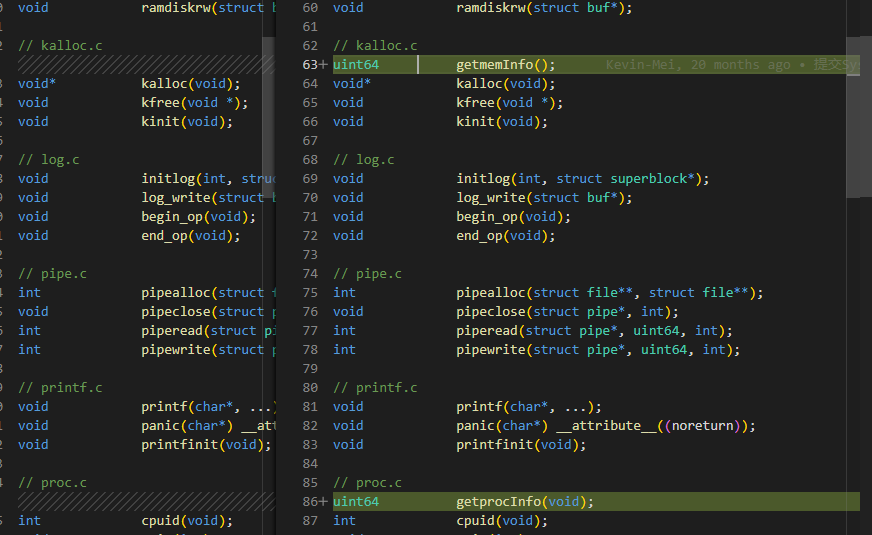
-
kernel/syscall.h 增加系统调用号

- kernel/syscall.c 增加syscalls和syscallnames的定义

补充trace的修改
- kernel/proc.h 增加MASKSIZE=24的定义
-
kernel/sysproc.c 同样补充遍历条件
最后执行结果
一点点反思
侵入式修改_反例
不好的做法,反例:定义一个全局变量,申请的时候++,释放的时候–,侵入式修改,修改了原有代码,后续需求变化还会引起散弹式修改,不好不好
- kernel/proc.c 返回系统的进程数量
- 返回系统可用内存