(一)设计Conv2dBatchLeaky
1、了解LeakyReLU激活函数
LeakyReLU 激活层,创建一个可调用对象以计算输入 x 的 LeakReLU 。其中,x为输入的 Tensor

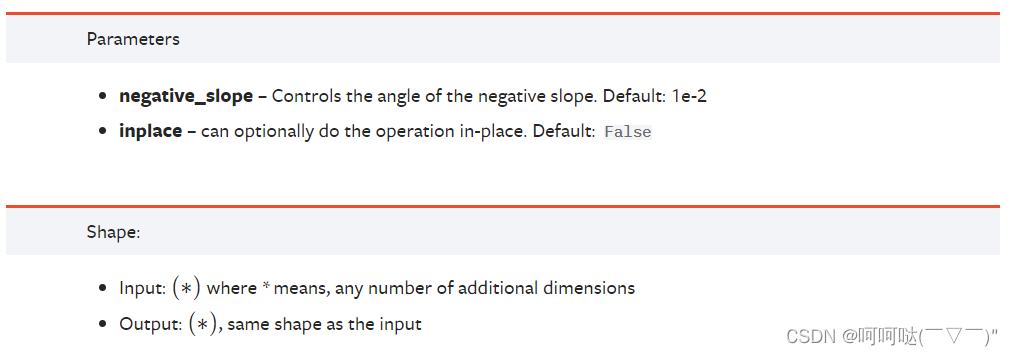
感觉和飞桨的api有点相同,可以对照参考理解:

LeakyReLU激活函数的图像

Examples:
import torch
import torch.nn as nn
m = nn.LeakyReLU(0.1)
input = torch.randn(2)
output = m(input)
print(input)
print(output)
演示效果:

2、了解isinstance内置函数
'''isinstance函数:是Python中的一个内置函数,用来判断一个函数是否是一个已知的类型,类似 type()。isinstance()与type()的区别:例如在继承上的区别:1、isinstance() 会认为子类是一种父类类型,考虑继承关系。2、type() 不会认为子类是一种父类类型,不考虑继承关系。
'''a = 2
print(isinstance(a,int) )     # 结果返回 True
print(isinstance(a,str))      # 结果返回 False
print(isinstance(a,(str,int,list)) )     # 是元组中的一个,结果返回 Trueprint("=======================================")class Parent:passclass Son(Parent):passprint(isinstance(Parent(), Parent))  # returns True
print(type(Parent()) == Parent ) # returns True
print(isinstance(Son(), Parent))  # returns True
print(type(Son()) == Parent)  # returns False
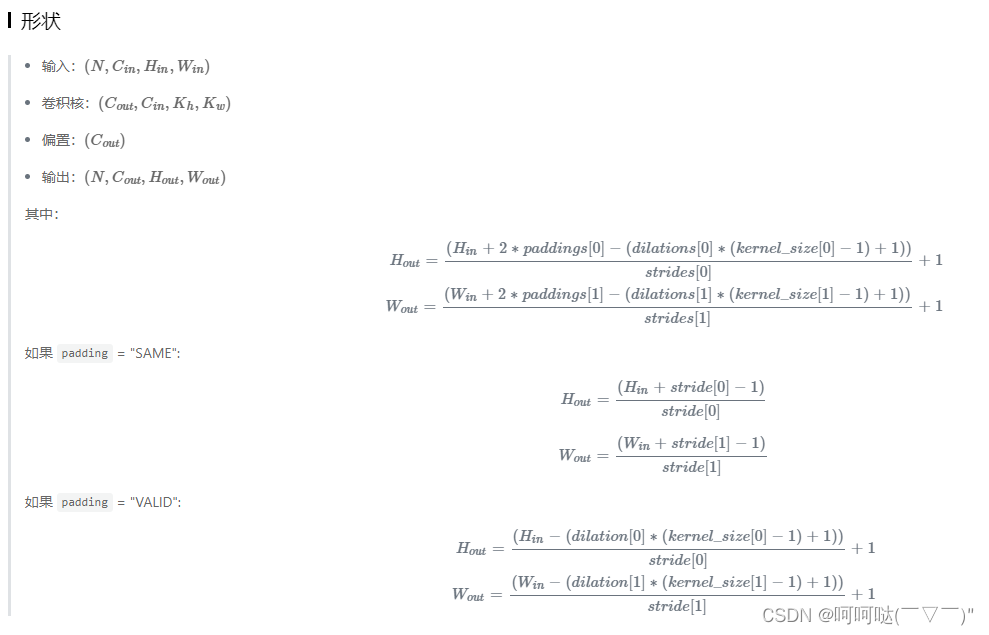
3、了解self.padding = int(kernel_size/2)
推荐文章:
CNN中卷积层的计算细节:CNN中卷积层的计算细节 - 知乎前几天在看CS231n中的CNN经典模型讲解时,花了一些时间才搞清楚卷积层输入输出的尺寸关系到底是什么样的,现总结如下。(可以参照我画的题图理解卷积层的运算) 卷积层尺寸的计算原理输入矩阵格式:四个维度,依次…
https://zhuanlan.zhihu.com/p/29119239
卷积神经网络:卷积神经网络2-padding_卷积padding计算公式_安好1997的博客-CSDN博客什么是padding? padding就是填充、覆盖的意思,也就是过滤器。padding的选择? 我们通常选择3x3的过滤器,但是如果你阅读大量文献,你也会发现也有许多5x5、7x7的过滤器。不难发现,这里都是奇数类型的过滤器。如果你阅读许多相关文献,你也会发现绝大多数都选择的是奇数过滤器,这也符合计算机视觉的惯例。之所以选择奇数,一方面有便于确定过滤器当前所在的位置(只有一个中心点),另外也不止是这个原因。当然,也可以选择偶数过滤器,可能也会有很...
https://blog.csdn.net/qq_37031892/article/details/109141826?spm=1001.2014.3001.5502pytorch中padding=kernel_size//2:
pytorch中padding=kernel_size//2_padding=2_gggoogle1020的博客-CSDN博客pytorch中padding=kernel_size//2到底是实现神魔形式的padding?padding=(kernel_size-1)/2若kernel_size是7*7,5*5,3*3,1*1常见的则padding是 3,2 ,1 ,0nn.Conv2d的padding是在卷积之前补0,如果愿意的话,可以通过使用torch.nn.Functional.pad来补非0的内容。四周都补!如果pad输入是一个tuple的话,则第一个参数表示上,下底的padding,第2个参数表示宽..
https://blog.csdn.net/qq_36249824/article/details/107005949
笔记抄录归纳:

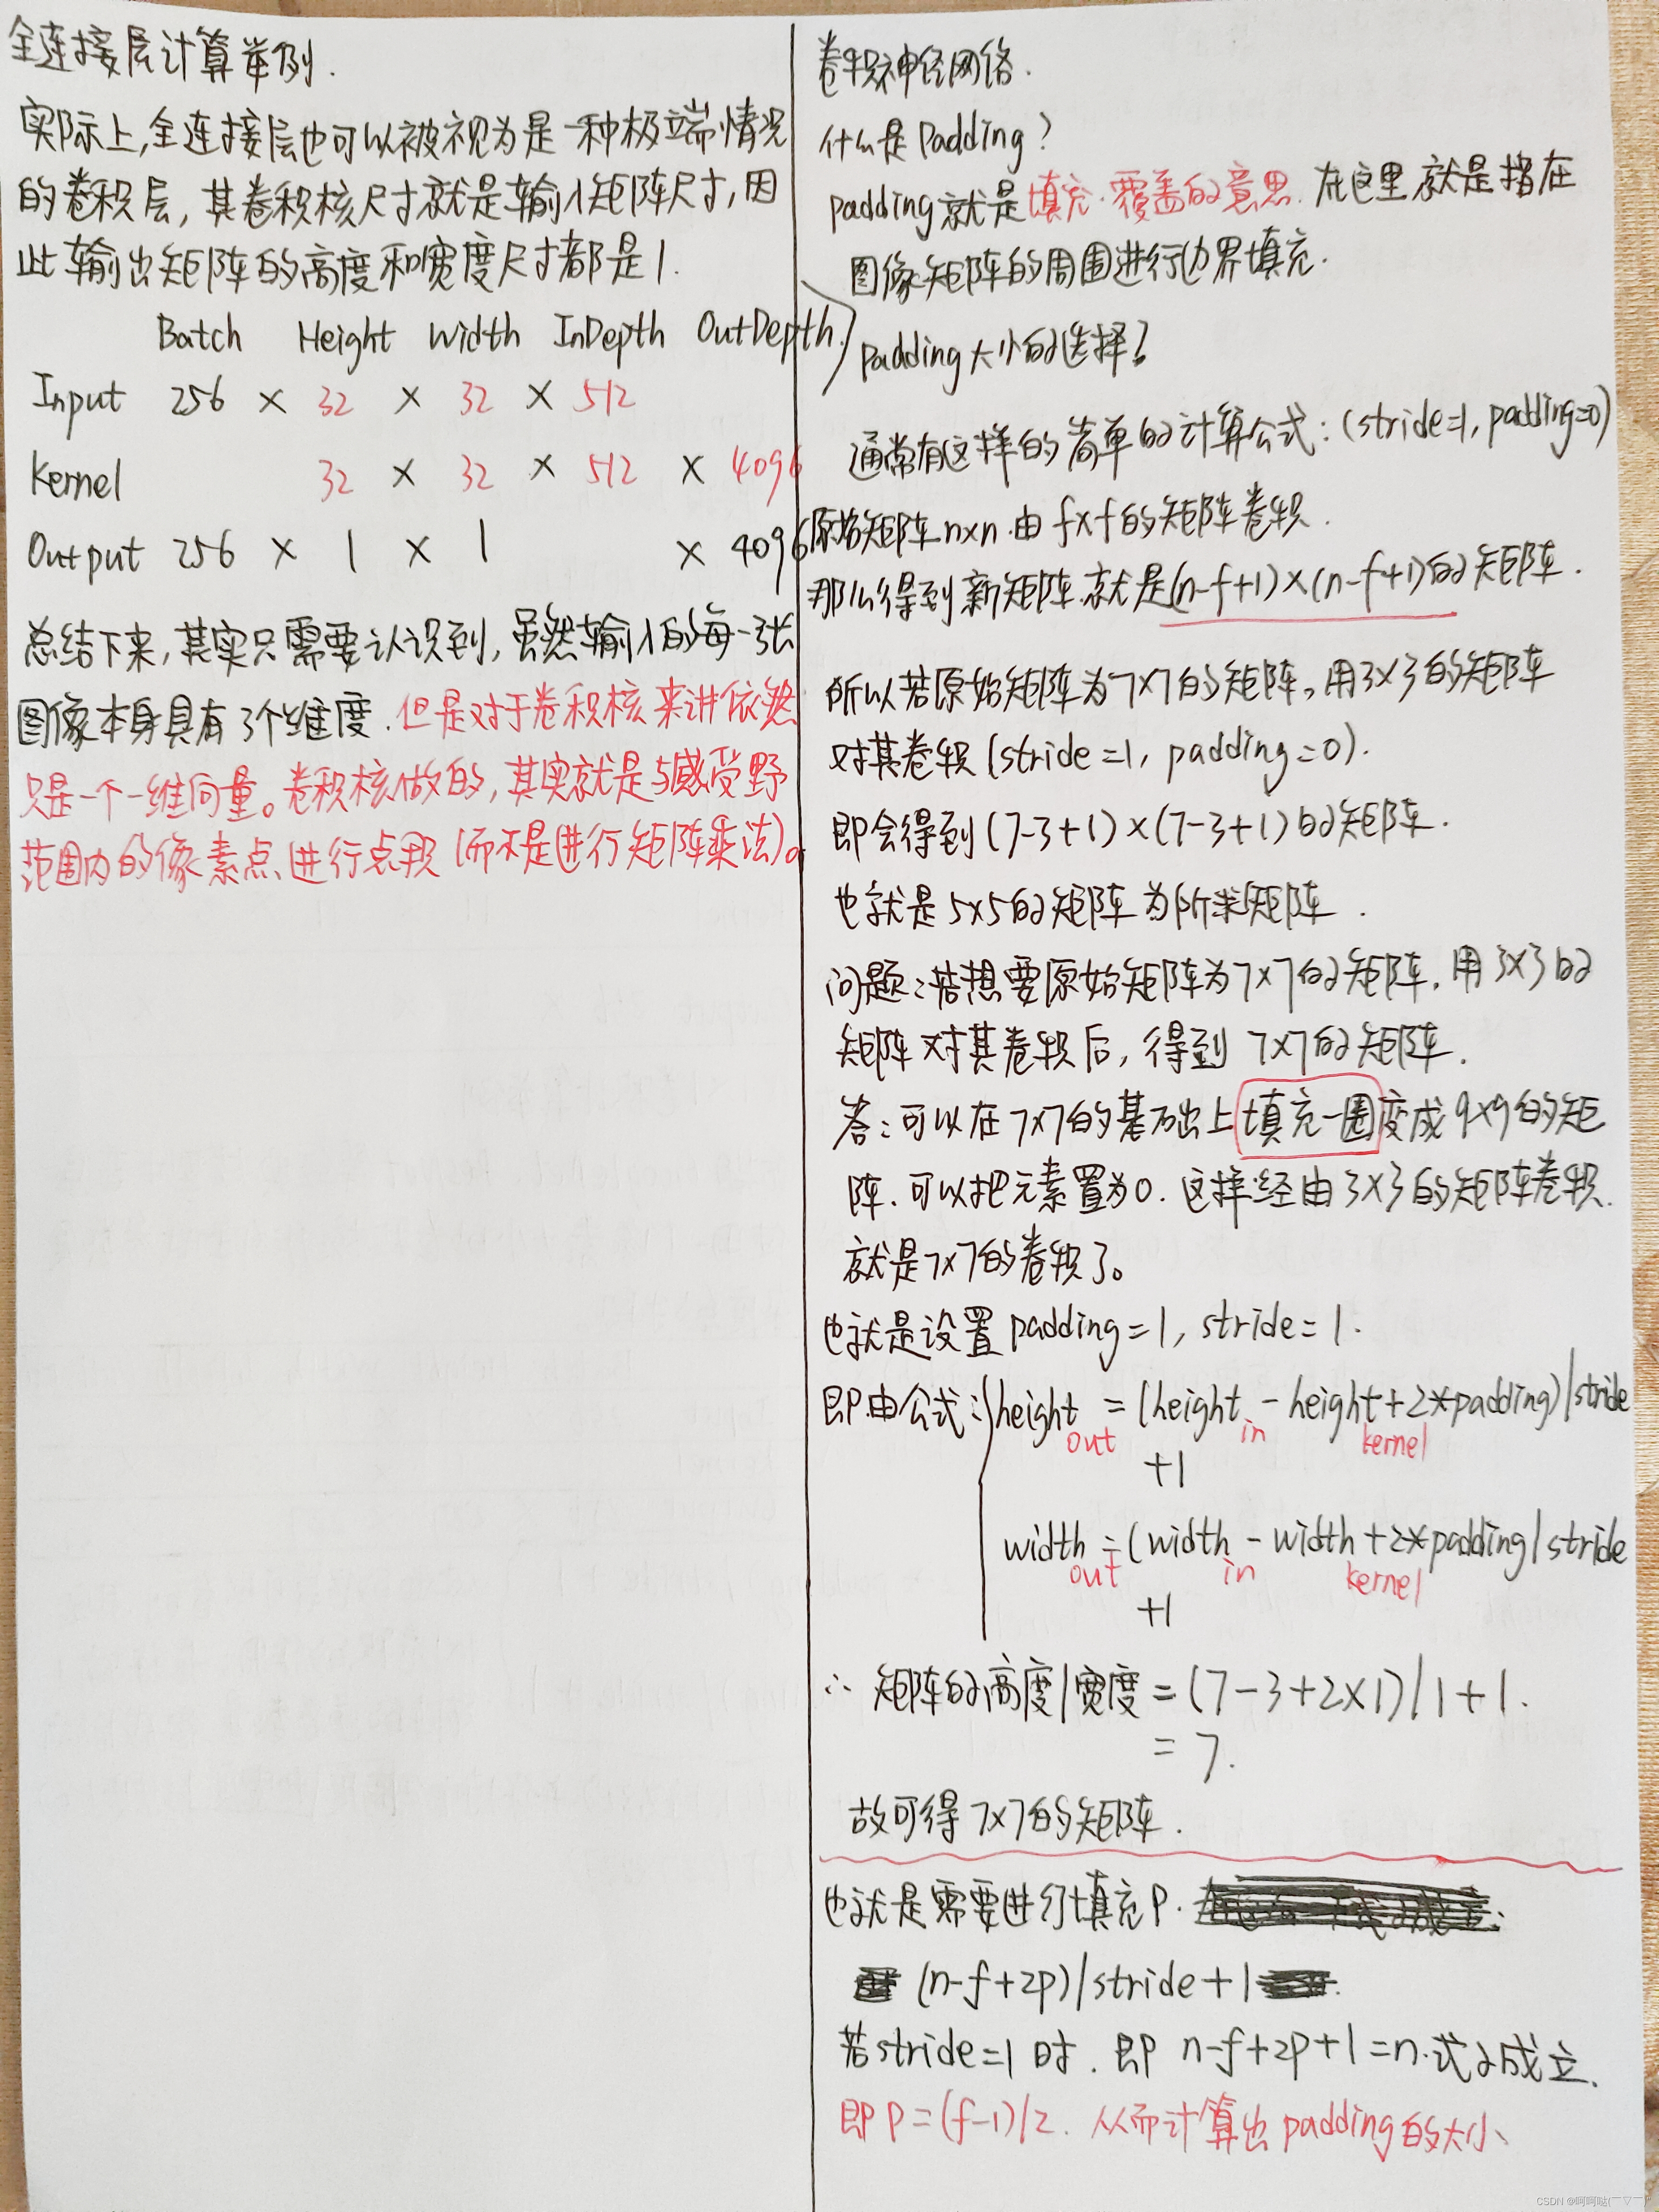
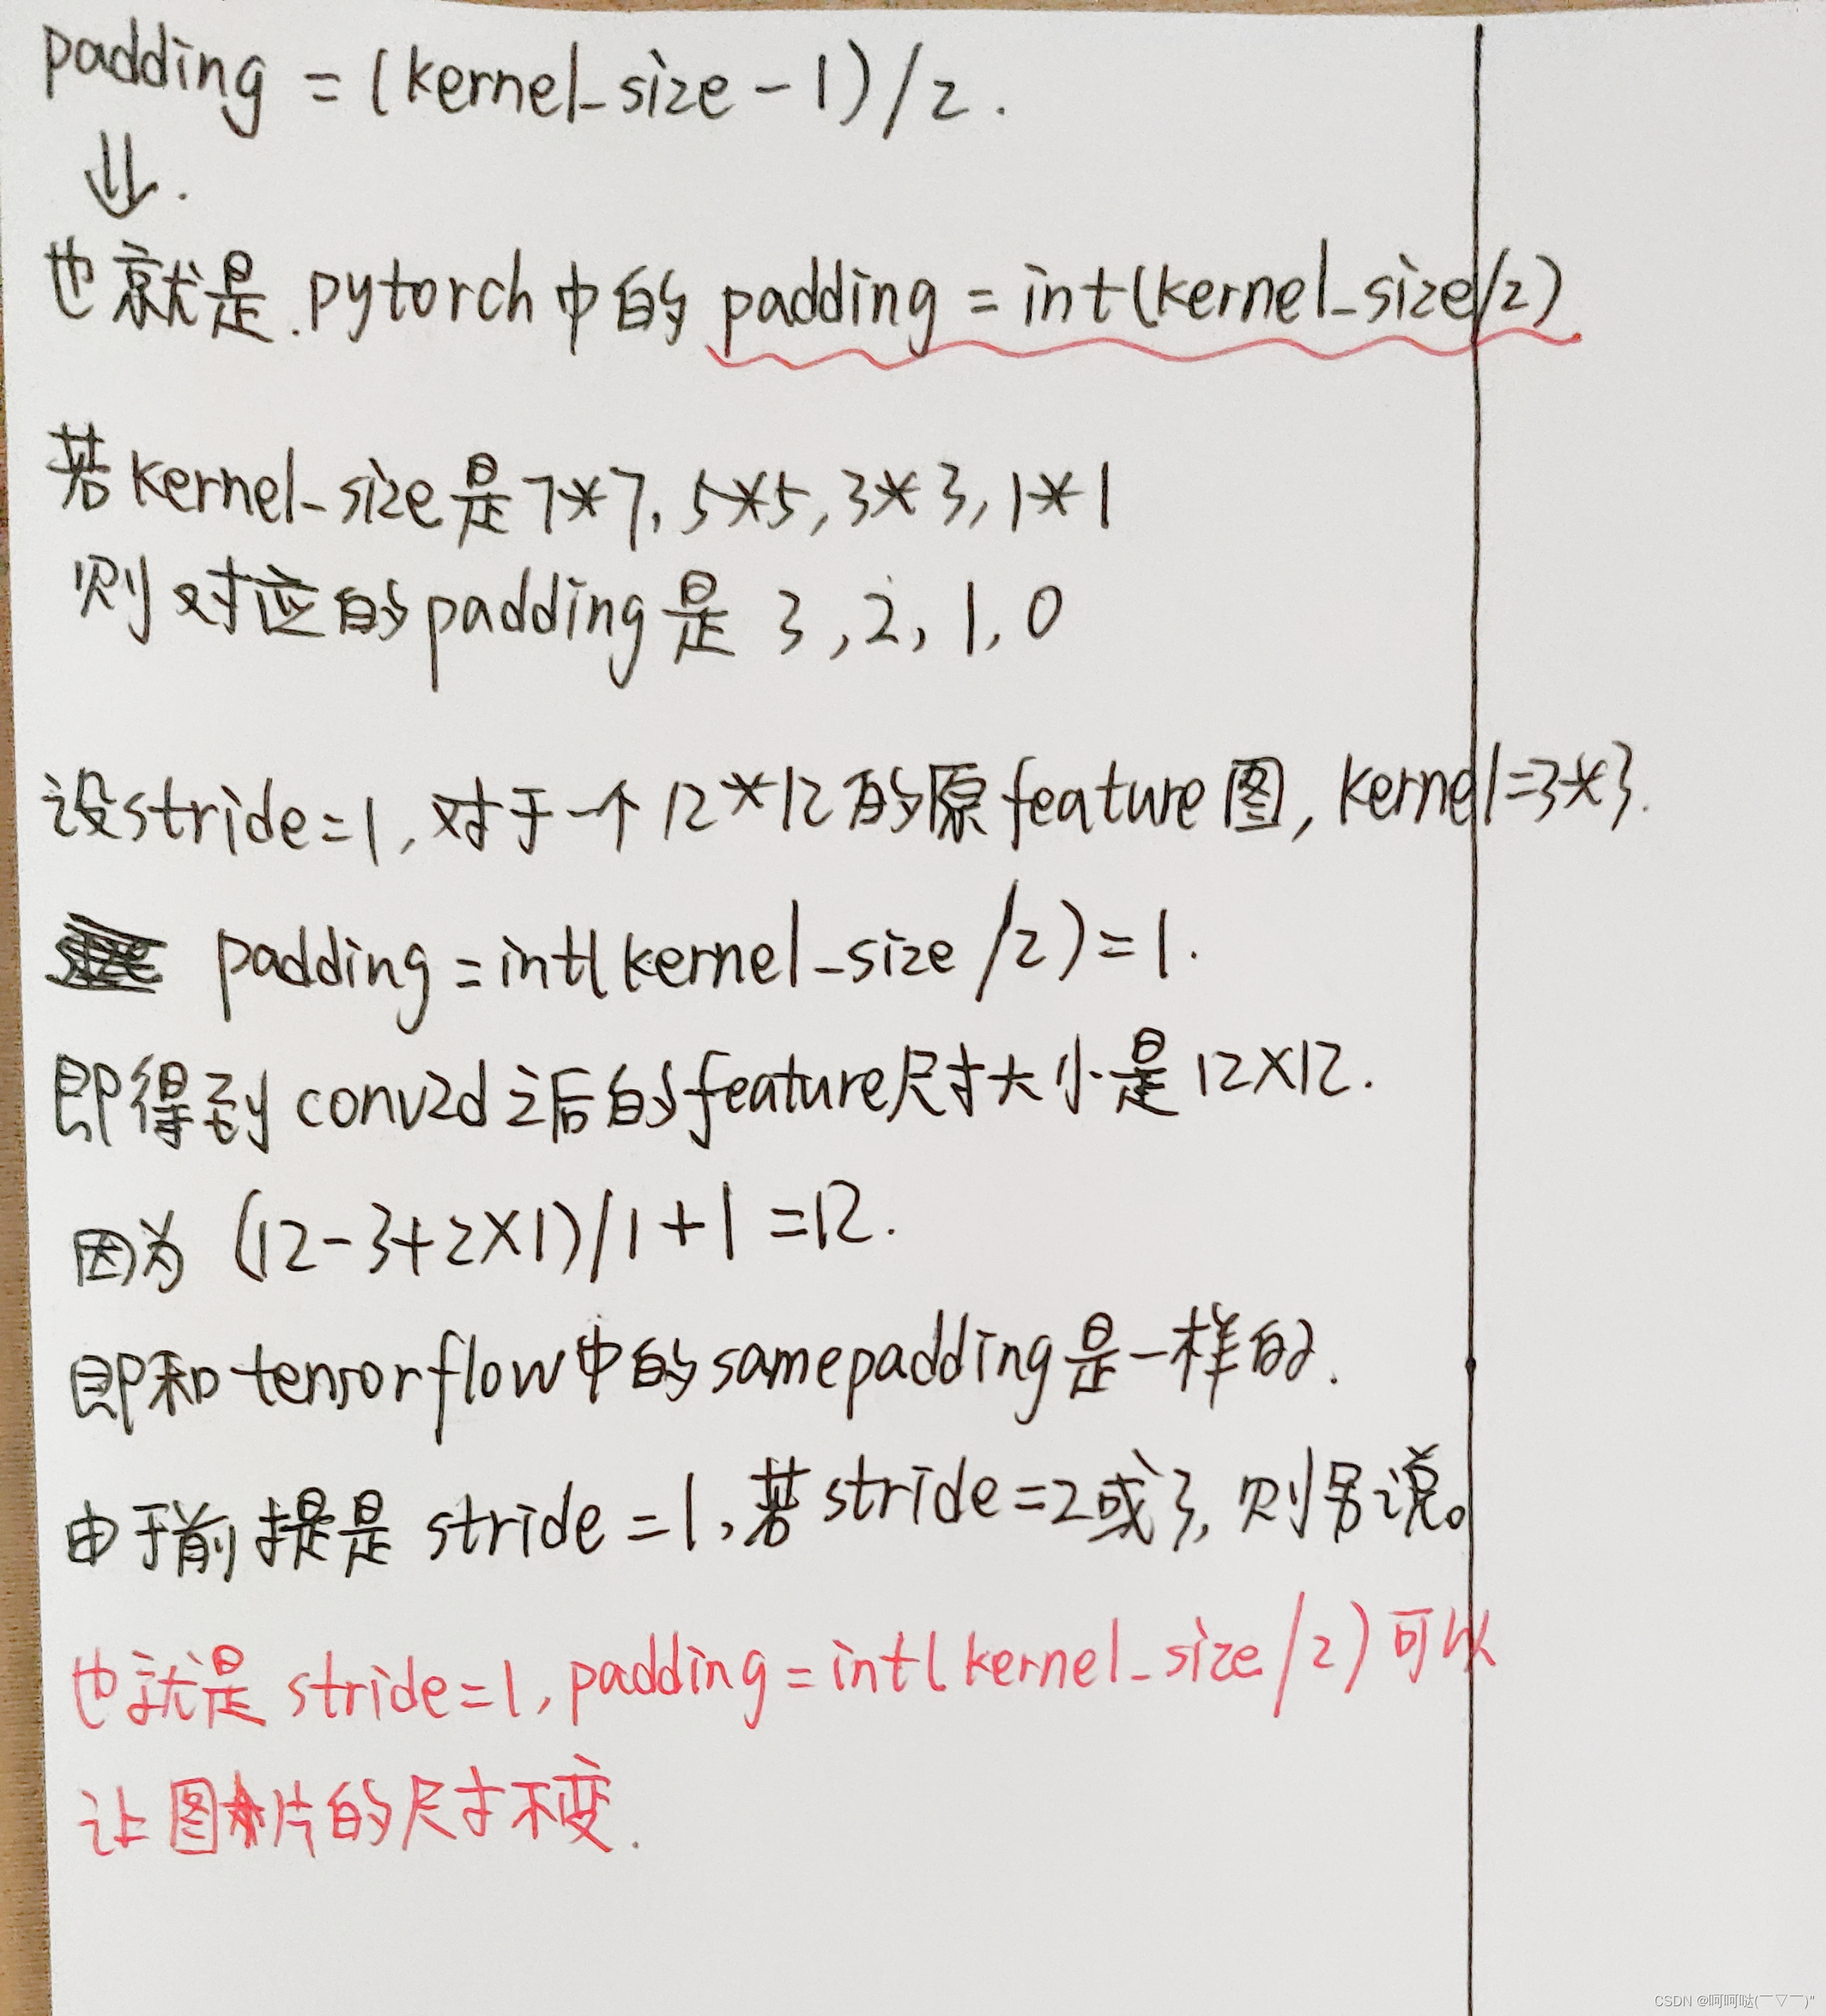
4、torch.nn.Sequential(*args)
顺序容器。模块将按照它们在构造函数中传递的顺序添加到它中。或者,可以传入一个包含模块的OrderedDict。Sequential的forward()方法接受任何输入并将其转发到它包含的第一个模块。然后,它将输出按顺序“链接”到每个后续模块的输入,最后返回最后一个模块的输出。
Sequential通过手动调用模块序列提供的价值是,它允许将整个容器视为单个模块,这样在Sequential上执行转换就可以应用于它存储的每个模块(每个模块都是Sequential的注册子模块)。
Sequential和torch.nn.ModuleList的区别是什么?模块列表顾名思义就是一个用于存储模块的列表!另一方面,sequence中的层以级联方式连接。
# Using Sequential to create a small model. When `model` is run,
# input will first be passed to `Conv2d(1,20,5)`. The output of
# `Conv2d(1,20,5)` will be used as the input to the first
# `ReLU`; the output of the first `ReLU` will become the input
# for `Conv2d(20,64,5)`. Finally, the output of
# `Conv2d(20,64,5)` will be used as input to the second `ReLU`
model = nn.Sequential(nn.Conv2d(1,20,5),nn.ReLU(),nn.Conv2d(20,64,5),nn.ReLU())# Using Sequential with OrderedDict. This is functionally the
# same as the above code
model = nn.Sequential(OrderedDict([('conv1', nn.Conv2d(1,20,5)),('relu1', nn.ReLU()),('conv2', nn.Conv2d(20,64,5)),('relu2', nn.ReLU())]))
使用Sequential创建一个小模型。当' model '运行时,输入将首先传递给' Conv2d(1,20,5) '。' Conv2d(1,20,5) '的输出将被用作第一个的输入“ReLU”;第一个“ReLU”的输出将成为“Conv2d(20,64,5)”的输入。最后,' Conv2d(20,64,5) '的输出将用作第二个' ReLU '的输入。
model = nn.Sequential(nn.Conv2d(1,20,5),nn.ReLU(),nn.Conv2d(20,64,5),nn.ReLU())使用Sequential和OrderedDict。这在功能上与上面的代码相同
model = nn.Sequential(OrderedDict([('conv1', nn.Conv2d(1,20,5)),('relu1', nn.ReLU()),('conv2', nn.Conv2d(20,64,5)),('relu2', nn.ReLU())]))
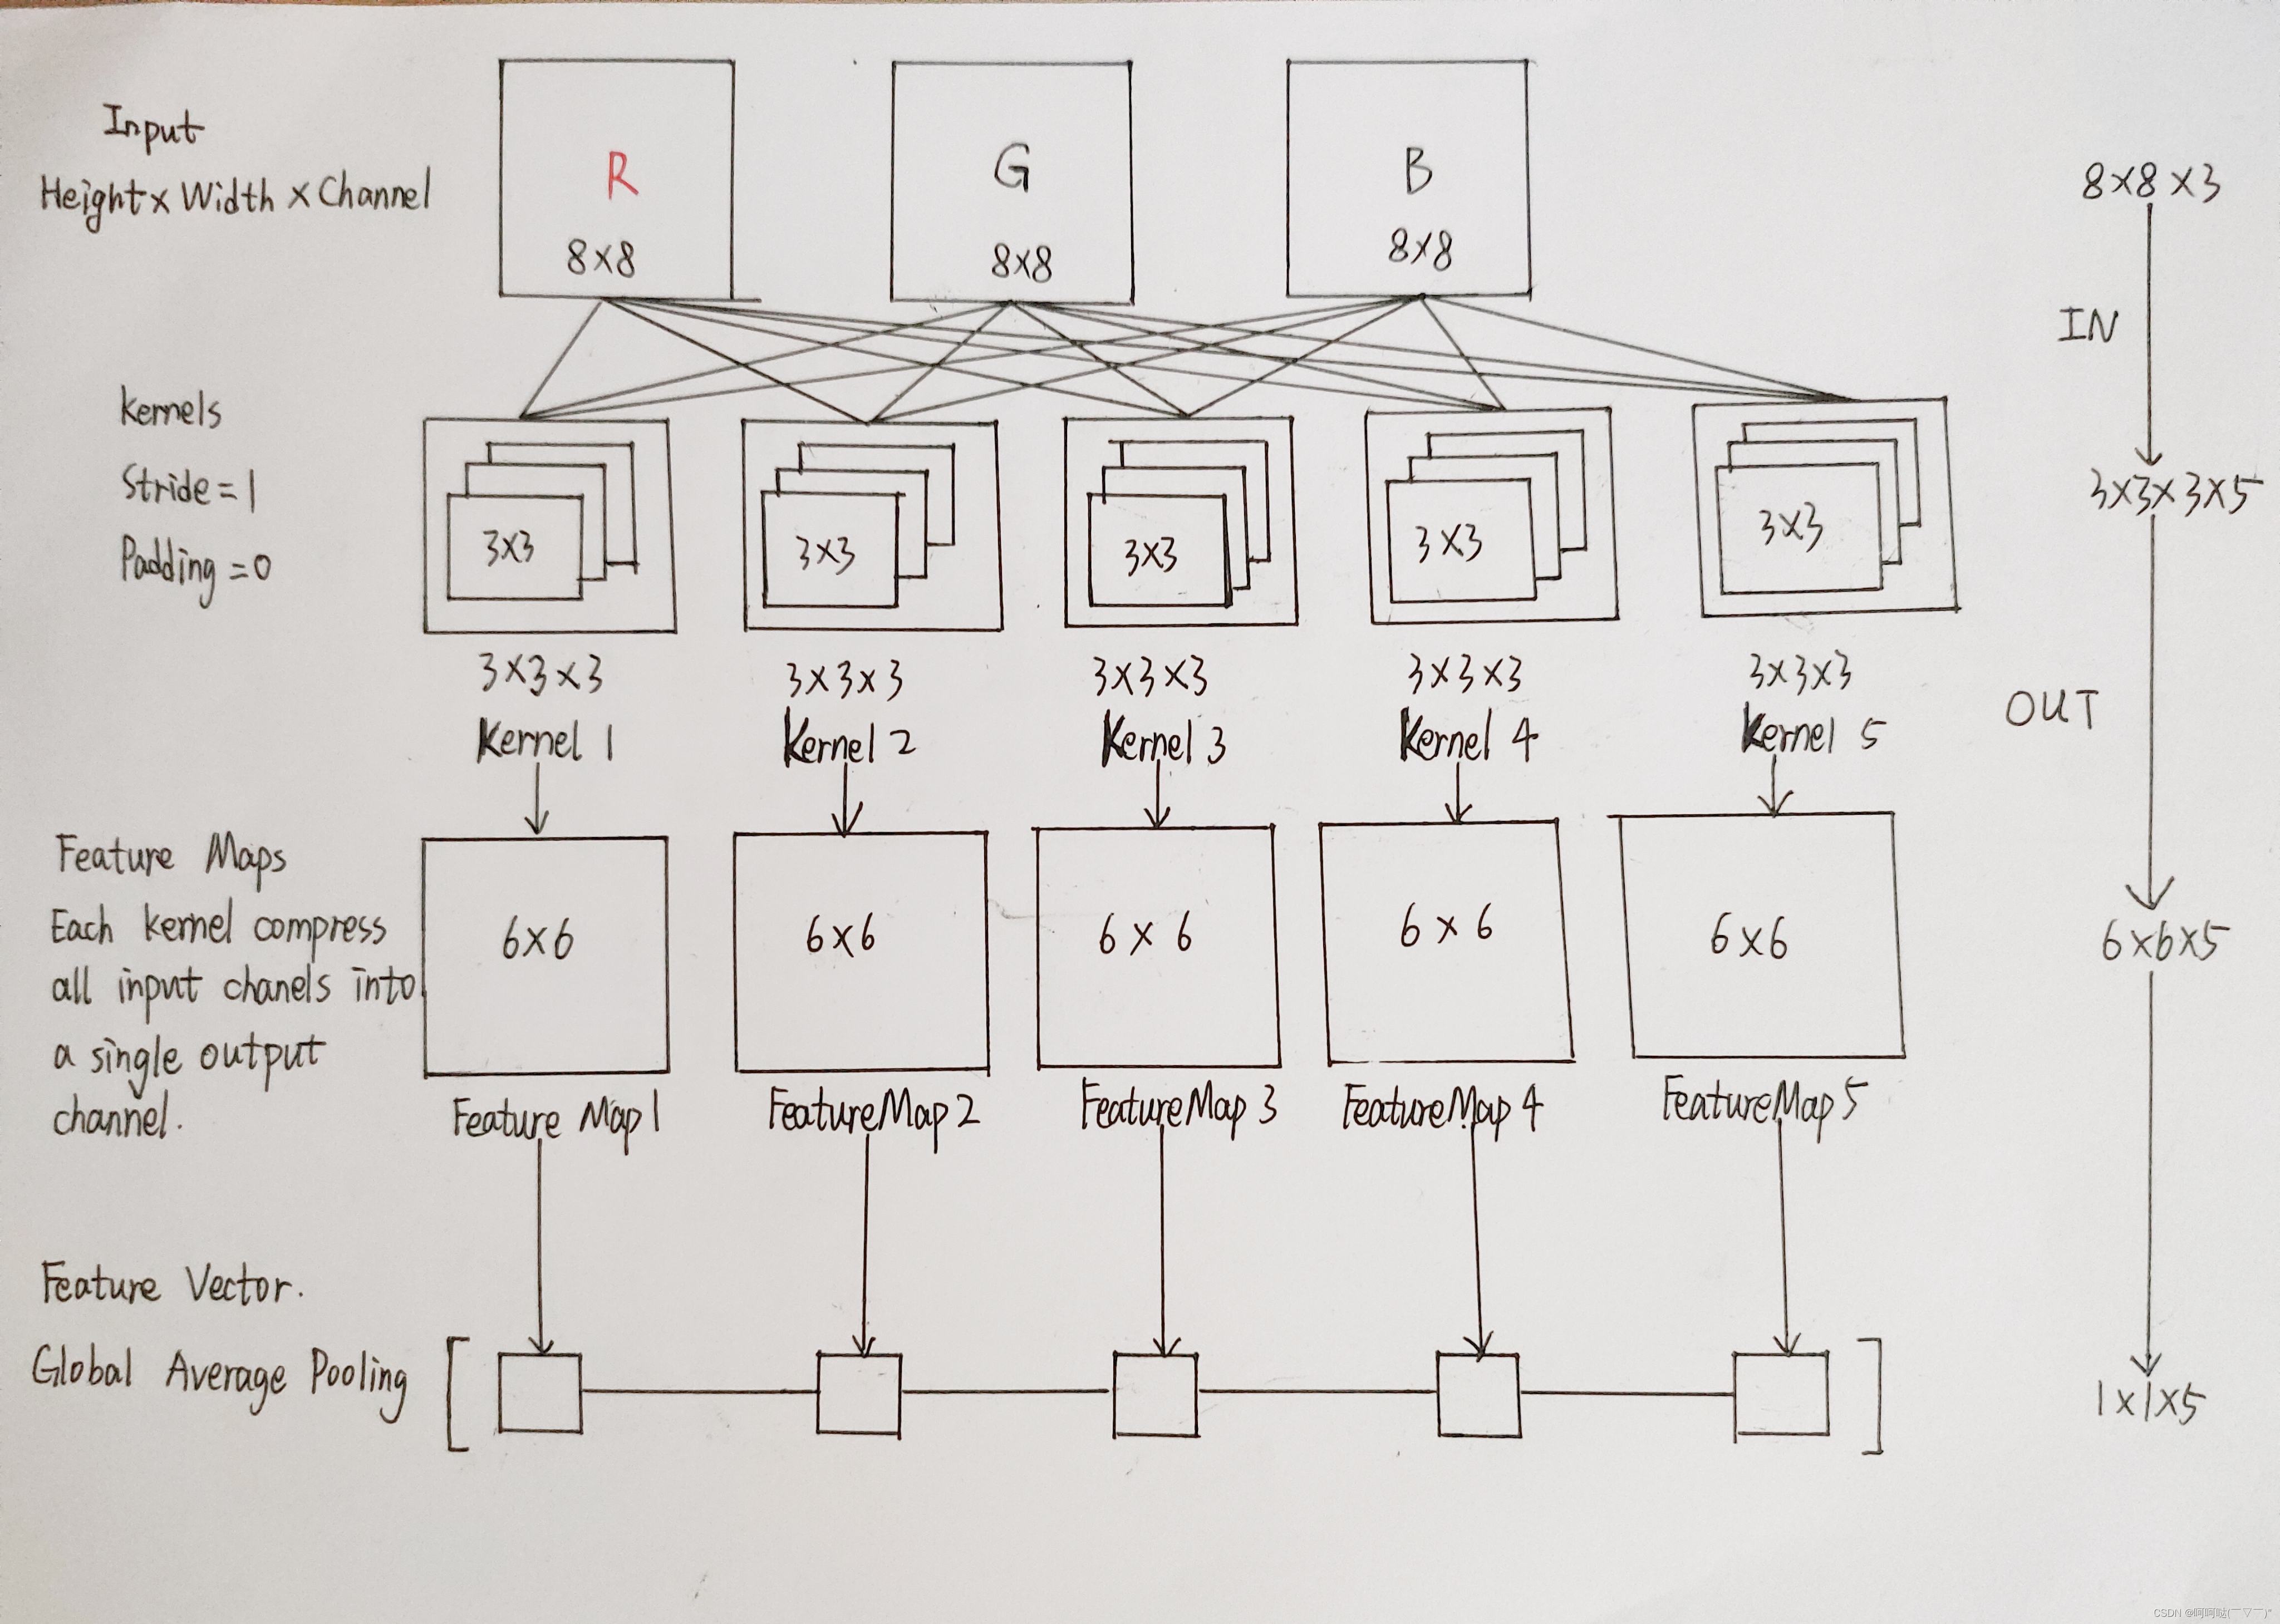
5、 torch.nn.Conv2d(in_channels, out_channels, kernel_size, stride=1, padding=0, dilation=1, groups=1, bias=True, padding_mode='zeros', device=None, dtype=None)

查看飞桨的Conv2d函数解释,可以参考理解:
Examples:
# With square kernels and equal stride
m = nn.Conv2d(16, 33, 3, stride=2)
# non-square kernels and unequal stride and with padding
m = nn.Conv2d(16, 33, (3, 5), stride=(2, 1), padding=(4, 2))
# non-square kernels and unequal stride and with padding and dilation
m = nn.Conv2d(16, 33, (3, 5), stride=(2, 1), padding=(4, 2), dilation=(3, 1))
input = torch.randn(20, 16, 50, 100)
output = m(input)6、torch.nn.BatchNorm2d(num_features, eps=1e-05, momentum=0.1, affine=True, track_running_stats=True, device=None, dtype=None)

import torch
import torch.nn as nn
# With Learnable Parameters
m = nn.BatchNorm2d(100)
# Without Learnable Parameters
m = nn.BatchNorm2d(100, affine=False)
input = torch.randn(20, 100, 35, 45)
output = m(input)
print(output)7、设计Conv2dBatchLeaky(用自定义layer充当积木)
思考:实际操作中我们往往更想要设计一些自定义的layer,怎么办呢?
此时若我们需要用nn.Conv2d,BatchNorm2d,又要LeakyReLU等公用积木搭网络,我们可以直接设计一个layer,叫做Conv2dBatchLeaky(),一块积木顶三块
'''in_channels:输入通道out_channels:输出通道kernel_size:核的大小stride:步长leaky_slop:默认设置为0.1
'''
class Conv2dBatchLeaky(nn.Module):def __init__(self, in_channels, out_channels, kernel_size, stride, leaky_slope=0.1):super(Conv2dBatchLeaky, self).__init__()self.in_channels = in_channelsself.out_channels = out_channelsself.kernel_size = kernel_sizeself.stride = strideif isinstance(kernel_size, (list, tuple)):self.padding = [int(ii/2) for ii in kernel_size]if flag_yolo_structure:print('------------------->>>> Conv2dBatchLeaky isinstance')else:self.padding = int(kernel_size/2)self.leaky_slope = leaky_slope# Layer# LeakyReLU : y = max(0, x) + leaky_slope*min(0,x)self.layers = nn.Sequential(nn.Conv2d(self.in_channels, self.out_channels, self.kernel_size, self.stride, self.padding, bias=False),nn.BatchNorm2d(self.out_channels),nn.LeakyReLU(self.leaky_slope, inplace=True))def forward(self, x):x = self.layers(x)return x
(二)设计ResBlockSum实现List0"黑色框框"结构(通俗讲,不知道怎么准确描述,哈哈哈~)
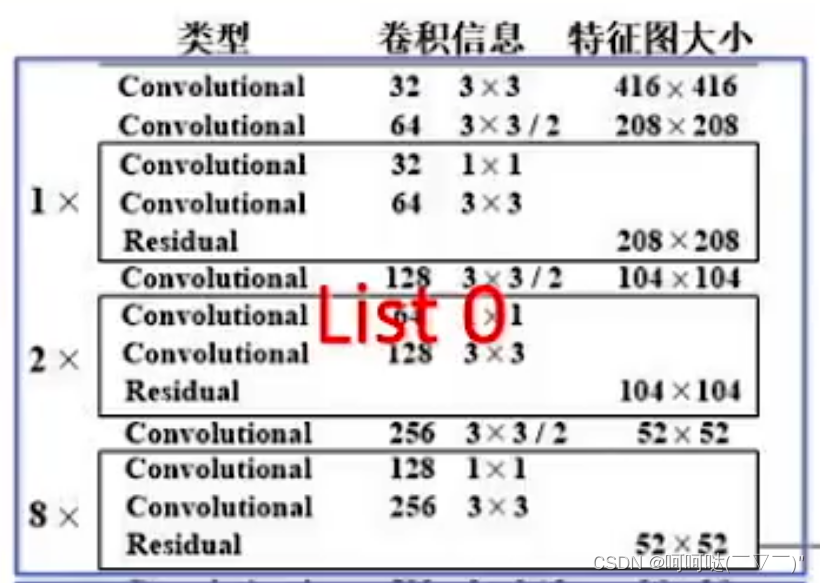
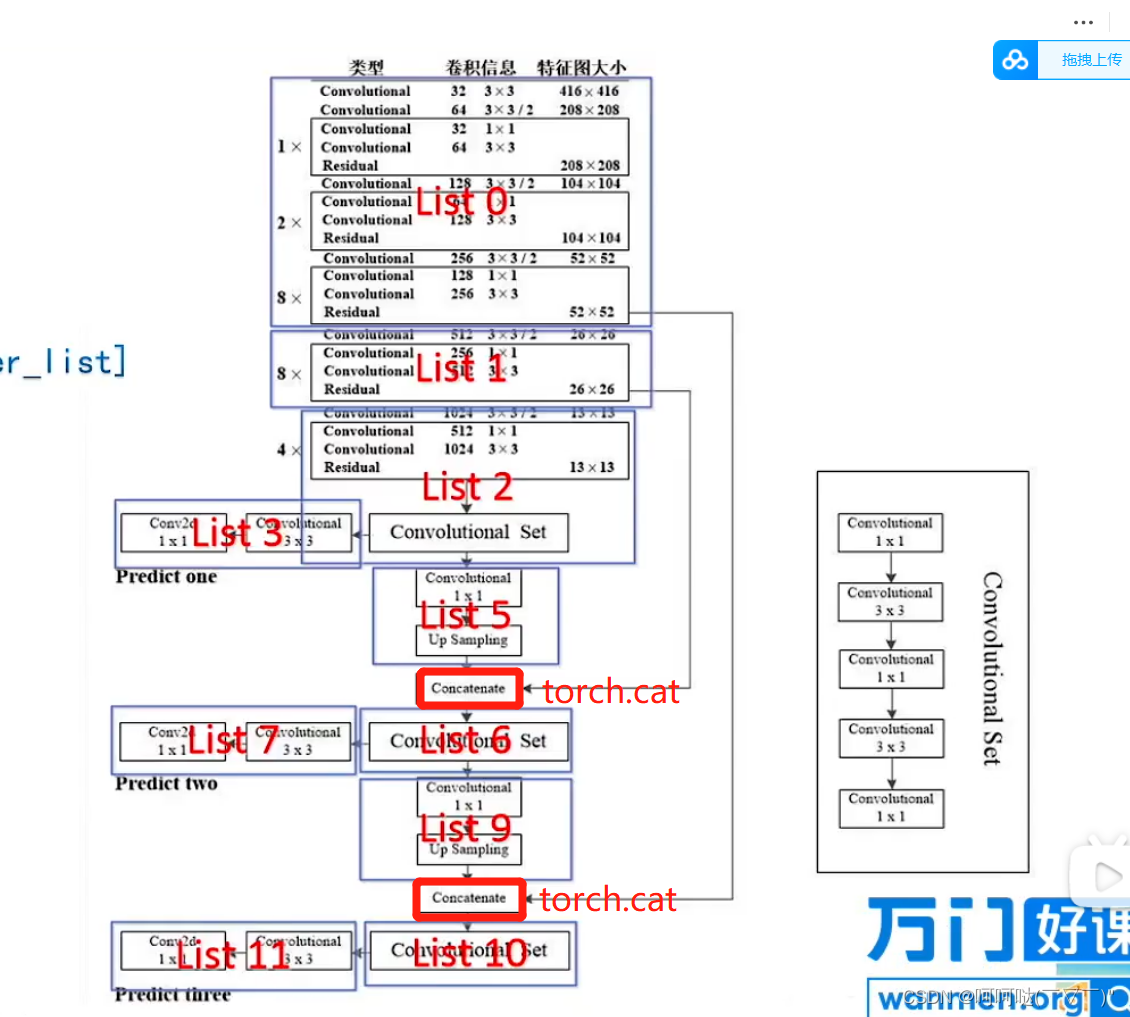
比如说我们要设计list0,可以发现图中的三个黑色的框框是一样的结构,都是两个Convolutional+一个Residual,其中第一个Convolutional的卷积信息为 32 1x1,第二个Convolutional的卷积信息为64 3x3;
观察list0,我们可以发现三个黑色框框除了是一样的结构,而且多次使用,所以我们可以考虑封装一个函数来实现复用。为此设计出了这个函数:ResBlockSum
class ResBlockSum(nn.Module):def __init__(self, nchannels):super().__init__()self.block = nn.Sequential(Conv2dBatchLeaky(nchannels, int(nchannels/2), 1, 1),Conv2dBatchLeaky(int(nchannels/2), nchannels, 3, 1))def forward(self, x):return x + self.block(x)核心实现:
self.block = nn.Sequential(Conv2dBatchLeaky(nchannels, int(nchannels/2), 1, 1),Conv2dBatchLeaky(int(nchannels/2), nchannels, 3, 1))
当传入nchannels=64,调用1次ResBlockSum(64),即
self.block = nn.Sequential(
Conv2dBatchLeaky(64, 32, 1, 1),
Conv2dBatchLeaky(32, 64, 3, 1)
)
即可实现该结构
当传入nchannels=128,调用2次ResBlockSum(128),即
self.block = nn.Sequential(
Conv2dBatchLeaky(128, 64, 1, 1),
Conv2dBatchLeaky(64, 128, 3, 1)
)即可实现该结构
当传入nchannels=256,调用8次ResBlockSum(256),即
self.block = nn.Sequential(
Conv2dBatchLeaky(256, 128, 1, 1),
Conv2dBatchLeaky(128, 256, 3, 1)
)即可实现该结构
(三)设计HeadBody,实现List2、List6、List10中的ConvolutionalSet
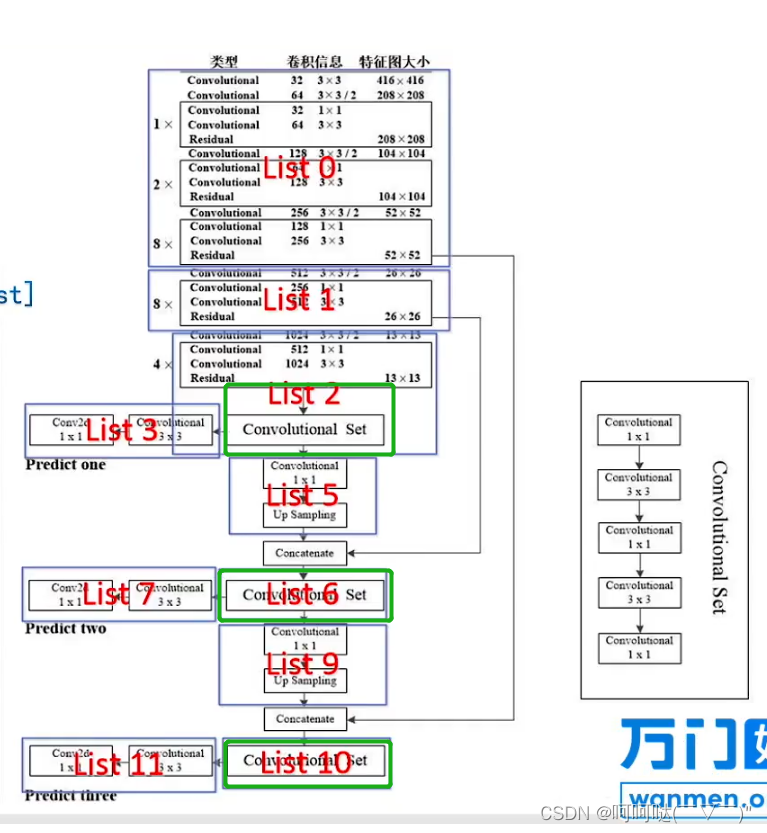

class HeadBody(nn.Module):def __init__(self, in_channels, out_channels):super(HeadBody, self).__init__()self.layer = nn.Sequential(Conv2dBatchLeaky(in_channels, out_channels, 1, 1),Conv2dBatchLeaky(out_channels, out_channels*2, 3, 1),Conv2dBatchLeaky(out_channels*2, out_channels, 1, 1),Conv2dBatchLeaky(out_channels, out_channels*2, 3, 1),Conv2dBatchLeaky(out_channels*2, out_channels, 1, 1))def forward(self, x):x = self.layer(x)return x(四)实现上采样Upsample,需要实现两次Upsample

推荐文章:
interpolate-API文档-PaddlePaddle深度学习平台调整一个 batch 中图片的大小。 输入为 4-D Tensor 时形状为(num_batches, channels, in_h, in_w)或者(num_batches, in_h, in_w,
https://www.paddlepaddle.org.cn/documentation/docs/zh/api/paddle/nn/functional/interpolate_cn.html
torch.nn.functional.interpolate(input, size=None, scale_factor=None, mode='nearest', align_corners=None, recompute_scale_factor=None)torch.nn.functional.interpolate — PyTorch 1.10 documentation
https://pytorch.org/docs/1.10/generated/torch.nn.functional.interpolate.html?highlight=f%20interpolate#torch.nn.functional.interpolate
了解torch的上采样Upsample的api:
import torch
import torch.nn as nn# output_shape = [64, 48]
# up = nn.Upsample(scale_factor=2, mode='bilinear', align_corners=True)
up = nn.Upsample(scale_factor=2)
input = torch.rand(32, 17, 32, 24)
output = up(input)
print(output.shape)
import torch
import torch.nn.functional as Finput = torch.rand(32, 17, 32, 24)
output = F.interpolate(input,scale_factor=2)
print(output.shape)
class Upsample(nn.Module):# Custom Upsample layer (nn.Upsample gives deprecated warning message)def __init__(self, scale_factor=1, mode='nearest'):super(Upsample, self).__init__()self.scale_factor = scale_factorself.mode = modedef forward(self, x):return F.interpolate(x, scale_factor=self.scale_factor, mode=self.mode)(五)实现YOLOLayer,得到物体的anchor和num_classes
# default anchors=[(10,13), (16,30), (33,23), (30,61), (62,45), (59,119), (116,90), (156,198), (373,326)]
class YOLOLayer(nn.Module):def __init__(self, anchors, nC):super(YOLOLayer, self).__init__()self.anchors = torch.FloatTensor(anchors)self.nA = len(anchors)  # number of anchors (3)self.nC = nC  # number of classesself.img_size = 0if flag_yolo_structure:print('init YOLOLayer ------ >>> ')print('anchors  : ',self.anchors)print('nA       : ',self.nA)print('nC       : ',self.nC)print('img_size : ',self.img_size)def forward(self, p, img_size, var=None):# p : feature mapbs, nG = p.shape[0], p.shape[-1] # batch_size , gridif flag_yolo_structure:print('bs, nG --->>> ',bs, nG)if self.img_size != img_size:create_grids(self, img_size, nG, p.device)# p.view(bs, 255, 13, 13) -- > (bs, 3, 13, 13, 85)  # (bs, anchors, grid, grid, xywh + confidence + classes)p = p.view(bs, self.nA, self.nC + 5, nG, nG).permute(0, 1, 3, 4, 2).contiguous()  #  predictionif self.training:return pelse:  # inferenceio = p.clone()  # inference outputio[..., 0:2] = torch.sigmoid(io[..., 0:2]) + self.grid_xy  # xyio[..., 2:4] = torch.exp(io[..., 2:4]) * self.anchor_wh  # wh yolo methodio[..., 4:] = torch.sigmoid(io[..., 4:])  # p_conf, p_clsio[..., :4] *= self.strideif self.nC == 1:io[..., 5] = 1  # single-class model# flatten prediction, reshape from [bs, nA, nG, nG, nC] to [bs, nA * nG * nG, nC]return io.view(bs, -1, 5 + self.nC), pdef create_grids(self, img_size, nG, device='cpu'):# self.nA : len(anchors)  # number of anchors (3)# self.nC : nC  # number of classes# nG : feature map grid  13*13  26*26 52*52self.img_size = img_sizeself.stride = img_size / nGif flag_yolo_structure:print('create_grids stride : ',self.stride)# build xy offsetsgrid_x = torch.arange(nG).repeat((nG, 1)).view((1, 1, nG, nG)).float()grid_y = grid_x.permute(0, 1, 3, 2)self.grid_xy = torch.stack((grid_x, grid_y), 4).to(device)if flag_yolo_structure:print('grid_x : ',grid_x.size(),grid_x)print('grid_y : ',grid_y.size(),grid_y)print('grid_xy : ',self.grid_xy.size(),self.grid_xy)# build wh gainsself.anchor_vec = self.anchors.to(device) / self.stride # 基于 stride 的归一化# print('self.anchor_vecself.anchor_vecself.anchor_vec:',self.anchor_vec)self.anchor_wh = self.anchor_vec.view(1, self.nA, 1, 1, 2).to(device)self.nG = torch.FloatTensor([nG]).to(device)def get_yolo_layer_index(module_list):yolo_layer_index = []for index, l in enumerate(module_list):try:a = l[0].img_size and l[0].nG  # only yolo layer need img_size and nGyolo_layer_index.append(index)except:passassert len(yolo_layer_index) > 0, "can not find yolo layer"return yolo_layer_index
>>>>>>>>>>>>>>>>>>>>>>>>>>>>>>>>>>>>>>>>>>>>>>>>>>>>>>>>>>>>>>>>>>>>>>>>
>>>>>>>>>>>>>>>>>>>>得到大物体的anchor和num_classes>>>>>>>>>>>>>>>>>>>>>>>>
>>>>>>>>>>>>>>>>>>>>>>>>>>>>>>>>>>>>>>>>>>>>>>>>>>>>>>>>>>>>>>>>>>>>>>>>
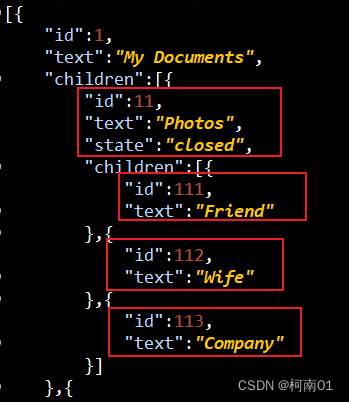
【一】实现List0
推荐文章:
Pytorch 快速搭建网络搭积木方法:Pytorch 快速搭建网络搭积木方法_w55100的博客-CSDN博客前言研究lightnet源代码时,看到这种技巧,惊为天人,于是单独摘出来。感谢作者EAVISE,lightnet传送门。一、 使用OrderedDict([ ])import torchimport torch.nn as nnfrom collections import OrderedDictlayer_list = [ # Seque...
https://blog.csdn.net/w55100/article/details/89083776
1、了解OrderedDict(参考上文,运行结果如下)
import torch
import torch.nn as nn
from collections import OrderedDictlayer_list = [# Sequence 1 :OrderedDict([('1_conv2d', nn.Conv2d(32, 64, 1, 1)),('2_Relu', nn.ReLU(inplace=True)),]),# Sequence 2 :OrderedDict([('3_conv2d', nn.Conv2d((4 * 64) + 1024, 1024, 3, 1)),('4_bn', nn.BatchNorm2d(1024, 20, 1, 1, 0)),]),
]sequence_list = [nn.Sequential(layer_dict) for layer_dict in layer_list]
print(sequence_list)
>>>>>>>>>>>>>>>>>>>>>>准备就绪,开始实现List0的结构搭建>>>>>>>>>>>>>>>>>>>>>>>

# list 0
layer_list.append(OrderedDict([('0_stage1_conv', Conv2dBatchLeaky(3, 32, 3, 1, 1)),  # 416 x 416 x 32        # Convolutional("0_stage2_conv", Conv2dBatchLeaky(32, 64, 3, 2)),  # 208 x 208 x 64          # Convolutional("0_stage2_ressum1", ResBlockSum(64)),                                        # Convolutional*2 + Resiudal("0_stage3_conv", Conv2dBatchLeaky(64, 128, 3, 2)),  # 104 x 104 128          # Convolutional("0_stage3_ressum1", ResBlockSum(128)),("0_stage3_ressum2", ResBlockSum(128)),                                       # (Convolutional*2 + Resiudal)**2("0_stage4_conv", Conv2dBatchLeaky(128, 256, 3, 2)),  # 52 x 52 x 256         # Convolutional("0_stage4_ressum1", ResBlockSum(256)),("0_stage4_ressum2", ResBlockSum(256)),("0_stage4_ressum3", ResBlockSum(256)),("0_stage4_ressum4", ResBlockSum(256)),("0_stage4_ressum5", ResBlockSum(256)),("0_stage4_ressum6", ResBlockSum(256)),("0_stage4_ressum7", ResBlockSum(256)),("0_stage4_ressum8", ResBlockSum(256)),  # 52 x 52 x 256 output_feature_0      (Convolutional*2 + Resiudal)**8]))
【二】实现List1
>>>>>>>>>>>>>>>>>>>>>>准备就绪,开始实现List1的结构搭建>>>>>>>>>>>>>>>>>>>>>>>

# list 1
layer_list.append(OrderedDict([("1_stage5_conv", Conv2dBatchLeaky(256, 512, 3, 2)),  # 26 x 26 x 512         # Convolutional("1_stage5_ressum1", ResBlockSum(512)),("1_stage5_ressum2", ResBlockSum(512)),("1_stage5_ressum3", ResBlockSum(512)),("1_stage5_ressum4", ResBlockSum(512)),("1_stage5_ressum5", ResBlockSum(512)),("1_stage5_ressum6", ResBlockSum(512)),("1_stage5_ressum7", ResBlockSum(512)),("1_stage5_ressum8", ResBlockSum(512)),  # 26 x 26 x 512 output_feature_1     # (Convolutional*2 + Resiudal)**8]))
【三】实现List2
>>>>>>>>>>>>>>>>>>>>>>准备就绪,开始实现List2的结构搭建>>>>>>>>>>>>>>>>>>>>>>>

# list 2
layer_list.append(OrderedDict([("2_stage6_conv", Conv2dBatchLeaky(512, 1024, 3, 2)), # 13 x 13 x 1024 # Convolutional("2_stage6_ressum1", ResBlockSum(1024)),("2_stage6_ressum2", ResBlockSum(1024)),("2_stage6_ressum3", ResBlockSum(1024)),("2_stage6_ressum4", ResBlockSum(1024)), # 13 x 13 x 1024 output_feature_2 # (Convolutional*2 + Resiudal)**4("2_headbody1", HeadBody(in_channels=1024, out_channels=512)), # 13 x 13 x 512 # Convalutional Set = Conv2dBatchLeaky * 5]))【四】实现List3
>>>>>>>>>>>>>>>>>>>>>>准备就绪,开始实现List3的结构搭建>>>>>>>>>>>>>>>>>>>>>>>

# list 3
layer_list.append(OrderedDict([("3_conv_1", Conv2dBatchLeaky(in_channels=512, out_channels=1024, kernel_size=3, stride=1)),("3_conv_2", nn.Conv2d(in_channels=1024, out_channels=len(anchor_mask1) * (num_classes + 5), kernel_size=1, stride=1, padding=0, bias=True)),
])) # predict one
【五】实现List4,得到大物体的anchor和num_classes
# list 4
layer_list.append(OrderedDict([("4_yolo", YOLOLayer([anchors[i] for i in anchor_mask1], num_classes))
])) # 3*((x, y, w, h, confidence) + classes )
>>>>>>>>>>>>>>>>>>>>>>>>>>>>>>>>>>>>>>>>>>>>>>>>>>>>>>>>>>>>>>>>>>>>>>>>
>>>>>>>>>>>>>>>>>>>>得到中物体的anchor和num_classes>>>>>>>>>>>>>>>>>>>>>>>>
>>>>>>>>>>>>>>>>>>>>>>>>>>>>>>>>>>>>>>>>>>>>>>>>>>>>>>>>>>>>>>>>>>>>>>>>
【一】实现List5

# list 5
layer_list.append(OrderedDict([("5_conv", Conv2dBatchLeaky(512, 256, 1, 1)),("5_upsample", Upsample(scale_factor=2)),
]))
【二】实现List6

# list 6
layer_list.append(OrderedDict([("6_head_body2", HeadBody(in_channels=768, out_channels=256)) # Convalutional Set = Conv2dBatchLeaky * 5
]))
【三】实现List7

# list 7
layer_list.append(OrderedDict([("7_conv_1", Conv2dBatchLeaky(in_channels=256, out_channels=512, kernel_size=3, stride=1)),("7_conv_2", nn.Conv2d(in_channels=512, out_channels=len(anchor_mask2) * (num_classes + 5), kernel_size=1, stride=1, padding=0, bias=True)),
])) # predict two
【四】实现List8,得到中物体的anchor和num_classes
# list 8
layer_list.append(OrderedDict([("8_yolo", YOLOLayer([anchors[i] for i in anchor_mask2], num_classes))
])) # 3*((x, y, w, h, confidence) + classes )
>>>>>>>>>>>>>>>>>>>>>>>>>>>>>>>>>>>>>>>>>>>>>>>>>>>>>>>>>>>>>>>>>>>>>>>>
>>>>>>>>>>>>>>>>>>>>得到小物体的anchor和num_classes>>>>>>>>>>>>>>>>>>>>>>>>
>>>>>>>>>>>>>>>>>>>>>>>>>>>>>>>>>>>>>>>>>>>>>>>>>>>>>>>>>>>>>>>>>>>>>>>>
【一】实现List9

# list 9
layer_list.append(OrderedDict([("9_conv", Conv2dBatchLeaky(256, 128, 1, 1)),("9_upsample", Upsample(scale_factor=2)),
]))
【二】实现List10

# list 10
layer_list.append(OrderedDict([("10_head_body3", HeadBody(in_channels=384, out_channels=128))  # Convalutional Set = Conv2dBatchLeaky * 5
]))
【三】实现List11

# list 11
layer_list.append(OrderedDict([("11_conv_1", Conv2dBatchLeaky(in_channels=128, out_channels=256, kernel_size=3, stride=1)),("11_conv_2", nn.Conv2d(in_channels=256, out_channels=len(anchor_mask3) * (num_classes + 5), kernel_size=1, stride=1, padding=0, bias=True)),
])) # predict three
【四】实现List12,得到小物体的anchor和num_classes
# list 12
layer_list.append(OrderedDict([("12_yolo", YOLOLayer([anchors[i] for i in anchor_mask3], num_classes))
])) # 3*((x, y, w, h, confidence) + classes )
>>>>>>>>>>>>>>>>>>>>>>>>>>>>>>>>>>>>>>>>>>>>>>>>>>>>>>>>>>>>>>>>>>>>>>>>
>>>>>>>>>>>>>>>>>>>>>>>>>>>>整合List1-List12>>>>>>>>>>>>>>>>>>>>>>>>>>>>>>>
>>>>>>>>>>>>>>>>>>>>>>>>>>>>>>>>>>>>>>>>>>>>>>>>>>>>>>>>>>>>>>>>>>>>>>>>
nn.ModuleList类似于pytho中的list类型,只是将一系列层装入列表,并没有实现forward()方法,因此也不会有网络模型产生的副作用
# nn.ModuleList类似于pytho中的list类型,只是将一系列层装入列表,并没有实现forward()方法,因此也不会有网络模型产生的副作用
self.module_list = nn.ModuleList([nn.Sequential(i) for i in layer_list])
self.yolo_layer_index = get_yolo_layer_index(self.module_list)
if flag_yolo_structure:print('yolo_layer : ',len(layer_list),'\n')print(self.module_list[4])print(self.module_list[8])print(self.module_list[12])
实现yolov3的forward()函数,将module_list中的list结构像搭积木一样搭建出该网络模型
def forward(self, x):img_size = x.shape[-1]if flag_yolo_structure:print('forward img_size : ',img_size,x.shape)output = []x = self.module_list[0](x)x_route1 = xx = self.module_list[1](x)x_route2 = xx = self.module_list[2](x)yolo_head = self.module_list[3](x)if flag_yolo_structure:print('mask1 yolo_head : ',yolo_head.size())yolo_head_out_13x13 = self.module_list[4][0](yolo_head, img_size)output.append(yolo_head_out_13x13)x = self.module_list[5](x)x = torch.cat([x, x_route2], 1)x = self.module_list[6](x)yolo_head = self.module_list[7](x)if flag_yolo_structure:print('mask2 yolo_head : ',yolo_head.size())yolo_head_out_26x26 = self.module_list[8][0](yolo_head, img_size)output.append(yolo_head_out_26x26)x = self.module_list[9](x)x = torch.cat([x, x_route1], 1)x = self.module_list[10](x)yolo_head = self.module_list[11](x)if flag_yolo_structure:print('mask3 yolo_head : ',yolo_head.size())yolo_head_out_52x52 = self.module_list[12][0](yolo_head, img_size)output.append(yolo_head_out_52x52)if self.training:return outputelse:io, p = list(zip(*output)) # inference output, training outputreturn torch.cat(io, 1), p完整代码
import os
import numpy as np
from collections import OrderedDictimport torch
import torch.nn.functional as F
import torch.nn as nn
flag_yolo_structure = False # True 查看 相关的网络 log
'''in_channels:输入通道out_channels:输出通道kernel_size:核的大小stride:步长leaky_slop:默认设置为0.1
'''
class Conv2dBatchLeaky(nn.Module):def __init__(self, in_channels, out_channels, kernel_size, stride, leaky_slope=0.1):super(Conv2dBatchLeaky, self).__init__()self.in_channels = in_channelsself.out_channels = out_channelsself.kernel_size = kernel_sizeself.stride = strideif isinstance(kernel_size, (list, tuple)):self.padding = [int(ii/2) for ii in kernel_size]if flag_yolo_structure:print('------------------->>>> Conv2dBatchLeaky isinstance')else:self.padding = int(kernel_size/2)self.leaky_slope = leaky_slope# Layer# LeakyReLU : y = max(0, x) + leaky_slope*min(0,x)self.layers = nn.Sequential(nn.Conv2d(self.in_channels, self.out_channels, self.kernel_size, self.stride, self.padding, bias=False),nn.BatchNorm2d(self.out_channels),nn.LeakyReLU(self.leaky_slope, inplace=True))def forward(self, x):x = self.layers(x)return xclass ResBlockSum(nn.Module):def __init__(self, nchannels):super().__init__()self.block = nn.Sequential(Conv2dBatchLeaky(nchannels, int(nchannels/2), 1, 1),Conv2dBatchLeaky(int(nchannels/2), nchannels, 3, 1))def forward(self, x):return x + self.block(x)
class HeadBody(nn.Module):def __init__(self, in_channels, out_channels):super(HeadBody, self).__init__()self.layer = nn.Sequential(Conv2dBatchLeaky(in_channels, out_channels, 1, 1),Conv2dBatchLeaky(out_channels, out_channels*2, 3, 1),Conv2dBatchLeaky(out_channels*2, out_channels, 1, 1),Conv2dBatchLeaky(out_channels, out_channels*2, 3, 1),Conv2dBatchLeaky(out_channels*2, out_channels, 1, 1))def forward(self, x):x = self.layer(x)return xclass Upsample(nn.Module):# Custom Upsample layer (nn.Upsample gives deprecated warning message)def __init__(self, scale_factor=1, mode='nearest'):super(Upsample, self).__init__()self.scale_factor = scale_factorself.mode = modedef forward(self, x):return F.interpolate(x, scale_factor=self.scale_factor, mode=self.mode)# default anchors=[(10,13), (16,30), (33,23), (30,61), (62,45), (59,119), (116,90), (156,198), (373,326)]
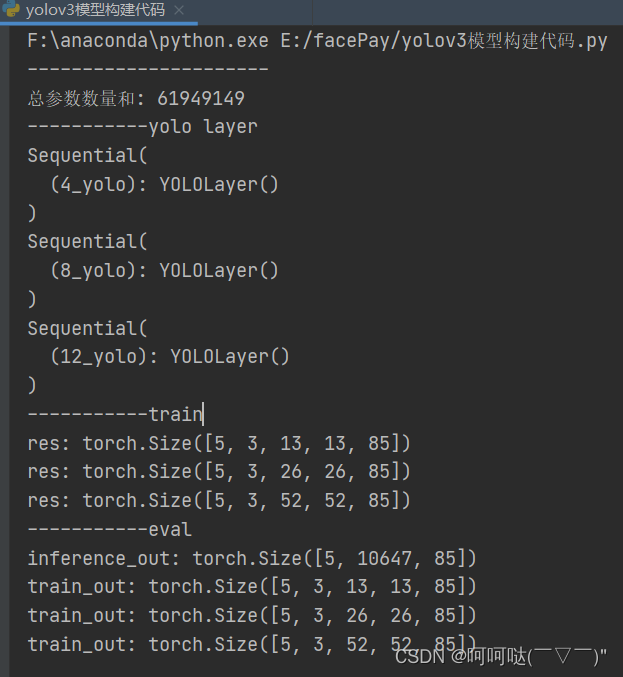
class YOLOLayer(nn.Module):def __init__(self, anchors, nC):super(YOLOLayer, self).__init__()self.anchors = torch.FloatTensor(anchors)self.nA = len(anchors)  # number of anchors (3)self.nC = nC  # number of classesself.img_size = 0if flag_yolo_structure:print('init YOLOLayer ------ >>> ')print('anchors  : ',self.anchors)print('nA       : ',self.nA)print('nC       : ',self.nC)print('img_size : ',self.img_size)def forward(self, p, img_size, var=None):# p : feature mapbs, nG = p.shape[0], p.shape[-1] # batch_size , gridif flag_yolo_structure:print('bs, nG --->>> ',bs, nG)if self.img_size != img_size:create_grids(self, img_size, nG, p.device)# p.view(bs, 255, 13, 13) -- > (bs, 3, 13, 13, 85)  # (bs, anchors, grid, grid, xywh + confidence + classes)p = p.view(bs, self.nA, self.nC + 5, nG, nG).permute(0, 1, 3, 4, 2).contiguous()  #  predictionif self.training:return pelse:  # inferenceio = p.clone()  # inference outputio[..., 0:2] = torch.sigmoid(io[..., 0:2]) + self.grid_xy  # xyio[..., 2:4] = torch.exp(io[..., 2:4]) * self.anchor_wh  # wh yolo methodio[..., 4:] = torch.sigmoid(io[..., 4:])  # p_conf, p_clsio[..., :4] *= self.strideif self.nC == 1:io[..., 5] = 1  # single-class model# flatten prediction, reshape from [bs, nA, nG, nG, nC] to [bs, nA * nG * nG, nC]return io.view(bs, -1, 5 + self.nC), pdef create_grids(self, img_size, nG, device='cpu'):# self.nA : len(anchors)  # number of anchors (3)# self.nC : nC  # number of classes# nG : feature map grid  13*13  26*26 52*52self.img_size = img_sizeself.stride = img_size / nGif flag_yolo_structure:print('create_grids stride : ',self.stride)# build xy offsetsgrid_x = torch.arange(nG).repeat((nG, 1)).view((1, 1, nG, nG)).float()grid_y = grid_x.permute(0, 1, 3, 2)self.grid_xy = torch.stack((grid_x, grid_y), 4).to(device)if flag_yolo_structure:print('grid_x : ',grid_x.size(),grid_x)print('grid_y : ',grid_y.size(),grid_y)print('grid_xy : ',self.grid_xy.size(),self.grid_xy)# build wh gainsself.anchor_vec = self.anchors.to(device) / self.stride # 基于 stride 的归一化# print('self.anchor_vecself.anchor_vecself.anchor_vec:',self.anchor_vec)self.anchor_wh = self.anchor_vec.view(1, self.nA, 1, 1, 2).to(device)self.nG = torch.FloatTensor([nG]).to(device)def get_yolo_layer_index(module_list):yolo_layer_index = []for index, l in enumerate(module_list):try:a = l[0].img_size and l[0].nG  # only yolo layer need img_size and nGyolo_layer_index.append(index)except:passassert len(yolo_layer_index) > 0, "can not find yolo layer"return yolo_layer_indexclass Yolov3(nn.Module):'''9个anchors,有小中大三个尺寸小  (10,13), (16,30), (33,23),中  (30,61), (62,45), (59,119),大  (116,90), (156,198), (373,326)为什么有小中大三个尺寸?答:是因为得符合长宽比,因为有的物体会偏长形,也就是长比宽高;有的物体时宽比长高;有的物体是比较偏于正方形的,也就是长宽差距不大yolov的作者,通过经验,统一出了常用的achors,长宽比例有时候人脸是有角度变化的,随着不同的角度变化,的确是不可能正对人脸,也就是长宽基本一样的情况。也就是它也会出现长比宽多,或者宽比长多,或者是长和宽的比例相差不大'''def __init__(self, num_classes=80, anchors=[(10,13), (16,30), (33,23), (30,61), (62,45), (59,119), (116,90), (156,198), (373,326)]):super().__init__()'''anchor_mask1 : 大物体 anchor [6, 7, 8] --->anchors[6] anchors[7] anchors[8] ---> (116,90), (156,198), (373,326)anchor_mask2 : 中物体 anchor [3, 4, 5] --->anchors[3] anchors[4] anchors[5] ---> (30,61), (62,45), (59,119)anchor_mask3 : 小物体 anchor [0, 1, 2] --->anchors[0] anchors[1] anchors[2] ---> (10,13), (16,30), (33,23)'''anchor_mask1 = [i for i in range(2 * len(anchors) // 3, len(anchors), 1)]  # [6, 7, 8]anchor_mask2 = [i for i in range(len(anchors) // 3, 2 * len(anchors) // 3, 1)]  # [3, 4, 5]anchor_mask3 = [i for i in range(0, len(anchors) // 3, 1)]  # [0, 1, 2]if flag_yolo_structure:print('anchor_mask1 : ',anchor_mask1) # 大物体 anchorprint('anchor_mask2 : ',anchor_mask2) # 中物体 anchorprint('anchor_mask3 : ',anchor_mask3) # 小物体 anchor# Network# OrderedDict 是 dict 的子类,其最大特征是,它可以“维护”添加 key-value 对的顺序layer_list = []'''******      Conv2dBatchLeaky       *****op : Conv2d,BatchNorm2d,LeakyReLUinputs : in_channels, out_channels, kernel_size, stride, leaky_slope''''''******      ResBlockSum ******op : Conv2dBatchLeaky * 2 + xinputs : nchannels'''# list 0layer_list.append(OrderedDict([('0_stage1_conv', Conv2dBatchLeaky(3, 32, 3, 1, 1)),  # 416 x 416 x 32        # Convolutional("0_stage2_conv", Conv2dBatchLeaky(32, 64, 3, 2)),  # 208 x 208 x 64          # Convolutional("0_stage2_ressum1", ResBlockSum(64)),                                        # Convolutional*2 + Resiudal("0_stage3_conv", Conv2dBatchLeaky(64, 128, 3, 2)),  # 104 x 104 128          # Convolutional("0_stage3_ressum1", ResBlockSum(128)),("0_stage3_ressum2", ResBlockSum(128)),                                       # (Convolutional*2 + Resiudal)**2("0_stage4_conv", Conv2dBatchLeaky(128, 256, 3, 2)),  # 52 x 52 x 256         # Convolutional("0_stage4_ressum1", ResBlockSum(256)),("0_stage4_ressum2", ResBlockSum(256)),("0_stage4_ressum3", ResBlockSum(256)),("0_stage4_ressum4", ResBlockSum(256)),("0_stage4_ressum5", ResBlockSum(256)),("0_stage4_ressum6", ResBlockSum(256)),("0_stage4_ressum7", ResBlockSum(256)),("0_stage4_ressum8", ResBlockSum(256)),  # 52 x 52 x 256 output_feature_0      (Convolutional*2 + Resiudal)**8]))# list 1layer_list.append(OrderedDict([("1_stage5_conv", Conv2dBatchLeaky(256, 512, 3, 2)),  # 26 x 26 x 512         # Convolutional("1_stage5_ressum1", ResBlockSum(512)),("1_stage5_ressum2", ResBlockSum(512)),("1_stage5_ressum3", ResBlockSum(512)),("1_stage5_ressum4", ResBlockSum(512)),("1_stage5_ressum5", ResBlockSum(512)),("1_stage5_ressum6", ResBlockSum(512)),("1_stage5_ressum7", ResBlockSum(512)),("1_stage5_ressum8", ResBlockSum(512)),  # 26 x 26 x 512 output_feature_1     # (Convolutional*2 + Resiudal)**8]))'''******      HeadBody      ******op : Conv2dBatchLeaky * 5inputs : in_channels, out_channels'''# list 2layer_list.append(OrderedDict([("2_stage6_conv", Conv2dBatchLeaky(512, 1024, 3, 2)),  # 13 x 13 x 1024      # Convolutional("2_stage6_ressum1", ResBlockSum(1024)),("2_stage6_ressum2", ResBlockSum(1024)),("2_stage6_ressum3", ResBlockSum(1024)),("2_stage6_ressum4", ResBlockSum(1024)),  # 13 x 13 x 1024 output_feature_2 # (Convolutional*2 + Resiudal)**4("2_headbody1", HeadBody(in_channels=1024, out_channels=512)), # 13 x 13 x 512  # Convalutional Set = Conv2dBatchLeaky * 5]))# list 3layer_list.append(OrderedDict([("3_conv_1", Conv2dBatchLeaky(in_channels=512, out_channels=1024, kernel_size=3, stride=1)),("3_conv_2", nn.Conv2d(in_channels=1024, out_channels=len(anchor_mask1) * (num_classes + 5), kernel_size=1, stride=1, padding=0, bias=True)),])) # predict one# list 4layer_list.append(OrderedDict([("4_yolo", YOLOLayer([anchors[i] for i in anchor_mask1], num_classes))])) # 3*((x, y, w, h, confidence) + classes )# list 5layer_list.append(OrderedDict([("5_conv", Conv2dBatchLeaky(512, 256, 1, 1)),("5_upsample", Upsample(scale_factor=2)),]))# list 6layer_list.append(OrderedDict([("6_head_body2", HeadBody(in_channels=768, out_channels=256)) # Convalutional Set = Conv2dBatchLeaky * 5]))# list 7layer_list.append(OrderedDict([("7_conv_1", Conv2dBatchLeaky(in_channels=256, out_channels=512, kernel_size=3, stride=1)),("7_conv_2", nn.Conv2d(in_channels=512, out_channels=len(anchor_mask2) * (num_classes + 5), kernel_size=1, stride=1, padding=0, bias=True)),])) # predict two# list 8layer_list.append(OrderedDict([("8_yolo", YOLOLayer([anchors[i] for i in anchor_mask2], num_classes))])) # 3*((x, y, w, h, confidence) + classes )# list 9layer_list.append(OrderedDict([("9_conv", Conv2dBatchLeaky(256, 128, 1, 1)),("9_upsample", Upsample(scale_factor=2)),]))# list 10layer_list.append(OrderedDict([("10_head_body3", HeadBody(in_channels=384, out_channels=128))  # Convalutional Set = Conv2dBatchLeaky * 5]))# list 11layer_list.append(OrderedDict([("11_conv_1", Conv2dBatchLeaky(in_channels=128, out_channels=256, kernel_size=3, stride=1)),("11_conv_2", nn.Conv2d(in_channels=256, out_channels=len(anchor_mask3) * (num_classes + 5), kernel_size=1, stride=1, padding=0, bias=True)),])) # predict three# list 12layer_list.append(OrderedDict([("12_yolo", YOLOLayer([anchors[i] for i in anchor_mask3], num_classes))])) # 3*((x, y, w, h, confidence) + classes )# nn.ModuleList类似于pytho中的list类型,只是将一系列层装入列表,并没有实现forward()方法,因此也不会有网络模型产生的副作用self.module_list = nn.ModuleList([nn.Sequential(i) for i in layer_list])self.yolo_layer_index = get_yolo_layer_index(self.module_list)if flag_yolo_structure:print('yolo_layer : ',len(layer_list),'\n')print(self.module_list[4])print(self.module_list[8])print(self.module_list[12])# print('self.module_list  -------->>> ',self.module_list)# print('self.yolo_layer_index  -------->>> ',self.yolo_layer_index)def forward(self, x):img_size = x.shape[-1]if flag_yolo_structure:print('forward img_size : ',img_size,x.shape)output = []x = self.module_list[0](x)x_route1 = xx = self.module_list[1](x)x_route2 = xx = self.module_list[2](x)yolo_head = self.module_list[3](x)if flag_yolo_structure:print('mask1 yolo_head : ',yolo_head.size())yolo_head_out_13x13 = self.module_list[4][0](yolo_head, img_size)output.append(yolo_head_out_13x13)x = self.module_list[5](x)x = torch.cat([x, x_route2], 1)x = self.module_list[6](x)yolo_head = self.module_list[7](x)if flag_yolo_structure:print('mask2 yolo_head : ',yolo_head.size())yolo_head_out_26x26 = self.module_list[8][0](yolo_head, img_size)output.append(yolo_head_out_26x26)x = self.module_list[9](x)x = torch.cat([x, x_route1], 1)x = self.module_list[10](x)yolo_head = self.module_list[11](x)if flag_yolo_structure:print('mask3 yolo_head : ',yolo_head.size())yolo_head_out_52x52 = self.module_list[12][0](yolo_head, img_size)output.append(yolo_head_out_52x52)if self.training:return outputelse:io, p = list(zip(*output))  # inference output, training outputreturn torch.cat(io, 1), pif __name__ == "__main__":dummy_input = torch.Tensor(5, 3, 416, 416)model = Yolov3(num_classes=80)params = list(model.parameters())k = 0for i in params:l = 1for j in i.size():l *= j# print("该层的结构: {}, 参数和: {}".format(str(list(i.size())), str(l)))k = k + lprint("----------------------")print("总参数数量和: " + str(k))print("-----------yolo layer")for index in model.yolo_layer_index:print(model.module_list[index])print("-----------train")model.train()for res in model(dummy_input):print("res:", np.shape(res))print("-----------eval")model.eval()inference_out, train_out = model(dummy_input)print("inference_out:", np.shape(inference_out))for o in train_out:print("train_out:", np.shape(o))
如果您喜欢我的分享,就点个赞👍+收藏,这也是我努力更新文章的动力!!!!!
