MVI框架搭建与使用
- 前言
- 正文
- 一、创建项目
- ① 配置AndroidManifest.xml
- ② 配置app的build.gradle
- 二、网络请求
- ① 生成数据类
- ② 接口类
- ③ 网络请求工具类
- 三、意图与状态
- ① 创建意图
- ② 创建状态
- 四、ViewModel
- ① 创建存储库
- ② 创建ViewModel
- ③ 创建ViewModel工厂
- 五、UI
- ① 列表适配器
- ② 数据渲染
- 六、源码
前言
有一段时间没有去写过框架了,最近新的框架MVI,其实出来有一段时间了,只不过大部分项目还没有切换过去,对于公司的老项目来说,之前的MVC、MVP也能用,没有替换的必要,而对于新建的项目来说还是可以替换成功MVVM、MVI等框架的。本文完成后的效果图:

正文
每当一个新的框架出来,都会解决掉上一个框架所存在的问题,但同时也会产生新的问题,瑕不掩瑜,可以在实际开发中,解决掉产生的问题,就能够更好的使用框架,那么MVI解决了MVVM的什么问题呢?
MVI同样是基于观察者模式,只不过数据通信方面是单向的,解决了MVVM双向通信所带来的问题,实际上MVVM也能做成单向通讯,但是这样就不是纯粹的MVVM,当然了,仁者见仁,智者见智。MVI框架适用于UI变化很多的项目,通过数据去驱动UI,MVI就是Model、View、Intent。
- Model 这里的Model有所不同,里面还包含UI的状态。
- View 还是视图,例如Activity、Fragment等。
- Intent 意图,这个和Activity的意图要区分开,我觉得说成是行为可能更妥当,表示去做什么。
多说无益,我们还是进入实操环节吧。
一、创建项目
首先创建一个名为MviDemo的项目
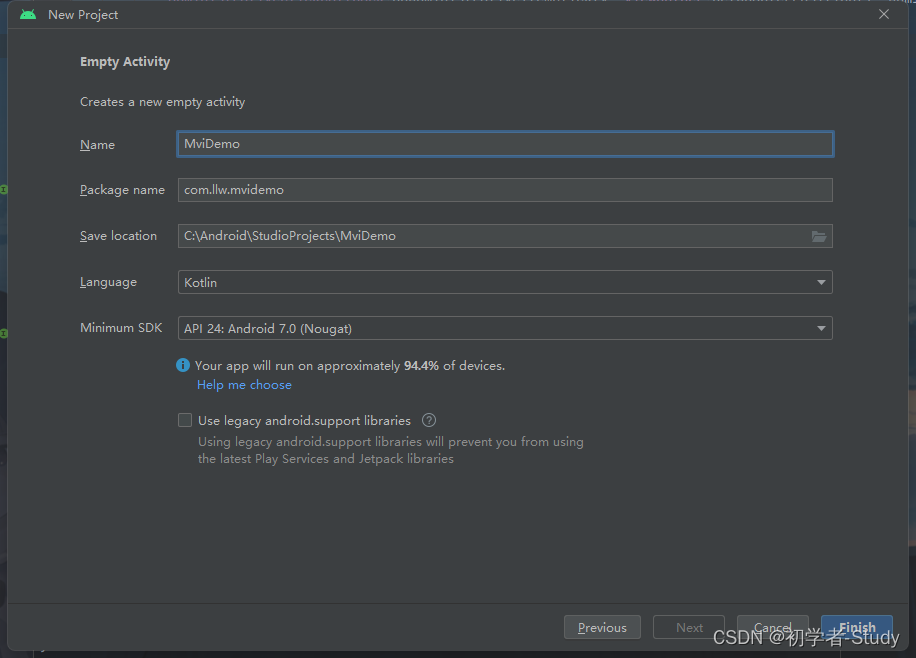
项目创建好了,下面我们需要先进行项目的基本配置。
① 配置AndroidManifest.xml
文章中会通过一个网络API接口,拿到数据来进行MVI框架的搭建与使用,接口地址如下:
http://service.picasso.adesk.com/v1/vertical/vertical?limit=30&skip=180&adult=false&first=0&order=hot
通过浏览器打开可以得到很多数据,如图所示:

这些数据都是JSON格式的,后面我们还会用到这些数据。因为接口使用的是http,而不是https,所以在xml文件夹下新建一个network_security_config.xml,代码如下:
<?xml version="1.0" encoding="utf-8"?>
<network-security-config><base-config cleartextTrafficPermitted="true" />
</network-security-config>
然后在AndroidManifest.xml中的application标签中配置它,如图所示:

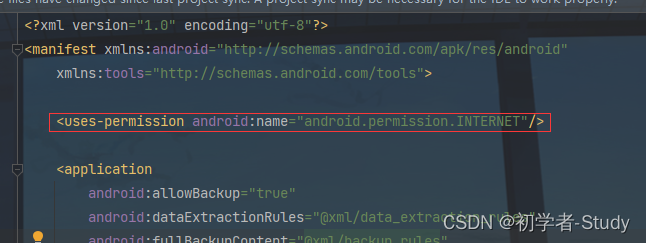
从Android 9.0起,默认使用https进行网络访问,如果要进行http访问则需要添加这个配置。还需要添加一个网络访问静态权限:
<uses-permission android:name="android.permission.INTERNET"/>
添加位置如下图所示:
项目正常搭建还需要一些依赖库和其他的一些设置,下面我们配置app模块下的build.gradle。
② 配置app的build.gradle
请注意,这里是配置app的build.gradle,而不是项目的build.gradle,很多人会配置错误,所以我再次强调一下,将你的项目切换到Android模式,如下图所示:

这里我标注了一下,你看到有两个build.gradle文件,两个文件的后面有灰色的文字说明,就很清楚的知道这两个build.gradle分别是项目和模块的。下面打开app模块下的build.gradle,在里面找到dependencies{}闭包,闭包中添加如下依赖:
// lifecycleimplementation 'androidx.lifecycle:lifecycle-viewmodel-ktx:2.4.1'implementation 'androidx.lifecycle:lifecycle-runtime-ktx:2.4.1'//glideimplementation 'com.github.bumptech.glide:glide:4.14.2'//retrofitimplementation 'com.squareup.retrofit2:retrofit:2.9.0'//retrofit moshiimplementation "com.squareup.retrofit2:converter-moshi:2.6.2"//moshi used KotlinJsonAdapterFactoryimplementation "com.squareup.moshi:moshi-kotlin:1.9.3"//Coroutineimplementation "org.jetbrains.kotlinx:kotlinx-coroutines-android:1.6.1"implementation "org.jetbrains.kotlinx:kotlinx-coroutines-core:1.6.1"
添加位置如下图所示:

然后再打开viewBinding,在android{}闭包下添加如下代码:
buildFeatures {viewBinding true}
添加位置如下图所示:

添加之后你会看到右上角有一个Sync Now,点击它进行依赖的载入配置,配置好之后进入下一步,为了确保你的项目没有问题,你可以现在运行一下看看。
二、网络请求
当我们使用Kotlin时,网络访问就变得更简单了,只需要Retrofit和协程即可,首先我们在com.llw.mvidemo包下新建一个data包,然后在data包下新建一个model包,model包下我们可以通过刚才使用网页访问API拿到的JSON数据来生成一个数据类。
① 生成数据类
生成数据类,这里我们可以使用一个插件,搜索JSON To Kotlin Class,如下图所示:
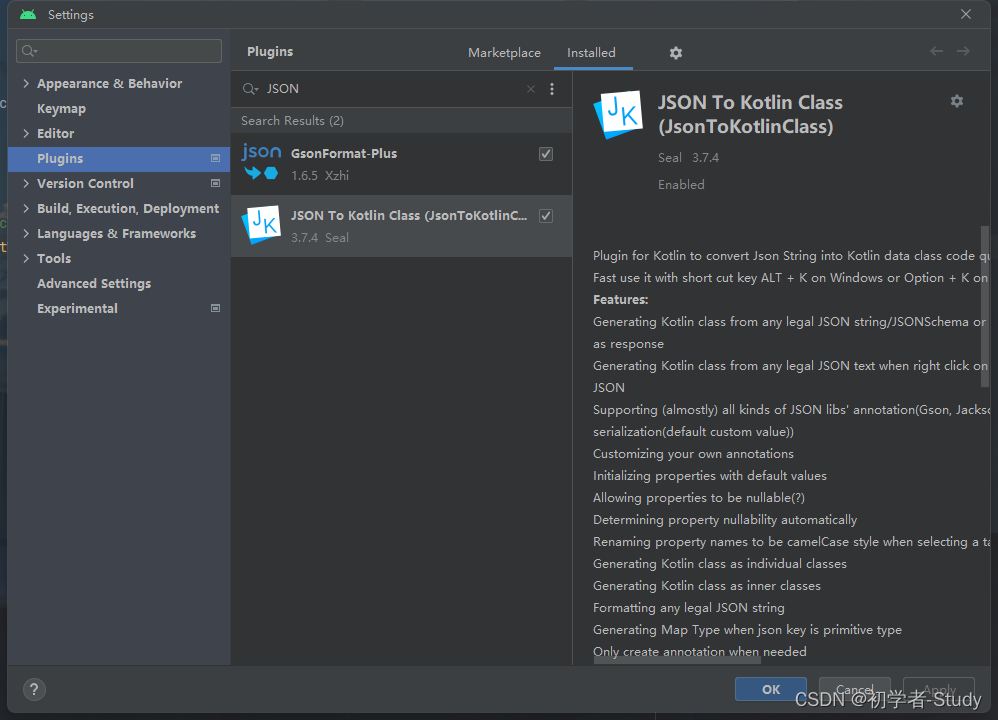
下载安装之后,如果需要重启,你就重启AS,重启之后,右键点击model → New → Kotlin data class File from JSON,如图所示:

在出现的弹窗中复制通过网页请求得到的JSON数据字符串,如图所示:
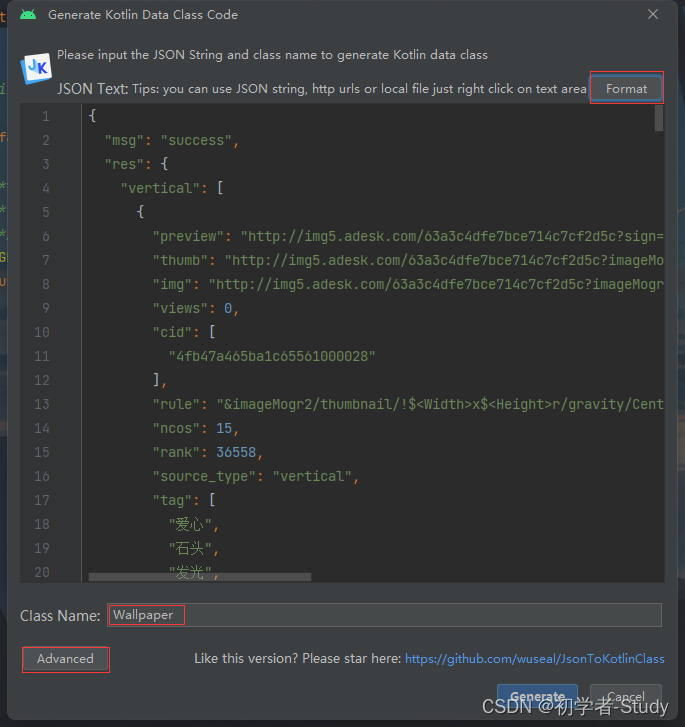
这里如果觉得看起来不舒服,点击 Format 进行JSON数据格式化,然后我们需要设置数据类的名称,这里输入Wallpaper,因为我们需要使用Moshi,将JSON数据直接转成数据类,所以这里我们点击Advanced,如图所示:

这里默认是None,选择MoShi(Reflect),其他的不用更改,点击OK,此弹窗关闭,回到之前的弹窗,然后点击 Generate 生成数据类,你会发现有三个数据类,分别是Wallpaper、Res和Vertical,我们看一下Wallpaper的代码:
package com.llw.mvidemo.data.modelimport com.squareup.moshi.Jsondata class Wallpaper(@Json(name = "code")val code: Int,@Json(name = "msg")val msg: String,@Json(name = "res")val res: Res
)
这里每一个字段上都有一个@Json注解,这里是MoShi依赖库的注解,主要检查一下导包的问题,这里还有一个小故事,Google 的Gson库,算是推出比较早的,从事Gson库的开发人员,后面离职去了Square,也就是OkHttp、Retrofit的开发者。Retrofit一开始是支持Gson转换的,后面增加了MoShi的转换,Moshi拥有出色的Kotlin支持以及编译时代码生成功能,可以使应用程序更快更小。这个故事我也是听说的,你可以自己去求证,下面继续。
② 接口类
现在数据类有了,那么我们就需要根据这个数据类来写一个接口类,在com.llw.mvidemo包下新建一个network包,network包下创建一个接口类ApiService,代码如下所示:
interface ApiService {/*** 获取壁纸*/@GET("v1/vertical/vertical?limit=30&skip=180&adult=false&first=0&order=hot")suspend fun getWallPaper(): Wallpaper
}
这里属于Retrofit的使用方式,增加了协程的使用而已,就取代了RxJava的线程调度。
③ 网络请求工具类
现在有接口,下面我们来做网络请求,在network包下新建一个NetworkUtils类,代码如下:
package com.llw.mvidemo.networkimport com.squareup.moshi.Moshi
import com.squareup.moshi.kotlin.reflect.KotlinJsonAdapterFactory
import retrofit2.Retrofit
import retrofit2.converter.moshi.MoshiConverterFactory/*** 网络工具类*/
object NetworkUtils {private const val BASE_URL = "http://service.picasso.adesk.com/"/*** 通过Moshi 将JSON转为为 Kotlin 的Data class*/private val moshi: Moshi = Moshi.Builder().add(KotlinJsonAdapterFactory()).build()/*** 构建Retrofit*/private fun getRetrofit() = Retrofit.Builder().baseUrl(BASE_URL).addConverterFactory(MoshiConverterFactory.create(moshi)).build()/*** 创建Api网络请求服务*/val apiService: ApiService = getRetrofit().create(ApiService::class.java)
}
由于担心你看的时候导错包,现在贴代码我会将导包的信息也贴出来,这样你总不会再导错包了吧。下面简单说明一下这个类,首先我定义了一个常量BASE_URL。作为网络接口请求的地址头,然后构建了MoShi,通过MoShi去进行JSON转Kotlin数据类的处理,之后就是构建Retrofit,将MoShi设置进去,最后就是通过Retrofit创建一个网络请求服务。
三、意图与状态
之前我们说MVI的I 是Intent,表示意图或行为,和ViewModel一样,我们在使用Intent的时候,也是一个Intent对应一个Activity/Fragment。
① 创建意图
在data包下创建一个intent包,intent包下新建一个MainIntent类,代码如下所示:
package com.llw.mvidemo.data.intent/*** 页面意图*/
sealed class MainIntent {/*** 获取壁纸*/object GetWallpaper : MainIntent()
}
这里只有一个GetWallpaper,表示获取壁纸的动作,你还可以添加其他的,例如保存图片、下载图片等,现在意图有了,下面来创建状态,一个意图有用多个状态。
② 创建状态
在data包下创建一个state包,state包下新建一个MainState类,代码如下:
package com.llw.mvidemo.data.stateimport com.llw.mvidemo.data.model.Wallpaper/*** 页面状态*/
sealed class MainState {/*** 空闲*/object Idle : MainState()/*** 加载*/object Loading : MainState()/*** 获取壁纸*/data class Wallpapers(val wallpaper: Wallpaper) : MainState()/*** 错误信息*/data class Error(val error: String) : MainState()
}
这里可以看到四个状态,获取壁纸属于其中的一个状态,通过状态可以去更改页面中的UI,后面我们会看到这一点,这里的状态你还可以再进行细分,例如每一个网络请求你可以增加一个请求中、请求成功、请求失败。
四、ViewModel
在MVI模式中,ViewModel的重要性又提高了,不过我们同样要添加Repository,作为数据存储库。
① 创建存储库
在data包下创建一个repository包,repository包下新建一个MainRepository类,代码如下:
package com.llw.mvidemo.data.repositoryimport com.llw.mvidemo.network.ApiService/*** 数据存储库*/
class MainRepository(private val apiService: ApiService) {/*** 获取壁纸*/suspend fun getWallPaper() = apiService.getWallPaper()
}
这里的代码就没什么好说的,下面我们写ViewModel,和MVVM模式中没什么两样的。
② 创建ViewModel
下面在com.llw.mvidemo包下新建一个ui包,ui包下新建一个adapter包,adapter包下新建一个MainViewModel类,代码如下:
package com.llw.mvidemo.ui.viewmodelimport androidx.lifecycle.ViewModel
import androidx.lifecycle.viewModelScope
import com.llw.mvidemo.data.repository.MainRepository
import com.llw.mvidemo.data.intent.MainIntent
import com.llw.mvidemo.data.state.MainState
import kotlinx.coroutines.channels.Channel
import kotlinx.coroutines.flow.MutableStateFlow
import kotlinx.coroutines.flow.StateFlow
import kotlinx.coroutines.flow.consumeAsFlow
import kotlinx.coroutines.launch/*** @link MainActivity*/
class MainViewModel(private val repository: MainRepository) : ViewModel() {//创建意图管道,容量无限大val mainIntentChannel = Channel<MainIntent>(Channel.UNLIMITED)//可变状态数据流private val _state = MutableStateFlow<MainState>(MainState.Idle)//可观察状态数据流val state: StateFlow<MainState> get() = _stateinit {viewModelScope.launch {//收集意图mainIntentChannel.consumeAsFlow().collect {when (it) {//发现意图为获取壁纸is MainIntent.GetWallpaper -> getWallpaper()}}}}/*** 获取壁纸*/private fun getWallpaper() {viewModelScope.launch {//修改状态为加载中_state.value = MainState.Loading//网络请求状态_state.value = try {//请求成功MainState.Wallpapers(repository.getWallPaper())} catch (e: Exception) {//请求失败MainState.Error(e.localizedMessage ?: "UnKnown Error")}}}
}
这里首先创建一个意图管道,然后是一个可变的状态数据流和一个不可变观察状态数据流,观察者模式。在初始化的时候就进行意图的收集,你可以理解为监听,当收集到目标意图MainIntent.GetWallpaper时就进行相应的意图处理,调用getWallpaper()函数,这里面修改可变的状态_state,而当_state发生变化,state就观察到了,就会进行相应的动作,这个通过是在View中进行,也就是Activity/Fragment中进行。这里对_state首先赋值为Loading,表示加载中,然后进行一个网络请求,结果就是成功或者失败,如果成功,则赋值Wallpapers,View中收集到这个状态后就可以进行页面数据的渲染了,请求失败,也要更改状态。
③ 创建ViewModel工厂
在viewmodel包下新建一个ViewModelFactory类,代码如下:
package com.llw.mvidemo.ui.viewmodelimport androidx.lifecycle.ViewModel
import androidx.lifecycle.ViewModelProvider
import com.llw.mvidemo.network.ApiService
import com.llw.mvidemo.data.repository.MainRepository/*** ViewModel工厂*/
class ViewModelFactory(private val apiService: ApiService) : ViewModelProvider.Factory {override fun <T : ViewModel> create(modelClass: Class<T>): T {// 判断 MainViewModel 是不是 modelClass 的父类或接口if (modelClass.isAssignableFrom(MainViewModel::class.java)) {return MainViewModel(MainRepository(apiService)) as T}throw IllegalArgumentException("UnKnown class")}
}
五、UI
前面我们写好基本的框架内容,下面来进行使用,简单来说,请求数据然后渲染出来,因为这里请求的是壁纸数据,所以我需要写一个适配器。
① 列表适配器
在创建适配器之前首先我们需要创建一个适配器所对应的item布局,在layout下新建一个item_wallpaper_rv.xml,代码如下图所示:
<?xml version="1.0" encoding="utf-8"?>
<com.google.android.material.imageview.ShapeableImageView xmlns:android="http://schemas.android.com/apk/res/android"xmlns:app="http://schemas.android.com/apk/res-auto"android:id="@+id/iv_wall_paper"android:layout_width="match_parent"android:layout_height="300dp"android:layout_margin="4dp"android:scaleType="centerCrop"app:shapeAppearanceOverlay="@style/roundedImageStyle" />
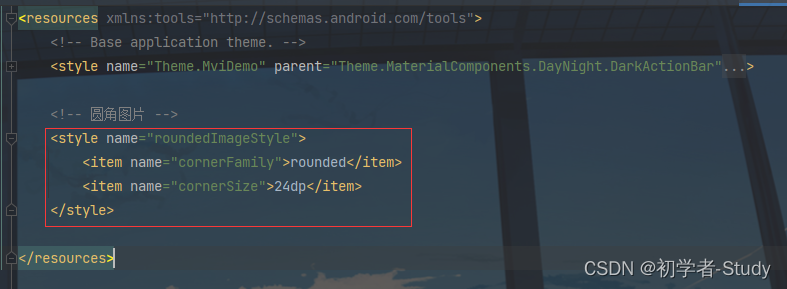
这里使用了ShapeableImageView,这个控件的优势就在于可以自己设置圆角,在themes.xml中添加如下代码:
<!-- 圆角图片 --><style name="roundedImageStyle"><item name="cornerFamily">rounded</item><item name="cornerSize">24dp</item></style>
添加位置如下图所示:
下面进行我们在ui包下新建一个adapter包,adapter包下新建一个WallpaperAdapter类,里面的代码如下所示:
package com.llw.mvidemo.ui.adapterimport android.view.LayoutInflater
import android.view.ViewGroup
import androidx.recyclerview.widget.RecyclerView
import com.bumptech.glide.Glide
import com.llw.mvidemo.data.model.Vertical
import com.llw.mvidemo.databinding.ItemWallpaperRvBinding/*** 壁纸适配器*/
class WallpaperAdapter(private val verticals: ArrayList<Vertical>) :RecyclerView.Adapter<WallpaperAdapter.ViewHolder>() {fun addData(data: List<Vertical>) {verticals.addAll(data)}class ViewHolder(itemWallPaperRvBinding: ItemWallpaperRvBinding) :RecyclerView.ViewHolder(itemWallPaperRvBinding.root) {var binding: ItemWallpaperRvBindinginit {binding = itemWallPaperRvBinding}}override fun onCreateViewHolder(parent: ViewGroup, viewType: Int) =ViewHolder(ItemWallpaperRvBinding.inflate(LayoutInflater.from(parent.context), parent, false))override fun getItemCount() = verticals.sizeoverride fun onBindViewHolder(holder: ViewHolder, position: Int) {//加载图片verticals[position].img.let {Glide.with(holder.itemView.context).load(it).into(holder.binding.ivWallPaper)}}
}
这里的代码相对比较简单,就不做说明了,属于适配器的基本操作了。
② 数据渲染
适配器写好之后,我们需要修改一下activity_main.xml中的内容,修改后代码如下所示:
<?xml version="1.0" encoding="utf-8"?>
<androidx.constraintlayout.widget.ConstraintLayout xmlns:android="http://schemas.android.com/apk/res/android"xmlns:app="http://schemas.android.com/apk/res-auto"xmlns:tools="http://schemas.android.com/tools"android:layout_width="match_parent"android:layout_height="match_parent"tools:context=".ui.MainActivity"><androidx.recyclerview.widget.RecyclerViewandroid:id="@+id/rv_wallpaper"android:layout_width="match_parent"android:layout_height="match_parent"android:paddingStart="2dp"android:paddingEnd="2dp"android:visibility="gone" /><ProgressBarandroid:id="@+id/pb_loading"android:layout_width="wrap_content"android:layout_height="wrap_content"android:visibility="gone"app:layout_constraintBottom_toBottomOf="parent"app:layout_constraintEnd_toEndOf="parent"app:layout_constraintStart_toStartOf="parent"app:layout_constraintTop_toTopOf="parent" /><Buttonandroid:id="@+id/btn_get_wallpaper"android:layout_width="wrap_content"android:layout_height="wrap_content"android:text="获取壁纸"app:layout_constraintBottom_toBottomOf="parent"app:layout_constraintEnd_toEndOf="parent"app:layout_constraintStart_toStartOf="parent"app:layout_constraintTop_toTopOf="parent" /></androidx.constraintlayout.widget.ConstraintLayout>
下面我们进入MainActivity,修改里面的代码如下所示:
package com.llw.mvidemo.uiimport androidx.appcompat.app.AppCompatActivity
import android.os.Bundle
import android.util.Log
import android.view.View
import android.widget.Toast
import androidx.lifecycle.ViewModelProvider
import androidx.lifecycle.lifecycleScope
import androidx.recyclerview.widget.GridLayoutManager
import com.llw.mvidemo.network.NetworkUtils
import com.llw.mvidemo.databinding.ActivityMainBinding
import com.llw.mvidemo.data.intent.MainIntent
import com.llw.mvidemo.data.state.MainState
import com.llw.mvidemo.ui.adapter.WallpaperAdapter
import com.llw.mvidemo.ui.viewmodel.MainViewModel
import com.llw.mvidemo.ui.viewmodel.ViewModelFactory
import kotlinx.coroutines.launchclass MainActivity : AppCompatActivity() {private lateinit var binding: ActivityMainBindingprivate lateinit var mainViewModel: MainViewModelprivate var wallPaperAdapter = WallpaperAdapter(arrayListOf())override fun onCreate(savedInstanceState: Bundle?) {super.onCreate(savedInstanceState)//使用ViewBindingbinding = ActivityMainBinding.inflate(layoutInflater)setContentView(binding.root)//绑定ViewModelmainViewModel = ViewModelProvider(this, ViewModelFactory(NetworkUtils.apiService))[MainViewModel::class.java]//初始化initView()//观察ViewModelobserveViewModel()}/*** 观察ViewModel*/private fun observeViewModel() {lifecycleScope.launch {//状态收集mainViewModel.state.collect {when(it) {is MainState.Idle -> {}is MainState.Loading -> {binding.btnGetWallpaper.visibility = View.GONEbinding.pbLoading.visibility = View.VISIBLE}is MainState.Wallpapers -> {     //数据返回binding.btnGetWallpaper.visibility = View.GONEbinding.pbLoading.visibility = View.GONEbinding.rvWallpaper.visibility = View.VISIBLEit.wallpaper.let { paper ->wallPaperAdapter.addData(paper.res.vertical)}wallPaperAdapter.notifyDataSetChanged()}is MainState.Error -> {binding.pbLoading.visibility = View.GONEbinding.btnGetWallpaper.visibility = View.VISIBLELog.d("TAG", "observeViewModel: $it.error")Toast.makeText(this@MainActivity, it.error, Toast.LENGTH_LONG).show()}}}}}/*** 初始化*/private fun initView() {//RV配置binding.rvWallpaper.apply {layoutManager = GridLayoutManager(this@MainActivity, 2)adapter  = wallPaperAdapter}//按钮点击binding.btnGetWallpaper.setOnClickListener {lifecycleScope.launch{//发送意图mainViewModel.mainIntentChannel.send(MainIntent.GetWallpaper)}}}
}
说明一下,首先声明变量并在onCreate()中进行初始化,这里绑定ViewModel采用的是ViewModelProvider(),而不是ViewModelProviders.of,这是因为这个API已经被移除了,在之前的版本中是过时弃用,在最新的版本中你都找不到这个API了,所以使用ViewModelProvider(),然后通过ViewModelFactory去创建对应的MainViewModel。
initView()函数中是控件的一些配置,比如给RecyclerView添加布局管理器和设置适配器,给按钮添加点击事件,在点击的时候发送意图,发送的意图被MainViewModel中mainIntentChannel收集到,然后执行网络请求操作,此时意图的状态为Loading。
observeViewModel()函数中是对状态的收集,在状态为Loading,隐藏按钮,显示加载条,然后网络请求会有结果,如果是成功,则在UI上隐藏按钮和加载条,显示列表控件,并添加数据到适配器中,然后刷新适配器,数据就会渲染出来;如果是失败则显示按钮,隐藏加载条,打印错误信息并提示一下。这样就完成了通过状态更新UI的环节,MVI的框架就是这样设计的。
页面UI(点击事件发送意图) → ViewModel收集意图(确定内容) →ViewModel更新状态(修改_state) → 页面观察ViewModel状态(收集state,执行相关的UI)
这是一个环,从UI页面出发,最终回到UI页面中进行数据渲染,我们看看效果。

六、源码
欢迎Star 或 Fork,山高水长,后会有期~
源码地址:MviDemo

