文章目录
- Advanced Slides 的使用
- 一、 概述
- 1、 简介
- 2、 特征
- 3、 第一个 PPT
- 二、 基础语法
- 1、 水平垂直幻灯片
- 2、 元素注释
- 3、 幻灯片注释
- 4、 块注解
- 5、 元素动画
- 6、 内联样式
- 7、 幻灯片背景样式
- 8、 演讲者模式
- 9、 列表动画
- 10、 画图支持
- 11、 图标
- 12、 表情包
- 13、 图表支持
- 14、 幻灯片动画
- 三、 布局
- 1、 拆分组件
- 2、 网格组件
- 2.1 基本语法
- 2.2 浮动
- 2.3 属性
- 2.3.1 背景
- 2.3.2 边框
- 2.3.3 动画
- 2.3.4 不透明度
- 2.3.5 过滤
- 2.3.6 旋转
- 2.3.7 填充
- 2.3.8 对齐
- 2.3.9 justify-content
- 2.3.10 元素动画
- 2.3.11 总结
- 四、 模板
- 1、 基础使用
- 2、 可选变量
- 3、 案例
- 3.1 模板文件
- 3.2 幻灯片
- 4、 默认模板
- 五、 配置选项
Advanced Slides 的使用
一、 概述
1、 简介
Advanced Slides 是 Obsidian 的开源插件,允许您在 Obsidian 中创建基于eveal.js的演示文稿。使用此工具,任何能够在 Obsidian 中创建笔记的人也可以创建漂亮的演示文稿。
其遵循以下理念convention over configuration,这意味着在大多数情况下,只需使用Obsidian Markdown 语法编写一个 Slide 就足够了。
官方文档位置:https://mszturc.github.io/obsidian-advanced-slides
2、 特征
- 编辑幻灯片时的实时预览
- 幻灯片的主题支持
- 嵌入支持 - 在幻灯片中包含其他 Markdown 文档 -
![[Note.md#FirstChapter]] - 图像支持
- 通过 Obsidian Synthax 包含图像 -
![[picture.jpg]] - 管道图像属性 - -
![[image.png|100x100]]
- 通过 Obsidian Synthax 包含图像 -
- 块支持 -
::: block - 脚注支持 -
Here's a footnote[^1] - 在 Markdown 中定义样式表 -
<style>....</style> - 通过 frontmatter 将选项传递给 Slide Compiler
- 注释元素
<!-- element class="red" --> - 支持内部链接
[[Note]]将在 Presentation 中呈现为普通文本- 带别名
[[Note|My Note]]
- Excalidraw 支持
- 流程图支持
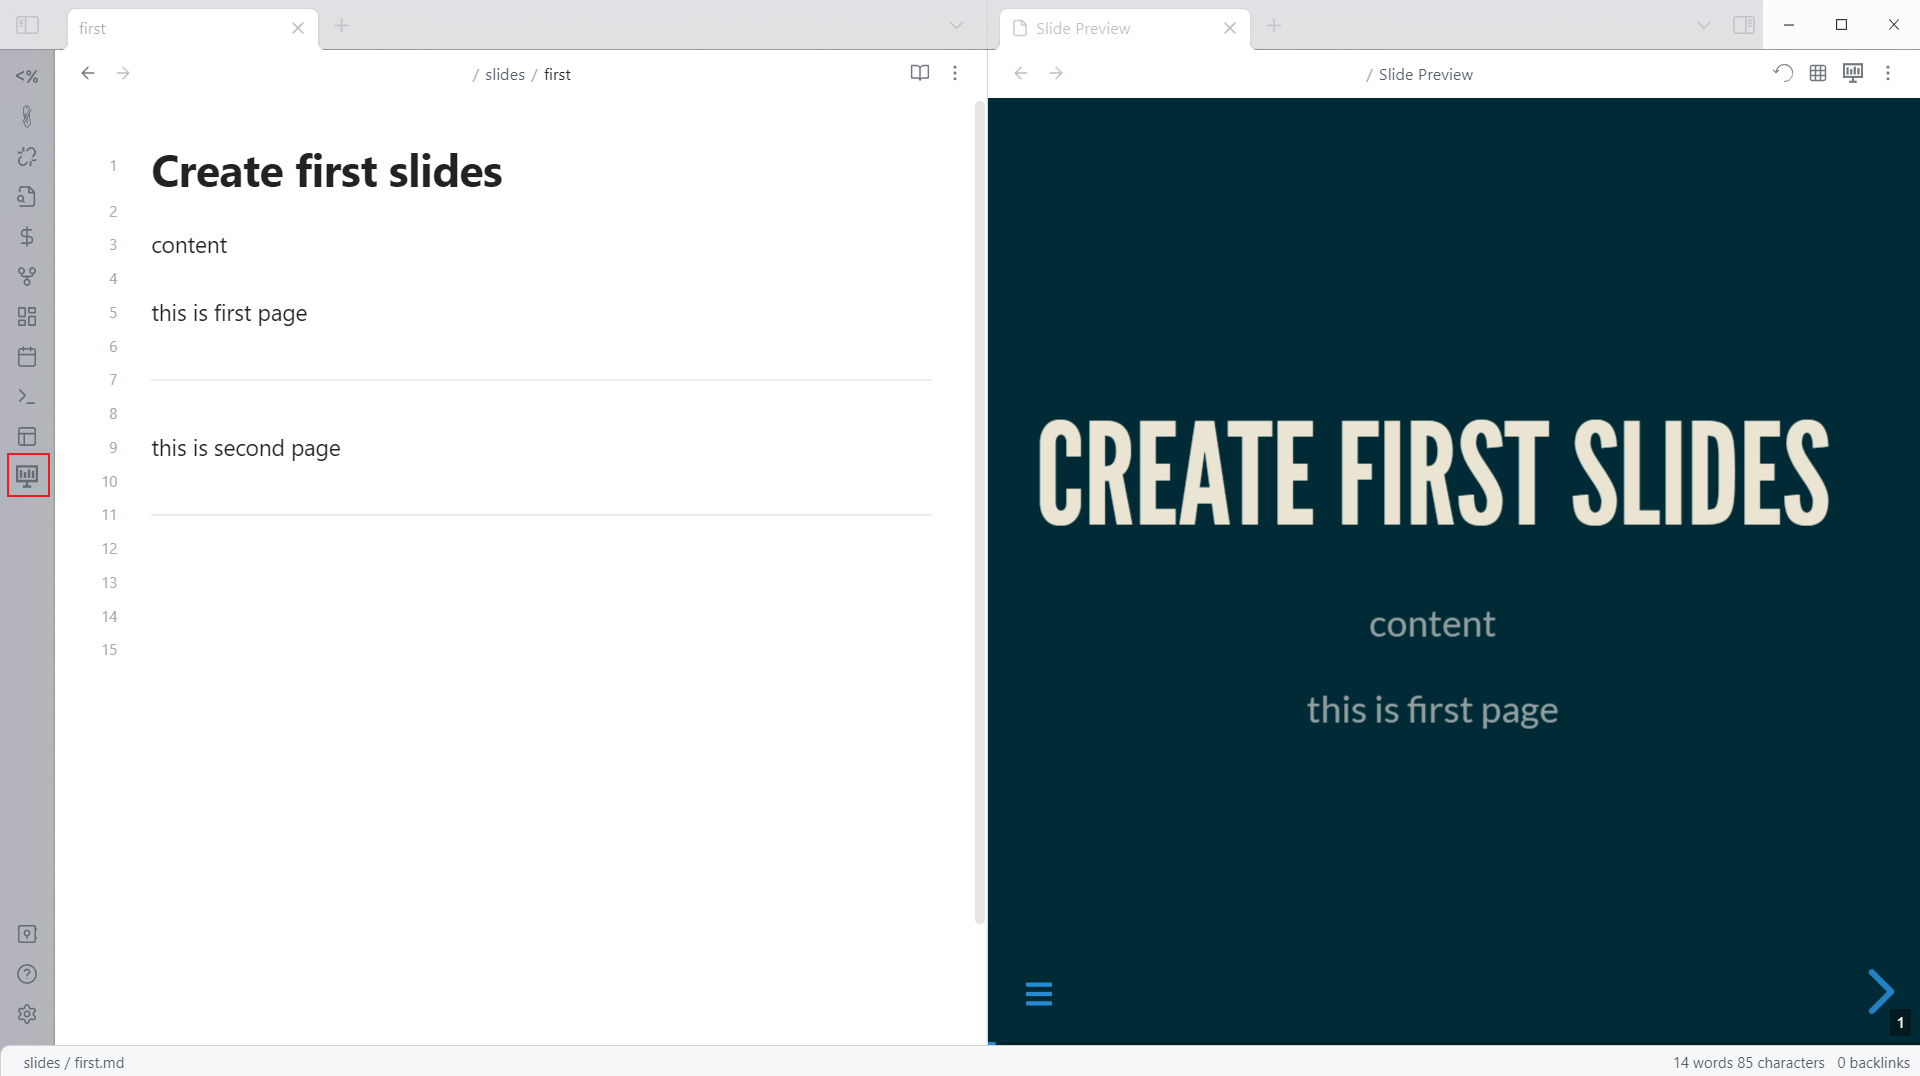
3、 第一个 PPT
官方示例演示文稿:https://liuzhongkun1.github.io/ppt/example/index.html
创建步骤:
- 创建幻灯片
![[外链图片转存失败,源站可能有防盗链机制,建议将图片保存下来直接上传(img-0rT0rqJf-1675683701530)(https://gitee.com/liuzhongkun1/img-store/raw/master/20232/1675669007_mytvrko36y.png1675669006256.png)]](https://img-blog.csdnimg.cn/img_convert/84efb73eff9523c8a97d8813d1ec3be1.png#pic_center)
-
打开实时预览

二、 基础语法
1、 水平垂直幻灯片
要创建水平幻灯片,请使用由两个空行包围的三个破折号。要创建垂直幻灯片,请使用两个空行包围的两个破折号:
# Slide 1---# Slide 2.1--# Slide 2.2
2、 元素注释
用来设置元素的样式
text with border <!-- element class="with-border" -->text with background <!-- element style="background:blue" -->text with attribute <!-- element data-toggle="modal" -->
3、 幻灯片注释
您可以通过注释为整个幻灯片传递样式或类属性:
<!-- .slide: style="background-color: coral;" --># Header with coral background colorParagraph has coral background color, too!---<!-- .slide: style="background-color: green;" -->- All Bullet points
- have green
- background color
4、 块注解
可以使用块注释对幻灯片的各个部分进行分组。通过对代码块进行注释,该代码块中的所有项目都将获得注释的属性:
::: block#### Header
_and_
Paragraph content
*in same block*:::---no color::: block <!-- element style="background-color: red;" -->everything inside this block has red background color::: block <!-- element style="background-color: blue;" -->blue:::red:::no color
5、 元素动画
用于突出显示或逐步显示幻灯片上的单个元素。在移动到下一张幻灯片之前,将逐步执行具有类片段的每个元素。默认片段样式是从不可见开始淡入。可以通过将不同的类附加到片段来更改此样式。
Fade in <!-- element class="fragment" -->Fade out <!-- element class="fragment fade-out" -->Highlight red <!-- element class="fragment highlight-red" -->Fade in, then out <!-- element class="fragment fade-in-then-out" -->Slide up while fading in <!-- element class="fragment fade-up" -->---- Permanent item
- Appear Fourth <!-- element class="fragment" data-fragment-index="4" -->
- Appear Third <!-- element class="fragment" data-fragment-index="3" -->
- Appear Second <!-- element class="fragment" data-fragment-index="2" -->
- Appear First <!-- element class="fragment" data-fragment-index="1" -->
常见的动画样式:https://revealjs.com/fragments/
6、 内联样式
你可以在你的标记中定义 css 样式:
-
通过使用<style>标签
<style>.with-border{border: 1px solid red;} </style>styled text <!-- element class="with-border" --> -
通过 CSS 文件包含它们
---
css: [css/layout.css,css/customFonts.css]
---
7、 幻灯片背景样式
你可以通过注释幻灯片来改变背景:
<!-- slide bg="aquamarine" -->
## Slide with text based background
---<!-- slide bg="#ff0000" -->
## Slide with hex based background---<!-- slide bg="rgb(70, 70, 255)" -->
## Slide with rgb based background---<!-- slide bg="hsla(315, 100%, 50%, 1)" -->
## Slide with hsl based background---# Slide without background---<!-- slide bg="https://picsum.photos/seed/picsum/800/600" -->
## Slide with image background---<!-- slide bg="[[image.jpg]]" -->
## Slide with image background #2---<!-- slide bg="https://picsum.photos/seed/picsum/800/600" data-background-opacity="0.5" -->
## with opacity0.5 ≙ 50% opacity---## More options:See [reveal backgrounds](https://revealjs.com/backgrounds/)
可以通过 fontmatter 添加内容来更改所有幻灯片的背景:
---
bg: red
bg: '#ff0000'
bg: rgb(70, 70, 255)
bg: transparent  <!--设置背景为透明样式-->
---
8、 演讲者模式
Advanced Slides 带有演讲者备注功能,可用于在演讲者视图中呈现每张幻灯片的备注。
要访问扬声器视图,您必须打开Slide Preview然后点击Open in Browser右上角的按钮。您的幻灯片将在您的默认网络浏览器中打开。按键盘上的 »S« 键打开备注窗口。
注释窗口还可以让您预览下一张幻灯片,因此即使您没有写任何注释,它也可能会有所帮助。
## My SlideThis is part of my Presentationnote: this is not! Only the speaker might see this text.- and this bulletpoint
- or this picture
9、 列表动画
基于片段概念的高级幻灯片引入了一个约定,自动将片段注释添加到有序和无序列表的项目符号点。通过使用 + 或 ) 作为列表的指示符,列表将自动显示为片段列表。
# Unordered list- First
- Second
- Third---# Fragmented unordered list- Permanent
+ First
+ Second
+ Third---# Ordered list1. First
2. Second
3. Third---# Fragmented ordered list1. Permanent
2) Second
3) Third
4) Fourth
10、 画图支持
需要在 Excalidraw 设置中激活 Auto-Export SVG/PNG。

#### Excalidraw support![[Sample.excalidraw|100]]![[Sample.excalidraw]] <!-- element style="width:300px; height:400px" -->
11、 图标
您可以使用以下标记将图标添加到幻灯片中:
<!-- .slide: bg="white"-->## Icons---<!-- .slide: bg="white"-->
### Basic Syntax<!-- .element: color="coral"-->Short Syntax<!-- .element: color="coral"-->HTML Synthax<i color="coral" class="fas fa-envelope fa-4x"/>ShortCode Synthax:fas_envelope:---# Sizing<i class="fas fa-camera fa-xs"></i>
<i class="fas fa-camera fa-sm"></i>
<i class="fas fa-camera fa-lg"></i>
<i class="fas fa-camera fa-2x"></i>
<i class="fas fa-camera fa-3x"></i>
<i class="fas fa-camera fa-5x"></i>
<i class="fas fa-camera fa-7x"></i>---# Rotating Icons<i class="fas fa-snowboarding"></i>
<i class="fas fa-snowboarding fa-rotate-90"></i>
<i class="fas fa-snowboarding fa-rotate-180"></i>
<i class="fas fa-snowboarding fa-rotate-270"></i>
<i class="fas fa-snowboarding fa-flip-horizontal"></i>
<i class="fas fa-snowboarding fa-flip-vertical"></i>
<i class="fas fa-snowboarding fa-flip-both"></i>---# Animating Icons<i class="fas fa-spinner fa-spin fa-3x"></i>
<i class="fas fa-circle-notch fa-spin fa-3x"></i>
<i class="fas fa-sync fa-spin fa-3x"></i>
<i class="fas fa-cog fa-spin fa-3x"></i>
<i class="fas fa-spinner fa-pulse fa-3x"></i>
<i class="fas fa-stroopwafel fa-spin fa-3x"></i>---#### Bordered + Pulled Icons<i class="fas fa-quote-left fa-2x fa-pull-left"></i>Gatsby believed in the green light, the orgastic future that year by year recedes before us.
It eluded us then, but that’s no matter — tomorrow we will run faster, stretch our arms further...
And one fine morning — So we beat on, boats against the current, borne back ceaselessly into the past.<!-- .element: style="font-size: 24px" align="justify" --><br><i class="fas fa-arrow-right fa-2x fa-pull-right fa-border"></i>Gatsby believed in the green light, the orgastic future that year by year recedes before us.
It eluded us then, but that’s no matter — tomorrow we will run faster, stretch our arms further...
And one fine morning — So we beat on.<!-- .element: style="font-size: 46px" align="justify" -->
支持的所有图标:https://fontawesome.com/v5/search
字体图标使用教程:https://fontawesome.com/v5/docs/web/reference-icons/
12、 表情包
你可以在幻灯片中使用表情包短代码:
:smile: => 😄
可以使用 Obsidian 的表情包插件来快速的查找表情包:obsidian-emoji-toolbar
13、 图表支持
Advanced Slides 允许使用Obsidian Charts插件语法或Reveal.js Charts语法添加图表。
目前不支持以下功能:
- 数据视图集成
- 表中的图表
Obsidian Charts:
```charttype: barlabels: [Monday,Tuesday,Wednesday,Thursday,Friday, Saturday, Sunday, "next Week", "next Month"]series:- title: Title 1data: [1,2,3,4,5,6,7,8,9]- title: Title 2data: [5,4,3,2,1,0,-1,-2,-3]
```
官方文档:https://charts.phibr0.de/chart%20types/
Reveal.js Charts:
<canvas data-chart="line" >
<!--
{"data": {"labels": ["January"," February"," March"," April"," May"," June"," July"],"datasets":[{"data":[65,59,80,81,56,55,40],"label":"My first dataset","backgroundColor":"rgba(20,220,220,.8)"},{"data":[28,48,40,19,86,27,90],"label":"My second dataset","backgroundColor":"rgba(220,120,120,.8)"}]}
}
-->
</canvas>
官方文档:https://github.com/rajgoel/reveal.js-plugins
14、 幻灯片动画
Advanced Slides 可以自动为幻灯片中的元素设置动画。您需要做的就是添加data-auto-animate到两个相邻的幻灯片注释和自动动画将为两者之间的所有匹配元素设置动画。
这是一个简单的示例,可以让您更好地了解如何使用它:
<!-- .slide: data-auto-animate -->
# Title---
<!-- .slide: data-auto-animate --># Title
##### **Subtitle**
###### *Author - 2022*
更多的动画教程:https://revealjs.com/auto-animate/
三、 布局
1、 拆分组件
通过使用<split>标签您可以按行和列拆分幻灯片的内容
-
通过设置 even 属性,拆分元素的内容被平均分配:
<split even>   </split> -
通过添加 gap 属性,每个元素之间将有一个间隙:
<split even gap="3">**Lorem Ipsum** is simply dummy text of the printing and typesetting industry. Lorem Ipsum has been the industry's standard dummy text ever since the 1500swhen an unknown printer took a galley of type and scrambled it to make a type specimen book. It has survived not only five centuries, but also the leapinto electronic typesetting, remaining essentially unchanged. It was popularised in the 1960s with the release of Letraset sheets containing Lorem
</split>
在此拆分中,每个元素之间有 3em 的间隙
-
如果你想按比例分割一张幻灯片,你可以用 left 和 right 属性来做到这一点。左右分别代表滑动栏的比例:
<split left="2" right="1" gap="2">**Lorem Ipsum** is simply dummy text of the printing and typesetting industry. Lorem Ipsum has been the industry's standard dummy text ever since the 1500s
when an unknown printer took a galley of type and scrambled it to make a type specimen book. It has survived not only five centuries, but also the leapinto electronic typesetting, remaining essentially unchanged. It was popularised in the 1960s with the release of Letraset sheets containing Lorem
</split>
在此拆分中,左侧元素的宽度是右侧元素宽度的两倍
-
通过添加一个 wrap 属性,您可以定义一个新行应该在多少个元素之后开始:
<split wrap="4">      </split>此拆分有 2 行。第一行有 4 张图片,第二行有 2 张。
-
通过不添加边距属性自动删除行和列之间的间隙:
-
<split no-margin>        </split>此拆分在行和列之间没有间隙。
2、 网格组件
2.1 基本语法
通过使用<grid>标签,您可以分部分布置幻灯片的内容。
网格布局拖放用于调整幻灯片内容的大小和位置。
- 拖动以调整幻灯片上一块内容的大小
- 放下该块以将该块放置在幻灯片上的任何位置。
基本语法:<grid drag="width height" drop="x y">
参数:
drag属性的宽度和高度值定义了内容显示区域的大小
drop属性的x和y值定义幻灯片上应插入内容的位置
按坐标定位:
可以在drop属性上为x和y设置正值和负值。每种情况下正负值的含义总结如下:
- 正 x 值表示相对于幻灯片左边缘的位置。
- 负 x 值表示相对于幻灯片右边缘的位置。
- 正 y 值表示相对于幻灯片上边缘的位置。
- 负 y 值表示相对于幻灯片底部边缘的位置。
<grid drag="60 55" drop="5 10" bg="red">
60 x 55
</grid><grid drag="25 55" drop="-5 10" bg="green">
25 x 55
</grid><grid drag="90 20" drop="5 -10" bg="gray">
90  x 20
</grid>
按名称定位:
为方便起见,已命名一些常见的网格位置。命名位置可以用来代替drop属性上的x和y坐标。当前定义了以下命名位置:
- center
- top
- bottom
- left
- right
- topleft
- topright
- bottomleft
- bottomright
<grid drag="40 30" drop="topleft" bg="red"> Top Left </grid><grid drop="right" bg="green"> Right with default size </grid><grid drag="80 30" drop="bottom" bg="coral"> Bottom </grid>默认情况下,假定值是基于幻灯片大小的百分比。将px附加到像素大小的值。
2.2 浮动
以下语法用于为网格定义自定义流:<grid drag="width height" drop="x y" flow="col | row">
使用col或row的值作为flow属性定义网格的布局行为。如果未指定 flow 属性,则网格会自动继承默认的col flow 行为。
什么时候使用flow="col"布局和间距行为发生在网格中:
-
孩子在网格内垂直呈现
-
每个孩子之间注入等量的空间
-
在网格的开始和结束处注入等量的空间
<grid  drag="40 100" drop="center" bg="coral" flow="col">
Heading
![[Image.jpg]]
**Lorem Ipsum** is simply dummy text
</grid>
什么时候使用flow=row布局和间距行为发生在网格中:
- 子项在网格内水平呈现。
- 每个孩子之间注入等量的空间
- 在网格的开始和结束处注入等量的空间
<grid  drag="100 40" drop="center" bg="coral" flow="row">
Left
![[Image.jpg]]
**Lorem Ipsum** is simply dummy text
</grid>
2.3 属性
2.3.1 背景
grid bg 属性用于为网格定义自定义背景。添加到网格的子项呈现在背景之上。
<grid drag="width height" drop="x y" bg="color">
示例:
<grid  drag="55 50" drop="topleft" bg="orange">
### Make
</grid>### Noise <!-- element drag="55 50" drop="bottomright" bg="rgb(0,0,0)"--><grid  drag="25 20" drop="center" bg="green" rotate="-15">
### some
</grid>
2.3.2 边框
网格边框属性用于为网格部分定义自定义边框。自定义边框有助于突出显示或区分幻灯片上的网格。
<grid drag="width height" drop="x y" border="width style color">
参数:
- width选项采用thin、medium、thick或像素值(例如10px )的值。
- style 选项采用dotted、solid、dashed、inset或outset的值。
- color选项采用任何有效的CSS Color Value。
<grid  drag="30 25" drop="left" border="thick dotted blue">
thick dotted blue
</grid><grid  drag="30 25" drop="center" border="4px solid white">
20px solid white
</grid>thick dotted blue <!-- element drag="30 25" drop="right" border="medium dashed red"-->
2.3.3 动画
网格动画属性用于定义网格部分的幻灯片动画。动画适用于网格和所有关联的子项。
<grid drag="width height" drop="x y" animate="type speed">
其中animate属性的类型选项可以采用以下动画类型之一:
- fadeIn
- fadeOut
- slideRightIn
- slideLeftIn
- slideUpIn
- slideDownIn
- slideRightOut
- slideLeftOut
- slideUpOut
- slideDownOut
- scaleUp
- scaleUpOut
- scaleDown
- scaleDownOut
速度选项是可选的。指定时,它接受较慢或较快的值。
2.3.4 不透明度
网格不透明度属性用于控制网格部分的透明度。调整部分的不透明度也会影响所有相关子项的不透明度。
<grid drag="width height" drop="x y" opacity="level">
其中opacity属性的level选项可以取0.0到1.0之间的任何值。不透明度值为 0.0 的网格部分是不可见的。
2.3.5 过滤
网格过滤器属性用于定义网格部分的过滤器效果。网格部分的滤镜效果也会影响所有关联的子项。
<grid drag="width height" drop="x y" filter="effect">
其中过滤器属性的效果选项可以采用以下类型之一:
- blur
- bright
- contrast
- grayscale
- hue
- invert
- saturate
- sepia
<grid  drag="50 50" drop="-12 -25" bg="white" filter="grayscale()">
![[Image.jpg]]
</grid>Text is too blurry <!-- element drag="30 25" drop="5 15" bg="#B565A7" filter="blur(10px)" -->
2.3.6 旋转
网格旋转属性用于控制网格部分的二维旋转。网格部分的旋转也会影响所有关联的子项。
<grid drag="width height" drop="x y" rotate="deg">
其中,rotate属性的deg选项是正值或负值表示从 0 到 360 度的旋转度数。
<grid  drag="30 25" drop="12 15" bg="#B565A7" rotate="-10">
Hello
</grid>World! <!-- element drag="40 25" drop="-12 -25" bg="#D65076" rotate="40" -->
2.3.7 填充
grid pad属性用于定义网格的自定义填充。自定义填充可以通过控制网格子项周围的空间来帮助增强内容的整体外观。
<grid drag="width height" drop="x y" pad="top right bottom left">
pad属性上的top、right、bottom和left选项都采用像素大小值。遵循标准的CSS 填充规则,这四个选项也可以只指定两个值甚至一个值,例如:
<grid  drag="50 50" drop="topleft" bg="orange" pad="0 50px">
###### Lorem Ipsum wasnt simply dummy text of the printing and typesetting industry. Lorem Ipsum has been the industry's standard dummy text ever since the 1500s, when an unknown printer took a galley of type and scrambled it to make a type specimen book here there
</grid><grid  drag="50 50" drop="bottomright" bg="orange" pad="20px">
![[Image.jpg|800]]
</grid>
此属性引入的填充不会增加网格本身的大小。相反,它减少了可用于在网格内渲染子项的区域的大小。
2.3.8 对齐
网格align属性用于定义网格部分的水平对齐方式。
<grid drag="width height" drop="x y" align="type">
其中align属性的类型选项可以采用以下类型之一:
- left
- right
- center (default)
- justify / block
- top
- bottom
- topleft
- topright
- bottomleft
- bottomright
- stretch
<grid drag="35 20" drop="topleft" align="left">
This text is aligned to the left side of the box
</grid><grid drag="35 20" drop="topright" align="right">
This text is aligned to the right side of the box
</grid><grid drag="36 20" drop="center" align="justify">
Stretches the text so that each line has equal width (like in newspapers and magazines)
</grid><grid drag="100 45" drop="top" flow="row" align="stretch">
![[Title-Wide.png]]
![[Title-Wide.png]]
![[Title-Wide.png]]
</grid><grid drag="100 55" drop="bottom" flow="col" align="stretch">
![[Title-Wide.png]]
![[Title-Wide.png]]
</grid>
2.3.9 justify-content
grid justify-content属性用于定义网格组件如何在其子组件之间和周围分配空间。
<grid drag="width height" drop="x y" justify-content="type">
其中justify-content属性的类型选项可以采用以下类型之一:
- start
- center
- space-between
- space-around
- space-evenly (default)
- end
<grid drag="30 100" drop="left" justify-content="center" bg="red">
Item 1Item 2Item 3Item 4
</grid><grid drag="30 100" drop="center" justify-content="space-between" bg="green">
Item 1Item 2Item 3Item 4
</grid><grid drag="30 100" drop="right" justify-content="space-around" bg="coral">
Item 1Item 2Item 3Item 4
</grid>
2.3.10 元素动画
grid frag 属性用于定义网格的片段。片段用于突出显示或逐步显示幻灯片上的单个元素。
<grid drag="width height" drop="x y" frag="index">
frag属性的index选项是一个正值表示片段显示的顺序。
<grid drag="60 55" drop="5 10" bg="red">
### Fragments:
+ Right
+ Bottom
</grid><grid drag="25 55" drop="-5 10" bg="green" frag="1">
Right Grid
</grid><grid drag="90 20" drop="5 -10" bg="gray" frag="2">
Bottom Grid
</grid>
正如您在示例中肯定看到的那样,您可以将 Fragment 和[Fragment List](#5、 元素动画)相互组合。默认情况下,片段列表生成从 1 开始的索引。
2.3.11 总结
- drag=“width height”
- drop=“x y | topleft | top | topright | left | center | right | bottomleft | bottom | bottomright”
- flow=“col | row”
- bg=“color name | #425232 | rgb(255, 99, 71) | hsl(0, 100%, 50%)”
- pad=“all sides | vertical horizontal | top right bottom left”
- align=“left | right | center | justify | block | top | bottom | topleft | topright | bottomleft | bottomright | stretch”
- border=“width style color”
- animate=“fadeIn | fadeOut | slideRightIn | slideLeftIn | slideUpIn | slideDownIn | slideRightOut | slideLeftOut | slideUpOut | slideDownOut | scaleUp | scaleUpOut | scaleDown | scaleDownOut | slower | faster”
- opacity=“0.1…1”
- rotate=“0…360”
- filter=“blur | bright | contrast | grayscale | hue | invert | saturate | sepia”
- frag=“1”
- style=“”
- class=“”
四、 模板
Advanced Slides 允许您根据幻灯片模板设计单独的幻灯片。每个幻灯片模板都可以有独特的布局和结构,您可以在整个演示文稿中重复使用。使用幻灯片模板可以轻松快速地创建在不同幻灯片中使用不同布局格式的演示文稿。此外,幻灯片模板减少了 md 演示文档中的冗余代码(又名样板代码)。
1、 基础使用
以下幻灯片模板定义了一个幻灯片结构,该结构具有主要内容区域和页脚。应命名为tpl-footer并且可以作为常规 md 笔记存储在您用于制作演示文稿的项目中的任何位置。
<% content %><grid drag="100 6" drop="bottom">
<% footer %>
</grid>
请注意,每个模板都必须包含
<% content %>变量*,即使它没有*在幻灯片内容中使用。
一旦我们创建了这个幻灯片模板,我们就可以通过以下方式制作幻灯片注释来在我们的演示文稿中引用它:
<!-- slide template="[[tpl-footer]]" --># This header will be part of the content section defined in the templateEverything define outside a block will be placed in the content section.
Therefore every template has to contain at least a content variable.To place a text into the footer section you have to create a block comment with the name of the variable you defined in the template.::: footer
#### This header will be placed in the footer section of the template
:::
2、 可选变量
默认情况下,幻灯片模板中的每个变量都必须由幻灯片中的块注释设置。否则,将在变量中放置一个虚拟文本,提醒您为此变量创建块注释。但是在某些情况下您不希望出现这种行为,例如当您在模板的页脚中有一个引文行,但您不需要引用任何引文。因此,您可以在模板中创建一个部分并?在其定义中添加一个:
<% content %><grid drag="100 6" drop="bottom">
<%? footer %>
</grid>
在您在幻灯片中创建页脚块注释之前,页脚标记将不可见。
3、 案例
3.1 模板文件
<grid drag="100 10" drop="top" bg="white" align="left" pad="0 20px"><% title %>
</grid><grid drag="28 75" drop="69 15" bg="white" style="border-radius:15px"/><grid drag="64 70" drop="3 15" align="topleft"><% left %></grid><grid drag="26 71" drop="70 17" align="topleft"><% right %></grid><% content %><style>
.horizontal_dotted_line{border-bottom: 2px dotted gray;
}
}
</style><grid drag="94 0" drop="3 -6" class="horizontal_dotted_line">
</grid><grid drag="100 30" drop="0 64" align="bottomleft" pad="0 30px" >
<%? source %>
</grid><grid drag="100 6" drop="bottom">
###### © 2022 Advanced Slides<!-- element style="font-weight:300" -->
</grid>
3.2 幻灯片
---
theme: consult
height: 540
margin: 0
maxScale: 4
---
<!-- slide template="[[tpl-con-2-1-box]]" -->::: title
### _**This is the Title of this Slide**_
:::::: left
![[Image.jpg|1500]]
:::<style>
.small-indent > ul { padding-left: 1em;
}
</style>::: right
**Header #1**
- Lorem ipsum dolor sit amet, consectetuer adipiscing elit.
- tium. Integer tincidunt. Cras dapibus. Vivamus elementum semper nisi. Aenean vulputate eleifend tellus. Aenean leo ligula, porttitor eu, consequa
- augue. Curabitur ullamcorper ultricies nisi. Nam eget dui. Etiam rhoncus. Maecenas tempus, tellus eget condimentum rhoncus, sem quam semper libero, sit a
- Nam quam nunc
Umsetzungsschritte
**Header #2**
- Curabitur
- condimentum
- Maecenas
**Header #3**
- justo
- rhoncus
- semper:::<!-- element align="left" style="font-size: 13px;" class="small-indent" -->::: source
###### Source: Copied from Lorem ipsum dolor Generator
:::
4、 默认模板
您可以定义一个默认模板,通过添加defaultTemplate您的 yaml 的 frontmatter 属性:
---
defaultTemplate: "[[tpl-footer]]"
---
五、 配置选项
| Name | Description | Possible Values | Default Value |
|---|---|---|---|
| width | 设置演示文稿的宽度 | number | 960 |
| height | 设置演示文稿的宽度 | number | 700: |
| margin | 内容周围的空白区域 | number | 0.04: |
| minScale | 应用于内容的最小可能比例的界限 | number | 0.2 |
| maxScale | 应用于内容的最大可能规模的界限 | number | 2.0 |
| notesSeparator | 设置注释分隔符 | string | note: |
| separator | 设置幻灯片分隔符 | string | ^( ?| )—( ?| )$ |
| verticalSeparator | 设置垂直滑动分隔符 | string | ^( ?| )–( ?| )$ |
| enableLinks | 在幻灯片中启用反向链接 | true / false | false |
| theme | 设置主题 | see theme docs | black |
| highlightTheme | 设置高亮主题 | see theme docs | zenburn |
| css | 添加更多的 css 文件 | [] | |
| enableOverview | 在幻灯片的右下角显示概览按钮 | true / false | false |
| enableChalkboard | 为幻灯片激活黑板 | true / false | false |
| controls | 显示演示控制箭头 | true / false | true |
| controlsLayout | 确定控件出现的位置 | edges / bottom-right | bottom-right |
| progress | 显示演示进度条 | true / false | true |
| slideNumber | 显示当前幻灯片的页码 | see reveal.js docs | false |
| overview | 启用幻灯片概览模式 | true / false | true |
| center | 幻灯片的垂直居中 | true / false | true |
| loop | 循环演示 | true / false | false |
| rtl | 将呈现方向更改为 RTL | true / false | false |
| shuffle | 每次加载演示文稿时随机化幻灯片的顺序 | true / false | false |
| fragments | 全局打开和关闭片段 | true / false | true |
| showNotes | 标记演讲者注释是否应该对所有观众可见 | true / false | false |
| autoSlide | 控制自动前进到下一张幻灯片 | number (in milliseconds) | 0 |
| transition | 过渡风格 | none / fade / slide / convex / concave / zoom | slide |
| transitionSpeed | 过渡速度 | default / fast / slow | default |
| bg | 为所有幻灯片设置默认背景 | see slide background docs | ‘#ffffff’ |
| markdown | 设置标记的选项 | (see note below) | (see note below) |
| enableTimeBar | 激活幻灯片的流逝计时器栏 | true / false | false |
| timeForPresentation | 以秒为单位设置流逝计时器的时间 | number | 120 |
| defaultTemplate | 设置将应用于所有幻灯片的模板 | see template docs | null |


