写在最前
如果这个项目让你有所收获,记得 Star 关注哦,这对我是非常不错的鼓励与支持。
源码地址:https://gitee.com/csps/mingyue
文档地址:https://gitee.com/csps/mingyue/wikis
新建 mingyue-gateway
在 【从零搭建微服务-注册中心(二)】中就建好了模块
核心依赖
<!-- SpringCloud Gateway,内置 webflux 依赖-->
<dependency><groupId>org.springframework.cloud</groupId><artifactId>spring-cloud-starter-gateway</artifactId>
</dependency><!-- LB 扩展 -->
<dependency><groupId>org.springframework.cloud</groupId><artifactId>spring-cloud-starter-loadbalancer</artifactId>
</dependency>
核心配置
保存到 application.yml 或 nacos 中都可以
spring:cloud:# 网关配置gateway:# 打印请求日志(自定义)requestLog: truediscovery:locator:enabled: trueroutes:# 认证中心- id: mingyue-authuri: lb://mingyue-authpredicates:- Path=/auth/**filters:- StripPrefix=1
测试网关
启动 mingyue-auth
直接调用登录接口: http://localhost:9000/oauth2/token
curl --location --request POST 'http://localhost:9000/oauth2/token?grant_type=password&client_id=1001&client_secret=aaaa-bbbb-cccc-dddd-eeee&username=sa&password=123456' \
--header 'User-Agent: Apifox/1.0.0 (https://www.apifox.cn)' \
--header 'Content-Type: application/json' \
--header 'Accept: */*' \
--header 'Host: localhost:9000' \
--header 'Connection: keep-alive'
返回结果:
{"code": 200,"msg": "ok","data": {"access_token": "xHJR3aIsYOZxZiCpbXzDjKMS32JfLV2m5jtme1gEsItvKR8ZiEZ3GUVkJBom","refresh_token": "O0SmM1Pb7MP18rE7Uz72MIY9uucCTBnAJ2CkWXCq4FeaTU7o8e0BPExfvQGX","expires_in": 7199,"refresh_expires_in": 2591999,"client_id": "1001","scope": "","openid": "gr_SwoIN0MC1ewxHX_vfCW3BothWDZMMtx__"}
}
启动 mingyue-gateway
间接调用(通过网关)登录接口:http://localhost:9100/auth/oauth2/token
curl --location --request POST 'http://localhost:9100/auth/oauth2/token?grant_type=password&client_id=1001&client_secret=aaaa-bbbb-cccc-dddd-eeee&username=sa&password=123456' \
--header 'User-Agent: Apifox/1.0.0 (https://www.apifox.cn)' \
--header 'Content-Type: application/json' \
--header 'Accept: */*' \
--header 'Host: localhost:9100' \
--header 'Connection: keep-alive' \
--header 'Cookie: Authorization=d7dc6f87-bf4a-4903-ad6c-2ac668f5e5a7'
返回结果:
{"code": 200,"msg": "ok","data": {"access_token": "PRMy2RJXTA8SAtHChWLXYRHfANQiOeFPxyfilCdUnz8j0oZrnpXZqkkh06BB","refresh_token": "najLtYrf2SZhtsayHTKEeG5yVeZEmcgu7ePVf00C8QcX0uVjh8yw2SaH8INP","expires_in": 7199,"refresh_expires_in": 2591999,"client_id": "1001","scope": "","openid": "gr_SwoIN0MC1ewxHX_vfCW3BothWDZMMtx__"}
}
改造 mingyue-ui
1.修改 vite.config.ts
http://localhost:9000 => http://localhost:9100
'/api': {target: 'http://localhost:9100/',ws: true,changeOrigin: true,rewrite: (path) => path.replace(/^\/api/, ''),
},
2.修改登录相关接口地址
src/api/login/index.ts
signIn: (data: object) => {let client_id = 1001;let grant_type = 'password';let client_secret = 'aaaa-bbbb-cccc-dddd-eeee';// TODO 规范入参类型let username = data.username;let password = data.password;return request({url: '/api/auth/oauth2/token',method: 'post',params: {grant_type, client_id, client_secret, username, password}});},
signOut: () => {let client_id = 1001;let client_secret = 'aaaa-bbbb-cccc-dddd-eeee';let access_token = Session.get('token');// 调用回收 Access-Token 接口return request({url: '/api/auth/oauth2/revoke',method: 'post',params: {client_id, client_secret, access_token}});}
3.启动测试
可以登录、登出即可~
小结
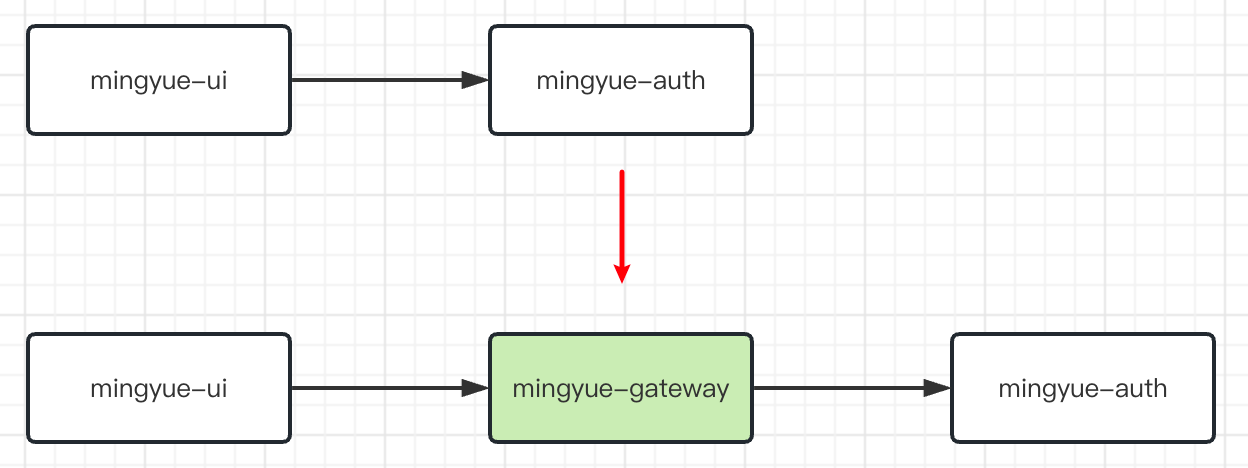
至此,我们已经完成了 mingyue-ui => mingyue-gateway => mingyue-auth,如下图流程所示:

接下来,我们我们开始编写 mingyue-system 用户相关模块,改造 mingyue-auth 用户查询走数据库。


