理论基础
在3D游戏中,我们通常可以通过鼠标或键盘操纵角色英雄在场景中移动,从不同的角度观察物体,这其实就是本章要介绍的摄像机漫游。
关于摄像机漫游其实就是围绕一个函数实现的(通过改变视点以及观察方向来实现),具体的函数为OpenGL中辅助函数库中的gluLookat(),通过设置相应的参数实现场景的漫游效果。函数如下:
void gluLookAt(GLdouble eyex,GLdouble eyey,GLdouble eyez,
GLdouble centerx,GLdouble centery,GLdouble centerz,
GLdouble upx,GLdouble upy,GLdouble upz);
该函数的9个参数定义了一个视图矩阵,并使用该矩阵与当前矩阵相乘。前三个参数(eyex,eyey,yeyz)定义了视点的位置,即观察者的位置(相当于我们人的眼睛);中间三个参数(centerx,centery,centerz)定义了摄像机瞄准的参考点,它决定了摄像机的朝向;最后三个参数(upx,upy,upz)定义了摄像机的向上向量,一般我们把它定义为(0, 1, 0)。
漫游过程实际上就是一个根据键盘或鼠标命令连续不断改变视点位置或视线方向并渲染场景的过程,这就好比我们通常所说的摄像机一样。关于摄像机的更多理论知识可以参考:
OpenGL–3D世界(视图变换,模型变换,投影变换,视口变换)
示例(vc++控制台项目)
- 主程序流程代码:
#include "stdafx.h"
#include<gl/glut.h>
#include<gl/glu.h>
#include<gl/gl.h>
#include <gl\GLAUX.h>#include "Camera.h"
#include "CBMPLoader.h"/** 定义光源的属性值 */
GLfloat LightAmbient[] = { 0.5f, 0.5f, 0.5f, 1.0f };    /**< 环境光参数 */
GLfloat LightDiffuse[] = { 1.0f, 1.0f, 1.0f, 1.0f };    /**< 漫射光参数 */
GLfloat LightSpecular[] = { 1.0f, 1.0f, 1.0f, 1.0f };   /**< 镜面光参数 */
GLfloat LightPosition[] = { 0.0f, 0.0f, 2.0f, 1.0f };   /**< 光源位置 */Camera m_Camera;
CBMPLoader m_Texture;/** 加载位图纹理(木箱贴图) */
bool LoadTexture()
{if (!m_Texture.LoadBitmap("image.bmp"))                                         /**< 载入位图文件 */{MessageBox(NULL, (LPCWSTR)"loadTexture error", (LPCWSTR)"error", MB_OK);    /**< 如果载入失败则弹出对话框 */return false;}glGenTextures(1, &m_Texture.ID);                                                /**< 生成一个纹理对象名称 */glBindTexture(GL_TEXTURE_2D, m_Texture.ID);                                     /**< 创建纹理对象 *//** 控制滤波 */glTexParameteri(GL_TEXTURE_2D, GL_TEXTURE_MIN_FILTER, GL_LINEAR);glTexParameteri(GL_TEXTURE_2D, GL_TEXTURE_MAG_FILTER, GL_LINEAR);glTexParameteri(GL_TEXTURE_2D, GL_TEXTURE_WRAP_S, GL_REPEAT);glTexParameteri(GL_TEXTURE_2D, GL_TEXTURE_WRAP_T, GL_REPEAT);/** 创建纹理 */gluBuild2DMipmaps(GL_TEXTURE_2D, GL_RGB, m_Texture.imageWidth,m_Texture.imageHeight, GL_RGB, GL_UNSIGNED_BYTE,m_Texture.image);return true;
}/** 绘制网格地面 */
void DrawGrid()
{/** 获得场景中一些状态  */GLboolean  lp, tp;glGetBooleanv(GL_LIGHTING, &lp);glGetBooleanv(GL_TEXTURE_2D, &tp);/** 关闭纹理和光照 */glDisable(GL_TEXTURE_2D);glDisable(GL_LIGHTING);/** 绘制过程 */glPushAttrib(GL_CURRENT_BIT);   /**< 保存当前属性 */glPushMatrix();                 /**< 压入堆栈 */glTranslatef(0.0f, 0.0f, 0.0f);glColor3f(0.0f, 0.0f, 1.0f);    /**< 设置颜色 *//** 在X,Z平面上绘制网格 */for (float i = -50; i <= 50; i += 1){/** 绘制线 */glBegin(GL_LINES);/** X轴方向 */glVertex3f(-50, 0, i);glVertex3f(50, 0, i);/** Z轴方向 */glVertex3f(i, 0, -50);glVertex3f(i, 0, 50);glEnd();}glPopMatrix();glPopAttrib();/** 恢复场景状态 */if (tp)glEnable(GL_TEXTURE_2D);if (lp)glEnable(GL_LIGHTING);
}/** 绘制球体 */
void DrawSphere()
{/** 设置材质属性 */GLfloat mat_ambient[] = { 0.9f, 0.5f, 0.8f, 1.0f };GLfloat mat_diffuse[] = { 0.9f, 0.5f, 0.8f, 1.0f };GLfloat mat_shininess[] = { 100.0f };glMaterialfv(GL_FRONT, GL_AMBIENT, mat_ambient);glMaterialfv(GL_FRONT, GL_DIFFUSE, mat_diffuse);glMaterialfv(GL_FRONT, GL_SHININESS, mat_shininess);/** 获得纹理启用状态 */GLboolean tp;glGetBooleanv(GL_TEXTURE_2D, &tp);glDisable(GL_TEXTURE_2D);                   /**< 关闭纹理 *//** 绘制过程 */glPushMatrix();glTranslatef(-5.0f, 2.0f, -10.0f);GLUquadricObj * sphere = gluNewQuadric();gluQuadricOrientation(sphere, GLU_OUTSIDE);gluQuadricNormals(sphere, GLU_SMOOTH);gluSphere(sphere, 2.0, 50, 50);gluDeleteQuadric(sphere);glPopMatrix();/** 恢复状态 */if (tp)glEnable(GL_TEXTURE_2D);
}/** 绘制木箱 */
void DrawBox()
{/** 设置材质属性 */GLfloat mat_ambient[] = { 0.8f, 0.8f, 0.8f, 1.0f };GLfloat mat_diffuse[] = { 0.8f, 0.8f, 0.8f, 1.0f };glMaterialfv(GL_FRONT, GL_AMBIENT, mat_ambient);glMaterialfv(GL_FRONT, GL_DIFFUSE, mat_diffuse);glPushMatrix();glTranslatef(5.0f, 2.0f, -10.0f);glScalef(2.0f, 2.0f, 2.0f);/** 选择纹理 */glBindTexture(GL_TEXTURE_2D, m_Texture.ID);/** 开始绘制四边形 */glBegin(GL_QUADS);/// 前侧面glNormal3f(0.0f, 0.0f, 1.0f);                               /**< 指定法线指向观察者 */glTexCoord2f(0.0f, 0.0f); glVertex3f(-1.0f, -1.0f, 1.0f);glTexCoord2f(1.0f, 0.0f); glVertex3f(1.0f, -1.0f, 1.0f);glTexCoord2f(1.0f, 1.0f); glVertex3f(1.0f, 1.0f, 1.0f);glTexCoord2f(0.0f, 1.0f); glVertex3f(-1.0f, 1.0f, 1.0f);/// 后侧面glNormal3f(0.0f, 0.0f, -1.0f);                              /**< 指定法线背向观察者 */glTexCoord2f(1.0f, 0.0f); glVertex3f(-1.0f, -1.0f, -1.0f);glTexCoord2f(1.0f, 1.0f); glVertex3f(-1.0f, 1.0f, -1.0f);glTexCoord2f(0.0f, 1.0f); glVertex3f(1.0f, 1.0f, -1.0f);glTexCoord2f(0.0f, 0.0f); glVertex3f(1.0f, -1.0f, -1.0f);/// 顶面glNormal3f(0.0f, 1.0f, 0.0f);                               /**< 指定法线向上 */glTexCoord2f(0.0f, 1.0f); glVertex3f(-1.0f, 1.0f, -1.0f);glTexCoord2f(0.0f, 0.0f); glVertex3f(-1.0f, 1.0f, 1.0f);glTexCoord2f(1.0f, 0.0f); glVertex3f(1.0f, 1.0f, 1.0f);glTexCoord2f(1.0f, 1.0f); glVertex3f(1.0f, 1.0f, -1.0f);/// 底面glNormal3f(0.0f, -1.0f, 0.0f);                              /**< 指定法线朝下 */glTexCoord2f(1.0f, 1.0f); glVertex3f(-1.0f, -1.0f, -1.0f);glTexCoord2f(0.0f, 1.0f); glVertex3f(1.0f, -1.0f, -1.0f);glTexCoord2f(0.0f, 0.0f); glVertex3f(1.0f, -1.0f, 1.0f);glTexCoord2f(1.0f, 0.0f); glVertex3f(-1.0f, -1.0f, 1.0f);/// 右侧面glNormal3f(1.0f, 0.0f, 0.0f);                               /**< 指定法线朝右 */glTexCoord2f(1.0f, 0.0f); glVertex3f(1.0f, -1.0f, -1.0f);glTexCoord2f(1.0f, 1.0f); glVertex3f(1.0f, 1.0f, -1.0f);glTexCoord2f(0.0f, 1.0f); glVertex3f(1.0f, 1.0f, 1.0f);glTexCoord2f(0.0f, 0.0f); glVertex3f(1.0f, -1.0f, 1.0f);/// 左侧面glNormal3f(-1.0f, 0.0f, 0.0f);                              /**< 指定法线朝左 */glTexCoord2f(0.0f, 0.0f); glVertex3f(-1.0f, -1.0f, -1.0f);glTexCoord2f(1.0f, 0.0f); glVertex3f(-1.0f, -1.0f, 1.0f);glTexCoord2f(1.0f, 1.0f); glVertex3f(-1.0f, 1.0f, 1.0f);glTexCoord2f(0.0f, 1.0f); glVertex3f(-1.0f, 1.0f, -1.0f);glEnd();glPopMatrix();
}void init(void)
{glClearColor(0.0f, 0.0f, 0.0f, 0.5f);glClearDepth(1.0f);glDepthFunc(GL_LEQUAL);glEnable(GL_DEPTH_TEST);glShadeModel(GL_SMOOTH);glHint(GL_PERSPECTIVE_CORRECTION_HINT, GL_NICEST);/** 设置光源的属性值 */glLightfv(GL_LIGHT1, GL_AMBIENT, LightAmbient);     /**< 设置环境光 */glLightfv(GL_LIGHT1, GL_DIFFUSE, LightDiffuse);     /**< 设置漫射光 */glLightfv(GL_LIGHT1, GL_SPECULAR, LightSpecular);   /**< 设置漫射光 *//** 启用光源和纹理 */glEnable(GL_LIGHTING);glEnable(GL_LIGHT1);glEnable(GL_TEXTURE_2D);/** 载入纹理 */if (!LoadTexture())MessageBox(NULL, (LPCWSTR)"载入纹理失败!", (LPCWSTR)"错误", MB_OK);/** 设置摄像机 */m_Camera.setCamera(0.0f, 1.5f, 6.0f, 0.0f, 1.5f, 0.0f, 0.0f, 1.0f, 0.0f);
}void display(void)
{/** 用户自定义的绘制过程 */glClear(GL_COLOR_BUFFER_BIT | GL_DEPTH_BUFFER_BIT);glLoadIdentity();/** 放置摄像机 */m_Camera.setLook();glLightfv(GL_LIGHT1, GL_POSITION, LightPosition);   /**< 设置光源位置 *//**< 绘制过程 */DrawGrid();DrawSphere();DrawBox();glFlush();
}void ChangeSize(int width, int height)
{glViewport(0, 0, width, height);                                    /**< 重新设置视口 */glMatrixMode(GL_PROJECTION);glLoadIdentity();gluPerspective(45.0f, (GLfloat)width / (GLfloat)height, 1.0f, 100.0f);glMatrixMode(GL_MODELVIEW);glLoadIdentity();
}void motion(int x, int y)
{m_Camera.setViewByMouse();glutPostRedisplay();
}void keyboard(unsigned char key, int x, int y)
{switch (key) {case 27:exit(0);break;case 49:m_Camera.setSpeed(0.2f);break;case 50:m_Camera.setSpeed(0.6f);break;case 119:m_Camera.moveCamera(m_Camera.getSpeed());break;case 115:m_Camera.moveCamera(-m_Camera.getSpeed());break;case 97:m_Camera.yawCamera(-m_Camera.getSpeed());break;case 100:m_Camera.yawCamera(m_Camera.getSpeed());break;}glutPostRedisplay();printf("========%d", key);
}int main(int argc, char** argv)
{glutInit(&argc, argv);glutInitDisplayMode(GLUT_DEPTH | GLUT_RGB);glutInitWindowSize(800, 600);glutInitWindowPosition((GetSystemMetrics(SM_CXSCREEN) >> 1) - 400, (GetSystemMetrics(SM_CYSCREEN) >> 1) - 300);glutCreateWindow("摄像机漫游");init();glutReshapeFunc(ChangeSize);glutDisplayFunc(display);glutMotionFunc(motion);glutKeyboardFunc(keyboard);glutMainLoop();return 0;
}- 辅助类
1,向量类
#ifndef __VECTOR_H__
#define __VECTOR_H__#include <math.h>                            /**< 包含math头文件 *//** 向量类 */
class Vector3
{
public:/** 构造函数 */Vector3()  { x = 0.0; y = 0.0; z = 0.0; }Vector3( float xx, float yy, float zz){x = xx;y = yy;z = zz;}Vector3(const Vector3& vec){x = vec.x;y = vec.y;z = vec.z;}/** 成员函数 */inline float length();                       /**< 计算向量长度 */Vector3 normalize();                         /**< 单位化向量 */float dotProduct(const Vector3& v);          /**< 计算点积 */Vector3 crossProduct(const Vector3& v);      /**< 计算叉积 *//** 重载操作符 */Vector3 operator + (const Vector3& v);Vector3 operator - (const Vector3& v);Vector3 operator * (float scale);Vector3 operator / (float scale);Vector3 operator - ();public:float x,y,z;};#endif //__VECTOR_H__
#include "stdafx.h"
#include "Vector.h"                       /**< 包含头文件 *//** 计算向量的长度 */
inline float Vector3::length()
{return (float)( x * x + y * y + z * z );
}/** 单位化一向量 */
Vector3 Vector3::normalize()
{float len = length();                  /**< 计算向量长度 */if( len == 0 )len = 1;x = x / len;y = y / len;z = z / len;return *this;
}/** 点积 */float Vector3::dotProduct(const Vector3& v)
{return ( x * v.x + y * v.y + z * v.z );
}/** 叉积 */
Vector3 Vector3::crossProduct(const Vector3& v)
{Vector3 vec;vec.x = y * v.z - z * v.y;vec.y = z * v.x - x * v.z;vec.z = x * v.y - y * v.x;return vec;
}/** 操作符 + */Vector3 Vector3::operator +(const Vector3& v)
{Vector3 vec;vec.x = x + v.x;vec.y = y + v.y;vec.z = z + v.z;return vec;
}/** 操作符 - */Vector3 Vector3::operator -(const Vector3& v)
{Vector3 vec;vec.x = x - v.x;vec.y = y - v.y;vec.z = z - v.z;return vec;
}/** 操作符 * */Vector3 Vector3::operator *(float scale)
{x = x * scale;y = y * scale;z = z * scale;return *this;
}/** 操作符 / */Vector3 Vector3::operator /(float scale)
{if(scale != 0.0){   x = x / scale;y = y / scale;z = z / scale;}return *this;
}/** 负号 */Vector3 Vector3::operator -()
{Vector3 vec( - x,- y, - z);return vec;
}
2,摄像机类
#ifndef __CAMERA_H__
#define __CAMERA_H__#include <windows.h>
#include<gl/glu.h>                     /**< 包含gl头文件 */
#include "Vector.h"                 /**< 包含向量类头文件 *//** 摄像机类 */
class Camera
{
public:/** 构造函数和析构函数 */Camera();~Camera();/** 获得摄像机状态方法 */Vector3 getPosition()   {   return m_Position;      }Vector3 getView()       {   return m_View;          }Vector3 getUpVector()   {   return m_UpVector;      }float   getSpeed()      {   return m_Speed;         }/** 设置速度 */void    setSpeed(float speed){ m_Speed  = speed;}/** 设置摄像机的位置, 观察点和向上向量 */void setCamera(float positionX, float positionY, float positionZ,float viewX,     float viewY,     float viewZ,float upVectorX, float upVectorY, float upVectorZ);/** 旋转摄像机方向 */void rotateView(float angle, float X, float Y, float Z);/** 根据鼠标设置摄像机观察方向 */void setViewByMouse(); /** 左右摄像机移动 */void yawCamera(float speed);/** 前后移动摄像机 */void moveCamera(float speed);/** 放置摄像机 */void setLook();private:/** 摄像机属性 */Vector3        m_Position;      /**< 位置 */Vector3        m_View;          /**< 朝向 */Vector3        m_UpVector;      /**< 向上向量 */float          m_Speed;         /**< 速度 */};#endif //__CAMERA_H__
#include "stdafx.h"
#include "Camera.h"                    /**< 包含摄像机头文件 *//** 构造函数 */
Camera::Camera()
{/** 初始化向量值 */Vector3 zero = Vector3(0.0, 0.0, 0.0);      Vector3 view = Vector3(0.0, 1.0, 0.5);      Vector3 up   = Vector3(0.0, 0.0, 1.0);      /** 初始化摄像机 */m_Position  = zero;                 m_View      = view;             m_UpVector  = up;   m_Speed     = 0.2f;}Camera::~Camera()
{
}/** 设置摄像机的位置,朝向和向上向量 */
void Camera::setCamera( float positionX, float positionY, float positionZ,float viewX,     float viewY,     float viewZ,float upVectorX, float upVectorY, float upVectorZ)
{/** 构造向量 */Vector3 Position    = Vector3(positionX, positionY, positionZ);Vector3 View        = Vector3(viewX, viewY, viewZ);Vector3 UpVector    = Vector3(upVectorX, upVectorY, upVectorZ);/** 设置摄像机 */m_Position = Position;  m_View     = View;          m_UpVector = UpVector;
}/**  旋转摄像机方向  */
void Camera::rotateView(float angle, float x, float y, float z)
{Vector3 newView;/** 计算方向向量 */Vector3 view = m_View - m_Position;     /** 计算 sin 和cos值 */float cosTheta = (float)cos(angle);float sinTheta = (float)sin(angle);/** 计算旋转向量的x值 */newView.x  = (cosTheta + (1 - cosTheta) * x * x)        * view.x;newView.x += ((1 - cosTheta) * x * y - z * sinTheta)    * view.y;newView.x += ((1 - cosTheta) * x * z + y * sinTheta)    * view.z;/** 计算旋转向量的y值 */newView.y  = ((1 - cosTheta) * x * y + z * sinTheta)    * view.x;newView.y += (cosTheta + (1 - cosTheta) * y * y)        * view.y;newView.y += ((1 - cosTheta) * y * z - x * sinTheta)    * view.z;/** 计算旋转向量的z值 */newView.z  = ((1 - cosTheta) * x * z - y * sinTheta)    * view.x;newView.z += ((1 - cosTheta) * y * z + x * sinTheta)    * view.y;newView.z += (cosTheta + (1 - cosTheta) * z * z)        * view.z;/** 更新摄像机的方向 */m_View = m_Position + newView;
}/** 用鼠标旋转摄像机 */
void Camera::setViewByMouse()
{POINT mousePos;                                   /**< 保存当前鼠标位置 */int middleX = GetSystemMetrics(SM_CXSCREEN) >> 1; /**< 得到屏幕宽度的一半 */int middleY = GetSystemMetrics(SM_CYSCREEN) >> 1; /**< 得到屏幕高度的一半 */float angleY = 0.0f;                              /**< 摄像机左右旋转角度 */float angleZ = 0.0f;                              /**< 摄像机上下旋转角度 */                 static float currentRotX = 0.0f;/** 得到当前鼠标位置 */GetCursorPos(&mousePos);                        ShowCursor(TRUE);/** 如果鼠标没有移动,则不用更新 */if( (mousePos.x == middleX) && (mousePos.y == middleY) )return;/** 设置鼠标位置在屏幕中心 */SetCursorPos(middleX, middleY); /**< 得到鼠标移动方向 */angleY = (float)( (middleX - mousePos.x) ) / 1000.0f;       angleZ = (float)( (middleY - mousePos.y) ) / 1000.0f;       static float lastRotX = 0.0f;      /**< 用于保存旋转角度 */lastRotX = currentRotX; /** 跟踪摄像机上下旋转角度 */currentRotX += angleZ;/** 如果上下旋转弧度大于1.0,我们截取到1.0并旋转 */if(currentRotX > 1.0f)     {currentRotX = 1.0f;/** 根据保存的角度旋转方向 */if(lastRotX != 1.0f) {/** 通过叉积找到与旋转方向垂直的向量 */Vector3 vAxis = m_View - m_Position;vAxis = vAxis.crossProduct(m_UpVector);vAxis = vAxis.normalize();///旋转rotateView( 1.0f - lastRotX, vAxis.x, vAxis.y, vAxis.z);}}/** 如果旋转弧度小于-1.0,则也截取到-1.0并旋转 */else if(currentRotX < -1.0f){currentRotX = -1.0f;if(lastRotX != -1.0f){/** 通过叉积找到与旋转方向垂直的向量 */Vector3 vAxis = m_View - m_Position;vAxis = vAxis.crossProduct(m_UpVector);vAxis = vAxis.normalize();///旋转rotateView( -1.0f - lastRotX, vAxis.x, vAxis.y, vAxis.z);}}/** 否则就旋转angleZ度 */else {   /** 找到与旋转方向垂直向量 */Vector3 vAxis = m_View - m_Position;vAxis = vAxis.crossProduct(m_UpVector);vAxis = vAxis.normalize();///旋转rotateView(angleZ, vAxis.x, vAxis.y, vAxis.z);}/** 总是左右旋转摄像机 */rotateView(angleY, 0, 1, 0);
}/** 左右移动摄像机 */
void Camera::yawCamera(float speed)
{Vector3 yaw;Vector3 cross = m_View - m_Position;cross = cross.crossProduct(m_UpVector);// Normalize the strafe vectoryaw = cross.normalize();m_Position.x += yaw.x * speed;m_Position.z += yaw.z * speed;// Add the strafe vector to our viewm_View.x += yaw.x * speed;m_View.z += yaw.z * speed;
}/** 前后移动摄像机 */
void Camera::moveCamera(float speed)
{/** 计算方向向量 */Vector3 vector = m_View - m_Position;vector = vector.normalize();         /**< 单位化 *//** 更新摄像机 */m_Position.x += vector.x * speed;    /**< 根据速度更新位置 */m_Position.z += vector.z * speed;       m_View.x += vector.x * speed;        /**< 根据速度更新方向 */   m_View.z += vector.z * speed;
}/** 设置视点 */
void Camera::setLook()
{/** 设置视口 */gluLookAt(m_Position.x, m_Position.y, m_Position.z, m_View.x,  m_View.y,     m_View.z,    m_UpVector.x, m_UpVector.y, m_UpVector.z);
}
3,bmp纹理加载类
#ifndef __CBMPLOADER_H__
#define __CBMPLOADER_H__#include<windows.h>        /**< 包含windows.h文件 */#define BITMAP_ID 0x4D42    /**< 位图文件的标志 *//** 位图载入类 */
class CBMPLoader
{public:CBMPLoader();~CBMPLoader();bool LoadBitmap(char *filename); /**< 装载一个bmp文件 */void FreeImage();                /**< 释放图像数据 */unsigned int ID;                 /**< 生成纹理的ID号 */int imageWidth;                  /**< 图像宽度 */int imageHeight;                 /**< 图像高度 */unsigned char *image;            /**< 指向图像数据的指针 */
};#endif //__CBMPLOADER_H__
#include "stdafx.h"
#include"CBMPLoader.h"              /**< 包含头文件 *//** 构造函数 */
CBMPLoader::CBMPLoader()
{/** 初始化成员值为0 */image = 0;imageWidth = 0;imageHeight = 0;
}/** 析构函数 */
CBMPLoader::~CBMPLoader()
{FreeImage(); /**< 释放图像数据占据的内存 */
}/** 装载一个位图文件 */
bool CBMPLoader::LoadBitmap(char *file)
{FILE *pFile = 0; /**< 文件指针 *//** 创建位图文件信息和位图文件头结构 */BITMAPINFOHEADER bitmapInfoHeader;BITMAPFILEHEADER header;unsigned char textureColors = 0;/**< 用于将图像颜色从BGR变换到RGB *//** 打开文件,并检查错误 */pFile = fopen(file, "rb");if(pFile == 0) return false;/** 读入位图文件头信息 */ fread(&header, sizeof(BITMAPFILEHEADER), 1, pFile);/** 检查该文件是否为位图文件 */if(header.bfType != BITMAP_ID){fclose(pFile);             /**< 若不是位图文件,则关闭文件并返回 */return false;}/** 读入位图文件信息 */fread(&bitmapInfoHeader, sizeof(BITMAPINFOHEADER), 1, pFile);/** 保存图像的宽度和高度 */imageWidth = bitmapInfoHeader.biWidth;imageHeight = bitmapInfoHeader.biHeight;/** 确保读取数据的大小 */if(bitmapInfoHeader.biSizeImage == 0)bitmapInfoHeader.biSizeImage = bitmapInfoHeader.biWidth *bitmapInfoHeader.biHeight * 3;/** 将指针移到数据开始位置 */fseek(pFile, header.bfOffBits, SEEK_SET);/** 分配内存 */image = new unsigned char[bitmapInfoHeader.biSizeImage];/** 检查内存分配是否成功 */if(!image)                        /**< 若分配内存失败则返回 */{delete[] image;fclose(pFile);return false;}/** 读取图像数据 */fread(image, 1, bitmapInfoHeader.biSizeImage, pFile);/** 将图像颜色数据格式进行交换,由BGR转换为RGB */for(int index = 0; index < (int)bitmapInfoHeader.biSizeImage; index+=3){textureColors = image[index];image[index] = image[index + 2];image[index + 2] = textureColors;}fclose(pFile);       /**< 关闭文件 */return true;         /**< 成功返回 */
}/** 释放内存 */
void CBMPLoader::FreeImage()
{/** 释放分配的内存 */if(image){delete[] image;image = 0;}
}
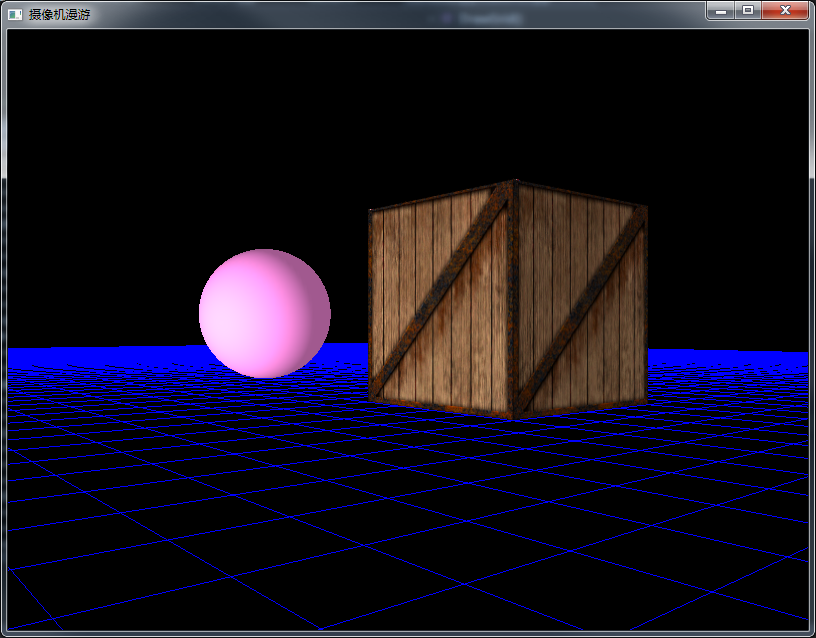
示例图:


