目录
1. 背景与问题
2.LoRA的原理
3. 源码解析
4. SD中LoRA应用
5. 资料
一、背景与问题
随着深度学习的发展,预训练大型模型在自然语言处理、计算机视觉和多模态等领域取得了显著的成功。这些模型通常包含数亿甚至数十亿的参数,如GPT系列模型、LLama、StableDiffusion和LLava等。尽管这些大型预训练模型具有强大的通用表示能力,但在特定任务上往往需要进行微调。然而,微调整个模型的参数在计算资源和存储需求上都非常高.
为了解决上述问题,研究者们提出了参数高效微调的方法,即在保持预训练模型大部分参数不变的情况下,只更新少量参数,以适应特定任务或数据。这些方法包括Dreambooth、Hypernetworks、LoRA等。LoRA(Low-Rank Adaptation)是其中一种高效且效果卓越的高效微调方法。
二、LoRA的原理
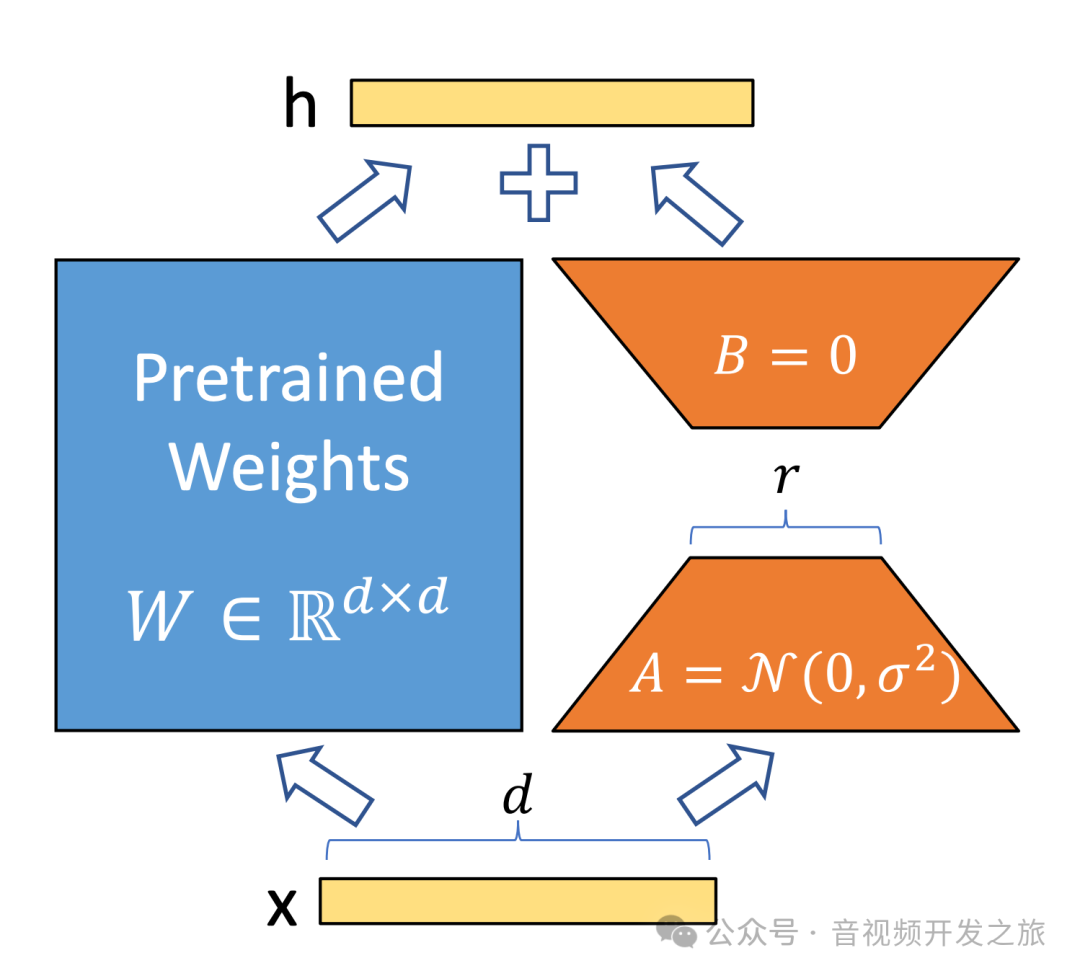
LoRA是由论文《LoRA: Low-Rank Adaptation Of Large Language Models》提出的一种用于大模型微调技术,该技术也适用于SD和多模态大模型的微调。它的核心思想:冻结预训练模型,在模型的特定层中引入低秩矩阵,对模型参数的高效微调,实现降低微调大型模型的计算和存储成本,同时保持或接近全参数微调的性能。

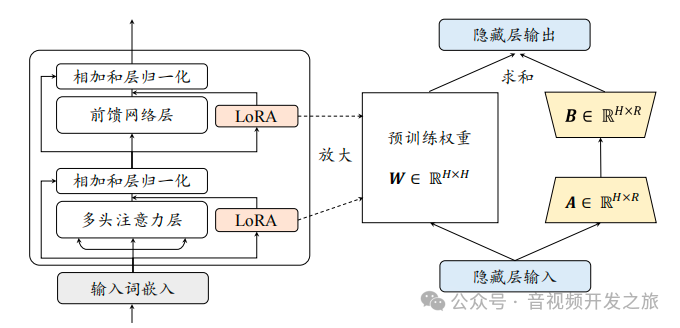
正如上图所示,左侧的预训练权重矩阵W为dxd的矩阵,右侧为LoRA将矩阵分解成两个更小的(低秩)矩阵A和B,其中A是dxr的矩阵,B是rxd的矩阵,r远远小于d,Lora通过将冻结预训练权重和微调少量参数相加 :W1 = W+ΔW = W+BA 实现降低成本同时保持效果的目标。
在LLM、SD和LLava等基于Transformer架构的模型中,主要的计算开销和参数量集中在全连接层和注意力机制中的投影矩阵。LoRA主要对这些权重矩阵进行低秩适应。

伪代码:
input_dim = 768 # 预训练模型hidden隐藏层维度output_dim = 768 #输出层维度rank = 8 # LoRA的秩r,即低秩矩阵的秩, 远小于input_dim和output_dimW = ... # 预训练网络的原始权重矩阵, 不参与微调(即被冻结),shpae为input_dim x output_dim#W_A和W_B是需要训练的LoRA权重,通过两个低秩矩阵相乘来近似权重的变化W_A = nn.Parameter(torch.empty(input_dim, rank)) # LoRA权重A,shape为 input_dim x rankW_B = nn.Parameter(torch.empty(rank, output_dim)) # LoRA权重B,shape为 rank x output_dim# 初始化Lora权重矩阵#其中W_A使用kaiming均匀分布进行初始化,以确保初始梯度的稳定性nn.init.kaiming_uniform_(W_A, a=math.sqrt(5))#W_B初始为零矩阵,以便在训练开始时,模型的输出主要由预训练的权重W决定,避免对预训练模型的干扰nn.init.zeros_(W_B)#定义常规的前向传播函数def regular_forward_matmul(x, W):h = x @ Wreturn h#定义使用Lora的前向传播函数def lora_forward_matmul(x, W, W_A, W_B):# 常规矩阵相乘,计算预训练模型的输出h = x @ W# 这是LoRA的核心, 在训练权重基础上添加使用LoRA权重,乘以缩放因子alpha,用于调整LoRA增量的影响程度h += x @ (W_A @ W_B)*alphareturn h在微调过程中,预训练模型的权重W保持不变,只更新W_A和W_B,原始权重矩阵W的参数量为input_dim * output_dim,而LoRA只需要训练(input_dim * r) + (r * output_dim)个参数,通常r远小于input_dim和output_dim, 减少需要训练的参数数量,降低计算和存储成本,同时保持或接近全参数微调的性能。
三、源码解析
以Diffusion源码中的train_text_to_image_lora.py(https://github.com/huggingface/diffusers/blob/main/examples/text_to_image/train_text_to_image_lora.py)来一起解读下LoRA训练的实现
1. 初始化:加速器,学习率 和加载预训练模型的噪声调度器(noise_scheduler)、分词器(tokenizer)、文本编码器(text_encoder)、自编码器(vae)以及UNet模型
2. 冻结预训练模型的unet、vae和text_encoder的参数,节省显存
3. Lora配置的参数:如 秩(rank)和初始化权重
4.添加LoRA适配器到UNet模型
5. 加载数据,进行训练,将图像编码为潜空间(Latent Space),添加噪声,获取文本嵌入(Text Embedding),使用模型预测噪声,计算Loss,进行反向传播不断更新模型权重
6.最后保存训练好的LoRA权重
def main():accelerator_project_config = ProjectConfiguration(project_dir=args.output_dir, logging_dir=logging_dir)accelerator = Accelerator(gradient_accumulation_steps=args.gradient_accumulation_steps,mixed_precision=args.mixed_precision,log_with=args.report_to,project_config=accelerator_project_config)#分别加载预训练的噪声调度器(noise_scheduler)、分词器(tokenizer)、文本编码器(text_encoder)、自编码器(vae)和UNet模型。noise_scheduler = DDPMScheduler.from_pretrained(args.pretrained_model_name_or_path, subfolder="scheduler")tokenizer = CLIPTokenizer.from_pretrained(args.pretrained_model_name_or_path, subfolder="tokenizer", revision=args.revision)text_encoder = CLIPTextModel.from_pretrained(args.pretrained_model_name_or_path, subfolder="text_encoder", revision=args.revision)vae = AutoencoderKL.from_pretrained(args.pretrained_model_name_or_path, subfolder="vae", revision=args.revision, variant=args.variant)unet = UNet2DConditionModel.from_pretrained(args.pretrained_model_name_or_path, subfolder="unet", revision=args.revision, variant=args.variant)weight_dtype = torch.float16#冻结预训练模型的unet、vae和text_encoder的参数,节省显存unet.requires_grad_(False)vae.requires_grad_(False)text_encoder.requires_grad_(False)for param in unet.parameters():param.requires_grad_(False)#Lora配置的参数:如 秩(rank)和初始化权重unet_lora_config = LoraConfig(r=args.rank, #rank:4lora_alpha=args.rank,init_lora_weights="gaussian",target_modules=["to_k", "to_q", "to_v", "to_out.0"],)#Move unet, vae and text_encoder to device and cast to weight_dtypeunet.to(accelerator.device, dtype=weight_dtype)vae.to(accelerator.device, dtype=weight_dtype)text_encoder.to(accelerator.device, dtype=weight_dtype)#添加LoRA适配器到UNet模型unet.add_adapter(unet_lora_config)if args.mixed_precision == "fp16":# only upcast trainable parameters (LoRA) into fp32cast_training_params(unet, dtype=torch.float32)lora_layers = filter(lambda p: p.requires_grad, unet.parameters())#数据加载data_files["train"] = os.path.join(args.train_data_dir, "**")dataset = load_dataset("imagefolder",data_files=data_files,cache_dir=args.cache_dir,)DATASET_NAME_MAPPING = {"lambdalabs/naruto-blip-captions": ("image", "text"),}#创建数据加载器,批量加载数据train_dataloader = torch.utils.data.DataLoader(train_dataset,shuffle=True,collate_fn=collate_fn,batch_size=args.train_batch_size,#train_batch_size:1num_workers=args.dataloader_num_workers,#dataloader_num_workers:8)# Prepare everything with our `accelerator`.unet, optimizer, train_dataloader, lr_scheduler = accelerator.prepare(unet, optimizer, train_dataloader, lr_scheduler)#循环训练#1. 将图像编码为潜在空间(Latent Space),添加噪声,获取文本嵌入(Text Embedding),使用模型预测噪声,计算Loss#2. 执行反向传播,更新模型权重for epoch in range(first_epoch, args.num_train_epochs):unet.train()train_loss = 0.0for step, batch in enumerate(train_dataloader):with accelerator.accumulate(unet):# Convert images to latent spacelatents = vae.encode(batch["pixel_values"].to(dtype=weight_dtype)).latent_dist.sample()latents = latents * vae.config.scaling_factor# Sample noise that we'll add to the latentsnoise = torch.randn_like(latents)bsz = latents.shape[0]# Sample a random timestep for each imagetimesteps = torch.randint(0, noise_scheduler.config.num_train_timesteps, (bsz,), device=latents.device)timesteps = timesteps.long()# Add noise to the latents according to the noise magnitude at each timestep# (this is the forward diffusion process)noisy_latents = noise_scheduler.add_noise(latents, noise, timesteps)# Get the text embedding for conditioningencoder_hidden_states = text_encoder(batch["input_ids"], return_dict=False)[0]# Predict the noise residual and compute lossmodel_pred = unet(noisy_latents, timesteps, encoder_hidden_states, return_dict=False)[0]loss = F.mse_loss(model_pred.float(), target.float(), reduction="mean")optimizer.step()lr_scheduler.step()optimizer.zero_grad()if global_step >= args.max_train_steps:break# 保存Lora权重到指定目录unet = unet.to(torch.float32)unwrapped_unet = unwrap_model(unet)unet_lora_state_dict = convert_state_dict_to_diffusers(get_peft_model_state_dict(unwrapped_unet))StableDiffusionPipeline.save_lora_weights(save_directory=args.output_dir,unet_lora_layers=unet_lora_state_dict,safe_serialization=True,)
四、SD中LoRA应用
4.1 LoRA应用
LoRA 下载网站(Civitai、Hugging Face、liblib)
https://civitai.com/
https://huggingface.co/models?other=lora
https://www.liblib.art/search?keyword=lora
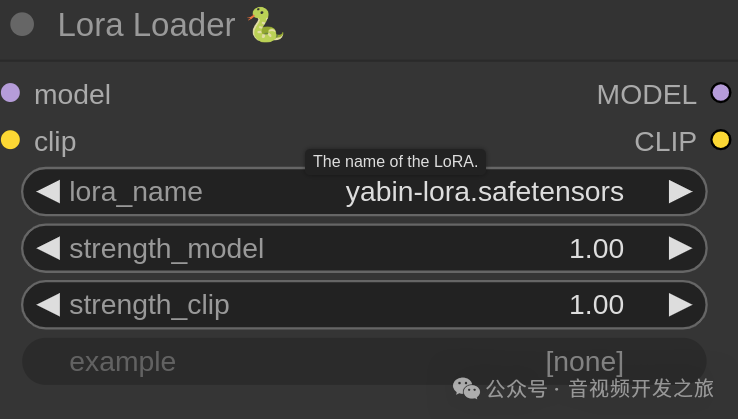
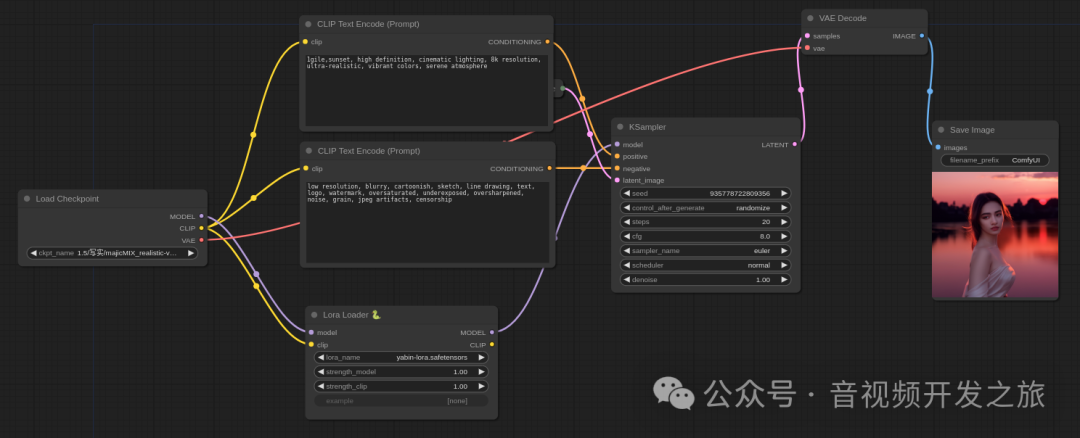
使用方法,把下载的Lora权重放入到StableDiffusionWebUI或者comfyUI的model/lora文件夹下, 然后在prompt或者节点中添加对应的lora名称和权重因子.

4.2 LoRA微调
LoRA微调有以下几个步骤
1. 确定目标,选择底模
2. 数据收集和处理
3. 配置参数,开始训练
4. 加载使用,验证效果
4.2.1 确定目标,选择底模
Lora可以用于不同的任务,比如:人物/角色Lora、风格Lora、姿势/动作Lora等等
根据不同的目标选择对应的低模(CheckPoint),最好选择一些比较原始基础的模型,比如 Stable Diffusion v1.5、Stable Diffusion 2.1-base、Anything V3 和chilloutmix等。原始的基础模型通常是在大规模、多样化的数据集上训练的,具有广泛的通用性,它们在各种任务和风格上都有良好的表现,选择这样的模型作为基础,可以确保微调后的LoRA模型在保持原始模型能力避免风格冲突,同时专注于新的目标。
4.2.2 数据收集与处理
“种瓜得瓜,种豆得豆”,数据集对于模型的训练至关重要,主要需要关注以下几点:
-
适当的样本数量:10-30张高质量的图像足以满足LoRA训练的需求。
-
高质量的图像:高分辨率、清晰度和多样性是关键,包含更多内容和细节,确保模型能够学习到丰富的特征。
-
准确的标签:标签的准确性直接影响模型的生成效果,必须确保标签与图像内容高度一致。
素材准备好之后,需要对图片进行一步进行处理,实现图像的高清化以及统一分辨率
图像的高清化处理,可以借助Real-Esrgan/Swinir等超分增强算法,分辨率一般为64的倍数,例如512x512或者768x768,可以通过在线工具birme(https://www.birme.net)进行批量裁剪
标签主要是辅助模型识别图片中的物体,标签的生成可以使用SD-Trainer中的WD标签器自动生成, 如果不想要图片中的什么内容,就在tag中写下相关内容。你想要什么内容,就在tag中删除相关的描述.
最终数据集目录结构示例:
train/yabin-images/2_yabin-images├── image1.jpg├── image1.txt├── image2.jpg├── image2.txt└── ...每个图像文件有对应的一个同名的且包含了该图像的标签的文本文件(例如:image1.txt)
4.2.3 配置参数,开始训练
Kohya_ss(https://github.com/kohya-ss/sd-scripts) 是目前比较主流的 LoRA 训练工具,也可用于训练Dreambooth 和 Textual inversion 模型。
秋叶大佬基于Kohya_ss 做了封装开源Akegarasu/lora-scripts :https://github.com/Akegarasu/lora-scripts(编辑参数脚本训练),降低了使用门槛.
配置参数以及参数说明如下:
#指定预训练模型(底模)的名称或路径pretrained_model_name_or_path = "./sd-models/majicMIX_realistic-v7.safetensors"#训练数据的目录路径,存放训练用的图片和相关文本数据train_data_dir = "./train/yabin-images"#训练图像的分辨率,格式为"宽,高"resolution = "512,512"#是否启用桶(bucketing)技术,这是一种内存优化技术,用于处理不同大小的图像。enable_bucket = true#最小桶分辨率,启用桶技术时,这是图像可以被分配到的最小尺寸min_bucket_reso = 256#作用类比min_bucket_resomax_bucket_reso = 1024#输出模型的名称和路径output_name = "yabin-lora"output_dir = "./output/yabin-lora"save_model_as = "safetensors"#每训练10个epoch保存一次模型save_every_n_epochs = 10#最大训练epoch数max_train_epochs = 100#训练时的批量大小train_batch_size = 1#是否只训练UNet网络部分network_train_unet_only = false#是否只训练文本编码器部分network_train_text_encoder_only = false#基础学习率learning_rate = 0.0001#UNet网络的学习率unet_lr = 0.0001#文本编码器的学习率text_encoder_lr = 0.00001#学习率调度器的类型,"cosine_with_restarts"表示余弦退火学习率调度器lr_scheduler = "cosine_with_restarts"#优化器的类型,"AdamW8bit"是一种优化器,带有权重衰减和8位精度优化。optimizer_type = "AdamW8bit"# CLIP模型的跳过层数clip_skip = 2#保存模型时的精度,"fp16"表示保存为16位浮点数模型。save_precision = "fp16"
配置好参数后,就可以启动LoRA微调训练
4.2.4 验证效果
训练完成后把输出的lora文件copy到StableDiffusion WebUI或者ComfyUI的models/Lora目录, 验证效果. 更好的做法是在StableDiffusionWebUI安装AdditionalNetworks的插件,测试不同LoRA权重的效果,观察是否欠拟合或者过拟合

五、资料
1.论文《LoRA: Low-Rank Adaptation Of Large Language Models》https://arxiv.org/abs/2106.09685
2.kohya-ss/sd-scripts源码: https://github.com/kohya-ss/sd-scripts
3.LoRA_Easy_Training_Scripts源码:https://github.com/derrian-distro/LoRA_Easy_Training_Scripts
4.lora源码:https://github.com/cloneofsimo/lora
5.使用 LoRA 进行 Stable Diffusion 的高效参数微调 https://huggingface.co/blog/zh/lora
6.Lora模型微调原理 https://www.bilibili.com/video/BV1Tu4y1R7H5/
7.B站视频-全网最细lora模型训练教程: https://www.bilibili.com/video/BV1GP411U7fK
8.B站视频-1小时超详细LoRa训练流程全解 https://www.bilibili.com/video/BV1Aa4y157A5
9.LoRA训练用什么底模:https://www.bilibili.com/video/BV1hk4y1Y7sc
10.如何从零开始训练一个高质量的LoRA模型 https://www.bilibili.com/read/cv23791189/
11.LoRA 在 Stable Diffusion 中的三种应用:原理讲解与代码示例 https://zhouyifan.net/2024/01/23/20240114-SD-LoRA/
12.Stable Diffusion——LoRA模型的训练详解(4万字详细解读)https://zhuanlan.zhihu.com/p/671353062
13.Stable Diffusion Lora locon loha训练参数设置 https://zhuanlan.zhihu.com/p/618758020
14.Diffusion中LoRA 训练 https://zhuanlan.zhihu.com/p/681563559
15.关于【SD-WEBUI】的LoRA模型训练:怎样才算训练好了?https://blog.csdn.net/ddrfan/article/details/130929685
16.图像生成:SD lora加载代码详解与实现:https://blog.csdn.net/WiSirius/article/details/136486297
17.从hugging face下载数据集,将.parquet类型数据中提取图片和标签 https://blog.csdn.net/beneficial/article/details/135706499
https://github.com/pytorch/pytorch/issues/78341
18.秋葉丹炉炼LoRA详细教程 https://doc-rde.lanrui-ai.com/docs/yong-hu-shou-ce/ying-yong-zhuan-qu/lora-jiao-cheng/-qiu-ye-lian-dan-lu-xiang-xi-jiao-cheng/
19.VSCode中 如何Debug用Bash脚本运行的Python代码: https://blog.csdn.net/m0_52394190/article/details/136913701
感谢你的阅读
接下来我们继续学习输出AI相关内容,欢迎关注公众号“音视频开发之旅”,一起学习成长。
欢迎交流


