目录
一、前言
set_input_delay%2Fset_output_delay-toc" style="margin-left:0px;">二、set_input_delay/set_output_delay
2.1 延时约束
2.2 约束设置界面
2.3 示例工程
2.4 Delay Value
2.5 Delay value is relative to clock edge
2.6 Delay value already includes latencies of the specified clock edge
2.7 Rise/Fall
2.8 Max/Min
2.9 Add delay information to the existing delay
一、前言
为了在设计中准确的模拟信号从FPGA传输到外部或外部信号进入到FPGA端口的时序,在设计中需要给定输入端口和输出端口的延时信息,因为vivado仅仅能够识别边界内部的时序。此时,就需要使用到约束set_input_delay/set_output_delay。
set_input_delay%2Fset_output_delay">二、set_input_delay/set_output_delay
2.1 延时约束
set_input_delay输入时延约束指定了设计中输入时钟端口的输入时延,以应用板为例,输入时延表示在数据从外部芯片通过应用板到达FPGA的输入引脚和应用板的时钟相位存在差异。因此,输入时延值可以是正数也可以是复数,正负值取决于数据信号和时钟信号在外部芯片与FPGA接口处的相对相位。
set_output_delay约束指定了关联时钟沿的输出端口的输出路径时延,输出时延可理解为在数据从FPGA的输出端口到达其他芯片和关联的参考时钟间的相位差。输出时延值可以是正数也可以是复数,正负值取决于数据信号和时钟信号在外部芯片与FPGA接口处的相对相位。
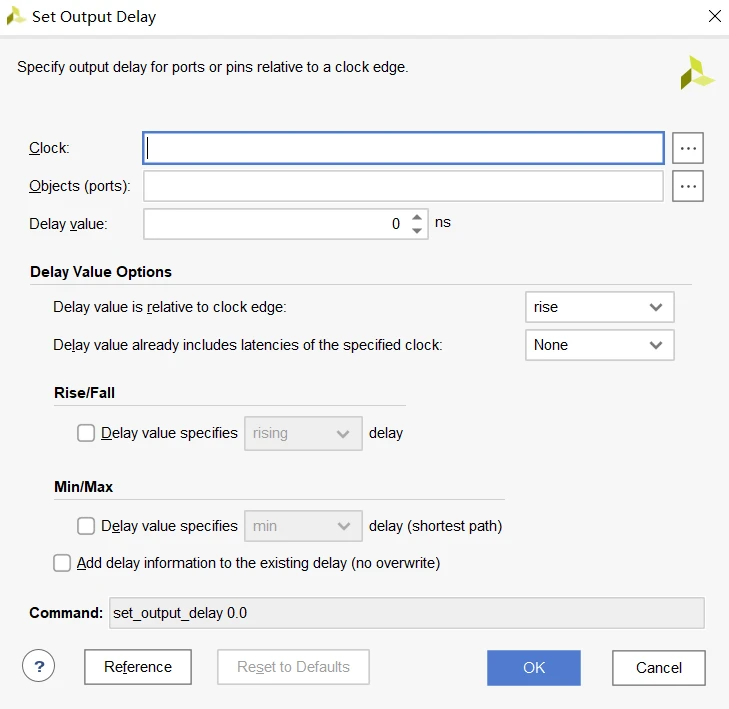
2.2 约束设置界面
set input delay和set output delay设置界面相同,区别是Object(ports)中可设置的端口分别为输入端口和输出端口。

set output delay界面
2.3 示例工程
工程设计为一个简单的包含2个触发器的时序路径
module slow_to_fast(in,clk1,clk2,rst,out);
input in,clk1,clk2,rst;
output out;
reg ff1,ff2;
//时钟域一
always@(posedge clk1,negedge rst)
beginif(!rst)ff1<=0;elseff1<=in;
end
//时钟域二
always@(posedge clk2,negedge rst)
beginif(!rst)ff2<=0;else              //打两拍处理ff2<=ff1;
end
assign out=ff2;endmodule时序约束由两条主时钟约束加上set_input_delay和set_output_delay,input延时为1ns,output延时为2ns
create_clock -period 10.000 -name clk1 -waveform {0.000 5.000} [get_ports clk1]
create_clock -period 8.000 -name clk2 -waveform {0.000 4.000} [get_ports clk2]
set_input_delay -clock [get_clocks clk1] 1.000 [get_ports in]
set_output_delay -clock [get_clocks clk2] 2.000 [get_ports -filter { NAME =~  "*" && DIRECTION == "OUT" }]
2.4 Delay Value
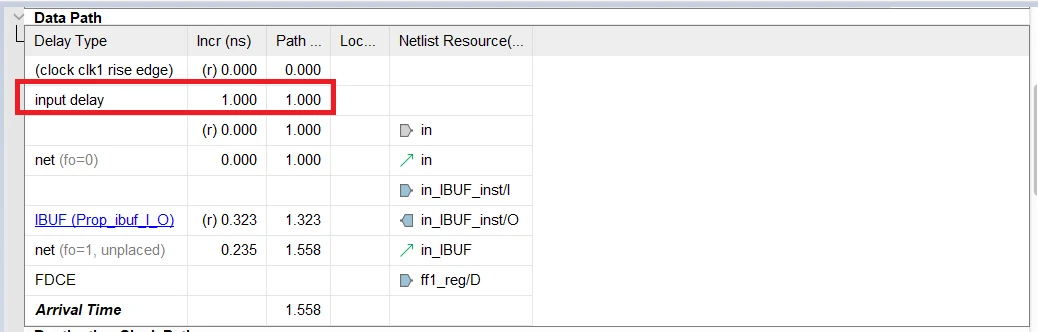
延时值Delay Value可设置正值或负值,并且设为正值或负值在set_input_delay/set_output_delay中表现不同,set_input_delay中的设置input delay值直接添加到Data Path的最前段,可理解为此段即为正常路径的Source Clock Path
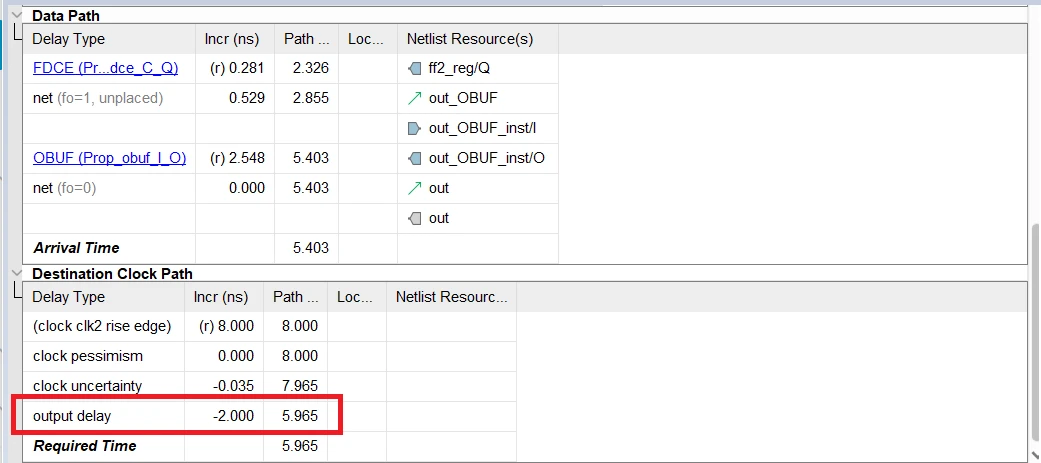
再看output delay,延时值output delay添加到Destination Clock Path,约束为2ns,分析时为-2ns,为何要取反呢?回到output delay的定义来,为数据输出端口的延时,但现在输出端口Data Path中并无新增2ns延时,延时添加到了Destination clock上。因此,对于捕获端,相当于时钟在原有基础上提前2ns(-2)到达,和延时值直接加到Data Path效果相同。
2.5 Delay value is relative to clock edge
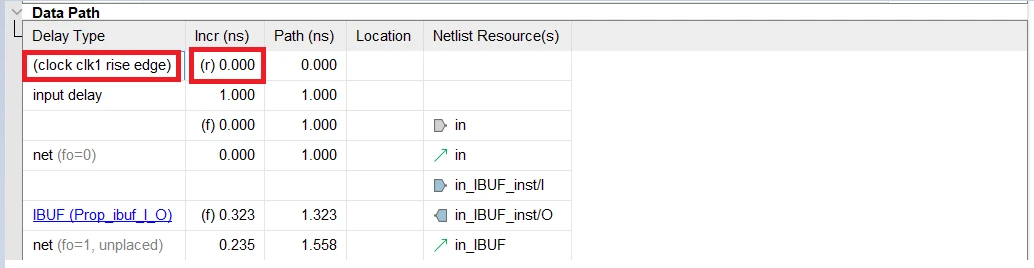
Delay value is relative to clock edge用于设置延时值是相对于关联时钟的上升沿还是下降沿,默认为上升沿,如示例工程Input delay约束,延时参考时钟为clk1,同时clk1的上升沿在0ns处,因次Incr为0ns,
set_input_delay -clock [get_clocks clk1] 1.000 [get_ports in]
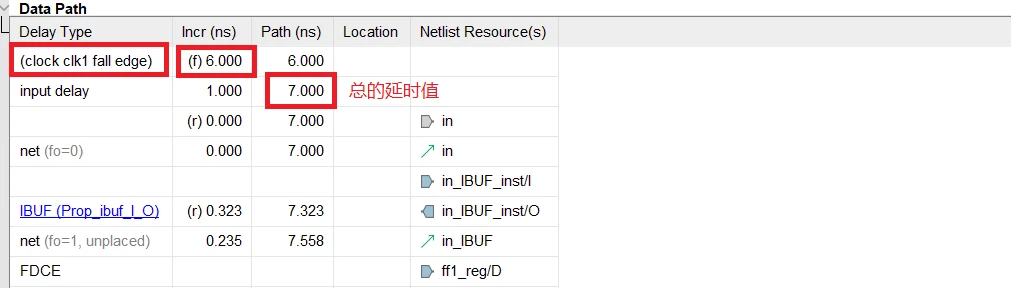
修改时钟clk1的下降沿在6ns处,同时input_delay参考边沿为下降沿
create_clock -period 10.000 -name clk1 -waveform {1.000 6.000} [get_ports clk1]
set_input_delay -clock [get_clocks clk1] -clock_fall 1.0 [get_ports in]
结果如下,因为下降沿在6ns处,因为总的延时值为6ns+1ns共7ns
2.6 Delay value already includes latencies of the specified clock edge
Delay value already includes latencies of the specified clock用于设置延时值是否包含set_clock_latency约束的延时。Vivado时序分析时会默认捕获时钟是在时钟延时(包含源延时和网络延时)后到达捕获触发器中,除非是set_input_delay/set_output_delay约束中指定包含了源延时或网络延时。该配置的设置主要是避免和set_clock_latency约束进行重复计算。
该配置选项可设置值如下
None:输入端口延时input delay不包含时钟延时
Network:输入端口延时包含网络延时
Source:输入端口延时包含源延时
Network/Source:输入端口延时包含源延时和网络延时
2.7 Rise/Fall
该配置和前面的Delay value is relative to clock edge容易混淆,看字面意思都是上升沿和下降沿,两者对象是完全不同,前者指时钟的上升沿或下降沿,此处指端口Port的切换沿为上升沿或下降沿,默认的是对Port的上升沿或下降沿都有效。但因port通常都是fall transition/rise transition都支持,因此,设置后看不到变化,该设置使用也不多。
2.8 Max/Min
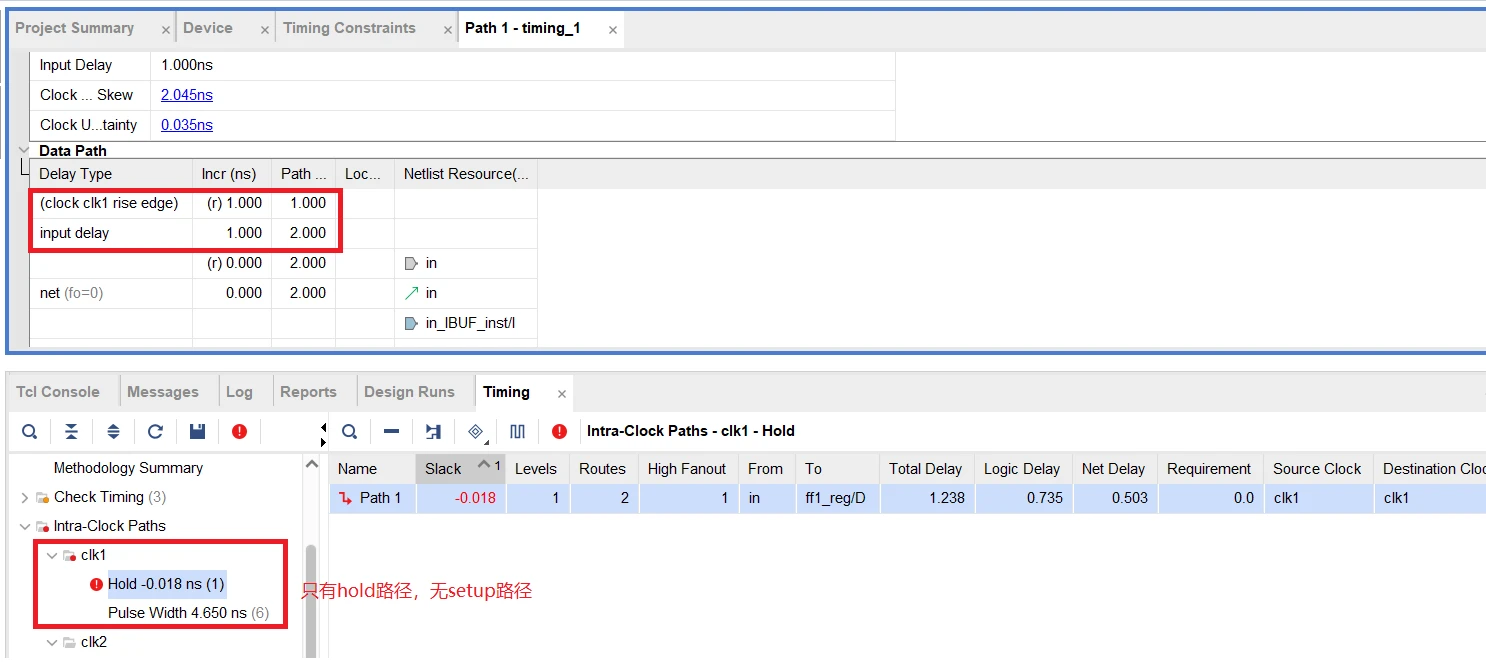
Min/Max中Min为最小时延值,作用于hold/removal,Max为最大时延值,作用于setup/recovery分析,如果Min/Max都未选择,表示最大时延和最小时延值相等,该延时值同时引用到setup/hold分析中。
以set_input_delay -clock [get_clocks clk1] -min -network_latency_included 1.0 [get_ports in]约束为例,clk1的同步路径中只有hold路径,无setup路径,符合预期。
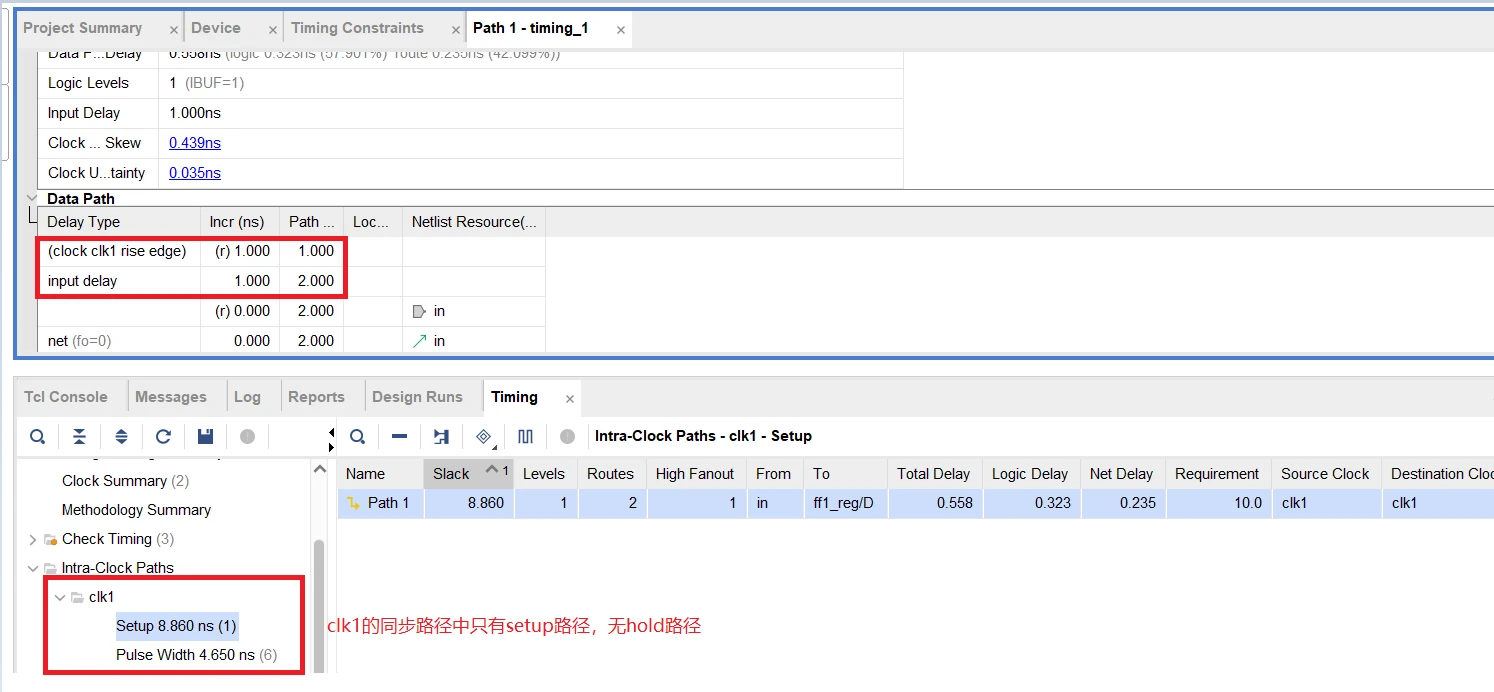
约束中min修改max,set_input_delay -clock [get_clocks clk1] -max -network_latency_included 1.0 [get_ports in]
2.9 Add delay information to the existing delay
Add delay information to the existing delay勾选表示如果设置约束的端口已经存在约束延时,新增加的约束不会覆盖旧的,不勾选则覆盖旧的约束。
1)端口in上同时两条set_input_delay,但都没有add参数,约束生效遍历到第二条时,因没有-add_delay参数,因此后一条覆盖前一条,input delay为1.11ns
set_input_delay -clock [get_clocks clk1] 2.22 [get_ports in]
set_input_delay -clock [get_clocks clk1] 1.11 [get_ports in]2)端口in上同时两条set_input_delay,但第一条添加了-add_delay参数,因此仍是后一条覆盖前一条,input delay为1.11ns
set_input_delay -clock [get_clocks clk1] -add_delay 2.22 [get_ports in]
set_input_delay -clock [get_clocks clk1] 1.11 [get_ports in]3)端口in上同时两条set_input_delay,都添加了-add_delay参数,后一条有参数将不会覆盖前面的,因此,input delay为2.22ns
set_input_delay -clock [get_clocks clk1] -add_delay 2.22 [get_ports in]
set_input_delay -clock [get_clocks clk1] -add_delay 1.11 [get_ports in]4)端口in上同时两条set_input_delay,只有第二条添加了-add_delay参数,因此,后一条有参数将不会覆盖前面的,input delay为2.22ns
set_input_delay -clock [get_clocks clk1] 2.22 [get_ports in]
set_input_delay -clock [get_clocks clk1] -add_delay 1.11 [get_ports in]