导入必要的库函数
import math
from functools import partial
%matplotlib inline
import matplotlib.pyplot as plt
from tqdm.auto import tqdm
import numpy as np
from multiprocessing import cpu_count
from download import downloadimport mindspore as ms
import mindspore.nn as nn
import mindspore.ops as ops
from mindspore import Tensor, Parameter
from mindspore import dtype as mstype
from mindspore.dataset.vision import Resize, Inter, CenterCrop, ToTensor, RandomHorizontalFlip, ToPIL
from mindspore.common.initializer import initializer
from mindspore.amp import DynamicLossScalerms.set_seed(0)
模型简介
Diffusion Model
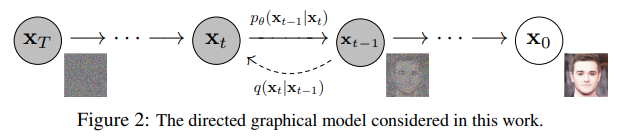
如果将Diffusion与其他生成模型(如Normalizing Flows、GAN或VAE)进行比较,它并没有那么复杂,它们都将噪声从一些简单分布转换为数据样本,Diffusion也是从纯噪声开始通过一个神经网络学习逐步去噪,最终得到一个实际图像。 Diffusion对于图像的处理包括以下两个过程:
选择的固定(或预定义)正相扩散过程:它逐渐将高斯噪声添加到图像中,制导最终得到纯噪声
一个学习的反相去噪的扩散过程:通过训练神经网络从纯噪声开始逐渐对图像去噪,直到最终得到一个实际的图像
扩散莫i选哪个实现原理
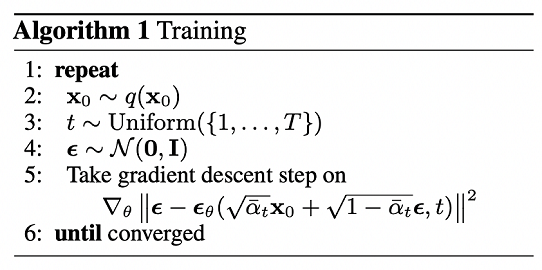
Diffusion前向过程
所谓前向过程,即向图片上加噪声的过程。
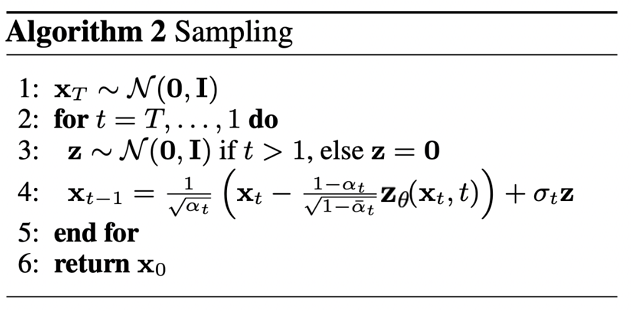
Diffusion逆向过程
逆向过程就是diffusion的去噪推断过程。
算法流程如下:
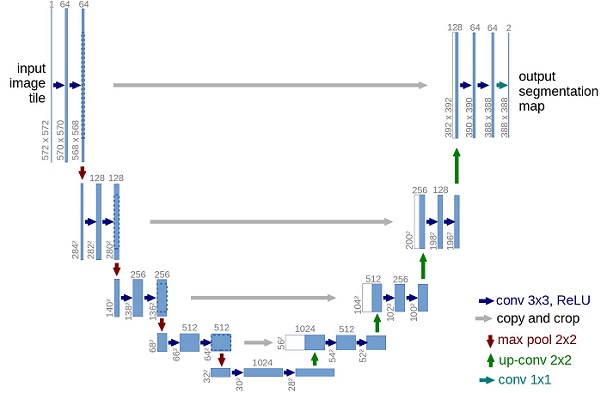
U-Net神经网络预测噪声
使用自动编码器,并再编码器和解码器之间引入残差连接,极大地改善了梯度流。
构建Diffusion模型
定义一些帮助函数和类
def rearrange(head, inputs):b, hc, x, y = inputs.shapec = hc // headreturn inputs.reshape((b, head, c, x * y))def rsqrt(x):res = ops.sqrt(x)return ops.inv(res)def randn_like(x, dtype=None):if dtype is None:dtype = x.dtyperes = ops.standard_normal(x.shape).astype(dtype)return resdef randn(shape, dtype=None):if dtype is None:dtype = ms.float32res = ops.standard_normal(shape).astype(dtype)return resdef randint(low, high, size, dtype=ms.int32):res = ops.uniform(size, Tensor(low, dtype), Tensor(high, dtype), dtype=dtype)return resdef exists(x):return x is not Nonedef default(val, d):if exists(val):return valreturn d() if callable(d) else ddef _check_dtype(d1, d2):if ms.float32 in (d1, d2):return ms.float32if d1 == d2:return d1raise ValueError('dtype is not supported.')class Residual(nn.Cell):def __init__(self, fn):super().__init__()self.fn = fndef construct(self, x, *args, **kwargs):return self.fn(x, *args, **kwargs) + x定义上采样和下采样操作
def Upsample(dim):return nn.Conv2dTranspose(dim, dim, 4, 2, pad_mode="pad", padding=1)def Downsample(dim):return nn.Conv2d(dim, dim, 4, 2, pad_mode="pad", padding=1)位置向量
由于神经网络的参数在时间(噪声水平)上共享,使用正弦位置嵌入来编码t。
class SinusoidalPositionEmbeddings(nn.Cell):def __init__(self, dim):super().__init__()self.dim = dimhalf_dim = self.dim // 2emb = math.log(10000) / (half_dim - 1)emb = np.exp(np.arange(half_dim) * - emb)self.emb = Tensor(emb, ms.float32)def construct(self, x):emb = x[:, None] * self.emb[None, :]emb = ops.concat((ops.sin(emb), ops.cos(emb)), axis=-1)return embResNet/ConvNeXT块
class Block(nn.Cell):def __init__(self, dim, dim_out, groups=1):super().__init__()self.proj = nn.Conv2d(dim, dim_out, 3, pad_mode="pad", padding=1)self.proj = c(dim, dim_out, 3, padding=1, pad_mode='pad')self.norm = nn.GroupNorm(groups, dim_out)self.act = nn.SiLU()def construct(self, x, scale_shift=None):x = self.proj(x)x = self.norm(x)if exists(scale_shift):scale, shift = scale_shiftx = x * (scale + 1) + shiftx = self.act(x)return xclass ConvNextBlock(nn.Cell):def __init__(self, dim, dim_out, *, time_emb_dim=None, mult=2, norm=True):super().__init__()self.mlp = (nn.SequentialCell(nn.GELU(), nn.Dense(time_emb_dim, dim))if exists(time_emb_dim)else None)self.ds_conv = nn.Conv2d(dim, dim, 7, padding=3, group=dim, pad_mode="pad")self.net = nn.SequentialCell(nn.GroupNorm(1, dim) if norm else nn.Identity(),nn.Conv2d(dim, dim_out * mult, 3, padding=1, pad_mode="pad"),nn.GELU(),nn.GroupNorm(1, dim_out * mult),nn.Conv2d(dim_out * mult, dim_out, 3, padding=1, pad_mode="pad"),)self.res_conv = nn.Conv2d(dim, dim_out, 1) if dim != dim_out else nn.Identity()def construct(self, x, time_emb=None):h = self.ds_conv(x)if exists(self.mlp) and exists(time_emb):assert exists(time_emb), "time embedding must be passed in"condition = self.mlp(time_emb)condition = condition.expand_dims(-1).expand_dims(-1)h = h + conditionh = self.net(h)return h + self.res_conv(x)Attention模块
class Attention(nn.Cell):def __init__(self, dim, heads=4, dim_head=32):super().__init__()self.scale = dim_head ** -0.5self.heads = headshidden_dim = dim_head * headsself.to_qkv = nn.Conv2d(dim, hidden_dim * 3, 1, pad_mode='valid', has_bias=False)self.to_out = nn.Conv2d(hidden_dim, dim, 1, pad_mode='valid', has_bias=True)self.map = ops.Map()self.partial = ops.Partial()def construct(self, x):b, _, h, w = x.shapeqkv = self.to_qkv(x).chunk(3, 1)q, k, v = self.map(self.partial(rearrange, self.heads), qkv)q = q * self.scale# 'b h d i, b h d j -> b h i j'sim = ops.bmm(q.swapaxes(2, 3), k)attn = ops.softmax(sim, axis=-1)# 'b h i j, b h d j -> b h i d'out = ops.bmm(attn, v.swapaxes(2, 3))out = out.swapaxes(-1, -2).reshape((b, -1, h, w))return self.to_out(out)class LayerNorm(nn.Cell):def __init__(self, dim):super().__init__()self.g = Parameter(initializer('ones', (1, dim, 1, 1)), name='g')def construct(self, x):eps = 1e-5var = x.var(1, keepdims=True)mean = x.mean(1, keep_dims=True)return (x - mean) * rsqrt((var + eps)) * self.gclass LinearAttention(nn.Cell):def __init__(self, dim, heads=4, dim_head=32):super().__init__()self.scale = dim_head ** -0.5self.heads = headshidden_dim = dim_head * headsself.to_qkv = nn.Conv2d(dim, hidden_dim * 3, 1, pad_mode='valid', has_bias=False)self.to_out = nn.SequentialCell(nn.Conv2d(hidden_dim, dim, 1, pad_mode='valid', has_bias=True),LayerNorm(dim))self.map = ops.Map()self.partial = ops.Partial()def construct(self, x):b, _, h, w = x.shapeqkv = self.to_qkv(x).chunk(3, 1)q, k, v = self.map(self.partial(rearrange, self.heads), qkv)q = ops.softmax(q, -2)k = ops.softmax(k, -1)q = q * self.scalev = v / (h * w)# 'b h d n, b h e n -> b h d e'context = ops.bmm(k, v.swapaxes(2, 3))# 'b h d e, b h d n -> b h e n'out = ops.bmm(context.swapaxes(2, 3), q)out = out.reshape((b, -1, h, w))return self.to_out(out)组归一化
class PreNorm(nn.Cell):def __init__(self, dim, fn):super().__init__()self.fn = fnself.norm = nn.GroupNorm(1, dim)def construct(self, x):x = self.norm(x)return self.fn(x)条件U-Net
网络构建过程如下:
-
首先,将卷积层应用于噪声图像批上,并计算噪声水平的位置
-
接下来,应用一系列下采样级。每个下采样阶段由2个ResNet/ConvNeXT块 + groupnorm + attention + 残差连接 + 一个下采样操作组成
-
在网络的中间,再次应用ResNet或ConvNeXT块,并与attention交织
-
接下来,应用一系列上采样级。每个上采样级由2个ResNet/ConvNeXT块+ groupnorm + attention + 残差连接 + 一个上采样操作组成
-
最后,应用ResNet/ConvNeXT块,然后应用卷积层
class Unet(nn.Cell):def __init__(self,dim,init_dim=None,out_dim=None,dim_mults=(1, 2, 4, 8),channels=3,with_time_emb=True,convnext_mult=2,):super().__init__()self.channels = channelsinit_dim = default(init_dim, dim // 3 * 2)self.init_conv = nn.Conv2d(channels, init_dim, 7, padding=3, pad_mode="pad", has_bias=True)dims = [init_dim, *map(lambda m: dim * m, dim_mults)]in_out = list(zip(dims[:-1], dims[1:]))block_klass = partial(ConvNextBlock, mult=convnext_mult)if with_time_emb:time_dim = dim * 4self.time_mlp = nn.SequentialCell(SinusoidalPositionEmbeddings(dim),nn.Dense(dim, time_dim),nn.GELU(),nn.Dense(time_dim, time_dim),)else:time_dim = Noneself.time_mlp = Noneself.downs = nn.CellList([])self.ups = nn.CellList([])num_resolutions = len(in_out)for ind, (dim_in, dim_out) in enumerate(in_out):is_last = ind >= (num_resolutions - 1)self.downs.append(nn.CellList([block_klass(dim_in, dim_out, time_emb_dim=time_dim),block_klass(dim_out, dim_out, time_emb_dim=time_dim),Residual(PreNorm(dim_out, LinearAttention(dim_out))),Downsample(dim_out) if not is_last else nn.Identity(),]))mid_dim = dims[-1]self.mid_block1 = block_klass(mid_dim, mid_dim, time_emb_dim=time_dim)self.mid_attn = Residual(PreNorm(mid_dim, Attention(mid_dim)))self.mid_block2 = block_klass(mid_dim, mid_dim, time_emb_dim=time_dim)for ind, (dim_in, dim_out) in enumerate(reversed(in_out[1:])):is_last = ind >= (num_resolutions - 1)self.ups.append(nn.CellList([block_klass(dim_out * 2, dim_in, time_emb_dim=time_dim),block_klass(dim_in, dim_in, time_emb_dim=time_dim),Residual(PreNorm(dim_in, LinearAttention(dim_in))),Upsample(dim_in) if not is_last else nn.Identity(),]))out_dim = default(out_dim, channels)self.final_conv = nn.SequentialCell(block_klass(dim, dim), nn.Conv2d(dim, out_dim, 1))def construct(self, x, time):x = self.init_conv(x)t = self.time_mlp(time) if exists(self.time_mlp) else Noneh = []for block1, block2, attn, downsample in self.downs:x = block1(x, t)x = block2(x, t)x = attn(x)h.append(x)x = downsample(x)x = self.mid_block1(x, t)x = self.mid_attn(x)x = self.mid_block2(x, t)len_h = len(h) - 1for block1, block2, attn, upsample in self.ups:x = ops.concat((x, h[len_h]), 1)len_h -= 1x = block1(x, t)x = block2(x, t)x = attn(x)x = upsample(x)return self.final_conv(x)正向扩散
定义T时间步的时间表
def linear_beta_schedule(timesteps):beta_start = 0.0001beta_end = 0.02return np.linspace(beta_start, beta_end, timesteps).astype(np.float32)# 扩散200步
timesteps = 200# 定义 beta schedule
betas = linear_beta_schedule(timesteps=timesteps)# 定义 alphas
alphas = 1. - betas
alphas_cumprod = np.cumprod(alphas, axis=0)
alphas_cumprod_prev = np.pad(alphas_cumprod[:-1], (1, 0), constant_values=1)sqrt_recip_alphas = Tensor(np.sqrt(1. / alphas))
sqrt_alphas_cumprod = Tensor(np.sqrt(alphas_cumprod))
sqrt_one_minus_alphas_cumprod = Tensor(np.sqrt(1. - alphas_cumprod))# 计算 q(x_{t-1} | x_t, x_0)
posterior_variance = betas * (1. - alphas_cumprod_prev) / (1. - alphas_cumprod)p2_loss_weight = (1 + alphas_cumprod / (1 - alphas_cumprod)) ** -0.
p2_loss_weight = Tensor(p2_loss_weight)def extract(a, t, x_shape):b = t.shape[0]out = Tensor(a).gather(t, -1)return out.reshape(b, *((1,) * (len(x_shape) - 1)))使用猫图像说明如何再扩散过程的每个时间步骤中添加噪声
# 下载猫猫图像
url = 'https://mindspore-website.obs.cn-north-4.myhuaweicloud.com/notebook/datasets/image_cat.zip'
path = download(url, './', kind="zip", replace=True)
将图像转换成mindspore张量
from mindspore.dataset import ImageFolderDatasetimage_size = 128
transforms = [Resize(image_size, Inter.BILINEAR),CenterCrop(image_size),ToTensor(),lambda t: (t * 2) - 1
]path = './image_cat'
dataset = ImageFolderDataset(dataset_dir=path, num_parallel_workers=cpu_count(),extensions=['.jpg', '.jpeg', '.png', '.tiff'],num_shards=1, shard_id=0, shuffle=False, decode=True)
dataset = dataset.project('image')
transforms.insert(1, RandomHorizontalFlip())
dataset_1 = dataset.map(transforms, 'image')
dataset_2 = dataset_1.batch(1, drop_remainder=True)
x_start = next(dataset_2.create_tuple_iterator())[0]
print(x_start.shape)
定义反向变换
import numpy as npreverse_transform = [lambda t: (t + 1) / 2,lambda t: ops.permute(t, (1, 2, 0)), # CHW to HWClambda t: t * 255.,lambda t: t.asnumpy().astype(np.uint8),ToPIL()
]def compose(transform, x):for d in transform:x = d(x)return x
定义前向扩散过程:
def q_sample(x_start, t, noise=None):if noise is None:noise = randn_like(x_start)return (extract(sqrt_alphas_cumprod, t, x_start.shape) * x_start +extract(sqrt_one_minus_alphas_cumprod, t, x_start.shape) * noise)再特定的时间步长上测试:
def get_noisy_image(x_start, t):# 添加噪音x_noisy = q_sample(x_start, t=t)# 转换为 PIL 图像noisy_image = compose(reverse_transform, x_noisy[0])return noisy_image# 设置 time step
t = Tensor([40])
noisy_image = get_noisy_image(x_start, t)
print(noisy_image)
noisy_image.show()
为不同的时间步骤可视化此情况:
import matplotlib.pyplot as pltdef plot(imgs, with_orig=False, row_title=None, **imshow_kwargs):if not isinstance(imgs[0], list):imgs = [imgs]num_rows = len(imgs)num_cols = len(imgs[0]) + with_orig_, axs = plt.subplots(figsize=(200, 200), nrows=num_rows, ncols=num_cols, squeeze=False)for row_idx, row in enumerate(imgs):row = [image] + row if with_orig else rowfor col_idx, img in enumerate(row):ax = axs[row_idx, col_idx]ax.imshow(np.asarray(img), **imshow_kwargs)ax.set(xticklabels=[], yticklabels=[], xticks=[], yticks=[])if with_orig:axs[0, 0].set(title='Original image')axs[0, 0].title.set_size(8)if row_title is not None:for row_idx in range(num_rows):axs[row_idx, 0].set(ylabel=row_title[row_idx])plt.tight_layout()定义模型的损失函数:
def p_losses(unet_model, x_start, t, noise=None):if noise is None:noise = randn_like(x_start)x_noisy = q_sample(x_start=x_start, t=t, noise=noise)predicted_noise = unet_model(x_noisy, t)loss = nn.SmoothL1Loss()(noise, predicted_noise)# todoloss = loss.reshape(loss.shape[0], -1)loss = loss * extract(p2_loss_weight, t, loss.shape)return loss.mean()数据准备与处理
# 下载MNIST数据集
url = 'https://mindspore-website.obs.cn-north-4.myhuaweicloud.com/notebook/datasets/dataset.zip'
path = download(url, './', kind="zip", replace=True)from mindspore.dataset import FashionMnistDatasetimage_size = 28
channels = 1
batch_size = 16fashion_mnist_dataset_dir = "./dataset"
dataset = FashionMnistDataset(dataset_dir=fashion_mnist_dataset_dir, usage="train", num_parallel_workers=cpu_count(), shuffle=True, num_shards=1, shard_id=0)
定义transform操作
transforms = [RandomHorizontalFlip(),ToTensor(),lambda t: (t * 2) - 1
]dataset = dataset.project('image')
dataset = dataset.shuffle(64)
dataset = dataset.map(transforms, 'image')
dataset = dataset.batch(16, drop_remainder=True)x = next(dataset.create_dict_iterator())
print(x.keys())
采样
定义算法如下:
代码实现:
def p_sample(model, x, t, t_index):betas_t = extract(betas, t, x.shape)sqrt_one_minus_alphas_cumprod_t = extract(sqrt_one_minus_alphas_cumprod, t, x.shape)sqrt_recip_alphas_t = extract(sqrt_recip_alphas, t, x.shape)model_mean = sqrt_recip_alphas_t * (x - betas_t * model(x, t) / sqrt_one_minus_alphas_cumprod_t)if t_index == 0:return model_meanposterior_variance_t = extract(posterior_variance, t, x.shape)noise = randn_like(x)return model_mean + ops.sqrt(posterior_variance_t) * noisedef p_sample_loop(model, shape):b = shape[0]# 从纯噪声开始img = randn(shape, dtype=None)imgs = []for i in tqdm(reversed(range(0, timesteps)), desc='sampling loop time step', total=timesteps):img = p_sample(model, img, ms.numpy.full((b,), i, dtype=mstype.int32), i)imgs.append(img.asnumpy())return imgsdef sample(model, image_size, batch_size=16, channels=3):return p_sample_loop(model, shape=(batch_size, channels, image_size, image_size))训练过程
# 定义动态学习率
lr = nn.cosine_decay_lr(min_lr=1e-7, max_lr=1e-4, total_step=10*3750, step_per_epoch=3750, decay_epoch=10)# 定义 Unet模型
unet_model = Unet(dim=image_size,channels=channels,dim_mults=(1, 2, 4,)
)name_list = []
for (name, par) in list(unet_model.parameters_and_names()):name_list.append(name)
i = 0
for item in list(unet_model.trainable_params()):item.name = name_list[i]i += 1# 定义优化器
optimizer = nn.Adam(unet_model.trainable_params(), learning_rate=lr)
loss_scaler = DynamicLossScaler(65536, 2, 1000)# 定义前向过程
def forward_fn(data, t, noise=None):loss = p_losses(unet_model, data, t, noise)return loss# 计算梯度
grad_fn = ms.value_and_grad(forward_fn, None, optimizer.parameters, has_aux=False)# 梯度更新
def train_step(data, t, noise):loss, grads = grad_fn(data, t, noise)optimizer(grads)return loss
import time# 由于时间原因,epochs设置为1,可根据需求进行调整
epochs = 1for epoch in range(epochs):begin_time = time.time()for step, batch in enumerate(dataset.create_tuple_iterator()):unet_model.set_train()batch_size = batch[0].shape[0]t = randint(0, timesteps, (batch_size,), dtype=ms.int32)noise = randn_like(batch[0])loss = train_step(batch[0], t, noise)if step % 500 == 0:print(" epoch: ", epoch, " step: ", step, " Loss: ", loss)end_time = time.time()times = end_time - begin_timeprint("training time:", times, "s")# 展示随机采样效果unet_model.set_train(False)samples = sample(unet_model, image_size=image_size, batch_size=64, channels=channels)plt.imshow(samples[-1][5].reshape(image_size, image_size, channels), cmap="gray")
print("Training Success!")
推理过程(从模型中采样)
定义采样函数:
# 采样64个图片
unet_model.set_train(False)
samples = sample(unet_model, image_size=image_size, batch_size=64, channels=channels)
# 展示一个随机效果
random_index = 5
plt.imshow(samples[-1][random_index].reshape(image_size, image_size, channels), cmap="gray")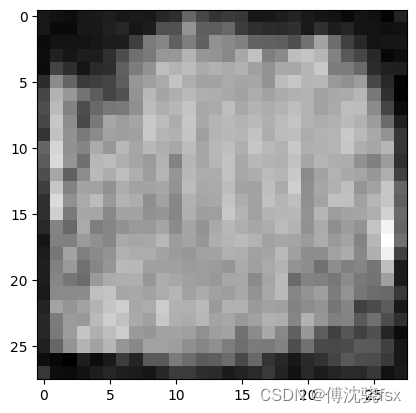
创建去噪过程的gif
import matplotlib.animation as animationrandom_index = 53fig = plt.figure()
ims = []
for i in range(timesteps):im = plt.imshow(samples[i][random_index].reshape(image_size, image_size, channels), cmap="gray", animated=True)ims.append([im])animate = animation.ArtistAnimation(fig, ims, interval=50, blit=True, repeat_delay=100)
animate.save('diffusion.gif')
plt.show()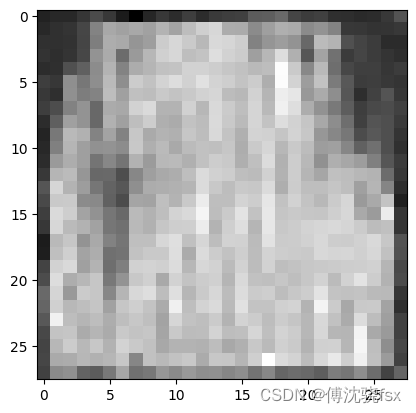
总结
扩散模型是(非)条件图像有希望生成的方向,但缺点是它们需要多次正向传递来生成图像(对于像GAN这样的生成模型来说,情况并非如此)。


