文章目录
- 哈希表的概念
- 哈希函数的设计
- 常见的哈希函数
- 哈希冲突
- 1. 闭散列
- 代码实现
- 2. 开散列
- 拉链法的优点
- 针对开散列哈希的扩展
- 基于开散列拉链法封装哈希表
- MyHash.h
- 基于哈希表实现unordered_map类
- Myunordered_map.h
- 基于哈希表实现unordered_set类
- Myunordered_map.h
哈希表的概念
哈希表,也被称为散列表。是一种通过键可以快速找到对应值的一种数据结构。像我们常使用的unordered系列的容器,其本质就是一个哈希表。哈希表最显著的特点就是查找数据的效率非常的高,平均查找的时间复杂度为O(1)。通过哈希函数将键值映射到数组的具体位置,再对其进行操作。
哈希表查找的过程为:通过键来找到数组中的一个位置,通过这个位置我们能找到该键唯一映射的值。
哈希表的y重要设计模块就是哈希函数以及解决哈希冲突的方法。下面将对此做出解释:
哈希函数的设计
哈希表的性能的一个关键因素就是哈希函数的设计。具体的来说,哈希函数指的是通过键值找到映射到数组具体位置的方法。一个好的哈希函数能将键均匀的分布到哈希表的各个位置。
常见的哈希函数
- 直接定值法
取关键字的某个线性函数为散列地址,该线性函数的返回值应该是一个整数。比如Hash(key)=A*Key+B - 除留余数法
设散列表中允许的地址数为m,取一个不大于m,但最接近或者等于m的质数p作为除数,按照哈希函数:Hash(key) = key% p(p<=m),将关键码转换成哈希地址
哈希冲突
什么叫哈希冲突?哈希冲突又叫做哈希碰撞。具体是指,多个键通过一个哈希函数得到的位置相同。造成哈希冲突的主要原因是,哈希表的大小是有限的,而输入的数据可能会非常多,因此不可能避免出现哈希冲突。
那出现哈希冲突之后该如何解决呢?下面给出几种常见的解决哈希冲突的方法:
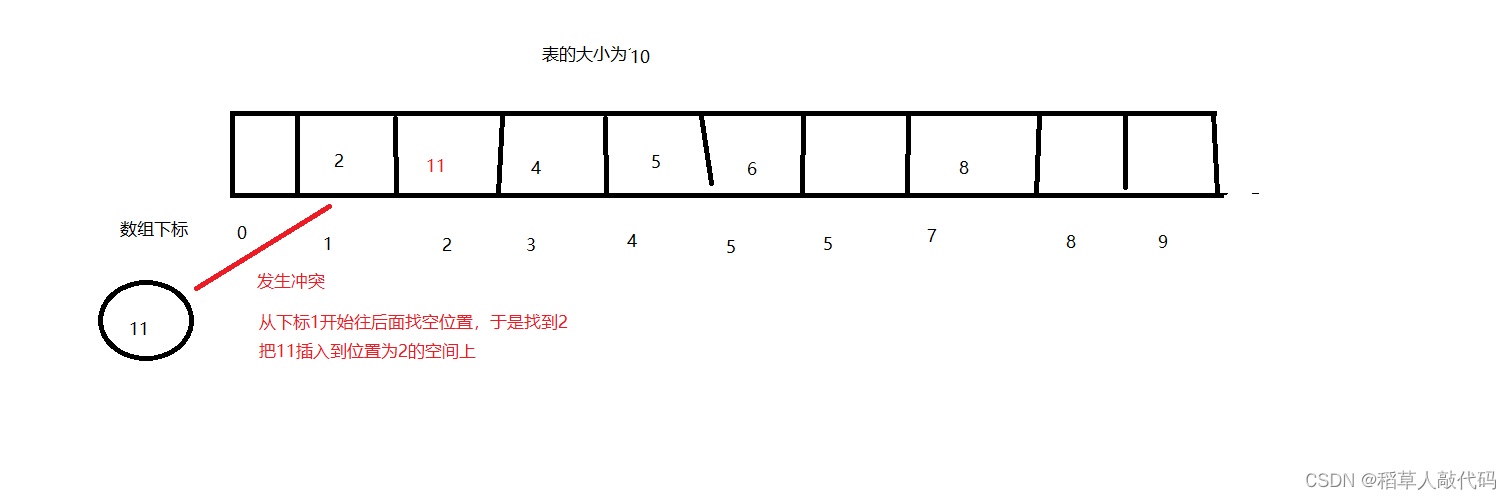
1. 闭散列
闭散列又叫开放定址法。当发生哈希冲突时,如果该哈希表还有空位,那么就从冲突位置开始往后找,直到找到空位。该如何往后找空位呢?一个一个找嘛?
- 线性探测:线性探测,从发生冲突的位置开始,一个一个往后面找,直到找到空位。
- 二次探测:从发生冲突的位置开始,使用一个二次探测公式来寻找下一个探测的位置,探测公式为:
H(k)=(Hash(k)+C1*i+C2*(i^2))%p- 其中
H(k)表示的是第i次探测的位置。 Hash(k)表示通过哈希函数得到的初始地址C1和C2是一个常数,C1通常为0,C2通常为1,即H(k)=(Hash(k)+(i^2))%pi是探测的次数,从0开始p是哈希表的大小
- 其中
二次探测的优点是能有效减少一次探测中数据过于“集中”的问题,即连续的冲突位置,会形成长链。而二次探测会使得探测的位置更加分散。
研究表明:当表的长度为质数且表装载因子a不超过0.5时,新的表项一定能够插入,而且任何一个位置都不会被探查两次。因此只要表中有一半的空位置,就不会存在表满的问题。在搜索时可以不考虑表装满的情况,但在插入时必须确保表的装载因子a不超过0.5,如果超出必须考虑增容。
装载因子又叫做负载因子,是哈希表中元素个数与哈希表大小的比值。
代码实现
哈希表类主要有两个模块需要实现,一个是节点类,还有一个是存储节点的容器。容器我们选择使用STL中的vector。对于节点类,我们希望至少能实现以下功能:
- 存储键值对
- 存储状态
值得注意的是,由于线性探测法的特性,删除一个元素之后可能会影响后续查找元素。我们需要给每个节点赋予三种状态表示:空节点、存在值得节点、被删除得节点。有了这三种种状态,我们在查找元素时,就不会因为中间曾经被删除的节点而影响。
#define _CRT_SECURE_NO_WARNINGS 1#include<iostream>
#include<vector>
using namespace std;
namespace Close_Hash{enum Statu{EMPTY,EXIST,DEL};template<class K,class V>struct Node {Node():_statu(EMPTY){}pair<K, V> _kv;Statu _statu;};template<class K>struct HashFunc{size_t operator()(const K& key) {return (size_t)key;}};template<>struct HashFunc<string> {size_t operator()(const string& key) {size_t res = 0;for (auto it : key) {int u = it - '0';res = res * 131 + u;}return res;}};template<class K,class V,class Hash=HashFunc<K>>class HashTable {public:HashTable(size_t capacity = 10): _totalSize(0), _ht(capacity){}V& operator[](const K& key) {Node<K, V>* node = Find(key);if (node) {return (node->_kv).second;}else {this->Insert(make_pair(key,0));return Find(key)->_kv.second;}}// 插入bool Insert(const pair<K, V>& val) {//负载超标if (_totalSize * 10 >= 7 * _ht.size()) {HashTable<K, V> newtable;newtable._ht.resize(_ht.size() * 2);for (int i = 0; i < _ht.size(); i++) {if (_ht[i]._statu == EXIST) {newtable.Insert(_ht[i]._kv);}}_ht.swap(newtable._ht);}Hash ha;size_t pos = ha(val.first) % _ht.size();//线性探测while (_ht[pos]._statu == EXIST) {pos++;pos = pos % _ht.size();}_ht[pos]._kv = val;_ht[pos]._statu = EXIST;_totalSize++;return true;}// 查找Node<K,V>* Find(const K& key) {Hash ha;size_t pos = ha(key) % _ht.size();while (_ht[pos]._statu != EMPTY) {if (_ht[pos]._statu == EXIST && _ht[pos]._kv.first == key) {return &_ht[pos];}pos++;pos = pos % _ht.size();}return nullptr;}// 删除bool Erase(const K& key) {Node<K, V>* node = Find(key);if (!node)return false;node->_statu = DEL;return true;}size_t Size() {return _ht.size();}bool Empty() const{return _ht.empty();}private:vector<Node<K,V>> _ht;size_t _totalSize;};}
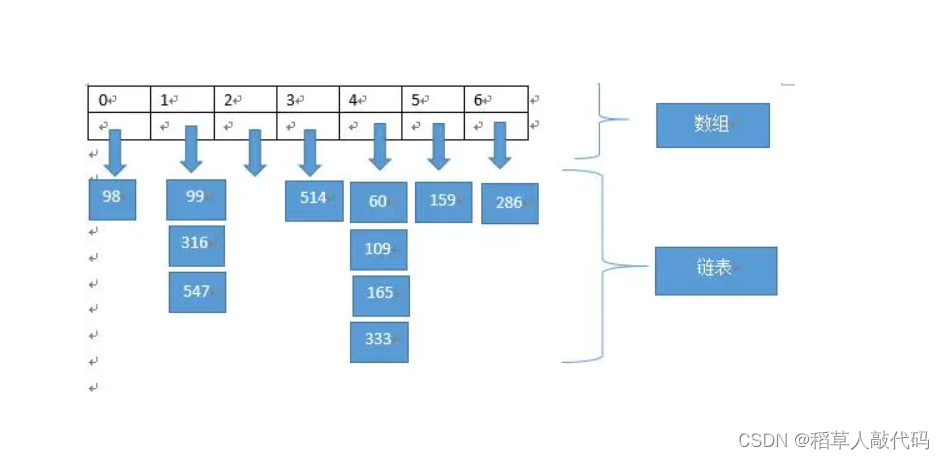
2. 开散列
开散列法又被叫做链地址法或者拉链法。和闭散列不同的是,具有相同地址的关键码属于同一集合,并用一个单链表维护这个集合。我们将这个集合称为桶。开散列得到哈希表的每一个元素实际上是一个名为桶的单链表。于是,当我们发生哈希冲突时,不用去哈希表中找空位了,因为当前桶是一个单链表,插入元素时直接头插就好了。
拉链法的优点
拉链法处理哈希冲突的效率是非常高的。即使多个元素通过哈希函数得到的地址是一样的,也不会显著影响哈希表的性能。此外,拉链法下的负载因子是可以超过1的,因此拉链法下的哈希表可以灵活的应对动态数据集的增长,不需要频繁的调整哈希表的大小。值得一提的是,虽然看上去会使用额外的空间来存放指针,但由于不需要严格维护平衡因子,空间效率并不会比开放定址法低。因为开放定址法需要开大量额外的空间来保证负载因子不溢出。
代码实现:
跟线性探测代码不一样的地方在于,拉链法的节点实际上是一个链表的头节点(桶)。所以对于哈希表的节点类,我们希望有以下功能:
- 指向下一个元素的指针
- 存储键值对
在插入元素时,将新节点插入到桶中。
#pragma once
#include<vector>
#include<iostream>
using namespace std;namespace hash_bucket {template<class K,class V>struct HashNode {HashNode(const pair<K, V>& kv): _kv(kv),_next(nullptr){}HashNode():_next(nullptr){}pair<K, V> _kv;HashNode<K, V>* _next;};template<class K>struct HashFunc {size_t operator()(const K& k) {return (size_t)k;}};template<>struct HashFunc<string> {size_t operator()(const string& str) {size_t res = 0;for (auto it : str) {int u = it;res = res * 131 + u;}return res;}};template<class K,class V,class Hash=HashFunc<K>>class HashTable {public:typedef HashNode<K, V> Node;typedef Node* pNode;HashTable():_table(10, nullptr), _n(0){}//随机访问V& operator[](const K& k) {if (!Find(k)) {Insert(make_pair(k,V()));}return Find(k)->_kv.second;}//插入bool Insert(const pair<K, V>& kv) {Hash ha;//负载因子为1时扩容if (_n == _table.size()) {HashTable<K, V> newtable;newtable._table.resize(_table.size() * 2);for (size_t i = 0; i < _table.size(); i++) {if (_table[i]) {pNode cur = _table[i];while (cur) {pNode temp = cur->_next;size_t pos = ha(cur->_kv.first) % newtable._table.size();if (newtable._table[pos]) {cur->_next = newtable._table[pos];}newtable._table[pos] = cur;cur = temp;}}}_table.swap(newtable._table);}size_t pos = ha(kv.first) % _table.size();pNode newnode = new Node(kv);if (_table[pos] != nullptr) {newnode->_next = _table[pos];}_table[pos] = newnode;_n++;return true;}//查找pNode Find(const K& k) {Hash ha;size_t pos= ha(k) % _table.size();pNode cur = _table[pos];while (cur) {if (cur->_kv.first == k)return cur;cur = cur->_next;}return nullptr;}//删除bool Erase(const K& k) {Hash ha;if (!Find(k))return false;size_t pos = ha(k) % _table.size();pNode pre = nullptr;pNode cur = _table[pos];if (cur->_kv.first == k) {delete cur;_table[pos] = nullptr;return true;}else {while (cur) {if (cur->_kv.first == k) {pre->_next = cur->_next;delete cur;cur = nullptr;return true;}pre = cur;cur = cur->_next;}return false;}}private:vector<pNode> _table;int _n;//存储有效桶的个数};}
上述代码大致实现了基于开散列法的哈希表,支持键值对的插入,删除、查询以及修改。
注意开散列法哈希表的扩容方案。当负载因子达到一定值时,我们选择扩大哈希表的大小,对于旧哈希表的元素不用再重新拷贝构造,而是移植到新表中。这样就节省了很多空间。具体实现如下:
//负载因子为1时扩容
if (_n == _table.size()) {HashTable<K, V> newtable;//新表newtable._table.resize(_table.size() * 2);for (size_t i = 0; i < _table.size(); i++) {if (_table[i]) {//遍历旧表,移植节点pNode cur = _table[i];while (cur) {pNode temp = cur->_next;size_t pos = ha(cur->_kv.first) % newtable._table.size();if (newtable._table[pos]) {cur->_next = newtable._table[pos];}newtable._table[pos] = cur;cur = temp;}}}_table.swap(newtable._table);
}
针对开散列哈希的扩展
如何给上述开散列哈希表类增加迭代器呢?
由于迭代器中需要访问哈希表而不仅仅是桶,而哈希表又属于哈希表类的私有成员。因此,设计迭代器模块时,我们可以将迭代器类设置为哈希表类的内部类。而一个类的内部类是这个类的友元,因此迭代器就能访问到哈希表。给出以迭代器代码,每一个迭代器对象指向哈希表中桶内的一个节点:
//迭代器内部类
template<class Ptr, class Ref>
struct _HashIterator {typedef _HashIterator<Ptr, Ref> self;pNode _node;const HashTable* _pht;_HashIterator(pNode pnode, const HashTable* pht):_node(pnode), _pht(pht){}Ref operator*() {return _node->_data;}Ptr operator->() {return &_node->_data;}self& operator=(const self it) {_node = it._node;_pht = it._pht;return *this;}self& operator++() {if (_node->_next) {_node = _node->_next;}else {KeyOft kft;Hash ha;size_t pos = ha(kft(_node->_data)) % _pht->_table.size();size_t i = pos + 1;for (; i < _pht->_table.size(); i++) {if (_pht->_table[i]) {break;}}if (i == _pht->_table.size()) {_node = nullptr;}else {_node = _pht->_table[i];}}return *this;}bool operator!=(const self& iterator) {return iterator._node != _node;}
};
该迭代器主要实现了重载操作符的作用,希望能将迭代器当指针来使用。
基于开散列拉链法封装哈希表
MyHash.h
该文件封装实现了一个哈希表类,哈希函数是除留余数,解决哈希冲突的方法采用拉链法。
代码:
#pragma once
#include<vector>
#include<iostream>
using namespace std;namespace hash_bucket {template<class T>struct HashNode {HashNode(const T& data): _data(data), _next(nullptr){}HashNode():_next(nullptr){}T _data;HashNode<T>* _next;};template<class K>struct HashFunc {size_t operator()(const K& k) {return (size_t)k;}};template<>struct HashFunc<string> {size_t operator()(const string& str) {size_t res = 0;for (auto it : str) {int u = it;res = res * 131 + u;}return res;}};template<class K, class T, class KeyOft, class Hash = HashFunc<K>>class HashTable {public:typedef HashNode<T> Node;typedef Node* pNode;HashTable():_table(10, nullptr), _n(0){}//迭代器内部类template<class Ptr, class Ref>struct _HashIterator {typedef _HashIterator<Ptr, Ref> self;pNode _node;const HashTable* _pht;_HashIterator(pNode pnode, const HashTable* pht):_node(pnode), _pht(pht){}Ref operator*() {return _node->_data;}Ptr operator->() {return &_node->_data;}self& operator=(const self it) {_node = it._node;_pht = it._pht;return *this;}self& operator++() {if (_node->_next) {_node = _node->_next;}else {KeyOft kft;Hash ha;size_t pos = ha(kft(_node->_data)) % _pht->_table.size();size_t i = pos + 1;for (; i < _pht->_table.size(); i++) {if (_pht->_table[i]) {break;}}if (i == _pht->_table.size()) {_node = nullptr;}else {_node = _pht->_table[i];}}return *this;}bool operator!=(const self& iterator) {return iterator._node != _node;}};typedef _HashIterator<T*, T&> Iterator;typedef _HashIterator<const T*, const T&> Const_Iterator;//迭代器Iterator begin() {for (size_t i = 0; i < _table.size(); i++) {if (_table[i]) {return Iterator(_table[i], this);}}return Iterator(nullptr, this);}Iterator end() {return Iterator(nullptr, this);}Const_Iterator begin()const {for (size_t i = 0; i < _table.size(); i++) {if (_table[i]) {return Iterator(_table[i], this);}}return Iterator(nullptr, this);}Const_Iterator end() const {return Iterator(nullptr, this);}//随机访问/*V& operator[](const K& k) {if (!Find(k)) {Insert(make_pair(k,V()));}return Find(k)->_kv.second;}*///插入pair<Iterator, bool> Insert(const T& val) {Hash ha;KeyOft kft;Iterator it = Find(kft(val));if (it._node != nullptr)return make_pair(it, false);//负载因子为1时扩容if (_n == _table.size()) {HashTable<K, T, KeyOft> newtable;newtable._table.resize(_table.size() * 2);for (size_t i = 0; i < _table.size(); i++) {if (_table[i]) {pNode cur = _table[i];while (cur) {pNode temp = cur->_next;size_t pos = ha(kft(cur->_data)) % newtable._table.size();if (newtable._table[pos]) {cur->_next = newtable._table[pos];}newtable._table[pos] = cur;cur = temp;}}}_table.swap(newtable._table);}size_t pos = ha(kft(val)) % _table.size();pNode newnode = new Node(val);if (_table[pos] != nullptr) {newnode->_next = _table[pos];}_table[pos] = newnode;_n++;return make_pair(Iterator(newnode, this), true);}//查找Iterator Find(const K& k) {Hash ha;KeyOft kft;size_t pos = ha(k) % _table.size();pNode cur = _table[pos];while (cur) {if (kft(cur->_data) == k)return Iterator(cur, this);cur = cur->_next;}return Iterator(nullptr, this);}//删除bool Erase(const K& k) {Hash ha;KeyOft kft;if (!Find(k))return false;size_t pos = ha(k) % _table.size();pNode pre = nullptr;pNode cur = _table[pos];if (kft(cur->_data) == k) {delete cur;_table[pos] = nullptr;return true;}else {while (cur) {if (kft(cur->_data) == k) {pre->_next = cur->_next;delete cur;cur = nullptr;return true;}pre = cur;cur = cur->_next;}return false;}}private:vector<pNode> _table;int _n;};}
基于哈希表实现unordered_map类
基于MyHash.h封装的哈希表类提供的接口,实现一个unordered_map。unordered_map的值是一个键值对。
Myunordered_map.h
该文件基本实现了unordered_map类。
代码:
#define _CRT_SECURE_NO_WARNINGS 1
#include"MyHash.h"namespace bit {template<class K, class V, class Hash =	hash_bucket::HashFunc<K> >class unordered_map {struct MapKeyOft {const K& operator()(const pair<K, V>& kv) {return kv.first;}};public:typedef typename hash_bucket::HashTable<K, pair<const K, V>, MapKeyOft, Hash>::Iterator iterator;//typedef typename hash_bucket::HashTable<K, pair<const K, V>, KeyOft, Hash>::Const_Iterator const_iterator;iterator begin() {return _ht.begin();}iterator end() {return _ht.end();}V& operator[](const K& k) {pair<iterator,bool>res=insert(make_pair(k, V()));return res.first->second;}pair<iterator, bool> insert(const pair<K,V>& kv) {return _ht.Insert(kv);}bool erase(const K& k) {return _ht.Erase(k);}pair<iterator, bool> find(const K& k) {return _ht.Find(k);}private:hash_bucket::HashTable<K, pair<const K, V>, MapKeyOft, Hash> _ht;};}
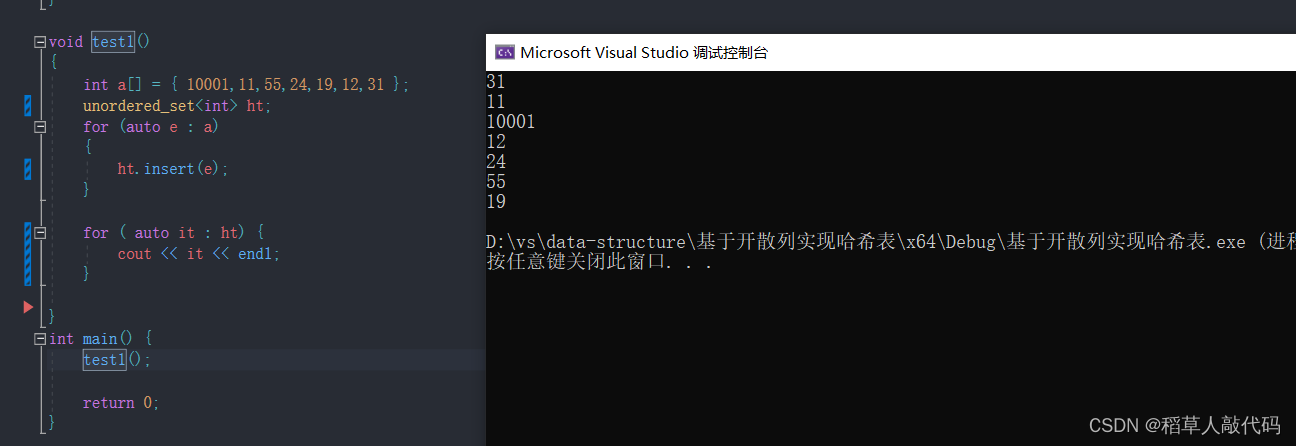
基于哈希表实现unordered_set类
基于MyHash.h封装的哈希表类提供的接口,实现一个unordered_set类。
Myunordered_map.h
该文件基本实现了unordered_set类。
代码:
#include"MyHash.h"namespace bit {template<class K,class Hash = hash_bucket::HashFunc<K> >class unordered_set {struct SetKeyOft {const K& operator()(const K& k) {return k;}};public:typedef typename hash_bucket::HashTable<K, const K, SetKeyOft, Hash>::Iterator iterator;typedef typename hash_bucket::HashTable<K, const K, SetKeyOft, Hash>::Const_Iterator const_iterator;iterator begin() {return _ht.begin();}iterator end() {return _ht.end();}pair<iterator, bool> insert(const K& kv) {return _ht.Insert(kv);}bool erase(const K& k) {return _ht.Erase(k);}pair<iterator, bool> find(const K& k) {return _ht.Find(k);}private:hash_bucket::HashTable<K, const K, SetKeyOft, Hash> _ht;};}