今天我们了解list,list在python中是列表的意思 ,但是在C++中它是一个带头双向循环链表:
list的介绍
- list是可以在常数范围内在任意位置进行插入和删除的序列式容器,并且该容器可以前后双向迭代。
- list的底层是双向链表结构,双向链表中每个元素存储在互不相关的独立节点中,在节点中通过指针指向其前一个元素和后一个元素。
- list与forward_list非常相似:最主要的不同在于forward_list是单链表,只能朝前迭代,已让其更简单高效。
- 与其他的序列式容器相比(array,vector,deque),list通常在任意位置进行插入、移除元素的执行效率更好。
- 与其他序列式容器相比,list和forward_list最大的缺陷是不支持任意位置的随机访问,比如:要访问list的第6个元素,必须从已知的位置(比如头部或者尾部)迭代到该位置,在这段位置上迭代需要线性的时间开销;list还需要一些额外的空间,以保存每个节点的相关联信息(对于存储类型较小元素的大list来说这可能是一个重要的因素)
list的模拟实现
有了前面的string和vector的模拟实现,我们的list的模拟实现算是轻车熟路了,我们要想模拟实现list就需要了解list在库里面的源码,我们用everything查找一下
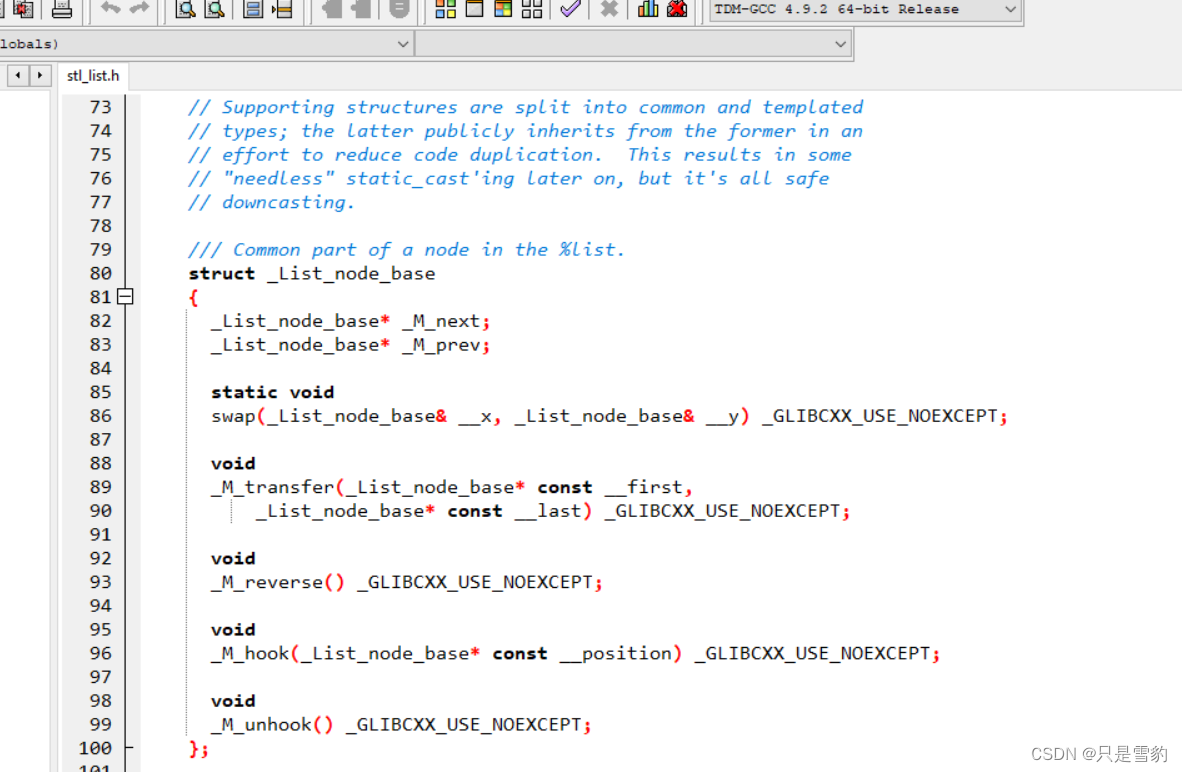
可以看到,在list的类里面成员参数只有一个,但是这个参数是此前定义的一个结构体,它包含了,next,prev和当前节点存储的data,所以我们同样需要去自定义一个结构体
我们首先把定义一个结构体,就是list的节点的结构,同时在里面定义一个构造新节点的函数:
template <class T>
struct list_node
{T _data;list_node<T>* _prev;list_node<T>* _next;list_node(const T& x = T()):_data(x), _prev(nullptr), _next(nullptr){}
};
然后我们就可以在命名空间内定义list类了:
为了可读性和代码的简洁,我就用Node来作为list_node的重命名了
namespace jh
{template <class T>struct list_node{T _data;list_node* _prev;list_node* _next;list_node(const T& x = T()):_data(x), _prev(nullptr), _next(nullptr){}};template <class T>class list{typedef list_node<T> Node;private:Node* _head;size_t _size;};
}
我们首先就拿下最难啃的一块骨头:
迭代器
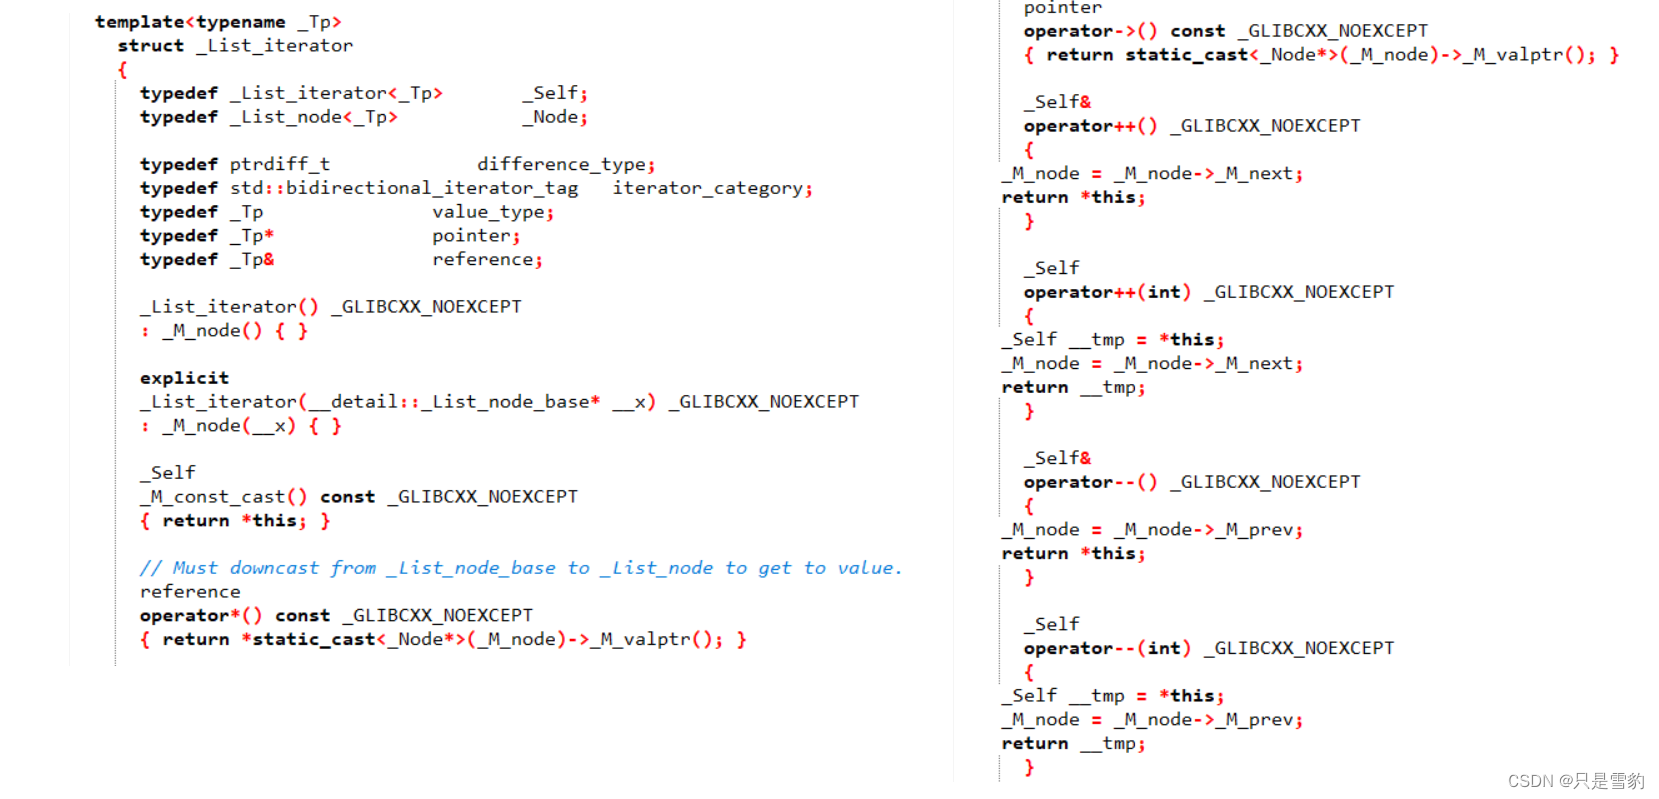
我们再次查看list的源码就会发现:
迭代器同样地使用了一个结构体来构造,所以这里我们也采用结构体
我们先整体地构造一个框架:
至于模块的地方为什么有多个参数我稍后做讲解,这是一个很重要的点
迭代器就是一个节点,我们同时定义一个拷贝构造的函数
template <class T,class Ref,class Ptr>struct __list_iterator{typedef list_node<T> Node;typedef __list_iterator<T,Ref,Ptr> self;Node* _node;__list_iterator(Node* node):_node(node){}};
++和–的重载:
迭代器最常用的点就是++和–,因为我们需要用迭代器来初始化等等,我们就首先在结构体内重载++和–:
括号后面又int的我们之前的博客也进行学习过,它是后置,编译器会自动识别的,temp就是一个匿名对象,他的生命周期只有一行,这里的->运算符我们之后也要做重载,不然不能用
这里还有一个需要注意的点:
前置是返回对象本身,所以用引用返回减少拷贝,但是后置返回的是对象temp临时变量,是一个常量,不能用引用
self& operator++()
{_node = _node->_next;return *this;
}
self& opetrator--()
{_node = _node->prev;return *this;
}
self operator++(int)
{self temp(*this);_node = _node->next;return temp;
}
self operator--(int)
{self temp(*this);_node = _node->prev;return temp;
}
*和->的重载:
*是解引用,就是返回迭代器所存储的数据,返回data就是
—>操作符前的是一个地址,所以就取地址就可以了,这里的Ref和Ptr就派上用场了
Ref operator*()
{return _node->_data;
}Ptr operator->()
{return &_node->data;
}
!=和==操作符重载:
这里用bool类型就可以了,直接返回它们之间的关系即可
bool operator!=(const self& s)
{return _node != s._node;
}bool operator==(const self& s)
{return _node == s._node;
}
迭代器就完成了:
增加Ref和Ptr的作用就是为了随时适应,例如需要const T或者const T*这种,这样就省去了const迭代器的代码,更加简洁了,这是迭代器的妙处之一!
template <class T,class Ref,class Ptr>struct __list_iterator{typedef list_node<T> Node;typedef __list_iterator<T,Ref,Ptr> self;Node* _node;__list_iterator(Node* node):_node(node){}self& operator++(){_node = _node->_next;return *this;}self& operator--(){_node = _node->prev;return *this;}self operator++(int){self temp(*this);_node = _node->next;return temp;}self operator--(int){self temp(*this);_node = _node->prev;return temp;}Ref operator*(){return _node->_data;}Ptr operator->(){return &_node->data;}bool operator!=(const self& s){return _node != s._node;}bool operator==(const self& s){return _node == s._node;}};
迭代器解决后我们就可以将其应用到list类里了:
这里大家记住:
begin就是头节点head的下一个节点
end就是head节点
const_iterator begin() const
{return const_iterator(_head->_next);
}
const_iterator end() const
{return const_iterator(_head);
}
iterator begin()
{return iterator(_head->_next);
}
iterator end()
{return iterator(_head);
}
构造函数
构造函数我们必须有一个头节点head,同时我们要知道当list为空时,head的next和prev都是head本身
void empty_init()
{_head = new Node;_head->_next = _head;_head->_prev = _head;
}list()
{empty_init();
}
insert函数
insert函数要做的就是首先构造一个新的节点,然后插入,插入很简单,我们在数据结构中学过,这里不做过多的讲解:
记住最后要返回插入的那个新节点!
iterator insert(iterator pos, const T& x = T())
{Node* cur = pos._node;Node* newnode = new Node(x);Node* prev = cur->_prev;prev->_next = newnode;newnode->_next = cur;cur->_prev = newnode;newnode->_prev = prev;return iterator(newnode);
}
erase函数
erase函数同样地也是用数据结构的知识来操作,但是erase函数返回的是删除pos位置的下一个位置的迭代器:
iterator erase(iterator pos)
{Node* cur = pos._node;Node* prev = cur->_prev;Node* next = cur->_next;delete cur;prev->_next = next;next->_prev = prev;return iterator(next);
}
尾删和头删,尾插和头插
这些我们在有了解决了erase和insert之后可以直接复用了:
void push_back(const T& x)
{insert(end(), x);
}
void push_front(const T& x)
{insert(begin(), x);
}
void pop_back()
{erase(end());
}
void pop_front()
{erase(begin());
}
拷贝构造函数
拷贝构造函数我们依旧用pushback和语法糖来实现:
逐一将lt中的元素尾插进入即可
list(const list<t>T& lt)
{empty_init();for (auto e : lt){push_back(e);}
}
赋值操作符重载
赋值操作符重载我们用swap解决,直接调用std库里的swap函数即可:
void swap(list<T>& lt)
{std::swap(_head, lt._head);
}
list<T>& operator=(list<T> lt)
{swap(lt);return *this;
}
析构函数
我们先定义一个clear函数用于清理空间,然后复用,记住将head节点释放:
void clear()
{iterator it = begin();while (it != end()){it = erase(it);//erase每次返回的都是it的next,故可以这样写}
}
~list()
{clear();delete _head;_head = nullptr;
}
到这里,list的模拟实现差不多就结束了,感谢大家的支持!
完整代码如下:
using namespace std;
namespace jh
{template <class T>struct list_node{T _data;list_node<T>* _prev;list_node<T>* _next;list_node(const T& x = T()):_data(x), _prev(nullptr), _next(nullptr){}};template<class T, class Ref, class Ptr>struct __list_iterator{typedef list_node<T> Node;typedef __list_iterator<T, Ref, Ptr> self;Node* _node;__list_iterator(Node* node):_node(node){}self& operator++(){_node = _node->_next;return *this;}self& operator--(){_node = _node->_prev;return *this;}self operator++(int){self temp(*this);_node = _node->_next;return temp;}self operator--(int){self temp(*this);_node = _node->_prev;return temp;}Ref operator*(){return _node->_data;}Ptr operator->(){return &_node->_data;}bool operator!=(const self& s){return _node != s._node;}bool operator==(const self& s){return _node == s._node;}};template <class T>class list{typedef list_node<T> Node;public:typedef __list_iterator<T, const T&, const T*> iterator;typedef __list_iterator<T, const T&, const T*> const_iterator;const_iterator begin() const{return const_iterator(_head->_next);}const_iterator end() const{return const_iterator(_head);}iterator begin(){return iterator(_head->_next);}iterator end(){return iterator(_head);}void empty_init(){_head = new Node;_head->_next = _head;_head->_prev = _head;}list(){empty_init();}iterator insert(iterator pos, const T& x = T()){Node* cur = pos._node;Node* newnode = new Node(x);Node* prev = cur->_prev;prev->_next = newnode;newnode->_next = cur;cur->_prev = newnode;newnode->_prev = prev;return iterator(newnode);}iterator erase(iterator pos){Node* cur = pos._node;Node* prev = cur->_prev;Node* next = cur->_next;delete cur;prev->_next = next;next->_prev = prev;return iterator(next);}void push_back(const T& x){insert(end(), x);}void push_front(const T& x){insert(begin(), x);}void pop_back(){erase(end());}void pop_front(){erase(begin());}list(const list<T>& lt){empty_init();for (auto e : lt){push_back(e);}}void swap(list<T>& lt){std::swap(_head, lt._head);}list<int>& operator=(list<int> lt){swap(lt);return *this;}void clear(){iterator it = begin();while (it != end()){it = erase(it);}}~list(){clear();delete _head;_head = nullptr;}private:Node* _head;size_t _size;};
}


![[GXYCTF2019]BabySQli1](https://img-blog.csdnimg.cn/direct/748ab70d48a248c29e5c9180fd8b6b55.png)