Angr学习
- Top Level Interfaces
- 基本信息
- Basic Block
- Loading a Binary
- 基本信息
- Symbols and Relocations
- Program State
- CFG
之前一直做静态代码检测,主要是针对未编译过的源代码文本,不过在文本层面能分析的问题只是一小部分,有些问题还得在执行层面发现。符号执行是一个有效的方法。关于符号执行,这里就不解释那么多了,主要学习一个工具,angr的使用。
angr是一个基于python的二进制框架,即一个python library。官网,安装也非常简单,我是用anaconda创建了一个python 3.7环境,直接pip install angr就能一键安装。
这里主要从官网给的例子来学习,差不多也就是搬运官网的内容。这位大佬写的也非常全,适合学习各个模块的功能。
Top Level Interfaces
以r100为例
涉及到angr的基本用法,先粘贴代码,一些解释写在注释上,感觉这样方便的多
import angrdef main():p = angr.Project("examples/r100")print(p.arch) # CPU架构print(hex(p.entry)) # start函数地址print(p.loader.shared_objects) # OrderedDict,涉及到的二进制文件print(hex(p.loader.min_addr)) # 0x400000,虚拟地址最低地址.imageBaseprint(hex(p.loader.max_addr))# block,angr执行的unitblock = p.factory.block(p.entry)print(block.pp())# print(type(block.pp()))print(block.instructions) # 一个int类型数值print(block.instruction_addrs) # 每个指令的地址,一个list,长度为block.instructions# statesstate = p.factory.entry_state() # start函数的stateprint(state.mem[p.entry].int.resolved)# simulation managerssimgr = p.factory.simulation_manager(p.factory.full_init_state())simgr.explore(find=0x400844, avoid=0x400855)print(simgr)print(simgr.found[0].posix.dumps(0).strip(b'\0\n'))
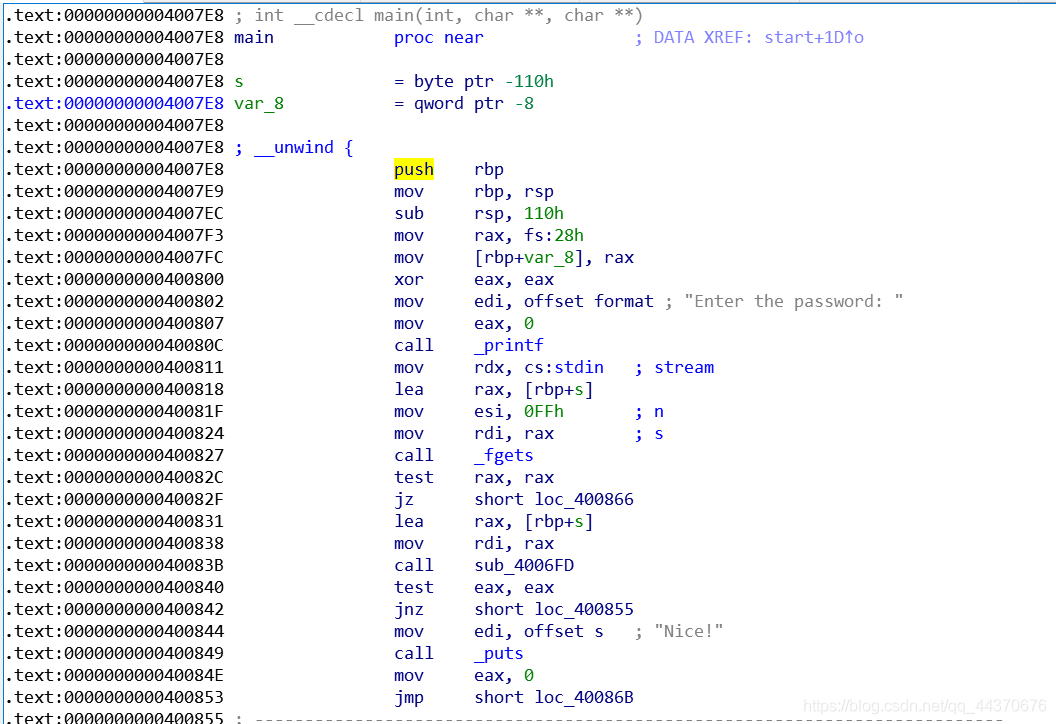
r100 IDA逆向如下:
start函数:

main函数:

基本信息
执行结果:
p.arch:<Arch AMD64 (LE)>
p.entry:0x400610
p.loader.shared_objects:OrderedDict([('r100', <ELF Object r100, maps [0x400000:0x601077]>), ('libc.so.6', <ELF Object libc-2.27.so, maps [0x700000:0xaf0adf]>), ('ld-linux-x86-64.so.2', <ELF Object ld-2.27.so, maps [0xb00000:0xd2b16f]>), ('extern-address space', <ExternObject Object cle##externs, maps [0xe00000:0xe7ffff]>), ('cle##tls', <ELFTLSObjectV2 Object cle##tls, maps [0xf00000:0xf1500f]>)])
p.loader.min_addr:0x400000
p.loader.max_addr:0x1007fff
Basic Block
可以通过project.factory.block(addr)来获取给定地址的基本块,angr分析代码的unit就是基本块。示例代码查看的是入口处start函数的基本块,结果如下:
block.pp():
0x400610:	xor	ebp, ebp
0x400612:	mov	r9, rdx
0x400615:	pop	rsi
0x400616:	mov	rdx, rsp
0x400619:	and	rsp, 0xfffffffffffffff0
0x40061d:	push	rax
0x40061e:	push	rsp
0x40061f:	mov	r8, 0x400900
0x400626:	mov	rcx, 0x400890
0x40062d:	mov	rdi, 0x4007e8
0x400634:	call	0x4005d0
Noneblock.instructions:11
block.instruction_addrs:[4195856, 4195858, 4195861, 4195862, 4195865, 4195869, 4195870, 4195871, 4195878, 4195885, 4195892]
关于state和simulation_manager,这里暂时不说。
Loading a Binary
这里主要介绍angr加载PE文件的component,CLE。
这里用到的示例为fauxware。
源代码如下:
#include <stdio.h>
#include <string.h>
#include <unistd.h>
#include <fcntl.h>
#include <stdlib.h>char *sneaky = "SOSNEAKY";int authenticate(char *username, char *password)
{char stored_pw[9];stored_pw[8] = 0;int pwfile;// evil back d00rif (strcmp(password, sneaky) == 0) return 1;pwfile = open(username, O_RDONLY);read(pwfile, stored_pw, 8);if (strcmp(password, stored_pw) == 0) return 1;return 0;}int accepted()
{printf("Welcome to the admin console, trusted user!\n");
}int rejected()
{printf("Go away!");exit(1);
}int main(int argc, char **argv)
{char username[9];char password[9];int authed;username[8] = 0;password[8] = 0;printf("Username: \n");read(0, username, 8);read(0, &authed, 1);printf("Password: \n");read(0, password, 8);read(0, &authed, 1);authed = authenticate(username, password);if (authed) accepted();else rejected();
}
先上代码
基本信息
>>> proj = angr.Project('examples/fauxware') # 加载PE文件
>>> proj.loader # 相应loader,map到了 [min_addr: max_addr] 的地址空间
<Loaded fauxware, maps [0x400000:0x1007fff]>>> proj.loader.all_objects # 所有被加载的Object
[<ELF Object fauxware, maps [0x400000:0x60105f]>, <ELF Object libc-2.27.so, maps [0x700000:0xaf0adf]>, <ELF Object ld-2.27.so, maps [0xb00000:0xd2b16f]>, <ExternObject Object cle##externs, maps [0xe00000:0xe7ffff]>, <ELFTLSObjectV2 Object cle##tls, maps [0xf00000:0xf1500f]>, <KernelObject Object cle##kernel, maps [0x1000000:0x1007fff]>]>>> proj.loader.main_object # fauxware PE文件
<ELF Object fauxware, maps [0x400000:0x60105f]>>>> proj.loader.shared_objects # 一个dict, filename -> file object
OrderedDict([('fauxware', <ELF Object fauxware, maps [0x400000:0x60105f]>), ('libc.so.6', <ELF Object libc-2.27.so, maps [0x700000:0xaf0adf]>), ('ld-linux-x86-64.so.2', <ELF Object ld-2.27.so, maps [0xb00000:0xd2b16f]>), ('extern-address space', <ExternObject Object cle##externs, maps [0xe00000:0xe7ffff]>), ('cle##tls', <ELFTLSObjectV2 Object cle##tls, maps [0xf00000:0xf1500f]>)])>>> proj.loader.all_elf_objects # 一个list,windows下用all_pe_objects
[<ELF Object fauxware, maps [0x400000:0x60105f]>, <ELF Object libc-2.27.so, maps [0x700000:0xaf0adf]>, <ELF Object ld-2.27.so, maps [0xb00000:0xd2b16f]>]


>>> obj = proj.loader.main_object
>>> hex(obj.entry)
'0x400580'>>> hex(obj.min_addr), hex(obj.max_addr)
('0x400000', '0x60105f')>>> addr = obj.plt['strcmp']
>>> hex(addr)
'0x400550'
>>> obj.reverse_plt[addr]
'strcmp'>>> hex(obj.linked_base) # Show the prelinked base of the object and the location it was actually mapped into memory by CLE
'0x400000'
>>> hex(obj.mapped_base)
'0x400000'
Symbols and Relocations
引用官网的话: A symbol is a fundamental concept in the world of executable formats, effectively mapping a name to an address.
loader.find_symbol是最简单的获取symbol的方式
>>> strcmp = proj.loader.find_symbol('strcmp')
>>> strcmp
<Symbol "strcmp" in libc-2.27.so at 0x79d940>
Symbol类有下面几个属性是常用的,name,owner,address。address通常比较模糊。Symbol对象通常有3种方式表示它的地址
rebased_addr: address in the global address spacelinked_addr: address relative to the prelinked base of the binaryrelative_addr: address relative to the object base
>>> strcmp.owner
<ELF Object libc-2.27.so, maps [0x700000:0xaf0adf]>>>> hex(strcmp.rebased_addr)
'0x79d940'
>>> hex(strcmp.linked_addr)
'0x9d940'
>>> hex(strcmp.relative_addr)
'0x9d940'
>>> main_strcmp = proj.loader.main_object.get_symbol('strcmp')
>>> main_strcmp
<Symbol "strcmp" in fauxware (import)>>>> main_strcmp.resolvedby
<Symbol "strcmp" in libc-2.27.so at 0x79d940>
可以看到 main_strcmp.resolvedby 和 proj.loader.find_symbol('strcmp') 是同一个Symbol。
Program State
angr用SimState类来表示Program State,可以用来访问寄存器和内存(模拟的)。
这里用/bin/true文件举例。粘贴一下官网的示例代码
import angr, claripy
proj = angr.Project('/bin/true')
state = proj.factory.entry_state()# copy rsp to rbp
state.regs.rbp = state.regs.rsp# store rdx to memory at 0x1000
state.mem[0x1000].uint64_t = state.regs.rdx# dereference rbp
state.regs.rbp = state.mem[state.regs.rbp].uint64_t.resolved# add rax, qword ptr [rsp + 8]
state.regs.rax += state.mem[state.regs.rsp + 8].uint64_t.resolved
这里用到的是proj.factory.entry_state()来创建一个state,还有其它的state构造方法(不好翻译,就直接粘贴英文说明)
blank_state():constructs a “blank slate” blank state, with most of its data left uninitialized.When accessing uninitialized data, an unconstrained symbolic value will be returnedentry_state():constructs a state ready to execute at the main binary’s entry point.full_init_state():constructs a state that is ready to execute through any initializers that need to be run before the main binary’s entry point, for example, shared library constructors or preinitializers.When it is finished with these it will jump to the entry point.call_state():constructs a state ready to execute a given function.
关于state其它内容,之后应用到具体分析上(比如CTF)再说:官网state解释
CFG
angr提供2种方式访问CFG,CFGFast和CFGEmulated。
CFGFast采用静态方式生成CFG,会受限于某些CFG只能运行时产生。CFGEmulated采用符号执行生成CFG。而可能由于符号执行路径不全的问题可能造成CFG一些缺失。
CFG可视化可以参考:angr-utils


