OpenStack 创建自定义的QCOW2格式镜像
前言
建议虚机网络配置为 NAT 或 桥接,因为未来 KVM虚机 需要借助 虚机 的外网能力进行联网安装软件包
虚机在启动前,必须在 VMware Workstation 上为其开启虚拟化引擎 虚拟化 Intel VT-x/EPT 或 AMD-V

安装kvm
虚拟机安装虚拟化软件包
# 挂载光盘
[root@localhost ~]# mount /dev/cdrom /mnt
mount: /dev/sr0 is write-protected, mounting read-only
[root@localhost ~]# ls /mnt/
CentOS_BuildTag  GPL       LiveOS    RPM-GPG-KEY-CentOS-7
EFI              images    Packages  RPM-GPG-KEY-CentOS-Testing-7
EULA             isolinux  repodata  TRANS.TBL# 配置本地YUM源
[root@localhost ~]# cd /etc/yum.repos.d/
[root@localhost yum.repos.d]# ls
CentOS-Base.repo       CentOS-fasttrack.repo  CentOS-Vault.repo
CentOS-CR.repo         CentOS-Media.repo      CentOS-x86_64-kernel.repo
CentOS-Debuginfo.repo  CentOS-Sources.repo
[root@localhost yum.repos.d]# mkdir bak
[root@localhost yum.repos.d]# mv *.repo bak/
[root@localhost yum.repos.d]# ls
bak
[root@localhost yum.repos.d]# vim source.repo
[root@localhost yum.repos.d]# cat source.repo
[source]
name = source
baseurl = file:///mnt/
gpgcheck = 0
[root@localhost yum.repos.d]# yum clean all
[root@localhost yum.repos.d]# yum repolist all# 安装虚拟化软件包及虚拟机镜像管理工具
[root@localhost ~]# yum grouplist
Loaded plugins: fastestmirror, langpacks
There is no installed groups file.
Maybe run: yum groups mark convert (see man yum)
Loading mirror speeds from cached hostfile
source                                                    | 3.6 kB  00:00:00
(1/2): source/group_gz                                    | 153 kB  00:00:00
(2/2): source/primary_db                                  | 3.3 MB  00:00:00
Available Environment Groups:Minimal InstallCompute NodeInfrastructure ServerFile and Print ServerBasic Web ServerVirtualization HostServer with GUIGNOME DesktopKDE Plasma WorkspacesDevelopment and Creative Workstation
Available Groups:Compatibility LibrariesConsole Internet ToolsDevelopment ToolsGraphical Administration ToolsLegacy UNIX CompatibilityScientific SupportSecurity ToolsSmart Card SupportSystem Administration ToolsSystem Management
Done
[root@localhost ~]# yum groupinstall -y "Virtualization*"
[root@localhost ~]#  yum install -y libguestfs-tools-c.x86_64
创建kvm虚拟机
# 创建目录上传ISO镜像
[root@localhost ~]# mkdir /iso
[root@localhost ~]# cd /iso/
# 将 CentOS7镜像 上传到 /iso 目录下
[root@localhost iso]# ls
CentOS-7-x86_64-DVD-2009.iso# 创建 kvm虚拟机 使用的磁盘文件
[root@localhost iso]# qemu-img create -f qcow2 /iso/centos7.qcow2 15G
Formatting '/iso/centos7.qcow2', fmt=qcow2 size=16106127360 encryption=off cluster_size=65536 lazy_refcounts=off # 创建 kvm 虚拟机
[root@localhost ~]# virt-install \
--name centos7 \
--disk path=/iso/centos7.qcow2 \
--vcpus 1 \
--memory 2048 \
--location /iso/CentOS-7-x86_64-DVD-2009.iso \
--network network=default
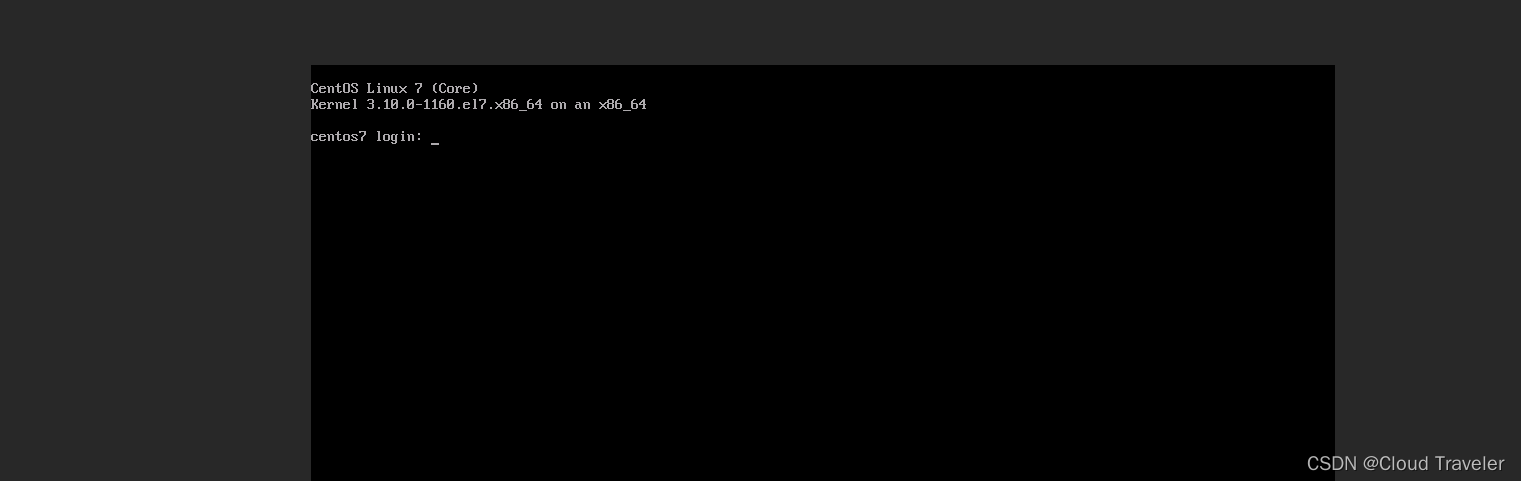
安装kvm虚拟机
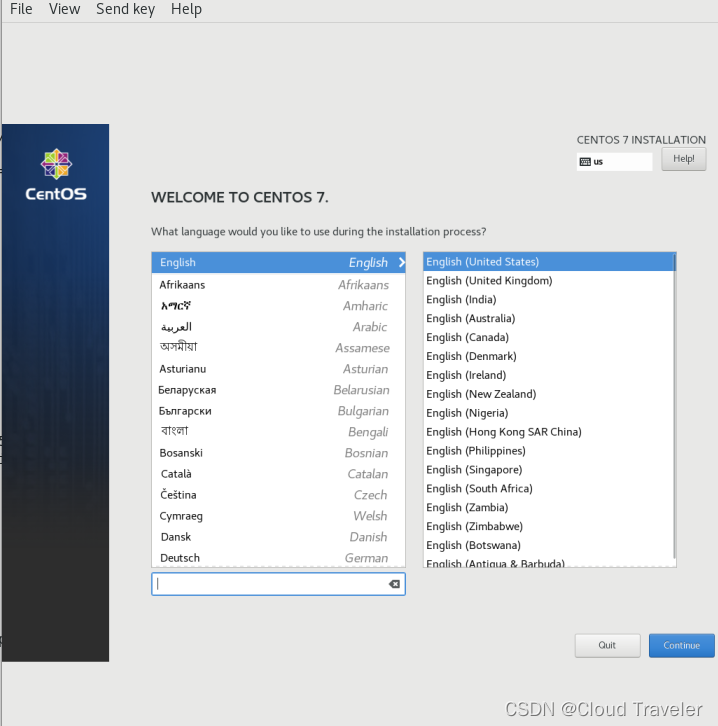
语言选择
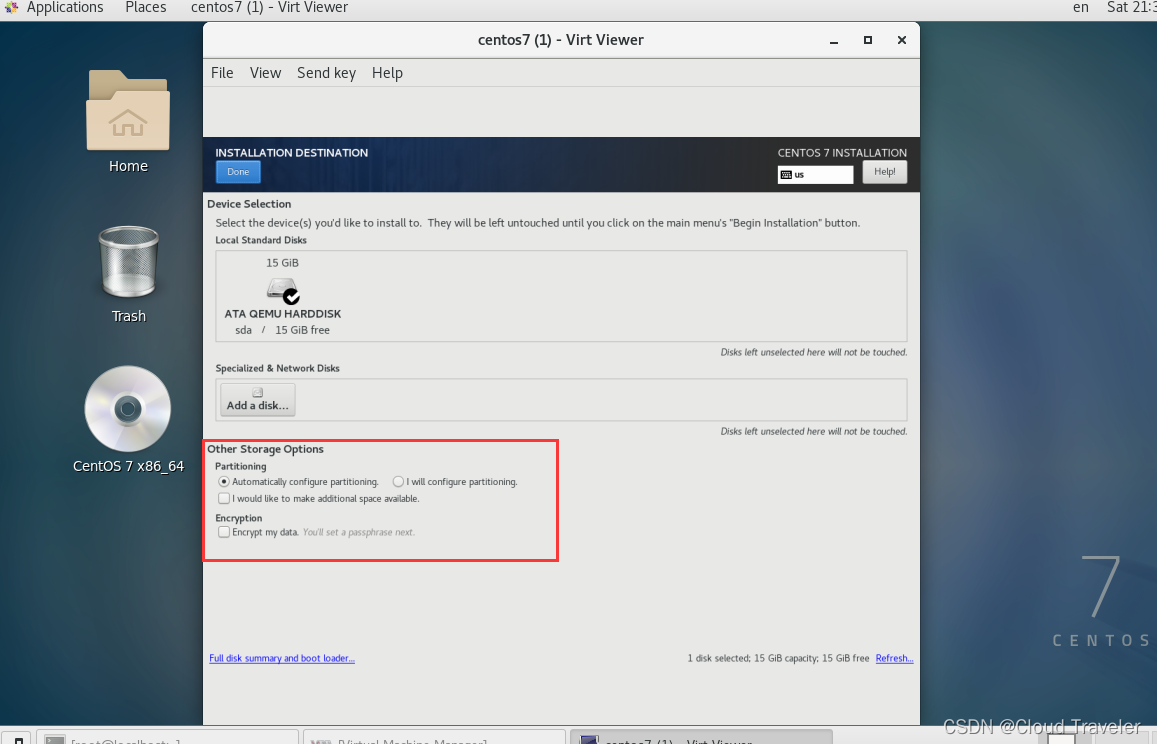
自动分区
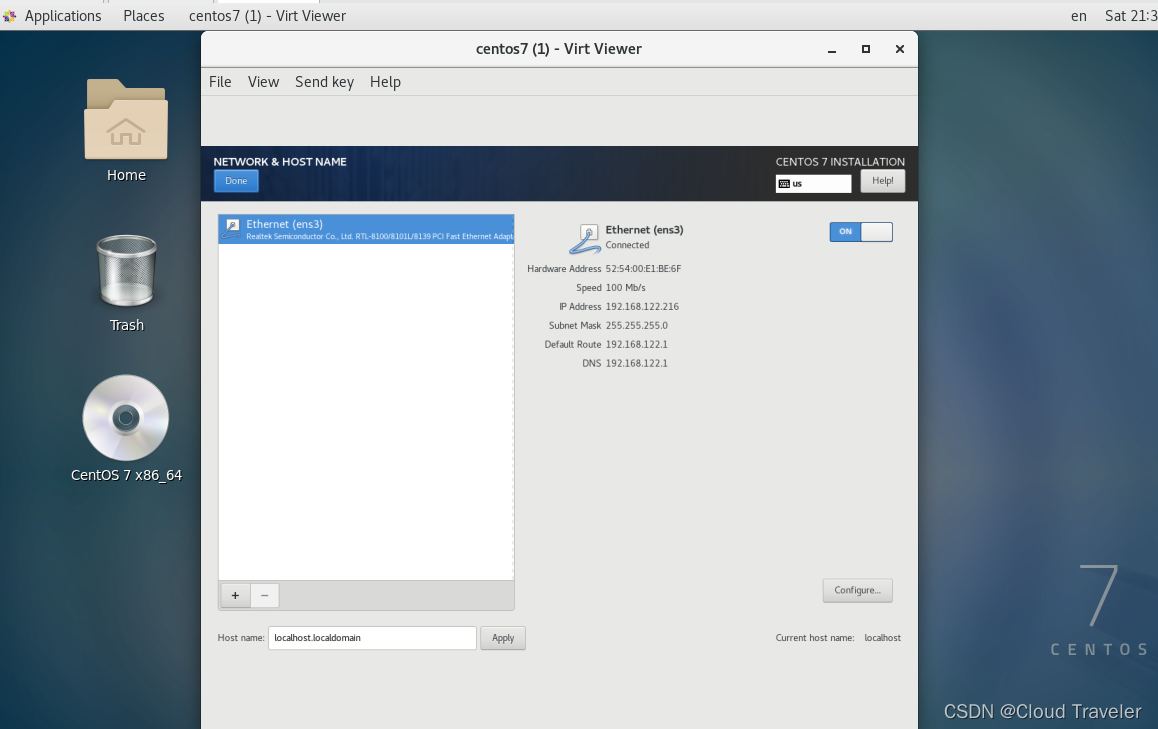
网络及主机名
注意:当开启网络后,必须可以通过 DHCP 自动获取到 IP 地址,如下图
配置ROOT密码
默认采用最小化 minimal 安装

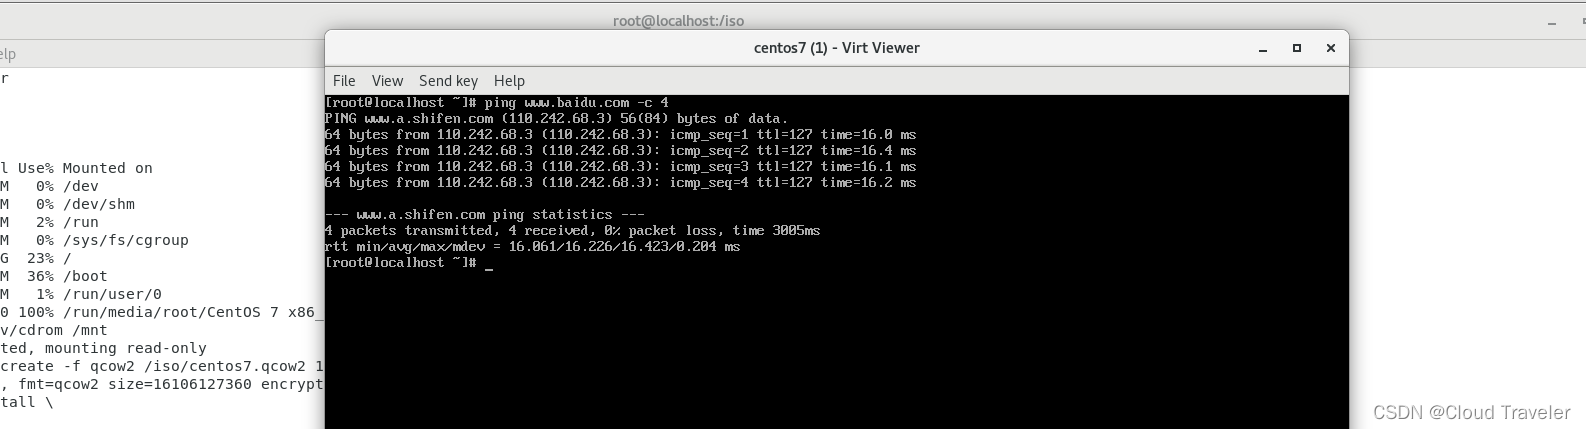
重启并测试网络
重启 kvm 创建的虚拟机,并以 root 身份登录,测试 kvm 虚机 能否连通外网

配置KVM虚拟机
修改KVM虚拟机网络配置文件
注意:是
kvm创建的虚拟机
# 修改 kvm 虚拟机网卡配置文件,使其只包括以下 4 行内容
[root@localhost ~]# vi /etc/sysconfig/network-scripts/ifcfg-ens3
[root@localhost ~]# cat /etc/sysconfig/network-scripts/ifcfg-ens3
TYPE="Ethernet"
BOOTPROTO="dhcp"
DEVICE="ens3"
ONBOOT="yes"
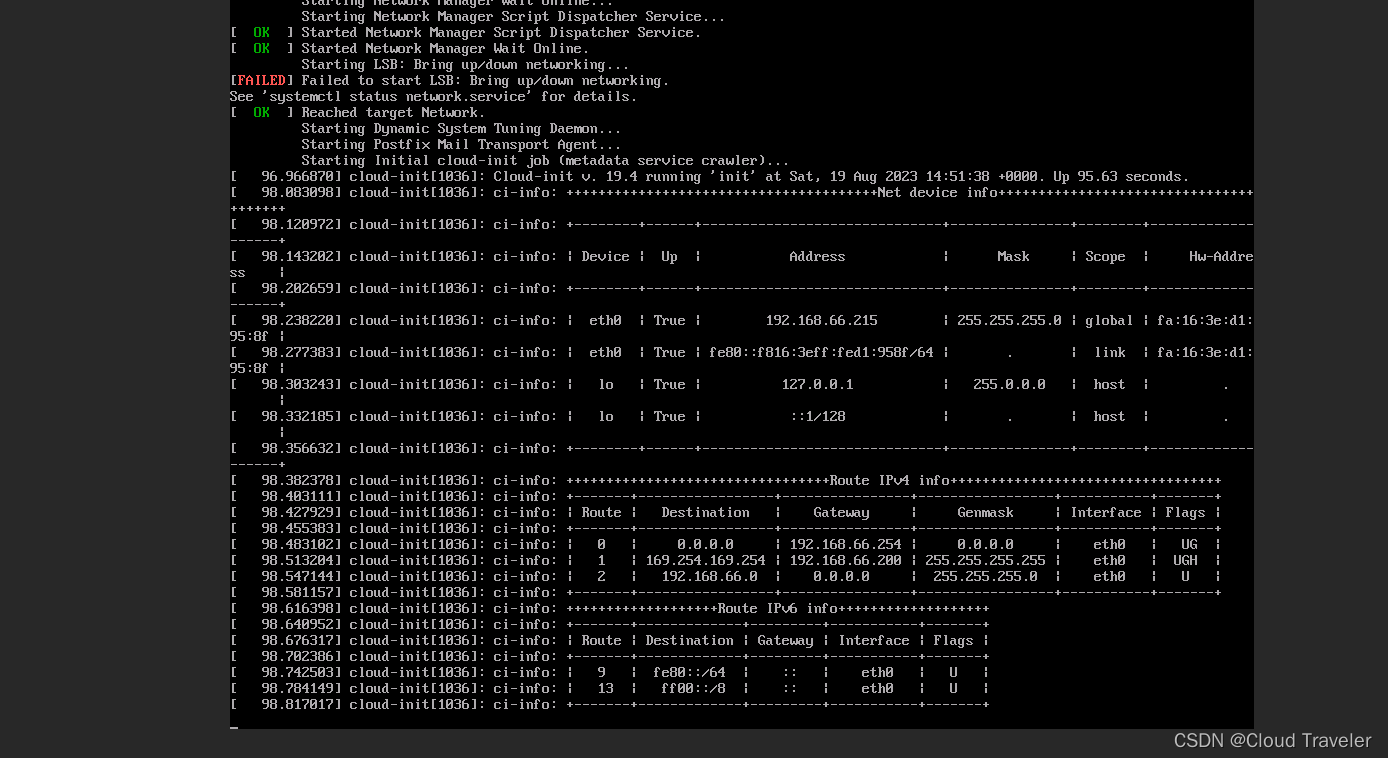
安装 cloud-int 软件包
根据 上边 测试,kvm 虚机可正常连通外网,此时直接在线安装软件包即可。目的是为了可以获取到客户自定义元数据信息,如主机名及root密码等。
[root@localhost ~]# yum install -y cloud-utils-growpart cloud-init
Loaded plugins: fastestmirror
Determining fastest mirrors* base: mirrors.bfsu.edu.cn* extras: mirrors.jlu.edu.cn* updates: mirrors.jlu.edu.cn
base                                                      | 3.6 kB  00:00:00
extras                                                    | 2.9 kB  00:00:00
updates                                                   | 2.9 kB  00:00:00
(1/4): base/7/x86_64/group_gz                             | 153 kB  00:00:00
(2/4): extras/7/x86_64/primary_db                         | 250 kB  00:00:00
(3/4): base/7/x86_64/primary_db                           | 6.1 MB  00:00:00
(4/4): updates/7/x86_64/primary_db                        |  22 MB  00:00:01
.................................................
Complete!
编辑 cloud.cfg 文件
编辑
/etc/cloud/cloud.cfg配置文件,在cloud_init_modules下添加以下内容
#添加内容
- resolv-conf# 最终配置文件效果
[root@localhost ~]# vi /etc/cloud/cloud.cfg
[root@localhost ~]# cat  /etc/cloud/cloud.cfg
users:- defaultdisable_root: 1
ssh_pwauth:   0mount_default_fields: [~, ~, 'auto', 'defaults,nofail,x-systemd.requires=cloud-init.service', '0', '2']
resize_rootfs_tmp: /dev
ssh_deletekeys:   1
ssh_genkeytypes:  ~
syslog_fix_perms: ~
disable_vmware_customization: falsecloud_init_modules:- disk_setup- migrator- bootcmd- write-files- growpart- resizefs- set_hostname- update_hostname- update_etc_hosts- rsyslog- users-groups- ssh- resolv-conf        ## 在这cloud_config_modules:- mounts- locale- set-passwords- rh_subscription- yum-add-repo- package-update-upgrade-install- timezone- puppet- chef- salt-minion- mcollective- disable-ec2-metadata- runcmdcloud_final_modules:- rightscale_userdata- scripts-per-once- scripts-per-boot- scripts-per-instance- scripts-user- ssh-authkey-fingerprints- keys-to-console- phone-home- final-message- power-state-changesystem_info:default_user:name: centoslock_passwd: truegecos: Cloud Usergroups: [adm, systemd-journal]sudo: ["ALL=(ALL) NOPASSWD:ALL"]shell: /bin/bashdistro: rhelpaths:cloud_dir: /var/lib/cloudtemplates_dir: /etc/cloud/templatesssh_svcname: sshd# vim:syntax=yaml
编辑network文件
编辑
/etc/sysconfig/network配置文件,使其包含以下内容,避免访问 EC2 元数据服务时出现问题。
#添加内容
NOZEROCONF=yes# 最终配置文件效果
[root@localhost ~]# vi /etc/sysconfig/network
[root@localhost ~]# cat /etc/sysconfig/network
# Created by anaconda
NOZEROCONF=yes# 执行命令使参数生效
[root@localhost ~]# grub2-mkconfig -o /boot/grub2/grub.cfg
Generating grub configuration file ...
Found linux image: /boot/vmlinuz-3.10.0-1160.el7.x86_64
Found initrd image: /boot/initramfs-3.10.0-1160.el7.x86_64.img
Found linux image: /boot/vmlinuz-0-rescue-ccaf1e6485aa46c3868726e2bb360253
Found initrd image: /boot/initramfs-0-rescue-ccaf1e6485aa46c3868726e2bb360253.img
done
编辑 grub文件
编辑
/etc/default/grub配置文件,使其包含以下引导选项内容,为了确保控制台的信息出现在 dashboard 的日志标签页中,以及 nova console-log 日志的输出内容中。
#添加内容
GRUB_CMDLINE_LINUX_DEFAULT="console=tty0 console=ttyS0,115200n8"# 最终配置文件效果
[root@localhost ~]# vi /etc/default/grub
[root@localhost ~]# cat /etc/default/grub
GRUB_TIMEOUT=5
GRUB_DISTRIBUTOR="$(sed 's, release .*$,,g' /etc/system-release)"
GRUB_DEFAULT=saved
GRUB_DISABLE_SUBMENU=true
GRUB_TERMINAL_OUTPUT="console"
GRUB_CMDLINE_LINUX="crashkernel=auto rd.lvm.lv=centos/root rd.lvm.lv=centos/swap rhgb quiet"
GRUB_CMDLINE_LINUX_DEFAULT="console=tty0 console=ttyS0,115200n8"
GRUB_DISABLE_RECOVERY="true"
关闭KVM虚拟机
[root@localhost ~]# init 0
创建QCOW2镜像
注意:以下步骤在 虚拟机 中操作,不是 kvm 虚拟机
重置并清理镜像
[root@localhost ~]# virsh list --allId    Name                           State
-----------------------------------------------------     centos7                        shut off[root@localhost ~]# virt-sysprep -d centos7
[   0.0] Examining the guest ...
[   8.8] Performing "abrt-data" ...
[   8.8] Performing "backup-files" ...
[   9.5] Performing "bash-history" ...
[   9.6] Performing "blkid-tab" ...
[   9.6] Performing "crash-data" ...
[   9.6] Performing "cron-spool" ...
[   9.6] Performing "dhcp-client-state" ...
[   9.6] Performing "dhcp-server-state" ...
[   9.6] Performing "dovecot-data" ...
[   9.6] Performing "logfiles" ...
[   9.6] Performing "machine-id" ...
[   9.7] Performing "mail-spool" ...
[   9.7] Performing "net-hostname" ...
[   9.7] Performing "net-hwaddr" ...
[   9.7] Performing "pacct-log" ...
[   9.7] Performing "package-manager-cache" ...
[   9.7] Performing "pam-data" ...
[   9.7] Performing "passwd-backups" ...
[   9.7] Performing "puppet-data-log" ...
[   9.7] Performing "rh-subscription-manager" ...
[   9.7] Performing "rhn-systemid" ...
[   9.7] Performing "rpm-db" ...
[   9.7] Performing "samba-db-log" ...
[   9.7] Performing "script" ...
[   9.7] Performing "smolt-uuid" ...
[   9.8] Performing "ssh-hostkeys" ...
[   9.8] Performing "ssh-userdir" ...
[   9.8] Performing "sssd-db-log" ...
[   9.8] Performing "tmp-files" ...
[   9.8] Performing "udev-persistent-net" ...
[   9.8] Performing "utmp" ...
[   9.8] Performing "yum-uuid" ...
[   9.8] Performing "customize" ...
[   9.8] Setting a random seed
[   9.8] Setting the machine ID in /etc/machine-id
[   9.8] Performing "lvm-uuids" ...
创建并压缩镜像
# 查找 centos 实例对应的磁盘文件
[root@localhost ~]# virsh domblklist centos7
Target     Source
------------------------------------------------
hda        /iso/centos7.qcow2
hdb        -# 创建并清理压缩镜像
[root@localhost ~]# virt-sparsify --compress /iso/centos7.qcow2 /tmp/centos7-cloud.qcow2
[   0.0] Create overlay file in /tmp to protect source disk
[   0.1] Examine source disk
[   1.8] Fill free space in /dev/centos/root with zero100% ⟦▒▒▒▒▒▒▒▒▒▒▒▒▒▒▒▒▒▒▒▒▒▒▒▒▒▒▒▒▒▒▒▒▒▒▒▒▒▒▒▒▒▒▒▒▒▒▒▒▒▒▒▒▒▒▒▒▒▒▒▒▒▒▒▒▒▒⟧ 00:00
[  14.7] Clearing Linux swap on /dev/centos/swap
[  15.6] Fill free space in /dev/sda1 with zero
[  17.1] Copy to destination and make sparse
[  73.5] Sparsify operation completed with no errors.
virt-sparsify: Before deleting the old disk, carefully check that the
target disk boots and works correctly.
测试镜像启动
注册镜像
将镜像 centos-cloud.qcow2 注册到 OpenStack 平台
[外链图片转存失败,源站可能有防盗链机制,建议将图片保存下来直接上传(img-FkX5NFX4-1693186720941)(./assets/image-20230819223145255.png)]
[外链图片转存失败,源站可能有防盗链机制,建议将图片保存下来直接上传(img-xsHpmi7t-1693186720941)(./assets/image-20230819223211819.png)]
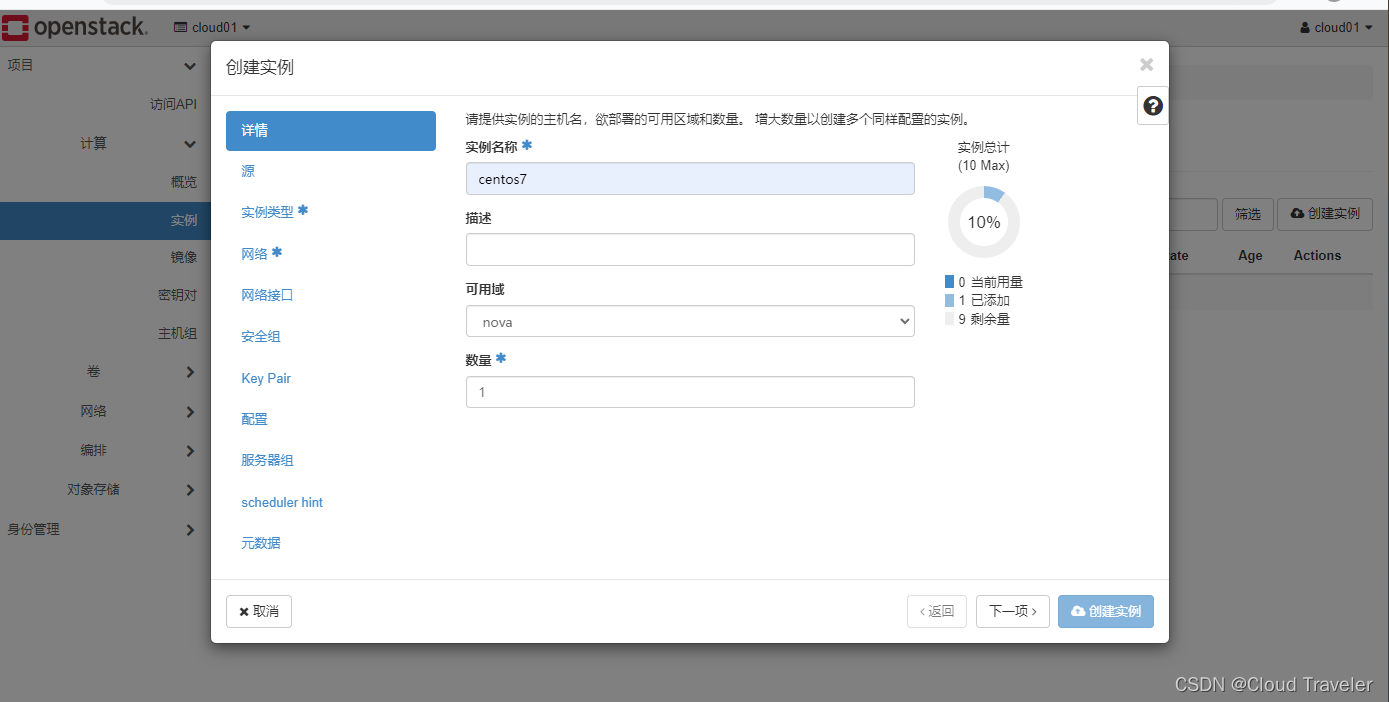
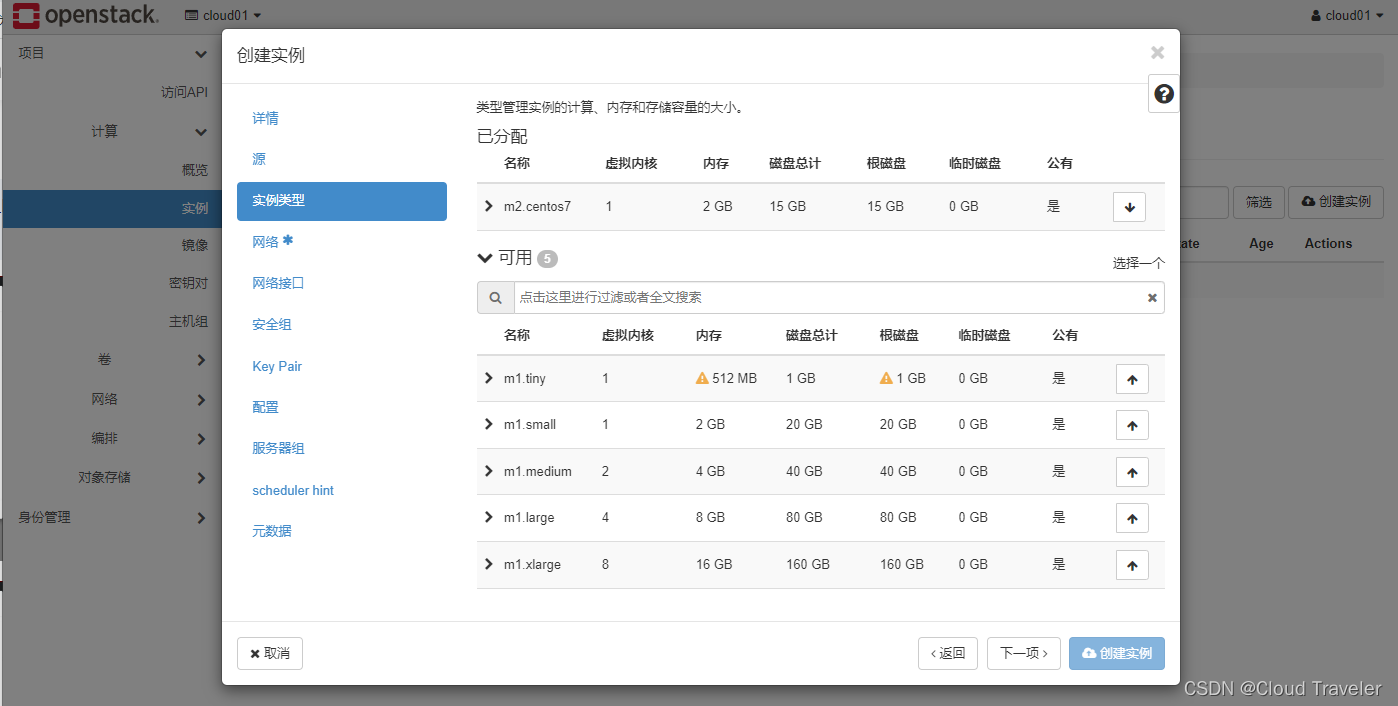
创建云主机类型(规格)
[外链图片转存失败,源站可能有防盗链机制,建议将图片保存下来直接上传(img-PCuQXjMm-1693186720941)(./assets/image-20230819223259314.png)]
[外链图片转存失败,源站可能有防盗链机制,建议将图片保存下来直接上传(img-UC9OIFyD-1693186720941)(./assets/image-20230819223322384.png)]
开启添加ROOT密码
开启添加 ROOT 密码后,可通过命令行或 WebUI 界面进行 root 密码自定义
控制节点
在
/etc/openstack-dashboard/local_settings文件中,把can_set_password参数的值设为 True
[root@controller ~]# vim /etc/openstack-dashboard/local_settings
...
'can_set_password': True
...
在
/etc/nova/nova.conf文件中,把 inject_password 参数的值设为 True
[root@controller ~]# vim /etc/nova/nova.conf
...
'can_set_password': True
...
重启服务
[root@controller ~]# systemctl restart openstack-nova-compute.service
[root@controller ~]# systemctl restart httpd.service
计算节点
在计算节点上的
/etc/nova/nova.conf文件中,把 inject_password 参数的值设为 True
[root@computer ~]# vim /etc/nova/nova.conf
...
inject_password=true
...
重启服务
[root@computer ~]# systemctl restart openstack-nova-compute.service
发放云主机测试
注意:网络及路由需存在,务必保证路由及网关存在,否则无法获取到客户自定义主机名


观察启动流程及尝试登录,测试镜像正确无误