CUD Stream
- https://docs.nvidia.com/cuda/cuda-c-programming-guide/index.html#c-language-extensions
中指出在kenel的调用函数中最后一个可选参数表示该核函数处在哪个流之中。
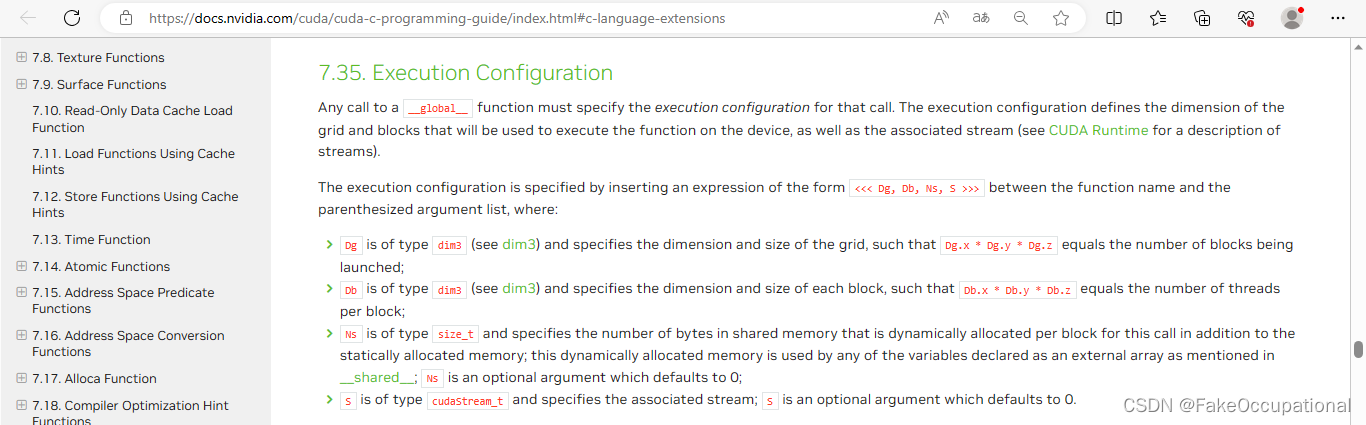
- 参数Dg用于定义整个grid的维度和尺寸,即一个grid有多少个block。为dim3类型。Dim3 Dg(Dg.x, Dg.y, 1)表示grid中每行有Dg.x个block,每列有Dg.y个block,第三维恒为1(目前一个核函数只有一个grid)。整个grid中共有Dg.x*Dg.y个block,其中Dg.x和Dg.y最大值为65535。
- 参数Db用于定义一个block的维度和尺寸,即一个block有多少个thread。为dim3类型。Dim3 Db(Db.x, Db.y, Db.z)表示整个block中每行有Db.x个thread,每列有Db.y个thread,高度为Db.z。Db.x和Db.y最大值为512,Db.z最大值为62。 一个block中共有Db.x*Db.y*Db.z个thread。计算能力为1.0,1.1的硬件该乘积的最大值为768,计算能力为1.2,1.3的硬件支持的最大值为1024。
- Ns 的类型为 size_t,用于设置每个block除了静态分配的shared Memory以外,最多能动态分配的shared memory大小,单位为byte。不需要动态分配时该值为0或省略不写。如[__shared__](https://docs.nvidia.com/cuda/cuda-c-programming-guide/index.html#shared)中所述,此动态分配的内存由声明为外部数组的任何变量使用;
- 参数S是一个cudaStream_t类型的可选参数,初始值为零,表示该核函数处在哪个流之中。
-
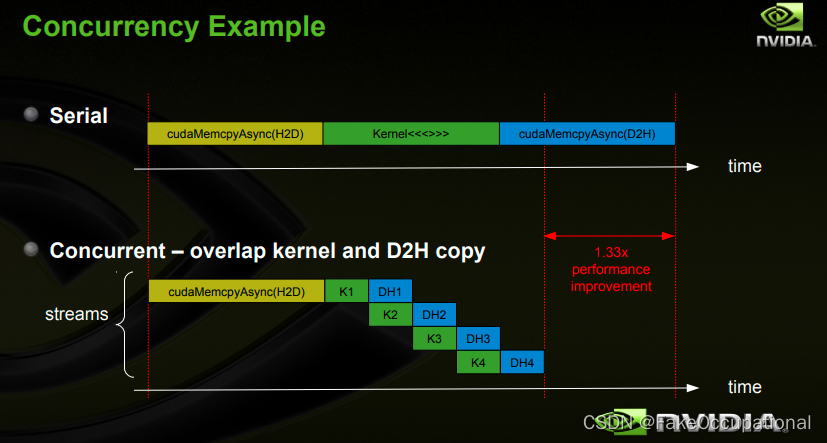
CUDA编程中,默认使用默认流非并行执行kernel,每个kernel由许多thread并行的执行在GPU上。Stream的概念是相对Grid level来说的,使得kernel在一个device上同时执行。
-
官方提供的用例
// https://docs.nvidia.com/cuda/cuda-c-programming-guide/index.html#streams
cudaStream_t stream[2];
for (int i = 0; i < 2; ++i)cudaStreamCreate(&stream[i]);
float* hostPtr;
cudaMallocHost(&hostPtr, 2 * size);
// 以下代码示例将其中每个流定义为从主机到设备的一个内存副本、一个内核启动和一个从设备到主机的内存副本的序列:
for (int i = 0; i < 2; ++i) {cudaMemcpyAsync(inputDevPtr + i * size, hostPtr + i * size,size, cudaMemcpyHostToDevice, stream[i]);MyKernel <<<100, 512, 0, stream[i]>>>(outputDevPtr + i * size, inputDevPtr + i * size, size);cudaMemcpyAsync(hostPtr + i * size, outputDevPtr + i * size,size, cudaMemcpyDeviceToHost, stream[i]);
}
// 通过调用 释放流
for (int i = 0; i < 2; ++i)cudaStreamDestroy(stream[i]);
PyTorch Stream
-
在PyTorch中,默认情况下,GPU上的操作是在默认流(default stream)中执行的。默认流是一个序列化的流,其中的操作按照它们出现的顺序逐个执行。这意味着在没有显式指定其他流的情况下,所有的操作都会在默认流中执行。
-
然而,PyTorch还提供了功能可以将操作提交到其他流中执行,以充分利用GPU的并行性。这对于并行处理多个任务或同时执行多个独立操作非常有用。
-
您可以使用
torch.cuda.Stream()来创建其他流,并使用torch.cuda.current_stream()来获取当前流。然后,您可以将操作提交到指定的流中执行,例如:
import torchdevice = torch.device('cuda')# 创建一个默认流
default_stream = torch.cuda.current_stream()# 创建一个自定义流
custom_stream = torch.cuda.Stream()# 在默认流中执行操作
with torch.cuda.stream(default_stream):# 执行操作...# 在自定义流中执行操作
with torch.cuda.stream(custom_stream):# 执行操作...
例子
import torch
s1 = torch.cuda.Stream()
s2 = torch.cuda.Stream()
# Initialise cuda tensors here. E.g.:
A = torch.rand(1000, 1000, device = 'cuda')
B = torch.rand(1000, 1000, device = 'cuda')
# Wait for the above tensors to initialise.
torch.cuda.synchronize()
with torch.cuda.stream(s1):C = torch.mm(A, A)
with torch.cuda.stream(s2):D = torch.mm(B, B)
# Wait for C and D to be computed.
torch.cuda.synchronize()
# Do stuff with C and D.
print(C)
print(D)
// https://stackoverflow.com/questions/70128833/why-and-when-to-use-torch-cuda-stream
这样可以利用多个流来并行执行计算,并在计算和数据传输之间实现重叠。这对于提高GPU利用率和加速训练或推理过程非常有帮助。
错误示例
- 没有使用 synchronize() 或者 wait_stream()进行同步,可能导致再未完成归一化前执行求和
// https://pytorch.org/docs/stable/notes/cuda.html
cuda = torch.device('cuda')
s = torch.cuda.Stream()  # Create a new stream.
A = torch.empty((100, 100), device=cuda).normal_(0.0, 1.0)
with torch.cuda.stream(s):# sum() may start execution before normal_() finishes!B = torch.sum(A)
CG
-
https://docs.nvidia.com/cuda/cuda-c-programming-guide/index.html#streams
-
https://pytorch.org/docs/stable/notes/cuda.html#multistream-capture
-
https://pytorch.org/cppdocs/notes/tensor_cuda_stream.html
-
https://pypi.org/project/pytorch-stream/
-
CUDA 的 Stream and Event https://zhuanlan.zhihu.com/p/369367933
-
GITHUBGIST Gist就是小型代码片段的分享https://www.cnblogs.com/leader755/p/14284716.html
-
[JIT] 在 TorchScript 中支持 CUDA 流 https://github.com/pytorch/pytorch/issues/41355
-
https://pytorch.org/docs/stable/notes/cuda.html#cuda-semantics
-
https://github.com/pytorch/pytorch/issues/41355
多设备
// https://pytorch.org/docs/stable/notes/cuda.html#cuda-semantics
cuda = torch.device('cuda')     # Default CUDA device
cuda0 = torch.device('cuda:0')
cuda2 = torch.device('cuda:2')  # GPU 2 (these are 0-indexed)x = torch.tensor([1., 2.], device=cuda0)
# x.device is device(type='cuda', index=0)
y = torch.tensor([1., 2.]).cuda()
# y.device is device(type='cuda', index=0)with torch.cuda.device(1):# allocates a tensor on GPU 1a = torch.tensor([1., 2.], device=cuda)# transfers a tensor from CPU to GPU 1b = torch.tensor([1., 2.]).cuda()# a.device and b.device are device(type='cuda', index=1)# You can also use ``Tensor.to`` to transfer a tensor:b2 = torch.tensor([1., 2.]).to(device=cuda)# b.device and b2.device are device(type='cuda', index=1)c = a + b# c.device is device(type='cuda', index=1)z = x + y# z.device is device(type='cuda', index=0)# even within a context, you can specify the device# (or give a GPU index to the .cuda call)d = torch.randn(2, device=cuda2)e = torch.randn(2).to(cuda2)f = torch.randn(2).cuda(cuda2)# d.device, e.device, and f.device are all device(type='cuda', index=2)


![com.alibaba.fastjson.JSONObject循环给同一对象赋值会出现“$ref“:“$[0]“现象问题](https://img-blog.csdnimg.cn/7a03b31634c345b4bfdbc101e6933dcf.png#pic_center)