目录
🌊前言
🌞1. 程序分析
🌞2. 案例说明
🌍2.1 修改内容
🌍2.2 测试自定义指令
🌞3. 实战内容
🌳3.1 修改内容
🌳3.2 测试自定义指令
🌳3.2 自定义gdb指令错误纠察
🍃测试一:手动开辟空间测试
🍃测试二:程序开辟,修改addstructcmd.c
🍃测试总结
🌊前言
本文目的:这段时间在使用gdb调试,我在思考能不能通过自定义一些gdb指令进行调试?本文即在此基础上完成了自定义gdb指令【借鉴core analyzer工具实现】。
准备内容:
- 操作环境
1. ubuntu 22.04
2. 安装core analyzer,传送门:【core analyzer安装】core analyzer的简介和安装问题解决详情- 熟悉gdb指令,传送门:【gdb调试】在ubuntu环境使用gdb调试一棵四层二叉树的数据结构详解
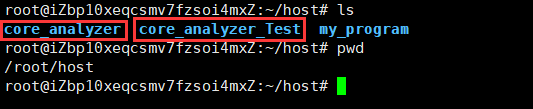
说明:为了方便对比和分析,我创建了两个core analyzer的环境,分别是
- core_analyzer
- core_analyzer_Test
其中core_analyzer 是初始环境【保持不动】,core_analyzer_Test 是测试环境【用作自定义gdb指令的环境】。
🌞1. 程序分析
程序修改的主要位置:
/root/host/core_analyzer_Test/core_analyzer/gdbplus/gdb-12.1/gdb/
可以看见heapcmd.c文件,其中包含一些特定GDB的函数和命令【GDB扩展】,该文件定义的功能是原来gdb12.1所没有的,引入了一些新的命令和功能,用于堆内存分析、对象搜索、内存段显示等。
heapcmd.c文件分析:
命令函数:
- 文件定义了多个函数,对应于调试器可以执行的命令。这些命令包括与堆内存检查、对象搜索、内存段显示等相关的操作。
- 每个函数通常接受一个字符串参数
args和一个整数参数from_tty,这表示命令的来源是否是终端。命令实现:
heap_command、ref_command、pattern_command、segment_command等函数实现了特定的调试器命令。- 例如,
heap_command似乎处理与堆内存相关的各种操作,如堆遍历、内存使用统计、泄漏检查等。- 同样,
ref_command用于搜索给定对象的引用,pattern_command用于显示内存模式,segment_command用于显示内存段。命令参数解析:
- 这些命令接收的参数似乎在函数内部进行解析。例如,使用
ca_parse_options函数将args字符串解析为标记。- 然后使用这些标记来确定要执行的特定操作或提取必要的信息,如内存地址或选项。
初始化函数:
- 存在一个初始化函数
_initialize_heapcmd,它将这些命令注册到调试器中。- 这个函数使用
add_cmd函数将命令添加到调试器的命令列表中。辅助函数:
- 文件中有多个辅助函数,如内存分配包装器
unique_xmalloc_ptr,解析函数parse_and_eval_address和打印函数CA_PRINT。帮助消息:
- 存在一个帮助消息
ca_help_msg,提供了可用命令的摘要以及它们的使用说明。- 当用户使用
ca_help命令请求帮助时,将显示此消息。其他:
- 其他函数如
display_help_command、switch_heap_command、info_local_command等提供了调试器环境中的其他功能或设置。
🌞2. 案例说明
🌍2.1 修改内容
测试目的:使用自定义指令打印出二叉树的所有节点【固定写死的内容】。
根据上述的分析,这里我打算编写三个文件:
- addstructcmd.c -----编写cmd内容
- addstruct.h -----编写结构体定义+扩展接口
- add_Struct.c -----编写具体的接口实现
详细步骤如下:
在/root/host/core_analyzer_Test/core_analyzer/gdbplus/gdb-12.1/gdb/目录下创建3个文件+内容:
vim addstructcmd.c/** addstructcmd.c** Created on: Feb 17, 2024* Author: sym*/
#include "ref.h"
#include "addstruct.h"/***************************************************************************
* gdb commands
***************************************************************************/
static void
addstructmem_command (const char *args, int from_tty)
{CA_PRINT("addstructmem_command\n");
}// 打印二叉树的所有节点
static void
addstruct_tree_command (const char *args, int from_tty)
{TreeNode* root = buildTree();print_Tree(root);CA_PRINT("\n");
}static char addstruct_help_msg[] = "Commands of addstruct v1.0\n""addstructmem -- print memory pool info.\n""addstruct_tree -- print binary tree node values.\n" // 添加新命令的帮助信息"type 'help <command>' to get more detail and usage info\n";static void
display_addstruct_help_command (const char *args, int from_tty)
{CA_PRINT("%s", addstruct_help_msg);
}void _initialize_addstructcmd ();void
_initialize_addstructcmd ()
{add_cmd("addstructmem", class_info, addstructmem_command, _("Search for references to a given object"), &cmdlist);// 打印二叉树add_cmd("addstruct_tree", class_info, addstruct_tree_command, _("Display binary tree node values"), &cmdlist);// help listadd_cmd("addstruct_help", class_info, display_addstruct_help_command, _("Display core analyzer help"), &cmdlist);
}vim addstruct.h/** addstruct.h** Created on: Feb 17, 2024* Author: sym*/
#include <stdio.h>
#include <stdlib.h>#ifndef TREENODE_H
#define TREENODE_H
/** Data structures for reference*/
typedef struct TreeNode {int data;struct TreeNode *left;struct TreeNode *right;
} TreeNode;/
// Import functions (required from etc.)
/
// 创建一个新的树节点
extern TreeNode* createNode(int data);
// 建立树节点数据:构建四层树
extern TreeNode* buildTree();
// 递归遍历树并打印节点数据
extern void print_Tree(TreeNode* root);#endif /* TREENODE_H */vim add_Struct.c/** add_Struct.c** Created on: Feb 17, 2024* Author: sym*/
#include "addstruct.h"// 创建一个新的树节点
TreeNode*
createNode(int data) {TreeNode* newNode = (TreeNode*)malloc(sizeof(TreeNode));if (newNode == NULL) {fprintf(stderr, "Memory allocation failed.\n");exit(EXIT_FAILURE);}newNode->data = data;newNode->left = NULL;newNode->right = NULL;return newNode;
}// 建立树节点数据:构建四层树
TreeNode*
buildTree() {TreeNode* root = createNode(1);root->left = createNode(2);root->right = createNode(3);root->left->left = createNode(4);root->left->right = createNode(5);root->right->left = createNode(6);root->right->right = createNode(7);root->left->left->left = createNode(8);root->left->left->right = createNode(9);return root;
}// 递归遍历树并打印节点数据
void
print_Tree(TreeNode* root) {if (root != NULL) {printf("%d ", root->data);print_Tree(root->left);print_Tree(root->right);}
}给上述三个文件加入rwx权限:
chmod 777 addstructcmd.c
chmod 777 addstruct.h
chmod 777 add_Struct.c
然后打开Makefile.in文件,在1102行加入
addstructcmd.c \add_Struct.c \
🌍2.2 测试自定义指令
回到/root/host/core_analyzer_Test/core_analyzer目录,终端输入
./build_gdb.sh编译完成后在当前路径下进行终端输入
./build/gdb-12.1/build/gdb/gdb测试gdb的自定义指令
addstructmem
addstruct_help
addstruct_tree
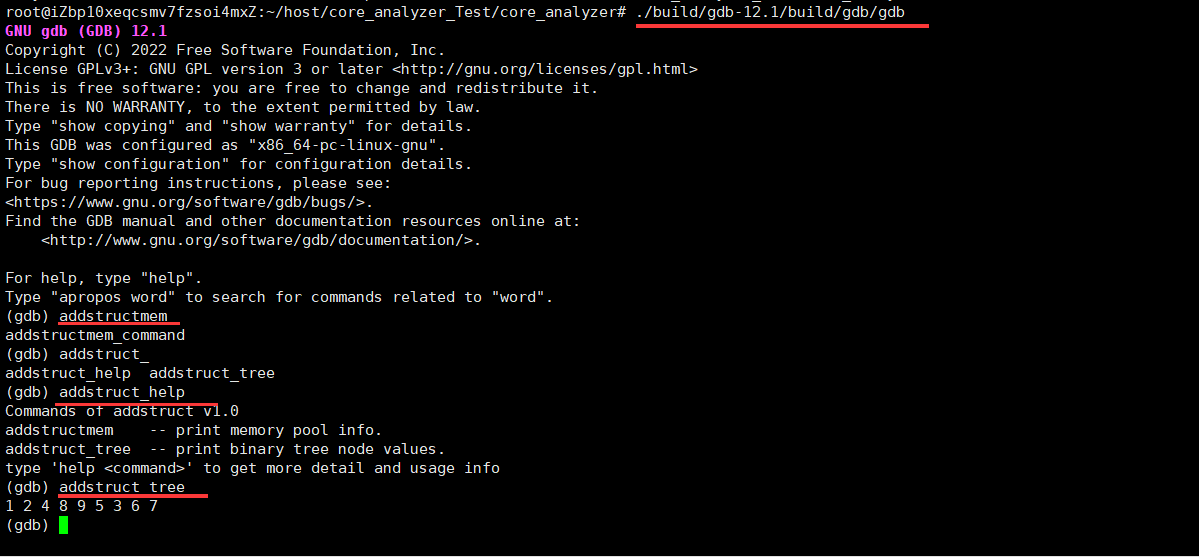
显示如上图则表明添加自定义gdb指令初步成功!
🌞3. 实战内容
前面案例实现了几个简单的自定义gdb指令,但缺陷在于都是基于写死的内容打印输出,实际情况使用gdb是为了去调试自己的程序是否存在问题,所以需要加上用户调试的参数以完善自定义gdb指令,使其更加灵活。
🌳3.1 修改内容
根据上述的案例,这里我打算编写文件:
- addstructcmd.c -----编写cmd内容
详细步骤如下:
在/root/host/core_analyzer_Test/core_analyzer/gdbplus/gdb-12.1/gdb/目录下创建addstructcmd.c 文件+内容:
vi addstructcmd.c /** addstructcmd.c** Created on: Feb 17, 2024* Author: sym*/
#include "ref.h"/***************************************************************************
* new structs and print structs
***************************************************************************/
// 定义数据结构:树
struct TreeNode {int data;struct TreeNode *left;struct TreeNode *right;
};// 打印数据:树【先序遍历】
static void
print_tree_nodes(struct TreeNode* root) {if (root == NULL) {return;}printf("%d ", root->data);if (root->left != NULL) {print_tree_nodes(root->left);}if (root->right != NULL) {print_tree_nodes(root->right);}
}
/***************************************************************************
* gdb commands
***************************************************************************/
static void
addstructmem_command (const char *args, int from_tty)
{CA_PRINT("addstructmem_command\n");
}// 测试内容
static void
addstruct_test_command (const char *args, int from_tty)
{printf("args=%s\n", args);printf("from_tty=%d\n", from_tty);
}// 打印以指定根节点地址为根的二叉树的所有节点
static void
addstruct_tree_command(const char *args, int from_tty)
{if (!args || *args == '\0') {printf("Please provide the root node address.\n");return;}// 将 args 存储的地址内容 转换为 root 的地址struct TreeNode *root = (struct TreeNode *)strtoul(args, NULL, 0);// 如果找到了指定的根节点,则打印以该节点为根的二叉树的所有节点if (root != NULL) {printf("Here is test root info:add and data\n");// 对指针进行有效性检查printf("root node address: %p\n", (void *)root); // 打印传入的根节点地址,用于验证printf("root node data: %d\n\n", root->data); // 打印传入的根节点数据,用于验证printf("Printing tree nodes:\n");print_tree_nodes(root);printf("\n");} else {printf("Specified root node not found.\n");}
}static char addstruct_help_msg[] = "Commands of addstruct v1.0\n""addstructmem -- print memory pool info.\n""addstruct_test <txt> -- test get user inputTxt\n""addstruct_tree <root> -- print binary tree node values starting from specified root node.\n""type 'help <command>' to get more detail and usage info\n";static void
display_addstruct_help_command (const char *args, int from_tty)
{CA_PRINT("%s", addstruct_help_msg);
}void _initialize_addstructcmd ();void
_initialize_addstructcmd ()
{add_cmd("addstructmem", class_info, addstructmem_command, _("Search for references to a given object"), &cmdlist);// 测试获取输入内容add_cmd("addstruct_test", class_info, addstruct_test_command, _("Display user inputTxt"), &cmdlist);// 打印二叉树add_cmd("addstruct_tree", class_info, addstruct_tree_command, _("Display binary tree node values"), &cmdlist);// help listadd_cmd("addstruct_help", class_info, display_addstruct_help_command, _("Display core analyzer help"), &cmdlist);
}给上述文件加入rwx权限:
chmod 777 addstructcmd.c 然后打开Makefile.in文件,在1102行加入
addstructcmd.c \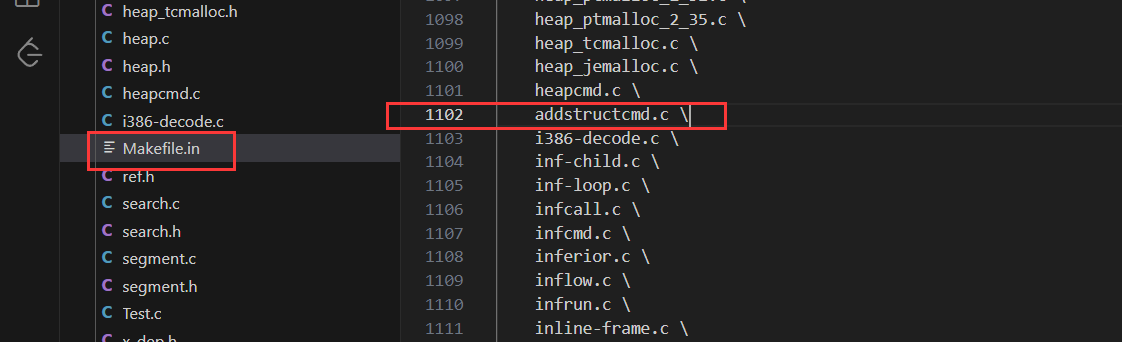
🌳3.2 测试自定义指令
回到/root/host/core_analyzer_Test/core_analyzer目录,终端输入
./build_gdb.sh编译完成后在当前路径下进行终端输入【说明:tree3_01.c 文件内容参考:【gdb调试】在ubuntu环境使用gdb调试一棵四层二叉树的数据结构详解】
./build/gdb-12.1/build/gdb/gdb /root/host/my_program/tree3_01测试gdb的自定义指令
addstructmem
addstruct_help
addstruct_tree + 地址
显示如下图则表明添加自定义gdb指令初步成功!
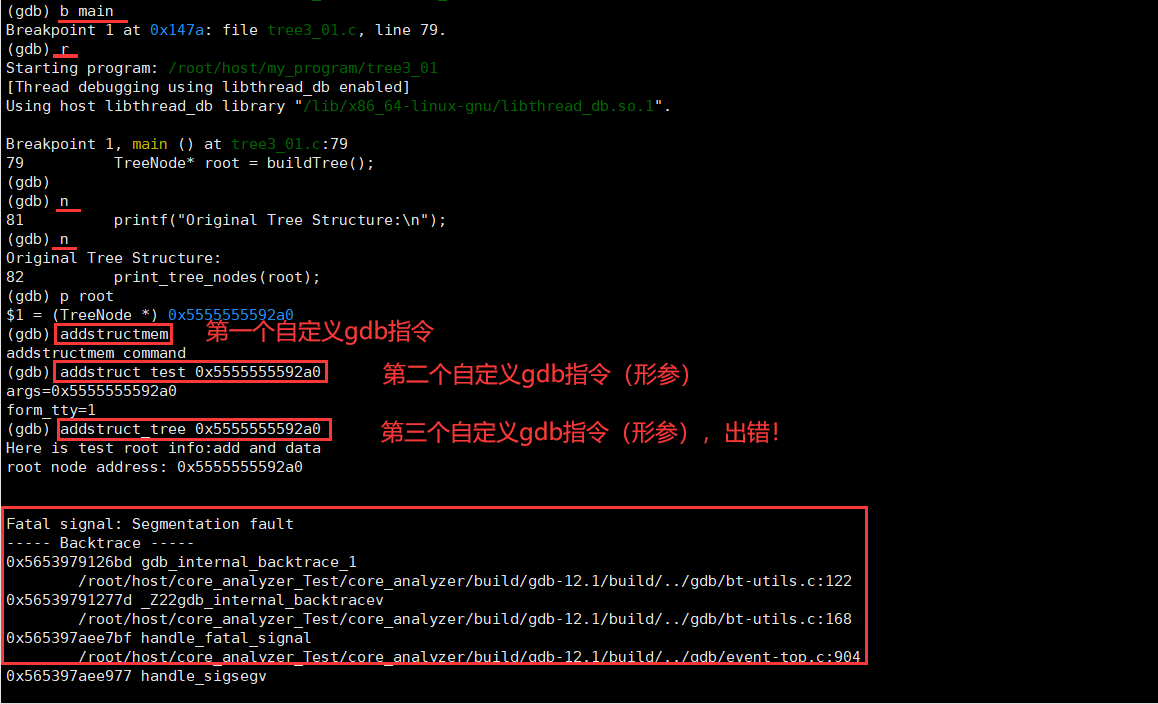
这里也反馈了一个信息:地址传递给 args,通过变量 args 成功将 root 的地址设置成了传递的地址【用户传递参数的处理过程是没问题的】,显示段错误是因为这个传递的地址空间未开辟。
🌳3.2 自定义gdb指令错误纠察
纠错思路:使用gdb调试修改的gdb进行查错,由于gdb中没有构建一颗完整的二叉树,所以我打算手动开辟一棵两层的二叉树用作测试。
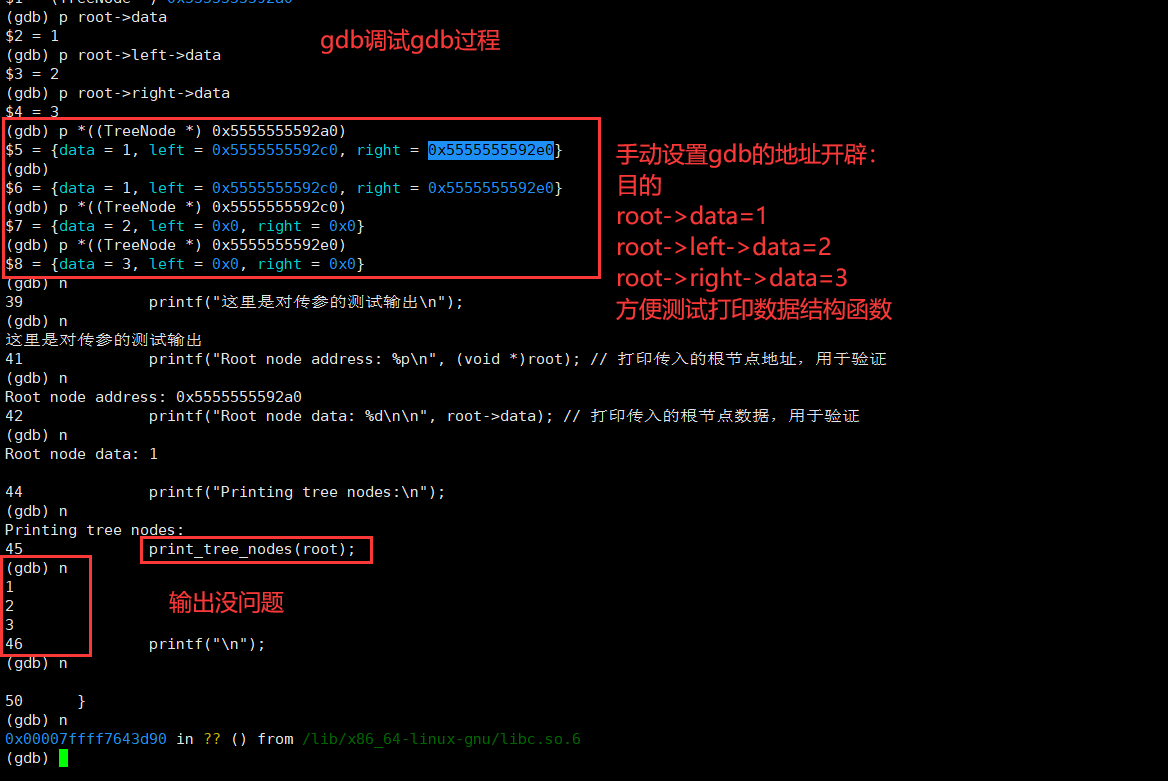
🍃测试一:手动开辟空间测试
在目录:/root/host/core_analyzer_Test/core_analyzer 使用gdb调试gdb:
./build/gdb-12.1/build/gdb/gdb ./build/gdb-12.1/build/gdb/gdb打开后依次执行:
start
b addstruct_tree_commandjump /root/host/core_analyzer_Test/core_analyzer/build/gdb-12.1/build/../gdb/addstructcmd.c:55set *((int *)0x5555555592a0) = 1
set ((struct TreeNode *)0x5555555592a0)->left = (struct TreeNode *)0x5555555592c0
set ((struct TreeNode *)0x5555555592a0)->right = (struct TreeNode *)0x5555555592e0set *((int *)0x5555555592c0) = 2
set ((struct TreeNode *)0x5555555592c0)->left = (struct TreeNode *)0x0
set ((struct TreeNode *)0x5555555592c0)->right = (struct TreeNode *)0x0set *((int *)0x5555555592e0) = 3
set ((struct TreeNode *)0x5555555592e0)->left = (struct TreeNode *)0x0
set ((struct TreeNode *)0x5555555592e0)->right = (struct TreeNode *)0x0set variable args = "0x5555555592a0"f
此时地址空间开辟的地址和值如下图:

调试可以正常打印:
🍃测试二:程序开辟,修改addstructcmd.c
修改addstructcmd.c 内容如下:
/** addstructcmd.c**  Created on: Feb 17, 2024*      Author: sym*/
#include "ref.h"/***************************************************************************
* new structs and print structs
***************************************************************************/
// 定义数据结构:树
struct TreeNode {int data;struct TreeNode *left;struct TreeNode *right;
};// 创建一个新的树节点
TreeNode* createNode(int data) {TreeNode* newNode = (TreeNode*)malloc(sizeof(TreeNode));if (newNode == NULL) {fprintf(stderr, "Memory allocation failed.\n");exit(EXIT_FAILURE);}newNode->data = data;newNode->left = NULL;newNode->right = NULL;return newNode;
}// 构建四层树
struct TreeNode* buildTree() {TreeNode* root = createNode(1);root->left = createNode(2);root->right = createNode(3);root->left->left = createNode(4);root->left->right = createNode(5);root->right->left = createNode(6);root->right->right = createNode(7);root->left->left->left = createNode(8);root->left->left->right = createNode(9);return root;
}// 打印数据:树【先序遍历】
static void
print_tree_nodes(struct TreeNode* root) {if (root == NULL) {return;}printf("%d ", root->data);if (root->left != NULL) {print_tree_nodes(root->left);}if (root->right != NULL) {print_tree_nodes(root->right);}
}
/***************************************************************************
* gdb commands
***************************************************************************/
static void
addstructmem_command (const char *args, int from_tty)
{CA_PRINT("addstructmem_command\n");
}// 测试内容
static void
addstruct_test_command (const char *args, int from_tty)
{printf("args=:%s\n", args);printf("args=:%d\n", from_tty);
}// 打印以指定根节点地址为根的二叉树的所有节点
static void
addstruct_tree_command(const char *args, int from_tty)
{if (!args || *args == '\0') {printf("Please provide the root node address.\n");return;}// 构建树struct TreeNode* root_frist = buildTree();// 将 args 存储的地址内容 转换为 root 的地址struct TreeNode *root = (struct TreeNode *)strtoul(args, NULL, 0);// 如果找到了指定的根节点,则打印以该节点为根的二叉树的所有节点if (root != NULL) {printf("Here is test root info:add and data\n");// 对指针进行有效性检查printf("root node address: %p\n", (void *)root); // 打印传入的根节点地址,用于验证printf("root node data: %d\n\n", root->data); // 打印传入的根节点数据,用于验证printf("Printing tree nodes:\n");print_tree_nodes(root);printf("\n");} else {printf("Specified root node not found.\n");}
}static char addstruct_help_msg[] = "Commands of addstruct v1.0\n""addstructmem    -- print memory pool info.\n""addstruct_test <txt>    -- test get user inputTxt\n""addstruct_tree <root>  -- print binary tree node values starting from specified root node.\n""type 'help <command>' to get more detail and usage info\n";static void
display_addstruct_help_command (const char *args, int from_tty)
{CA_PRINT("%s", addstruct_help_msg);
}void _initialize_addstructcmd ();void
_initialize_addstructcmd ()
{add_cmd("addstructmem", class_info, addstructmem_command, _("Search for references to a given object"), &cmdlist);// 测试获取输入内容add_cmd("addstruct_test", class_info, addstruct_test_command, _("Display user inputTxt"), &cmdlist);// 打印二叉树add_cmd("addstruct_tree", class_info, addstruct_tree_command, _("Display binary tree node values"), &cmdlist);// help listadd_cmd("addstruct_help", class_info, display_addstruct_help_command, _("Display core analyzer help"), &cmdlist);
}
然后回到章节 3.2 进行编译。
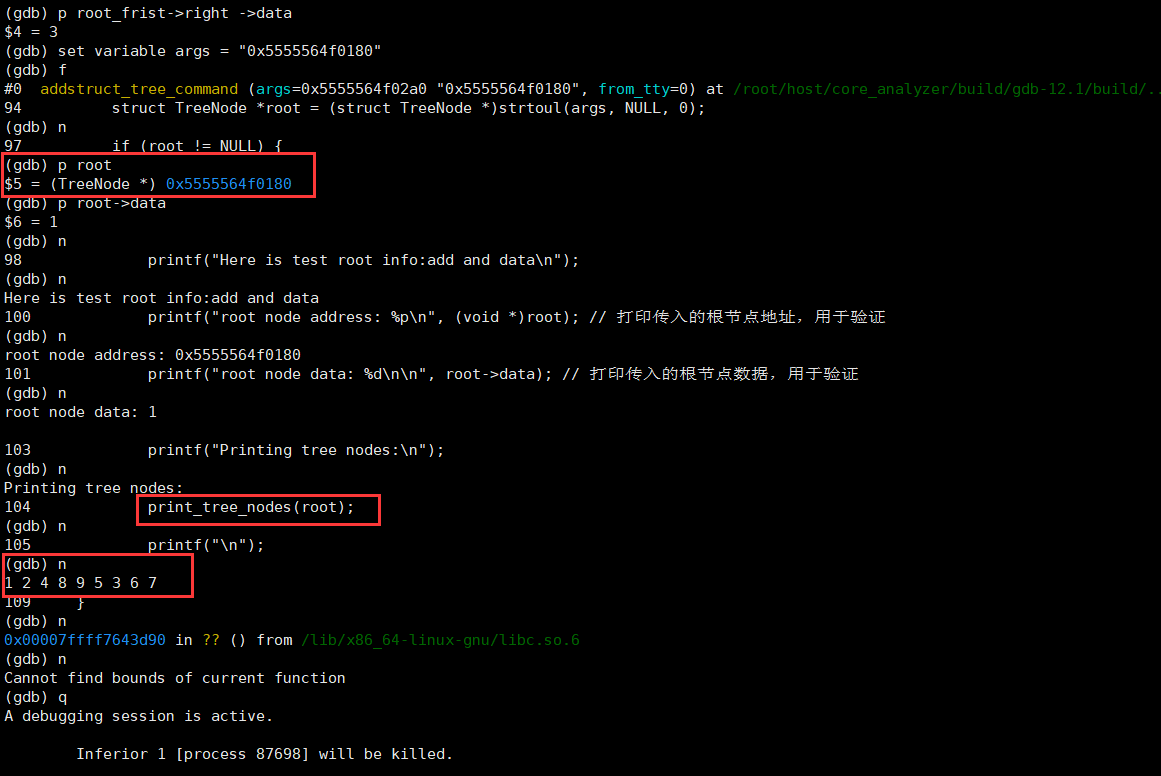
在目录:/root/host/core_analyzer_Test/core_analyzer 使用gdb调试gdb:
./build/gdb-12.1/build/gdb/gdb ./build/gdb-12.1/build/gdb/gdb打开后依次执行【这里赋给args的值是随意的,防止 if 语句那里直接 return】:
start
b addstruct_tree_commandjump /root/host/core_analyzer/build/gdb-12.1/build/../gdb/addstructcmd.c:84set variable args = "0x5555555592a0"
f
使用p root_frist 打印 root_frist 的地址,然后将其重新赋给args

在gdb写死的数据结构:树【调用方法 struct TreeNode* buildTree() 】。获取地址可以正常输出:
🍃测试总结
上面两轮测试都在说明==>程序没问题,传参的设置与转换没问题。
问题:无法知道用户开辟的地址在哪,解决思路是通过输入变量名然后搜索堆栈获取信息,再打印。类似(比如p root会输出地址信息,这里的root就是变量名),而后面要做的就是获取这个显示的地址。
补充说明:
./xxx 每次执行开辟的地址空间不同,而gdb调试每次的开辟地址都一样。