前言
使用cnn和resnet实现了对flower5,flower17,flower102数据集上实现花朵识别分类。也就是6份代码,全部在Gitee仓库里,记得点个start支持谢谢。
本文给出flower17在cnn网络实现,flower102在resnet网络实现的代码。其余在Gitee仓库中,还附有学习其他博主的模型的代码。
前置准备
理论:一定的深度学习,卷积神经网络的理论知识学习,python基础语法。
环境:Anaconda3安装,python安装,pycharm安装,相应的依赖包安装,如TensorFlow,matplotlib,pillow,pandas等。
数据集
介绍
flower5

flower17

flower102

下载
https://gitee.com/karrysmile/flower_data.git
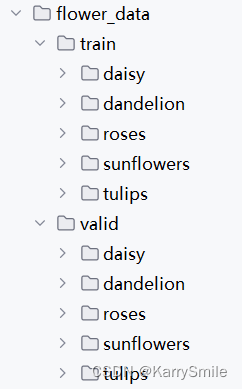
每个flower.*文件夹就是一个数据集。
每个数据集中包含train,valid文件夹,分别作训练集和数据集用。
训练集和数据集文件架构相同,包含文件夹相同,同种花归为一个文件夹,以花名为文件夹名。
运行要求
我的电脑配置是
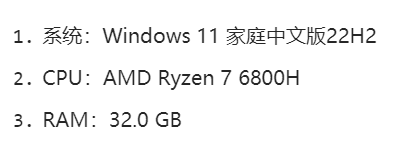
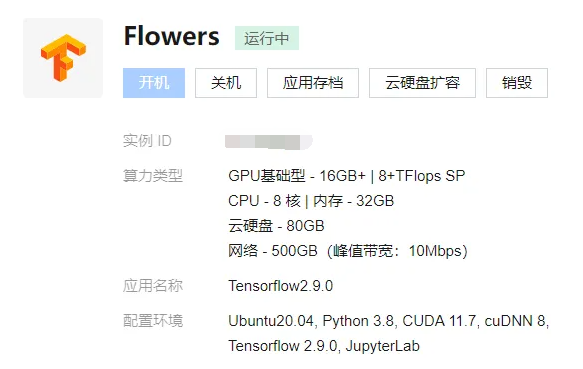
flower5,17可以在本地运行,flower102建议用显卡跑。没有显卡的可以到腾讯云或其他平台,租一个服务器来跑,我租了一个Tesla V4显卡来跑,1.6r一小时,用钱换时间。
代码
代码思路
- 导入数据集
- 数据预处理
- 构建模型
- 训练模型
- 调参优化
- 结果可视化
- 模型复用
代码解释
以flower17数据集的cnn模型,flower102数据集的resnet模型作为举例,其余在文末的仓库里。
每行代码都加了注释,看注释吧。
# flower17_cnn
import tensorflow as tf
from tensorflow.keras.preprocessing.image import ImageDataGenerator
import matplotlib.pyplot as plt
import sys
import datetime
from keras.callbacks import ReduceLROnPlateau, EarlyStopping, ModelCheckpoint
# 打印环境版本信息 作者信息
print("@Author karrysmile")
print("@Date "+datetime.datetime.now().strftime('%Y-%m-%d %H:%M:%S'))
print("Python version:"+sys.version)
print("TensorFlow version:", tf.__version__)# 设置GPU设备 有的话动态增长
physical_devices = tf.config.list_physical_devices('GPU')
if physical_devices:tf.config.experimental.set_memory_growth(physical_devices[0], True)# 该数据集总共1360个文件,其中1190用于训练集,170用于验证集# 数据准备和增强
# 文件目录
train_data_dir = 'flower_data/train'
valid_data_dir = 'flower_data/valid'
# 批处理大小
batch_size = 32
# 每张图片的重塑大小
image_size = (128, 128)# 使用 ImageDataGenerator 对图像进行数据增强
train_datagen = ImageDataGenerator(# 设定数据增强的模式参数# 将图像的像素值缩放到 [0, 1] 范围内。rescale=1./255,# 随机旋转图像30度rotation_range=30,# 随机水平平移20%width_shift_range=0.2,# 随机垂直平移20%height_shift_range=0.2,# 随机应用错切变换20度shear_range=0.2,# 随机缩放图像尺寸20%zoom_range=0.2,# 随机进行水平翻转horizontal_flip=True,# 随机亮度变化20%brightness_range=[0.8, 1.2],  # 亮度范围
)
# 验证集只把图像的像素值缩放到 [0, 1] 范围内。
test_datagen = ImageDataGenerator(rescale=1./255)# 应用数据增强模型,设定训练数据,从文件目录读取图像
train_generator = train_datagen.flow_from_directory(# 训练集目录train_data_dir,# 图片重塑大小target_size=image_size,# 批处理张数batch_size=batch_size,# 分类模型 - 多分类class_mode='categorical',
)
# 应用数据增强模型,设定验证集数据,从文件目录读取图像
valid_generator = test_datagen.flow_from_directory(# 验证集目录valid_data_dir,# 重塑图像大小target_size=image_size,# 批处理数batch_size=batch_size,# 设定分类模型class_mode='categorical',
)# 搭建CNN模型
model = tf.keras.models.Sequential([# 卷积层,32个filter,卷积核大小为3x3,激活函数为relu,输入形状为(128, 128, 3),长x宽x3通道(RGB)tf.keras.layers.Conv2D(32, (3, 3), activation='relu', input_shape=(128, 128, 3)),# 最大池化层 提取主要特征,减少计算量tf.keras.layers.MaxPooling2D(2, 2),tf.keras.layers.Conv2D(32, (3, 3), activation='relu'),tf.keras.layers.MaxPooling2D(2, 2),# 卷积层,64个filter,卷积核大小3x3,激活函数为relutf.keras.layers.Conv2D(64, (3, 3), activation='relu'),tf.keras.layers.MaxPooling2D(2, 2),# 最大池化层 提取主要特征,减少计算量tf.keras.layers.BatchNormalization(),# 卷积层,128个filter,卷积核大小为3x3,激活函数为relutf.keras.layers.Conv2D(128, (3, 3), activation='relu'),tf.keras.layers.BatchNormalization(),tf.keras.layers.MaxPooling2D(2, 2),# 将多维输入数据展平为一维向量,以便连接到全连接层tf.keras.layers.Flatten(),# 全连接层,512维,激活函数为relutf.keras.layers.Dense(512, activation='relu'),# dropout 30%的数据 避免过拟合tf.keras.layers.Dropout(0.3),# 全连接层,输出,17个维度对应17种花,激活函数为softmax,用于多分类tf.keras.layers.Dense(17, activation='softmax')
])# 设定优化器 Adam 初始学习率为0。001
optimizer = tf.keras.optimizers.Adam(learning_rate=0.001)
# 编译模型,优化器选择Adam,损失函数为交叉熵损失函数,适用于多类别分类问题,准确率作为评估模型性能的指标
model.compile(optimizer=optimizer, loss='categorical_crossentropy', metrics=['accuracy'])
# 打印出模型的摘要信息,包括每一层的名称、输出形状和参数数量等
model.summary()# 训练模型
# 检查点,根据验证准确率,每个epoch判断要不要保存最好的模型  保存整个模型
checkpoint = ModelCheckpoint("model", monitor='val_accuracy', verbose=1,save_best_only=True, save_weights_only=False, mode='auto', save_freq='epoch')
# 早退,当设定的n个epoch发生,验证准确率都没有发生提升,就退出
early = EarlyStopping(monitor='val_accuracy', min_delta=0, patience=50, verbose=1, mode='auto')
# 减少学习率 检测val_loss 如果5个epoch没有发生更好的变化,就变为原来的二分之一,避免过拟合
reduce_lr = ReduceLROnPlateau(monitor='val_loss', patience=5, mode='auto',factor=0.5)
# 模型训练,结果保存到history
history = model.fit(# 训练数据放进来train_generator,# 计算每个epoch的数量(总长度 除以 批处理大小)steps_per_epoch=train_generator.samples // batch_size,# 要跑的轮数epochs=1000,# 批处理大小batch_size=batch_size,validation_data=valid_generator,validation_steps=valid_generator.samples // batch_size,# 回调函数,用于监测和调整超参数callbacks=[reduce_lr,checkpoint,early]
)
# 保存模型
model.save('flower17_cnn.h5')
model.save('flower17_cnn')
# 用全部测试数据评估模型
test_loss, test_acc = model.evaluate(valid_generator, verbose=2)
print('\nTest accuracy:', test_acc)# 绘制训练和测试损失
plt.plot(history.history['loss'], label='train_loss')
plt.plot(history.history['val_loss'], label='valid_loss')
plt.xlabel('Epochs')
plt.ylabel('Loss')
plt.legend()
plt.show()# 绘制训练和测试准确率
plt.plot(history.history['accuracy'], label='train_acc')
plt.plot(history.history['val_accuracy'], label='valid_acc')
plt.xlabel('Epochs')
plt.ylabel('Accuracy')
plt.legend()
plt.show()
# flower102_resnet18
import tensorflow as tf
from tensorflow.keras.preprocessing.image import ImageDataGenerator
import matplotlib.pyplot as plt
import sys
import datetime
from keras.callbacks import ReduceLROnPlateau, EarlyStopping, ModelCheckpoint
# 打印环境版本信息 作者信息
print("@Author karrysmile")
print("@Date "+datetime.datetime.now().strftime('%Y-%m-%d %H:%M:%S'))
print("Python version:"+sys.version)
print("TensorFlow version:", tf.__version__)# 设置GPU设备
physical_devices = tf.config.list_physical_devices('GPU')
if physical_devices:tf.config.experimental.set_memory_growth(physical_devices[0], True)# 数据准备和增强
train_data_dir = 'flower_data/train'
valid_data_dir = 'flower_data/valid'
batch_size = 32
image_size = (128, 128)train_datagen = ImageDataGenerator(rescale=1./255,rotation_range=30,width_shift_range=0.2,height_shift_range=0.2,shear_range=0.2,zoom_range=0.2,horizontal_flip=True,brightness_range=[0.8, 1.2],  # 亮度范围
)valid_datagen = ImageDataGenerator(rescale=1./255)train_generator = train_datagen.flow_from_directory(train_data_dir,target_size=image_size,batch_size=batch_size,class_mode='categorical',
)valid_generator = valid_datagen.flow_from_directory(valid_data_dir,target_size=image_size,batch_size=batch_size,class_mode='categorical',
)def ConvLayer(x,filters,kernel_size,stride):x = tf.keras.layers.Conv2D(filters=filters, kernel_size=kernel_size, strides=stride,padding='same')(x)x = tf.keras.layers.BatchNormalization(epsilon=1e-5,momentum=0.1)(x)return xdef ResNetBlock(input,filters,kernel_size,strides):x = ConvLayer(input,filters,kernel_size,strides)x = tf.keras.layers.Activation('relu')(x)x = ConvLayer(x,filters,kernel_size,(1,1))if strides != (1,1):residual = ConvLayer(input,filters,(1,1),strides)else:residual = inputx = x+residualx = tf.keras.layers.Activation('relu')(x)return xdef ResNet(input_size):# headx = ConvLayer(input_size,64,(7,7),(2,2))x = tf.keras.layers.Activation('relu')(x)x = tf.keras.layers.MaxPooling2D(3,strides=2,padding='same')(x)# layer1-------------------x = ResNetBlock(x,64,(3,3),(1,1))x = ResNetBlock(x,64,(3,3),(1,1))# layer2-------------------x = ResNetBlock(x,128,(3,3),(2,2))x = ResNetBlock(x,128,(3,3),(1,1))# layer3-------------------x = ResNetBlock(x,256,(3,3),(2,2))x = ResNetBlock(x,256,(3,3),(1,1))# layer4-------------------x = ResNetBlock(x,512,(3,3),(2,2))x = ResNetBlock(x,512,(3,3),(1,1))# tailx = tf.keras.layers.AvgPool2D(1)(x)x = tf.keras.layers.Flatten()(x)x = tf.keras.layers.Dense(512, activation='relu')(x)output = tf.keras.layers.Dense(102, activation='softmax')(x)return outputinputs = tf.keras.Input((128,128,3))
outputs = ResNet(inputs)
model = tf.keras.Model(inputs,outputs)optimizer = tf.keras.optimizers.Adam(learning_rate=0.001)
model.compile(optimizer=optimizer, loss='categorical_crossentropy', metrics=['accuracy'])
model.summary()
# 训练模型
checkpoint = ModelCheckpoint("model", monitor='val_accuracy', verbose=1,save_best_only=True, save_weights_only=False, mode='auto', save_freq='epoch')
early = EarlyStopping(monitor='val_accuracy', min_delta=0, patience=10, verbose=1, mode='auto')
reduce_lr = ReduceLROnPlateau(monitor='val_loss', patience=3, mode='auto',factor=0.2)
history = model.fit(train_generator,steps_per_epoch=train_generator.samples // batch_size,epochs=50,batch_size=batch_size,validation_data=valid_generator,validation_steps=valid_generator.samples // batch_size,callbacks=[reduce_lr,checkpoint,early]
)# 保存为h5文件
model.save('flower102_resnet.h5')
# 保存为文件夹形式,可以注释掉
model.save('flower102_resnet')test_loss, test_acc = model.evaluate(valid_generator, verbose=2)
print('\nTest accuracy:', test_acc)# 绘制训练和测试损失
plt.plot(history.history['loss'], label='train_loss')
plt.plot(history.history['val_loss'], label='valid_loss')
plt.xlabel('Epochs')
plt.ylabel('Loss')
plt.legend()
plt.show()# 绘制训练和测试准确率
plt.plot(history.history['accuracy'], label='train_acc')
plt.plot(history.history['val_accuracy'], label='valid_acc')
plt.xlabel('Epochs')
plt.ylabel('Accuracy')
plt.legend()
plt.show()
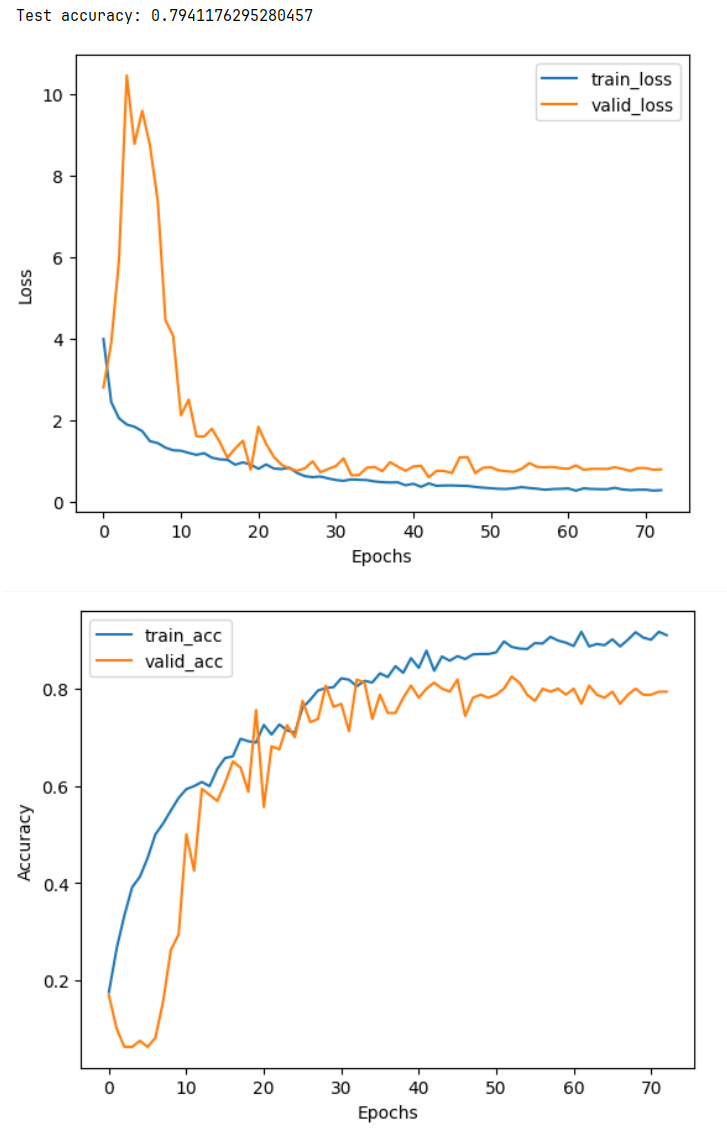
运行结果
flower17_cnn
flower102_resnet18

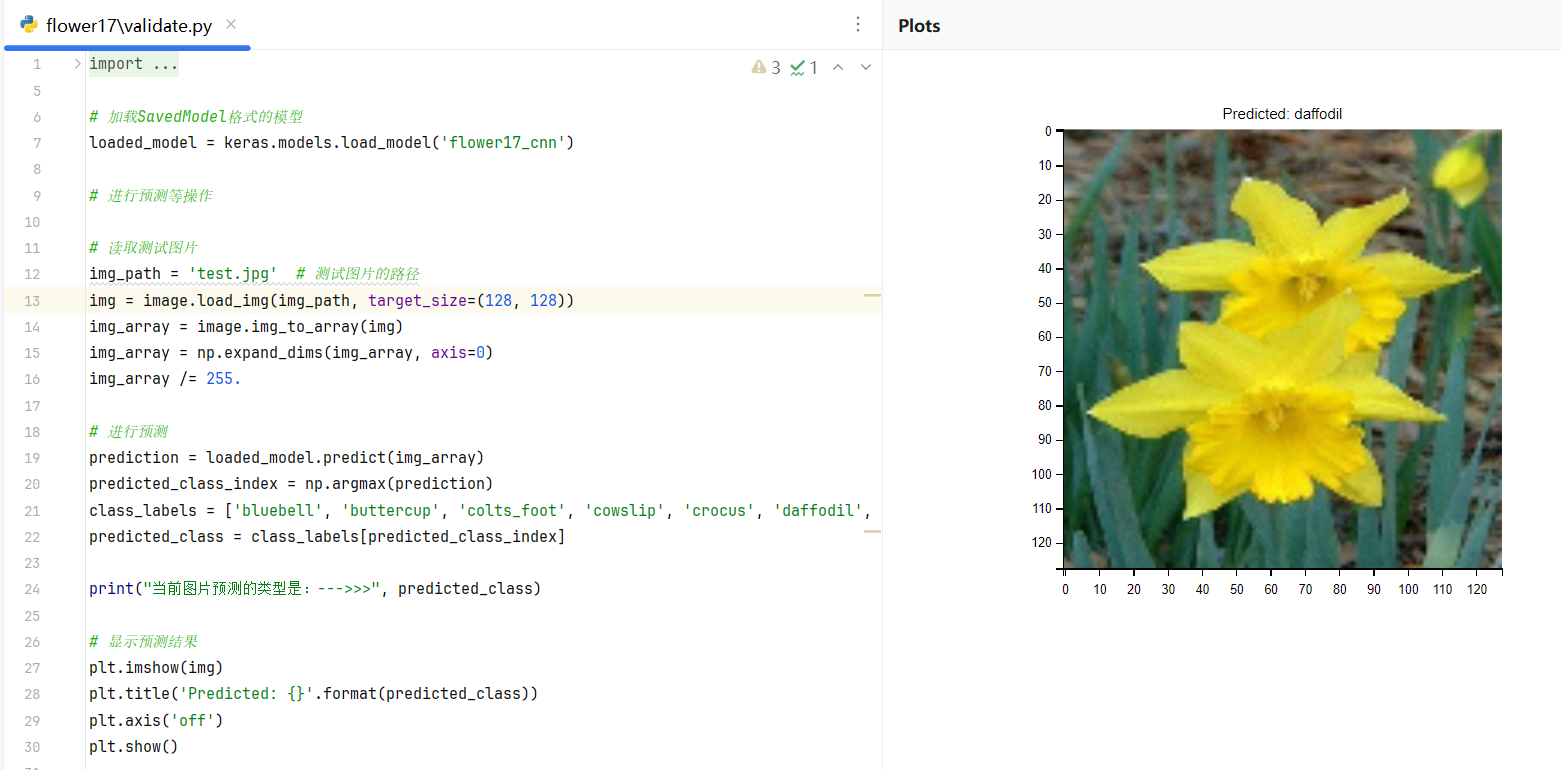
随机加载一张图片来验证
在根目录下放置一张test.jpg,加载这张图片并输出验证结果。
import keras.models
import numpy as np
import matplotlib.pyplot as plt
from tensorflow.keras.preprocessing import image# 加载SavedModel格式的模型
loaded_model = keras.models.load_model('flower17_cnn')# 进行预测等操作# 读取测试图片
img_path = 'test.jpg'  # 测试图片的路径
img = image.load_img(img_path, target_size=(128, 128))
img_array = image.img_to_array(img)
img_array = np.expand_dims(img_array, axis=0)
img_array /= 255.# 进行预测
prediction = loaded_model.predict(img_array)
predicted_class_index = np.argmax(prediction)
class_labels = ['bluebell', 'buttercup', 'colts_foot', 'cowslip', 'crocus', 'daffodil', 'daisy', 'dandelion', 'fritillary', 'iris', 'lily_valley', 'pansy', 'snowdrop', 'sunflower', 'tigerlily', 'tulip', 'windflower']
predicted_class = class_labels[predicted_class_index]print("当前图片预测的类型是:--->>>", predicted_class)# 显示预测结果
plt.imshow(img)
plt.title('Predicted: {}'.format(predicted_class))
plt.axis('off')
plt.show()
运行结果
总结
- 真的需要算力,不然很多时间都留在等待上面,但又恰恰因为等待,可以有更深的思考(所以需要一定时间的等待,但不能过长)
- 不要随意更新或者卸载依赖包,会容易影响整个环境的包之间的版本不匹配
- 越深层的网络,需要考虑的东西越多,如果不考虑,仅仅是堆深度,可能根本学不到东西,甚至比原来更差。
- 图片进行垂直翻转,会出现验证率下降的问题。待验证和解决。
- 最好是自动监控与停止,多参考别人的代码。
参考文章
ResNet18详细原理(含tensorflow版源码)_resnet18网络结构-CSDN博客
(四)pytorch图像识别实战之用resnet18实现花朵分类(代码+详细注解)_pytorch中调用resnet18进行分类-CSDN博客
TensorFlow指定GPU使用及监控GPU占用情况_taskflow gpu-CSDN博客
Gitee仓库
包含两种模型(cnn,resnet)在三个数据集(flower5,17,102)上的六个实现,用ipynb存储。
resnet附上了其他作者的迁移预训练结果的代码。文件名包含example的代码不是本人写的。
https://gitee.com/karrysmile/flowers.git
有用请点个star,按赞收藏关注。
