文章目录
- 1.定义
- 2. 结构组成
- 3. 组合模式结构
- 4. 示例代码
- 5. 模式优势
- 6. 应用场景
1.定义
组合模式是一种设计模式,它允许将对象组合成树形结构来表示 “部分 - 整体” 的层次关系,使得客户端可以统一地处理单个对象和对象组合,而无需区分它们。
2. 结构组成
- 组件(Component):
- 定义:是组合模式中的抽象类或接口,它定义了组合对象和叶子对象的公共操作,为客户端提供统一的操作接口。
- 常见方法:
- 操作方法:例如execute()或operation()等,在不同的实现类中会有不同的具体操作逻辑。
- 管理子组件的方法:如add(Component component)用于添加子组件,remove(Component component)用于移除子组件。这些方法在叶子类中可能为空实现。
- 判断是否为组合对象的方法:如isComposite()用于判断当前对象是否是组合对象。
- 叶子(Leaf):
- 定义:是组合模式中的基本对象,它没有子对象,实现了组件接口中定义的方法,完成具体的操作。
- 特点:
- 叶子对象是树形结构中的叶子节点,是操作的实际执行者。
- 由于没有子对象,其添加和移除子对象的方法通常是空的。
- 组合(Composite):
- 定义:是包含子对象的对象,它可以是其他组合对象或叶子对象。它实现了组件接口中的方法,并且在这些方法中调用其子对象的相应方法。
- 内部结构:
- 通常包含一个数据结构(如列表、数组等)来存储子组件,例如children。
- 实现管理子组件的方法,如add和remove方法会操作内部的子组件存储结构。
- 在操作方法(如execute)中,会遍历子组件并调用它们的操作方法,实现将操作委派给子组件的功能。
- 客户端(Client):
- 作用:是使用组合模式的代码部分,通过组件接口来操作组合对象和叶子对象,无需知道它们的具体类型。
- 操作方式:
- 客户端调用组件的操作方法,由具体的对象(叶子或组合)来执行实际的操作。
- 例如,客户端可以调用component.operation(),而不需要关心component是叶子对象还是组合对象。
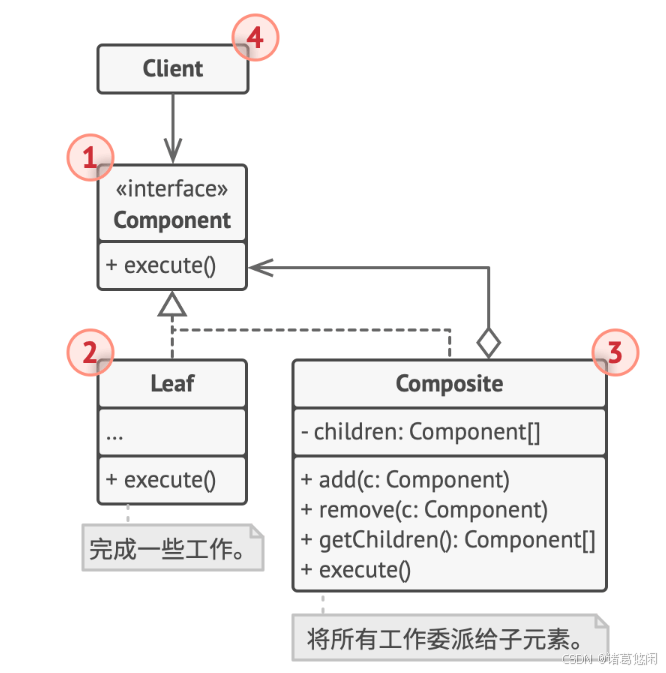
3. 组合模式结构

-
组件 (Component) 接口描述了树中简单项目和复杂项目所共有的操作。
-
叶节点 (Leaf) 是树的基本结构, 它不包含子项目。
一般情况下, 叶节点最终会完成大部分的实际工作, 因为它们无法将工作指派给其他部分。
-
容器 (Container)——又名 “组合 (Composite)”——是包含叶节点或其他容器等子项目的单位。 容器不知道其子项目所属的具体类, 它只通过通用的组件接口与其子项目交互。
容器接收到请求后会将工作分配给自己的子项目, 处理中间结果, 然后将最终结果返回给客户端。
-
客户端 (Client) 通过组件接口与所有项目交互。 因此, 客户端能以相同方式与树状结构中的简单或复杂项目交互。
4. 示例代码
#include <iostream>
#include <memory>
#include <list>using namespace std;class Component{
protected:shared_ptr<Component> parent;
public:Component(){ cout<< "Component Construct" <<endl; }~Component(){cout<< "Component Destruct" <<endl; }shared_ptr<Component> GetParent(){return this->parent;}void SetParent(shared_ptr<Component> parent){this->parent = parent;}virtual void Add(shared_ptr<Component>){cout<< "Default Add" <<endl;}virtual void Remove(shared_ptr<Component>){cout<< "Default Remove" <<endl;}virtual bool IsComposite() const{cout<< "Default IsComposite : false" <<endl; return false;}virtual string Operation() const = 0;
};class Leaf : public Component{
public:Leaf(){cout<< "Leaf Construct" <<endl;}~Leaf(){cout<< "Leaf Destruct" <<endl;}string Operation()const{return "Leaf";}
};class Composite : public Component,public enable_shared_from_this<Composite>{
protected:list<shared_ptr<Component>> children_;
public:Composite(){cout<< "Composite Construct" <<endl;}~Composite(){cout<< "Composite Destruct" <<endl;}void Add(shared_ptr<Component> component){children_.push_back(component);component->SetParent(shared_from_this());}void Remove(shared_ptr<Component> component){children_.remove(component);component->SetParent(nullptr);}bool IsComposite() const{return true;}string Operation() const{string result;for(const shared_ptr<Component> c : children_){if(c == children_.back()){result += c->Operation();}else{result += c->Operation() + "+";}}return "Branch(" + result + ")";}
};void ClientCode(shared_ptr<Component> component){std::cout << "RESULT: " << component->Operation();
}void ClientCode2(shared_ptr<Component> component1,shared_ptr<Component> component2){if (component1->IsComposite()) {component1->Add(component2);}cout << "RESULT: " << component1->Operation();
}int main()
{shared_ptr<Component>  simple = make_shared<Leaf>();cout << "Client: I've got a simple component:\n";ClientCode(simple);cout << "\n\n";shared_ptr<Component> tree = make_shared<Composite>();shared_ptr<Component> branch1 = make_shared<Composite>();shared_ptr<Component> leaf_1 = make_shared<Leaf>();shared_ptr<Component> leaf_2 = make_shared<Leaf>();shared_ptr<Component> leaf_3 = make_shared<Leaf>();branch1->Add(leaf_1);branch1->Add(leaf_2);shared_ptr<Component> branch2 = make_shared<Composite>();branch2->Add(leaf_3);tree->Add(branch1);tree->Add(branch2);cout << "Client: Now I've got a composite tree:\n";ClientCode(tree);std::cout << "\n\n";cout << "Client: I don't need to check the components classes even when managing the tree:\n";ClientCode2(tree, simple);cout << "\n";return 0;
}
5. 模式优势
- 简化客户端代码
- 客户端以统一的方式处理单个对象和组合对象,无需区分它们的具体类型,降低了客户端代码的复杂性。
- 易于扩展
- 可以方便地添加新类型的组件(叶子或组合),只要实现了组件接口,就可以无缝地集成到现有的系统中,符合开闭原则。
- 层次结构清晰
- 非常适合表示具有层次关系的数据结构,例如文件系统(文件和文件夹)、图形系统(简单图形和复合图形)等,使系统的层次结构更加清晰和易于理解。
- 代码复用性高
- 叶子对象和组合对象都基于相同的组件接口,操作方法可以在不同场景下复用。
6. 应用场景
- 图形系统
- 在图形系统中,简单图形(如圆形、矩形)可以作为叶子对象,而由多个图形组成的复杂图形可以作为组合对象。客户端可以统一地对它们进行绘制、移动等操作。
- 文件系统
- 文件系统中的文件可以作为叶子对象,文件夹作为组合对象。操作系统的文件管理器(客户端)可以统一地操作文件和文件夹,如显示内容、复制、删除等操作。
- 组织结构
- 在企业或组织的结构表示中,员工可以作为叶子对象,部门作为组合对象。可以方便地对组织进行管理和操作,如统计员工数量、计算部门绩效等。


